1
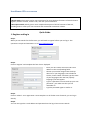
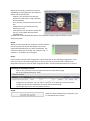
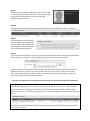
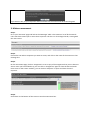
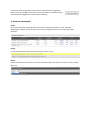
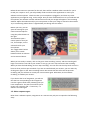
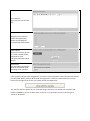
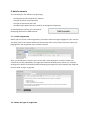
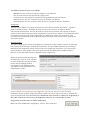
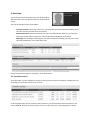
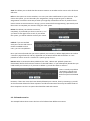
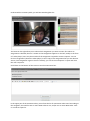
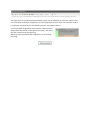
Online CEF-based assessment of oral proficiency for intercultural professional communication Grant agreement number: 2009 - 4349 / 001 - 001 Project number: 505246-LLP-1-2009-1-BE-KA2-KA2MP Document title: User Manual CEFcult platform English Date of issue: October 2011 Version: v1 Author(s): John Osborne, Université de Savoie Contributors to the document (incl. quality review): all partners Number of pages: 29 Manual CEFcult tool by CEFcult project is licensed under a Creative Commons AttributionNonCommercial-ShareAlike 3.0 Unported License. The CEFcult project has been funded with support from the European Commission, Education, Audiovisual & Culture Executive Agency, under KA2 – Multilateral Projects of the Lifelong Learning Programme USER MANUAL CEFCULT PLATFORM This user manual is in two parts: A Quick Guide, which gives step by step instructions for using the basic functions of CEFcult: how to register, follow a scenario, assess a user, and view your assessments. A Descriptive Guide, which gives a more complete description of all the functions of CEFcult, including how to create your own scenarios and customized assessment scheme. Quick Guide 1. Register and log in Step 1. When you use CEFcult for the first time, you will need to register before you can log in. This operation is simple and automatic. Go to http://cefcult.eu/tool Step 2. Click on ‘Register’ and complete the form that is displayed. Enter your first name, last name and e-mail address in the corresponding fields. Choose your mother tongue from the dropdown list. If your language is not included in the list, choose ‘Other’ and then type the name of your language in the new line (‘Specify language’) that will appear. Type in a password. You can make up your own password – just make sure that you can remember it! Type the password again to confirm it. Step 3. Click on ‘Submit’. Your registration is now complete. For all further uses of CEFcult, you can log in directly. Step 4. You can now type the e-mail address and password into the log-in box to enter CEFcult. 2. Follow a scenario Step 1. On the CEFcult main page, click on ‘Follow a scenario’ Step 2. Choose the scenario that you want to follow by clicking on the corresponding box. You can filter the list of scenarios by language, or see all of the available scenarios, in all languages. Step 3. Read the description of the scenario, and then click on ‘Start scenario’ Step 4. Read the description and instructions for the first assignment. Step 5. When you are ready, record your response. Depending on the assignment, the response will be one of several types: webcam: you record an oral response directly onto the server, using a webcam and microphone text: you type a written answer into a text box multiple choice: you choose the best answer from a list video upload: you record your answer offline (e.g. on a mobile phoneand then upload the file. You will find a more detailed description of the different response types in section 1 of the descriptive guide. Step 6. When you have finished your response, click the ‘Submit’ button. A green check-mark will appear next to that assignment indicating that you have completed it. The pencil icon allows you to review your response and – if necessary – to delete it and start again. Step 7. If the scenario contains other assignments, repeat steps 4-6 for the remaining assignments. If you don’t have time to do all the assignments in one go, you can quit CEFcult after completing an assignment and return to do the other assignments later. The box below describes how to do this. Continuing an unfinished scenario: Click on ‘My overview’ in the top right-hand corner of the CEFcult page Go to the ‘Followed scenarios’ table The third column indicates how many of the assignments you have done. If there are still assignments to complete, you can click on ‘continue’ to re-open the scenario (if all the assignments have been completed, this option will be deactivated). Go through steps 4-6 for the unfinished scenarios. Step 8. When you have submitted your responses, click on ‘Done with this scenario’. Step 9. Now that you have finished with the scenario, click on ‘My overview’ in the top right-hand corner of the CEFcult page, and go to the second table in your ‘Overview’ page, headed ‘Followed scenarios’. Step 10 You next need to specify who will be able to view and assess your responses. Click on ‘configure’. Step 11. Choose between the two options. The first means that all registered users of CEFcult can see and assess your responses. The second means only selected people can do so. Step 12. If you chose the second option in step 11, you now need to add the names of the people who will be able to assess your responses. Start by typing a person’s first name into the text box. The box will start to display the list of all CEFcult users whose name begins with the same letter or sequence of letters. As soon as you see the name that you want in the list, select it and click on ‘Add’. Then repeat the process for any other users that you want to add. Remember to add your own name if you want to do a self-assessment. You have now finished: your responses for this scenario are ready and available for assessment. Deleting a completed scenario. If you decide at any point that you want to remove your responses to a scenario – either because you want to do them over again or because you are finished with them and don’t want to leave them on the server – you can do this by going to your ‘Overview’ page for that scenario and selecting ‘reset’ Warning: this is a radical option. It will delete all your responses to the scenario and all the assessments that may have been made. If you choose this option you will be asked to confirm that you want to continue. If you answer ‘OK’, all your responses and assessments for the scenario will be erased for good. 3. Make an assessment Step 1. Go to your ‘Overview’ page and look at the ‘Messages’ table. This contains a list of all the CEFcult users who have invited you to assess their responses. The list is in chronological order, starting with the most recent. Step 2. Choose the user whose responses you want to assess, and click on the name of the scenario in that message line. Step 3. On the assessment page, click on ‘Assignment’ to see a copy of the assignment that you are about to assess. Once you have looked at it, you can click on ‘Assignment’ again to close the box and make more room on the screen. Similarly, you can click on ‘Response’ to open and close the user’s response. Step 4. Scroll down to the bottom of the screen to see the assessment box. Step 5. Click on the name of the assessment scale to open the list of levels and choose the one that you think best describes the user’s response. In this example, only one assessment scale is used (‘INCA: Knowledge Discovery’). For some assignments, there may be more than one. Step 6. Use the text box to type comments, explanations or examples which will help the user understand why you rated his/her response at that level. Step 7. Save your assessment. Step 8. If there are other assignments in the scenario, select the next assignment from the list on the right of the screen, and repeat steps 3-7. When you have assessed all the assignments, click on ‘Done assessing’ 4. View an assessment Step 1. Go to your ‘Overview’ page and look at the table of ‘Followed scenarios’. In the ‘Assessed assignments’ column you will see how many of your assignments for each scenario have been assessed. Step 2. To see the assessments for a particular scenario, click on ‘view’. Step3. Scroll to the bottom of the screen to see the assessment box, and choose an assessor from the dropdown list. Step 4. You can now see the assessment made by that person, and any comments that s/he made to motivate the assesment. Descriptive Guide The main menu Follow a scenario (see section 1): allows you to choose a scenario, to view the assignments, and to record your responses, which you can then make available for assessment. Build a scenario (see section 2): allows teachers, assessors and other users to create their own scenarios by defining one or more assignments for users to do. Create assessment scheme (see section 3): allows scenario builders to create their own custom descriptors to accompany the INCA assessment scheme. Overview (see section 4): allows you as a scenario creator, to see any scenarios that you have created, and to edit them if necessary as a learner, to see the list of scenarios that you have followed as a learner or assessor, to see messages inviting you to assess responses made by other users. 1. Follow a scenario For most users of CEFcult, the first thing you will want to do is follow a scenario, to practise and assess your intercultural communication skills. A scenario consists of one or more tasks, in which you will be presented with a situation or a question, and will then give an oral, or occasionally written, response. 1.1. Choose your scenario To choose a scenario, first click on ‘Follow a scenario’ in the main menu, to display the scenarios available. From the drop-down box ‘I want to learn [ ]’ you can choose a particular language, as shown below, or choose “any language” to display all the existing scenarios for all languages. Click on the box corresponding to the scenario that you want to follow. You will then see a brief description of the scenario. Click on the ‘Start scenario’ button to begin the scenario. Otherwise, use the ‘back’ button on your browser (or Alt+back arrow) to return to the previous screen and choose another scenario. When you start the scenario, you will see on the right of your screen one or more boxes listing the assignments that compose the scenario. Each box indicates the the kind of response required (e.g. ‘Webcam’ means that your answer is given orally and recorded via a webcam). You don’t need to do the assignments in order. Notice though that some scenarios will be structured in such a way that it is difficult to do an assignment if you haven’t done the previous ones. The first assignment is selected automatically when you enter the page. The question and/or instructions for the assignment are displayed on the left side of your screen. Immediately below the instructions you will see the box for your response. This will generally be a webcam video recorder, but it can also be a text box, for written responses, or a multiple choice question, or a file upload for reponses recorded off-line, on a computer, camcorder or mobile phone. 1.2. Recording your reponse (webcam) Below the instructions or question for the task, there will be a webcam video recorder for you to record your response. First, you will probably need to authorise the application to access your webcam and microphone. Check also that your microphone is plugged in, and close any other applications you might be using, such as Skype. One you have authorised access to your webcam and microphone, the webcam recorder will become active and your image will appear in the recording window. Adjust the webcam and/or your own position so that your image is centred in the window. Try to avoid sitting where there is a light behind you shining into the camera. Before you start, you can ajust the settings for your camera and microphone using the yellow buttons to the right. These buttons open a control panel so that you can, for example, set the volume level for your microphone. The ‘Toggle video’ button allows you to switch between a built-in webcam and an external device. When you are ready to answer, click on the green ‘Start recording’ control, and the recording will begin. You need to record all of your answer in one go; you can’t stop and restart the recording. When you have finished talking, click on ‘Stop recording’. You can now use the ‘Play back’ control to listen to what you have just recorded. If you are not satisfied with your answer, you can redo it by clicking once again on the ‘Start recording’ button. But notice that this will erase the previous recording and you will have to record your entire answer again. Otherwise, click on ‘Submit recording’ to validate your answer. If you look at the list of assigments, you will see that the box corresponding to this assignment now has a green check-mark, indicating that you have completed it. The pencil icon allows you to review your response and – if necessary – to delete it and start again. 1.3. Other response types Other than a webcam reponse, assignments in a scenario may ask you to respond in the following ways: Text response Type your text into the text box. Multiple choice question Choose the appropriate answer by checking the corresponding radio button. Video upload Record your answer off-line (e.g. with a mobile phone, camcorder or on a computer) and then upload the file. Assessment Use the scale(s) provided to make an assesment of the recording in the question. If the scenario contains other assignments, choose the next assignment to do and repeat the process just described. When you have finished all the asignments, click on the ‘Done with this scenario’ button (on the right of the screen, just under the list of assignments). The scenario will now appear in your ‘overview’ page, where you can review your response and make it available for you or for other users to assess. For instructions on how to do this, go to section 4, ‘Overview’. 2. Build a scenario You can build your own scenarios by specifying: the assignments that compose your scenario the type of task for each assignment the type of reponse for each task the CEFR and/or INCA scales to be used for assessing each assignment To start building a scenario, go to the CEFcult Home page and click on ‘Build Scenario’ 2. 1. Create assignments Before you can start to create assignments, you need to select the target language for your scenario. The other parts of the scenario builder will not become active until you have done this. Select your language from the drop-down menu and click ‘Confirm’. Next, you should enter a title for your scenario and a short description. In order to make your scenario more easily identifiable, you might like to add a thumbnail picture, which you can do by clicking on the button at the bottom left and selecting the image from your hard disk (the image file must be either a .jpg or a .png file). 2.2. Choose the type of assignment You are now ready to add assignments to your scenario. To add the first assignment, choose from the list of assignment types shown on the right of the screen. Video, audio or image assignments are created by uploading a file, often accompanied by a written instruction or question asking the user to respond in some way to the recording or picture which is displayed. More specifically, when you select one of these assignment types, you will be asked to do the following: Video assignment It is necessary first to give your video assignment a title. The other two fields – ‘Instructions’ and ‘More info’ – are optional. For example, if the instructions and/or questions intended for the user are recorded in the video, then you may choose to leave these fields blank. If you do use these fields, then in the completed scenario they will appear to the user in the following way: Audio and image assignments Audio and image assignments are similar to video assignments. The main difference is that in addition to the ‘Title’, there is just one other field to complete – ‘More info’ – which is obligatory. For these three types of assignment, the files for upload may be of the following types: video: .mp4 file, maximum size 30 megabytes audio: .mp3 or .acc file, maximum size 10 megabytes image: .jpg or .png file, maximum size 1 megabyte An assignment can only consist of a single file, but you can create as many assignments as you wish. So If you want to use several different video and/or audio or image files, you should break your scenario down into successive assignments. Text assignment Complete the ‘Title’ and ‘More info’ fields (both obligatory) and then type (or copy and paste) the text of your assignment into the text box. Multiple choice assignment A Multiple Choice assignment does not require a title. Simply type your question into the ‘Question’ field. You can add further information or instructions in the field underneath, but this is optional. You can then add as many aswer options as you want. Remember to check the appropriate radio button to indicate which answer is to be accepted as correct. Guideline assignment This option is not strictly an assignment, in that it does not require any response from the user. It is a useful way of providing the user with background information or instructions, usually at the beginning of a scenario, but it could also be used, for example, as a transition in the middle of a complex scenario, or as a summary at the end. When you have completed the appropriate fields for your assignment and uploaded any necessary file, click on ‘Save assignment’. You will then be asked to choose the type of response that you want for your assignment. 2.3. Choose a response type The different response types are as follows: Webcam: the user records a response using his or her webcam Text: the user answers the question by typing a text Assessment: the user makes an assessment using a defined scale (see below) Multiple choice: the user chooses from a list of answers (see below) Video Response: the user records a video off-line as a response and then uploads it. Assessment You can use this option if you want to present the users with some kind of situation – typically a scene recorded on video – and then ask them to assess the scene for its linguistic and/or intercultural characteristics. This can be a way for users to practise their own capacity to discern aspects of intercultural communicative competence. If you select this option, you will then be asked to indicate which of the CEF and/or INCA scales you want to be used in the assessment. The procedure for selecting the scales is identical to that discussed in the section below, ‘Choose the assessment scales’. Multiple choice. This option allows you to create an assignment consisting of a video, audio or picture, to which the user reponds by answering a multiple choice question. It is thus slightly different from creating a Multiple choice assignment, which consists only of a multiple choice question. If you choose this type of response, the procedure for creating the question and adding the possible answers is identical to that described above for Multiple choice assignments. When you have finished defining your response type, click on ‘Save response’ to close the window and return to the main scenario-building window. The details of your assignment will now appear in the box entitled ‘Your assignments in order’. If your scenario is to contain only one assignment, you can now move on to the next step. Otherwise, choose another assignment (which can be of the same type as the first or of a different type), and repeat the steps described above. Remember that you have to create your assignments in the order in which you want them to be displayed to the user. It is not possible to create assignments in random order and then shuffle them. When you have added all the assignments, click on ‘Go to next step’. At this point you may get a dialogue box asking you to confirm that you want to leave the page. Answer yes. 2.4. Choose the assessment scales The final stage in building a scenario is to choose the assessment scale(s) that you want to use for each assignment. At the top of your page you will see a summary of the assignments in your scenario. Below this, at the botttom of the screen, you will see the available scales that you can choose from. The toggle button allows you to see the full list of scales for CEF and for INCA. The scales available are shown opposite: All the CEF scales are available in English, French, Dutch, German, Italian, Polish and Finnish. For the moment, the INCA scales are only available in English and German. Check the boxes of the scales that you want to use for the first assignment in your scenario. Notice that if you check the main box, for example ‘INCA for assessors’, then all 7 of the INCA scales will be selected. In principle, it is possible to use all the CEF scales and all the INCA scales, but the assessment of your assignment will then be a timeconsuiming process, so it is usually better to be selective. Choose the language you want the scales to be displayed in from the drop-down boxes on the right of the screen (see the screen shot on the previous page). When you have chosen the scales and language for your first assignment, click on the ‘Save assessment’ button. If your scenario contains other assignments, click on the next assignment and repeat the steps. As the scales are chosen for each assignment a green check-mark will appear beside that assignment in the summary table. Once you have chosen the assessment scales for all of your assignments, click on ‘Done’ You will now be automatically directed to your ‘Overview’ page, where you can manage the scenario. This is described in the last section – section 4: Overview. 3. Create an assessment scheme For assessing intercultural competencies, it is possible to customize the INCA scales. This may be useful, for example, if you want to rephrase the INCA descriptors, or complement them with specific criteria or examples that are appropriate to a particular scenario or assignment. This can also be used to create versions of the INCA scales in another language, by replacing the English descriptors by a translated text. Go to the CEFcult Home page and select ‘Create an assessment scheme’. First give your scheme a name that will make it easily identifiable when scenario builders come to choose an appropriate assessment scale form the list of those available. The rest of the page for creating your new assessment scheme lists the INCA scales for ‘Basic’, ‘Intermediate’ and ‘Full’ levels. On the left are the standard INCA descriptors (assessor version, in English); to the right of these are blank text fields in which you can type (or copy and paste) your own customized scales – either translations into another language, or adapted versions of the descriptors in English or any other language. Whatever you enter in these boxes will replace the standard INCA descriptors when your customized assessment scheme is displayed. So if you just want to add something to the standard descriptors, you need to copy the standard text and your additions into the text box. When you have entered all of your new descriptors, click on ‘Save scheme’. Your new scheme will now appear in the list of available scales which scenario builders can choose from (see sction 2.4 above, ‘Choose the assessment scales). Notice that once you have saved your new scheme it is not possible to edit or remove it. So check carefully that there are no errors before you save your scheme. 4. Overview Your overview can be accessed at any time by clicking on ‘My overview’ in the top right-hand corner of the CEFcult screen. The overview page contains three tables: Created scenarios: shows the state of any scenarios that you have created and allows you to view the scenarios and edit them if necessary. Followed scenarios: lists the scenarios that you have followed and allows you to view your responses, modify them if necessary, and to make them available for assessment. Messages: lists messages informing you that users of CEFcult (including yourself) have made reponses available for you to view and assess. Each of these three sections is decribed in more detail below. 4.1. Created scenarios From this table, you can manage any scenarios that you have created. The options available will vary according to the current state of your scenario. In this example table, the last scenario ‘Demo scenario’, has recently been created and has not yet been published. Only the scenario creator can see it, and can do any of the following four things: View: this allows you to check that the scenario contains no mistakes and to view it as the final user will see it. Edit: use this option to correct mistakes, or to carry out other modifications to your scenario. If you choose this option, you can then edit your assignments, change response types or add new assignments in much the same way as when you originally created the scenario. If you don’t have time to create an entire scenario in one go, you can create the first assignment(s), quit CEFcult, and then return to complete your scenario using this ‘edit’ option. Delete: this allows you to delete a scenario completely, if you decide you have no use for it, or if you want to start again from scratch. If you choose this option, you will be asked to confirm your choice. Publish: if you are satisfied with your scenario and want to make it available to other users, you can now publish it. Once you have confirmed that you want to publish your scenario, it will be displayed on the ‘Follow a scenario’ page of CEFcult, and any registered user of CEFcult will be able to follow it. It is not possible to restrict acces to a scenario to a specific group of users. Retract: When a scenario has been published, the ‘edit’, ‘delete’ and ‘publish’ options are deactivated, like for the first three scenarios in the table above. If you subsequently decide that you need to edit your scenario, or if you want to delete it, you will first have to retract it. There is usually no problem retracting a scenario soon after you published it and before anyone has followed it. However, if there are users who have already followed your scenario, then by retracting it, you will at the same time delete all of their responses and all the assessments that may have been made of those responses. So this is an option that should be used with caution. 4.2. Followed scenarios The example below shows a user who has so far followed two different scenarios. The first scenario listed consists of just one assignment, which the user has completed, while the second scenario contains seven assignments altogether, of which the user has completed one. The options available will therefore vary slightly according to how much of the scenario has been completed. Configure. Nobody can view or assess your responses unless you have invited them. The ‘configure’ option therefore allows you to protect your privacy and to specify who you want to have access to your responses. When you click on ‘configure’ you will see a box like the one below. If you choose the first option (I want everyone to assess my responses for this scenario), then all registered user of CEFcult will be able to view and assess your reponses. If you choose the second option, then you will be asked to specify, out of the list of registered users, which people – including yourself – you want to have access to your responses. Choosing who can assess your responses. If you select the second option, a new box will appear, in which you can type the names of the people who you want to invite to assess your responses. Start by typing the person’s first name. The box will start to display the list of all CEFcult users whose name begins with the same letter or sequence of letters. As soon as you see the name that you want in the list, you can select it and click on ‘Add’. Then repeat the process for any other users that you want to add. You can add more names at any time by returning to the ‘configure’ option. It is also possible to delete names, if you have made a mistake or if you want to remove one or more people from the list. View. This option allows you to review both the scenario and your reponses to it, and most importantly, to see any assessments that have been made of your reponses. You can see in the overview table whether any of your responses have been assessed. In this example, there are no assessments available yet for the first scenario, but for the second scenario one of the seven assignments has been completed and has also been assesed. Clicking on ‘view’ will therefore allow the user to see the assessment that has been made. When you open the ‘view’ option, you will be able to see the assignments for that scenario and your responses. Assignments that have been assessed will be indicated by the notepad icon. The corresponding assessments will be displayed at the bottom of the screen. In order to view an assessment, you must first choose an assessor from the names in the drop-down list. Once you have selected a name (even if there is only one name in the list), then the CEF and/or INCA levels determined by that assessor will be displayed, along with the corresponding descriptors, and any comments or explanations that the assessor added in the annotation box. These annotations can give useful information on why the assesor perceived your response in the way s/he did. Continue. Your responses to a scenario are saved on the CEFcult server as you go along, so if a scenario contains several assignments, you can do some of the assignments and then return to the scenario later to complete the remaining assignments. The ‘continue’ option is therefore only active so long as you still have assignments left to complete. When you select ‘continue’, the scenario will re-open where you left it, and you will be able to record reponses to all the assignments that are still unchecked (like Question 2 in the example on the right). Any assignments that you have already completed will appear with a green tick (like Question 1 in this example); you will be able to view your reponse to these completed assigments, but not to modify them (if you want to modify responses, you will need to use the ‘reset’ option). Reset. This is a radical option, to be used with caution, because it will delete not only all the reponses you have already given to the assignments in a scenario, but also any assessments that may have been made. If you choose this option, you will see a message asking if you want to continue. If you choose ‘OK’, then you will in effect wipe off all your work on that scenario, so that you can start again. 4.3. Messages This table shows all the messages (starting with the most recent) informing you that other CEFcult users have made their responses available for you to view and assess. Note: if a user has made a scenario available for assessment and later decided to delete it, the message of invitation will remain. So if you follow an invitation and find that you cannot open the person’s responses, it is not a disfunction in the system, but probably because the user has subsequently deleted his/her responses, or modified the list of people with access to them. Choose the user whose responses you want to assess, and click on the name of the scenario in that message line. At the top of the screen you will now see a summary of the user and scenario. You can click on the ‘information’ icon to obtain a description of the scenario. Underneath this summary table, you will see something like this: The boxes on the right allow you to select which assignment you want to assess first. When an assignment is selected, the user’s answer to that assignment appears on the left, usually in the form of a video player, but it may be a text box if the assignment required a written response. You can click on ‘Assignment’ (above the video player) to see a copy of the assignment that you are about to assess; click ‘Assignment’ again to close it. Similarly, you can click on ‘Response’ to open and close the user’s response. Scroll down to the bottom of the screen to see the assessment box. In the upper part of the assessment box, you will see the list of assessment scales used. According to the assigment, there will be one or more CEFR scales to use, and/or one or more INCA scales. Click on a scale to expand it. When you expand the scale you will see the full text, with descriptors for each level. If it is a CEFR scale, there will typically be 6 descriptors, from A1 to C2; if it is an INCA scale there will be 3, from ‘Basic’ to ‘Full’. Read the descriptors and decide which one best describes the user’s answer. Then check the corresponding radio-button. You can also add text explaining or justifying your assessment. The procedure for this is described below (‘Annotations’). Once you have made your assessment for that scale, you can either save your assessment, if it is the last or the only scale used for that assignment, or you can expand the next scale and repeat the process just described (when you have finished with a scale you can reduce it again by clicking on its name). Once you have finished with all the scales, click on ‘Save assessment’ at the bottom of the page. A green check-mark will now appear in the box for that assignment, indicating that you have assessed it. You can click on the notepad icon to reopen your assessment and edit it if necessary. Annotations Underneath the list of assessment scales there is a text box which can be used to annotate your assessment. This is a way to explain or justify your assessment, or to provide additional comments or suggestions for the user. It is often more helpful for the user (or other assessors) to know the reasons for your assessment than just to know which level you have chosen. Just type your text into the annotation window, which can be edited like any text box. There is only one annotation window per assignment, so if the assignment has more than one assesment scale, it is important to indicate in your text which scale your annotations refer to. If there are other assignments in the scenario, select the next assignment from the list on the right of the screen, and assess the user’s responses in the same way. When you have assessed all the assignments, click on ‘Done assessing’