1
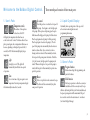
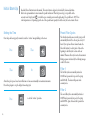
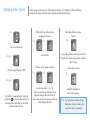
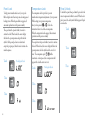
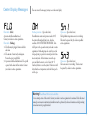
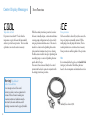
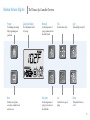
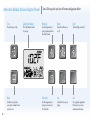
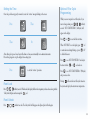
Deluxe Digital Control
Owner’s Manual
A
dvanced microprocessor technology has been
combined with solid state electronic
switches to produce the Balboa digital control, the
finest spa control in the world! Technologically
sophisticated, but very easy to understand and use,
every spa function is conveniently located at your
fingertips. A backlit, highly reliable liquid crystal
display gives you a complete update of the spa’s
status at any time of the day or night. Temperature
setting, as well as control of the light, jets, blower,
filtration, and time of day display, are all instantly
available from spa side. All this and more with the
simple touch of a finger.
Your Balboa digital spa control has been
constructed to give years of trouble-free service.
Safety is assured through design concepts and
materials which meet or exceed the most stringent
requirements of Underwriters Laboratories and
other safety agencies. Field proven through years
of testing and evaluation, every feature has been
optimized for maximum utilization of your spa.
Relax and enjoy your spa experience each and
every time with the finest spa control in the world –
from Balboa!
WARNING
This equipment generates and uses radio frequency energy and if not installed and used properly, that is, in strict accordance with the manufacturer’s instruction, may cause interference to radio and television reception.
It has been type tested and found to comply with the limits for a class B computing device in accordance with the specifications in subpart J of part 15 of the FCC rules, which are designed to provide reasonable
protection against such interference in a residential installation. However, there is no guarantee that interference will not occur in a particular installation. If this equipment does cause interference, which can be
determined by turning the equipment on and off, the user is encouraged to try to correct the interference by one or more of the following measures: • Reorient the receiving antenna. • Relocate the receiver with respect
to the spa. • Move the receiver away from the spa. • Plug the receiver into a different outlet so that the receiver and spa are on different branch circuits. • If necessary, the user should consult the dealer or an
experienced radio/television technician for additional suggestions. • The user may find the following booklet prepared by the Federal Communications Commission helpful : “How to identify and resolve radio-TV
interference problems”. This booklet is available from the U.S. Government Printing Office, Washington, DC 20402, Stock No. 004-000-00345-4.
2
Welcome to the Balboa Digital Control.
1. User’s Pads
Temperature controls
When either of these pads are
touched once, the LCD
will display the temperature which has been set,
as well as the words “set heat." Each time either of these
pads is pressed again, the set temperature will increase or
decrease, depending on which pad is pressed. After 3
seconds, the LCD will automatically display the spa
temperature.
Light
Turns light on or off. The light will
automatically turn off after some period
of operation.
Time
Press to view time of day, press again to view
temperature. Current spa temperature display
will automatically resume after 3 seconds.
Your control panel consists of three main parts:
Jets control
Touch this pad once to activate the low speed of
the pump. Touch again to start the high speed
of the pump. (If the spa has a 2nd pump, press the pad a
third time and the high speed of pump 2 will also activate.
Press the pad again and only pump 2 will be operating.)
Press the pad again to deactivate the pump(s). The low
speed of the pump starts automatically when the heater is
turned on, when a filter cycle is activated, or when a
freezing condition is detected. If automatically activated,
the low speed of the pump cannot be turned off with the
“jets” pad; however, the high speed of the pump may be
started. Whenever the high- or low speed of the pump is
started with this pad, it will automatically stop after some
period of operation.
Blower
Starts or stops the blower for aeration in the spa.
The blower will also automatically stop after
some period of operation.
2. Liquid Crystal Display
Continually shows operating status of the spa, as well
as the various monitoring functions and
programming information.
3. Owner’s Pads
Program function
Initiates time setting, filter programming, and
panel lock routines.
Mode function
Switches spa operation to either the economy or
standard mode. In the economy mode, the spa
will heat only during the filter cycles. In the standard mode,
the preset spa temperature will be maintained. This pad
also resets the control in the rare instance of an overheat
(See Center Display Messages).
3
Initial Start-Up
Read and follow all instructions in this manual. This control system is designed to be installed by a licensed electrician.
Refer to the spa manufacturer’s owner’s manual for specific instructions. When first powered up, your spa will be in the
economy mode. Simply touch
to switch the spa to standard operation and begin heating. The spa will heat to 100° F if no
other temperature is set. Depending upon the size of the spa and heater capacity, it should be ready for use in a matter of hours.
Setting the Time
Preset Filter Cycles
Once the spa has been properly connected, notice the “set time” message flashing on the screen.
Now that the time has been set correctly, your spa will
automatically filter itself for a 2-hour period every 12
hours. If your spa has a blower cleanout feature, the
blower will activate for a short period of time at the
beginning of each filter cycle to clean out the air
channel. Whenever a filter cycle is active, this automatic
filtering sequence is indicated by the following messages
on the LCD screen:
Press
Then
Then
Or
After either pad is pressed once, hours will advance or decrease automatically in one-minute increments.
Press either pad again to stop the display’s time-setting cycle.
Filter 1
The first filter cycle is automatically activated at
2:00 AM and operates the low speed of the pump
until 4:00 AM. The heater will operate in the
economy mode.
Filter 2
Press
4
to exit the “set time” procedure.
The second filter cycle is automatically activated at
2:00 PM and operates the low speed of the pump
until 4:00 PM. Again, the heater will operate in the
economy mode.
Changing Filter Cycles
If the preset times are inconvenient, if a different duration is preferred, or if you wish to leave the heater off during
filtering, the following procedure can be used to change the automatic filter cycle settings.
When the filter start or filter stop times
are displayed on the screen,
Press
Press
Or
After entering the filter set routine,
you must
Press
Time of day will be shown.
Then press
“Set time” message will appear on LCD.
Press
to reset the times.
to proceed through all the start and stop times for both
filter cycles. Just follow the same procedure to adjust the
“Filter 2” settings.
When the “set heat” message is displayed,
To exit the filter set routine
Or
Press
Then press
“Set Start Filter 1” message will appear. At this point,
each time the
is pressed, the filter start time, the
heater enable status, and the filter stop time will be
indicated on the LCD screen.
to set the center display to “on” or “off.”
In the “on” position, the spa will warm to the set
temperature during the filter cycles. In the “off”
position, the heater, in the economy mode, will not be
activated during the filter cycles.
and the LCD will display the
current water temperature.
Note: To properly clean and maintain your spa,
filtering time of at least four hours per day
(total of both cycles) is recommended.
5
Panel Lock
Temperature Lock
Panel Unlock
To help prevent unauthorized use of your spa, the
Balboa digital control has incorporated a unique panel
locking system. When the panellock is engaged, all
automatic spa functions will operate normally.
The temperature lock is provided to prevent
unauthorized temperature adjustment of your spa water.
While setting your spa water temperature,
after you have pressed or , follow the
instructions below to lock the set temperature.
When the temperature lock is engaged, all automatic
spa functions will operate normally.
To unlock the panel, these pads must be pressed in the
correct sequence and within 2 seconds. When the last
pad is pressed, the lock symbol will disappear. All pads
are now active.
These pads must be pressed within 3 seconds to
activate the lock. When locked, the center display
will show the spa temperature along with the lock
symbol. All the panel pads are now deactivated
except the program pad, which is used to initiate the
unlock sequence.
Touch
The display will read
These pads must be pressed within 3 seconds to activate
the lock. When locked, the center display will show the
spa temperature, the lock symbol and the words “set
heat.” The temperature pads
will be
deactivated – when pressed, the set temperature will
appear with a double arrow next to it.
Touch
The display will read
Then
Then
Then
Then
SET HEAT
6
Touch
Then
Then
Center Display Messages
These are some of the messages you may see on the center display.
Flow switch (Solid.)
A pressure switch has malfunctioned.
Contact your dealer or service organization.
Flow switch (Flashing.)
1 – The filter may be plugged. Remove the filter
and clean.
2 – The amount of water may be inadequate.
Be sure the spa is properly filled.
3 – A pressure switch has malfunctioned. The spa will
operate, but the heater will not activate. Contact
your dealer or service organization.
Overheat protection (Spa is shut down.)
If a malfunction occurs and spa water reaches 112° F,
the system will completely shut down. In such a
condition, DO NOT ENTER THE WATER. Turn
off all power to the spa and contact your dealer or service
organization. Overheating may also occur if you set the
low-speed pump to operate for extended periods of time
in economy mode. In this instance, remove the spa
cover and allow the water to cool to below 110° F.
Touch any button to reset the system. If the water is still
hotter than the set temperature, touch the blower pad to
cool the spa.
Open sensor (Spa is shut down.)
The high-limit temperature sensor is not working.
This must be repaired only by a dealer or qualified
service organization.
Open sensor (Spa is shut down.)
The water sensor is not working. This also must
be repaired by a dealer or service organization.
Warning! Shock Hazard! No User Serviceable Parts.
Do not attempt service of this control. Contact your dealer or service organization for assistance. Follow all owner’s
manual power connection instructions. Installation must be performed by a licensed electrician, and all grounding
connections must be properly installed.
7
Center Display Messages
Temperature set back
If spa water is more than 20° F cooler than the
temperature set point, the heater will automatically
activate to provide freeze protection. This is a normal
spa function; no corrective action is necessary.
Freeze Protection
While the normal system freeze protection, located at
the heater, is usually adequate, certain extreme climates
or unique pump configurations may be best served by
using an optional external freeze sensor. This sensor is
attached to a location on the plumbing that a service
professional can determine is most prone to freezing.
Possible locations would be the output plumbing from
an auxiliary pump or a section of plumbing that runs
near the skirt of the spa.
This sensor is then connected directly to the control
system circuit board and operates in conjunction with
the existing system freeze protection.
Freeze protection
If a freeze condition is detected by any freeze sensor, the
low-speed pump is automatically activated. (With a
multi-pump system, all pumps will activate.) This is a
normal spa function; no corrective action is necessary.
Freeze protection is enabled regardless of the spa’s status.
Note:
It is recommended that the spa be set in Standard Mode
during very cold weather. This will keep the water
heated to the set temperature and circulated more often.
Warning! Shock Hazard!
No User Serviceable Parts.
Do not attempt service of this control.
Contact your dealer or service organization for
assistance. Follow all owner’s manual power
connection instructions. Installation must be
performed by a licensed electrician, and all
grounding connections must be properly installed.
8
Auxiliary Freeze Sensor 22312
Balboa Deluxe Digital
Program
For initiating time setting,
filter programming and
panel lock.
Mode
Switches your spa from
economy to standard mode
and vice versa.
The Ultimate Spa Controller Overview
Liquid Crystal Display
The “Information Center”
of your spa.
Warm (up)
Sets the temperature of
your spa warmer and sets
the clock forward.
Time
Shows the time of day.
Light
Turns the light on and off.
Cool (down)
Sets the temperature of
your spa cooler and sets
the clock back.
Jets
Controls the two-speed
pump.
Blower
Turns the air blower on
or off.
9
Alternate Balboa Deluxe Digital Panel
Time
Shows the time of day.
Mode
Switches your spa from
economy to standard mode
and vice versa.
10
Liquid Crystal Display
The “Information Center”
of your spa.
Some Deluxe panels may have the button configuration below
Warm (up)
Sets the temperature of
your spa warmer and sets
the clock forward.
Blower
Turns the air blower on
or off.
Light
Turns the light on and off.
Cool (down)
Sets the temperature of
your spa cooler and sets
the clock back.
Jets
Controls the two-speed
pump.
Aux
(for opptional equipment)
Please refer to your spa
manufactures literature.
Setting the Time
Once the spa has been properly connected, notice the “set time” message flashing on the screen.
Press
Then
Then
Or
After either pad is pressed once, hours will advance or decrease automatically in one-minute increments.
Press either pad again to stop the display’s time-setting cycle.
Press
to exit the “set time” procedure.
Panel Lock
Press
within 3 seconds. When locked, the display will show the temperature you have chosen, along with the
“lock” symbol. All pads are frozen except the
pad.
Optional Filter Cycle
Programming
While you are not required to set filter cycles, if you
want to change them, press
within 3
seconds. “SET START FILTER 1” (AM cycle) will
appear on the display.
Press
or
to reset the filter start time.
When “SET HEAT” is on the display, press
“on”
to warm the water during filtering, or press
to disable the heater.
“off”
Press
to see “SET STOP FILTER 1” and adjust
the time with the
or
as done above.
Press
to see “SET START FILTER 2” (PM cycle)
and proceed as above.
Pressing
will enter the new filter cycle times into
the system and display the current water temperature.
Panel Unlock
Press
within 2 seconds. The lock symbol will disappear and all panel pads will work again.
11
Balboa
Instruments
Incorporated
© Copyright 2000 Balboa Instruments, Inc. All rights reserved.
2M400 DM100