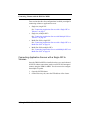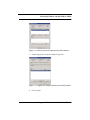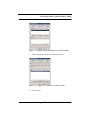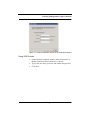
1
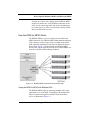
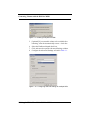
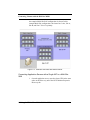
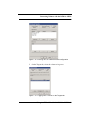
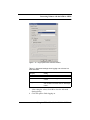
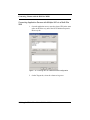
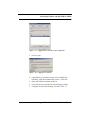
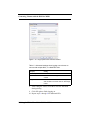
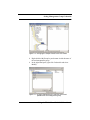
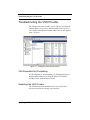
HP LeftHand P4000
Windows Solution Pack
HP LeftHand P4000 DSM for
MPIO
HP LeftHand P4000 VSS Provider
Authentication Console
User Guide
Part number: AT004-96010
edition: March 2009
Legal and notice information
© Copyright 2009 Hewlett-Packard Development Company, L.P.
Confidential computer software. Valid license from HP required for possession,
use or copying. Consistent with FAR 12.211and 12.212, Commercial Computer
Software, Computer Software Documentation, and Technical Data for
Commercial Itemsare licensed to the U.S. Government under vendor's standard
commercial license.
The information contained herein is subject to change without notice. The only
warranties for HP products and services are setforth in the express warranty
statements accompanying such products and services. Nothing herein should be
construed asconstituting an additional warranty. HP shall not be liable for
technical or editorial errors or omissions contained herein.
WARRANTY STATEMENT: To obtain a copy of the warranty for this product, see
the warranty information website:
http://www.hp.com/go/storagewarranty
Microsoft, Windows, Windows XP, and Windows NT are U.S. registered
trademarks of Microsoft Corporation.
ii
Table Of Contents
About this guide
HP technical support......................................... ix
Subscription service.......................................... ix
HP websites ....................................................... x
Documentation feedback ................................... x
Chapter 1
Using the HP LeftHand P4000 DSM for
MPIO
Overview ........................................................... 1
Device Specific Modules (DSMs) and
Microsoft MPIO .......................................... 2
Installing the DSM for MPIO ............................ 4
Connecting Volumes with the
DSM for MPIO ............................................ 7
Verifying DSM for MPIO Operations............. 21
Chapter 2
Using the HP LeftHand P4000 VSS Provider
Overview .........................................................
Installing the VSS Provider .............................
Setting Management Group Credentials..........
Working with VSS Snapshots .........................
Troubleshooting the VSS Provider..................
Chapter 3
23
24
27
30
32
Using the Authentication Console
Overview .........................................................
Authenticating Management Groups...............
Entering Management Group Credentials .......
Setting Default Credentials Only.....................
35
35
38
40
iii
Setting Credentials for A New
Management Group ................................... 41
Index 43
iv
Figures
Figure 1.3.
Figure 1.4.
Figure 1.5.
Figure 1.6.
Figure 1.7.
Figure 1.8.
Figure 1.9.
Figure 1.10.
Figure 1.12.
Figure 1.13.
Figure 1.14.
Figure 1.15.
Figure 1.17.
Figure 1.18.
Figure 1.19.
Figure 1.20.
Figure 2.1.
Figure 2.2.
Figure 2.3.
Figure 2.6.
Figure 2.7.
Figure 2.8.
Figure 3.1.
Figure 3.2.
Figure 3.3.
Figure 3.4.
Figure 3.5.
Figure 3.6.
Figure 3.7.
Figure 3.8.
Figure 3.9.
Choosing the DSM for MPIO to install .................................... 6
Entering cluster VIP address in the iSCSI initiator .................. 9
Logging on to targets (volumes) in the iSCSI Initiator ............ 9
Logging on to target volume ................................................... 10
Entering cluster VIP address in the iSCSI Initiator ................ 11
Logging on to volumes in the iSCSI Initiator ......................... 11
Enabling multi-path for DSM ................................................. 12
Configuring dvanced settings for multiple NICs .................... 12
Entering VIPs in a Multi-Site SAN configuration .................. 15
Logging onto a volume on the Targets tab ............................. 15
Logging on to volume ............................................................. 16
Target portal value remains Default ....................................... 17
Logging onto a volume on the Targets tab ............................. 19
Logging on to volume ............................................................. 19
Target portal value remains Default ....................................... 20
Verifying the DSM for MPIO connections ............................ 21
Installing the VSS Provider from the Solution Pack CD ........ 24
Choosing which provider to install ......................................... 25
Authentication reminder ......................................................... 26
Viewing a VSS-named snapshot in the CMC ......................... 30
Viewing the VSS Provider service ......................................... 32
Viewing messages in the Event Log ....................................... 33
Reminder to run Authentication Console .............................. 36
Opening the Credentials Wizard the first time ....................... 37
Management group credentials in the
Authentication Console .......................................................... 38
Default Credentials window in the Credentials Wizard ......... 39
Configure Credentials window in the Credentials Wizard ..... 40
Completed management group authentication for VSS ......... 40
Setting default credentials ....................................................... 41
Adding credentials for a new management group .................. 41
Deleting a management group or default credentials ............. 42
v
vi
Tables
Table 1.1.
Table 1.2.
Table 1.3.
Advanced settings when logging onto volumes with servers
with multiple NICs ..................................................................13
Advanced settings when logging onto volumes in a
Multi-Site SAN ........................................................................17
Advanced settings when logging onto volumes on servers
with multiple NICs, in a Multi-Site SAN ................................20
vii
viii
About this guide
This guide provides information about:
•
Installing and using the HP LeftHand P4000 VSS Provider
and the HP LeftHand P4000 DSM for MPIO
HP technical support
For worldwide technical support information, see the HP support
website:
http://www.hp.com/support
Before contacting HP, collect the following information:
•
•
•
•
•
•
Product model names and numbers
Technical support registration number (if applicable)
Product serial numbers
Error messages
Operating system type and revision level
Detailed questions
Subscription service
HP recommends that you register your product at the Subscriber's
Choice for Business website:
http://www.hp.com/go/e-updates
After registering, you will receive e-mail notification of product
enhancements, new driver versions, firmware updates, and other
product resources.
About this guide ix
HP websites
HP websites
For additional information, see the following HP websites:
•
•
•
•
•
http://www.hp.com
http://www.hp.com/go/storage
http://www.hp.com/service_locator
http://www.hp.com/support/manuals
http://www.hp.com/support/downloads
Documentation feedback
HP welcomes your feedback.
To make comments and suggestions about product documentation, please send a message to [email protected]
All submissions become the property of HP.
x About this guide
Using the HP LeftHand P4000
DSM for MPIO
1
Overview
The HP LeftHand P4000 DSM for MPIO (DSM for MPIO)
enables fault-tolerant paths to the SAN storage nodes while
increasing available bandwidth to the SAN for superior performance. When a Windows server running iSCSI connects to a
volume on the SAN, it establishes an active iSCSI session to each
storage node in the cluster.
The DSM for MPIO enables an application server to continually
communicate with the storage node that is hosting a copy of the
data that the server is requesting. The SAN/iQ software aggregates the Ethernet connections, processing power and storage
capacity of all nodes. This aggregation increases performance and
capacity as you add storage nodes to the network.
Supported Versions of Microsoft® Windows® Server
The DSM for MPIO supports the following versions of Microsoft
Windows Server.
•
•
•
Windows Server 2003
Windows Server 2008
Windows Server 2008 Server Core
32- and 64-Bit Support
The DSM for MPIO is supported on both 32- and 64-bit versions
of Windows Server. When you install the DSM for MPIO using
the HP LeftHand P4000 Windows Solution Pack CD, the correct
version of the DSM for MPIO is automatically installed.
Using the HP LeftHand P4000 DSM for MPIO 1
Device Specific Modules (DSMs) and Microsoft MPIO
Check Server Properties to verify which operating system you are
using.
Device Specific Modules (DSMs) and
Microsoft MPIO
HP LeftHand Networks provides a vendor-specific DSM to
optimize multi-pathing using the Microsoft MPIO framework in
the HP LeftHand Storage Solution. MPIO is a key component to
building a highly available, fault tolerant SAN solution. MPIO
technologies provide for the following:
•
•
•
I/O path redundancy for fault tolerance
I/O path failover for high availability
I/O load balancing for optimal performance
DSM for MPIO
The DSM for MPIO provides enhanced MPIO functionality as
follows:
•
•
•
An I/O path is built to each storage node in the cluster on
which the volume resides, plus an additional administrative
path. The DSM for MPIO automatically handles all the path
creation for the administrator.
Improved performance architecture over native MPIO solutions;
• Read I/Os are always serviced by a storage node that
holds a copy of the data being requested.
• Write I/Os are always serviced by a storage node that
receives a copy of the data. Remaining copies (replicas)
of the data are forwarded to the appropriate storage node
based on the volume replication algorithm (0-way, 2-way
or 3-way replication).
Because an I/O path is built to every storage node in the
cluster, you can build a robust fault tolerant solution. For
2 Using the HP LeftHand P4000 DSM for MPIO
Device Specific Modules (DSMs) and Microsoft MPIO
example, in a cluster with 5 storage nodes, DSM for MPIOconnected volumes have 6 iSCSI MPIO connections to the
SAN, one for each storage node and one for the administrative connection. Five of the six connections could go offline
and I/O would still be serviced.
How the DSM for MPIO Works
The DSM for MPIO is a server-side plug-in to the Microsoft
MPIO framework. The DSM for MPIO understands the data map
of the volume(s) on the storage cluster according to the iSCSI
SAN replication algorithm to read and write data to the correct
storage node. Figure 1.1 illustrates how the DSM for MPIO
driver works with the Microsoft iSCSI driver to build MPIO connections to the HP LeftHand Storage Solution.
Figure 1.1. Building MPIO connections to the iSCSI SAN
Using the DSM for MPIO with Multiple NICs
The DSM for MPIO supports connecting multiple NICs in the
application server to the SAN. Configuring with multiple NICs
improves fault tolerant physical network connections in the
server, as illustrated in Figure 1.2.
Using the HP LeftHand P4000 DSM for MPIO 3
Installing the DSM for MPIO
Figure 1.2. Using DSM for MPIO with multiple NICs in the application server
Using the DSM for MPIO in a Multi-Site SAN
The DSM for MPIO can be used in a Multi-Site SAN with one or
more subnets. In this configuration, the DSM will only build I/O
paths to the storage nodes that are in the same subnet as the application server. This enables higher performance and lower
network utilization by not sending I/Os across the WAN link.
Tip: Watch for instructions specific to Multi-Site SAN
configurations in the rest of this chapter. You can also
refer to the HP LeftHand P4000 Multi-Site HA/DR Solution
Pack User Manual, installed in the Documentation
subdirectory with the HP LeftHand Centralized
Management Console program files.
Installing the DSM for MPIO
Follow the instructions for the appropriate version of Windows
Server.
4 Using the HP LeftHand P4000 DSM for MPIO
Installing the DSM for MPIO
Windows Server 2003
Prerequisites
•
•
•
32-bit or 64-bit version of Windows Server 2003
The latest Microsoft iSCSI initiator
Microsoft DSM installed
Updating the DSM for MPIO
If you are running a 7.x version of DSM for MPIO
•
•
•
•
Uninstall previous version of DSM for MPIO
Reboot the server
[Windows 2003] Download and install the latest version of
the MS iSCSI Initiator. You must select the “Microsoft®
MPIO Multipathing Support for iSCSI” option when you
install the Microsoft iSCSI initiator.
Install the 8.1 DSM for MPIO
If you are running the 8.0 version of DSM for MPIO you can
simply upgrade from 8.0 to 8.1 using the Solution Pack CD.
•
Install the 8.1 DSM for MPIO.
Windows Server 2008 and Server Core Option
Prerequisites
•
•
32-bit or 64-bit version of Windows Server 2008 or the
Server Core installation
Note: The Microsoft iSCSI initiator comes installed with
both the Windows Server 2008, and the Server Core
installation.
The Microsoft Multipath IO optional feature installed
Using the HP LeftHand P4000 DSM for MPIO 5
Installing the DSM for MPIO
If Installing DSM for MPIO Into an Existing Microsoft
Cluster
1. Move all cluster resources and related file shares to one node
that will stay active.
2. Pause the node that holds no resources and install the DSM
for MPIO.
Install the DSM for MPIO
You must reboot the server to complete the installation.
1. Insert the HP LeftHand P4000 Windows Solution Pack CD in
your CD drive.
2. Click Install.
Figure 1.3. Choosing the DSM for MPIO to install
3. Select HP LeftHand P4000 DSM for MPIO.
The installation wizard takes you through the installation
process for the DSM for MPIO.
6 Using the HP LeftHand P4000 DSM for MPIO
Connecting Volumes with the DSM for MPIO
Silent Install and Uninstall for Windows Server 2008
Server Core Option
To perform a silent install:
1. Open a command prompt and use the cd command to
navigate to the installation media folder (where setup.exe is
found).
2. Type the following command:
setup /s /f1".\setup.iss"
3. The setup will begin, but you will see nothing until the server
reboots in a minute or two.
4. When the server is back up, check \Windows\dsminstall.log for
errors.
To perform a silent uninstall:
1. Open a command prompt and use the cd command to
navigate to the installation media folder (where setup.exe is
found).
2. Type the following command:
setup /removeonly /s /f1”.\uninst.iss”
3. The uninstall begins. You will see nothing until the server
reboots in a minute or two.
4. When the server is back up, check \Windows\dsminstall.log for
errors.
Connecting Volumes with the DSM for MPIO
Once the DSM for MPIO is installed on the server, all iSCSI
volume connections made to an iSCSI SAN will attempt to
connect with the DSM for MPIO. You do not need to configure
the multiple I/O paths manually. The iSCSI Initiator Properties
application has changed slightly for Windows Server 2008. The
procedures below include both Windows Server 2003 and
Windows Server 2008 instructions.
Using the HP LeftHand P4000 DSM for MPIO 7
Connecting Volumes with the DSM for MPIO
Four sections describe four configurations in which you might be
connecting volumes to application servers.
•
•
•
•
Single site, single NIC
See “Connecting Application Servers with a Single NIC to
Volumes” on page 8
Single site, multiple NICs
See “Connecting Application Servers with Multiple NICs to
Volumes” on page 10
Multi-Site SANs, single NIC
See “Connecting Application Servers with a Single NIC to a
Multi-Site SAN” on page 14
Multi-Site SANs, multiple NICs
See “Connecting Application Servers with Multiple NICs to a
Multi-Site SAN” on page 18
Connecting Application Servers with a Single NIC to
Volumes
Once the DSM for MPIO is installed on the server and rebooted,
all iSCSI volume connections made to an iSCSI SAN attempt to
connect using the DSM for MPIO. You do not need to configure
the multiple I/O paths.
1. Open the iSCSI Initiator.
2. On the Discovery tab, enter the VIP address of the cluster.
8 Using the HP LeftHand P4000 DSM for MPIO
Connecting Volumes with the DSM for MPIO
Figure 1.4. Entering cluster VIP address in the iSCSI initiator
3. On the Targets tab, select the volume to log on to.
Figure 1.5. Logging on to targets (volumes) in the iSCSI Initiator
4. Click Log On.
Using the HP LeftHand P4000 DSM for MPIO 9
Connecting Volumes with the DSM for MPIO
Figure 1.6. Logging on to target volume
5. [Optional] If you want this volume to be available after
rebooting, select the Automatically restore... check box.
Caution: Leave the Enable multi-path choice unselected,
since the DSM for MPIO is the only supported multi-path
solution for Windows servers connected to LeftHand SAN.
Using the MS multi-path choice will adversely affect
volume and data availability.
6. Click OK to log on to the volume.
Connecting Application Servers with Multiple NICs to
Volumes
Connect to the volumes using the iSCSI Initiator, as follows.
1. Open the iSCSI Initiator.
2. On the Discovery tab, enter the VIP address of the cluster.
10 Using the HP LeftHand P4000 DSM for MPIO
Connecting Volumes with the DSM for MPIO
Figure 1.7. Entering cluster VIP address in the iSCSI Initiator
3. On the Targets tab, select the volume to log on to.
Figure 1.8. Logging on to volumes in the iSCSI Initiator
4. Click Log On.
Using the HP LeftHand P4000 DSM for MPIO 11
Connecting Volumes with the DSM for MPIO
Figure 1.9. Enabling multi-path for DSM
5. [Optional] If you want this volume to be available after
rebooting, select the Automatically restore... check box.
6. Select the Enable multi-path check box.
7. Click Advanced to open the Advanced Settings window.
8. Configure the Advanced Settings as listed in Table 1.1.
Figure 1.10. Configuring dvanced settings for multiple NICs
12 Using the HP LeftHand P4000 DSM for MPIO
Connecting Volumes with the DSM for MPIO
Table 1.1. Advanced settings when logging onto volumes with
servers with multiple NICs
Property
Setting
Local Adapter
Microsoft iSCSI Initiator
Source IP
IP address of the storage NIC to connect to the
volume
Target Portal
Select the VIP of the cluster containing the
volume.
9. After setting the values, click OK to close the Advanced
Settings dialog.
10. Click OK again to finish logging on.
11. Repeat steps 3 through 10 for additional storage NICs.
Connecting Volumes in a Multi-Site SAN
Connecting to volumes in a Multi-Site SAN is similar to connecting to volumes in a single-site configuration with a couple of
important differences.
•
•
For proper failover/failback configuration of a Multi-Site
SAN you must configure all cluster VIPs for discovery. Order
the VIPs in preferred order of connect. For example, if Site A
is preferred, put the VIP associated for Site A first in the
discovery list.
You must also log on to the volumes with the default Target
Portal setting.
Using Multiple Cluster VIPs When Connecting to a Multi-Site SAN
You use the Virtual IP address (VIP) of the HP LeftHand Storage
Solution cluster when connecting to the DSM for MPIO. In a
Multi-Site SAN, you must enter the VIPs of all the multi-site
clusters on all the application servers to take advantage of the
multi-path I/O capabilities of the DSM for MPIO. All the application servers must have the VIPs listed in the same order.
Using the HP LeftHand P4000 DSM for MPIO 13
Connecting Volumes with the DSM for MPIO
An example Multi-Site SAN configuration is shown. In this
example Multi-Site configuration, the cluster has 3 sites, Site A,
Site B, and Site C. Site A is primary.
Figure 1.11. Multi-site SAN VIPs with DSM for MPIO
Connecting Application Servers with a Single NIC to a Multi-Site
SAN
1. On each application server, enter the cluster VIPs in the same
order on the Discovery tab of the iSCSI Initiator Properties
Discovery tab.
14 Using the HP LeftHand P4000 DSM for MPIO
Connecting Volumes with the DSM for MPIO
Figure 1.12. Entering VIPs in a Multi-Site SAN configuration
2. On the Targets tab, select the volume to log on to.
Figure 1.13. Logging onto a volume on the Targets tab
Using the HP LeftHand P4000 DSM for MPIO 15
Connecting Volumes with the DSM for MPIO
3. Click Log On.
Figure 1.14. Logging on to volume
4. [Optional] If you want this volume to be available after
rebooting, select the Automatically restore... check box.
Caution: Leave the Enable multi-path choice unselected,
since the DSM for MPIO is the only supported multi-path
solution for Windows servers connected to LeftHand SAN.
Using the MS multi-path choice will adversely affect
volume and data availability.
5. Click Advanced to open the Advanced Settings window.
6. Configure the Advanced Settings as listed in Table 1.2.
16 Using the HP LeftHand P4000 DSM for MPIO
Connecting Volumes with the DSM for MPIO
Figure 1.15. Target portal value remains Default
Table 1.2. Advanced settings when logging onto volumes in a
Multi-Site SAN
Property
Setting
Local Adapter
Microsoft iSCSI Initiator
Source IP
IP address of the storage NIC to connect to the
volume
Target Portal
Leave as Default so that the Discovery list of
VIPs is used in the same order on all storage
nodes.
7. After setting the values, click OK to close the Advanced
Settings dialog.
8. Click OK again to finish logging on.
Using the HP LeftHand P4000 DSM for MPIO 17
Connecting Volumes with the DSM for MPIO
Connecting Application Servers with Multiple NICs to a Multi-Site
SAN
1. On each application server, enter the cluster VIPs in the same
order on the Discovery tab of the iSCSI Initiator Properties
Discovery tab.
Figure 1.16. Entering VIPs in a Multi-Site SAN configuration
2. On the Targets tab, select the volume to log on to.
18 Using the HP LeftHand P4000 DSM for MPIO
Connecting Volumes with the DSM for MPIO
Figure 1.17. Logging onto a volume on the Targets tab
3. Click Log On.
Figure 1.18. Logging on to volume
4. [Optional] If you want this volume to be available after
rebooting, select the Automatically restore... check box.
5. Select the Enable multi-path check box.
6. Click Advanced to open the Advanced Settings window.
7. Configure the Advanced Settings as listed in Table 1.3.
Using the HP LeftHand P4000 DSM for MPIO 19
Connecting Volumes with the DSM for MPIO
Figure 1.19. Target portal value remains Default
Table 1.3. Advanced settings when logging onto volumes on
servers with multiple NICs, in a Multi-Site SAN
Property
Setting
Local Adapter
Microsoft iSCSI Initiator
Source IP
IP address of the storage NIC to connect to the
volume
Target Portal
Leave as Default so that the Discovery list of
VIPs is used in the same order on all storage
nodes.
8. After setting the values, click OK to close the Advanced
Settings dialog.
9. Click OK again to finish logging on.
10. Repeat steps 1 through 9 for additional NICs.
20 Using the HP LeftHand P4000 DSM for MPIO
Verifying DSM for MPIO Operations
Verifying DSM for MPIO Operations
After logging on to a volume via iSCSI, the DSM for MPIO automatically builds a data path to each storage node in the cluster
plus one administrative path. You can verify the DSM for MPIO
operations by looking at the Details window of the iSCSI connection for the volume after logging on to that volume.
Figure 1.20. Verifying the DSM for MPIO connections
What Happens if a Path Fails
If one I/O path fails, volume I/O continues because additional
active I/O paths to the iSCSI SAN remain, illustrated in
Figure 1.21.
Using the HP LeftHand P4000 DSM for MPIO 21
Verifying DSM for MPIO Operations
Figure 1.21. Multiple paths ensure continued I/O in event of path failure
When the problem with the I/O path is repaired, the DSM for
MPIO re-connects an I/O path to the storage node, thus restoring
optimized performance and fault tolerance.
22 Using the HP LeftHand P4000 DSM for MPIO
Using the HP LeftHand P4000
VSS Provider
2
Overview
The HP LeftHand P4000 VSS Provider ( VSS Provider) is the
hardware provider that supports the Microsoft Volume Shadow
Copy Service (VSS) on the HP LeftHand Storage Solution. This
manual provides general information about using the VSS
Provider with your HP LeftHand Storage Solution. Detailed
information about creating and using SAN/iQ snapshots is
available in the HP LeftHand Storage Solution User Manual or
Online Help. You can find detailed information about using the
Volume Shadow Copy Service on the Microsoft web site.
Supported Versions of Microsoft® Windows® Server
The VSS Provider supports the following versions of Microsoft
Windows Server.
•
•
•
Windows Server 2003
For transportable snapshots on the Standard version you must
install a Microsoft QFE. See “Transportable Snapshots” on
page 31 for details.
Windows 2008 Server
Windows 2008 Server Core
32- and 64-Bit Versions
VSS Provider is supported on both 32- and 64-bit versions of
Windows. When you install the VSS Provider using the HP
LeftHand P4000 Windows Solution Pack (Solution Pack) CD, the
correct version of the VSS Provider is automatically installed.
Check Server Properties to verify which operating system you are
using.
Using the HP LeftHand P4000 VSS Provider 23
Installing the VSS Provider
Installing the VSS Provider
Use the Solution Pack CD for installing the VSS Provider on any
Windows 2003 or Windows 2008 Server. If you are installing the
VSS Provider on Windows 2008 Server Core, go to the section
“Installing on Windows 2008 Server Core Option” on page 26.
Installing on Windows 2003 Server or Windows 2008
Server
1. Insert the Solution Pack CD in your CD drive.
Figure 2.1. Installing the VSS Provider from the Solution Pack
CD
2. Click Install.
3. The menu of provider choices opens.
24 Using the HP LeftHand P4000 VSS Provider
Installing the VSS Provider
Figure 2.2. Choosing which provider to install
4. Click VSS Provider.
The installation wizard takes you through the installation
process for the VSS Provider.
5. After the VSS Provider is installed, a reminder window
opens.
Using the HP LeftHand P4000 VSS Provider 25
Installing the VSS Provider
Figure 2.3. Authentication reminder
6.
7.
8.
9.
When you have finished installing all the Solution Pack
components, you must open the Authentication Console to
configure user names and passwords for management groups
Click Next to continue.
Click Finish on the final window to complete the wizard.
Click Menu on the installer window.
Click Exit to close the installer.
Installing on Windows 2008 Server Core Option
Prerequisites
•
32-bit or 64-bit version of Windows 2008 Server installed
with the Server Core option. Note: The VSS Installer automatically installs the correct version of the VSS Provider.
1. Copy the VSS Provider installer file to the Windows 2008
server that has the Server Core option installed.
26 Using the HP LeftHand P4000 VSS Provider
Setting Management Group Credentials
2. Run the installer from the command prompt.
The installation wizard opens and takes you through the
installation process for the VSS Provider.
Note the reminder window, shown in Figure 2.3, that opens
after the VSS Provider is installed. In the Server Core
installation you do not run the Authentication Console. You
import the credentials into the Registry.
3. Click Next to finish the installer.
Next you must set the management group credentials, described,
as described in “Setting Credentials on Windows 2008 Server
Core” on page 27.
Setting Management Group Credentials
Before using VSS, you must set the management group credentials.The credentials required for using the VSS Provider include:
•
•
Management group name
Management group user name and password
In most Windows Server installations, you set these credentials in
the Authentication Console, described in Chapter 3, “Using the
Authentication Console,” on page 35.
However, in the Windows 2008 Server Core installation, you set
the credentials in the Registry, described in the next section.
Setting Credentials on Windows 2008 Server Core
After you have installed the VSS Provider on the Server Core,
you import the credentials.reg file into the Registry. This file is
installed in the same directory into which you installed the VSS
Provider.
Using the HP LeftHand P4000 VSS Provider 27
Setting Management Group Credentials
The credentials.reg file adds sample credentials which you must
edit with the proper values for your management group credentials.
Caution: Take standard precautions when editing the
registry. If you are not comfortable with this process,
consider making a backup copy of the registry before
starting.
For more information on backing up, editing and restoring
the registry, please refer to the Microsoft Knowledge Base
article listed at http://support.microsoft.com/kb/322756/.
1. Go to the directory where you installed the VSS Provider.
The default directory is C:\Program Files\LeftHand
Networks\LeftHand Networks VSS Provider.
2. Verify that the credentials.reg file is installed in that directory.
3. Import the credentials into the Registry by typing the file
name, credentials.reg, and pressing Enter.
4. Click Yes on the warning message to continue adding the
registry values.
A Registry Editor message opens verifying that the keys and
values are added to the Registry.
5. Click OK to continue.
6. Type Regedit and press Enter.
The Registry Editor opens to
HKEY_LOCAL_MACHINE\SOFTWARE.
7. Open LeftHand Networks to the Client Settings\1.0\Credentials\MyGroup key.
28 Using the HP LeftHand P4000 VSS Provider
Setting Management Group Credentials
Figure 2.4. Changing the sample values to the real values
8. Right-click the MyGroup key and rename it with the name of
the real management group.
9. In the right-hand pane, right-click Credentials and select
Modify.
Figure 2.5. Change credentials to the real user name and
password for the management group
Using the HP LeftHand P4000 VSS Provider 29
Working with VSS Snapshots
10. Change the values to the real user name and password for the
management group.
11. Click OK.
12. Exit the Registry Editor, or you may add credentials for
another management group.
Adding Credentials for Additional Management Groups
You can create additional credentials as necessary.
1. Right-click on the Credentials key and select New Key.
2. Name the new key with the name of the management group.
3. Right-click on the new management group key and select
New > Multi-String Value.
4. Name the new value Credentials.
5. Right-click the new Credentials value and select Modify.
6. In the Edit Multi-String window, change the values to the real
user name and password for the management group.
7. Click OK.
8. Exit the Registry Editor when you have finished adding management group credentials.
Working with VSS Snapshots
The VSS Provider creates a VSS snapshot as a persistent target in
the MS iSCSI initiator. The VSS snapshot also appears in the
CMC with the naming convention of “VSS-<unique id>”. The
snapshot is available as needed to the backup application. When
the snapshot is no longer needed, it is deleted from both the CMC
and the iSCSI initiator.
Figure 2.6. Viewing a VSS-named snapshot in the CMC
30 Using the HP LeftHand P4000 VSS Provider
Working with VSS Snapshots
Note: When working with other backup products, all VSS
snapshots remain in the CMC until processing is
complete, and then they are deleted. If they are not
deleted then you can delete them manually when you are
certain that the backup process is finished.
Transportable Snapshots
VSS snapshots can be used as transportable snapshots, that is,
they can be mounted on a different server for backup. Transportable snapshots are persistent, which means they remain in the
CMC and the iSCSI initiator until the backup completes.
Note: To use transportable snapshots on Windows Server
2003 Standard, you must install the Microsoft QFE
referenced in Microsoft Knowledge Base Article: 913648.
Deleting Transportable Snapshots
In order to cleanly delete a transportable snapshot from the
system, you should use the requestor application to perform the
deletion.
For example, a CommVault QR job requests a transportable
snapshot from the VSS Provider. Then, when the snapshot is no
longer needed, you can log in to the CommVault application and
delete that snapshot which is associated with the job that created
it.
Snapshot Provisioning
In SAN/iQ software release 7.0.xx and later, all snapshots are
created as thinly provisioned.
Using the HP LeftHand P4000 VSS Provider 31
Troubleshooting the VSS Provider
Troubleshooting the VSS Provider
The VSS Provider runs as an NT service. You can view both the
Volume Shadow Copy service and the VSS Provider service in
the Computer Management window under Services and Applications > Services.
Figure 2.7. Viewing the VSS Provider service
VSS Snapshots Not Completing
If VSS snapshots are not completing, try authenticating the credentials and IP addresses by using the Allow VDS Control
checkbox in the Authentication Console.
Restarting the VSS Provider
The VSS Provider starts automatically. If you check in the
Services list and it isn’t started, you can start it.
32 Using the HP LeftHand P4000 VSS Provider
Troubleshooting the VSS Provider
Viewing the Event Log Messages
The event log reports issues with the VSS Provider, the iSCSI initiator, and Volume Shadow Copy. Open the Event Log to view
messages about those applications.
Figure 2.8. Viewing messages in the Event Log
Using the HP LeftHand P4000 VSS Provider 33
Troubleshooting the VSS Provider
34 Using the HP LeftHand P4000 VSS Provider
Using the Authentication
Console
3
Overview
Use the Authentication Console with the HP LeftHand P4000
VSS Provider to authenticate management groups on the SAN.
Then, when the management groups are authenticated, you can
use the Microsoft Volume Shadow Copy Service (VSS) with the
SAN.
If you are using Windows 2008 Server Core installation, you
must add the management group credentials using the Registry
Editor. See Chapter 2, the section about Setting Management
Group Credentials, on page 27.
Authenticating Management Groups
Authenticating management groups on the SAN is the first step
for using the VSS Provider You authenticate management groups
by setting credentials for them in the Authentication Console.
This authentication is normally a one-time process. You would
need to redo or update the authentication only if you changed any
of the following:
•
•
•
IP addresses of storage nodes
User name and password for logging in to storage nodes
Which storage nodes are in the management group, that is,
you added or removed storage nodes
Installing the Authentication Console
The Authentication Console is installed automatically when you
install the VSS Provider. During the installation for the VSS
Using the Authentication Console 35
Authenticating Management Groups
Provider, a reminder message opens, telling you to first run the
Authentication Console before you can create LUNs or snapshots.
Figure 3.1. Reminder to run Authentication Console
Information Needed for Authenticating Management
Groups
Prerequisites
You need the following information (credentials) about the management groups you want to authenticate for VSS:
•
•
Management group name
User name and password for logging in to the management
group.
Choosing Between Default or Individual Credentials
If you use the same user name and password to log into all your
management groups, you can designate default credentials for
that user name and password combination.
36 Using the Authentication Console
Authenticating Management Groups
If you use unique user name and password combinations for
different management groups, you can define individual credentials for different management groups.
Setting the Credentials
To use VSS, you must enter the user name and password for management groups containing the volumes to snapshot.
Opening the Authentication Console
•
Open the Authentication Console from the Programs menu.
Credentials Wizard
The first time you open the Authentication Console the Credentials Wizard opens. At other times, you can open the Credentials
Wizard from the Action menu, or the right-click menu. For information about using the Credentials Wizard, see “Setting Default
Credentials in the Credentials Wizard” on page 38.
Figure 3.2. Opening the Credentials Wizard the first time
Using the Authentication Console 37
Entering Management Group Credentials
Authentication Console Window
The Authentication Console window opens after you have
entered management group credentials.
Discovering Management Groups
The Authentication Console automatically discovers management groups that are on the same subnet as the client you are
working on, displayed in the right pane.
If you have a management group on a different subnet, you can
add it by adding new management group credentials. See “Setting
Credentials for A New Management Group” on page 41.
Figure 3.3. Management group credentials in the Authentication
Console
Entering Management Group Credentials
Before using the VSS Provider, you must configure credentials
for the management group or groups on the SAN. These credentials include the management group name and user name and
password.
Setting Default Credentials in the Credentials Wizard
In the Credentials Wizard, you can set default credentials for all
management groups that use the same user name and password.
38 Using the Authentication Console
Entering Management Group Credentials
Figure 3.4. Default Credentials window in the Credentials Wizard
Using VSS Provider
1. On the Default Credentials window, make sure that the Use
Default Credentials Below check box is selected.
2. Type in the user name, password, and confirm the password.
3. Click Next.
Using the Authentication Console 39
Setting Default Credentials Only
Figure 3.5. Configure Credentials window in the Credentials
Wizard
4. Clear the Allow VDS Control checkbox and click Next.
The default credentials are saved and the Authentication
Console opens with any management groups it discovered on
the subnet listed in the right pane.
Figure 3.6. Completed management group authentication for
VSS
Setting Default Credentials Only
You can, at any time, choose to set default credentials in the
Authentication Console without using the Credentials Wizard.
Also use this choice to change existing default credentials.
40 Using the Authentication Console
Setting Credentials for A New Management Group
1. From the Action menu, click Set Default Credentials.
Figure 3.7. Setting default credentials
2. Type in the user name and password and confirm the
password or use the default credentials.
3. Click OK.
The default credentials are saved.
Setting Credentials for A New Management
Group
Add credentials for a new management group.
1. From the Action menu, click New Management Group
Credentials.
Figure 3.8. Adding credentials for a new management group
Using the Authentication Console 41
Setting Credentials for A New Management Group
2. Type in the management group name and the user name and
password.
3. Click OK.
The Authentication Console window opens with the new
management group listed in the right pane.
Deleting a Management Group or Default Credentials from
the Console
1. Select from the list in the right pane the management group
or default credentials that you want to delete.
2. Right-click and select Delete.
The selected item is deleted from the list.
Figure 3.9. Deleting a management group or default credentials
42 Using the Authentication Console
Index
A
Authenticating Management Group
credentials 38
for VSS Provider 27, 36, 38, 41
prerequisites for 36
Authentication Console 35–42
and VSS Provider 27
deleting management group 42
installing 35
opening 37
B
Backing Up Registry 28
C
Computer Management
Window 32
Credentials
adding for additional
management groups 30
for VSS Provider
setting 27, 36, 38, 41
setting in Windows 2008
Server Core 27
management group 38
sample credentials for Windows
2008 Server Core 28
Credentials Wizard 38
Credentials.reg File, Importing 27
D
Default Credentials
setting for management
groups 38, 40
Device Specific Modules See DSM
DSM for MPIO
and I/O path failure 21
configuring for multiple NICs in
application server 3, 10
connecting volumes in a MultiSite SAN 13
connecting volumes with 7
in Multi-Site SAN 4
installing 6
overview 1
supported Windows versions 1,
23
upgrading 5
verifying operations 21
DSM, Microsoft 10, 16
E
Event Log Messages
VSS Provider 33
I
Import Credentials.reg File 27
Installing
Authentication Console 35
DSM for MPIO 6, 7
VSS Provider 24–26
L
Log Messages See Event Log
Messages
43
M
Management Group
deleting from Authentication
Console 42
Management Group Credentials
adding additional in Registry for
Server Core 30
credentials wizard 38
sample credentials for Windows
2008 Server Core 28
setting default credentials 38, 40
Messages, Event Log
VSS Provider 33
Microsoft
Device Specific Modules
(DSM) 2
DSM 10, 16
MPIO 2
Multipath I/O (MPIO) 2
supported Windows versions for
DSM for MPIO 1, 23
supported Windows versions for
VSS 23
Volume Shadow Copy Service
(VSS) 35
VSS 23
Microsoft Windows See Windows
MPIO, Microsoft 2
Multipath I/O See MPIO,
Microsoft
Multi-Site SAN and DSM for
MPIO 4
N
NICs
connecting application server
using DSM for MPIO 3
44
O
Opening Authentication
Console 37
Overview
DSM for MPIO 1
VSS Provider 23
P
Persistent Snapshots See Transportable Snapshots
Prerequisites
DSM for MPIO 5
VSS Provider 23, 26
Prerequisites for Authenticating
Management Groups 36
R
Registry
backing up 28
Registry, Windows 27
S
Server Core
setting credentials in 27
Server, Application
multiple NICs and DSM for
MPIO 3, 10
Services, NT
VSS Provider 32
Setting Management Group Credentials
VSS Provider 27
Starting
VSS Provider 32
System Registry 27
T
Transportable Snapshots 31
Troubleshooting
VSS Provider 32
U
Uninstalling
DSM for MPIO silent uninstall
for Windows 2008 Server
Core 7
Upgrading DSM for MPIO 5
User Name and Password 38
Using VSS 30
V
Verifying DSM for MPIO
Operations 21
Virtual IP Address See VIP
Volume Shadow Copy Service See
VSS
Volumes
connecting in a Multi-Site SAN
with DSM for MPIO 13
connecting with DSM for
MPIO 7
VSS 23
VSS Provider
authenticating management
groups for 27
authentication console and 27
credentials for 27
event log messages 33
installing 24–26
overview 23
running as NT service 32
setting credentials for 36, 38, 41
setting management group
credentials 27
starting 32
supported Windows versions 23
transportable snapshots 31
troubleshooting 32
W
Warnings
MS DSM is not supported 10, 16
Windows
2003 Server 5
VSS Provider 23
2008 Server 5, 26
VSS Provider 23
2008 Server Core 5, 26, 27
VSS Provider 23
32-bit or 64-bit Windows 2003
Server 5, 23
Registry 27
supported versions for DSM for
MPIO 1
supported versions for VSS
Provider 23
Windows 2008 Server Core
silent install and uninstall 7
silent uninstall 7
Wizard, Installation 6
Working with VSS Snapshots 30
45
46