1
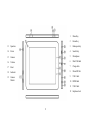
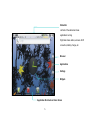
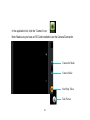
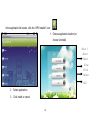
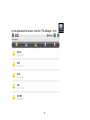
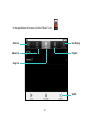
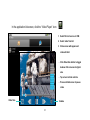
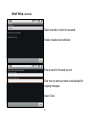
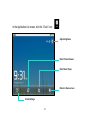
Controls ......................................................................................................................................................................2
Function Keys.............................................................................................................................................................3
Touch Screen Interface ...............................................................................................................................................6
Settings .....................................................................................................................................................................10
Camera/Camcorder ...................................................................................................................................................22
Web Browsing ..........................................................................................................................................................23
Application Installer .................................................................................................................................................24
Text Reader...............................................................................................................................................................25
Task Manager ...........................................................................................................................................................27
File Manager.............................................................................................................................................................27
File Manager.............................................................................................................................................................28
Music Player .............................................................................................................................................................30
Video Player .............................................................................................................................................................32
Picture Browser ........................................................................................................................................................33
Email Setup...............................................................................................................................................................35
Clock Settings...........................................................................................................................................................38
Specifications............................................................................................................................................................40
FCC Statement..........................................................................................................................................................42
1
1
Menu Key
2
Home Key
13
Speakers
3
Backspace Key
14
Power
4
Search Key
15
Camera
5
Microphone
16
Volume
6
Mini USB Jack
17
Reset
7
Charge Jack
18
Indicator
8
Micro SD Slot
19
Camera
Shutter
9
USB 1 Jack
10
HDMI Jack
11
USB 2 Jack
12
Earphone Jack
2
Home Key
•
•
In the option program, menu or webpage, press home key to return to the main interface.
Press & hold the home key and it will show your recently opened applications.
Menu Key
•
•
•
•
Press the Menu key to open the sub-menu for this page.
Press the menu key again to close the sub-menu.
Press & hold the menu key in an application to open/close the virtual keyboard.
When the screen is locked, press the Menu key to enable the screen. Press it again to unlock
the screen.
(If you have set the unlock mode, you can unlock the screen based on your settings.)
Backspace Key
•
Press the BACKSPACE key to return to the previous operation or previous screen.
Search Key
•
Press search to enter search input interface.
3
On/Off Key
Turn ON
•
Press and hold Power ON/OFF key to turn on the tablet pc.
Turn OFF
•
•
Press ON/OFF key to lock the screen and enter sleep mode.
Press and hold ON/OFF key: The mode selection window pops up.
You can then choose silent mode, or power off.
•
•
Volume Key
Press + to increase the volume.
Press - to reduce the volume.
•
Recover Factory Settings
•
Press and hold the Camera button together with press turn on/off,. A red screen will be
displayed, then the tablet will reset to original factory settings.
Update System Version
•
•
Press Volume Θ button and reset button together, it will show the blue screen.
Then it will show the update status.
4
Accessories Included in The Package:
1
Tablet pc
2
Power adapter
3
USB cable
4
Instruction Manual
5
Warranty Card
6
Stop card
7
Registration card
8
Pouch(opptional)
5
Status Bar
Left side of the status bar shows
applications running
Right side shows alerts, sub-menu Wi-Fi
Applications
Click any icon to
work the application.
connection, battery charge, etc.
Browser
Applications
Settings
Widgets
Application Shortcuts on Home Screen
6
Screen Interface
Main screen interface is similar to a computer desktop.
Place application shortcuts and widgets here.
Touch and “swipe” to go to next page, move things on the screen, etc.
Touch 2 fingers and spread apart or bring together to zoom pictures in and out.
Widgets
Press the screen for 1-2 seconds. The “Add to Home screen” menu will pop up offering you
options to add widgets, change wallpaper, etc.
Deleting Application shortcuts
Press and hold down the application button on the screen. The application list button will
change to a trash can. Drag the application to the trash.
Status Bar
Pay attention to the status bar on the top of screen. If icons show on the left, it is a reminder
that applications are running. On the right of the status bar, there are alarm settings, Wi-Fi
connection, battery charge, etc.
7
Status Bar Icons
Finished
Mute
Downloading
Wi-Fi Service
Uploading /
Connected &
Downloading
Available
Alarm clock
Playing Music
SD Card Nearly Full
Battery Power
Status
Charging
When a prompt is displayed on the status bar, touch it to open the notification.
•
•
•
Click selection window to open prompt message
Click on the top of the column to read the full message
Close the column
8
Application List
Click the Application List icon to show the application library.
Touch an application icon to start it
up.
Press and hold the application icon
and a shortcut will be added to the
home screen.
Press the “Home” key in the
application list interface to return to
the home screen.
9
9
Touch Screen Calibration
In the application list screen, Click the “Screen Calibrator” icon:
10
1.Click “Calibration”
2.Click start, it will calibrate automatically
3.After 20 seconds, it’s ok.
11
Language Settings
Touch: “Options”
>
“Language & keyboard”
12
>
“Select language”
> Choose Language
Screen Brightness Settings
Touch: “Settings”
>
“Display”
>
“Brightness”
13
> Adjust slider and hit “OK”
Screen Timeout Settings
Touch: “Settings”
>
“Display” >
“Screen Timeout”
14
>
Choose Time
SD card Mount / Un-Mount
After inserting a micro-SD card to the tablet, do the following to install the card.
Touch: “Settings” > “SD Card & Tablet Storage” > “Mount SD card”
15
15
SD card Mount /Un-Mount (continued)
The Settings screen will also show how much memory is available on the card as well as on
the internal memory.
After mounting a card, the selection will change to “Unmount SD card”
To uninstall the card select this option.
16
HDMI device output
To set up the HDMI output:
Touch: “Settings” > “Display”
>
“TV Mode”
17
> (continued on next page)
HDMI device output (continued)
Select HDMI output mode
> Resolution > and select whether TV supports HDMI
18
USB Connections
USB indicator when connected
To connect a USB device such as a
flash drive, plug it into USB #1 or
USB #2 port (see page 2).
The USB connection icon will be
displayed, however you must first
install the device.
First, touch the status bar and
swipe down to open the dialog box.
19
The dialog at left will open.
Select “USB Connected”
Click on the button: “Turn on USB Storage”
The USB device should now be enabled.
Before removing USB device, click on
“Turn off USB Storage” to eject the device.
20
Wi-Fi Settings
Touch: “Menu Key”
>
“Wireless & Networks”
>
“Wi-Fi Settings”
1
Click Wi-Fi (turn on Wi-Fi). Tablet will start searching for available networks.
2
Choose available network, input password and click “Connect”.
For advanced settings, touch menu icon at right of status bar and choose “Advanced”
Note !!
Wi-Fi connection will drain the
battery quickly. Turn off when not in use.
21
In the application list, click the “Camera” icon:
Note: Make sure you have an SD Card installed to use the Camera/Camcorder
Camcorder Mode
Camera Mode
Start/Stop Video
Take Picture
22
Before using the internet browser, please make sure Wi-Fi service is turned on.
Click the “Browser” icon to open the browser.
Click on the menu icon at the right side of the status bar for browser commands.
23
In the application list screen, click the “APK Installer” icon:
1
Choose application location (or
choose Uninstall)
Enter i
direct
Enter
direc
Click
Uninst
Exit
2
Select application.
3
Click Install or cancel.
24
In the application list screen, click the “Text Reader” icon: .
1
Select memory location of the
document.
2
25
Touch document icon to open.
Click the Menu button at the right side of the status bar to show/hide the lower menu.
Using Bookmarks:
Click “Add Bookmark”, type bookmark and click OK
To jump to a bookmark, click “Open Bookmark”
Select from the list, then press “Jump”
26
In the application list screen, click the “Task Manager: icon:
The Task Manager shows all the running
applications and how much memory they are
using.
Click on an application to end it (kill it)or
uninstall it.
Warning: Use this screen with caution to avoid
accidentally removing applications.
27
In the application list screen, click the “File Manager” icon:
28
Use the file manager to organize files.
The icons across the top are for navigating to files on the SD card, USB 1 & 2 and to move up
and down within the folders.
Click on the menu button on the right side of the status bar to show the bottom menu. Use
this to add a new folder or file.
29
In the application list screen, click the “Music” icon:
Artist List
Now Playing
Album List
Playlists
Song List
Shuffle
30
Song Screen
Shuffle
Repeat
Play List
Artist
Album
Song Title
Back
Next
Play / Pause
31
In the application list screen, click the “Video Player” icon:
1. Select SD card source or USB
2. Select video from list
3. Video screen will appear and
video will start.
- Click Video Size button to toggle
between full screen and original
size.
- Tap screen to hide controls.
- Press and hold screen to pause
video.
Video Size
Volume
32
In the Application List screen, click the “Gallery” icon:
1.
SD card and USB sources will automatically be
scanned for pictures and videos.
2.
3. Tap to select a picture or video.
Touch and “Swipe” to view all the photos / videos
33
Touch the folder to open the picture browser.
Pictures
Touch screen and “Swipe” left or right to view the next or previous picture.
Touch screen with 2 fingers and spread apart to zoom (or use +/- buttons).
•
•
•
34
Tap screen to show / hide menu
Select “Slideshow”
Tap “Menu” for more options
o Delete
o Share with Bluetooth device
o More:
Photo details
Set as wallpaper
Crop
Rotate Left
Rotate Right
In the Application List screen, click the “EMAIL” icon:
1
Input email address and
password.
Click “Next”.
2
Select type of email account.
35
Email Setup (continued)
3
Follow the prompts to set up
your email account.
Note: The values in the fields on the left are for
illustration only. Set all fields to the appropriate
settings for your account.
Select “Next” to go to the next screen.
If you are unsure about the settings, contact your
email host for details.
Select “Next” to go to the next screen.
36
Email Setup (continued)
Select how often to check for new email.
Enable / disable email notification.
Enter a name for this email account.
Enter how you want your name to be displayed for
outgoing messages.
Select “Done”
37
In the Application List screen, click the “Clock” icon:
Adjust brightness
Enter Picture Browser
Enter Music Player
Return to Home screen
Alarm Settings
38
Alarm & Time Settings
Enter “Alarm Settings” screen (see page 36)
Click “Add Alarm”
Set Time
Set time and alarm options
39
CPU
Screen
Memory
Samsung A8 S5PC110– 1GHz
Display
9.7 inch Touch Panel, IPS Screen,
Resolution
1024*768
Flash ROM
512MB NAND
RAM
512MB Mobile DDR
Antenna
Built-in Antenna
Wifi
802.11 b/g/n
G-Sensor
Support
Camera
2M pixel Front Camera
Audio
MP3, AAC
Video
MPEG4 H264, H263
Photo
JPG, PNG
40
Input/Output
Touch Panel
Capacitive type Touch Panel
Speaker
Built–in Speaker
Headphone
3.5mm sSereo Jack
MIC
Internal Microphone
SD / MMC
TF Slot, capacity up to 32GB (support TF HC)
USB
USB 2.0 Device (Mini Port) x1, USB2.0 Host ( A type) x 2
HDMI
MINI HDMI, Support 1080P Video Play
1. Hardware Power ON/OFF Switch and Reset Switch
Buttons / Switches
2. Volume Up, Volume Down
3. Back Key, Home Key, Menu Key, Search Key
4. Photo Key
Type
Battery
Car Charger
Active
Output
Certification & Regulation
Built-in Rechargeable 3.7V 6800mAh Li-Polymer
5~7 hrs battery life on full power mode with backlight setting on
mid range
Φ3.5mm DC-Jack, 5V, 2.5A
CE, FCC, RoHS
41
FCC Caution:
This equipment has been tested and found to comply with the limits for Class B digital device, pursuant to part 15 of the FCC Rules.
These limits are designed to provide reasonable protection against harmful interference in a residential installation. This equipment
generates uses and can radiate radio frequency energy and, if not installed and used in accordance with the instructions, may cause
harmful interference to radio communications. However, there is no guarantee that interference will not occur in a particular
installation. If this equipment does cause harmful interference to radio or television reception, which can be determined by turning
the equipment off and on, the user is encouraged to try to correct the interference by one or more of the following measures:
·Reorient or relocate the receiving antenna.
·Increase the separation between the equipment and receiver.
·Connect the equipment into an outlet on a circuit different from that to which the receiver is connected.
·Consult the dealer or an experienced radio/TV technician for help.
FCC Compliance:
·To assure continued compliance, follow the attached installation instructions.
·Use only the provided shield interface cables when connecting to computer.
Any unauthorized changes or modifications to this equipment would void the user's authority to operate this device.
This device complies with part 15 subpart B of the FCC Rules. Operation is subjected to the following conditions: (1)This device
may not cause harmful interference, and (2) This device must accept any interference received, including interference that may
cause undesired operation.
This product may receive radio interference caused by mobile telephones or other products during operation. If such interference is
apparent, please increase separation between the product and the mobile telephone or other product.
42
Industry Canada Requirement:
This Class B apparatus complies with Canadian ICES-003.
Cet appareil numérique de la classe B est conforme á la norme NMB-003 du Canada.
Other names of systems and products mentioned in these instructions are usually the registered trademarks or trademarks of the
marks are not used to identify registered
manufacturers who developed the system or product concerned. The TM and
trademarks and trademarks in these instructions.
This manual was correct and complete at the time of printing. However, new specifications and updates can occur at any time
without prior notice. No part of this manual may be copied, republished, reproduced, transmitted or distributed in any way
without prior written consent of Leader International Inc.. Any unauthorized distribution of this manual is expressly forbidden.
Leader International Inc may find it necessary to modify, amend or otherwise change or update this manual. We reserve the right
to do this at any time, without any prior notice. All specifications and features are subject to change without notice. All screen
shots shown are simulated and may not represent the actual screen on production units sold to consumers.
For instruction manuals or other information, be sure to visit our website at:
www.leaderinternationalinc.com
Or write to us at:
Leader International Inc
225 S. Lake Avenue, Suite 300
Pasadena, CA 91101
USA
Copyright
43
2011