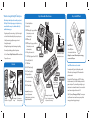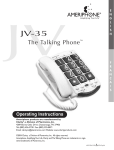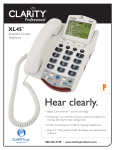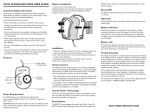
1
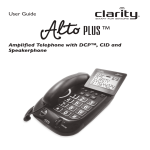
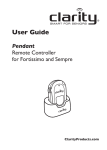
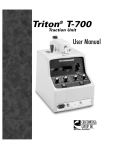
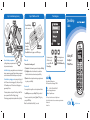
Step 3 – Install and charge battery
Step 4 – Make/Receive Calls
Menu Navigation
Quick Setup
Guide
Press the Dial Key
to dial or connect a call.
Press/Hold
Power Key to
turn ON phone.
Press/Hold the Power Key again to turn OFF the phone.
Clarity Pal
TM
Access the battery compartment
by sliding the battery compartment cover from
the phone back as shown above.
Install the battery by ensuring that the contacts on the battery and
battery compartment are engaged. Replace the battery compartment
cover as shown above. Make sure that it snaps securely into place.
The battery indication on the phone LCD will begin to “blink.” If the
phone is powered off, the LCD will display “charging.”
When charging is complete the battery indicator will stop “blinking.”
Make a call
Three methods for making a call.
1) Phonebook – Find the number you want to dial, and press Dial Key.
Scroll through the menu
listings by pressing the
UP/DOWN Arrow Key.
Amplified
Mobile Phone
2) Call Register – Enter the list of missed calls, received calls or
dialed calls, and then choose the number, and press Dial Key.
3) Manual – In idle mode, input the number by pressing the numeric
keys, then press the Dial Key.
Receive a call
On incoming calls, the ring will be a sound, or the phone will vibrate.
Press Dial Key to answer, or press Reject (M3 key) to refuse call.
You can also receive the call by selecting “Option” (M1 key), or by
pressing the “Dial” key.
Note: To use Boost Button, Press/Hold for (1) one second.
Clarity, a Division of Plantronics, Inc.
6131 Preservation Drive, Chattanooga, TN 37416
CONTACT
Start the battery charging process by inserting the “plug-tip” of
the AC Power cord into the charging port (11) of the phone. Plug the
AC Power Adapter into a 110V electrical outlet. Charging time is
approximately 2-3 hours.
Select menu options
(OK, Back, etc.) by
pressing the M1 or M3
Memory Keys.
Tel:
800-426-3738 Fax: 800-325-8871
E-mail: claritycs @ plantronics.com
Website: ClarityProducts.com
©2011 Clarity, a Division of Plantronics, Inc. All Rights Reserved.
Clarity, Clarity Pal, and Smart for Seniors are trademarks or registered trademarks
of Plantronics, Inc.
Printed in China
ClarityProducts.com
Thanks for choosing the Clarity Pal mobile phone
More than just a mobile phone, this is mobile peace of mind.
The Clarity Pal™ mobile phone gives you the freedom to stay
connected with the ones you love, and know that help is
available wherever you go.*
• Designedespeciallyforseniorson-the-go.Only5inchesinlength
and one-half inch in thickness. Easily fits in your pocket or purse.
amplifes incoming sound and is
• Clarity Power technology
Hearing Aid compatible.
• Full-keypadfeatureslargebuttonsforviewingandeasydialing.
• ProminentlylocatedEmergencyButtonforquickaccess.
• SeeUser’sManualatClarityProducts.com/Pal for more features.
* Requires
cell phone service.
1 Volume Adjust Button
4
4 M2 Memory Key
Signal Strength
Ring Tone
Bluetooth Battery
1
5 M3* Memory Key – Long-press/Memory
(Short-press key to access and
select menu options.)
2
Install SIM card
13
3*
6 Dial Key (Press to connect call)
6
8
See User’s Manual for a complete
description of phone status icons.
7 ON/OFF Key (Long-press to Power ON/OFF)
9 TONE Button
9
11
12 Emergency Button
(Located on back of phone)
13 Phone Status Icons
14 AC Power Adapter
3.7V
Rechargeable
Battery
Quick Setup Guide
Safety Instructions
Warranty Information
Important: Before using phone,
please read Safety Instructions.
Additional information is available online at:
ClarityProducts.com/Pal
• PowerOFF phone
• Insertcard,metalfacedown.
Warning: Do not remove SIM card while phone is charging,
or connected to AC power.
Install SIM card and connect to a network
10 BOOST Button (Amplify)
AC Power
Adapter
Charging Base
7
3 M1* Memory Key – Long-press/Memory
(Short-press key to access and
select menu options.)
11 AC Power (Charging Port)
TM
5*
2 Headset Port
8 Arrow Key (Menu Scroll)
Contents
Clarity Pal
Mobile Phone
Step 2 – Install SIM card
Step 1– Review Basic Phone Features
TM
12
A network provider (of your choice) will provide you with a
SIM card that is key for entering the GSM network and their
particular network.
10
Note: To use Boost
Button, Press/Hold
for (1) one second.
Warning: Use the supplied AC
Adapter. Other adapters may damage
the phone and void the warranty.
14
First install the SIM card, then battery. (See STEP 3 for battery
installation instructions.) Once SIM card and battery are installed,
power-on the phone. The phone will begin searching for a registered network, or other available networks. Once connected, the
name of network supplier will show on the LCD.
If the LCD prompts “Emergency Call Only”, it means you are
out of the network service area. However, you may still make
emergency calls according to signal strength.