1
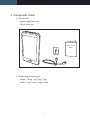
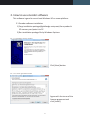
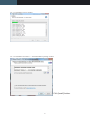
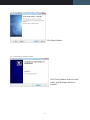
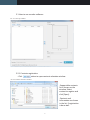
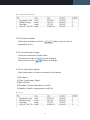
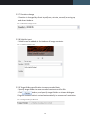
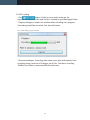
Digital Signage Badge
User’s Manual
This document is including introduction and directions of "Digital badge encoder"
software for creating needed contents and lists to use for "Digital badge".
Contents
Component check
3
Component
Supporting contents type
How to use encoder software
4
Encoder software installation
How to use encoder software
How to use badge
Function
Power on
Power off
Menu
Playing contents
Contents Pause/Skip
12
1. Component check
1.1 Component
- Digital badge body 1ea
- Quick Guide 1ea
Quick Installation
Guide
1.2 Supporting contents type
- Image : *.bmp, *.gif, *.jpg, *.png
- Video : *.avi, *.mkv, *.mpg, *.mp4
3
2. How to use encoder software
This software is good to use at least Windows XP or newer platform.
2.1 Encoder software installation
1) Copy installation package(digitalbadge-setup.exe) from product's
SD memory and paste it to PC.
2) Run installation package file by Windows Explorer.
Pic 1.1. Installation start-up window
Click [Next] button.
Pic 1.2. License agreement window
Agree with the terms of the
license agreement and
click [Install].
4
Pic 1.3. Installation process window
Pic 1.4. Installation of Visual C++ 2010 redistribution package window
Click [Install] button.
5
Pic 1.5 Installation of combined Codec package window
Click [Next] button.
Pic 1.6 Installation complete window
Click [Finish] button to finish installation, and Windows will be rebooted.
6
2.1 How to use encoder software
Pic 2.1. Start-up window
2.2.1 Contents registration
- Click
button to open contents selection window.
Pic 2.2 Contents selection window
- Supportable contents
list is shown on the
window. Select
content to register and
click [Open].
- Contents and
information are shown
in the list, if registration
is done well.
7
Pic 2.3 Registered contents list
2.2.2 Contents deletion
- Select item to delete, and click
removed from list.
2.2.3 Contents order change
- Contents is executed in order listed.
- The contents order on the list can be changed.
Select item and click
buttons to change.
2.2.4 List information display
- Basic information is shown on contents list as below.
button, then the item is
1) File: Name
2) Type: Type(Image, Video)
3) Size: File size
4) Duration: Contents duration on the list
5) Subtitle: Subtitle is registered or not(O, X)
Pic 2.4 List
8
2.2.5 Preview mode
- Registered contents can be previewed before encoding.
1) Image : Select item on the list for preview.
2) Video : Select item on the list for preview and control with
buttons.
Pic 2.5 Preview screen
2.2.6 Screen ratio change
- Contents can be encoded as two kinds of screen modes as below.
Original contents ratio is resized automatically in measure of resolution.
1) Portrait mode
2) Landscape mode
- Check or uncheck
check box to change screen ratio.
9
2.2.7 Duration change
- Duration is changed by direct input(hour, minute, second) or using up
and down buttons.
Pic 2.6 Duration change screen
2.2.8 Subtitle input
- Subtitle can be added at the bottom of image contents.
Pic 2.7 Subtitle added screen
2.2.9 Target folder specification to save encoded data
- Specify target folder to save encoded contents and list file.
- Click
button, and specify target folder on shown dialogue.
Original contents ratio is resized automatically in measure of resolution.
Pic 2.8 Target folder specification
10
2.2.10 Encoding
- Click
button. Codec is converted in order on the
registered list. Encoded file and list file is created in specified target folder.
- Progress dialogue is shown on window when encoding is on progress.
If encoding should be canceled, click [cancel] button.
Pic 2.9 Encloding progress window
- Recommendations : Encoding video takes more time and capacity than
encoding image, because of its bigger size of file. Therefore, encoding
10MB or less video is recommended for better use.
11
3. How to use badge
Introduction for each buttons and their actions of badge.
3.1 Function
1) Power : Power On/Off.
2) Function : Changing contents, setting up menu.
3) Micro SD slot : Storage for encoded contents.
4) Mini USB cable : Connection between PC and badge for acting
removable disk.
5) LCD screen : Running image, and video contents.
3.2 Power on
- Press [Power button] and hold 2-3 seconds, when power is turned off.
3.3 Power off
- Press [Power button] and hold 2-3 seconds, when power is turned on.
3.4 Menu
- Press [Power button] shortly when power is turned on.
"Configuration menu" is appeared.
3.4.1 Configuration menu
- Press [Power button] shortly to change menu, and press [Function
button] to change settings or run the function, on configuration menu.
1) Power off : Turn the power off of product.
2) USB connection : Make PC aware badge as removable disk.
3) Screen brightness control : Control brightness of LCD.
4) Battery residual capacity : Display residual capacity of battery.
5) Exit from configuration : Exit from configuration menu.
6) Clock setting : Set up clock and dates.
12
3.5 Playing contents
- Badge saves encoded contents and lists by "Encoding software" to
SD memory of badge, reads the contents, and plays them on LCD screen
in order.
- There are two ways to receive encoded contents from PC as below.
1) By mini USB cable
a. Attach badge to PC with mini USB cable.
b. Make PC to aware badge as removable disk by USB connection menu.
c. Run Windows explorer from PC. Copy encoded contents and lists files
and paste them to removable disk.
d. Safely remove removable disk, and exit from configuration of badge.
e. Check playing of contents.
2) By micro SD
a. Turn the power off of badge
b. Remove micro SD memory from SD card slot of badge
c. Attach the memory to PC. (Check the type of PC slot before attachment
- Micro SD, SD adapter, Micro SD to USB adapter and Etc.)
d. Copy and paste encoded contents and list files to removable disk,
when memory is recognized as "Removable disk".
e. Safely remove removable disk from PC and remove memory.
f. Attach memory to badge.
g. Turn the badge on and check playing of contents.
3.6 Contents Pause/Skip
-[Function button] makes pause or skip contents while playing.
1) Press [Function button] one time : Pause contents.
2) Press [Function button] two times : Skip current contents and
play next contents.
13
http://www.31cts.com
SAMIL Create Technical Service CO., LTD
Rm806, Woolim Lion's Valley 3cha,
5445 Sangdaewon-dong, Jungwon-gu,
Seongnam-Si, Gyeonggi-do, Korea
E-mail : [email protected]