1
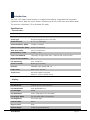
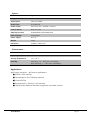
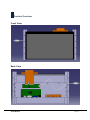
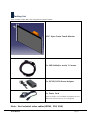
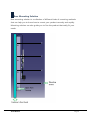
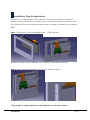
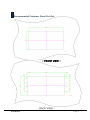
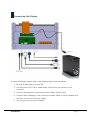
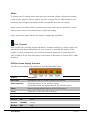
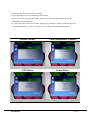
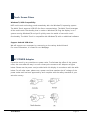
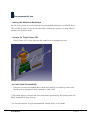
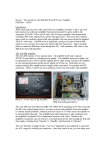
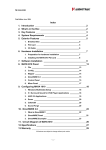
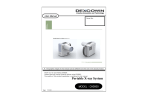
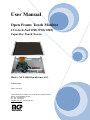
User Manual
Open Frame Touch Monitor
15.6 inch Full HD(1920x1080)
Capacitive Touch Screen
Model : XLT-1560-OpenFrame-AU1
Preliminary
Version JAN 2014
A-909, Woolim Lion’s Valley, 371-28, Gasandong, Geumchoen-Gu
SEOUL, South KOREA 153-803
Tel : +82 -2-839-0182~3
Fax: +82 -2-839-0184
[email protected] , www.mcpia.com
Before Installation
It is very important to mount the equipment in a suitable surface.
Make sure the place has a good ventilation, is out of direct sunlight, away from sources
of excessive dust, dirt, heat, water, moisture and vibration.
Unpacking
The equipment comes with the standard parts shown in package content. Check and
make sure they are included and in good condition. If anything is missing, or damaged,
contact the supplier immediately.
Caution
■ To avoid the risk of electric shock, make sure your hands are dry before unplugging
your monitor from or plugging your monitor into an electrical outlet.
■ When you clean your monitor, do not press down on the Touch Screen and LCD.
Pressing down on the screen can scratch or damage your display. Pressure damage is
not covered under warranty.
■ Do not use alcohol (methyl, ethyl or isopropyl) or any strong dissolvent. Do not use
thinner or benzene, abrasive cleaners or compressed air.
■ To clean the touch screen, use window or glass cleaner. Put the cleaner on the rag
and wipe the touch screen.
Technical Support and Assistance
-
Visit the MCP website at http://www.mcpia.com where you can find
the latest information about the product.
Document Feedback
-
To assist us in making improvements to this manual, we would welcome comments
and constructive criticism. Please send all such – in writing to : [email protected]
**This User manual is subject to change without notice.
User Manual
Page 2
Introduction
The 15.6" XLT Open Frame monitor is a large format display integrated with projected
capacitive touch. With ten touch points, interacting with the screen has never been easier.
The monitor is Windows 7/8 or Android OS ready.
Specifications
- Touch Screen Item
Spec
Touch Screen Size
15.6 inch
Touch Type
Projected Capacitive with cover lens
Touch Structure
G + F + F , Film type
Touch Resolution (WxH)
1920(W) x 1080(H)
Outline Dimension (WxH)
306.83 x 216.24 mm
View Area (WxH)
345.23 x 194.54 mm
Transmittance / Haze
≥ 88% / < 3%
Cover Lens Material
Chemically Strengthened Glass , attached the protective film
Cover Surface Hardness
7H
Life Expectancy
Over 350 Million
Touch Controller
Board type controller
Interface
USB(HID) High-Speed USB 2.0
Finger Point
Multi-Touch 10 point
Touch Driver
Windows7/8(HID compliant)
Android - support kernel source
- Display Item
Spec
LCD Panel Size
15.6inch (15.55”) FULL HD 16:9
LCD Panel Brand
AUO (B156HW01 V.0)
LCD Backlight
WLED
LCD Resolution
1920 x 1080 max, FULL HD 1080p
LCD Display Mode
TN, Normally White, Transmissive
LCD Brightness
300 cd/m2 (Typ.)
Contrast Ratio
500:1
Support Color
262K
Viewing Angle
70°(R)/70°(L)/60°(H)/60°(V)
User Manual
Page 3
- System Item
Spec
Display Controller
Rear mounted
Video Inputs
VGA, DVI, HDMI
Audio Input
PC AUDIO IN
Audio Output
Ear-Phone Jack / Speaker connector
Control Button
Rear mounted
OSD Key Function
POWER,MENU,UP,DOWN,ENTER
OSD Language
8 Languages
Power supply
DC 12V
Weight
1.2kg
Dimension
396(W) x 238(H) mm
- Environment Item
Spec
Operating Temperature
0 ~ 50° C
Storage Temperature
-20 ~ 60° C
Humidity
Operating : 10 ~ 80% (non-condensing)
Non-operating : 5 ~ 90% (non-condensing)
Applications
Application scenarios - self-service applications:
■ KIOSK / POS machine
■ Transportation and Ticketing machine
■ Financial ATM
■ Entertainment / Gaming / Slot machine
■ HMI (Human-Machine Interface) equipment controller monitor
User Manual
Page 4
Product Overview
Front View
Back View
User Manual
Page 5
Display Controller Description
Label
Description
1
DC power Input
2
HDMI
3
DVI
4
VGA Input
5
Audio Input
6
Headphone Jack
7
Speaker connector , 2×1W(8Ω)
Input
Input
Touch Controller Description
Label
Description
1
Touch Screen FPC Connector 40pin
2
Touch Screen FPC Connector 60pin
3
USB Interface Connector
User Manual
Page 6
Packing List
Your monitor ships with the components shown below.
15.6” Open Frame Touch Monitor
1 x USB Cable(for touch) 1.5 meter
1 x DC12V/3.33A Power Adapter
1 x Power Cord
(Type of power cord included will depend on the
where the LCD monitor is to be shipped)
Note : Not included video cables(HDMI , DVI, VGA)
User Manual
Page 7
Rear Mounting Solution
Rear mounting solution is a collection of different kinds of mounting methods
that can help you to know how to mount your product correctly and rapidly.
Mounting solution can also guide you to fine the product that really fit your
needs.
User Manual
Page 8
Installation Step & Application
This monitor can be mounted to the wall with 8 screws and two pairs of brackets.
Mounting method that mounts products from the rear and secured by bracket on left
and right sides. They are widely used when there is a safety consideration, for example,
ATMs.
Step1. Put Monitor on the fixture(Wall, panel……) from the rear.
Customer's fixture Cut-out dimension and mounting hole base on drawing
Step 2. Fasten with M4 screw from the front of customer’s fixture.
**The length of screws depends on the thickness of customer’s fixture
User Manual
Page 9
Recommended Customer Panel Cut-Out
- FRONT VIEW -
User Manual
Page 10
Connecting the Display
To setup this display, please refer to the following figure and procedures.
1. Be sure all equipment is turned off.
2. Connect either VGA, DVI or HDMI Video Source from the monitor to the
computer.
3. Connect the computer to the monitor with USB(for Touch) cable.
4. Connect the AC Adapter to the monitor and Power Cable to the AC Adapter first
and then connect to the power supply.
5. Turn on your monitor and computer
User Manual
Page 11
Note :
To ensure the LCD display works well with your computer, please configure the display
mode of your graphics card to make it less than or equal 1920 x 1080 resolution and
make sure the timing of the display mode is compatible with the LCD display.
Attach power and video cables as needed and insure cables are not pinched or pulled
tight by other devices mounted above or below the display.
Insure that the air space behind the display is adequately ventilated.
User Control
Your monitor will not likely require adjustment. However, variations in video output and
application may require adjustments to your monitor to optimize the quality of the
display. For best performance, your monitor should be operating in native resolution,
1920 x 1080 at 60 Hz. Use the Display control panel in Windows to choose 1920 x 1080
resolution
OSD(On-Screen Dsplay) Functions
The OSD of the monitor was selected to illustrate examples below:
Buttons
Description
Menu/Exit
Display/exits the On Screen Display (OSD) menus.
Value Up/Down
Move the selector to the previous option
Increase/Decrease the gauge value of the selected option
Select
Selects the adjustment items from the OSD menus.
Power
Power ON or OFF (with LED indicator)
LED Function
Monitor
ON
Green
Monitor
STANDBY
Orange
Monitor
OFF
Red
User Manual
Page 12
To Display and Select the OSD Functions:
1. Press the Menu key to activate the OSD menu.
2. Use or to move through the menu. Press the Select key, the parameter will be
highlighted when selected.
3. To quit the OSD screen at any time during the operation, press the Menu key. If no
keys are pressed for a short time period, the OSD automatically disappears.
User Manual
Picture Control
Color Adjustment Control
OSD Menu
Setup Menu
Page 13
Touch Screen Driver
Windows7,8 USB Compatibility
MCP multi-touch technology works seamlessly with the Windows7,8 operating system.
The Multi-Touch supports USB HID for direct communication. The Multi-Touch leverages
all the multi-touch functionality that is native to Windows7,8. Plug the display in to a
system running Windows7,8 and you’ll quickly enter the world of true multi-touch
functionality. The Multi-Touch is compatible with Windows7,8 with no additional software.
Support Android USB driver
We will support our customers by connecting to the variety Android board.
For more information, it is listed on our Webpage.
AC POWER Adaptor
Capacitive touch is very sensitive to system noise. To eliminate the effect of the system
noise, the most effective way is to use a three pole connectors AC Adaptor as figure
below. Please use the power cord provided with this display in accordance with the table
below. For all other cases, please use a power cord that matches the AC voltage of the
power outlet and has been approved by and complies with the safety standard of your
articular country.
User Manual
Page 14
Troubleshooting
• The monitor does not respond after you turn on the system.
-
Make sure that the monitor is turned on.
Turn off the power and check the monitor’s power cord, AC adapter, and signal
cable for proper connection.
• Appear the “No Input the Signal”
-
Check the connecting of the video cable between the monitor and the computer.
• The characters on the screen are too dim or too bright
-
Choose fit color temperature, use “AUTO COLOUR ADJUST or manually adjust”
RGB ADJUSTMENT, refer to the Control section.
• If the front LED is blinking amber, check the status of the OFF MODE.
• Power Button does not respond
- Unplug the power cord of the monitor from the AC outlet to turn off and reset
the monitor. Check the Vacation Switch on the rear side of the monitor
• Check the signal cable connector for bent or pushed-in pins.
User Manual
Page 15
Recommended use
• Setting the Maximum Resolution
Set the timing mode on your computer. Recommended resolution and refresh rate is
1920 x 1080 @ 60Hz. If you do not see 1920 x 1080 as an option, you may need to
update your graphics driver.
• Caution for Touch Screen FPC
-
Touch Screen FPC is very sensitive. Be careful not to damage this part.
• DO NOT OPEN THE MONITOR.
-
There are no user serviceable parts inside and opening or removing covers may
expose you to dangerous shock hazards or other risks.
• The power supply cord you use must have been approved by and comply with the
safety standards of your country.
• Do not use monitor in high temperatured, humid, dusty, or oily areas.
User Manual
Page 16