1
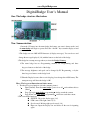
www.DigitalBadge.com
DigitalBadge User’s Manual
One: The badge structure illustration:
Two: Summarization:
1. Insert the 3V battery into the name badge (the battery seat crust is battery anode) and
the name badge will begin to operate. Press the “ On/Off ”key to turn the display on and
to turn it off.
2.The badge can store 2056 ASCII characters (6 display messages). You can choose and
change the message displayed (1-6) with the buttons on the back of the badge.
3.The badge has a startup message when you insert the Badge’s Battery.
4.The name badge has two Programming methods: PC Programming and three
key-press buttons on the back of the badge.
5.The message brightness and speed can be changed by PC Programming, or by the
three key-press buttons on the badge back.
5.When the Display becomes dim or can’t display, please change the cr2032 battery. The
startup message will show the badge is OK.
Three: The key-press illustration and choice menu:
1. The three key-press function: (refer the structure picture):
1
Enter (On/Off): Turns the name badge’s power on or off and confirms choices
(Enter)
2
Page Up: begin name badge programming And up search the content.
3
Page Down: exit name badge programming and down search the content.
2.The controllable functions:
SWITCH: Choose the display page (1-6)
LUM control: The light control (1-9)
Speed control: Moving-right speed control (1-9)
Input text: Input the display text and delete all the text for inputting
again.
1
www.DigitalBadge.com
3.Choose the Message to Program:
1) While the badge is scrolling press the page_up key. A number will appear. The
number displayed is the current message number. Choose the message (1-6) that needs
to be modified by using the Page up or Page down buttons. Press the “Enter” key to
move to the next Programming Step.
2 is the message selected, press ENTER to begin programming message 2.
If you only want to change the message displayed, press ENTER from Any number.
2) Choose the Function to Modify:
Choose one of these Functions by using the Page up and Page down keys. (SWITCH) changes
message displayed, (INPUT) input text, (SPEED) control the scrolling speed, (LUM) control
brightness.
SWITCH MENU
SPEED MENU
INPUT
MENU
LUM MENU
3) With the Display showing the Function that you wish to change Press the “Enter”
key to move to the next Programming Step. Four: Using the Functions:
1
Selecting the Message to Display:
Hit page up. The current message number will be displayed (1-6)
Hit enter.
When “Switch” Function is displayed, hit enter again
The badge will still display the current message number. (1-6).
Page up or Page down until the message number that you want to display is
2
www.DigitalBadge.com
shown. Press ”Enter”. The new message number will display twice. (in the
middle of the badge and on the right side of the badge.)
Exit/Run: Press01 Page down for three seconds to exit programming and the new
message will begin to scroll. If you wait for 10 seconds, the badge will exit and
run automatically.
For example: Display Message 2:
On the SWITCH menu: Press ENTER.
Page Up or Page Down to Message 2.
Press ENTER to Select Message 2 Press Page Down for 3 seconds to run the Message
LUM Control (Message Brightness)
Choose the “LUM” Function using the instructions on page 3.
The badge will display current LUM value (1-9). Adjust the value between 1 and
9 by using the Page up or Page down buttons, with 9 being the brightest.
Press Enter to choose the new setting. (The value will display in the center and
the right of the display.)
For example: adjust LUM to 6:
First change to LUM menu:
LUM menu
Page Up or Page down to 6
Press ENTER to display the LUM value.
Press ENTER to choose 6
3
www.DigitalBadge.com
Exit/Run: Press Page down for three seconds to exit programming and the new
message will begin to scroll. If you wait for 10 seconds, the badge will exit and
run automatically.
2
Press Page Down for 3 seconds above to run.
SPEED Control
Choose the “Speed” Function using the instructions on page 3.
The badge will still show the current Speed value (1-9). Adjust the value between
1 and 9 by using the Page up or Page down buttons, with 9 being the fastest.
Press Enter to choose the new setting. (The value will display in the center and
the right of the display.)
Exit/Run: Press Page down for three seconds to exit programming and the new
message will begin to scroll. If you wait for 10 seconds, the badge will exit and
run automatically.
For example: set up the speed 2:
Enter SPEED Function
Press Page Down to value 3
Press ENTER to select 2
Press ENTER to display the current speed.
Press again Page Down to value 2
Press Page Down for 3 seconds to Run.
4
www.DigitalBadge.com
4
Text Input
Choose the “Input” Function using the instructions on page 3.
These instructions are quite lengthy and will be covered in Section Five.
Five: Text Input (INPUT)
1) Character input: The character for input is displayed on the right side of the badge. Page up
or Page down to the character you want to input. When the correct character is displayed press
“Enter” to input the character.
2) Repeat this step to input each character of your message.
3) To enter a Blank Space: After inputting a character Press “Enter” again without changing
the character displayed. Each time you press “Enter” without changing the letter displayed
another blank space will be added.
4) To enter the same letter twice (as in the word spell): Page up or down and then return to the
letter that needs to be repeated. Press “Enter”.
5) Delete a character: When you input the wrong character, press and hold “Enter” for three
seconds. The display will jump to the left deleting the last character inputted. Release “Enter”.
Continue inputting your message. To delete more characters than one character Press “Enter”
for 3 seconds and Release as many times as necessary.
6) The ending symbol: When you finish inputting your message the badge will automatically
input the ending symbol.
7) Exit/Run: Press Page Down for three seconds to exit programming and the new message
will begin to scroll. If you wait for 10 seconds, the badge will exit and run automatically.
8) Attention: If you end up in the wrong function of Programming, please don’t press the
“Enter” key. Exit Programming by pressing the Page Down key for 3 seconds or just wait 10
seconds to exit automatically. Then try again.
9) Warning: If you pause for 10 seconds while programming the badge will automatically exit
programming and run the message.
For example: input AB A (four characters - between AB and A have a blank space)
ENTER the INPUT Function:
The default Character is A
Press Page Up to B
Press ENTER to input A
Press ENTER to input B
5
www.DigitalBadge.com
Press ENTER again to input a BLANK Space
Press ENTER to input A
Page Down to A
Press Page Down for 3 seconds to exit and scroll AB A
Six: Input the text by PC remote
1
The Programming Screen is shown above.
2
Clear History: Will clear the history box of old down loaded messages.
3
Message to Send Box: (1-6) choose the message to be downloaded. Each message
must be downloaded separately. 6 messages requires 6 downloads.
6
www.DigitalBadge.com
4
Auto Find: Choose it to automatically detect the serial port. If not checked you may
select the serial port manually.
5
MESSAGE Boxes (1—6): Type your messages in the boxes.
(Attention: you can download 1 or 2 messages of up to 512 characters each, or up
to 6 messages of up to 256 character each).
6
BRIGHTNESS: Adjust brightness - right is dimmest, left is brightest.
7
SPEED: For the speed adjustment - left is slow, right is fast.
8
DOWNLOAD: Sending button: downloads the current setup and text.
9
DOWNLOAD PROCESS: Download process display window.
Attention: The badge is programmed by Infrared. The Infrared Transmitter should be lined up
with the Infrared Receiver. Keep distance 1 to 2 inches.
IR
IR
Note: Light will interfere with the programming download. Please dim the lights and
shield the badge while downloading. If the message download was unsuccessful, please
download again.
7