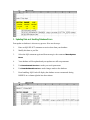
1
SQL Link for MS Excel 1.50
User Manual
Developed and Written by: M. Armaghan Saqib
© 1998-1999 by M. Armaghan Saqib & Associates
Email:
[email protected]
Web site:
http://www.geocities.com/WallStreet/Floor/8484/
http://armaghan.webjump.com
Table of Contents
1. INTRODUCTION......................................................................................................... 5
2. INSTALLATION AND GETTING STARTED......................................................... 6
1.
2.
3.
4.
5.
6.
WHAT IS INCLUDED IN THE SQL LINK PACKAGE ....................................................... 6
INSTALLATION REQUIREMENTS .................................................................................. 6
INSTALLING SQL LINK AS AN ADD-IN IN MICROSOFT EXCEL .................................... 7
OPENING SQL LINK ONLY WHEN REQUIRED ............................................................ 7
CREATING NEW EXCEL WORKBOOKS FOR USE WITH SQL LINK ............................... 7
USING EXISTING EXCEL WORKBOOKS FOR USE WITH SQL LINK .............................. 8
3. FEATURES.................................................................................................................... 9
1. ORACLE DATABASE FEATURES .................................................................................. 9
2. ODBC DATABASE CONNECTIVITY FEATURES ........................................................... 9
3. OTHERS FEATURES ..................................................................................................... 9
4. USING SELECT QUERIES ...................................................................................... 10
1.
2.
3.
4.
5.
CONNECTING TO DATABASE .................................................................................... 10
EXECUTING SQL FROM WORKSHEET CELLS ............................................................. 10
DEFINING USER PARAMETERS USING SQL PLUS SYNTAX........................................ 10
USING AUTOMATIC GROUPS AND FILTERS ON QUERIES ........................................... 11
USING DICTIONARY MENU................................................................................... 12
5. INSERTS AND UPDATES ........................................................................................ 13
1.
2.
3.
4.
5.
PREPARING FOR INSERT ......................................................................................... 13
INSERTING ROWS AND HANDLING DATABASE ERRORS ............................................ 13
UPDATING DATA AND HANDLING DATABASE ERRORS ........................................... 14
USING PRIMARY KEYS/ROWIDS FOR UPDATE ..................................................... 15
COMMIT AND ROLLBACK OF INSERTS AND UPDATES ................................... 15
6. EXECUTING PL/SQL............................................................................................. 16
1. EXECUTING INSERT, UPDATE, DELETE, CREATE ETC. ................................... 16
2. EXECUTING PL/SQL ................................................................................................ 16
3. COMMIT AND ROLLBACK .................................................................................. 16
7. QUERY BY EXAMPLE (QBE)................................................................................. 17
1.
2.
3.
4.
5.
6.
CREATING QBE GRID .............................................................................................. 17
SELECTING QUERY COLUMNS AND SPECIFYING CRITERIA ....................................... 18
USING COLUMN EXPRESSIONS ................................................................................. 18
USE GROUP BY AND HAVING ROWS ................................................................... 18
CUSTOMIZING QBE GRID ........................................................................................ 18
SPECIFYING QBE OPTIONS ...................................................................................... 18
8. SQL LINK OTHER FEATURES.............................................................................. 19
1. GENERATING SIMPLE SQL STATEMENTS ................................................................. 19
2. USING KEY BUILDERS .............................................................................................. 19
3. USING REPORT BUILDERS ........................................................................................ 19
9. BUILDING SOLUTIONS WITH MACROS ........................................................... 20
1. AUTO_CONNECT AND AUTO_EXECUTE WHEN YOU OPEN A WORKSHEET ...... 20
2. CALLING SQL LINK PROCEDURES/MACROS DIRECTLY ........................................... 20
3. USING SENDKEYS ACTION TO EXECUTE SQL LINK COMMANDS ............................... 20
A. ODBC INTERFACE.................................................................................................. 23
1.
2.
3.
4.
5.
6.
EXECUTING SELECT QUERIES ................................................................................ 23
SPECIFYING USER PARAMETERS .............................................................................. 24
SPECIFYING OTHER QUERY OPTIONS ....................................................................... 24
MODIFYING QUERIES USING MS QUERY BUILDER ................................................... 25
CHANGING SQL CREATED BY QUERY BUILDER ....................................................... 25
LIMITATIONS OF ODBC INTERFACE IN SQL LINK 2.0 ............................................. 25
B. SQL LINK MENU AND MACROS REFERENCE................................................ 26
7. EXECUTE .................................................................................................................. 26
8. CONNECT ................................................................................................................. 27
9. DICTIONARY............................................................................................................. 27
10. QUERY BY EXAMPLE............................................................................................. 28
11. DATA .................................................................................................................... 28
12. GENERATE ............................................................................................................ 30
13. KEY BUILDERS...................................................................................................... 30
14. REPORT BUILDERS ................................................................................................ 31
15. ORACLE LINK ....................................................................................................... 31
16. ODBC .................................................................................................................. 32
17. ABOUT .................................................................................................................. 32
C. TROUBLE SHOOTING AND TECHNICAL SUPPORT ..................................... 33
D. LICENSE AND DISCLAIMER................................................................................ 34
1. Introduction
SQL Link for MS Excel is a tool, which allows you to combine the flexibility of
Microsoft Excel with power of databases.
It provides native access to Oracle database using Oracle Objects for OLE for high-speed
data access.
You can compare it with Oracle SQL Plus. SQL Plus is a very powerful tool, which
allows you to extract data from Oracle database tables. You can also INSERT, UPDATE
and DELETE with SQL Plus.
SQL Link for MS Excel does the same but within the environment of MS Excel. This
capability gives you the tremendous power of MS Excel to apply on Oracle data.
Current version of SQL Link also gives you the power to access any ODBC database
using its ODBC connectivity.
SQL Link for MS Excel provides an excellent environment for ad hoc reporting. With its
batch execution facility combined with SQL Plus like “&” variables, auto-connect and
auto-execute on startup allows you to create presentation quality reports complete with
user-supplied parameters for reports.
2. Installation and Getting Started
Install Oracle Object for OLE (supplied by Oracle Corporation with almost all
distributions of Oracle Database).
Copy the worksheet in whatever directly you want to use.
Open the worksheet and enter your user name, password and database name on Options
worksheet.
Start learning its functionality using sample SQL statements provided. For this you must
be connected as user ‘scott’.
When you are familiar with the tool, delete the samples and start using your own SQL
statements.
WARNING: In the current version of SQL Link, you cannot UNDO any changes made
by SQL Link commands. So be a little more careful when using SQL Link commands on
critical data. And remember to keep backups always.
1. What is included in the SQL Link Package
SQL Link is available as a self-extracting executable file sqllink.exe on the web site.
Following is the description of the files included in the self-extractor.
Sqllink150.exe contains following three files:
1. sqllink.xla
SQL Link addin for MS Excel
2. samples.xls
Demonstrations of SQL Link features. Can be used as a
starting point to make your own worksheets.
3. manual.pdf
SQL Link user manual with smaller page size optimized for
on-screen viewing
2. Installation Requirements
SQL Link requires MS Excel 97 or higher. In addition it requires the following
components to operate as required:
Oracle Objects for OLE (oo4o):
This is required for native connectivity to Oracle.
OO4O comes on almost all installation CDs of
Oracle database. This is not required if you will
only use ODBC functionality. You can download
OO4O trial version from Oracle web site. Here are
the links:
http://www.oracle.com/products/trial/
ftp://ftp.oracle.com/pub/www/oo4o/
Data Access Objects (DAO):
If you want to use ODBC functionality, you must
install MS Excel with DAO 3.5 or higher
Microsoft Query (Optional):
This optional component of Microsoft Excel allows
you to edit ODBC queries in a user-friendly
graphical environment.
3. Installing SQL Link as an Add-in in Microsoft Excel
To install SQL Link as an Add-in to MS Excel, follow this step-by-step procedure:
1.
Copy sqllink.xla in any folder (e.g. c:\sqllink\) on your hard drive.
2.
Select Tools:Add-Ins from Excel menu.
A list of installed add-ins will be displayed along with Ok Canal Browse
buttons. There will be a check mark to the left of each active add-in.
3.
Click Browse and a file open dialog will appear.
4.
Select sqllink.xla using this dialog.
It will be installed in the MS Excel as an Add-in and will open automatically
whenever you will open the worksheet.
4. Opening SQL Link Only When Required
It might be required by some of the users that SQL Link does not automatically opens
whenever they start MS Excel.
This can be achived by putting a default auto_open macro in your worksheet. Use
SQL:SQL Link:Auto_Open Macro to insert such a macro.
Now whenever you open worksheet containing this macro, sqllink.xla will automatically
open. Samples.xls can be good starting point for this purpose.
(Note: Any reference to sqllink.xla in a work sheet will open sqllink.xla automatically)
5. Creating New Excel Workbooks for Use with SQL Link
SQL Link operation requires that two sheets (Options and SQL_Batch) be present in the
working workbook with specific information.
After you create blank workbooks using File – New command, you should also create
these two sheets in that workbook.
You can create both these sheets through SQL Link by “SQL : SQL Link : Insert
Options Sheets” command.
6. Using Existing Excel Workbooks for Use with SQL Link
Similarly you need these two sheets (Options and SQL_Batch) in all existing
worksheets which you intend to use with SQL Link.
Use the same procedure as described above to achieve this.
3. Features
1. Oracle Database Features
Execute SQL and PL/SQL from cells
Execute SQL from cell comments (mimics XL formulas)
Execute more than one SQL statements at once from a batch SQL sheet
Automatically create Groups and subtotals after SQL execution
Auto-connect to database on opening of worksheet
Auto-execute SQL statements on opening of worksheet
Extract data from any number of users on any number of databases all in one go.
Easily browse database tables structure and data with menu commands.
User SQL Plus like “&” variables to create parameters for all your SQL statements.
2. ODBC Database Connectivity Features
Execute SQL from any worksheet cell.
Specify user parameters using ? in the SQL.
Specify result set properties (range name, parameter names and values etc) directly by
right clicking on the result set.
Refresh on open can be specified to automatically refresh the data when worksheet opens.
ODBC connectivity is a new feature in SQL Link. It uses Microsoft DAO technology.
Currently you cannot do INSERTs or UPDATEs to ODBC databases but future versions
of SQL Link will allow you to do so.
3. Others Features
Insert a SUM function for currently selected cells.
Insert a VLOOKUP function for a data range using Range Names
Insert a VLOOKUP function for a data range using Selected Range
4. Using SELECT Queries
1. Connecting to Database
You can connect to database using Connect:Connect User command and specifying
user name, password and database alias.
You can also store user information in “Options” sheet and connect to database using
command.
Connect:Connect Default User
You can also connect automatically to database whenever you open your worksheet. To
do this you must do the following:
1. Specify user and database information in “Options” sheet.
2. Set Auto Connect? to TRUE in “Options” sheet.
3. Finally create a default auto_open macro in your sheet using SQL Link : Auto_Open
Macro command.
2. Executing SQL from worksheet cells
You can execute an SQL statement from any worksheet range. Simply enter your SQL in
as many worksheet rows as you like.
To execute this sql, position your cursor in any cell and select SQL:Execute:SQL in
Cell.
3. Defining User Parameters using SQL Plus Syntax
You can specify parameters SQL Plus like & variables. The following example stores
highest and lowest salary in two worksheet cells E2 and E3. These cells are then
referenced in SQL using &E2 and &E3.
If you are specifying parameters for varchar2 columns, you must enclose parameters in
single quotes e.g. ‘&E2’.
4. Using Automatic Groups and Filters on Queries
You can group your query results and calculate subtotals for each group. First column of
your query results is used to group the results and last column is used to calculate
subtotals.
To calculate groups and subtotals set “Calculate Subtotals?” to TRUE in “Options”
sheet.
Similarly you can further filter your data retrieved from Oracle using XL filters. If you
set “Auto Filter?” to TRUE then SQL Link will insert the filter buttons in your query
results.
Note: Due to current Microsoft XL limitations, you can use filter buttons with only one
data range on a single worksheet.
5. Using DICTIONARY menu
Using Dictionary menu you can easily navigate through the tables, structures and data in
your database. These simple commands do now require you to type any SQL to browse
your database.
Please see the demo1.scm for the demonstration of this feature.
5. INSERTs and UPDATEs
1. Preparing for INSERT
You can insert data into your Oracle database directly from your worksheets. Here is the
procedure.
1. Enter an SQL statement on your worksheet.
2. From SQL Link menu select Data:Create Insert Rows Area
SQL Link will bring up the table structure along with column types and sizes. This
information helps you to enter data for INSERTing in the database.
3. You can now enter data on your worksheet.
2. Inserting Rows and Handling Database Errors
1. To insert into database, select the SQL statement and give the command Data:Insert
Rows. Rows will be inserted in the database but not committed yet.
2. To make your INSERTs permanent, give the command Data:Commit Session.
3. To undo your INSERTs, give the command Data:Rollback Session.
4. Error handling: SQL Link will display the database errors encountered during
INSERTs in a column right the last data column.
3. Updating Data and Handling Database Errors
Data update to database is also an easy process. Here are the steps:
1.
Enter an SQL SELECT statement to retrieve data from your database.
2.
Modify this data as you like.
3.
Select the SQL statement again and from menu give the command Data:Update
Rows.
4.
Your database will be updated and your updates are still not permanent.
5.
Use Data:Commit Session to make your work permanent
6.
Use Data:Rollback Session to undo changes made to the database.
7.
Error handling: SQL Link will display the database errors encountered during
INSERTs in a column right the last data column.
4. Using Primary Keys/ROWIDs for UPDATE
These features are currently not implemented. Future versions will allow you to use
Primary keys or ROWIDs to update your data.
Please visit your web site regularly to find updated version of SQL Link.
5. COMMIT and ROLLBACK of INSERTs and UPDATEs
Changes are not made permanent to database unless you commit them using
Data:Commit Session command.
You can also undo any changes made to database using Data:Rollback Session
command.
6. Executing PL/SQL
1. Executing INSERT, UPDATE, DELETE, CREATE etc.
2. Executing PL/SQL
3. COMMIT and ROLLBACK
7. Query by Example (QBE)
SQL Link provides a QBE interface to construct SELECT queries. With the help of QBE
grid, even novice users can create very complex SELECT statements.
QBE is also helpful for experts. It saves them typing a lot of column names, avoiding
syntax errors etc.
A working knowledge of SQL is recommended to make full use of QBE feature.
1. Creating QBE Grid
To use QBE, type name of the table in a worksheet cell. While selecting this cell, give the
command Query by Example : Build QBE Grid. A grid containing column names of
your tables along with other information will be created (as show in the above screen
output)
2. Selecting Query Columns and Specifying Criteria
3. Using Column Expressions
4. Use GROUP BY and HAVING rows
5. Customizing QBE Grid
You can delete any columns safely from QBE grid which you do not want in your select
statement. Similarly you can arrange columns by moving columns back and forth thus
bringing the columns in the order you want.
6. Specifying QBE Options
You can specify the following options on Options sheet to control the behavior of the
QBE functionality.
8. SQL Link Other Features
1. Generating Simple SQL Statements
2. Using Key Builders
3. Using Report Builders
9. Building Solutions with Macros
1. AUTO_CONNECT and AUTO_EXECUTE when you open a worksheet
You can connect to database automatically when you open your worksheet. Similarly you
can automatically execute SQL statements on SQL_Batch sheet when you open your
worksheet.
To activate these startup settings you need to do two things:
1.
Set Auto Connect? And Auto Execute? To TRUE in Options sheet
2.
Create a default auto_open macro in your worksheet using SQL:SQL
Link:Auto_Open Macro. SQL Link will insert the following macro in your
current worksheet.
Sub Auto_Open()
Application.Run "sqllink.xla!Auto_Connect"
Application.Run "sqllink.xla!Auto_Execute"
End Sub
2. Calling SQL Link Procedures/Macros Directly
You can also call SQL Link commands directly from your macros. Macro name for each
SQL Link command is given in Chapter B of this user manual.
To run an SQL Link macro use the following syntax:
Application.run “sqllink.xla!your_macro_name”
Here is a sample macro:
Sub macro1
Range("C3").Select
ActiveCell.FormulaR1C1 = "select * from emp"
Application.Run "sqllink.xla!Default_Connect"
Application.Run "sqllink.xla!Execute_From_Cell"
Range("F7:F21").Select
Selection.Font.Italic = True
Range("F12").Select
End Sub
This macro inserts an sql select statement in a cell, connects to database, executes this sql
statement, selects the mgr column and changes its font to italics.
3. Using Sendkeys action to execute SQL Link commands
Currently SQL Link menu commands cannot be recorded as part of macro recording.
You can get around this problem by using Sendkeys method in your macros.
Here is the slightly modified above macro using Sendkeys method.
Sub macro1
Range("C3").Select
ActiveCell.FormulaR1C1 = "select * from emp"
SendKeys "%SCC" ' Connect default user
SendKeys "%SES" ' Execute SQL in Cell
End Sub
Using Sendkeys is not the preferred way since future versions of SQL Link might
change the shortcut keys for menu commands. Use direct calls to SQL Link macros
whenever possible.
Here is some more description and help for Sendkeys. (This is taken from VBA for
XLA help file.)
To specify characters that aren't displayed when you press the corresponding key (for
example, ENTER or TAB), use the codes listed in the following table. Each code in the table
represents one key on the keyboard.
Key
Code
BACKSPACE
{BACKSPACE} or {BS}
BREAK
{BREAK}
CAPS LOCK
{CAPSLOCK}
CLEAR
{CLEAR}
DELETE or DEL
{DELETE} or {DEL}
DOWN ARROW
{DOWN}
END
{END}
ENTER (numeric keypad)
{ENTER}
ENTER
~ (tilde)
ESC
{ESCAPE} or {ESC}
HELP
{HELP}
HOME
{HOME}
INS
{INSERT}
LEFT ARROW
{LEFT}
NUM LOCK
{NUMLOCK}
PAGE DOWN
{PGDN}
PAGE UP
{PGUP}
RETURN
{RETURN}
RIGHT ARROW
{RIGHT}
SCROLL LOCK
{SCROLLLOCK}
TAB
{TAB}
UP ARROW
{UP}
F1 through F15
{F1} through {F15}
You can also specify keys combined with SHIFT and/or CTRL and/or ALT. To specify a key
combined with another key or keys, use the following table.
To combine a key with
Precede the key code with
SHIFT
+ (plus sign)
CTRL
^ (caret)
ALT
% (percent sign)
A. ODBC Interface
1. Executing SELECT Queries
2. Specifying User Parameters
3. Specifying Other Query Options
4. Modifying Queries using MS Query Builder
5. Changing SQL created by Query Builder
6. Limitations of ODBC Interface in SQL Link 2.0
B. SQL Link Menu and Macros Reference
7. Execute
SQL in Cell
Executes SQL in the currently selected cell and paste the result two rows below. Pasted
data is also assigned an XL range name using first column in SQL statement as name.
You can use “&” variables to specify parameters in the SQL statement.
Macro Name: sqllink.xla!Execute_From_Cell
Count Rows
Counts the rows that will be returned by executing SQL in the currently selected cell and
pastes this count in two rows below.
Macro Name: sqllink.xla!Count_Rows
SQL in Comment – One
Executes SQL in the comment text of currently selected cell and pastes the result in this
column and below.
Macro Name: sqllink.xla!Exe_Comment_One
SQL in Comment – Selection
Same as above but executes SQL from comment text for the currently selected cells oneby-one.
Macro Name: sqllink.xla!Exe_Comment_Sel
Batch Execute One
Executes currently selected SQL statement from SQL_Batch sheet. Cursor must be
positioned in the first column of the row in SQL_Batch sheet that contains the SQL to be
executed.
Macro Name: sqllink.xla!Execute_One
Batch Execute All
Automatically switches to “sql_batch” sheets and executes SQL statements one-by-one.
After execution it returns to the original sheet. Cursor can be anywhere in any sheet.
Macro Name: sqllink.xla!Execute_All
DB/FS Script
8. Connect
Connect Default User
Connects to the database using user name, password and database name specified on
“Options” sheet.
Macro Name: sqllink.xla!Default_Connect
Connect User
Prompts the user for user name, password, database and connects to database.
Macro Name: sqllink.xla!User_Connect
9. Dictionary
List Tables
Lists the tables of current users in the currently selected cell and below.
Macro Name: sqllink.xla!List_Tables
List Columns
Lists the column names of the table whose name is under the cursor.
Macro Name: sqllink.xla!List_Columns
Table Quick View
Displays the first 10 rows of the table under selection in a new sheet.
Macro Name: sqllink.xla!Quick_View
10. Query by Example
Build QBE Grid
This command creates and formats an area of current sheet which you can use to do
Query-by-Example. To execute this command.
1.
Enter the table name in a worksheet cell.
2.
Position the cursor on this cell and give the command SQL : Query by Example
: Build QBE Grid.
Macro Name: sqllink.xla!Build_QBE
Execute QBE
This command builds the SQL from the criteria entered in QBE grid and executes this
SQL. To give this command, you must position the cursor in the first column of the QBE
grid.
Macro Name: sqllink.xla!Execute_QBE
11. Data
PL/SQL in Cell
Executes PL/SQL (anything except SELECT statement) in the currently selected cells
and pastes the number of rows affected two lines below.
Macro Name: sqllink.xla!Execute_PLSQL
Create Insert Rows Area
Using the SQL statement in current cell, it creates an area where you can enter data.
Macro Name: sqllink.xla!Insert_Data1
Insert Rows
Inserts the data that you have entered using the above-mentioned command.
To execute this command, select the cell with SQL statement (used to create insert rows
area) and give this command from OracleSQL menu.
Each INSERT or UPDATE operation starts a new session or participates in the current
session. Data is committed to database only when you give the COMMIT command on
Data menu.
You can also ROLLBACK your work by ROLLBACK command on the Data menu.
Macro Name: sqllink.xla!Insert_Data2
Update Rows
Updates the data retrieved using SQL select command.
To execute this command, select the cell with SQL statement (which was executed to
retrieve this data) and give this command from OracleSQL menu.
Each INSERT or UPDATE operation starts a new session or participates in the current
session. Data is committed to database only when you give the COMMIT command on
Data menu.
WARNING USE WITH CARE: This command currently does not use primary key or
any such mechanism to update data. It just updates the last retrieved data. This might not
be suitable in certain situations (e.g. somebody has inserted new rows in the data you
retrieved) and you may get unpredictable results.
Macro Name: sqllink.xla!Update_Data
Commit Session
Commits the currently active session to database and makes any changes permanent
made through INSERT or UPDATE etc.
Macro Name: sqllink.xla!Commit_Session
Rollback Session
Rollbacks the currently active session and discards any changes made to the database in
current session.
Macro Name: sqllink.xla!Rollback_Session
12. Generate
Select
Generates a simple SELECT statement in the current cell assuming the contents of
current cell as table name.
Macro Name: sqllink.xla!Gen_Select
Insert
Generates a simple SELECT statement in the current cell assuming the contents of
current cell as table name.
Macro Name: sqllink.xla!Gen_Insert
Update
Generates a simple SELECT statement in the current cell assuming the contents of
current cell as table name.
Macro Name: sqllink.xla!Gen_Update
Delete
Generates a simple SELECT statement in the current cell assuming the contents of
current cell as table name.
Macro Name: sqllink.xla!Gen_Delete
13. Key Builders
Numbers 2 Text
Converts the numbers in the current selection to text and optionally pads with zero to the
length which is specified in the Text Processing Section of Options sheet.
Macro Name: sqllink.xla!Num2Text
Text 2 Numbers
Converts the text in the current selection to numbers. If something cannot be translated in
a valid number, it is converted to use.
Macro Name: sqllink.xla!Text2Num
Concatenate Columns
Concatenates the columns in current selection using the concatenation separator specified
on Options sheet. It then puts the results in the first column of the selection, overriding
any existing data.
Macro Name: sqllink.xla!Concat_Cols
14. Report Builders
SUM Selection
Inserts a SUM formula for the currently selected cell ranges.
Macro Name: sqllink.xla!Sum_Selection
Named Range Lookup
Inserts a VLOOKUP formula using the criteria given by the user.
Macro Name: sqllink.xla!Lookup_Wiz2
Selected Range Lookup
Macro Name: sqllink.xla!Lookup_Wizard
Change Numbers
Macro Name: sqllink.xla!Change_Numbers
15. Oracle Link
Insert Options Sheet
Macro Name: sqllink.xla!Insert_SQLLink_Sheets
Auto_Open Macro
Macro Name: sqllink.xla!CreateAnAutoOpen
16. ODBC
Execute SQL
Macro Name: sqllink.xla!ODBC_Execute_SQL
Get SQL
Macro Name: sqllink.xla!ODBC_Get_SQL
17. About
About
Macro Name: sqllink.xla!Show_About
C. Trouble Shooting and Technical Support
D. License and Disclaimer
SQL LINK 1.50 IS A FREE SOFTWARE WITHOUT ANY
WARRANTIES AND SUPPORT.
Distribution
You can distribute and make as many copies of this software and documentation as you
wish. You can also give exact copies of the original version to anyone; and distribute the
software and documentation in its unmodified form via electronic means. There is no
charge for any of the above.
You are specifically prohibited from charging, or requesting donations, for any such
copies, however made; and from distributing the software and/or documentation with
other products (commercial or otherwise) without prior written permission.
Disclaimer of Warranty
THIS SOFTWARE AND THE ACCOMPANYING FILES ARE SOLD "AS IS" AND
WITHOUT WARRANTIES AS TO PERFORMANCE OR MERCHANTABILITY
OR ANY OTHER WARRANTIES WHETHER EXPRESSED OR IMPLIED. NO
WARRANTY OF FITNESS FOR A PARTICULAR PURPOSE IS OFFERED. ANY
LIABILITY OF THE SELLER WILL BE LIMITED EXCLUSIVELY TO PRODUCT
REPLACEMENT OR REFUND OF PURCHASE PRICE.
It is a good practice to thoroughly test SQL Link with non-critical data before
relying on it. The user must assume the entire risk of using the program.
By using SQL Link, user agrees to the above terms and conditions of disclaimer of
warranty.
If you do not agree uninstall and delete ALL sql link files from your
workstation/server/network immediately.