1
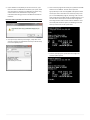
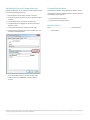
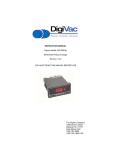
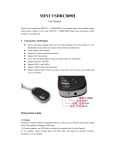
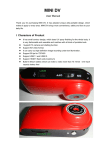
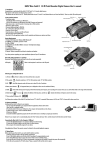
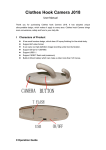
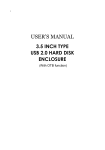
SSD Firmware Update Utility Guide Crucial® v4 2.5” SSD Firmware Update Guide for Windows 7 + Windows 8 (Update from 22 to 25) Introduction This document describes the process of updating the firmware on the Crucial v4 SSD using our Windows update utility. The utility is a single executable file that contains all the code necessary to perform the upgrade. 3. Disable/Remove Drive Passwords Password protection, such as OS drive encryption or BIOS-‐level passwords can block firmware updates. Drive encryption can be disabled in the OS or software tool you use for encryption. To disable a BIOS password, you may need to edit your computer’s BIOS settings. Please see your computer’s owner’s manual for details on editing these settings. Enter the BIOS (typically by hitting the “Delete”, “F2” or “F12” key during start-‐up screen) and disable any passwords that you may have set on the SSD. This program is to be used for updating the Firmware from Revision 22 to Revision 25. PLEASE NOTE: This firmware update is not applicable to any Micron SSD which was purchased separately or as original equipment in a computer system. Any firmware updates for such drives, if necessary, will be made available by the computer manufacturer or at www.micron.com. This update is for 2.5” v4 drives only and should not be used to update m4 drives or any others. WARNING: This firmware update is destructive to the data on the SSD and on the flash drive being created as bootable media. Your data will be lost. As with all firmware updates, it is strongly recommended that you backup or make copies of all important files before performing this update. This firmware update process is done entirely at your own risk. However, if the firmware process is interrupted for any reason, your solid state drive may not function properly. If this update is done on a notebook computer, it is strongly recommended that power be supplied by the AC power adapter. General Instructions Complete the following steps before starting the firmware update process: 1. Backup the Solid State Drive This firmware update is destructive to the data on the SSD and on the flash drive being created as bootable media. It is highly recommended that full system backup be completed before starting this firmware upgrade procedure. If the upgrade is interrupted (by a power loss or hardware failure of some sort), it is possible that the solid state drive may not function properly. 2. Use AC Power Ensure your mobile PC or desktop PC is plugged in to AC power during the update process. It is not recommended to use only battery power during the upgrade. Do not remove power at any time during the firmware update process as this could produce incomplete results and may render your solid state drive unusable. Download the Firmware Update 1. Before beginning the firmware download process, close all other programs except for your Internet browser. 2. Find the Firmware Windows Update Utility associated with your Crucial v4 SSD at: http://www.crucial.com/support/firmware.aspx 3. Click the link for the Firmware Windows Update Utility and select Save to download the ZIP file containing the firmware update utility to your system. 4. Double-‐click the ZIP file to extract the files inside. Save them to your desktop. Run the Firmware Update 1. If not already done, copy the update utility file to your desktop. 2. Double-‐click the icon to launch the update utility. 3. A User Account Control box will open: 4. If your USB drive is compatible you will see it in the list, if you have more than one USB device installed on your system, make sure the program is pointing to the USB drive you will be using and then click on the make button and you will get a confirmation box letting you know it will delete all the data on that drive. Note: The data on your flash drive will be lost. Please make sure it has been backed up. 6. Close out of the program and restart your system with the USB device still in the USB slot. You will need to press the appropriate key to enter the setup/BIOS of the system. Please consult your owner’s manual for the correct key to tap. Once you are in the BIOS/Setup program, first thing to do is set the drive configuration from AHCI to IDE, the update will not run or the drive will not be found, then find the boot configuration and change the boot order to boot from the USB drive. Press the F10 key and reboot the system, the following screen will show up on the screen as the system boots. 5. Once you click yes and the process begins, it only takes a few seconds to prepare your USB device and then you will be ready to start the update process. 7. At the C:\ prompt type in isp.bat and enter to begin the firmware update process. 8. The program will then look for all qualified drives. 11. The update process will take a few minutes and if everything is successful you will see the next screen upon completion. 9. After the scan is completed the list of available drives will show as depicted in the screen shot below. 12. At this point, you can remove the USB drive and restart the system. The update process has been completed. 13. When Windows successfully restarts, the firmware update process is complete. 10. Note: The data on your flash drive will be lost. Please make sure it has been backed up. Once this has been completed, type in “Y” to start the update. Troubleshooting Tips • Although efforts have been made to test the compatibility of this software with various system and chipset configurations, it is not possible to test every available system. Therefore, certain systems (e.g., older systems) may experience compatibility problems. • If you experience issues after the tool reboots, verify that you have disabled any drive passwords BIOS and that you are in IDE mode. • Some systems prevent firmware updates when in RAID mode. In this case, changing to AHCI or IDE mode may help to complete the update process. Any RAID configurations should be preserved after the update, when the system is put back into RAID mode, but check with your system’s user manual before proceeding. • Peripheral RAID cards will not pass the necessary commands to perform firmware updates. You may need to move the target drive onto a SATA host bus adapter or SATA connector on the motherboard that facilitates these commands. Validating the Current Firmware Revision Firmware Release Notes Windows 7 allows the user to check the current firmware revision of the drive by following these steps: Firmware for the v4 SSD is being updated from Revsion 22 to 25. • Click the Windows “Start” button, and select “Computer.” • On the disk icon which represents your drive, right-‐click and select “Properties.” • In the window that pops up, select the “Hardware” tab. The following is a summary of changes between 22 and 25, which are independent of operating system: • Improved full disk performance. • Improved mixed mode performance. • In the All Disk Drives list, highlight your m4 drive, and click the “Properties” button. Revision History • In the next window that opens, select the “Details” page. Rev. A………………………………………………………… 20 February 2013 • Under the Property pull-‐down menu, select “Hardware Ids,” and you will see the following display: • Initial release • The current firmware revision is circled in red above. If the firmware revision says “S5FAMM25,” no further action is necessary. ©2013 Micron Technology, Inc. All rights reserved. Information is subject to change without notice. Crucial, and the Crucial logo are trademarks and service marks of Micron Technology, Inc. All other trademarks and service marks are property of their respective owners. Revision 2/20/13 FW25