1
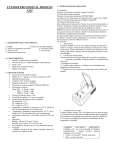
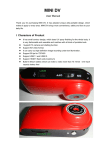
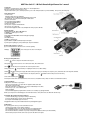
06057 Bino Catch II 1.3 M Pixels Binocular Digital Camera User’s manual
1. Introduction
Congratulations on purchasing the Bino Catch II 1.3 M Pixels 2-in 1 binocular digital camera.
That requires no film and you can take far pictures or short.
· Take photos and view them on your PC.· Transfer photos/videos to your PC to edit.· E-mail photos/videos to your friends and family. · Shoot up a video. (Not working now)
2. Bino Catch II Features:
· 2 resolutions modes:
High (HI) for SXGA resolutions up to 200 pictures,
low (Lo) VGA resolution up to 800 pictures when 64M SD memory card presented.
· Video camera mode - Up to 30 seconds of streaming video in VGA resolution.
· Self timer for both resolution.
· Fluorescent lighting settings for 50/60 Hz.
· 22 x 16mm Status LCD display with Icons.
· Fixed focus 15m to infinity.
· Erase last picture or all pictures and SD card format.
· Auto power off to conserve battery life.
· Bino Catch II CD with applications software to edit, manipulate and enhance your pictures and videos.
System Requirements
1. Windows 98/ Windows Me / Windows 2000/ Windows XP.
2. P 200 MHz ( or equivalent ) processor or faster.
3. 64 MB of SDRAM
4. Video (VGA) card with 2MB of RAM for minimum 16 bit (High Color) display.
5. CD-ROM drive.
6. An available USB port.
7. 600 MB of free hard drive space.
8. Optional: Windows compatible sound board, microphone and speaker.
if you have questions regarding your system specifications please call your PC manufacturer.
The mode setting operation is a cycle loop.
By pressins Shutter/confirm button each time to enter the next mode sequentially.
LCD display:
Below is the description for each Icon on the LCD panel.
Choosing your setting/LCD read out
1. self-timer:
self timer to delay a short time and then take a snap shot
2. Hi/Lo quality:
3. AVI:
Resolution selections as “LO” for VGA resolution mode, “HI” for SXGA resolution
Auto Video Impression mode, the frame rate is about 9 fps for all resolution
4. Battery status detection:
5. 50/60:
A 3-segments battery icon is displayed to inform users the condition of battery.
50 for 50 Hz electrical power frequency, 60 for 60 Hz electrical power frequency. Set it according to the country where you are, and the flicker effect on the image will be eliminated.
6. Delete last/all:
the icon
indicates the deletion of the last picture, and the icon
indicates the deletion of all pictures stored in the memory.
7. Picture number/PC/Memory_full:
It will show picture number at Bino Catch LCD, and show the text “PC” while PC is connected. When memory is full, the text “FULL” is shown and the alarm sound rises.
3. Software Installation
Installing the Bino Catch II software to your computer
1. Do not connect the USB cable to your computer before the application software and the driver
(Bino Catch II) is completely installed.
2. Put the Bino Catch II CD into your CD-Rom drive. Your computer will automatically run the software.
3. Follow the steps on your screen to install the software.
4. Restart your Windows.
5. Successful installation application program and will create relative icons on a desktop or program pop manual bar.
Remark: if your computer can’t run automatically, please click “Start” button and choose “Run”, and then browse the CD-Rom drive and click “Setup”.
Connecting the Bino Catch II to the Computer’s USB port
1. Connect the USB cable (B type) to your computer’s USB port as below drawing.
2. Connect the USB cable (A type) to your Bino Catch II as below drawing.
3.Your computer will automatically recognize the new device.
Using Application Software The operation manual ia attached in the provided application program.
4. Taking Photos
Before operating your Bino Catch II, you need to load the batteries as below:
1. Pull down with your thumb on the top of battery compartment.
2. Insert 2 AAA alkaline batteries into the Bino Catch II according to the engraving battery marks.
3. Press Power/Mode button about 3 second, the camera will be turned on ( Default setting ).
4. Insert the SD card to SD card slot, if SD card is not presented, a warning tone will sounded 10 seconds then power off automatically.
5. If the SD card is protected, the PrT will be shown. Please un-protect the SD card then start to capture.
Attention: Bino Catch II will be auto power off with a key tone after certain time if not in use and Bino Catch II will be power on by pressing power/mode button with a key tone.
Bino Catch II performs best under good lighting conditions. Please remember that to keep focus 15 meter to infinity to take picture and do not view the sun directly.
1. Select your capture mode.
2. Center your subject in the binocular.
3. Press the shutter button. A beep will be sounded to warn the capture ia started then sounded again to confirming that a picture was taken.The LCD will increase by one.
While capture is start, please hold the Bino Catch II stably unit sounded again.
4. If the memory were full, the text “FULL” is shown on the LCD panel and with an alarm sound.
Self Timer - Taking still pictures
The self-timer allows you to take a picture and have 10 seconds delay before taking a picture.
1. Select the self-timer feature from the by press mode button.
2. Set up your shot using Bino Catch II stand if necessary.
3. Press and release the Shutter/Confirm button. The buzzer keeps beeping for about 10 seconds then sounded again to confirming that a picture was taken.
4. While you have activated the self-timer function if you want to stop it, just press shutter button within 10 seconds to stop the self-timer countdown.
Taking a Video
1. Select Video mode to activate the function. You are now ready to start shooting video.
2. Center the subject in the binocular.
3. Press the shutter button to capture images continuously, until button is released or memory buffer is full.
4. The picture is stored in AVI-format and picture number will increase by one only.
Battery status indicator
The battery status indicator is a three-segment indicator and the meaning is explained briefly below.
When the battery is full, three segments are shown, the voltage is about 3 volts.
After a period of operation, the voltage drop down to half, the buzzer sounds a thrilling tone and the left part of the battery icon disappears.
When the battery is almost exhausted, the battery icon displays only the right part for a short period and the camera will be power off automatically.
Erasing/Deleting Pictures
As with still pictures, you could have the ability to erase the last or all of your pictures.
Run on PC Webcam mode:
Press the shutter button while unit is connected with PC until the “PC” show on the status LCD.
Now unit is works on the PC cam mode succes.
Please note: When the Camera memory is full the LCD will display FULL and you cannot take any more picture until you have transfer your pictures to PC or erased the pictures by using the EAL-erase All or E01Erase Last Picture option.
Bino Catch II is bundled application to let you have more funs with the images on your PC: also it can be used as a web cam. Operation details please refer to the CD-Rom contents.
5. Maintenance
1. Operating Environment: 41 to 104 degF (5 to 40 deg C). 20-85% relative umidity, non condensing.
2. Special care taking!
· Never immerse the Bino Catch II into any fluid or liquid. remove dust or stains with a soft cloth dampened with water or neutral detergent.
To keep the Bino Catch II in dry and cool dust-free environment or container when it is NOT used.
· To take the batteries out, when Bino Catch II is NOT to be used over a long period.
· Avoid dropping the Bino Catch II to hard ground. Do not disassemble the Bino Catch II.
6. Camera Specifications
1. Sensor type: 1/2.7” Color VGA (1280 x 1024 pixels ) CMOS image sensor.
2. Auto-exposure and Auto White-balance control.
3. Frame rate: Auto Video Impression: 9 fps in all resolution.
4. Memory & Images: 64Mbit SDRAM Memory Storage.
200 +/- 10 pictures for HI Resolutions when 64M SD card is presented.
800 +/- 20 pictures for Lo Resolutions when 64M SD card is presented.
5. Battery: AAA 1,5 V x 2 alkaline batteries.
6. Power Comsumption:
Operation voltage: 3 volts - AAA battery x 2
Standby current: 150mA +/- 5mA.
Capture current: 150mA +/- 10mA.
Sleep mode current: Less then 50uA +/- 10uA (Power off).
With USB Connection: no battery consumption.
7. Focusing Distance: 15 meter min. to infinity
8. Minimum Luminosity: 300 Luxs or above.
9. Operation System Environment: Windows 98 / Windows 2000 / Windows Me / Windows Xp
10. Interface Type: USB 1.1
11. Storage condition: -4 to 131 deg F ( -20 to 55 deg C ); 20-85% R.H., non condensing.
7. Troubleshooting
Display resolution adjiustment: you need to set the display resolution to 16 bit color or higher for optimum image display. Refer to the display card manual or below procedure:
Following is setting Hi Color (16 bit) or above procedure.
1. Click the Windows Start button2. Click Setting and then Control Panel from the pop-up menus.
3. Double click the Display icon.
4. Click the Setting tab.
5. The Color Palette group showing out setting reading. Please select to High Color (16 bit) or True Color (24 bit), then choose High Color or True Color from the list box.
6. Click O.K. If need to do monitor driver, please do it to change the new setting.
7. Restart your computer.
REPORTER srl via G. di Vittorio, 18 40013 Castel Maggiore (BO) tel: 051 63 28 711 fax: 051 63 25 380 e-mail [email protected]
www.reporter-fiab.it