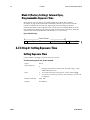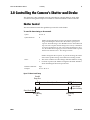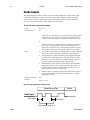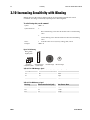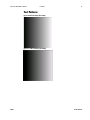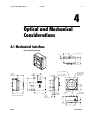
1
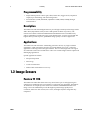
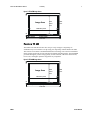
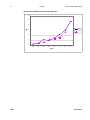
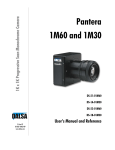
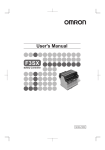
Progressive Scan Monochrome Camera Pantera TF 11M4 and 6M8 25-Apr-05 03-32-10096-03 www.dalsa.com Camera User’s Manual PT-2x-11M04 4 fps PT-2x-06M08 8 fps 2 Preliminary Pantera TF 11M and 6M User’s Manual © 2005 DALSA. All information provided in this manual is believed to be accurate and reliable. No responsibility is assumed by DALSA for its use. DALSA reserves the right to make changes to this information without notice. Reproduction of this manual in whole or in part, by any means, is prohibited without prior permission having been obtained from DALSA. About DALSA DALSA is an international high performance semiconductor and electronics company that designs, develops, manufactures, and markets digital imaging products and solutions, in addition to providing wafer foundry services. DALSA’s core competencies are in specialized integrated circuit and electronics technology, and highly engineered semiconductor wafer processing. Products include image sensor components; electronic digital cameras; and semiconductor wafer foundry services for use in MEMS, power semiconductors, image sensors and mixed signal CMOS chips. DALSA is a public company listed on the Toronto Stock Exchange under the symbol “DSA”. Based in Waterloo, On. Canada, the company has operations in Bromont, PQ; Colorado Springs, CO; Woodland Hills, CA; Eindhoven, NL; Munich, Germany and Tokyo, Japan. All DALSA products are manufactured using the latest state-of-the-art equipment to ensure product reliability. For further information not included in this manual, or for information on DALSA’s extensive line of image sensing products, please call: DALSA Sales Offices Waterloo Europe Asia Pacific 605 McMurray Rd Waterloo, ON N2V 2E9 Canada Tel: 519 886 6000 Fax: 519 886 8023 www.dalsa.com [email protected] Breslauer Str. 34 D-82194 Gröbenzell (Munich) Germany Tel: +49 - 8142 – 46770 Fax: +49 - 8142 – 467746 www.dalsa.com [email protected] Space G1 Building, 4F 2-40-2 Ikebukuro Toshima-ku, Tokyo 171-0014 Japan +81 3 5960 6353 (phone) +81 3 5960 6354 (fax) www.dalsa.com [email protected] DALSA Worldwide Operations DALSA Waterloo Colorado Springs Europe Asia Pacific 605 McMurray Rd Waterloo, ON N2V 2E9 Canada Tel: 519 886 6000 Fax: 519 886 8023 www.dalsa.com [email protected] 4820 Centennial Blvd., Suite 115 Colorado Springs, CO 80919 USA Tel: 719 599 7700 Fax: 719 599 7775 www.dalsa.com [email protected] Breslauer Str. 34 D-82194 Gröbenzell (Munich) Germany Tel: +49 - 8142 – 46770 Fax: +49 - 8142 – 467746 www.dalsa.com [email protected] Space G1 Building, 4F 2-40-2 Ikebukuro Toshima-ku, Tokyo 1710014 Japan +81 3 5960 6353 (phone) +81 3 5960 6354 (fax) www.dalsa.com [email protected] 03-32-10096-03 Pantera TF 11M and 6M User’s Manual Preliminary 3 Contents Introduction to the Pantera TF 11M and 6M Area Scan Cameras _______________________ 5 1.1 Camera Highlights.......................................................................................................................................................5 1.2 Image Sensors .............................................................................................................................................................6 1.3 Camera Performance Specifications ............................................................................................................................8 Camera Hardware Interface________________________________________________ 15 2.1 Installation Overview...................................................................................................................................................15 2.2 Input/Output Connectors and LED...............................................................................................................................15 Software Interface: How to Control the Camera __________________________________ 21 3.1 Communications Protocol Overview ............................................................................................................................21 3.2 Overview: Setting up the Camera to Send Commands................................................................................................22 3.3 Saving and Restoring Settings.....................................................................................................................................23 3.4 Setting Output Mode....................................................................................................................................................23 3.5 Setting the Data Mode.................................................................................................................................................24 3.6 Setting Baud Rate........................................................................................................................................................25 3.7 Setting Frame Rate, Exposure Time, and Exposure Mode...........................................................................................25 3.8 Controlling the Camera’s Shutter and Strobe .............................................................................................................29 3.9 Setting Gains ...............................................................................................................................................................31 3.10 Increasing Sensitivity with Binning............................................................................................................................32 3.11 Monitoring the Camera .............................................................................................................................................33 3.12 Rebooting the Camera...............................................................................................................................................33 3.13 Setting the Pre-trigger ..............................................................................................................................................33 3.14 Setting the Video Mode and Generating Test Patterns .............................................................................................33 Optical and Mechanical Considerations________________________________________ 39 4.1 Mechanical Interface....................................................................................................................................................39 4.2 Lens Mounts.................................................................................................................................................................40 4.3 Mounting the Camera..................................................................................................................................................40 4.4 Thermal Management.................................................................................................................................................40 4.5 Environment ................................................................................................................................................................40 Cleaning and Maintenance ________________________________________________ 41 5.1 Cleaning.......................................................................................................................................................................41 5.2 Maintenance ................................................................................................................................................................43 Troubleshooting ________________________________________________________ 45 DALSA 03-32-10096-03 4 Preliminary Pantera TF 11M and 6M User’s Manual 6.1 Common Solutions.......................................................................................................................................................45 6.2 Troubleshooting Using the Serial Interface.................................................................................................................46 6.3 Specific Solutions .........................................................................................................................................................47 6.4 Product Support...........................................................................................................................................................49 Camera Link™ Reference, Timing, and Configuration Table__________________________ 51 Commands and Error Handling _____________________________________________ 59 B1 All Available Commands ..............................................................................................................................................59 EMC Declaration of Conformity______________________________________________ 63 Index _______________________________________________________________ 67 DALSA 03-32-10096-03 Pantera TF 11M and 6M User’s Manual Preliminary 5 1 Introduction to the Pantera TF 11M and 6M Area Scan Cameras 1.1 Camera Highlights Features DALSA • 4008(H) x 2627(V) or 3072(H) x 2048(V) resolution, full frame CCD architecture • The Pantera TF 11M4 offers up to 4.4 fps, two outputs at full resolution, 36 MHz data rate • The Pantera TF 6M8 offers 7.5 fps, two outputs at full resolution, 36 MHz data rate • Up to 14 bit digitization • Small gain steps to achieve extremely low seam mismatch between taps (if you are using the two tap model) • High sensitivity with low dark current • Progressive scan readout • Exposure control and antiblooming • Asynchronous image capture, externally triggerable • Tap to tap matching • 100% fill factor • Single 12VDC to 24VDC power supply • Multiple triggering options • Up to 4x4 binning 03-32-10096-03 6 Preliminary Pantera TF 11M and 6M User’s Manual Programmability • Simple ASCII protocol controls gain, offset, frame rates, trigger mode, test pattern output, up to 4x4 binning, and camera diagnostics • Serial interface (ASCII, 9600 baud, adjustable to 19200, 57600, 115200), through Camera Link™ Description The Pantera TF 11M and 6M digital cameras provide high-sensitivity 14 bit images with a 4008 x 2672 (output 4032 x 2672) or 3076 x 2048 spatial resolution respectively. The cameras use DALSA’s full frame FTF4027M and FTF3020M CCDs to simultaneously achieve outstanding resolution and gray scale characteristics. A square pixel format and high fill factor provide superior, quantifiable image quality even at low light levels. Applications The Pantera TF 11M and 6M are outstanding performers in fast, very high resolution applications. 14 bit performance provides up to 8192 distinct gray levels—perfect for applications with large interscene light variations. The low-noise, digitized video signal also makes the camera an excellent choice where low contrast images must be captured in challenging applications. Specific applications include: • Flat panel inspection • Microscopy • Aerial reconnaissance • Medical and non-destructive test x-ray 1.2 Image Sensors Pantera TF 11M The Pantera TF 11M4 offers frame rates at up to 4.4 frames per second (fps) using two output taps to simultaneously read out data or 2.6 fps using one output tap. The Pantera TF 11M2 uses one output tap. This camera uses DALSA’s FTF4027M full-frame CCD image sensor. The FTF4027M provides the highest possible image quality for its resolution, with lower dark current, lower noise, and higher dynamic range than any competitor. DALSA 03-32-10096-03 Pantera TF 11M and 6M User’s Manual Preliminary 7 Figure 1: FTF4027M Image Sensor 6 black lines Z Image Area Y 2672 2684 active lines lines 20 4 4 20 4008 active pixels W X 6 black lines 4056 cells Output register 24 Output amplifier 24 4104 cells Pantera TF 6M The Pantera TF 6M8 offers frame rates at up to 7.5 fps using two output taps to simultaneously read out data or 4.5 fps using one output tap with the Pantera TF 6M5. This camera uses DALSA’s FTF3020M full-frame CCD image sensor and its remarkable image quality made it the de facto standard for digital still photography. The FTF3020M provides the highest possible image quality for its resolution, with lower dark current, lower noise, and higher dynamic range than any competitor. Figure 2: FTF3020M Image Sensor 6 black lines Z Image Area Y 2048 2060 active lines lines 20 4 W 7 Output amplifier 4 20 3072 active pixels 3120 cells Output register 6 black lines X 7 3134 cells DALSA 03-32-10096-03 8 Preliminary Pantera TF 11M and 6M User’s Manual 1.3 Camera Performance Specifications Table 1: Pantera TF 11M4 and 6M8 Camera Performance Specifications Camera Features Units Resolution H x V pixels 11M: 4032 x 2672 6M: 3072 x 2048 Pixel Size µm 11M: 9 x 9 6M: 12x12 Pixel Fill Factor % 100 Output Modes 1 Dual or Single Mechanical Interface Units Size mm 94 x 94 x 51 Weight kg 0.68 Electrical Interface Units Power Dissipation W Input Voltage VDC Power Connector Notes Notes < 15 12 24 6 pin Hirose Data Output Format Bits Programming Connector 12 Base Camera Link™ Optical Interface Units Back Focal Distance F Mount M72 Mount mm mm Notes 46.50±0.18 6.5mm Lens Mount F-mount Camera Thread M72x0.75 (standard) Aperture Sensor Alignment x, y z z z Parallelism/Tilt DALSA Notes mm 36.86x24.58 (6M) 36.07x24.05 (11M) µm F Mount back focal distance Sensor die to front edge of M72 mount º µm ±400 46.50 ± 0.30mm available as accessory 12.13±0.30mm ±1.25 <175 over sensor 03-32-10096-03 Pantera TF 11M and 6M User’s Manual Preliminary 9 Sensor Flatness µm Camera Performance Units Min. Frame Rate fps .06-Mode 8 Data Rate MHz 2x36 Data Format Operating Temp 30 peak-peak Nom. Max. Notes 11M4: 4.4 6M8: 7.5 2, 3 8, 10, 12, or 14 bit user selectable °C Nominal Gain Range 0 40 At front plate. 1x 4x 4 Dynamic Range dB DN:DN 66 3600:1.75 Pixel Response NonUniformity (PRNU) %rms <5 Fixed Pattern Noise (FPN) DN rms <5 Random Noise DN rms Sat. Output Amplitude DN DC Offset DN DC Offset Subtraction DN 1.2 1.75 3600 3900 4095 5 45 50 55 5 up to 50 5 >100x 5 Antiblooming Responsivity DN/(nJ/cm2) Power Up Duration sec 12-bit @530nm 20 10 Regulatory Regulatory Compliance CE Notes: DALSA 1. Sensor line length is actually 4008 pixels but to fit evenly on 64-bit boundaries required for most high-performance frame grabbers 4032 pixels are sent in each line. The extra pixels are split evenly and placed at the start and the end of each line. 2. No binning, full resolution. 3. Minimum frame rate while operating in Mode 8. 4. 2x and 4x gain are not available when using 14 bit output 5. Nominal output, 100ms exposure time. Light source: broadband quartz halogen, 3200K, 750nm and IR cutoff filter. 03-32-10096-03 10 Preliminary Pantera TF 11M and 6M User’s Manual Figure 3: Pantera TF 11M Responsivity Responsivity[DN/(nJ/cm²)] Pantera TF 11M Responsivity 20 16 12 8 4 0 430 480 530 580 630 680 730 780 830 880 930 Wavelength (nm) Figure 4: Pantera TF 6M Responsivity Pantera TF 6M Responsivity Responsivity[DN/(nJ/cm²)] 24 20 16 12 8 4 0 400 450 500 550 600 650 700 750 800 Wavelength (nm) DALSA 03-32-10096-03 Pantera TF 11M and 6M User’s Manual Preliminary 11 Figure 4: Pantera TF 11M Normalized Noise vs. Camera Front PlateTemperature 1.4 1.3 Noise 1.2 Tap 1 Tap 2 1.1 1 0.9 25 30 35 40 43 45 48 50 53 55 57.4 60 Temp Figure 5: Pantera TF 11M4 Dark Offset vs Camera Front Plate Temperature 5 4.5 4 3.5 FPN 3 Tap 1 2.5 Tap 2 2 1.5 1 0.5 0 25 30 35 40 43 45 48 50 53 55 57.4 60 Tem p DALSA 03-32-10096-03 12 Preliminary Pantera TF 11M and 6M User’s Manual Figure 6: Pantera TF 11M4 FPN vs Camera Front Plate Temperature 5 4.5 4 3.5 FPN 3 Tap 1 2.5 Tap 2 2 1.5 1 0.5 0 25 30 35 40 43 45 48 50 53 55 57.4 60 Tem p DALSA 03-32-10096-03 Pantera TF 11M and 6M User’s Manual Preliminary 13 Figure 7: Pantera TF 6M Normalized Noise vs. Camera Front Plate Temperature 2.00 1.80 Noise 1.60 Tap 1 1.40 Tap 2 1.20 1.00 0.80 25 30 35 40 45 50 55 60 Temp Figure 8: Pantera TF 6M Dark Offset vs Camera Front Plate Temperature 59 57 Dark Offset 55 Tap 1 53 Tap 2 51 49 47 25 30 35 40 45 50 55 Temp DALSA 03-32-10096-03 14 Preliminary Pantera TF 11M and 6M User’s Manual Figure 9: Pantera TF 6M FPN vs Camera Front Plate Temperature 12 10 FPN 8 Tap 1 6 Tap 2 4 2 0 25 30 35 40 45 50 55 60 Temp DALSA 03-32-10096-03 Pantera TF 11M and 6M User’s Manual Preliminary 15 2 Camera Hardware Interface 2.1 Installation Overview In order to set up your camera, you should take these initial steps: This installation overview assumes you have not installed any system components yet. 1. Power down all equipment. 2. Following the manufacturer’s instructions, install the framegrabber (if applicable). Be sure to observe all static precautions. 3. Install any necessary imaging software. 4. Before connecting power to the camera, test all power supplies. Ensure that all the correct voltages are present at the camera end of the power cable (The Camera Performance Specifications on page 7 list appropriate voltages). Power supplies must meet the requirements defined in section 2.4 Power Input. 5. Inspect all cables and connectors prior to installation. Do not use damaged cables or connectors or the camera may be damaged. 6. Connect data, serial interface, and power cables. 7. After connecting cables, apply power to the camera. After a few seconds, the LED on the back of the camera should be green to indicate that the camera is operating and ready to receive commands. 2.2 Input/Output Connectors and LED The camera uses a: DALSA • Diagnostic LED for monitoring the camera. See LED Status Indicator section below for details. • High-density 26-pin MDR26 connector for Camera Link control signals, data signals, and serial communications. Refer to Figure 11: MDR26 Connector for pin descriptions. 03-32-10096-03 16 Preliminary Pantera TF 11M and 6M User’s Manual • 5-pin MiniUSB type connector for shutter control and direct trigger. Refer to page 19 for pin descriptions. • 6-pin Hirose connector for power. Refer to page 18 for pin descriptions. Figure 10: Camera Inputs/Outputs Shutter Control Diagnostic LED Camera Link™ +12 to +24V DC and Ground 2.2.1 LED Status Indicator Table 2: Status LED Color of Status LED Meaning Flashing Green Camera Initialization Solid Green Camera Ready Flashing Red Fatal Error Solid Red Warning, such as firmware did not load or voltage out of limit 2.2.2 Camera Link Data Connector The Camera Link interface is implemented as a Base Configuration in the Pantera TF 11M and 6M cameras. A Base Configuration uses 1 MDR26 connector and 1 Channel Link chip. The main characteristics of the Base Configuration are: DALSA • Ports supported: A, B, C • Serializer bit width: 28 • Number of chips: 1 • Number of MDR26 connectors: 1 03-32-10096-03 Pantera TF 11M and 6M User’s Manual Preliminary 17 Data Connector Figure 11: MDR26 Connector M D R 2 6 Fe m ale 13 1 26 14 M atin g P a r t: 3 M 33 4 -31 se r ie s C a b le: 3 M 14 X 2 6-SZ L B -X X X -0 LC * * Table 3: MDR26 Connector Reference Item Value Pinout BASE 1 GND Item Pinout Value BASE 14 GND 2 X0- 15 X0+ 3 X1- 16 X1+ 4 X2- 17 X2+ 5 Xclk- 18 Xclk+ 6 X3- 19 X3+ 7 SERTC+ 20 SERTC- 8 SERTFG- 21 SERTFG+ 9 CC1- 22 CC1+ 10 CC2+ 23 CC2- 11 CC3- 24 CC3+ 12 CC4+ 25 CC4- 13 GND 26 GND Notes: *Exterior Overshield is connected to the shells of the connectors on both ends. **3M part 14X26-SZLB-XXX-0LC is a complete cable assembly, including connectors. Unused pairs should be terminated in 100 ohms at both ends of the cable. Table 4: DALSA Camera Control Configuration Signal Configuration CC1 EXSYNC CC2 Spare CC3 Spare CC4 Spare Digital Data The camera digitizes internally to 14 bits and has a user selectable output of 8, 10, 12, or 14 bits in LVDS format on the Camera Link connector. You can select the output using the oms command. For details, see section 3.5 Setting the Data Mode. DALSA 03-32-10096-03 18 Preliminary Pantera TF 11M and 6M User’s Manual Data Clocking Signals These signals indicate when data is valid, allowing you to clock the data from the camera to your acquisition system. These signals are part of the Camera Link configuration and you should refer to the DALSA Camera Link Implementation Road Map, available at , http://vfm.dalsa.com/docs/appnotes/00450-00_0332_DALSA_Camera_Link_Road_Map.pdf, for the standard location of these signals: Clocking Signal IMPORTANT: This camera’s data should be sampled on the rising edge of STROBE. Indicates LVAL (high) Outputting valid line DVAL (high) Valid data STROBE (rising edge) Valid data See Appendix A for the complete Camera Link timing, DALSA Camera Link configuration table, and refer to the DALSA Web site, http://vfm.dalsa.com/docs/appnotes/00450-00_0332_DALSA_Camera_Link_Road_Map.pdf, for the official Camera Link document. Input Signals The camera accepts an EXSYNC control input through the Camera Link MDR26F connector. External control signals are optional and enabled through the serial interface. EXSYNC (Triggers Readout) EXSYNC is an optional input signal that can be used to trigger the frame rate. Depending on the camera’s exposure mode setting, it can use either the rising or falling edge of EXSYNC to trigger frame readout. Refer to the following table for details. Table 5: EXSYNC Edge Description Mode EXSYNC Edge Description 4 The rising edge of EXSYNC begins camera exposure. The falling edge begins readout. 6 The falling edge of EXSYNC initiates camera exposure. For more information on camera exposure modes, including timing diagrams, refer to section 3.7 Setting Frame Rate, Exposure Time, and Exposure Mode on page 25. NOTE: EXSYNC should not be clocked faster than the camera’s specified maximum frame rate. The camera ignores the EXSYNC pulse until it has completed reading the last line out. DALSA 03-32-10096-03 Pantera TF 11M and 6M User’s Manual Preliminary 19 2.2.3 Power Connector H iro se 6-pin C ircular M ale 6 1 5 2 4 3 M at in g P a r t: H IRO SE H R 10 A -7 P -6 S Pin Description Pin Description 1 +12V to +24V 4 GND 2 +12V to +24V 5 GND 3 +12V to +24V 6 GND The camera requires a single voltage input (+12VDC to +24VDC). The camera meets all performance specifications using standard switching power supplies, although wellregulated linear supplies provide optimum performance. When setting up the camera’s power supplies follow these guidelines: • Protect the camera with a fast-blow fuse between power supply and camera. • Do not use the shield on a multi-conductor cable for ground. • Keep leads as short as possible to reduce voltage drop. • Use high-quality linear supplies to minimize noise. Note: Performance specifications are not guaranteed if your power supply does not meet these requirements WARNING: It is extremely important that you apply the appropriate voltages to your camera. Incorrect voltages will damage the camera. Protect the camera with a fast-blow fuse between power supply and camera. Visit the www.dalsa.com Web site for a list of companies that make power supplies that meet the camera’s requirements. The companies listed should not be considered the only choices. 2.2.4 Shutter Control Connector Figure 12: Shutter Control Connector 1 2 3 4 5 Table 6: Shutter Control Connector Pinout Reference Pin Description Pin Description DALSA 1 NC 4 NC 2 Direct Trigger In 5 GND 3 Shutter Control Out 03-32-10096-03 20 Preliminary Pantera TF 11M and 6M User’s Manual The shutter control connector provides a direct interface to control an external shutter and/or a trigger input when the camera is operating in one of the external trigger modes (refer to section 3.7 Setting Frame Rate, Exposure Time, and Exposure Mode for more information on operating in external trigger modes). These signals are TTL compatible (i.e. Vlow_max=0.8V, Vhigh_min=2.4V). The shutter control output is a signal that is active (high) while the camera is in the exposure state. For example, if the exposure time is set to 1 second then this signal would be high for the 1 second exposure and then low while the camera is reading out. This signal can be used to control an external shutter, opening it when the signal is high and closing it when the signal is low and preventing image smearing caused by light exposure during read out. You can also modify the signal using the software commands, sct and scp. Refer to section 3.8 Controlling the Camera’s Shutter and Strobe for details. The direct trigger input has the same function as the CC1 control signal on the Camera Link interface. The specific function of this trigger depends on the camera’s operating mode but is similar to EXSYNC signal described in section 2.2.2. A mating connector and cable for this interface is available from DigiKey, PN: 167-1009ND (1 meter length). DALSA 03-32-10096-03 Pantera TF 11M and 6M User’s Manual Preliminary 21 3 Software Interface: How to Control the Camera i This chapter outlines the more commonly used commands. See Appendix B for a list of all available commands. All camera features can be controlled through the serial interface. The camera can also be used without the serial interface after it has been set up correctly. This chapter explains the most commonly used and important commands, including: • Saving and restoring settings, described on page 23. • Setting the output mode, described on page 23. • Setting the exposure mode and frame rate, described on page 25. • Setting gain, described on page 29. The serial interface uses a simple ASCII-based protocol. For a complete list of all available commands, refer to the Communications Protocol on page 59. Online Help For quick help, the camera can return all available commands and parameters through the serial interface. To generate this list, send the command h to the camera. Retrieving Camera Settings To read current camera settings, send the command gcp. 3.1 Communications Protocol Overview Serial Protocol Defaults: DALSA • 8 data bits • 1 stop bit • No parity • No flow control 03-32-10096-03 22 Preliminary • 9.6Kbps • Camera does not echo characters Pantera TF 11M and 6M User’s Manual When entering commands, remember that: • A carriage return (CR) ends each command. The linefeed character is ignored. • The camera will answer each command with either "OK >" or "Error x: Error Message >". The ">" is always the last character sent by the camera. • The following parameters are used throughout the manual: i = integer f = float t = tap [ ] = optional parameter 3.2 Overview: Setting up the Camera to Send Commands The following steps describe how to begin using the Pantera TF 11M4 and 6M8 commands. 1. If you have not already set up your camera cables, connect your cables as described in section 2.1 Installation Overview. 2. Using a terminal program (e.g., Microsoft HyperTerminal), open a terminal window. Note: In order to communicate with the camera, a serial connection in the Camera Link cable needs to be established. The framegrabber manufacturers should be able to provide a solution in order to communicate through this serial link. The terminal software can be also provided by the framegrabber manufacturer. Standard terminal software such as HyperTerminal can be used in case if COM port is allocated by the framegrabber. Terminal should be set at 9600 baud during the camera power up. 3. When the terminal window is set up, power on the camera. 4. The boot-up message should appear on the terminal window: Camera Initialization in progress, Please Wait ... OK> You can now communicate with the camera through the terminal using the software commands described in this manual. DALSA 5. Set up the framegrabber to receive the data. Following the framegrabber manufacturer’s instructions, set up the parameters described in the Camera Link™ Configuration Table on page 56. 6. Once the framegrabber is set up for data processing and the camera is powered up, run your image processing software. You should be able to see an image from the camera when exposed to a light source. 7. You can now set the other camera parameters described in this chapter. 03-32-10096-03 Pantera TF 11M and 6M User’s Manual Preliminary 23 3.3 Saving and Restoring Settings The camera provides a number of commands for restoring, storing, and saving settings. • To restore the original factory settings, use the command rfs. • To save all current user settings to EEPROM, use the command wus. The camera will automatically restore the saved user settings when powered up. • To restore the last saved user settings, use the command rus. Figure 13: Saving and Restoring Overview Factory Settings restore rfs command User Settings / EEROM write / restore wus, rus commands Current Session 3.4 Setting Output Mode The PT-2x-11M04 and the PT-2x-06M08 have two data output taps (or channels). You can configure the camera to read out data using a single tap or you can double your frame rate by simultaneously reading out of both taps. To select dual or single output mode, use the command: Syntax: sos i Syntax Elements: i 1 Single tap readout, maximum 2.6 (11M) or 4.5(6M) fps 2 Dual tap readout, maximum 4.4 (11M) or 7.5(6M) fps Related Commands: Example: DALSA sos 1 03-32-10096-03 24 Preliminary Pantera TF 11M and 6M User’s Manual 3.5 Setting the Data Mode The PT-2x-11M04 and the PT-2x-06M08 have two output taps, each are 12 bits. The 24 bits of data (two taps) that are sent from the camera to the frame grabber are divided into three ports: A, B, and C. Each port is 8 bits. The sos command selects the number of bits that the camera sends to the frame grabber from each tap. In the table below, ports A-C refer to the Camera Link specification. To set the data mode for the camera output, use the command: Syntax: oms i Syntax Elements: i 14 12 10 8 DALSA Notes: • Example: oms 8 14 bit Tap 1 Data bit 0 to 7 are linked to Port A Tap 1 Data bits 8 to 13 are linked to Ports B bits 0 to 5 Tap 2 Note: When operating in 14 bit mode, tap 2 cannot be transmitted as normal. To maintain the same frame rates as when the camera is configured using 2 taps (command sos 2), the dual tap data is piped to a single tap. The output pixel rate increases to 72Mhz and the framegrabber uses the same configuration used for one tap operation. (Refer to section 3.4 Setting Output Mode command for setting the number of taps.) 12 bit (Factory setting), Tap 1 Data bits 0 to 7 are linked to Port A Tap 1Data bits 8 to 11 are linked to Port B bits 0 to 3 Tap 2 Data bits 8 to 11 are linked to Port B bits 4 to 7 Tap 2 Data bits 0 to 7 are linked to Port C 10 bit, Tap 1 Data bits 0 to 7 are linked to Port A Tap 1 Data bits 8 and 9 are linked to Port B bits 0 and 1 Tap 2 Data bits 8 and 9 are linked to Port B bits 4 and 5 Tap 2 Data bits 0 to 7 are linked to Port C 8 bit, Tap 1 Data bits 0 to 7 are linked to Port A Tap 2 Data bits 0 to 7 are linked to Port B To obtain the current output data format, use the command gcp 03-32-10096-03 Pantera TF 11M and 6M User’s Manual Preliminary 25 3.6 Setting Baud Rate To set the speed of the camera serial communication port, use the command: Syntax: sbr i Syntax Elements: i Baud rate. Available baud rates are: 9600 (Default), 19200, 57600, and 115200. Notes: Example: • Power-on rate is always 9600 baud. • The rc (reset camera) command will not reset the camera to the power-on baud rate. sbr 57600 3.7 Setting Frame Rate, Exposure Time, and Exposure Mode With three different exposure mode settings, the Pantera TF 11M and 6M cameras deliver many possibilities for flexible camera timing. Table 7 outlines each of these three exposure modes, and is followed by a full explanation on how to set the camera’s frame rate and exposure time. Mode Table 7: Overview of Pantera TF 11M and 6M Exposure Modes i SYNC Exposure Time Notes 4 –External –Not programmable –Exposure time is set by the high pulse width of the EXSYNC signal. “Smart EXSYNC” Mode: external exposure time – high time of external signal is exposure time and 1/period is frame rate. The rising edge of EXSYNC begins camera exposure. The falling edge begins readout. 6 –External -Programmable with set command The user is responsible for not violating timing constraints for the EXSYNC signal used in this mode. The falling edge of EXSYNC initiates the camera exposure. For more information on the EXSYNC signal, refer to section 2.2 Input/Output Connectors and LED. i Mode 8 is the factory setting DALSA 03-32-10096-03 Preliminary Mode 26 8 Pantera TF 11M and 6M User’s Manual SYNC Exposure Time Notes –Internal -Not programmable –Frame rate is internally set to correspond with the programmed exposure time plus readout time. –Internal –Programmable using the set command Factory Default Mode. Frame period is the programmed exposure time plus the readout time. The frame period can be read in this mode by using the gcp command. Overview: Setting Frame Time and Exposure Time The camera’s frame rate (synchronization) can be generated internally through software commands or input externally from a frame grabber/host system. To select how you want the camera’s frame rate to be generated: 1. You must first set the camera mode using the sem command. Refer to Step One on the next page for details. 2. Then, if you are using mode 8, use the set command to set the exposure time. Refer to Step Two on page 27 for details. 3.7.1 Step 1: Setting the Exposure Mode In internal sync mode, (mode 8), the camera delivers data independent of external signals according to the timing set internally. In external sync modes (modes 4, and 6), the camera starts exposure after an external trigger pulse (EXSYNC). To set the camera exposure mode, use the command: DALSA Syntax: sem i Syntax Elements: i Exposure mode to use. Default is 8. Refer to Table 7 for a quick list of available modes or to the following sections for a more detailed explanation. To obtain the current value of the exposure mode, use the command gcp. Notes: Related Commands: set Example: sem 4 03-32-10096-03 Pantera TF 11M and 6M User’s Manual Preliminary 27 Mode 4: Smart EXSYNC, External Frame Rate and Exposure Time In this mode, the external trigger rate sets both the frame rate and the exposure time. The rising pulse of the external trigger marks the beginning of the exposure time. Readout begins on the falling edge of EXSYNC. A charge dump occurs at the beginning of the exposure time, clearing any accumulated charge gathered up to this point. An external shutter or strobe should be used to remove light during readout Figure 14: Mode 4 Timing Frame Period Exposure Time CD No Light Waiting EXSYNC CD Triggers ignored during readout =Charge Dump (~100µs) Mode 6: External Frame Rate and Internal Exposure Time In Mode 6, EXSYNC sets the frame rate but the exposure time is set internally using the software command, set (described on page 28). The exposure time begins with a charge dump that clears all charge accumulated until this point. To prevent image smearing, you should use an external shutter or strobe to prevent light exposure during the readout period. Figure 15: Mode 6 Timing Frame Period CD Exposure Time (set internally) No Light Waiting Readout EXSYNC CD DALSA =Charge Dump (~100µs) Triggers ignored during readout 03-32-10096-03 28 Preliminary Pantera TF 11M and 6M User’s Manual Mode 8 (Factory Setting): Internal Sync, Programmable Exposure Time In Mode 8, the exposure time is programmed internally with the set command (described on page 28). Readout occurs immediately after the exposure time. After the readout is complete, the next exposure begins again. Since all timing is generated internally the shutter control output must be used to control an external shutter or strobe light. Without any shuttering, the effects of image smearing can be reduced by setting the exposure time much longer than the readout time (i.e. 1 or 2 seconds). Figure 16: Mode 8 Timing Frame Period CD Exposure Time Readout CD Exposure Time 3.7.3 Step 2: Setting Exposure Time Setting Exposure Time Camera must be operating in exposure mode 8 or mode 6. To set the camera exposure time, use the command: Syntax: set f Syntax Elements: f Floating point number in milliseconds. Allowable range is .00116000.000 milliseconds. Notes: DALSA To read the current line rate frequency, use the command gcp. If you enter an invalid exposure time, the valid range of values will be displayed. Related Commands: sem, ssf Example: set 5500.3 03-32-10096-03 Pantera TF 11M and 6M User’s Manual Preliminary 29 3.8 Controlling the Camera’s Shutter and Strobe The camera has a TTL compatible signal for controlling an external shutter or strobe light. A connector and signal description is available in section 2.2.4 Shutter Control Connector. Shutter Control The sct command controls the signal that opens and closes the shutter. To control the shutter timing, use the command: Syntax: sct f f Syntax Elements: f Shutter opening time before exposure. The camera will be held in charge reset during this time to allow the shutter to open prior to exposure. Allowable range is 0 to 65 milliseconds in .001 millisecond steps. The sensor requires that the charge reset is always a minimum of .1ms for opening times of .1ms or less. If the opening time is set to zero, the shutter control signal goes active at the start of the exposure and does not include sensor’s .1ms charge reset time. f Shutter closing time after exposure. To prevent smearing, the camera will wait the specified closing control time before starting readout. Notes: • The sensor continues to collect charge while the shutter is closing • For short exposures, the shutter closing time should be included when calculating the desired exposure time. Related Commands: scp Example: sct 1.34 3.5 Figure 17: Shutter Control Timing Extended Charge Reset Camera ExposureTime Shutter/Strobe Signal Shutter Opening Time DALSA Readout Readout delayed to prevent smearing Shutter Closing Time 03-32-10096-03 30 Preliminary Pantera TF 11M and 6M User’s Manual Strobe Control The scp command provides a signal to control an external light source. The control signal is only active during the exposure time of the camera. This command controls rather the strobe control is to be on continuously or pulsed during this period. The scp command also can be used to disable the control output for dark imaging. To control the strobe signal, use the command: Syntax: scp f f Syntax Elements: f Strobe signal ON time. Specifies the time, in milliseconds, for the strobe pulse to remain high (or on). The strobe control output begins at the same time as the exposure time unless modified by the sct command. Allowable range is 0 to 65 milliseconds in .001ms steps. f Strobe signal OFF time. Specifies the time, in milliseconds, that the pulse is low (or off). Allowable range is 0 to 65 milliseconds in .001ms steps. Setting the low to zero makes the signal active (high) during the entire exposure time regardless of the on time setting. Notes: • To force the strobe signal to be continuously low (off), set the ON time to zero and the OFF time to a number greater than zero. • To keep the strobe signal continuously active (high) during the exposure time set the OFF time to 0. This will work even if the ON time is 0. So for example the command default of scp 0 0 gives the continuous high during the exposure state. • If the total time of the ON time and the OFF is shorter than the integration time, the pulse will keep repeating. The pulse will terminate to the low (off) condition at the end of the exposure time regardless of where it is in the cycle. • Shutter control is normally not used when using strobe control. Ensure that the shutter control is turned off (sct 0 0) when using strobe control. Related Commands: sct Example: scp 0.4 0.6 Figure 18: Strobe Signal Timing with Pulse Control Camera ExposureTime Readout Strobe Signal Pulse high time Pulse low time Set by command scp f f DALSA 03-32-10096-03 Pantera TF 11M and 6M User’s Manual Preliminary 31 3.9 Setting Gains Optimizing gain in the analog domain allows you to achieve a better signal-to-noise ratio (dynamic range) than you would achieve by trying to optimize the gain in the digital domain. As a result, perform all analog gain adjustments (ssg command) prior to any digital gain adjustments (gm command). Setting Analog Gain for Tap to Tap Matching The set system gain command allows you to adjust the analog gain in both the left and right channels for precise control over tap-to-tap matching. To set the digital gain, use the command: Syntax: ssg i i Syntax Elements: i Tap value. Either 1 for the left tap or 2 for the right tap. i 0-4095. 0 corresponds to low gain, 4095 corresponds to high gain Related Commands: gm Example: ssg 1 4000 Gain Mode (Digital Gain) To set the digital gain mode, use the command: DALSA Syntax: gm i Syntax Elements: i 0 1x Output Gain Mode (Factory setting) 1 2x Output Gain Mode 2 4x Output Gain Mode Notes: • Related Commands: ssg Example: gm 2 This command is not available when operating the camera in 14 bit mode. 03-32-10096-03 32 Preliminary Pantera TF 11M and 6M User’s Manual 3.10 Increasing Sensitivity with Binning Binning increases the camera’s light sensitivity by decreasing horizontal and vertical resolution—the charge collected by adjacent pixels is added together. To set the binning value, use the command: Syntax: sbm i i Syntax Elements: i Horizontal binning value. Must be identical to the vertical binning value. i Notes: Example: Vertical binning value. Must be identical to the horizontal binning value. Available values are 1x1 (factory setting), 2x2, or 4x4 sbm 2 2 Figure 19: 2x2 Binning More charge = brighter pixel q3 q1 q4 q1 + q2 + q3 + q4 q2 2 a a Normal image Binned image 1 Charge in Charge binned: 4 adjacent pixels 1 pixel output Table 8: PT-2x-11M4 Binning vs. Speed Binning Min Frame Period (mS) 1x1 227 4.4fps 2x2 151 6.6fps 4x4 113 8.8fps Table 9: PT-2x-6M8 Binning vs. Speed Binning Min Frame Period (mS) DALSA Max Frame Rate Max Frame Rate 1x1 132 7.5fps 2x2 87 11.4fps 4x4 64 15.6fps 03-32-10096-03 Pantera TF 11M and 6M User’s Manual Preliminary 33 3.11 Monitoring the Camera Note: When more than one condition is active, the LED indicates the condition with the highest priority. Error and warning states are accompanied by corresponding messages further describing the current camera status. The camera is equipped with a red/green LED used to display the operational status of the camera. Table 10 below summarizes the operating states of the camera and the corresponding LED states. Table 10: Camera Operating States LED state Priority Camera Status Condition Blinking RED 1 Error Fatal hardware failure Steady RED 2 Warning Monitoring task failure Blinking GREEN 3 Progress Lengthy operation in progress Steady GREEN 4 OK Healthy 3.12 Rebooting the Camera The command rc reboots the camera. The camera starts up with the last saved settings. 3.13 Setting the Pre-trigger A pre-trigger may be required for some frame grabbers. To set the pre-trigger, use the command: Syntax: sp i Syntax Elements: i Pretrigger value from 0 to 15. Example: sp 10 3.14 Setting the Video Mode and Generating Test Patterns To set the video mode, use the command: Syntax: svm i Syntax Elements: i Notes: • Video mode to use. DALSA See table below for mode descriptions 03-32-10096-03 34 Preliminary Table 11: Pantera FF 11M and 6M Video Modes Mode Description 0 Normal operating mode. Pantera TF 11M and 6M User’s Manual Example Image A W 1 Test pattern left side. 2 Test pattern right side. 3 Test pattern both sides. 4 Flip image left side. W 5 DALSA Flip image left side. Test pattern left side. 6 Flip image left side. Test pattern right side. 7 Flip image left side. Test pattern both sides. 8 Flip image right side. 9 Flip image right side. Test pattern left side. 10 Flip image right side. Test pattern right side. 11 Flip image right side. Test pattern both sides. 12 Flip image both sides. 13 Flip image both sides. Test pattern left side. 14 Flip image both sides. Test pattern right side. 15 Flip image both sides. Test pattern both sides. A 03-32-10096-03 Pantera TF 11M and 6M User’s Manual Preliminary 35 Test Patterns Figure 20: 8 Bit Test Pattern (One Output) Figure 21: 10 Bit Test Pattern (One Output) DALSA 03-32-10096-03 36 Preliminary Pantera TF 11M and 6M User’s Manual Figure 22: 12 or 14 Bit Test Pattern (One Output) Figure 23: 8 Bit Test Pattern (Two Outputs) DALSA 03-32-10096-03 Pantera TF 11M and 6M User’s Manual Preliminary 37 Figure 24: 10 Bit Test Pattern (Two Outputs) Figure 25: 12 or 14 Bit Test Pattern (Two Outputs) DALSA 03-32-10096-03 38 DALSA Preliminary Pantera TF 11M and 6M User’s Manual 03-32-10096-03 Pantera TF 11M and 6M User’s Manual Preliminary 39 4 Optical and Mechanical Considerations 4.1 Mechanical Interface Figure 26: Mechanical Drawing 46.97 1/4-20 x 5mm DEEP 6.61 45.1 M72 x .75 x .28 DEEP IMAGE CENTER (ROTATION WRT CAMERA EDGE IS .6° MAX) 47.0 46.50±.30 OPTICAL DISTANCE 6.78 31.3 93.9 51.3 M4 x .7 x .6 DEEP 2x BOTH SIDES 50.80 57.9 40.97±.40 36.8 21.57 85.1 F-MOUNT CONFIGURATION 46.96±.40 93.9 6.56±.30 OPTICAL DISTANCE SHUTTER I/O CONNECTOR 12.13±.30 OPTICAL DISTANCE 50.72 17.8 74.5 DALSA 03-32-10096-03 40 Preliminary Pantera TF 11M and 6M User’s Manual 4.2 Lens Mounts An F mount adapter is available to order as an accessory. Contact DALSA Sales for more information. See contact information on page 2. 4.3 Mounting the Camera The Pantera TF 11M and 6M cameras can be mounted via the 4 M4 holes (2 per side) and the 1/4”-20 threaded tripod mount located on the bottom of the front plate. 4.4 Thermal Management For any CCD camera optimal performance is achieved by transferring heat away from the sensor. Keeping a sensor “cool” reduces the amount of dark current generated. Dark current is the leading contributor to FPN, PRNU, dark offset, random noise and other performance specifications, especially when a camera is significantly gained (i.e. +10db). Generally, dark current doubles for every 7°C increase in temperature at the sensor and increases linearly with integration time. The Pantera FF 11M and 6M mechanicals have been optimized to transfer heat from the sensor to the front of the housing. Mount fans away from the camera to avoid vibration, and direct the airflow across the housing to decrease the temperature delta between ambient and housing temperatures. Convection is the ideal method to minimize camera warm-up times and reduce dark current generation. Both methods: either conduction through heat sinking, or convection through air flow, greatly reduce dark current and will improve you systems performance. 4.5 Environment The camera and cables should be shielded from environmental noise sources for best operation. The camera should also be kept as cool as possible. The specified operating temperature is 0–40°C measured at the top of the camera. DALSA 03-32-10096-03 Pantera TF 11M and 6M User’s Manual Preliminary 41 5 Cleaning and Maintenance 5.1 Cleaning Electrostatic Discharge and the CCD Sensor Charge-coupled device (CCD) image sensors are metal oxide semiconductor (MOS) devices and are susceptible to damage from electrostatic discharge (ESD). Although many sensor pins have ESD protection circuitry, the ESD protection circuitry in CCDs is typically not as effective as those found in standard CMOS circuits. Electrostatic charge introduced to the sensor window surface can induce charge buildup on the underside of the window that cannot be readily dissipated by the dry nitrogen gas in the sensor package cavity. When charge buildup occurs, surface gated photodiodes (SGPDs) may exhibit higher image lag. Some SGPD sensors may also exhibit a highly non-uniform response when affected by charge build-up, with some pixels displaying a much higher response when the sensor is exposed to uniform illumination. The charge normally dissipates within 24 hours and the sensor returns to normal operation. Preventing ESD Damage To prevent ESD damage, DALSA advises you to take the following handling precautions. DALSA 1. Ground yourself prior to handling CCDs. 2. Ensure that your ground and your workbench are also properly grounded. Install conductive mats if your ground or workbench is non-conductive. 3. Use bare hands or non-chargeable cotton gloves to handle CCDs. NOTE: Rubber fingercots can introduce electrostatic charge if the rubber comes in contact with the sensor window. 4. Handle the CCD from the edge of the ceramic package and avoid touching the sensor pins. 5. Do not touch the window, especially in the region over the imaging area. 03-32-10096-03 42 Preliminary Pantera TF 11M and 6M User’s Manual 6. Ground all tools and mechanical components that come in contact with the CCD. 7. DALSA recommends that CCDs be handled under ionized air to prevent static charge buildup. 8. Always store the devises in conductive foam. Alternatively, clamps can be used to short all the CCD pins together before storing. The above ESD precautions need to be followed at all times, even when there is no evidence of CCD damage. The rate which electrostatic charge dissipates depends on numerous environmental conditions and an improper handling procedure that does not appear to be damaging the CCDs immediately may cause damage with a change in environmental conditions. Protecting Against Dust, Oil, and Scratches The CCD window is part of the optical path and should be handled like other optical components, with extreme care. Dust can obscure pixels, producing dark patches on the sensor response. Dust is most visible when the illumination is collimated. The dark patches shift position as the angle of illumination changes. Dust is normally not visible when the sensor is positioned at the exit port of an integrating sphere, where the illumination is diffuse. Dust can normally be removed by blowing the window surface using clean, dry, compressed air, unless the dust particles are being held by an electrostatic charge, in which case either an ionized blower or wet cleaning is necessary. Oil is usually introduced during handling. Touching the surface of the window barehanded will leave oily residues. Using rubber fingercots and rubber gloves can prevent contamination. However, the friction between rubber and the window may produce electrostatic charge that may damage the sensor. To avoid ESD damage and to avoid introducing oily residues, only hold the sensor from the edges of the ceramic package and avoid touching the sensor pins and the window. Improper handling, cleaning or storage of the sensor can cause scratches. Vacuum picking tools should not come in contact with the window surface. CCDs should not be stored in containers where they are not properly secured and can slide against the container. Scratches diffract incident illumination. When exposed to uniform illumination, a sensor with a scratched window will normally have brighter pixels adjacent to darker pixels. The location of these pixels will change with the angle of illumination. Cleaning the Sensor Window DALSA 1. Use clean, dry, compressed air to blow off loose particles. This step alone is usually sufficient to clean the sensor window. 2. If further cleaning is required, use a lens wiper moistened with alcohol. 3. We recommend using lint free, ESD safe cloth wipers that do not contain particles that can scratch the window. 4. Wipe the window carefully and slowly. 03-32-10096-03 Pantera TF 11M and 6M User’s Manual Preliminary 43 5.2 Maintenance There are no user serviceable parts on this camera. Please contact DALSA service. DALSA 03-32-10096-03 44 DALSA Preliminary Pantera TF 11M and 6M User’s Manual 03-32-10096-03 Pantera TF 11M and 6M User’s Manual Preliminary 45 6 Troubleshooting The information in this chapter can help you solve problems that may occur during the setup of your camera. Remember that the camera is part of the entire acquisition system. You may have to troubleshoot any or all of the following: • power supplies • cabling • frame grabber hardware & software • host computer • light sources • optics • operating environment • encoder Your steps in dealing with a technical problem should be: 1. Try the general and specific solutions listed in sections 6.1, 6.2, and 6.3. 2. If these solutions do not resolve your problem, see section 6.4 on getting product support. 6.1 Common Solutions Connections The first step in troubleshooting is to verify that your camera has all the correct connections. Power Supply Voltages Check for the presence of all voltages at the camera power connector. Verify that all grounds are connected. EXSYNC When the camera is powered on for the first time, the factory setting is exposure mode 8 (no external inputs required). After you have saved settings, the camera powers up with the saved settings next time it is rebooted. DALSA 03-32-10096-03 46 Preliminary Pantera TF 11M and 6M User’s Manual Data Clocking/Output Signals To validate cable integrity, have the camera send out a test pattern and verify it is being properly received. 6.2 Troubleshooting Using the Serial Interface The following commands can aid in debugging. (The complete command protocol is described in Appendix B.) Communications To quickly verify serial communications send the help command. The h command returns the online help menu. Verify Parameters To verify the camera setup, send the gcp command. Verify Factory Calibrated Settings To restore the camera’s factory settings, send the rfs command. After executing this command send the gcp command to verify the factory settings. Verify Timing and Digital Video Path Use the test pattern feature to verify the proper timing and connections between the camera and the frame grabber and verify the proper output along the digital processing chain. See below. Generating Test Patterns The camera can generate a test pattern to aid in system debugging. Use the command svm i to activate the test pattern (see section 3.14 Setting the Video Mode and Generating Test Patterns for details). The test pattern is a ramp from 1 to the number of pixels in the line, then starts at 1 again. Use the test pattern to verify the proper timing and connections between the camera and the frame grabber. • No test pattern or bad test pattern — May indicate a problem with the camera (e.g. missing bit) or a system setup problem (e.g. frame grabber or timing). Verify the presence of the LVAL and STROBE signals. • Test pattern successful — Run the svm 0 command to deactivate video correction. Verify Temperature To check the camera’s internal temperature, use the vt command. If it is within the proper range, the camera returns OK>. Otherwise the camera returns an error message. DALSA 03-32-10096-03 Pantera TF 11M and 6M User’s Manual Preliminary 47 LED Status Located on the back of the camera is a red/green LED used to display the operational status of the camera. Red lights indicate errors or warnings and green lights indicate progress and OKs. Error and warning states are accompanied by corresponding messages further describing current camera status. See section 2.2.1 LED Status Indicator for the complete LED information. 6.3 Specific Solutions No Output or Erratic Behavior If your camera provides no output or behaves erratically, it may be picking up random noise from long cables acting as antennae. Do not attach wires to unused pins. Verify that the camera is not receiving spurious inputs (e.g. EXSYNC, if camera is in exposure mode that regulates external signals). Line Dropout, Bright Lines, or Incorrect Frame Rate Verify that the frequency of the internal sync is set correctly, or when the camera is set to external sync that the EXSYNC signal supplied to the camera does not exceed the camera’s maximum specified frame rate. Noisy Output Check your power supply voltage outputs for noise. Noise present on these lines can result in poor video quality. Low quality or non-twisted pair cable can also add noise to the video output. Dark Patches If dark patches appear in your output the optics path may have become contaminated. Clean your lenses and sensor windows with extreme care. 1. Take standard ESD precautions. 2. Wear latex gloves or finger cots 3. Blow off dust using a filtered blow bottle or dry, filtered compressed air. 4. Fold a piece of optical lens cleaning tissue (approx. 3" x 5") to make a square pad that is approximately one finger-width 5. Moisten the pad on one edge with 2-3 drops of clean solvent—either alcohol or acetone. Do not saturate the entire pad with solvent. 6. Wipe across the length of the window in one direction with the moistened end first, followed by the rest of the pad. The dry part of the pad should follow the moistened end. The goal is to prevent solvent from evaporating from the window surface, as this will end up leaving residue and streaking behind. DALSA 03-32-10096-03 48 Preliminary Pantera TF 11M and 6M User’s Manual 7. Repeat steps 2-4 using a clean tissue until the entire window has been cleaned. 8. Blow off any adhering fibers or particles using dry, filtered compressed air. Horizontal Lines or Patterns in Image A faulty or irregular encoder signal may result in horizontal lines due to exposure time fluctuations; ensure that your exposure time is regular. If you have verified that your exposure time is consistent and patterns of low frequency intensity variations still occur, ensure that you are using a DC or high frequency light source. DALSA 03-32-10096-03 Pantera TF 11M and 6M User’s Manual Preliminary 49 6.4 Product Support If there is a problem with your camera, collect the following data about your application and situation and call your DALSA representative. Note: You may also want to photocopy this page to fax to DALSA. Customer name Organization name Customer phone number fax number Complete Product Model Number (PT-21-11M04, PT-21-06M08...) Complete Serial Number Your DALSA Agent or Dealer Acquisition System hardware (frame grabber, host computer, light sources, etc.) Acquisition System software (version, OS, etc.) Power supplies and current draw Data rate used Control signals used in your application, and their frequency or state (if applicable) Results when you run the gcp command Detailed description of problem encountered. T EXSYNC Other _______ please attach description with as much detail as appropriate In addition to your local DALSA representative, you may need to call DALSA Technical Sales Support: Voice: Fax: DALSA North America 519-886-6000 519-886-8023 Europe +49-8142-46770 +49-8142-467746 Asia 519-886-6000 519-886-8023 03-32-10096-03 50 DALSA Preliminary Pantera TF 11M and 6M User’s Manual 03-32-10096-03 Pantera TF 11M and 6M User’s Manual Preliminary 51 Appendix A Camera Link™ Reference, Timing, and Configuration Table Camera Link is a communication interface for vision applications. It provides a connectivity standard between cameras and frame grabbers. LVDS Technical Description Low Voltage Differential Signaling (LVDS) is a high-speed, low-power general-purpose interface standard. The standard, known as ANSI/TIA/EIA-644, was approved in March 1996. LVDS uses differential signaling, with a nominal signal swing of 350mV differential. The low signal swing decreases rise and fall times to achieve a theoretical maximum transmission rate of 1.923 Gbps into a loss-less medium. The low signal swing also means that the standard is not dependent on a particular supply voltage. LVDS uses currentmode drivers, which limit power consumption. The differential signals are immune to ±1 V common volt noise. Camera Signal Requirements This section provides definitions for the signals used in the Camera Link interface. The standard Camera Link cable provides camera control signals, serial communication, and video data. Video Data The Channel Link technology is integral to the transmission of video data. Image data and image enable signals are transmitted on the Channel Link bus. Four enable signals are defined as: • FVAL—Frame Valid (FVAL) is defined HIGH for valid lines. • LVAL—Line Valid (LVAL) is defined HIGH for valid pixels. • DVAL—Data Valid (DVAL) is defined HIGH when data is valid. • Spare— A spare has been defined for future use. All four enable signals must be provided by the camera on each Channel Link chip. All unused data bits must be tied to a known value by the camera. For more information on image data bit allocations, refer to the official Camera Link specification on the http://vfm.dalsa.com Web site. DALSA 03-32-10096-03 52 Preliminary Pantera TF 11M and 6M User’s Manual Camera Control Signals Four LVDS pairs are reserved for general-purpose camera control. They are defined as camera inputs and frame grabber outputs. Camera manufacturers can define these signals to meet their needs for a particular product. The signals are: • Camera Control 1 (CC1) • Camera Control 2 (CC2) • Camera Control 3 (CC3) • Camera Control 4 (CC4) Communication Two LVDS pairs have been allocated for asynchronous serial communication to and from the camera and frame grabber. Cameras and frame grabbers should support at least 9600 baud. These signals are • SerTFG—Differential pair with serial communications to the frame grabber. • SerTC—Differential pair with serial communications to the camera. The serial interface will have the following characteristics: one start bit, one stop bit, no parity, and no handshaking. It is recommended that frame grabber manufacturers supply both a user interface and a software application programmming interface (API) for using the asynchronous serial communication port. The user interface will consist of a terminal program with minimal capabilities of sending and receiving a character string and sending a file of bytes. The software API will provide functions to enumerate boards and send or receive a character string. See Appendix B in the Official Camera Link specification on the http://vfm.dalsa.com Web site. Power Power will not be provided on the Camera Link connector. The camera will receive power through a separate cable. Camera manufacturers will define their own power connector, current, and voltage requirements. DALSA 03-32-10096-03 Pantera TF 11M and 6M User’s Manual Preliminary 53 Camera Link Video Timing Figure 27: Pantera TF 11M4 and 6M8 Timing (Input and Output Relationships) STROBE tFRAME PERIOD twSYNC_INT twSYNC IMPORTANT: This camera uses the falling edge of EXSYNC to trigger line readout, unlike previous DALSA cameras, which used the rising edge. EXSYNC tTRANSFER tREADOUT tOVERHEAD FRAME VALID tLF tFL LINE VALID tLINE tLVAL_LOW 1 N DATA DVAL Table 12: 11M Single Output Timing Symbol Binning 1x1 2x2 4x4 twSYNC (min sync pulse, 100ns 100ns 100ns 1us 1us 1us 1.0ms 1.1ms 1.2ms 375ms 224ms 149ms 125us 125us 125us 1us 1us 1us TwSYNC_INT (min integration pulse, in SMART SYNC) 1us 1us 1us tFRAME PERIOD (min 376ms 225ms 150ms 28.5us 55.5us 110us 112us 112us 112us 29us 56us 112us 0ns 25ns 25ns not SMART SYNC) twSYNC (min sync pulse in SMART SYNC) tTRANSFER (time from falling edge of EXSYNC to start of readout in SMART SYNC, pretrigger=0) tREADOUT (frame readout time, pretrigger=0) tOVERHEAD (time after readout before next EXSYNC) TwSYNC_INT (min integration pulse, not SMART SYNC) frame period) tFL (time from FVAL to first LVAL) tLINE (LVAL high time) tLVAL_LOW (LVAL low time) tLF (time from last LVAL to end of FVAL) DALSA 03-32-10096-03 54 Preliminary Pantera TF 11M and 6M User’s Manual Table 13: 11M Dual Output Timing Symbol Binning 1x1 2x2 4x4 twSYNC (min sync pulse, 100ns 100ns 100ns 1us 1us 1us 690us 720us 774us 226ms 150ms 112ms tOVERHEAD (time after readout before next EXSYNC) 125us 125us 125us TwSYNC_INT (min 1us 1us 1us TwSYNC_INT (min integration pulse, in SMART SYNC) 1us 1us 1us tFRAME PERIOD (min 227ms 151ms 113ms 28.5us 55.5us 110.0us 56us 56us 56us 29us 56us 112us 300ns 300ns 250ns Symbol Binning 1x1 2x2 4x4 twSYNC (min sync pulse, 100ns 100ns 100ns 1us 1us 1us 448us 868us 609us 218ms 130ms 85ms not SMART SYNC) twSYNC (min sync pulse in SMART SYNC) tTRANSFER (time from falling edge of EXSYNC to start of readout in SMART SYNC, pretrigger=0) tREADOUT (frame readout time, pretrigger=0) integration pulse, not SMART SYNC) frame period) tFL (time from FVAL to first LVAL) tLINE (LVAL high time) tLVAL_LOW (LVAL low time) tLF (time from last LVAL to end of FVAL) Table 14: 6M Single Output Timing not SMART SYNC) twSYNC (min sync pulse in SMART SYNC) tTRANSFER (time from falling edge of EXSYNC to start of readout in SMART SYNC, pretrigger=0) tREADOUT (frame readout time, pretrigger=0) DALSA 03-32-10096-03 Pantera TF 11M and 6M User’s Manual Preliminary 55 Binning 1x1 2x2 4x4 tOVERHEAD (time after readout before next EXSYNC) 125us 125us 125us TwSYNC_INT (min 1us 1us 1us TwSYNC_INT (min integration pulse, in SMART SYNC) 1us 1us 1us tFRAME PERIOD (min 219ms 131ms 86ms 21us 41us 81us 86us 86us 86us 21us 41us 81us 300ns 300ns 250ns Symbol integration pulse, not SMART SYNC) frame period) tFL (time from FVAL to first LVAL) tLINE (LVAL high time) tLVAL_LOW (LVAL low time) tLF (time from last LVAL to end of FVAL) Table 15: 6M Dual Output Timing Symbol Binning 1x1 2x2 4x4 100ns 100ns 1us 1us 1us 550us 568us 610us 131ms 86ms 63ms 125us 125us 125us 1us 1us 1us 1us 1us 1us 132ms 87ms 64ms twSYNC (min sync pulse, 100ns not SMART SYNC) twSYNC (min sync pulse in SMART SYNC) tTRANSFER (time from falling edge of EXSYNC to start of readout in SMART SYNC, pretrigger=0) tREADOUT (frame readout time, pretrigger=0) tOVERHEAD (time after readout before next EXSYNC) TwSYNC_INT (min integration pulse, not SMART SYNC) TwSYNC_INT (min integration pulse, in SMART SYNC) tFRAME PERIOD (min frame period) DALSA 03-32-10096-03 56 Preliminary Pantera TF 11M and 6M User’s Manual Symbol Binning 1x1 2x2 4x4 tFL (time from FVAL to 21us 41us 81us 42us 42us 42us 21us 41us 81us 300ns 300ns 250ns first LVAL) tLINE (LVAL high time) tLVAL_LOW (LVAL low time) tLF (time from last LVAL to end of FVAL) Camera Link™ Configuration Table The following table provides tap reconstruction information. DALSA is working with the machine vision industry to use this table as the basis for auto configuration. Visit the http://vfm.dalsa.com Web site and view the DALSA Camera Link Implementation Road Map document, 03-32-00450, for further details. Pantera TF 11M4 and 6M8 Interface Parameters Table 16: Frame Grabber Interface Parameters (Unverified) Item (when programmable configuration the options are separated with a | ) Imager Dimension 6M8 2 2 Imager Columns<number of active columns, X> 2672 2048 Imager Rows<number of active rows, Y> Line Scan/TDI are defined as 1 4032 3076 Number of Imager Taps 1 or 2 1 or 2 <xx MHz> 36 36 Camera Standard <NTSC, PAL, VS, VW, MW> VS VS Variable Window <Column Start, Column End, Row Start, Row End> (0,0,0,0) (0,0,0,0) Multiple Window Number of Windows, (Column Start 1, Column End 1, Row Start 1, Row End 1) (Column Start 2, Column End2, … 0,(0,0,0,0) 0,(0,0,0,0) Camera Color <Hybrid, Mono, Pattern, Solid> Mono Mono Pattern Size <(T1,Columns*Rows)(T2, Columns*Rows)(T3,Columns*Rows….> (T0, 1*1) (T0, 1*1) Color Definition <T1= R,G,B, CY, MG, Y, or M> (T0=(1.1M) (T0=(1.1M) Row Color Offset 0 0 Tap Clock Rate DALSA <1,2 or 1|2> 11M4 <1,2,3…..> <0,1,2,3…> Column Color Offset <0,1,2,3…> 0 0 Number of Camera Configurations<1,2,3,…> 2 2 03-32-10096-03 Pantera TF 11M and 6M User’s Manual Preliminary Item (when programmable configuration the options are separated with a | ) 11M4 6M8 Configuration Definition Cx= HDW, Number of Output Taps, Bit Width, Number of Processing Nodes where Cx is the configuration ID x is <1,2,3…> HDW is <Base, Medium, Full> Number of Output Taps is <1,2,3…> Bit width is <8, 10,12…> Number Processing Nodes is <1 or 2> C1 = Base 1, 14,1 C2 = Base 2,12,1 C3 = Base 1,12,1 C4 = Base 1, 10, 1 C5 = Base 2, 10, 1 C6 = Base 1, 8, 1 C7 = Base 2, 8, 1 C1 = Base 1, 14,1 C2 = Base 2,12,1 C3 = Base 1,12,1 C4 = Base 1, 10, 1 C5 = Base 2, 10, 1 C6 = Base 1, 8, 1 C7 = Base 2, 8, 1 Tap Reconstruction In some configurations the reconstruction may change. C0 is the default output format and must be listed. Output configurations that don’t conform are listed separately. <Cx,Tn (Column Start, Column End, Column Increment, Row Start, Row End, Row Increment> CO,T1(1,1336,1,1, 2016,1) CO,T2(1337,2672, 1,2017,4032) CO,T1(1,1024,1,1, 1538,1) CO,T2(1025,2048, 1,1539,3076,1) Row Binning Factor <1,2,3 or 1|2|3> 1|2|4 1|2|4 Column Binning Factor 1|2|4 1|2|4 Pretrigger Pixels <0,1,2…or 0..15> <1,2,3 or 1|2|3> 0..15 (programmable) 0..15 (programmable) Pretrigger Lines <0,1,2.. or 0..15> 0 0 Line/Frame Time Minimum <xx ns> 1 000 000 1 000 000 Line/Frame Time Maximum <xx ns> 16 000 000 000 16 000 000 000 Internal Line/Frame Time Resolution <xx ns> 0 if not applicable N/A N/A Pixel Reset Pulse Minimum Width <xx ns> 0 if not applicable N/A N/A Internal Pixel Reset Time Resolution <xx ns> 0 if not applicable N/A N/A Pixel Reset to Exsync Hold time DALSA 57 TBD TBD BAUD Rate <9600….> <xx ns> 9600 9600 CC1 <Exsync> Exsync Exsync CC2 <Spare> Spare Spare CC3 <Forward, Spare> Spare Spare CC4 <Spare> Spare Spare DVAL out <Strobe Valid, Alternate> Data Valid, held high except in binning modes Data Valid, held high except in binning modes FVAL out <Frame Valid, Alternate> Frame Valid Frame Valid Spare out <Spare> Spare Spare 03-32-10096-03 58 DALSA Preliminary Pantera TF 11M and 6M User’s Manual 03-32-10096-03 Pantera TF 11M and 6M User’s Manual Preliminary 59 Appendix B Commands and Error Handling B1 All Available Commands This table provides a brief overview of all of the available user commands. For a detailed explanation of these commands, refer to Chapter 3. Parameters: i = integer f = float t = tap DALSA Table 17: All Available Commands Command Syntax Parameters Description gain mode gm get camera model gcm Read the camera model number get camera parameters gcp Read all of the camera parameters. get camera serial gcs Read the camera serial number get camera version gcv Read the firmware version and FPGA version get sensor serial gss Read the sensor serial number help h Display the online help output mode select oms reset camera rc Reset the entire camera (reboot) restore factory settings rfs Restore the camera’s factory settings. restore user settings rus Restore the camera's last saved user settings. i i Sets the digital gain mode. Available values are: 0: 1x output gain 1: 2x output gain 2: 4x output gain Sets the data mode to use. Available values are: 8: 8 bit mode 10: 10 bit mode 12: 12 bit mode 14: 14 bit mode 03-32-10096-03 60 Parameters: i = integer f = float t = tap DALSA Preliminary Pantera TF 11M and 6M User’s Manual Command Syntax Parameters Description set baud rate sbr i Set the speed of camera serial communication port. Baud rates: 9600, 19200, 57600, and 115200. Default baud: 9600 strobe control pulse scp f f Sets the strobe pulse timing. The first value is the time the keep the signal high (or on) in a range from 0-65 in .001 millisecond steps. The second value is the time in milliseconds to keep the value low (or off). shutter control timing sct f f Controls the shutter signal’s opening and closing times. The first value is the time to keep the shutter open in a range from 0 to 65 in .001 millisecond steps. The second value is the shutter’s closing time in milliseconds. set exposure time set f Set the exposure time in exposure mode 8 or 6. Value is a floating-point number in milliseconds in a range from .001 to 16000.000. set exposure mode sem i Set the exposure mode. Available values are: 4: Smart EXSYNC 6: External SYNC, programmable exposure time 8: (Factory Setting) Internal sync, programmable exposure time set output mode sos i Sets whether to read out data using one or two taps. Use 1 for one tap or 2 for two taps. set pretrigger sp i Set the pretrigger to a value from 0 or 15 set system gain ssg t i The first value is the tap value. Either 1 for the left tap or 2 for the right tap. The second value is the analog gain with an available range from 0-4095. 03-32-10096-03 Pantera TF 11M and 6M User’s Manual Parameters: i = integer f = float t = tap DALSA Preliminary Parameters 61 Command Syntax set video mode svm write user settings wus Write all of the user settings to EEPROM verify temperature vt Displays the temperature of the digitizer board and the sensor board. Condition <0ºC or >85ºC will produce an error condition. i Description Set video mode. Available values are: 0: Normal operating mode 1: Test pattern Left side) 2: Test pattern Right side 3: Test pattern Both sides 4: Flip image Left side 5: Flip image Left side Test pattern Left side 6: Flip image Left side Test pattern Right side 7: Flip image Left side Test pattern Both sides 8: Flip image Right side 9: Flip image Right side Test pattern Left side 10:Flip image Right side Test pattern Right side 11:Flip image Right side Test pattern Both sides 12:Flip image Both sides 13:Flip image Both sides Test pattern Left side 14:Flip imgae Both sides Test pattern Right side 15:Flip image Both sides Test pattern Both sides 03-32-10096-03 62 DALSA Preliminary Pantera TF 11M and 6M User’s Manual 03-32-10096-03 Pantera TF 11M and 6M User’s Manual Preliminary 63 Appendix C EMC Declaration of Conformity We, DALSA 605 McMurray Rd., Waterloo, ON CANADA N2V 2E9 declare under sole responsibility, that the product(s): PT-2x-11M4 PT-2x-06M8 fulfill(s) the requirements of the standard(s) EN 61326 EMC: EN 5011 CLASS A EN 61000 3-2 EN 61000 3-3 EN 61000 4-2 EN 61000 4-3 EN 61000 4-4 EN 61000 4-5 EN 61000 4-6 EN 61000 4-11 This product complies with the requirements of the Low Voltage Directive 73/23/EEC and the EMC Directive 89/336/EEC and carries the CE mark accordingly. Place of Issue Date of Issue Name and Signature of authorized person Waterloo, ON, CANADA March 2005 Hank Helmond Quality Manager, DALSA Corp. This Declaration corresponds to EN 45 014. DALSA 03-32-10096-03 64 DALSA Preliminary Pantera TF 11M and 6M User’s Manual 03-32-10096-03 Pantera TF 11M and 6M User’s Manual Preliminary 65 Appendix D Revision History DALSA Revision Number Change Description 00 Preliminary release 01 On page 8, sensor alignment updated the x,y from ±200µm to be ±400µm Added Figure 7: Pantera TF 6M Normalized Noise vs. Camera Front Plate Temperature, Figure 8: Pantera TF 6M Dark Offset vs Camera Front Plate Temperature, and Figure 9: Pantera TF 6M FPN vs Camera Front Plate Temperature to page 13 and 14. Updated mechanical drawing to show shutter control connector in section 4.1. Added Shutter Control Connector description and pinout to section 2.2.4. 02 Added 14 bit data output functionality to section 3.5 Setting the Data Mode and to section B1 All Available Commands. Added section 3.8 Controlling the Camera’s Shutter and Strobe. Added shutter and strobe commands to section B1 All Available Commands. 03 In Table 1: Changed Fixed Pattern Noise spec from “% rms” to “DN rms” and changed Max value from <3.8 to <5. DC Offset Max changed from 52 to 55. Added “100ms exposure time” to Note 5. 03-32-10096-03 66 DALSA Preliminary Pantera TF 11M and 6M User’s Manual 03-32-10096-03 Pantera TF 11M and 6M User’s Manual Preliminary 67 Index 2 2 taps, 23 A aperture, 8 applications, 6 B F baud rate, 25 binning, 32 bright lines, 47 features, 5 fill factor, 8 frame rate, 9 FVAL, 51 C G camera control signals, 52 Camera Link configuration, 17 connector, 17 signals, 18 clock signals, 18 command reference, 59 commands descriptions, 59 compliance, 63 connector Camera Link, 17 data, 17 pinout, 17 power, 19 shutter, 19 gain range, 9 D dark patches, 47 data bus, 18 data rate, 9 digital data, 17 DVAL, 18, 51 dynamic range, 9 E EMC Declaration of Conformity, 56, 63 exposure control, 25 DALSA modes, 25 setting, 26 time, 25 exposure time setting, 28 EXSYNC, 18 troubleshooting, 45 external trigger, 18 H help, 21 I incorrect line rate, 47 installation, 15 interface parameters, 56 L LED, 16 lens mounts, 40 line dropout, 47 LVAL, 18, 51 LVDS, 51 pairs, 52 M MDR26 connector, 15, 17 modes, 26 default, 27 exposure, 26 operating, 26 03-32-10096-03 68 Preliminary N noisy output, 47 O operating modes, 26 operating temp, 9 P performance specifications, 8 pixel fill factor, 8 size, 8 power dissipation, 8 PRNU, 9 R rebooting, 33 resolution, 8 responsivity, 9 graph, 10 S sensor alignment, 8 drawing, 7 serial interface, 21 DALSA Pantera TF 11M and 6M User’s Manual settings restoring, 23 saving, 23 shutter connector, 19 control, 19, 29 size, 8 specifications, 8 electro-optical, 9 startup sequence, 22 STROBE, 18 troubleshooting, 46 T tap reconstruction, 56 Technical Sales Support, 49 temperature, 9 test patterns generating, 46 setting, 34 timing, 53 camera, 53 Camera Link, 53 exposure, 28 troubleshooting, 45 V video data, 51 video modes, 34 03-32-10096-03