1
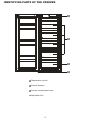
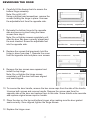
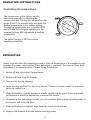
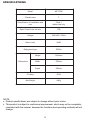
Upright Freezer
USER MANUAL
MF172W
CONTENTS
Safety information
........................................ 2-3
Identifying parts of the freezer
........................................ 4
Transporting
........................................ 5
Installation
........................................ 5
Reversing the door
........................................ 6-7
Operating instructions
........................................ 8
Cleaning & Maintenance
........................................ 8-9
Energy saving tips
........................................ 10
Disconnection of the appliance
........................................ 10
Troubleshooting Guide
........................................ 11
Repairs, Service & Warranty
........................................ 12
Specifications
........................................ 13
1
SAFETY INFORMATION
Congratulations on your new Midea freezer. This manual contains important information on the
installation, use and care of your appliance. Please read this manual carefully before use. Follow
instructions and keep the manual for future reference.
The appliance is specifically constructed for domestic use and is therefore suitable for the storage of
frozen food and the production of ice-cubes. The appliance has not been designed or manufactured for
professional use. Midea declines all responsibility for damage deriving from improper use of the
appliance. The freezer has undergone the necessary tests on the tightness of the refrigeration circuit
and complies with the safety regulations.
WARNING
WARNING
The WARNING symbol indicates information that concerns your personal safety
CAUTION
The CAUTION symbol indicates information on avoiding damage to the appliance
CAUTION
R600a WARNING LABEL
R600a
R600a Refrigerant Warning
· This appliance contains a small quantity of flammable, non-synthetic R600a refrigerant.
· Ensure that the tubing of the refrigerant circuit is not damaged during transportation and
R600a
installation.
· Ensure careful installing, handling and disposing to avoid safety hazards. If accidental
damage occurs, keep the appliance away from open fires or devices that produce sparks,
unplug the appliance and call an authorised service agent. Thoroughly ventilate the room in
which the appliance is situated for several minutes.
· Leaking refrigerant may cause eye injuries or could ignite.
· Hydrocarbon refrigerants have excellent refrigerant properties, minimal global warming
potential and no ozone depletion potential.
· Hydrocarbon refrigerants cannot be ‘retrofitted’ to an appliance that has not been designed
and approved to use that type of refrigerant.
· The room for installing the appliance must be at least 1m3 per 8g of refrigerant. The amount
of refrigerant in the appliance can be found on the rating plate attached to the appliance.
2
SAFETY INFORMATION
Safety Precautions
- The freezer is designed to operate on a single phase power supply within a voltage range of 220240V/50Hz.
- Do not allow any sharp objects to come in contact with the refrigerant system to avoid damage to the
refrigerant circuit.
- This product is for indoor use only.
- Do not place electrical items or cooking equipment nearby. Keep away from substances which could
cause ignition and ensure good ventilation is always available.
- Do not place or operate any electrical appliances inside the freezer.
- Do not place objects on top of the appliance which are magnetic, heavy or filled with water.
- If the supply cord is damaged, it must be replaced by authorised Midea service personal, service
agent or similarly qualified persons in order to avoid a hazard.
- Do not store flammable, explosive, volatile and highly corrosive materials in the freezer. Containers
with flammable gases or liquids can leak at low temperature. There is a risk of explosion or fire.
- Do not splash water on the appliance. It may cause malfunction or electric shock.
- Always switch off and unplug the appliance before cleaning.
- This appliance is not intended for use by persons (including children) with reduced physical, sensory
or mental capabilities, or lack of experience and knowledge, unless they have been given
supervision or instruction concerning use of the appliance by a person responsible for their safety.
Safety of children
· Young children should be supervised to ensure that they do not play with the appliance.
· Packing (e.g. plastic wraps, polystyrene etc.) can be dangerous for children. There is a
WARNING
risk of suffocation. Keep packaging materials away from children.
Information on disposal
Most of the packing material used is recyclable. Please separate the plastic and cardboard and dispose
through your local recycling depot or place in appropriate recycling collection bins.
If disposing of this appliance, please contact your local authority for safe disposal. Incorrect disposal
may cause injury to the user or flammable gases may cause environmental damage. Remove the door,
cut off the main cable, break or remove spring or bolt catches to prevent children from getting trapped
or harming themselves.
3
IDENTIFYING PARTS OF THE FREEZER
1
2
3
4
1 Temperature control
2 Freezer drawers
3 Freezer compartment cover
4 Adjustable foot
4
TRANSPORTING
Keep the freezer upright and avoid squeezing or vibration during
transport. Avoid a slanting angle over 45 degrees during handling.
Avoid the door or top cap from being under excessive stress when
moving, otherwise it may become deformed.
CAUTION
Do not connect your freezer to the power supply immediately after it is placed
vertically. You should keep it standing for at least 3 hours before connection to let
it settle.
INSTALLATION
Remove all packaging material and adhesive tape before using your new freezer. This
includes the foam base and all adhesive tape holding the freezer accessories inside and
outside.
Clean both the inside and outside of the freezer with a soft cloth and lukewarm soapy
water.
Positioning your freezer
Place your freezer in a well ventilated area away from a heat source and direct sunlight.
Do not install the freezer in a damp or wet location as this may cause damage to the
insulation and result in leakage. Condensation may also build up on the outer cabinet
causing rust.
Use the front two adjustable feet to level the freezer. Rotate the feet in a clockwise
direction to raise the freezer and anti-clockwise to lower. Ensure the freezer slightly tilts
backwards so that the door self-close to provide a consistent closed seal.
Allow for adequate ventilation around your freezer
There should be a clearance of at least 200mm from the
top of your freezer, and 50mm from either the sides of the
freezer (or) the back of the unit. If the freezer is to sit flush
with the cabinetry, then a 50mm clearance must be
available to allow the door to open freely and enable the
removal of baskets.
The minimum clearance recommended at each side is
5mm, if this is the case the door must sit proud of the
cabinetry by 50mm (not flush). A 5mm side clearance will
require 50mm of airspace at the back of the unit to allow for
adequate ventilation.
5
50mm
Minimum
recommended
airspace around
freezer
50mm
50mm
5mm
5mm
DOOR
50mm
REVERSING THE DOOR
Please ensure the freezer is unplugged from the main power source and any
items removed from inside the freezer before reversing the door.
WARNING
Follow below steps to reverse the door from the supplied position.
step 1
1. Remove the cover from the hinge.
hinge cover
2. Use a phillips head screwdriver to remove the 2
screws holding the hinge in place. Support the
weight of the door while removing the hinge.
hinge screws
step 4
3. Lift the door off the bottom hinge and place in a
safe location to prevent damage.
hinge shaft
sleeve
door block
4. Remove the hinge shaft sleeve and door block from
the bottom and relocate it to the opposite side of
the door.
step 5
5. Take the hinge and undo the nut holding the hinge
pin. Relocate to the opposite side and fix in place.
6
REVERSING THE DOOR
6. Carefully tilt the freezer back to access the
bottom hinge assembly.
Note: Do not tilt >45°.
Using a phillips head screwdriver, remove the
screws holding the hinge in place. Unscrew
the adjustable foot from the opposite side.
step 6
bottom hinge assembly
7. Relocate the bottom hinge to the opposite
side and secure in place using the same
screws from step 6.
Note: Do not tighten screws completely until
after the door has been correctly placed and
the seal checked. Screw the adjustable foot
into the opposite side.
8. Replace the screws that previously held the
hinge in place from step 1. Remove the cover
from the opposite side and place over screws.
9. Remove the two screws now exposed and
install the top hinge.
Note: Do not tighten the hinge screws
completely until the door has been aligned
and seals aligned.
adjustable foot
step 7
adjustable foot
bottom hinge assembly
step 8
replace screws here
top cover
step 9
cover installed here
install hinge here
10. To reverse the door handle, remove the two screw caps from the side of the handle.
Unscrew both screws and remove handle. Remove the screw caps from the
opposite side of the door and replace them to this side. Screw handle onto new side
and replace original screw caps on handle.
11. Place the door on the top and bottom hinges, align making sure the door gasket
seals correctly. Once aligned, tighten the hinge screws.
12. Replace the hinge cover.
7
OPERATING INSTRUCTIONS
Controlling the temperature
The temperature of the freezer can be
controlled manually by adjusting the
temperature dial. Turning the temperature dial
(page 4 item 1) to position MAX will lower the
interior temperature to the coldest setting.
Turning the temperature dial to position MIN
will increase the interior temperature to the
warmest setting. MID represents a medium
temperature.
The default setting is MID for normal
operating conditions.
DEFROSTING
Heavy frost will effect the freezing process or internal temperature of the appliance and
increase the power consumption. Thus, defrosting is required if the frost is >5mm thick.
Defrosting is a manual process. Please follow these steps:
1. Switch off and disconnect the appliance.
2. Remove all food from the freezer.
3. Remove the freezer drawers.
4. Open the door and wait for the ice to defrost. Place a container under the freezer to
catch the melted ice.
5. When defrosting, a plastic scraper or plastic utensil may be used. Never use metal
instruments or electrical appliances to defrost the freezer.
6. To speed up the defrosting process, you can carefully place a bowl of boiling water in
the freezer and close the door.
7. When defrosting is complete, wipe down the inside of the freezer.
8. Replace the drawers and food before restoring power.
8
CLEANING & MAINTENANCE
Cleaning the appliance
Before cleaning: Turn appliance off at the power point, then remove the power
cord from the outlet. This will make sure there is no chance of electric shock.
WARNING
Interior
Clean the freezer interior regularly. Turn power off. Wipe the interior with a soft cloth and
lukewarm soapy water. Wipe away any food spills thoroughly. Dry all surfaces and
removable parts. Avoid getting water on the freezer controls. If you have taken out any
removable parts, replace them and switch on the power before re-stocking the freezer.
Exterior
Clean the freezer with only lukewarm soapy water and a soft cloth. Rinse with clean
water and then wipe the surface with a soft clean cloth to remove any soap residue.
Door seal
Take care to keep the door seal clean. Sticky food and drink can cause the seal to stick
to the cabinet and tear when you open the door. Wash the seal with a mild detergent
and warm water. Rinse thoroughly and dry.
CAUTION
Never use hot water, solvents, commercial kitchen cleaners, aerosol cleaners,
metal polishers, caustic or abrasive cleaners or scourers to clean the appliance
as they will damage it. Many commercially available cleaning products and
detergents contain solvents that will damage your freezer. When cleaning,
using only a soft cloth and lukewarm soapy water.
Please check the points below after maintenance:
(1) Is there any damage to the power lead?
(2) Can the power plug be inserted into the power socket correctly?
(3) Is the power plug and/or lead heating up?
9
ENERGY SAVING TIPS
1. Reduce opening the door frequently. This will increase the appliance efficiency and
reduce power consumption.
2. Be sure to wrap foods properly, and wipe containers dry before placing them in the
freezer. This cuts down on frost build-up inside the freezer.
3. There should always be some space between food items for proper air circulation.
4. Hot food should be cooled down before placing into the appliance, otherwise the
interior temperature and power consumption will increase.
5. Adjust the temperature control to a setting that is acceptable for the storage of the
food. This will reduce the power consumption.
DISCONNECTION OF THE APPLIANCE
If unplugging the appliance from the power outlet, please leave at least 5
minutes before re-connection.
CAUTION
During a power failure, do not put additional food in the appliance and reduce opening
the door.
Leave the freezer operating during short vacations.
If the freezer will not be used for several months or it is to be placed in storage, remove
all food and unplug the power cord. Clean and dry the interior thoroughly. To prevent
odour and mould growth, leave the door open slightly: wedging it open if necessary or
have the door removed.
Use extreme caution in the case of children. The unit should not be accessible to child’s
play.
10
TROUBLESHOOTING GUIDE
If you think something may be wrong with your freezer, you can carry out some easy checks before
calling for service. You may locate the problem and spare yourself from inconvenience, saving time and
money.
SYMPTOM
Freezer is not operating
SUGGESTION
· Check that the power cord is plugged into the power outlet properly
and that the outlet is switched “ON”.
· Try running another appliance from the power outlet. If no power is
coming from the outlet you may have blown a fuse or tripped a
circuit of your household power supply.
· Try adjusting the temperature control to a slightly “colder” position.
Unusual noise
· The flow of refrigerant through the pipeline coil could cause
gurgling, similar to water boiling. This is the normal function of the
appliance.
· Metal parts undergo expansion and contraction, as in hot water
pipes. This is normal. Sound will level off or disappear as freezer
continues to run.
· It is quite normal for noise to seem louder just after the freezer
starts operating.
· Other strange sounds may mean that you need to check and take
action. For example, noises may mean that:
- The cabinet is not level.
- The floor is uneven or weak.
- There are vibrations from an object on top of or behind or beside
the freezer.
- The back of the freezer cabinet is touching the wall.
Compressor seems to run
more than expected
·
·
·
·
Temperature in the freezer is
too warm
· Check that the appliance has enough clearance at the sides, back
and top. Refer to installation instruction on page 5.
· Refer to “Controlling the temperature” on page 8.
· You may have kept the door open too long or too frequently.
· Food containers or packaging may be holding a door open.
The door will not close
· Check whether the front of the freezer is tilted back slightly to allow
the door to self close.
· Check whether something is holding the door open.
Is door kept open too long or too often?
Is control set too cold?
Have large amounts of warm food just recently been stored?
If the day is hot or the room is very warm, the freezer will need to
run more than normal.
· The freezer will run more than normal just after you install it or when
it has been turned off for a long time.
The following cases are not malfunctions:
Moisture may form as condensation on the outside of the appliance during humid conditions. To remove
excess moisture, wipe clean.
It is normal that the sides of the appliance and the turnover beam will get warm as a result of the
refrigeration system operation.
The appliance operation could cause electrical interference to electrical equipment.
11
REPAIRS, SERVICE & WARRANTY
It is hazardous for anyone installing, removing, altering, repairing servicing, testing or
certifying the gas system of a gas device (i.e. charging, discharging or breaking into
the refrigeration system that uses hydrocarbon refrigerants). Only an Authorised
Service Person can carry out servicing or repairs to this appliance.
If service is required
If you have a problem which persists after you have made the checks listed in the
Troubleshooting Guide, please contact:
Midea Customer Care on 1300 132 371
Please refer to the enclosed warranty card or visit www.mideaappliances.com.au for
warranty information. Ensure you have the appliance model number and proof of
purchase handy before calling Midea Customer Care to enquire about a warranty
claim.
Complete and retain the following information for your records:
Model No.
Serial No.
Date of purchase
Retailer
Please retain proof of purchase for warranty claims.
12
SPECIFICATIONS
Model
MF172W
Climate class
T
Classification of installation and
use
Class 1
Indoor use only
Rated Total Gross Volume
172L
Voltage
220-240V / 50Hz
Noise Level
42dB
Refrigerant type
R600a
Dimensions
Height
1420mm
Width
550mm
Depth
550mm
IP rating
IPX0
Net Weight
44Kg
NOTE:
· Product specifications are subject to change without prior notice.
· This product is subject to continuous improvement, which may not be completely
consistent with the manual, however the functions and operating methods will not
change.
13
V 05/15