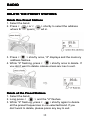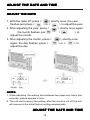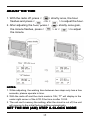
1
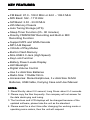
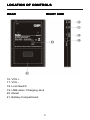
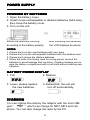
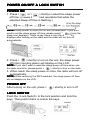
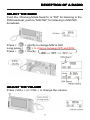
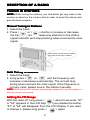
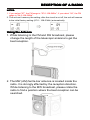
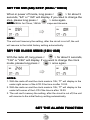
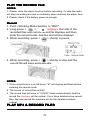
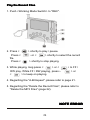
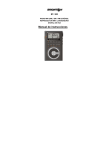
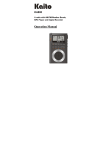
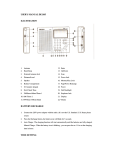
112
3
KA
KA112
1123
FM STEREO · MW · SW DSP RECEIVER /
MP3 PLAYER / DIGITAL RECORDER
Operation Manual
KEY FEATURES
FM Band: 87.0 - 108.0 MHz or 64.0 – 108.0 MHz
MW Band: 522 - 1710 KHz
● SW Band: 2.30 - 23.00 MHz
● 225 Memory Presets
● Auto Tuning Storage (ATS)
● Sleep Timer Function (05 - 90 minutes)
● Directly FM/MW/SW Recording and Built-in MIC
Recording Function
● Support MP3 and WMA Decode
● MP3 A-B Repeat
● 3 Kinds of Play Modes
● Built-in Flash Memory
● Mini-USB 2.0 Jack (High Speed)
● Key Lock Function
● Battery Power Levels Display
● LED Backlight
● Digital Volume Control
● Use 3 x AAA Size Batteries
● Radio Size: 110x69x13mm
● Accessories: Stereo Earphones, 3 x AAA Size Ni-MH
Batteries, USB Cable, Carrying Case and User Manual
●
●
NOTES:
1. Press Shortly: about 0.2 second; Long Press: about 2~3 seconds.
2. Please copy the files frequently. Our company will not answer for
the data destroying and losing.
3. The functions and LCD displays will be changed because of the
updated software, please take the unit as the standard.
4. Please await for a short time after changing the working mode or
operating some orders, then the unit will respond.
INDEX
LOCATION OF CONTROLS...............................................1
LCD DISPLAY.....................................................................3
POWER SUPPLY................................................................4
POWERED BY BATTERIES........................................4
BATTERY
POWER
DISPLAY.......................................4
CHARGING..................................................................4
Charged by the Adaptor........................................5
Charged by the PC...............................................5
POWER ON/OFF & LOCK SWITCH..................................6
RECEPTION OF A RADIO.................................................7
SELECT THE BAND....................................................7
ADJUST THE VOLUME...............................................7
TUNING IN STATIONS................................................8
Manual
Tuning
in
Stations.....................................8
Auto Tuning in Stations.........................................8
Setting
the
FM
Range..............……......................8
Using the Antenna................................................9
SAVING STATIONS...................................................10
Manual Saving....................................................10
Auto Tuning Storage (ATS).................................11
Recall
the
Stored
Frequency...............................11
DELETE THE PRESET STATIONS...........................12
DIRECTLY
MW
(AM)
/
FM
RECORDING...................13
ADJUST THE DATE AND TIME........................................14
SET THE MW (AM) STEP & CLOCK MODE....................16
INDEX
SET THE ALARM FUNCTION..........................................17
SET THE ALARM TIME.............................................17
SET THE ALARM MODE...........................................17
OPEN / CLOSE THE ALARM FUNCTION.................17
CONNECT THE RADIO AND PC.....................................18
SORT RULERS FOR FOLDERS & FILES........................19
PLAY MP3 & RECORD FILES..........................................20
PLAY
MP3
FILES.......................................................20
Play / Pause / Stop.............................................20
Select the Folder.................................................20
FF
/
RW
Play.......................................................21
Select the Play Modes........................................21
A-B Repeat.........................................................21
Delete the MP3 Files..........................................22
PLAY THE RECORD FILES......................................23
Record................................................................23
Play
the
Record
Files..........................................24
NOTE ERROR..................................................................25
SPECIFICATIONS............................................................26
LOCATIOIN OF CONTROLS
FRONT
1. Power On/Off
11. Working Mode Switch
2. Memory; Play ; Set FM Range
12. Telescopic Antenna
3. Freq. +; Music +
13. Neck Strap Hole
4. Freq. -; Music -
14. LCD Display
5. Delete (Memories, MP3 Files,
15. Earphone Jack;
Record Files); Stop Playing
Built-in MIC Jack
6. Station -; Folder -; Adjust Time;
12H / 24H Clock Mode Setting
7. Speaker
8. Station +; Folder +; Adjust Date; MW Step 9K / 10K Setting
9. A-B Repeat; Record
10. MW/SW Band Switch; Play Mode Selection
1
LOCATION OF CONTROLS
REAR
RIGHT SIDE
16. VOL +
17. VOL 18. Lock Switch
19. USB Jack / Charging Jack
20. Reset
21. Battery Compartment
2
LCD DISPLAY
LCD DISPLAY WHILE RECEIVING THE FM
BROADCAST
LCD DISPLAY WHILE PLAYING MUSICS
3
POWER SUPPLY
POWERED BY BATTERIES
1. Open the battery cover.
2. Install 3 new rechargeable or alkaline batteries (AAA size),
then close the battery cover.
3. Turn on the unit.
Install the batteries correctly
according to the battery polarity.
After installing the batteries,
the LCD displays as above.
NOTES:
1. Please don't mix the used batteries with new ones.
2. Please don't mix the rechargeable batteries with the alkaline ones.
3. Please don't charge the alkaline batteries.
4. When the radio is not being used for a long period, remove the
batteries to avoid leakage and corrosion. If battery leakage occurs,
wipe the battery compartment with a soft cloth before inserting new
batteries.
BATTERY POWER DISPLAY
1. Full
2. Medium
3. Lower, please replace
the new batteries.
4. Exhausted, the unit will
turn off automatically.
CHARGING
You can charge the radio by the adaptor with the mini USB
jack "
", which can charge for MP3, MP4 and cell
phone. You can also charge the radio by the PC.
4
POWER SUPPLY
Charged by the Adaptor
1. Install 3 AAA size rechargeable batteries correctly.
2. Plug one port of the adaptor into the AC socket and plug
the other port into the USB jack, "
" will display.
3. With the radio off, press <
> shortly to charge. The
battery power icon "
" flows.
4. When the battery power is full, "
" stops flowing.
Please disconnect the adaptor and the radio.
NOTES:
1. While charging, please make sure the connection is ok.
2. You can know the charging time (about 2 ~ 7 hours) according to
the capacity of the rechargeable batteries.
3. Please only use the supplied adaptor for charging the radio. While
listening to the radio, please use the batteries instead of the
adaptor to avoid the disturb.
4. Please plug or unplug the adaptor with the radio off.
Charged by the PC
1. Plug one port of the supplied USB cable into the USB jack
of the PC and the other port into the USB jack of the radio.
2. After connecting correctly, "
" will display in the task
bar.
3. With the radio off, press <
> shortly to charge, and the
battery power icon "
" flows.
4. When the battery power is full, "
" stops flowing.
Please disconnect the PC and the radio.
NOTE:
If you want to charge the unit by the PC in "MP3" or "REC" mode,
please turn off the unit first and then connect the unit and PC via the
supplied USB cable.
5
POWER ON/OFF & LOCK SWITCH
POWER ON
1. Press <
> or <
> shortly to select the sleep power
off time. (Please do the next operation fast while the
selected sleep off time is flashing.)
NOTE: Sleep power off time (05~90 min) is selectable. If you don't
want to set the sleep power off time, please select "
" (only the
sleep icon displays). That's to say, there is only the sleep icon
displays after turning on the radio and the radio will not turn off
automatically.
2. Press <
> shortly to turn on the unit, the sleep power
off time (counting down) will display on the LCD.
NOTE: If you don't want to reset the sleep power off time when use
the radio next time, please press <
> shortly to turn on the radio.
3. When reach the sleep power off time, the radio will turn off
automatically.
NOTE: While receiving the SW broadcast, the sleep power off time
will not display on the LCD.
POWER OFF
After turning on the unit, press <
> shortly to turn it off.
LOCK SWITCH
Push the <Lock Switch> to the lock position and lock the
keys. Then push it back to unlock the keys.
6
RECEPTION OF A RADIO
SELECT THE BAND
Push the <Working Mode Switch> to "FM" for listening to the
FM broadcast; push to "MW.SW" for listening to MW/SW
broadcast.
Press <
> shortly to change MW to SW.
Long press <
> to change between SW and MW.
Press <
> shortly:
ADJUST THE VOLUME
Press <VOL+> or <VOL-> to change the volume.
7
RECEPTION OF A RADIO
TUNING IN STATIONS
NOTE: While tuning the stations, you had better get very close to the
window or stand on the outdoor field in order to avoid the disturb and
gain the best reception.
Manual Tuning in Stations
1. Select the band.
2. Press <
> or <
> shortly to increase or decrease
the frequency slowly. Please pay attention to the station
signal indicator and stop pressing when receives the clear
signal.
Auto Tuning in Stations
1. Select the band.
2. Long press <
> or <
> and the frequency will
increase or decrease automatically. The unit will stop
tuning when receives the clear signal. If the frequency is
not very clear, please tune in the station manually.
NOTE: While tuning in the stations automatically, please don't use the adaptor, or
else the unit will not respond.
Setting the FM Range
With the radio off, long press <
> about 5 seconds, "87"
or "64" appears in the LCD display. If you release the button,
"87" or "64" will disappear from the LCD display. If you want
to change it, please long press <
> again.
8
RECEPTION OF A RADIO
NOTES:
1. If you select "87", the FM range is "87.0-108.0MHz"; if you select "64", the FM
range is "64.0-108.0MHz".
2. The unit can't memory the setting, after the circuit is cut off, the unit will resume
to the initial factory setting (87.0 - 108.0 MHz) automatically.
Using the Antenna
1. While listening to the FM and SW broadcast, please
change the length of the telescopic antenna to get the
best reception.
2. The MW (AM) ferrite-bar antenna is located inside the
radio. It is strongly effected by the reception direction.
While listening to the MW broadcast, please rotate the
radio to find a position where the best reception can be
searched.
9
RECEPTION OF A RADIO
SAVING STATIONS
Manual Saving
1. Select the band.
2. Tune (manual or auto) in a station.
3. Press <
> shortly once and the memory icon "E"
flashes.
4. Press <
address.
> or <
> shortly to select the memory
NOTE: If the icon "C" displays near the "E", that's to say, the address
has been saved the frequency. If you select this address to save the
frequency, the old frequency will be replaced by the new one.
5. Press <
> shortly to confirm the saving. If you don't
want to save, please press any key. Please remember
the memory address, you can fold the frequency fast.
NOTES:
FM band: can memory 100 (00 ~ 99) frequencies;
MW band: can memory 25 (00 ~ 24) frequencies;
SW band: can memory 100 (00 ~ 99) frequencies.
10
RECEPTION OF A RADIO
Auto Tuning Storage (ATS)
1. Select the band.
2. Long press <
>, the frequency changes fast. That's to
say, the radio is ATS. If receives the strong signal station,
the radio will save automatically. (FM and SW freq. Will
save from the 50th address, MW freq. will save from the
15th address.)
NOTES:
1. While ATS, please get very close to the window or stand on the
outdoor field to avoid the disturb and gain the best reception.
2. The new frequencies will cover the old ones if the radio is ATS once.
3. While ATS, please disconnect the adaptor and the radio in order to
avoid the disturb by adaptor.
Recall the Stored Frequency
1. Select the band.
2. Press <
> or <
> shortly.
NOTE:
While recalling the stored frequency
directly, the unit will jump over the
empty address (has not saved station)
automatically.
RECEPTION
11
OF
A
RADIO
DELETE THE PRESET STATIONS
Delete One Preset Stations
1. Select the band.
2. Press <
> or <
> shortly to select the address
where the frequency saved in.
3. Press <
> shortly once, "d" displays and the memory
address flashes.
4. While "d" flashing, press <
> shortly once to delete. If
you don't want to delete, please press any key to exit.
Delete all the Preset Stations
1. Select the band.
2. Long press <
> and the "d" flashes.
3. While "d" flashing, press <
> shortly again to delete
all the preset frequencies in the selected band. If you
don't want to delete, please press any key to exit.
12
RECEPTION OF A RADIO
DIRECTLY MW (AM) / FM RECORDING
While listening to the FM or AM broadcast, you can record
the programs directly.
1. Please adjust the volume to be the biggest while listening
to the radio.
2. Long press <
>, the "
" displays, the total of the
recorded files and current record file displays and then
enter the record status. Then the record time displays.
NOTES:
1. The record file numbers will be ordinal. If you have deleted some record files,
the new record file numbers will be the deleted numbers ordinal.
2. While recording, please use the earphone to reduce the battery consumption.
3. Press <
4. Press <
> shortly to pause.
> shortly to stop recording.
NOTES:
1. You can find the record files in the "REC" working mode.
2. While recording, the record time (minute and second) displays. If
the record time is over one hour, the hour doesn't display and the
record time (minute and second) displays from zero once again.
3. The unit supports at most 100 (00 ~ 99) record files. Please
observe the record files number and delete the trashy record files in
time.
13
ADJUST THE DATE AND TIME
ADJUST THE DATE
1. With the radio off, press <
> shortly once, the year
flashes and press <
> or <
> to adjust the year.
2. After adjusting the year, press <
> shortly once again,
the month flashes, press <
> or <
> to
adjust the month.
3. After adjusting the month, press <
> shortly once
again, the day flashes, press <
> or <
> to
adjust the day.
NOTE
S:
NOTES
1. While adjusting, the waiting time between two steps only has a few
seconds, please operate in time.
2. The unit can't memory the setting, after the circuit is cut off, the unit
will resume to the initial factory setting automatically.
ADJUST THE DATE AND TIME
14
ADJUST THE TIME
1. With the radio off, press <
> shortly once, the hour
flashes and press <
> or <
> to adjust the hour.
2. After adjusting the hour, press <
> shortly once gain,
the minute flashes, press <
> or <
> to adjust
the minute.
NOTES:
1. While adjusting, the waiting time between two steps only has a few
seconds, please operate in time.
2. With the radio off and the clock mode is 12H, "P" will display in the
under right corner of the LCD if the time is after 12:00.
3. The unit can't memory the setting, after the circuit is cut off, the unit
will resume to the initial factory setting automatically.
SET THE MW (AM) STEP & CLOCK MODE
15
SET THE MW (AM) STEP (9KHz / 10KHz)
When in power off mode, long press <
> for about 5
seconds, "9A" or "10A" will display. If you want to change the
step, please long press <
> once again.
NOTE: 9KHz for China; 10KHz for Europe and America.
NOTE:
The unit can't memory the setting, after the circuit is cut off, the unit
will resume to the initial factory setting automatically.
SET THE CLOCK MODE (12H / 24H)
With the radio off, long press <
> for about 5 seconds,
"12H" or "24H" will display. If you want to change the clock
mode, please long press <
> once again.
NOTES:
1. With the radio off and the clock mode is 12H, "P" will display in the
under right corner of the LCD if the time is after 12:00.
2. With the radio on and the clock mode is 12H, "P" will display in the
under left corner of the LCD if the time is after 12:00.
3. The unit can't memory the setting, after the circuit is cut off, the unit
will resume to the initial factory setting automatically.
SET THE ALARM FUNCTION
16
SET THE ALARM TIME
1. With the radio off, press <
> shortly once, the hour
and " " flashes, then press <
> or <
>
shortly to adjust the hour.
2. After adjusting the hour, press <
> shortly once
again, the minute and "
" flashes, then press
<
> or <
> shortly to adjust the minute.
NOTE: While adjusting, the waiting time between two steps only has
a few seconds, please operate in time.
SET THE ALARM MODE
1. If you want to the unit will turn on and receive the broadcast when
reaches the alarm time, please push the <Working Mode Switch> to
"FM" or "MW.SW".
2. If you want to the unit will turn on and play the MP3 files or record
files when reaches the alarm time, please push the <Working Mode
Switch> to "MP3" or "REC".
NOTE: After the unit turns on automatically, the frequency / MP3 file / record file
and volume is same as the status before the unit turned off last time.
OPEN / CLOSE THE ALARM FUNCTION
1. With the radio off, press <
> shortly once, "
"
displays, that's to say, the alarm function is opened and
the unit will turn on when reaches the alarm time.
2. With the radio off, press <
> shortly once, "
"
disappears from the LCD display, that's to say, the alarm
function is closed.
The alarm function is opened.
The alarm function is closed.
CONNECT THE RADIO AND PC
17
1. Push the <Working Mode Switch> to "MP3" and turn on
the unit.
2. Connect the unit and PC via the supplied USB cable. Plug
one port into the USB jack of the PC and plug the other
port into the USB jack of the radio.
3. After the computer finds the new hardware, "
" will
display in the task bar.
4. Click "My Computer" and enter, you will find a removable
disk.
5. You can copy the MP3 format files into the removable disk.
And you can delete the music files or the record files which
are in the "VOICE" folder.
6. Close the removable disk window.
7. Click "
" and disconnect the unit and PC.
NOTE: If the computer can't find the new hardware, maybe it's
because of the compatibility. Please disconnect the unit and PC, then
press <
> shortly to turn on the unit. Push the <Working Mode
Switch> to "MP3" and then connect the unit and PC via the supplied
USB cable again.
SORT RULERS FOR FOLDERS & FILES
18
SORT RULERS FOR FOLDERS
NOTES:
1. The numbers which are in the brackets are the serial numbers of
folders. The serial numbers are made orderly and automatically
according to the set up time of the folders. The folders which have
no files will not have the serial numbers.
2. If there are MP3 files in every folder, the unit will play them orderly
according to the serial numbers of folders.
NOTE: In every folder (include the folder which is the root directory),
please don't set up too many folders. Or else, maybe the unit will not
find some folders.
SORT RULERS FOR FILES
1. Note that you had better save at most 200 files in every
folder.
2. Please save the MP3 and WAV files in different folders.
3. The unit will play the files orderly according to the copied
time of the files. If you have copied multi-files once, the unit
will play them orderly from the selected file.
PLAY MP3 & RECORD FILES
19
PLAY MP3 FILES
Play / Pause / Stop
1. Push the <Working Mode Switch> to "MP3".
2. Press <
> shortly to play / pause.
Press <
> shortly to stop playing.
Select the Folder
When in stop playing mode, press <
shortly to select the folder.
> or <
>
PLAY MP3 & RECORD FILES
20
FF / RW Play
While playing, long press <
> or <
play. While FF / RW playing, press <
shortly to keep on playing.
> to FF / RW
> or <
>
Select the Play Modes
While playing, press <
> shortly to select the play mode:
If nothing displays, the unit plays all the files circularly.
If "R" displays, the unit plays the current file circularly.
If "FR" displays, the unit plays all the files in this folder
circularly.
A-B Repeat
1. While playing the music, press <
> shortly once to
set the starting point "A".
2. When reaches the suit position, press <
> shortly
once again to set the ending point "B". Then the unit will
play the A-B file repeatedly.
3. While repeating, press <
> shortly again to finish the
repeating and keep on playing the music.
PLAY MP3 & RECORD FILES
21
Delete the MP3 Files
1. Push <Working Mode Switch> to "MP3".
2. Press <
> or <
> shortly to select the MP3
files which you want to delete.
3. Long press <
>, "
" displays.
4. Press <
> shortly to delete the selected file. If you
don't want to delete, please press any key to exit.
PLAY MP3 & RECORD FILES
22
PLAY THE RECORD FILE
NOTES:
1. Please close the alarm function before recording. Or else the radio
will stop recording and turn on suddenly when reaches the alarm time.
2. Please check if the battery power is enough.
Record
1. Push <Working Mode Switch> to "REC".
2. Long press <
>, “
“ displays, the total of the
recorded files and current record file displays and then
enter the record mode. And the record time displays.
3. While recording, press <
> shortly to pause.
4. While recording, press <
> shortly to stop and the
record file will save automatically.
NOTES:
1. If the record time is over 99 hours, "E" will display and flash before
entering the record mode.
2. The format of record files is WAV.
3. The record files will save in "VOICE" folder automatically. And the
record file numbers will be ordinal. If you have deleted some record
files, the new record file numbers will be the deleted numbers
ordinal.
PLAY MP3 & RECORD FILES
23
Play the Record Files
1. Push <Working Mode Switch> to "REC".
2. Press <
Press <
file.
Press <
> shortly to play / pause.
> or <
> shortly to select the record
> shortly to stop playing.
3. While playing, long press <
> or <
RW play. While FF / RW playing, press <
<
> to keep on playing.
> to FF /
> or
4. Regarding the "A-B Repeat", please refer to page 21.
5. Regarding the "Delete the Record Files", please refer to
"Delete the MP3 Files" (page 22).
NOTE ERROR
24
e.g.: Delete the file error,
E01 Order parameter error (e.g.:
Appointed ID error, Not find the file)
E02 No file to play (include: MUSIC, VOICE mode)
E04 Set up directory failed (While recording, if not have
RECORD folder, it will set it up)
E05 No response
e.g.: There are at most 99 files in
E06 Folder is full (e.g.:
RECORD folder)
E07 Disk capacity is not enough (While recording, the disk
capacity is not enough)
e.g.: Not format the disk, it will note while
E08 Flash error (e.g.:
entering MUSIC, VOICE, RING, RECORD folder)
E10 Recording error
E12 Directory doesn't exist
E53 In voice folder, no record files or record files error
SPECIFICATIONS
25
Specifications for Radio
1. Frequency Range
FM
87.0 - 108.0 MHz or 64.0 - 108.0 MHz
MW
522 - 1710 KHz
SW
2.30 - 23.00 MHz
2. Preset Memories(225): FM(100); MW(25); SW(100)
3. Noise Limit Sensitivity
FM
≤ 5μV
MW
≤ 2.5mv/m
SW
≤ 50μV
4. Signal Selection
≥ 40dB
Specifications for MP3
5. Memory
6. Record Format
7. Max. Record Time
8. Battery Consumption
9. Earphone Output
512M / 1G / 2G / 4G
WAV
About 69H (32kbps 1G)
About 15H (by earphone)
≤10mW*2
10. Communication Standard
USB2.0 (high speed)
11. Access Rate
MP3: 16-320Kbps
WMA: 8-384Kbps
12. Max. Out Power:
Approx 100mW
13. Max. Consumption Current:
Approx 120mA
14. Power Source
Batteries: AAA*3
External Adaptor: 5V
15. Speaker
16. Earphone
17. Dimensions
18. Weight:
D50mm
D3.5mm
Approx 110 * 69 * 13mm
Approx 81g(excl. Batteries)
26
KA
112
3
KA112
1123
FM STEREO · MW · SW DSP RECEIVER /
MP3 PLAYER / DIGITAL RECORDER
All copy right reserved by Kaito Electronics, Inc
For update information, visit www.kaitousa.com
Printed in China, 2008 V1.0