1
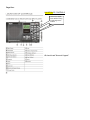
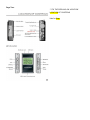
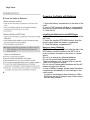
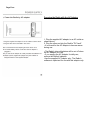
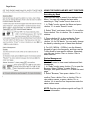
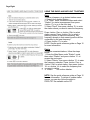
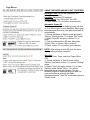
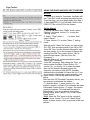
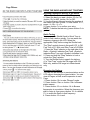
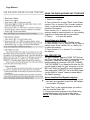
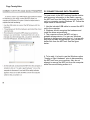
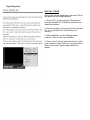
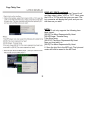
Copyright 2007, Kaito Electronics, Inc.
For update information, visit www.kaitousa.com
Version 1.0, Printed in China
OPERATION MANUAL
The KAITO KA1121 is a frequency synthesized radio receiver with an integrated MP3
recorder/player that covers longwave, AM, shortwave, FM and NOAA weather radio bands. The
MP3 player can be used to record what is received on the radio or it can be used as a conventional
stand-alone MP3 player.
What!s included with the KA1121?
Kaito KA1121 radio with built-in MP3 player
Soft case
Quick reference guide
User Manual
AC adaptor
3 AA rechargeable (TYPE?) batteries
DF6 Ni-MH rechargeable battery for the MP3 player
Stereo earphones
External wire antenna
Warranty card
Installation CD-ROM
USB cable
MAIN FEATURES
The radio and MP3 player can work as a single integrated unit or can be used independently of
each other.
A built-in timer exists to control the on/off switching of the radio and MP3 player.
FM direct recording and external microphone recording is possible using the MP3 player.
Alphanumeric display of up to 100 user-set station names, 400 frequency memories.
LW/MW(AM)/SW dual conversion technology for superior reception results.
PC-based editing of the receiver!s frequency and station name memories.
Local, normal and distant radio sensitivity settings.
Fast/slow tuning speed selection.
External antenna jack.
28x64 matrix LCD display.
MP3 player supports WAV and WMA formats.
MP3 or microphone standalone MP3 player recording.
MP3 player A-B repeat function.
Four playback cycle modes, 6 equalizer configurations for the MP3 player.
Built-in high quality speaker
Power Supply: 3 "AA! Batteries (Radio), 1 DF6 Battery (MP# unit) and AC Power Adapter.
INDEX
Location of controls..........…………………………..1
Power supply......................................................... 3
Using the radio and MP3 Player together...............5
Setting the radio clock.............................................5
Volume control.........................................................5
Keypad lock/unlock................................................. 6
Menu functions........................................................ 6
Tuning the radio.....................................................14
Quick operations.....................................................15
Editing the FREQTXT file........................................16
Active amplifier...................................................... ..16
Using the radio without the MP3 player....................17
How to use this radio................................................ 19
FM mono/stereo ........................................................19
Local/normal/DX sensitivity selection.........................19
Selecting narrow or wide reception bandwidth.......... 19
SSB/CW reception modes..........................................20
NOAA weather band....................................................20
Using the MP3 player with the radio............................ 21
Using the MP3 player without the radio....................... 27
Connecting to a PC and transferring data.....................29
How to upgrade firmware...............................................30
Lyric display....................................................................31
Frequently asked questions.....………………………......33
Specifications ................................................................ 35
Page One:
LOCATION OF CONTROLS
These keys appear
to be "drawn" wrong
on this page of the
manual
#5 should read "Numeric Keypad"
Page Two:
***FIX THE SPELLING ON ‘LOCATION’
LOCATION OF CONTROLS
Hole for Strap
Page Three:
Powering the Radio with Batteries
1. Open the battery compartment on the back of the
radio.
2. Insert 3 "AA" batteries (alkaline or rechargeable).
Note polarity signs inside the battery compartment.
3. Close the lid
Installing the Batteries for the MP3 Player
1. Open the battery compartment on the back of the
MP3 unit.
2. Insert the supplied DF6 NiMH battery. Note the
polarity signs inside the battery compartment.
3. Close the battery compartment lid
Notes on using Batteries
NOTE: When using the MP3 unit with the radio, the
DF6 battery must be installed in the MP3 unit in
order to prevent shutdown in the event of a power
failure.
Do not try to charge dry (alkaline)batteries.
Do not mix old and new batteries together.
Take the batteries out if you don't plan to use the
radio for a long period of time.
Do not use non-rechargeable batteries with the AC
adaptor plugged into the unit.
In case of battery leakage, please clean the battery
compartment immediately to avoid damage to the
radio circuits.
It is best to use batteries when listening to AM or
SW bands, as the AC adaptor may cause noise or
interfere with reception.
Page Four:
Powering the Radio with the AC Adaptor
1. Plug the supplied AC adaptor to an AC outlet as
shown above.
2. Plug the other end into the Radio's "DC Jack".
• It is normal for the AC Adaptor to become warm
during use.
• The Radio's internal batteries will be cut off when
the AC Adaptor is in use.
• If you employ the AC Adaptor for daily use,
remove the Radio's batteries.
•Use the supplied AC Adaptor only. The Radio's
software is optimized for use with this adaptor only.
Page Five:
USING THE RADIO AND MP3 UNIT TOGETHER
1. Observe the LCD screen during each step.
2. Attach the MP3 unit to the Radio
3. Supply power to the Radio (AC or Batteries)
before turning it on.
Adjusting the Radio Clock
When the Radio is turned OFF, press <button 7>
once to get into "Time Set" mode. The sub-display
will show "SET". Press <button 7> again to get into
"Entry" mode. Use the Numeric Keypad to enter the
time. Example: you will have to type "0 1 3 0" for
"1:30".
Power ON / OFF and Change Operating Mode
1. Power ON: Press <button 4> once to turn Radio
ON. The system will enter "Radio" mode.
2. Power OFF: In "Radio" mode, press <button 4>
once to turn Radio OFF.
3. Turn off Main LCD screen: In "Radio" mode,
press and hold <button 4> until the main LCD
screen shuts off.
4. Change operating mode: In "Radio" mode,
press <button 3> to switch to "MP3" mode. In
"MP3" mode, press <button 4> to switch to
"Radio" mode.
NOTE: To avoid damage to the MP3 unit, do not
insert or remove the MP3 unit while either unit
(Radio or MP3) is turned ON.
Volume Control
1. Increase Volume: Press <button 8>.
2. Decrease Volume: Press <button 12>.
3. Mute: Press <button 6>.
Page Six:
USING THE RADIO AND MP3 UNIT TOGETHER
Key Lock and Unlock
1. Lock: Press and hold <button 9>. The small
LCD will show the "lock" <symbol> symbol.
2. Unlock: Press and hold <button 9>. The "lock"
<symbol> symbol will disappear from the small
LCD.
NOTE: When Key Lock is engaged, all keys are
inactivated.
Menu Features
In "Radio" mode, press <button 17> to enter the
main Menu.
Press <button 13a> or <button 13b> to select
Menu. Press <button 17> to access the next
Menu.
Searching by Station Name
There are a total of 100 memory preset stations
available in each of 4 frequency bands, for a total
of 400 memory presets.
1. Select "Search" mode: After entering the Radio
main Menu, press <button 17> to search stations.
2. Select "Memory", then <button 17> to confirm.
Press <button 13a> or <button 13b> to change
stations.
Press <button 16> or <button 14> to change
frequencies under the same station name (Or the
same page).
See Page 14 for other ways to search.
Page Seven:
USING THE RADIO AND MP3 UNIT TOGETHER
Searching by Band
There are two ways to search for a station in the
Menu. You can only change the band while
searching in "Step" mode. Here is how to do it:
1. In "Radio" mode, access the Menu and press
<button 17> to enter "Search" mode.
2. Select "Step", and press <button 17> to confirm.
Press <button 13a> or <button 13b> to search for
stations.
3. Press <button 16> to choose bands. Press
<button 16> for FM, <button 15> for AM, or
<button 14> for SW bands. You can easily change
the band by selecting one of these three buttons.
4. For LW (140KHz - 510KHz), use the Numeric
Keypad to type in the frequency, and then use the
Tuning Knob to tune specific stations. Alternately,
you may use <button 13a> or <button 13b> to
select stations.
Station Management
Browser
Use the Browser to view saved stations and their
frequencies.
1. In "Radio" mode, press <button 17> to open the
Browser. Select "Station" to enter Station
Manager, then press <button 17> to enter the next
page.
2. Select "Browser," then press <button 17> to
confirm. Press <button 13a> or <button 13b> to
view station names, or press <button 16> or
<button 14> to see the four frequencies under the
same station name.
NOTE: See the quick reference guide on Page 15
for more information.
Page Eight:
USING THE RADIO AND MP3 UNIT TOGETHER
Save
To save a frequency to a desired station name.
1. Search for a desired Station
2. In "Radio" mode, access the Menu and select
"Station" for station management, then press
<button 17> to go to the next step.
3. Select "Save", then press <button 17> to enter
the station where you want to save the frequency.
Press <button 13a> or <button 13b> to select
station names. Press <button 14> to select a
memory position to save the frequency. Any
frequency already in that memory position will be
overwritten by the new frequency.
4. Press <button 17> to save.
NOTE: See the quick reference guide on Page 15
for more information.
Delete
To delete unwanted stations, follow the steps
below:
1. Enter the Main Menu under "Station" mode,
then select "Station" and press <button 17> to
access the next menu.
2. Select "Delete," then press <button 17> to enter
the frequency selection. Press <button 13a> or
<button 13b> to select station, then press <button
16> or <button 14> to select the frequency that
you want to delete.
3. Press<
>to confirm deletion.
NOTE: See the quick reference guide on Page 15
for more information. To delete or update station
names, you can also follow the steps in
FREQ.TXT file available on the CD.
Page Nine:
USING THE RADIO AND MP3 UNIT TOGETHER
You can edit the station names and frequencies in
the FREQ.TXT file, save the FREQ.TXT file to the
MP3 unit, then use the "Import" function to load it
to the Radio's preset memory. Use the following
procedure:
1. Edit the FREQ.TXT file. You can change the
names of each page (P00 - P99), and preset 4
frequencies in each page.
2. Connect the MP3 unit to the computer, open it
as a storage device, and save the FREQ.TXT file
ot the MP3 unit.
3. Disconnect the M3 unit from the computer and
replace it in the Radio. Turn on the Radio by
pressing <button 4>. On the main LCD, access the
Menu, select "Station," and press <button 17> to
enter.
4. Select "Import" and press <button 17> to start
importing. (The save FREQ.TXT file will be copied
to the Radio's memory and update all the memory
listings. The LCD will show "Wait . . ." until it is
complete.
After importing, all pages in the Radio's memory
will be changed according to the presets in the
FREQ.TXT file.
The Weather Pages (P98 and P99) might be
changed. If the Weather Pages do not show the
correct weather bands, please reset the Radio.
This will get the default Weather stations back into
the Radio's memory. To reset the Radio, simply
remove the batteries for 1 to 3 minutes, then reinstall them. Page 98 and Page 99 should be reset
to the 7 correct Weather stations.
• Recording
You can record the current broadcast. The
duration of the recording depends on the amount of
free memory left on the MP3 unit and the sound
quality you wish to record. There are 3 sound
quality choices: 32 kbps, 80 kbps, and 128 kbps.
(kbps = kilobytes per second)
Page Ten:
USING THE RADIO AND MP3 UNIT TOGETHER
1. Open the Menu in "Radio" mode and select
"Recorder." Press <button 17> to select sound
quality (32/80/128 kbps), then press <button 13a>
or <button 13b> to select the one you want.
2. For Shortwave 32 kbps is good enough. For FM
stereo, select 80 or 128 kbps. Sound quality will be
better with a higher kbps, but recording time will be
shorter.
3. Quick Record: if you do not need the specify
the recording quality, press and hold <button 10>.
You will automatically enter 32 kbps recording
mode.
NOTES:
-Check the battery prior to recording. Make sure
you have enough battery life to record the quality
and duration you desire.
-It is recommended to record clips of less than 1
hour duration for ease of management.
-It is normal to get interference while recording.
Adjusting the LCD
The Menu will allow you to set the contrast and
backlight for the LCD.
1. Access the Menu in "Radio" mode. Select
"Setting" and press <button 17> to enter the next
menu.
2. Select "LCD" and press <button 17> to enter
your desired LCD settings. This includes contrast,
backlight time, and screen protection program.
3.Press<
> to enter next page.
Page Eleven:
USING THE RADIO AND MP3 UNIT TOGETHER
Backlight Time: Select the duration for the
backlight to remain on.
Contrast: Adjust the LCD contrast.
Screen Saver: Turn ON or OFF the LCD.
4. Press <button 17> to confirm your selection.
Automatic Power Off
This feature allows you to select a power-off time
of 10 to 60 minutes, or even indefinite. When your
selected preset time is up, the radio turns itself off
automatically.
1. Access the Menu in "Radio" mode and select
"Setting." Press <button 17> to enter "Set" mode.
2. Select "AutoOff" and press <button 17> to
enter.
3. Find your desired Auto Off time, then press
<button 13a> or <button 13b> to select it.
4. Press <button 17> to confirm your selection.
NOTE: After setting an Auto Off time, the main
display will count down <symbol>.
Time Set
To adjust Clock, Timer, and Auto Power ON or
OFF.
1. Access the Menu in "Radio" mode, select
"Setting," and press <button 17> to enter "Setting"
mode.
2. Select "Time" and press <button 17> to enter
"Setting" mode. Select "Clock." You will be
prompted with a time entry display. Use the
Numeric Keypad to enter the time you want. As
soon as the time is entered, the Radio
automatically exits "Time Set" mode and returns to
"Radio" mode.
Page Twelve:
USING THE RADIO AND MP3 UNIT TOGETHER
NOTES:
1. If there is no entry for 3 seconds, the Radio will
exit "Time Set" mode and keep the previous time.
To set the time, you must begin again from Step 1.
2. Date (MM/DD/YY) is not set here. Refer to the
FREQ.TXT file on the CD for this feature.
Set Up Alarm 1
1. Access the Menu from "Radio" mode, select
"Setting", and press <button 17> to enter the
"Setting" mode.
2. Select " Time", press <
> to enter, then
select "Alarm1".
3. Press <button 17> to enter "Alarm 1" setting
mode.
After you enter "Alarm Set" mode, you can set the
ON / OFF time and select what to turn ON or OFF.
-Auto ON Time: Use the Numeric Keypad to input
the time directly. If you do not want to change the
existing Auto ON Time, press <button 13b> to
enter the next option. (See the "Auto ON
Frequency")
After the time is set, you are prompted to enter
"Band" and "Frequency".
-Auto ON Frequency: After setting the Time, you
need to select the Band. Press <button 16> ,
<button 14>, or <button 15> to select the band,
then use the Numeric Keypad to input the
frequency you want to hear (NOTE: Weather
stations are not available for Alarm Set Up). If you
do not want to change the current frequency, just
press <button 13b> to skip and enter the next
option.
After the Auto ON Time and Frequency are set, you
can activate or deactivate the feature.
- To Activate Alarm 1, press <button 17> - the
symbol <symbol> is shown. This indicates the alarm
is Activated. Press <button 17> again - the symbol
<symbol> is shown. This indicates the alarm is
Deactivated. If you do not want to change the
existing setup, press <button 13b> to exit "Alarm
Setup" mode.
- Exit: When the "Set" arrow is at the <symbol>
symbol, press <button 17> to exit "Alarm Setup"
mode, or press <button 13b> to continue to the next
options.
Page Thirteen:
USING THE RADIO AND MP3 UNIT TOGETHER
When the Auto ON Time is set, follow the steps to
select what device you want to turn on.
You have 4 options: 1. Radio, 2. Radio and MP3
unit Recorder, 3. MP3 unit, 4. Recorder with builtin microphone.
-To select the Auto ON device: After entering the
Auto ON Frequency, press <button 17> to select
the device. <Symbol> will turn on the radio only.
<Symbol> will turn on the Radio and begin
recording to the MP3 unit. <Symbol> will turn on
the built-in microphone to record ambient noises.
<Symbol> will turn on the MP3 unit.
After selecting the device to be turned on, you can
select the Auto ON volume.
-Change the Volume: After selecting the device, a
number appears showing the volume of the device
when it comes on. Press <volume up> or <volume
down> to adjust the volume to the proper level.
The volume control has a 40-unit range.
When the Volume is set, you can select the Auto
OFF time.
-Auto OFF Time: After selecting the Volume, you
can select the Auto OFF Time. Use the Numeric
Keypad to set the Auto OFF Time. To keep the
existing setting, just press <button 13b> to exit
and finish setting Alarm 1. If you wish to change
the time, the Alarm setup is completed as soon as
the number is entered, and the Radio returns to
"Radio" mode.
4. If the setting is completed correctly, the symbol
<symbol> will appear on the LCD. For more
details on setting the Alarm, please see the
following section.
Auto ON Tim
Auto ON Status
Auto ON Frequency Auto ON Volume
Activate/Deactivate
Auto OFF
NOTES:
1. To set up Alarm 2 and 3, follow the same
procedures, but begin by selecting Alarm 2 or Alarm
2. It is easy to fill the MP3 memory by using the
"MP3 Record" function in the "Auto ON" mode.
Because of this, it is better to select a different
device for the "Auto ON" feature.
Page Fourteen:
USING THE RADIO AND MP3 UNIT TOGETHER
Battery Charging (Radio)
Install the rechargeable batteries in the radio,
making sure the polarity is correct.
Plug in the AC adaptor in and connect it to the
Radio. Leave the Radio and MP3 unit OFF. Press
<symbol> to charge the Radio batteries.
1. Access the Menu in "Radio" mode and find
"Setting" in the Browser. Press <button 17> to
select "Charge".
2. To select "charge" mode, press <button 13a>
or <button 13b>.
3. Select "Radio" to charge the Radio batteries.
Select "MP3" to charge the MP3 battery.
4. Press <button 17> to begin charging.
<Symbol> shows the charging status on the LCD.
NOTE: In Method 1, press and hold <button 17>
to charge the MP3. Refer to Page 21 for charging
details. AA batteries will charge for no more than
ten hours.
Radio Tuning
There are 2 ways to tune the radio: Step and
Memory. Step: "Step" mode changes the band
and searches the frequency under the selected
band. You can change the band and step search
for frequencies in "Step" mode only.
Memory: Only "Memory" mode allows you to
select preset stations and frequencies.
To search for FM or SW stations, fully extend the
telescopic antenna for best reception. For best
AM reception, you may need to reposition the
Radio.
Page Fifteen:
USING THE RADIO AND MP3 UNIT TOGETHER
Inputting frequencies directly to the Radio.
1. Press <button 7> to clear the LCD.
2. Select the band you want: <button 16> for FM,
<button 15> for AM, <button 14> for SW.
3. Use the Numeric Keypad to enter the number of
the station you want to hear. To hear station 101.7,
press <1> <0> <1> <7>.
4. Press <button 7> to confirm your entry.
NOTE: To delete the last entry, press <button 6> to
go back.
Quick Tuning
You can use the Shuttle Knob to Quick Tune in
order to find a station quickly. You can watch the
frequency change in the LCD. Select the
appropriate "Step" before using the Shuttle knob.
The "Step" symbol shows in the small LCD. In FM,
Fast Tune is 0.1 MHz, and Slow Tune is 0.05 MHz.
1. Press the "Step" selector on the right side of the
Radio. <Symbol> indicates Fast Tune, <Symbol>
indicates Slow Tune, and <Symbol> indicates Lock.
2. Press and hold the "Step" selector to lock or
unlock the "Step" selector.
3. Turn the Shuttle Knob to search for stations.
4. In "Fast Tune" mode, the FM range is 88-108
MHz only, and the SW range is in Meter bands
only.
Browsing the Stations
You can use the Browser to preview stations on the
LCD without changing the current station. You can
view all Pages, as well as all frequencies in each
Page.
1. Press <button 10> to enter "Browse" mode.
2. Press <button 13a> or <button 13b> to Browse
station names.
3. Press <button 16> or <button 14> to Browse
frequencies in one station. Select the frequency you
wish to listen to, then press <button 10> or <button
17> to switch the Radio to that frequency.
4. Press <button 15> to exit.
Page Sixteen:
USING THE RADIO AND MP3 UNIT TOGETHER
Quick save of a station
1. Search for a station.
2. Press <button 9> to enter "Save" mode. Press
<button 13a> or <button 13b> to select a station
name, or use the Numeric Keypad to enter the
number of the station.
Press <button 16> or <button 14> to select a
memory preset to save the station in. Any existing
frequency in that preset will be over-written.
3. Press<
> to save the station.
Quick Delete of a Station
1. Press <button 11> to enter "Delete" mode.
2. Press <button 13a> or <button 13b> to select a
station name. Press <button 16> or <button 14>
to select a frequency.
3. Press <button 11> or <button 17> to confirm
the deletion.
Edit FREQ.TXT File
On your computer, open the FREQ.TXT file from
the CD or from the MP3 unit (if it is attached to the
computer). Read the last few lines in the file
before making any changes. DO NOT CHANGE
THE FILE NAME. If you open the file from the CD,
you will need to save it to your computer or to the
MP3 unit. Refer to Page 29 for more information.
After saving the FREQ.TXT file to the MP3 player,
use the Radio's "Import" feature to send data to
the Radio's memory.
Active Amplifier/iPod Speaker function
There is an audio lin-in jack on the Radio, so you
can use it as a speaker for an iPod, MP3 player,
or a portable CD player.
1. Press "Play" on the external player you wish to
use, the turn the Radio ON.
2. Connect the external player to the Radio using
the included stereo-mini to stereo-mini cable.
NOTE: This feature only works in "Radio" mode.
Page Seventeen:
USING THE RADIO WITHOUT THE MP3 UNIT
Use the Radio Only:
1. When using the Radio only, watch the small
LCD.
2. Remove the MP3 unit from the Radio and install
batteries in the Radio only.
Charging the battery
In the "Power OFF" mode, press <button 11> to
charge the Radio battery. Press button 6 to exit
"Charge" mode.
Turn the Radio ON / OFF
When the Radio is OFF, press <button 4> to turn
the Radio ON. When the Radio is ON, press
<button 4> to turn the Radio OFF.
Search for Stations
1. When the Radio is on, press <button 17> to
select the manner of search (Station Name or
Step).
2. In "Step" search, press <button 13a> or <button
13b> to search for stations. Press <button 16> for
FM, <button 15> for AM, <button 14> for SW.
3. When searching by Station Name, press
<button 13a> or <button 13b> to select the
frequency, then press <button 10> to check the
related station and frequency.
Saving the Frequency
Select the frequency you want, then press <button
9>, followed by the two-digit address. The
frequency will be saved in the two-digit address.
Deleting a Frequency
Select a station, then press <button 11> to show the
station number and press <button 11> to delete the
frequency.
NOTE: In "Radio Only" mode, all operations on
frequency are limited to the first frequency only.
Page Eighteen:
USING THE RADIO WITHOUT THE MP3 UNIT
Set up timer on the radio
In "Power OFF" mode, observe the small LCD.
1. Press <button 7> to enter "Set Up" mode. The
small LCD displays "Set".
2. Press <button 16> to enter "Alarm 1" mode.
When the symbol <symbol> flashes, then perform
the following actions:
-Use the Numeric Keypad to enter set the Timer.
-Press <button 7> to enter the next step, press
"Step" and use the Numeric Keypad to input the
frequency to be heard when the Radio turns ON
(Refer to " Inputting frequencies directly to the
Radio " on Page 15). Press <button 7>, and enter
Volume level. The small LCD will display "OL15".
You can now use the <button 8> and <button 12>
to adjust the level. Press <button 7> again to set
"OFF Time". The LCD will display "OF15". Use
the Numeric Keypad to set the time for the Radio
to turn OFF.
3. When the symbol <symbol> appears on the
small LCD, it indicates that Alarm 1 is set up and
activated.
4. Press <button 16> and the <symbol> will flash.
Press <button 6> to exit Alarm 1 setup.
NOTE: Use the same procedures for setting up
Alarm 2 and Alarm 3, but use <button 15> for
Alarm 2 and <button 14> for Alarm 3. Whether the
MP3 unit is attached or not, this setup method
access the Radio's Auto ON / OFF feature.
Set Up automatic power off
1. Press and hold <button 6>. The small LCD will
display the current time.
2. Press <button 7> to display the current Turn
OFF time.
-Use the Numeric Keypad to set the Turn OFF time
(01-99 minutes).
-If you do not take any action, the default Turn OFF
time is 60 minutes.
-Pressing <button 6> sets the default Turn OFF
time to "unlimited".
Compare: These procedures are the same for both
modes: "Using the Radio Without the MP3 Unit" and
"Using the Radio and MP3 Unit Together."
Page Nineteen:
USING THE RADIO
FM Mono/Stereo
When listening to the an FM broadcast, press the
"Mono/Stereo" selector button on the right side of
the Radio. In "Stereo" mode, the small LCD
displays "ST" and the main LCD displays
<symbol>. In "Mono" mode, the small LCD will not
display "ST", and the main LCD will display the
"Mono" symbol <symbol>.
Stereo: you can use stereo earphones to listen to
stereo broadcasts, but the better the signal is, the
better the reception (and sound) will be.
Mono: It is better to use Mono to receive weak
FM signals. If the signal is recieved and
maintained, you can switch to Stereo for better
sound quality. (The Radio receives Mono signals
better than Stereo signals)
NOTE: You may prefer to listen to news in Mono,
and to listen to music in Stereo.
Local - Normal - Distant Selection
It is important to select proper sensitivity to
receive signals better. This Radio has 3 levels of
sensitivity:
Normal (NOR): The middle range of the Radio's
sensitivity. This is the recommended setting.
Local (LO): If local stations are very strong, they
may suffer from distortion or override other
stations. In that case, select LO to reduce
sensitivity and receive local stations more clearly.
Local stations that are more distant may be
"buried" in noise.
Distant (DX): To receive SW or remote AM
stations, the DX position helps to receive weak or
noisy signals.
Narrow/Wide Bandwidth
When listening to AM/SW/LW broadcasts, press
<AM WIDE-NAR> to switch between wide or narrow
bandwidth.
Wide bandwidth offers better tone reception while
narrow bandwidth offers less noise on reception.
SSB (Single Sideband)/CW
1. With the Radio ON, enter the Menu and select
"Step" as the search method, then press <button
14> to enter SW band.
Page Twenty:
USING THE RADIO
SSB (Single Sideband)/CW-continued
2. Press <SSB> (on the right side of the Radio) till
the main LCD displays <symbol>, which indicates
"SSB" mode.
3. Turn the Tuning Knob to tune the Radio to a
frequency close to a SSB station.
4. Use the SSB fine tuning knob to get the best
reception.
NOAA Weather Band
The 7 Weather Bands are stored in Page 98 and
Page 99. To hear the Weather Bands:
Using the Radio Only
Press the numbers 98 (<9> <8>) or 99 (<9> <9>),
then turn the Tuning Knob. The small LCD will
display number from "01" to "07". If you can
clearly hear a station, you have found the
Weather station.
Using the Radio and MP3 Unit together
1. Access the Menu in "Radio" mode, select
"Search".
2. Select "Memory", then press (button 17) to
enter, then type the number "98" to enter the
Weather Band Page.
3. Use <button 14> to cycle through the stations
in this page and to find one broadcasting in your
area.
4. If you cannot find a station in Page 98, press
<button 13b> again to enter the next Page (Page
99). Use <button 14> to select a station that you
can hear.
NOTES:
1. The Weather stations are stored in 2 pages.
Stations 1, 2, 3, and 4 are stored in Page 98.
Stations 5, 6, and 7 are stored in Page 99. Use
<button 13a> or <button 13b> to change Pages
and use <button 16> or <button 14> to change
stations within each Page.
2. When in "Weather Band" mode, press
<STEREO/MONO> to change the sound tone.
When the small LCD displays "ST" and the main
LCD displays the stereo symbol <symbol>, high
tones will sound better. When the main LCD
displays the MONO symbol <symbol>, low tones
will sound better.
3. Do not save other frequencies into Page 98 or
Page 99. If you save other frequencies into these
Pages, you will lose the Weather Bands. You can
reset the Radio to restore the Weather Bands.
Page Twenty-One:
USING THE MP3 UNIT WITH THE RADIO
When using the MP3 unit on the Radio
1. Make sure the MP3 unit is correctly connected
to the Radio.
2. Make sure the batteries are installed in both the
Radio and the MP3 unit before use.
3. Observe the main LCD when using the MP3
unit.
4. Download MP3 music to the player via a USB
cable.
5. Be sure to charge the batteries in both the
Radio and the MP3 unit before use.
Charging the MP3 Player
Connect the AC adaptor to the Radio. In "Power
OFF" mode, press and hold <button 11> until you
see the symbol <symbol> blinking in the small
LCD.
NOTE: Before attempting to charge, be sure the
MP3 unit has a rechargeable battery installed.
Maximum charging time is 4.5 hours.
Turn ON / OFF and Switch Mode
1. To turn the MP3 unit ON: Press <button 3>.
2. To turn the MP3 unit OFF: Press <button 3>.
3. To switch the "Operating" mode: In "MP3"
mode, press <button 4> to switch to "Radio"
mode. In "Radio" mode, press <button 3> to
switch to "MP3" mode.
Adjusting the Volume
1. Increase Volume: Press <button 8> until you
have increased to the desired volume.
2. Decrease Volume: Press <button 12> until you
have decreased to the desired volume.
NOTE: When in "Volume Adjust" mode, the main
LCD displays the output volume level.
Page Twenty-Two:
USING THE MP3 UNIT WITH THE RADIO
Play Music (In MP3 Mode)
- Select music: Press <button 13a> or <button
13b> to select the music you wish to hear.
-Pause playback: Press <button 16> to Pause
music playback.
-Stop playback: Press <button 15> to Stop music
playback.
The MP3 unit has different EQ settings available.
Press < button 14> to cycle through them. The
main LCD will show the current "EQ" mode.
A-B Repeat
1. Set the Start Point (A): Press <button 10>. The
main LCD will display "A" in the upper right.
2. Set the End Point (B): Wait the desired amount
of time, then press <button 10> again. The MP3
unit will continue to "loop" between Point A and
Point B.
3. When you wish to stop the "loop", press <button
10> one more time. This will cancel the "A-B" loop.
Page Twenty-Three:
USING THE MP3 UNIT WITH THE RADIO
1. Access the main MP3 Menu on the main LCD
2. In "MP3" mode, press <button 17> to access
the MP3 menu.
3. Press <button 13a> or <button 13b> to select
the desired sub-menu.
4. Press <button 17> to exit the Menu and return
to the last Menu.
File Management
1. Browse the MP3 files, and press <button 13a>
or <button 13b> to select the one you want.
2. Press <button 15> to return to the root
directory.
3. Press <button 16> to Play the selected MP3
file. Press <button 16> again to Pause playback.
4. Press <button 15> to Stop playback.
MP3 Play
Enter the MP3 file list as above and select the
MP3 file you wish to play
1. Browse the files, using <button 13a> or <button
13b> to search.
2. Press <button 16> to Play the desired file.
Press <button 16> again to Pause playback.
3. Press <button 15> to Stop playback.
Page Twenty-Four:
USING THE MP3 UNIT WITH THE RADIO
To play back voice recordings
Access the MP3 files as above.
1. Use <button 13a> or <button 13b> to browse
the files.
2. Press <button 16> to Play the file. Press
<button 16> again to Pause playback.
3. Press <button 15> to Stop playback.
Record (Microphone Recording)
1. Access the main Menu. Select "Record" to
begin recording with the built-in microphone.
2. Press <button 15> to stop recording.
NOTE: To avoid a sudden stop to your recording,
cancel all Timer functions. Make sure there is
enough battery power to record. The recorded
files are saved in a "Speech List".
Line-in recording to MP3
Using the supplied stereo-mini to stereo-mini cord
to connect an external sound source to the
Radio's LINE IN jack, you can record to the MP3
unit in MP3 format.
1. Connect the external sound source to the
Radio's LINE IN jack with the supplied stereo-mini
to stereo-mini cord.
2. Access the Menu and select "MP3 REC", then
press <button 17> to select the desired kbps
record rate.
3. Once you have selected the desired record
rate, press <button 17> to Begin recording.
4. Press <button 15> to Stop recording.
NOTE: MP3 recordings from LINE IN are saved in
a "MP3 Play" list.
Page Twenty-Five:
USING THE MP3 UNIT WITH THE RADIO
Settings
-EQ Effects
The MP3 unit has 6 "EQ" modes. You can select a
different mode for different types of music
1. Access the MP3 main Menu and select
"Setting".
2. Select "Equalizer" to enter EQ selection.
3. Press <button 13a> or <button 13b> to select
the desired "EQ" mode.
4. Press <button 17> to confirm your selection.
NOTE: There are 4 "EQ" modes: Normal, Classic,
Pop, Rock, Jazz, and DBB (Base).
Repeat
There are 4 "Repeat" modes for the MP3 unit.
1. Access the MP3 main Menu and select
"Setting".
2. Select "Repeat" and press <button 17> to make
a "Repeat" mode selection.
3. Press <button 13a> or <button 13b> to select
the desired "Repeat" mode.
4. Press <button 17> to confirm your selection.
NOTE:
There are 4 "Repeat" modes:
<symbol> Normal Play
<symbol> Repeat All
<symbol> Repeat 1 file
Random
<symbol> Repeat
Page Twenty-Six:
USING THE MP3 UNIT WITH THE RADIO
LCD
Setting up the LCD in "MP3" mode is the same as
in "Radio" mode. Please refer to Pages 10 and 11
for details.
Auto Power OFF
Setting Auto Power OFF in in "MP3" mode is the
same as in "Radio" mode. Please refer to Page 11
for details.
Deleting Archives
There are 2 ways to delete files. You can delete
files one at a time, or use "Format" to delete all
files. If you decide to delete files by either method,
you will not be able to recover them. Be very
careful to avoid mistakes with this feature.
1. Access the MP3 main Menu and select
"Setting". Press <button 17> to enter, the select
"Erase".
2. Select "Erase One File". You will be asked if you
want to erase the selected file.
3. Press <button 17> to confirm the deletion, or
press <button 15> to exit "Delete" mode.
Formatting
1. Access the MP3 main Menu and select
"Setting". Press <button 17> to enter, the select
"Erase".
2. In the "Erase" menu, select "Format". You will
be asked if you want to Format.
3. Press <button 17> to confirm the Format, or
press <button 15> to exit "Delete" mode.
NOTE: If you receive a "Format Failed" message,
try connecting to a PC to perform the Format.
Page Twenty-Seven:
USING THE MP3 UNIT WITHOUT THE RADIO
To use the MP3 unit separate from the Radio,
make sure the rechargeable battery is in the MP3
unit and that it is fully charged.
Turning the MP3 Unit ON / OFF
1. To turn ON: Press and hold <Play/pause> until
the unit powers ON.
2. To turn OFF: Press and hold <Stop> until the
unit displays "Bye Bye".
Play/Pause/Stop
1. Play: When the unit is ON, press <Play/pause>
to Begin playback.
2. Pause: When the unit is playing music, press
<Play/pause> to Pause playback.
3. Stop: When the unit is playing music, press
<Stop> to Stop playback.
Select Song/ FF/RW
1. Select a song: Press <FF> or <RW> to browse
titles.
2. Fast Forward / Rewind: During playback, press
and hold <FF> or <RW> to move forward or
backward in a song.
Increase or decrease the Volume
1. Increase Volume press< + >.
2. Decrease Volume press< - >.
Page Twenty-Eight:
USING THE MP3 UNIT WITHOUT THE RADIO
Menu Function
Press <M> to access the Menu. Press <FF> or
<RW> to browse the Menu.
NOTE: When the MP3 unit is used separate from
the Radio, the LINE IN feature is disabled.
A-B Repeat
1. Set the Start Point (A): During playback, press
<A-B Repeat>. The main LCD will display "A" in
the upper right.
2. Set the End Point (B): Wait the desired amount
of time, then press < A-B Repeat > again. The
MP3 unit will continue to "loop" between Point A
and Point B.
3. When you wish to stop the "loop", press < A-B
Repeat > one more time. This will cancel the "AB" loop.
Recording
Quick record: Press and hold <Record> to Begin
recording.
NOTE: This unit records through a built-in
microphone. Refer to "Record (Microphone
Recording)" on Page 24 for information on
recording while using the MP3 unit with the
Radio.
Page Twenty-Nine:
PC CONNECTION AND DATA TRANSFER
To save music to the MP3 unit and transfer station
and frequency information to the Radio, remove
the MP3 unit from the Radio and connect ithe MP3
unit to a computer running Windows XP. Follow the
steps below to transfer data.
1. Use the included USB cable to connect the MP3
unit to the computer.
2. Windows should recognize the hardware and
install the driver automatically.
3. The computer will see the MP3 unit as a
portable storage device. You can use Windows
Explorer to browse and save files to it. Just as with
any other portable storage device, you can add or
delete files from the MP3 unit. See the figure
below:
4. To be safe, it is best to use the Windows option
"Unplug or Eject Hardware" prior to disconnecting
the MP3 unit from your computer. Also, do not
attempt to remove the MP3 unit from the computer
while files are still being written to it.
Page Thirty:
FIRMWARE UPDATE
If you encounter difficulty reading or writing data
to the MP3 unit, you may need to update the
MP3 unit's firmware, or reformat the MP3 unit.
Follow the steps below to perform the update:
1. Connect the MP3 unit to the computer with the
included USB cable.
2. Your Radio should have come with a CD.
Insert that CD into your computer.
3. Find the file "KA1121MP3radioVxx.exe" and
double-click on it to start the update.
IMPORTANT: Do not disconnect the USB cable
while updating the firmware.
A pop-up menu will ask you "Do you want to
delete all the files on the storage device?" You
should select "Yes" to begin the update, or select
"No" to cancel the update. See the figure below:
4. Click "Confirm" to finish the update, then you
can disconnect the MP3 unit. (Be sure to use the
"Unplug or Eject Hardware" function)
NOTES:
If you have difficulty achieving a good connection
between the MP3 unit and your PC, you may
need to update the MP3 unit's firmware.
A. To reset the Radio and MP3 unit, take the
batteries out of both units. After one minute, they
will be reset.
B. If you still have difficulty connecting to your
PC, press and hold <Play/pause> along with any
other button on the MP3 unit, and connect the
unit to your PC. Release the buttons after
approximately 3 seconds, you should be able to
get a good connection to your PC.
C. If you still cannot connect, use the steps
above to update the firmware.
D. If you can connect the MP3 unit to your PC,
you can use the FAT32 format to reformat the
MP3 unit as a portable storage device.
Page Thirty-One:
DISPLAY LYRICS
Song lyrics can be displayed on the main LCD at
the same time the song is playing.
1. On your PC, run the program "Winamp.exe"
from the included CD. Follow the instructions to
install the software.
2. Run the program "Lyrie.exe" from the included
CD. You must install it in the Winamp root
directory.
3. After installation, run the Winamp player
software. Then run the Lyrie software.
4. Click on the "toolbox" icon at the bottom of the
Lyrie interface, select "Edit Lyric" and you will be
able to input lyrics. See the figure below for
details.
Page Thirty-Two:
DISPLAY LYRICS-continued
5. Click on the Toolbox icon, select "Import from"
and then select either "LCR" or "TXT". Next, open
the LCR or TXT file with the lyrics you want. The
lyric converter will display the lyrics, and you can
edit them as you wish.
NOTE:
This MP3 unit only supports the following time
label format:
[00:05] The Moon Represents My Heart
[00:08] Singer: Theresa Deng
If the lyrics show:
[00:05:10] The Moon Represents My Heart
then you must edit it to:
[00:05] The Moon Represents My Heart
6. Save the lyric file to the MP3 unit. The lyric and
music will both be saved to the MP3 unit
Page Thirty-Three:
FREQUENTLY ASKED QUESTIONS
1. Radio fails abruptly, or reception changes
dramatically during Playback.
A: The Timer may have reached its preset limit,
and shut the Radio OFF, or the Auto ON Timer
may have initiated, causing the Auto ON
Frequency to override the current frequency.
2. There is a lot of noise during Playback.
A: a. The noise may be from the AC adaptor. Do
not use the radio near a computer or other
electronic device.
b. The signal is weak, or not strong enough, or
is shielded by metal or buildings.
c. In Auto Scan mode, if there is a strong
interfering signal, the scan may be interrupted.
Use Auto Scan in places that are clear of
electromagnetic fields.
3. Do I have to take out the battery when I connect
the AC adaptor?
A: No, the unit has a built-in battery protection
circuit. When you use the AC adaptor, the battery
is automatically cut out of the circuit. None of this
affects the battery power for the built-in clock.
(except when you perform the "reset" function)
4. Battery failed to charge in "quick charge" mode.
A: a. The unit supports battery charging during
Power OFF mode only.
b. Check to see that you used the correct steps
to charge the battery.
c. Check to see that you have attached the AC
adaptor correctly, and that the voltage is correct.
5. How do I receive the Single Side Band (SSB)?
A: a. SSB may have no waveform carrier, so no
signal can be received. Try searching for the SSB
signal frequently to be sure you have a signal there.
b. The SSB signal may be outside the meter band,
so you will have to key in the frequency to search
for it. You may find more signal near 7 MHz to 14
MHz.
6. The unit switches from Radio to MP3 unit very
slowly.
A: a. When the MP3 unit if very full, delete some
that you don't need, leaving at least 10KB free
memory.
b. Recorded files may be too long.
7. SSB signals don't come in clearly.
A: a. SSB uses a very narrow bandwidth, so you
cannot expect it to have the same audio quality as
an FM or AM signal.
b. SSB users tend to employ a lot of "verbal
shorthand" in their communication, so it may be
difficult to understand what they are saying.
Page Thirty-Four:
FREQUENTLY ASKED QUESTIONS
c. SSB stations are built with low power in mind,
so it is not easy to to receive and demodulate the
signal.
8. I cannot record my voice on the MP3 unit.
A: You may need to reformat the unit after you
have used it for some time. Then you should be
able to record to the MP3 unit again.
9. My PC shows the MP3 unit memory to be less
than claimed. Why?
A: The system files on the MP3 unit take up some
space from the total memory. Some of these files
are "invisible".
10. After connecting to my PC, I cannot perform
any file operations.
A: There may be a compatibility problem with your
computer. Try using a PC running Windows XP.
11. There is no sound when I play MP3 files.
A: a. The volume may be too low. Try increasing
the volume level.
b. The MP3 files may be corrupted and have no
sound.
12. There are MP3/WMA files in the MP3 unit, but
they cannot be played.
A: Because compression rates and formats vary,
this unit will only play standard MP3/WMA files at
32/80/128 bit rates.
13. There is noise or "cut-out" when I playback my
MP3 files.
A: Some the files may be corrupted. Please
reformat the MP3 unit memory, copy the files back
to the MP3, and try again.
14. The playing time is not correct when I play
MP3 files.
A: We use VBR (variable bit rate) format to
compress MP3 files, so the playing time may not
be accurate, but playback will be correct. If you
have this problem, simply compress the file again
and it will be back to normal.
15. MP3 unit does not play, and the firmware
update is not working.
A: The software may be corrupted. Remove the
MP3 unit and take out the DF6 battery. Press and
hold the <Play/Pause> button while holding any
other button on the MP3 unit, connect it to your
PC, and release the buttons after 3 seconds. This
should solve the problem.
Page Thirty-Five:
TECHNICAL SPECIFICATIONS: RADIO
1. Frequency Range
FM
70.00 - 108.00 MHz
LW-MW
140 -1710 KHz
2. Preset Frequencies/Stations:
400 Frequencies; 100 Stations
49m
41m
31m
25m
22m
19m
5.800 - 6.400 MHz
6.900 - 7.500 MHz
9.300 - 9.900 MHz
11.510 - 12.100 MHz
13.300 - 13.900 MHz
15.100 - 15.700 MHz
(1)
(2)
(3)
(4)
162.400
162.425
162.450
162.475
16m
13m
11m
(5)
(6)
(7)
MHz
MHz
MHz
Mhz
17.400 - 18.000 MHz
21.400 - 22.000 MHz
25.500 - 26.100 MHz
162.500 MHz
162.525 MHz
162.550 MHz
2. Preset Stations and Frequencies: 100
Stations, 400 Frequencies.
3. Noise sensitivity
FM
5 V
MW
1mv/m
SW
20 V
4. SW Selectivity Wide Band: More than
20dB
Narrow Band: More than 80dB
5. AM Second intermediate frequency
6. Most Line Import
500mV
7. Power Supply
Internal Battery
AA*3
External Power Supply 6V 300mA
8. Built-in Speaker
D77mm
9. External Earphone
D3.5mm
10. Dimensions
About 163 * 32 * 103mm
11. Weight
About 300g(excl.Battery)
Page Thirty-Six:
TECHNICAL SPECIFICATIONS: MP3
MP3 player specifications
FLASH Memory
Max Record Time
Music Format
Record Format
Microphone
Capacitance Microphone
Battery Life
Earphone Output
Communication Standard
MP3/WMA Access Rate
Battery
Weight
Battery)
Dimensions
256M
Approx. 16H/32H
MP3/WMA
MP3/WAV
Electron
Approx. 3H
>3mW*2
USB2.0
32Kbps - 320Kbps
DF6*1
Approx. 36g(excl.
58*36*15mm
TECHNICAL ASSISTANCE
FOR TECHNICAL HELP WITH YOUR RADIO ,
PLEASE CALL: (866)524-8676