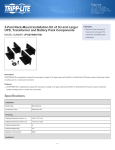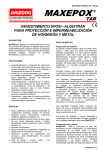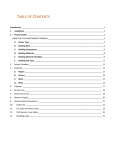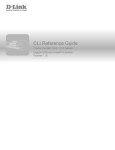
1
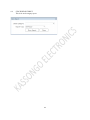
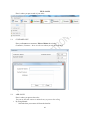
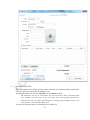
 SmartPro POS USER MANUAL
ONE: INTRODUCTION .......................................................................................................................... 1 1.1: WHAT IS SmartPro POS? ............................................................................................................... 1 1.1.1: VERSION .................................................................................................................................. 1 1.1.2: PLATFORM OF SmartPro POS ................................................................................................ 1 1.2: SYSTEM SECURITY ...................................................................................................................... 1 1.3: SYSTEM SUPPORT ........................................................................................................................ 1 1.4: ADVANTAGES OF USING SmartPro POS ................................................................................... 1 TWO: START USING SYSTEM ............................................................................................................... 2 2.1: CREATE NEW USER ................................................................................................................ 2 2.2: LOGIN/SIGN IN ......................................................................................................................... 3 2.3: HOME PAGE .............................................................................................................................. 4 THREE: SET-UP ................................................................................................................................... 4 3.1 SYSTEM SETUP ........................................................................................................................ 4 3.1.1: COMPANY DETAILS: ............................................................................................................. 4 3.1.2: COMPANY LOCATIONS ........................................................................................................ 5 3.1.3: SUPPLIERS .............................................................................................................................. 5 3.1.4: EXPENSE ACCOUNT ............................................................................................................. 5 3.1.5: BASE UNIT OF MEASURE .................................................................................................... 6 3.1.6: STOCK CATEGORIES ............................................................................................................ 6 3.1.7: STOCK BIN: ............................................................................................................................ 7 3.1.8: STOCK ITEMS: ........................................................................................................................ 8 3.1.9: USER MANAGEMENT: .......................................................................................................... 9 FOUR: PURCHASES ............................................................................................................................. 10 i 4.1: ADD PURCHASES ................................................................................................................... 10 4.2: PURCHASE MASTER FILE .................................................................................................... 12 4.3: STOCK ADJUSTMENT FILE .................................................................................................. 13 4.4: STOCK REPORT PRICE .......................................................................................................... 14 FIVE: SALES ........................................................................................................................................... 15 5.1: CUSTOMER LIST .................................................................................................................... 15 5.2: ADD SALES ............................................................................................................................. 15 5.3: SALES MASTER FILE ............................................................................................................ 17 5.4: DAILY SOLD ITEMS ................................................................................................................... 18 SIX: REMEINDER ................................................................................................................................ 19 6.1: EXPIRED ITEMS .......................................................................................................................... 19 SEVEN: ACCOUNTS .......................................................................................................................... 20 7.1: DEBT COLLECTIONS ................................................................................................................. 20 7.2: CREDIT PAYMENTS ................................................................................................................... 21 7.3: EXPENSES BOOK ........................................................................................................................ 21 EIGHT: REPORTS .............................................................................................................................. 22
ii ONE: INTRODUCTION
1.1: WHAT IS SmartPro POS?
SmartPro POS is a local made Point Of Sale (POS) and Stock Management System for small to Midsize
Businesses to handle Sales, Purchasing and Inventory Management and Control.
SmartPro POS can scan barcodes, accept cash and credit sales, print cash receipt and customer invoices
as well. It is made to fit Tanzanian business model and enviroment.
1.1.1: VERSION
SmartPro POS is system which is updated timely as per business environment changes. This is version 2
Product
1.1.2: SYSTEM COMPATIBILITY
SmartPro 2.0 POS, is a Standalone software which runs on all Windows 32 bit Operating Systems, This
means, the software can run on WIN XP, WINDOWS VISTA, WINDOWS 7 and WINDOWS 8
compatibly.
1.2: SYSTEM SECURITY
1.3: SYSTEM SUPPORT
1.4: ADVANTAGES OF USING SmartPro POS
1) SmartPro POS helps to informs you how much stock you have. It also tells you whether you
have enough stock for sales or you need to order more.
2) SmartPro POS reduces human errors. Constantly monitoring the levels of inventory means
you can update your system and therefore update your financial records with how much you have
tied up in stock to sell.
3) SmartPro POS tells you a story about your business. Unless you have records of quantities
you bought, quantities you’ve sold and quantities you hold, you won’t know what sells well, what
doesn’t and how you can change this to grow your business.
1 TWO: START USING SYSTEM
2.1:
CREATE NEW USER
2 2.2:
LOGIN/SIGN IN
Here is where the created user can login by entering the correct user name and password
3 2.3: HOME PAGE
This is the first window after successful login.
The user can start accessing the system in either of the following
Setup, Purchase, Sales, Remainder, Accounts & Report.
THREE:
SET-UP
For the first time in using the system, the administrator should have to setup the system to suit the
purposes of use for the company.
3.1
SYSTEM SETUP
3.1.1: COMPANY DETAILS:
Here is where you put your company information
4 - Address, Company Name, TIN No, VRN.
3.1.2: COMPANY LOCATIONS
Here is where you state Company Branches, if the company has branches.
3.1.3: SUPPLIERS
Here is where you Add suppliers whom you are dealing with.
3.1.4: EXPENSE ACCOUNT
5 Here is where you add the accounts which you use as expenses.
- Fuel, Electricity, Stationary, Transport etc…
3.1.5: BASE UNIT OF MEASURE
Here is where you add base unit of measure, these are the units which are used in
various products.
- Peace, Tin, Box, Bottle, Pc, Gallon, Kg, Lt. etc….
3.1.6: STOCK CATEGORIES
6 Here is where you define your stock according to the categories.
- Nafaka, Nguo, Soda, Beer, etc…
3.1.7: STOCK BIN:
Here is where you define the location where your stock/product will be arranged.
The stock/product is arranged by categories and the bin defined where the stock
is allocated.
- Location A, Location B, Upstairs etc…
7 3.1.8: STOCK ITEMS:
Here is where you state all you products information. The Name of Product, in
which Bin the product is allocated, Unit of Measure, Size/Number of Product
accumulatively in the unit, Re-order Level
(Re-order Level - This is minimum amount of the product remaining in stock before you order the other
product)
The product can be in singly item or in pack (bundle) eg. Milk can be in single boxes (as individual) or
can be in pack as accumulation of number of single boxes (like Carton).
8 3.1.9: USER MANAGEMENT:
Here is where you create user and give the user the level of accessing the system
(User information and User Privileges).
You can group the users according to their activities (the level of accessing the
system). “Who should do what” (Refer to Create New User)
9 FOUR: PURCHASES
Here is where you put your information/record to the product which you have purchased (From
the Wholesale/Industry/Manufacturer).
4.1:
ADD PURCHASES
Item List:
This is the item you purchased; these lists of items are the ones which
you have added previously (Refer Stock Item).
Supplier Name:
This is the supplier whom you purchase the product.
Here you will find the list of suppliers who have already added (Refer to
Add Supplier), also you can add (by typing in the field Supplier Name)
the supplier who is not in the list (not added before).
Date:
this is the date you purchased the product. By default it displays the
system date. The system allows changing the date
This is branch of your office which you purchased the product for. This
list of branches is the one you added previously. (Refer to Add Location)
Location:
Ref. No.:
This is Reference Number is the receipt number of the product you
purchased.
The purchase can be in Singly Item or Pack
Item Code:
Select the type of purchase you have done.
This is the code of item, it displays automatically when are you select the
item in the list.
Item Purchased Details:
Qty
- Quantity of product purchased
Price - This is the unit price of the product
Total - This is the result of Product purchased with the Unit Price.
This is out calculated
10 Sales Price:
Here you put you selling price. Also, selling price can be either per Pack
or per Singly item.
After filling all information in the fields, then click Insert as to allow the Item Purchased Details
After clicking Insert, the item purchased will list down. The system allows to Edit or to Remove the
Items from the list. (Select the item then Edit or Remove)
You should select the Mode of Payment you have done, by stating either you purchased by CASH or by
CREDIT. The system displays Total amount of all items (products) from the list.
11 Save the Purchase as finishing the process of Adding Purchase in the System. You can also deny the
process by closing without saving by clicking Red Cross Mark (X)
Options:
4.2:
this button gives you the easy link to the Quick Search (Searching Item and
update the its information/details) and Quick Sales (Searching Add Sales
Window) options
PURCHASE MASTER FILE
This is the window shows all purchases you have done with respective Supplier and total amount.
You can organize the information by Month or Year.
Through this window you can also Add, Edit as well as Delete the Purchases.
You can exit from the window by clicking Red Cross Mark (X)
12 4.3:
STOCK ADJUSTMENT FILE
This is the window shows stock Received and Issued.
You can organize the information by Month or Year.
Through this window you can Edit as well as Remove Adjusted Item
13 4.4:
STOCK REPORT PRICE
This is for stock category report
14 FIVE: SALES
Here is where you put records of your sales;-
5.1:
CUSTOMER LIST
Here you Create new customers, Edit and Delete the existing
Customers. (Customer – these are the ones whom you sale items to them)
5.2:
•
ADD SALES
Here is where you process the sales;You can use barcode scanner or manual entry to process the selling.
By Using Manual
- Select the item you want to sell from the item list.
15 -
•
Select the customer name if the customer exists in the system, otherwise you can type
customer name manually
- The system provides the invoice number automatically.
- The sales can be done by Singly item or Pack.
- The system displays quantity is in stock.
- Put the quantity you want to sell. Automatically the selling will display (Refer to Add
Purchase) and the system calculates the Total
- If the item has discount you can enter discount amount
- The products sold are listed below.
- You can Edit or Remove the sales before printing the receipt.
You should select the Mode of Sale you have done, by stating either you sale by CASH, CREDIT
or CHEQUE by. The system displays Total amount of all items (products) sold from the list.
By using barcode
Use barcode scanners to manage your inventory more quickly and accurately. SmartPro POS is
compatible with most barcode scanners you can plug into your computer. This can be used simply
by scanning the product instead of using the keyboard during the selling.
Options:
this button gives you the easy link to the Quick Search (Searching Item and update its
information/details) and Quick Purchase (Searching Add Purchase Window) options.
Cash payment: here you enter the cash from the customer, then the system calculate the difference of
Cash payment and Total
- Save Sales as finishing the process of Adding Sales in the System. You can also deny the
process by closing without saving by clicking Red Cross Mark (X) Close Form
16 5.3:
SALES MASTER FILE
This is the window shows all Sales you have done with respective Customer and the total amount.
You can organize the information by Month or Year.
Through this window you can also Add, Edit as well as Delete the Sales.
NB: Sometimes you are on sales Master File and you want to Receive Payments from
your Customer you don’t have to go to accounts then credit payments and Receive
Payments but you can simply add Payments by clicking Payment Button, likewise the
same features in the Purchases Master File
You can exit from the window by clicking Red Cross Mark (X)
17 5.4: DAILY SOLD ITEMS
This window shows the items sold at a day.
18 SIX:
REMEINDER
The system allows the user to sign some issues as remainder, these like Expired Items, and Items out of
Stock
6.1: EXPIRED ITEMS
19 SEVEN:
ACCOUNTS
7.1: DEBT COLLECTIONS
20 7.2: CREDIT PAYMENTS
7.3: EXPENSES BOOK
21 EIGHT:
REPORTS
Smart Pro as other system, it produces various reports.
These reports are from Sales, Purchases, Stock, and Other Areas
22