1
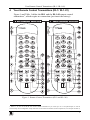
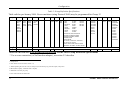
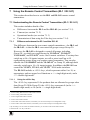
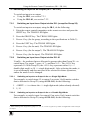
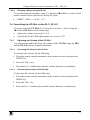
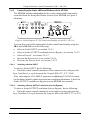
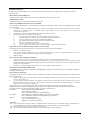
Kramer Electronics, Ltd.
USER MANUAL
Models:
RC-IR1 / IR-1 / IR-1-01
Infra-Red Remote Control Device
Remote Control Transmitter
Remote Receiver
Contents
Contents
1
2
3
4
5
5.1
5.2
6
6.1
6.2
7
7.1
Introduction
Getting Started
Overview
Your Remote Control Transmitters (IR-1 / IR-1-01)
Your Remote Receiver
Identifying the Built-in Remote Receiver
Connecting the External Remote Receiver
Configuration
Setting the Group #
Setting the Unit #
Using the Remote Control Transmitters (IR-1 / IR-1-01)
Understanding the Remote Control Transmitters (IR-1 / IR-1-01)
1
1
2
3
5
5
5
7
7
7
9
9
7.1.1
Differences between the IR-1 and the IR-1-01
9
7.1.1.1 Using the <0/10> Key
7.1.1.2 Using the <-> Single Digit Mode to Select 10 via the <0/10> Key
7.1.1.3 Using the <--> Double Digit Mode to Select 0 via the <0/10> Key
9
10
10
7.1.2
7.1.3
7.1.4
Timeout
Operational Modes
Transmitting Data using the Take Key
10
10
10
7.2
Switching an Input to an Output (IR-1 / IR-1-01)
11
7.2.1
7.2.2
Switching an Input to an Output via the IR-1 (except for Group 20)
Switching an Input to an Output via the IR-1-01
11
11
7.2.2.1 Switching an Input to an Output in the <-> Single Digit Mode
7.2.2.2 Switching an Input to an Output in the <--> Double Digit Mode
11
11
7.3
Storing/Recalling a Setup (IR-1 / IR-1-01)
12
7.3.1
Storing a Setup (IR-1 / IR-1-01)
12
7.3.1.1 Storing a Setup using the IR-1
7.3.1.2 Storing a Setup using the IR-1-01
12
12
7.3.2
Recalling a Setup (IR-1 / IR-1-01)
12
7.3.2.1 Recalling a Setup using the IR-1
7.3.2.2 Recalling a Setup using the IR-1-01
12
13
7.4
Controlling the VP-25xl via the IR-1 / IR-1-01
13
7.4.1
Adjusting the Volume of the VP-25xl
13
7.4.1.1 Increasing the Volume of the VP-25xl
7.4.1.2 Decreasing the Volume of the VP-25xl
13
13
7.4.2
14
Controlling the Scaler LEDs and Buttons of the VP-25xl
7.4.2.1 Selecting a Scaler INPUT
14
i
Contents
7.4.2.2
7.4.2.3
7.4.2.4
7.4.2.5
Selecting a Scaler OUTPUT resolution (but not Bypass)
Selecting a Process
Increasing the Process level
Decreasing the Process level
14
15
15
15
7.5
8
Controlling an Expanded Series 16x16 Matrix Switcher
Technical Specifications
15
15
Figures
Figure 1: Remote Control Transmitters (IR-1 and IR-1-01)
Figure 2: Built-in Remote Receiver
Figure 3: Connecting the External Remote Receiver
Figure 4: Controlling the VP-25xl Scaler functionality via the IR-1 / IR-1-01
3
5
6
14
Tables
Table 1: Remote Control Transmitter Features (IR-1 and IR-1-01)
Table 2: Group Definition Specifications
Table 3: Technical Specifications of the IR-1 and the IR-1-01
ii
4
8
15
KRAMER: SIMPLE CREATIVE TECHNOLOGY
Introduction
1
Introduction
Welcome to Kramer Electronics (since 1981): a world of unique, creative and
affordable solutions to the infinite range of problems that confront the video,
audio and presentation professional on a daily basis. In recent years, we have
redesigned and upgraded most of our line, making the best even better! Our
350-plus different models now appear in 8 Groups1, which are clearly defined
by function.
Congratulations on purchasing your Kramer IR-1 or IR-1-01 Infra-Red
Remote Control Device, which is ideal for video and audio studio remote
control applications, and for remote control of presentations using Kramer
switchers and matrices. The package includes the following items:
• IR-1 or IR-1-01 Remote Control Transmitter2
• This user manual3 and the Kramer concise product catalog/CD
Most Kramer switchers include a built-in front panel remote receiver. When
there is no built-in remote receiver, use4 an external remote receiver5.
The high performance Kramer IR-1-01 is an upgrade of the popular IR-1,
with additional functionality that lets you route up to 96 x 96 inputs/outputs,
as well as store/recall up to 99 configuration setups with some of our
switchers (for the complete list, see Group 20 in Table 2).
2
Getting Started
We recommend that you:
• Unpack the equipment carefully and save the original box and packaging
materials for possible future shipment
• Review the contents of this user manual
• Use Kramer high performance high resolution cables6
1 GROUP 1: Distribution Amplifiers; GROUP 2: Video and Audio Switchers, Matrix Switchers and Controllers; GROUP 3:
Video, Audio, VGA/XGA Processors; GROUP 4: Interfaces and Sync Processors; GROUP 5: Twisted Pair Interfaces;
GROUP 6: Accessories and Rack Adapters; GROUP 7: Scan Converters and Scalers; and GROUP 8: Cables and Connectors
2 The required AA size regular 1.5V battery is supplied
3 Download up-to-date Kramer user manuals from the Internet at this URL: http://www.kramerelectronics.com/manuals.html
4 For example, when ordering an IR-1-01 remote control transmitter, order an external remote receiver to control Kramer
switchers—such as the VS-1002, VS-1202, VS-1602, and VS-1604—that have no built-in remote receiver
5 It includes an attached RS-232 cable with a DB9 connector, and comes with a 12V DC power adapter
6 The complete list of Kramer cables is on our Web site at http://www.kramerelectronics.com (click “Cables and Connectors”
in the Products section)
1
Overview
3
Overview
The IR-1 and the IR-1-01 can operate any Kramer RS-232 controlled
switcher or matrix that is listed in Table 2. Both the IR-1 and the IR-1-01:
• Have their own hand held wireless remote control transmitter1 that
includes the protocols of all Kramer devices and is programmable to control
any Kramer machine (see Figure 1)
• Transmit to an identical remote receiver, either built-in (see Figure 2) or
external (see Figure 3). The remote receiver includes non-volatile memory that
retains the last setting, even after the power supply is interrupted
Achieving the best performance means:
• Pointing the remote control transmitter directly at the remote receiver
(whether built-in or external)
• Making sure that nothing blocks the path of the infra-red beam2
• Connecting only good quality connection cables, thus avoiding
interference, deterioration in signal quality due to poor matching, and elevated
noise levels
• Avoiding interference from neighboring electrical appliances that may
adversely influence signal quality
1 Both the IR-1 and IR-1-01 remote control transmitter deliver instantaneous results and have a range of up to 15 meters
2 For example, do not place a group of switchers in front of the remote receiver. This may prevent it from receiving signals
from the remote control transmitter
2
KRAMER: SIMPLE CREATIVE TECHNOLOGY
Your Remote Control Transmitters (IR-1 / IR-1-01)
4
Your Remote Control Transmitters (IR-1 / IR-1-01)
Figure 1 and Table 1 define the IR-1 and the IR-1-01 remote control
transmitters1, which require no connection (just insert the battery):
Figure 1: Remote Control Transmitters (IR-1 and IR-1-01)
1 Items 17, 18, and 19 of the IR-1-01 remote control transmitter let you route up to 96 x 96 inputs/outputs, as well as
store/recall up to 99 configuration setups with some of our advanced switchers (for the complete list, see Group 20 in Table 2)
3
Your Remote Control Transmitters (IR-1 / IR-1-01)
Table 1: Remote Control Transmitter Features (IR-1 and IR-1-01)
#
Feature
Function
1
2
3
4
5
TRANS LED
RCL Key
STO Key
SHIFT Key
ALL Key
Red LED illuminates when transmitting an instruction to a unit
Recalls the stored data
Stores the current setting
2
Press SHIFT and the appropriate key to invoke the upper level function
3
Pressing ALL before pressing an INPUT key, connects that input to all outputs
(ALL= All Outputs)
6
7
8
9
10
ESC Key
VID Key
AUD Key
A-F-V Key
TAKE Key
Press ESC to cancel the last key(s) pressed (when the action requires another key)4
Affects video (the default)
Affects audio
Audio-follow-video
Pressing TAKE once before preparing a set of codes for switching and then
pressing TAKE again transmits the prepared set of codes to the unit(s)
Pressing OFF after pressing an OUTPUT key disconnects that output from the
input. To disconnect all the outputs, press the ALL key and then the OFF key
5
Locks a unit or all units (optional )
Selects the machine # of a specific unit
Selects the # of a specific group
Decreases the volume6
Increases the volume6
Pressing the <SHIFT> <19> keys to select the -- double digit mode,
selects 0 via the 0/10 key
Available
only on the
Pressing the <SHIFT> <16> keys to select the - single digit mode,
IR-1-01
selects 10 via the 0/10 key
Serves as 0 (in -- double digit mode) or 10 (in - single digit mode) for
Group 20
11 OFF Key
12
13
14
15
16
LOCK Key
UNIT # Key
GROUP Key
VOL- Key
VOL+ Key
17 -- Double
Digit Mode
18 - Single Digit
Mode
19 0/10 Key
1
1 Red warns the operator of the need for a clear path from the remote control transmitter to the remote receiver
2 1 (for STO), 2 (for RCL), 17 (to increase the volume), 20 (to decrease the volume), and UNIT # (for GROUP). On the
IR-1-01: 16 (for the <-> single digit mode) and 19 (for the double digit <--> mode)
3 For example, press ALL and then Input key # 2 to connect that input to all outputs
4 For example, say you want to increase the volume, but instead of pressing SHIFT + 17, you press SHIFT + 20, in error, you
can press ESC (clearing the 20) and then 17
5 This feature will be available in future versions
6 To adjust the volume on the VP-25xl, see section 7.4.1
4
KRAMER: SIMPLE CREATIVE TECHNOLOGY
Your Remote Receiver
5
Your Remote Receiver
This section includes details of:
• The built-in front panel remote receiver (see section 5.1)
• How to connect the external remote receiver (see section 5.2)
5.1 Identifying the Built-in Remote Receiver
Most Kramer switchers1 include a built-in front panel remote receiver that is
located to the left of the power switch, as Figure 2 illustrates:
Figure 2: Built-in Remote Receiver
5.2 Connecting the External Remote Receiver
When your RS-232 controlled Kramer switcher has no built-in front panel
remote receiver, you can use the external remote receiver1 (see Figure 3). The
external remote receiver includes an attached RS-232 cable with a DB9
connector, and a 12V DC power socket.
To connect the external remote receiver, as the example in Figure 3
illustrates, do the following:
1. Connect the external remote receiver to the RS-232 port on the Kramer
switcher, via one of the following methods:
• A direct one-to-one connection, by simply connecting the attached
RS-232 cable’s DB9 connector to the RS-232 DB9 port on the switcher
• An extended (up to about 25 meters) one-to-one connection, by
connecting a flat cable, or by just connecting PIN # 2 to PIN # 2, PIN # 3 to
PIN # 3, and PIN # 5 to PIN # 5 (ground) between the attached RS-232 cable’s
1 Some switchers do not have a built-in remote receiver. For these units, an external remote receiver may be connected to the
switcher. When ordering a IR-1-01 remote control transmitter, a separate order must be made for an external remote receiver
if you want to use the IR-1-01 to control a Kramer switcher that has no built-in remote receiver—such as the VS-1002,
VS-1202, VS-1602, and VS-1604
5
Your Remote Receiver
DB9 connector and the RS-232 DB9 port on the switcher
• A cross connection (or Null-modem adapter) when required1. For the
cross connection, connect PIN # 2 to PIN # 3, PIN # 3 to PIN # 2, and PIN # 5
to PIN # 5
2. Connect the 12V DC power adapter to the power socket and connect the
adapter to the mains electricity.
Figure 3: Connecting the External Remote Receiver
When using more than one unit, connect the RS-485 detachable terminal
block connectors between the different units. The units must belong to the
same group and the same series2 but can be different models3.
1 For example, with the VP-81
2 For example, vertical interval matrix switchers for composite video and stereo audio signals
3 For example, the VS-808xl and the VS-606xl
6
KRAMER: SIMPLE CREATIVE TECHNOLOGY
Configuration
6
Configuration
Kramer products are arranged in groups. Each group is controlled by a
different protocol1. To use the IR-1 and/or IR-1-01 you need to manually
allocate each unit you want to control to its group. Allocating the units in this
way enables the IR-1 and/or IR-1-01 to communicate with each unit in the
system. For a list of the products arranged according to their group, see Table
2 (which also indicates the maximum number of units that you can control in
a system using your IR-1 and/or IR-1-01).
There are 16 different groups, numbered 1, 2, 3, 4, 5, 6, 7, 9, 10, 12, 14, 15,
16, 17, 18, and 20 (there are no groups numbered 8, 11, 13, or 19). Groups
numbered 1, 2, 3, 4, 14, 15 and 16 include units with only a single output. In
some cases, you will need to allocate different versions of the same unit to
different groups. For example, the VS-4x4YC vertical interval matrix
switcher appears in Groups 5 and 12. Group 5 works with the old protocol (at
the time that the VS-4x4YC was initially manufactured) and Group 12 works
with the new protocol2.
6.1 Setting the Group #
To select the Group # on a unit, do the following:
1. Point the remote control transmitter at the remote receiver and press the
SHIFT key. The TRANS LED lights.
2. Press the GROUP key. The TRANS LED lights.
3. Press the digit corresponding to the number of the Group3. The TRANS
LED lights.
This sets and saves the Group #.
6.2 Setting the Unit #
To select the Unit # on a unit, do the following:
1. Point the remote control transmitter at the remote receiver and press the
UNIT key. The TRANS LED lights.
2. Press the digit corresponding to the number of the Group4. The TRANS
LED lights.
This sets and saves the UNIT #.
1 Each Kramer unit has an internal (serial) communication protocol
2 Kramer Protocol-2000 (version 3.1 or higher)
3 According to the specifications in Table 2
4 According to the machine number set up on the unit (for example, via the DIP switches)
7
Configuration
Table 2: Group Definition Specifications
Table valid as per January 2004. Newer machines (using Protocol 2000) may be programmed for Group 12
Group #
1
2
3
Product
SD-7308
VP-61xl/N
2031n
VS-401
VS-601
VS-801
VS-401N
VS-601N
VS-801N
(BUS A)
VS-402
VS-602
VS-802
VS-1202
(BUS B)
VS-402
VS-602
VS-802
VS-1202
51
4
61
VS-4X4YC
2081
VS-2481
2016
VS-2053
VS-5X4
7
2088
2288
101
9
2066
2466
122
2516
2216
2616
2516
2216
2616
CVG-61CS
VP-24
VP-4X4
VS-4X4YC
VS-5X4
VP-81*
14
VP-108
VP-1608
VP-23xl
VP-25xl
VS-812
VS-804xl
VS-848
VS-12113
VS-1616
VS-162
VS-4228
VS-1604
SD-7316
SD-7388
VP-88, VP-84, VP-82, VP-66, VP-64
VS-1602xl, VS-1202xl, VS-1002xl
VS-804YC, VS-806YC, VS-808xl
VS-606xl, VS-646
VS-402, VS-602
VS-401xlm, VS-601xlm, VS-801xlm,
VS-1001xl, VS-1201xl)
VS-411, VS-611, VS-811, VS-1011, VS-1211
SD-7588A, SD-7588V, VS-88A, VS-88V
Speed4
Max.5
1200
8
VS-120
151
16
17
18
VS-401xl
VS-601xl
VS-801xl
VS-1001xl
VS-1201xl
VS-411
VS-611
VS-811
VS-1011
VS-1211
VS-2042
VP-23
VP-25
VS-606
VS-808
8
16
20
VS-1616A
VS-1616V
VS-1616AD
VS-162V
VS-1616SDI
VS-162AV
VP-81N
VP-161
VP-321
VS-1002
VS-1202
VS-1602
VS-1604
VS-1604YC
9600
16
8
1 + 16
1
16
8
Refer to our web site: www.kramerelectronics.com, for the latest Group Definition Specifications
* Use a cross connection (or Null-modem adapter), as section 5.2 describes
1 Old protocol
2 New Kramer Protocol-2000 (version 3.1)
3 When operating the VS-1211 unit, in Group 12 (but not Group 15), press the (input) # key twice
4 Baud (with no parity, 8 data bits and 1 stop bit)
5 Maximum # of units per group
6 One video unit and one audio unit
8
KRAMER: SIMPLE CREATIVE TECHNOLOGY
Using the Remote Control Transmitters (IR-1 / IR-1-01)
7
Using the Remote Control Transmitters (IR-1 / IR-1-01)
This section describes how to use the IR-1 and IR-1-01 remote control
transmitters.
7.1 Understanding the Remote Control Transmitters (IR-1 / IR-1-01)
This section includes details of the:
• Differences between the IR-1 and the IR-1-01 (see section 7.1.1)
• Timeout (see section 7.1.2)
• Operational modes (see section 7.1.3)
• Transmission of data using the Take key (see section 7.1.4)
7.1.1
Differences between the IR-1 and the IR-1-01
The difference between the two remote control transmitters—the IR-1 and
the IR-1-01—is that the IR-1 can control all groups except Group 20.
However, the IR-1-01 is designed to control all groups, including
Group 20—to which you can allocate the VS-1616A1, VS-1616V2,
VS-1616AD3, and VS-162V4 series 16x16 matrix switchers. You may then
switch up to 96 x 96 inputs/outputs, as well as store/recall up to 99
configuration setups from your remote control transmitter. You can also
allocate the VS-1616SDI5 and the VS-162AV6 to Group 20, although both
can only switch up to 16 x 16 inputs/outputs. In addition, the IR-1-01 can
control the VP-81N, VP-161, and VP-3217 XGA/audio switchers.
The IR-1-01 includes a <0/10> key8, which represents either 0 or 10, as
appropriate; and two upper level functions: a <-> single digit mode, and a
<--> double digit mode.
7.1.1.1
Using the <0/10> Key
The <0/10> key represents 10 for products that are allocated to groups other
than Group 20. With Group 20, the <0/10> key represents 0 (in the <-->
double digit mode) or 10 (in the <-> single digit mode).
1 A 16x16 analog balanced stereo audio matrix switcher
2 A 16x16 analog video matrix switcher
3 A 16x16 digital audio matrix switcher
4 A 16x16 video matrix switcher
5 A 16x16 SDI video matrix switcher, with which you can store/recall up to 99 configuration setups
6 A 16x16 audio-video matrix switcher, with which you can store/recall up to 60 configuration setups
7 By cascading 3 VP-321 32X1 XGA/audio switchers, you can form a 96x1 XGA/audio switcher
8 Instead of the <10> key on the IR-1
9
Using the Remote Control Transmitters (IR-1 / IR-1-01)
7.1.1.2
Using the <-> Single Digit Mode to Select 10 via the <0/10> Key
The <-> single digit mode is accessed by pressing <SHIFT> <->1. This mode
accepts single digit numbers.
7.1.1.3
Using the <--> Double Digit Mode to Select 0 via the <0/10> Key
The <--> double digit mode is accessed by pressing <SHIFT> <-->1. This
mode accepts double digit numbers.
7.1.2
Timeout
By design, every keypad operation is subject to a 10 second timeout. Failure
to fully execute an action within 10 seconds will necessitate restarting that
action.
7.1.3
Operational Modes
Choose the operational mode, “VID”: video (the default), “AUD”: audio or
“A-F-V”: audio-follow-video, by pressing the appropriate key2.
7.1.4
Transmitting Data using the Take Key
To transmit data using the Take key, do the following:
1. Point the remote control transmitter at the remote receiver and press the
TAKE key. The TRANS LED lights.
2. Prepare the set of codes for switching (see section 7.2).
3. Press the TAKE key again. The TRANS LED lights.
The data transmits to the unit(s).
1 See the example in section 7.2.2
2 See items 7, 8 and 9 in Figure 1
10
KRAMER: SIMPLE CREATIVE TECHNOLOGY
Using the Remote Control Transmitters (IR-1 / IR-1-01)
7.2 Switching an Input to an Output (IR-1 / IR-1-01)
To switch an input to an output:
• Using the IR-1, see section 7.2.1
• Using the IR-1-01, see section 7.2.2
7.2.1
Switching an Input to an Output via the IR-1 (except for Group 20)
To switch an input to an output, using the IR-1, do the following:
1. Point the remote control transmitter at the remote receiver and press the
SHIFT key. The TRANS LED lights.
2. Press the GROUP key. The TRANS LED lights.
3. Press a # key (for the group, according to the specifications in Table 2).
4. Press the UNIT key. The TRANS LED lights.
5. Press a # key (for the unit). The TRANS LED lights.
6. Press a # key (for the output1). The TRANS LED lights.
7. Press a # key (for the input). The TRANS LED lights.
7.2.2
Switching an Input to an Output via the IR-1-01
Usually—for products that are allocated to groups other than Group 20—to
switch input 3 to output 7, press <# 7> and then <# 3>. The <0/10> key
represents 10. With Group 20, the <0/10> key represents either 0 (<-->
double digit mode) or 10 <-> single digit mode). After selecting the mode, it
is saved internally and does not need to be selected for future operations,
unless the mode is to be changed.
7.2.2.1
Switching an Input to an Output in the <-> Single Digit Mode
For example, to switch input 15 to output 5 on series 16x16 matrix switcher
that is allocated to Group 20, using the IR-1-01, do the following:
1. <SHIFT> <-> to choose the <-> single digit mode (unless already selected).
2. 5, 15.
7.2.2.2
Switching an Input to an Output in the <--> Double Digit Mode
For example, to switch, input 4 to output 62 on series 16x16 matrix switcher
that is allocated to Group 20, using the IR-1-01, do the following:
1 When switching units categorized in groups 1, 2, 3, 4, 14, 15 and 16, ignore step 7 which is inapplicable to units with just
one output
11
Using the Remote Control Transmitters (IR-1 / IR-1-01)
1. <SHIFT> <--> to choose the <--> double digit mode (unless already
selected).
2. 6, 2, 0, 4.
7.3 Storing/Recalling a Setup (IR-1 / IR-1-01)
This section includes details of:
• Storing a setup (see section 7.3.1)
• Recalling a setup (see section 7.3.2)
7.3.1
Storing a Setup (IR-1 / IR-1-01)
You can store a setup using the IR-1 and the IR-1-01.
7.3.1.1
Storing a Setup using the IR-1
To store a setup using the IR-1, do the following:
1. Point the remote control transmitter at the remote receiver and press the
SHIFT key. The TRANS LED lights.
2. Press the STO key. The TRANS LED lights.
3. Press the setup # key. The TRANS LED lights.
The memory stores that setup #.
7.3.1.2
Storing a Setup using the IR-1-01
To store a setup (for example, setup # 5) using the IR-1-01 for a series 16x16
matrix switcher that is allocated to Group 20, press:
•
<SHIFT> <STO> <# 0/10> <# 5>
7.3.2
Recalling a Setup (IR-1 / IR-1-01)
You can recall a setup using the IR-1 and the IR-1-01.
7.3.2.1
Recalling a Setup using the IR-1
To recall a setup using the IR-1, do the following:
1. Point the remote control transmitter at the remote receiver and press the
SHIFT key. The TRANS LED lights.
2. Press the RCL key. The TRANS LED lights.
3. Press the setup # key. The TRANS LED lights.
The memory recalls the stored data.
12
KRAMER: SIMPLE CREATIVE TECHNOLOGY
Using the Remote Control Transmitters (IR-1 / IR-1-01)
7.3.2.2
Recalling a Setup using the IR-1-01
To recall a setup (for example, setup # 7) using the IR-1-01 for a series 16x16
matrix switcher that is allocated to Group 20, press:
•
<SHIFT> <RCL> <# 0/10> <# 7>
7.4 Controlling the VP-25xl via the IR-1 / IR-1-01
You can control the VP-25xl 4x1 Presentation Switcher / Scaler using the
IR-1 and/or IR-1-01 to do the following:
• Adjust the volume (see section 7.4.1)
• Control the Scaler LEDs and buttons (see section 7.4.2)
7.4.1
Adjusting the Volume of the VP-25xl
You can increase and/or decrease the volume of the VP-25xl using the IR-1
and the IR-1-01 remote control transmitters.
7.4.1.1
Increasing the Volume of the VP-25xl
To increase the volume, do the following:
1. Point the remote control transmitter at the remote receiver and press the
SHIFT key.
2. Press the VOL+ key.
3. Press the key 1 continuously until the volume increase is satisfactory.
7.4.1.2
Decreasing the Volume of the VP-25xl
To decrease the volume, do the following:
1. Point the remote control transmitter at the remote receiver and press the
SHIFT key.
2. Press the VOL- key.
3. Press the key 1 continuously until the volume decrease is satisfactory.
13
Using the Remote Control Transmitters (IR-1 / IR-1-01)
7.4.2
Controlling the Scaler LEDs and Buttons of the VP-25xl
The VP-25xl includes independent Scaler control functionality that can be
controlled from the front panel Scaler section of the VP-25xl, as Figure 4
illustrates:
Figure 4: Controlling the VP-25xl Scaler functionality via the IR-1 / IR-1-01
You can also control this independent Scaler control functionality using the
IR-1 and/or IR-1-01 to do the following:
• Select a Scaler INPUT, see section 7.4.2.1
• Select a Scaler OUTPUT resolution (but not Bypass), see section 7.4.2.2
• Select a Process1, see section 7.4.2.3
• Increase the Process level, see section 7.4.2.4
• Decrease the Process level, see section 7.4.2.5
7.4.2.1
Selecting a Scaler INPUT
To select a Scaler INPUT, do the following:
• Point the remote control transmitter at the remote receiver and press the
keys 5 and then 1 to cycle between the 3 Input LEDs (CV, Y/C, VGA)
Note: Selecting the VGA INPUT generates an additional VGA/XGA output,
but facilitates neither signal conversion nor resolution adjustment. It fixes the
Scaler OUTPUT resolution at Bypass (see the VP-25xl user manual).
7.4.2.2
Selecting a Scaler OUTPUT resolution (but not Bypass)
To select a Scaler OUTPUT resolution (but not Bypass), do the following:
• Point the remote control transmitter at the remote receiver and press the
keys 5 and then 2 to cycle between the Output LEDs (with INPUT CV or Y/C)
1 H Phase, Hue, Color, V Pos, Bright and/or Contrast
14
KRAMER: SIMPLE CREATIVE TECHNOLOGY
Technical Specifications
7.4.2.3
Selecting a Process
To select a Process1, do the following:
• Point the remote control transmitter at the remote receiver and press the
keys 5 and then 3 to cycle between the 6 process LEDs
7.4.2.4
Increasing the Process level
To increase the Process level, do the following:
• Point the remote control transmitter at the remote receiver and press the
keys 5 and then 5 until the increase in the level is satisfactory
7.4.2.5
Decreasing the Process level
To decrease the Process level, do the following:
• Point the remote control transmitter at the remote receiver. Press the keys
5 and then 4 until the decrease in the level is satisfactory
7.5 Controlling an Expanded Series 16x16 Matrix Switcher
You can control an expanded series 16x16 matrix switcher, using the IR-1
and/or IR-1-01. For example, when using 2 VS-1616V units to form a 32x16
switcher1, set both VS-1616V units as MACHINE # 12. Using the setup
commands, on the first VS-1616V unit, set the IR REMOTE control to ON,
and on the second VS-1616V unit, set the IR REMOTE control to OFF3.
When a switcher has no built-in front panel remote receiver, for example,
when using 3 VS-1604 units, set each VS-1604 unit as MACHINE # 1 and
connect an external remote receiver to the first VS-1604 unit only.
8
Technical Specifications
Table 3 lists the technical specifications:
4
Table 3: Technical Specifications of the IR-1 and the IR-1-01
Remote Control Transmitter (IR-1 / IR-1-01)
6 cm (W) x 3 cm (D) x 17 cm (H)
Power
AA size regular 1.5V alkaline battery
Source:
Remote current: 21 mA
Stand By: 5 micro A
Accessories: Battery
Dimensions:
External Remote Receiver
8.5 cm (W) x 8.5 cm (D) x 9.5 cm (H)
Power adapter (12V DC Input)
28 mA maximum
Attached RS-232 Cable and connector
Power adapter
1 See the VS-1616V user manual, section 6.3.1 on page 12
2 As Figure 9 illustrates on page 13 of the VS-1616V user manual
3 See the VS-1616V user manual, section 8.10 on page 51
4 Specifications are subject to change without notice
15
LIMITED WARRANTY
Kramer Electronics (hereafter Kramer) warrants this product free from defects in material and workmanship under the
following terms.
HOW LONG IS THE WARRANTY
Labor and parts are warranted for three years from the date of the first customer purchase.
WHO IS PROTECTED?
Only the first purchase customer may enforce this warranty.
WHAT IS COVERED AND WHAT IS NOT COVERED
Except as below, this warranty covers all defects in material or workmanship in this product. The following are not covered
by the warranty:
1.
2.
3.
Any product which is not distributed by Kramer, or which is not purchased from an authorized Kramer dealer. If you are
uncertain as to whether a dealer is authorized, please contact Kramer at one of the agents listed in the web site
www.kramerelectronics.com.
Any product, on which the serial number has been defaced, modified or removed.
Damage, deterioration or malfunction resulting from:
i)
Accident, misuse, abuse, neglect, fire, water, lightning or other acts of nature
ii)
Product modification, or failure to follow instructions supplied with the product
iii)
Repair or attempted repair by anyone not authorized by Kramer
iv)
Any shipment of the product (claims must be presented to the carrier)
v)
Removal or installation of the product
vi)
Any other cause, which does not relate to a product defect
vii)
Cartons, equipment enclosures, cables or accessories used in conjunction with the product
WHAT WE WILL PAY FOR AND WHAT WE WILL NOT PAY FOR
We will pay labor and material expenses for covered items. We will not pay for the following:
1.
2.
3.
Removal or installations charges.
Costs of initial technical adjustments (set-up), including adjustment of user controls or programming. These costs are the
responsibility of the Kramer dealer from whom the product was purchased.
Shipping charges.
HOW YOU CAN GET WARRANTY SERVICE
1.
2.
3.
To obtain service on you product, you must take or ship it prepaid to any authorized Kramer service center.
Whenever warranty service is required, the original dated invoice (or a copy) must be presented as proof of warranty coverage,
and should be included in any shipment of the product. Please also include in any mailing a contact name, company, address, and
a description of the problem(s).
For the name of the nearest Kramer authorized service center, consult your authorized dealer.
LIMITATION OF IMPLIED WARRANTIES
All implied warranties, including warranties of merchantability and fitness for a particular purpose, are limited in duration to
the length of this warranty.
EXCLUSION OF DAMAGES
The liability of Kramer for any effective products is limited to the repair or replacement of the product at our option. Kramer
shall not be liable for:
1.
2.
Damage to other property caused by defects in this product, damages based upon inconvenience, loss of use of the product, loss
of time, commercial loss; or:
Any other damages, whether incidental, consequential or otherwise. Some countries may not allow limitations on how long an
implied warranty lasts and/or do not allow the exclusion or limitation of incidental or consequential damages, so the above
limitations and exclusions may not apply to you.
This warranty gives you specific legal rights, and you may also have other rights, which vary from place to place.
NOTE: All products returned to Kramer for service must have prior approval. This may be obtained from your dealer.
This equipment has been tested to determine compliance with the requirements of:
EN-50081:
"Electromagnetic compatibility (EMC);
generic emission standard.
Part 1: Residential, commercial and light industry"
EN-50082:
"Electromagnetic compatibility (EMC) generic immunity standard.
Part 1: Residential, commercial and light industry environment".
CFR-47:
FCC Rules and Regulations:
Part 15: “Radio frequency devices
Subpart B – Unintentional radiators”
CAUTION!
⌦ Servicing the machines can only be done by an authorized Kramer technician. Any user who makes changes or modifications to
the unit without the expressed approval of the manufacturer will void user authority to operate the equipment.
⌦ Use the supplied DC power supply to feed power to the machine.
⌦ Please use recommended interconnection cables to connect the machine to other components.
16
KRAMER: SIMPLE CREATIVE TECHNOLOGY
For the latest information on our products and a list of Kramer
distributors, visit our Web site: www.kramerelectronics.com.
Updates to this user manual may be found at
http://www.kramerelectronics.com/manuals.html.
We welcome your questions, comments and feedback.
Kramer Electronics, Ltd.
Web site: www.kramerelectronics.com
E-mail: [email protected]
P/N: 2900-002012 REV 4