1
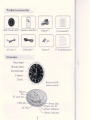
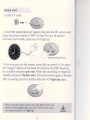
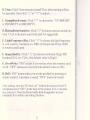
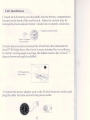
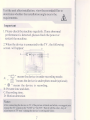
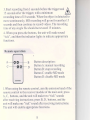
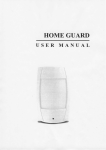
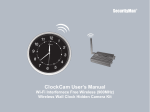
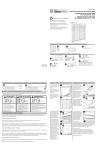
User Manual
Clock Smart Cam
m
Welcome!
Thank you for choosingHD029.It is a hidden audio & video
recorder with multifunctional features,such as motion
detectionrecording,pre-recordingand remoterecording.
This product supportslarge-capacityMini SD card extension
which is easyfor-acces.und dutureading.
I
l
Safety instructions
Pleaseread theseinstructionsbefore using the product.
. Sincethis product is controlledby a microcomputerchip,
it is normal that systemhalt may occur if usersoperateit
incorrectly.In this case,re-startthe device .
r This product is neitherwaterproofnor dust proof, and
thereforeit can not be usedoutdoorsor in adverseenvironment.
o Pleaseadoptoriginal DC power supply,to avoid causing
device damageor electric shockor fire.
o Unauthorizeddismantlementof the device or replacement
ofdevice parts is forbidden.The manufacturerwill not be
responsiblefor any loss arising from such actions.
I Do not put the device into fire, oven or microwave oven, in
order to avoid explosion.
. As a result of version changes,the user manualmay be
different from the real product.Pleasetake the real product as
the standard.
I
Productaccessories
W a l l - C l o c k C a m * I R e m o t ec o n t r o l l e r *l
A d a p t e r xl
@E@E
AV Line* I
U S B c a b l e *I
S c r e w s *I
U s e rm a n u a l xI
T F C a r d ( O p t i o n a r1
Structure
Hourhand
Minutehand
S e c o n dh a n d
Camera
Clock
R e c e i v e ro f l R
r e m o t ec o n t r o l
TF card slot
USB port
AV Out
l-Power jack
Power on/off
Power indicator
Detect indicator
Quick start
I . I n s e r tT F c a r d
2 . I n s e r tt h e s u p p l i e dp o w e rs u p p l yp l u g i n t o t h e D C s o c k e t ,a n d
p l a c et h e p o w e rs w i t c ht o " O N " t o s t a r tt h e u n i t ; t h e p o w e r
i n d i c a t o ra n d s t a n d b yi n d i c a t o rw i l l l i g h t u p .
,lqPo"*..
3 . N o w y o u m a y u s et h e r e m o t ec o n t r o l l e rt o c o n t r o li t . O r ' ,p r e s s
t h e " t r i g g e r "b u t t o no n t h e b a c k o f c o l o c k t os t a r tM D f u n c t i o n ,
t h e s t a n d b yi n d i c a t o rg o e so u t . W h e nt h e r e c o r d i n gi s t r i g g e r e d ,
s t a n d b yi n d i c a t o r f l a s h e so n c e .P r e s st h e b u t t o na g a i nt o d i s a b l e
M D r e c o r d i n ga n d t h e s t a n d b yi n d i c a t o rw i l l l i g h t u p a g a i n .
When using the remote control, press the "REC"button,the
standby indicator goes out . press the "STOP"button again,
t h e s t a n d b yi n d i c a t o rw i l l l i g h t u p .
Unit setting
Connectthe unit to your computer,andturn on the power
turn on the power
Connect the computer
2. Open "My Computer" and you will find a mobile hard disk;
click the "DvXSet.exe", thenfollow the following setting:
O . . . j
, ; -
! H
I '
f t';.-
' d I .
t / '
fl---I
t*| t:i""*'
rI
I
|
|
ltu
t r*,
|
@o,.'.
I
----l w"
I
lffi=l
ltrHl
Il*ru1
.-----:
I
Settinginstruction:
turning in blue
A. Date: Click "yearlmonth/date"first,after
to adjust.
background,thenclick
B. Time: Click "hour/minute/second"first,
after turning in blue
background,then click "A"or "W" to adjust.
C. StampDateFormat: Click "V" to choosethe "YY/MM/DD"
or DD/MM/YY or MM/DD/YY.
D.MotionDetecSensitive:Click "W"to choosemotion sensitivity
from 1-5.(5is the most sensitivityand 3 is suggested)
E. LightFrequence(Hz):Click "V"to choosethe light frequency
in your country.Normally it is 5OHzin Europeand China,60Hz
in AmericaandJapan.
F. ImageQuality: Click " V'jto chooseresolution:High-HD,
Standard-DI ,Low-VGA, (the defaultvalue is High)
G. OverWrite: "ON" meansit overwriteswhen the memory card
is full. "OFF" meansno overwrite(the defaultvalue is ON).
H. Bell: "ON" means when you set the product by pressing or
remote control, it produce a sound. "OFF" means no sound.
A f t e r s e t t i n g , s a v et h e " D v X s e t . e x e " w i t h o u t d i s c o n n e c tf r o m P C .
A n d p l e a s ep r e s s " S E T " o n t h e b a c k o f t h e c a m e r a f o r 3 - 5 s e c o n d s ,
t h e n r e l e a s ei t . N o w t h e R e m o v a b l e d i s k d i s a p p e a r s i n y o u r
computer for a while and settingfinishes.
Unit Installation
I .Insert an AA battery (not included) into the battery compartment
locatedon the back of the wall-clock. Adjust to current time by
turning the clock adjusterturner clockwise or counter-clockwise.
to curreDttime
,,@---@-Adjust
,n*.f o**oV
(not included)
2.Find a desire location to mount the ClockCam. Recommended to
installT-8 ft high above floor level in areas intended for surveillance.
For better viewing angle coverage, the hidden camera has a fixed I 7
degree downward angle by defdult.
7-8ft high above
rloor level
3.Connect the power adapterjack to the ClockCam power socket and
plug the other end into an electrical power outlet.
l fr,
n
ffi\w
r-]sll
rFr
v
6
6Y-,
=l
Testthe unit after installation,view the recordedfiles to
determinewhetherthe installationansle meetsthe
requirements.
A
Important
I . Pleasecheckthe machineregularly.If any abnormal
performanceis detected,pleasecheck the power or
r e s t a r t t h em a c h i n e .
2 . W h e nt h e d e v i c ei s c o n n e c t e d
t o t h e T V , t h ef o l l o w r n s
screen will appear:
.
D
B
C
"
" m e a n st h e d e v i c ei s u n d e rr e c o r d i n gm o d e;
tr
" l-ol "meansthe deviceis underphoto mode(optional);
" C " m e a n st h e d e v i c e i s r e c o r d i n g .
B : P r e s e ntti m e a n d d a t e .
C : R e c o r d i n gt i m e .
D: Motiondetection
A:
Note:
After connectingthe device to TV ifthe picture is black and white, we suggestyou
changethe TV system to be "N358" or "AUTO". Then it will be color. Any of
adjustmenton TV won't changethe device's setting and video.
beforethetriggerand ft
3.Startrecordingfrom 3 seconds
-t\
15 seconds
afte;he trigger,with a minimum
. h e n t h e o b j e c t i s d e t e c t e dt o
r e c o r d i n gt i m e o f 1 8 s e c o n d sW
m o v e c o n t i n u o u s l yM
, D r e c o r d i n gw i l l g o o n f o r a n o t h e r1 5
s e c o n d sa n d t h e n c o n t i n u et o r e c o r dv i d e o s .T h e r e c o r d i n g
t i m e o f a n y s i n g l ef i l e s h o u l dn o t e x c e e d1 5 m i n u t e s .
4. When you pressthe buttons, the unit will make sound
" t i c k " , a n d t h e n t h e i n d i c a t o rl i g h t s t o i n d i c a t ea p p r o p r i a t e
functions.
Remote operation
g
n
"
Buttondescription:
B u t t o nA : m a n u a lr e c o r d i n g
B u t t o nB : s t o pr e c o r d i n g
B u t t o n C : e n a b l eM D m o d e
B u t t o n D : d i s a b l eM D m o d e
l . W h e n u s i n g t h e r e m o t ec o n t r o l ,a i m t h e e m i s s i o nh e a do f t h e
remote control to the receiver module of the main unit; press
A. C. buttons. and the unit will make two "tick" sounds
after receiving instructions; press B, D, buttons, and the
unit will make one "tick" sound after receiving instructions.
The unit will enableappropriatefunctions.
2 . W h e nm a n u a lr e c o r d i n gi s e n a b l e d t, h e u n i t w i l l
c o n t i n u o u s l yr e c o r du n t i l y o u p r e s st o s t o pi t o r T F c a r d i s
o u t o f m e m o r y( r e c o r d i n gw i l l s t o pw h e n i n n o n - o v e r w r i t t e n
r n o d ei . e . " O v e r w r i t e : O F F " ) . N e w f i l e s w i l l b e g e n e r a t e d
w h e n r e c o r d i n gt i m e e x c e e d s1 5 m i n u t e s .
Tips:
o T h i s r e m o t ec o n t r o li s b a s e do n i n f r a r e dr e m o t ec o n t r o l .
s o t h e r e c e i v e rm o d u l eo n l y r e c e i v e st h e l i g h t w a v e e r n i t t e d
b y s t r a i g h te m i s s i o nl i n e . W h e n t h e e m i s s i o nh e a do r r e c e i v e r
r n o d u l ei s b l o c k e d ,o r t h e l i g h t w a v e e m i t t e db y t h e e m i s s i o n
h e a dc a n ' t b e r e c e i v e d t. h e r e m o t ec o n t r o lw i l l f a i l t o
function.
. L o w v o l t a g eo f t h e b a t t e r i i si n s t a l l e di n t h e r e r n o t e
c o n t r o lw i l l s h o r t e nt h e r e m o t ec o n t r o ld i s t a n c eP
. lease
r e p l a c et h e b a t t e r i e si n t i m e .
A
. When the remote control is out of servicefor a long ,/I\
t i m e , r e m o v et h e b a t t e r i e st o a v o i d c i r c u i t d a m a g e
Connect to PC and read files
1 . Connectthe unit to PC with a cable.turn on the unit, and then
y o u w i l l s e ea m o b i l e h a r dd i s k i n " M y C o m p u t e r " ;o p e nt h e d i s k
and you can copy, delete,move files and format the disk.
2 . Y o u c a n a l s o c h o o s et o r e m o v et h e T F c a r d .S e l e c ta p r o p e r
card readerto read the data storedin the card.
Notes:
o Do not remove the TF card during recording or when the
unit is starting, to avoid damaging the TF card, unit or files.
. This unit has an auto file-overwriting function. Andwhen
the memory is full, it will automatically delete the earliest
dated files to continue to record. Ifyou have any important
t1les,pleaseread and copy them in time.
o To avoid false motion-triggering, please avoid not
putting the product straightly to strong light.
.If the product is used to watch out of the window. the
motion sensitivity may be decreased,or there will be false
triggering due to glisten ofthe glass.
.In low-light condition, or the moving object being same
color as background, the sensitivity may be decreased.
t0
Product Specification
Video format
A V I H D / D l / V G A 3 0 F P Sw i t h a u d i o
C a m e r aL e n s
Color -pinhole
Focal distance
0.6m-infinity
TV system
NTSC/PAL
Memory extension supported Up to 32 GB
USBport
U S B2 . 0
Auto file-overwriting
Available
Resolution
HD, D1, VGA(optional)
D e t e c t i o ns e n s i t i v i t y
S o f t w a r es e t t i n gL e v e l s 1, 2 , 3 , 4 , 5
P r e - r e c o r dt i m e
3 s e c o n d sb e f o r e m o t i o n d e t e c t e d
R e c o r dt i m e d i s p l a y
Available
R e m o t ec o n t r o l d i s t a n c e
l0 meters
S i z eo f v i d e o f i l e
Approx.3sM/Min( HD )
Minimum Illumination
1 0L u x
ViewAngle
About 45"
Powerconsumption
Max 350mA 6V
Powersupply
Input: 100-240V, output:6V, 800mA
Operation temperature
10 - s 0c
O p e r a t i n gh u m i d i t y
20%-80%
Dimensions
0365mm
11