1
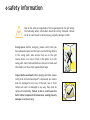
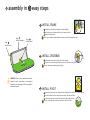
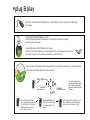
USB Golf Simulator
User’s Manual
Contents
safety information.....1
identifying the components.....2
assembly in 3 easy steps....3
plug & play.....4
playing tips.....5
care.....6
troubleshooting.....7
notes.....8
warranty....9
Thank you for purchasing Golf•Launchpad™ — the premier
golf simulation system. Please read this instruction manual
carefully before use and retain it for your reference.
!
Due to the extreme forces generated in golf, please read the safety information page prior to use
1
safety information
Due to the extreme magnitude of forces generated in the golf swing,
the following safety information should be strictly followed. Failure
to do so could result in serious injury, property damage or both.
Swing space: before swinging, please verify that you
have adequate space and there are no interfering objects
in the swing path. Also ensure that—as on the golf
course—there is no one in front of the golfer or in the
swing path. Golf clubs and balls are known to break and
their debris can fly at high speeds downrange.
Inspect Golf•Launchpad: Before playing each hole, please
verify that all Golf•Launchpad™ components are secure
and not damaged in any way. If the ball, tee or their
tethers are worn or damaged in any way, they must be
replaced immediately. Failure to do so could cause the
ball or tether components to break loose, causing property
damage or serious injury.
X
2
identifying the components
what's in the box
A
after the 3-step assembly
A
Golf•Launchpad™ CPU
B
Net with frame assembly
C
Tethered ball
D
L-key (for assembly)
E
Turf
2
2
2
1
3
5
B
F
User's Manual
G
Game software
H
Anti-slip strips
4
6
(optional for carpeted floors)
7
8
9
D
C
G
F
E
H
1
Net
6
Status Light
2
Crossbar
7
Left Sensor
3
Frame Assembly
8
Right Sensor
4
Frame Holder
9
Putt Sensor
5
Pivot and tethered Ball
3
assembly in
easy steps
INSTALL FRAME
unfold the net which includes the frame assembly
fully insert each frame end A into the frame holder B
B
A
tighten locking bolts
Step
Install frame
Step
Install crossbar
Step
Install pivot
Check: when properly assembled the frames should be upright and rigid
INSTALL CROSSBAR
remove the screws from each end of the crossbar
thread the screws through the frame into the crossbar and tighten
Check: the frame assembly must be rigid
WARNING: Due to the enormous forces of
impact in golf, improper or incomplete
assembly can damage Golf•Launchpad™
and cause injury!
C
INSTALL PIVOT
D
place the pivot top C over the pivot base D oriented so that the “•” marks line up
lower the pivot-top into the pivot-base until the two feel flush
rotate the pivot to bring the ball around to the home position
Check: when pulled up, the pivot must not lift off its base
4
plug & play
Insert the Golf•Launchpad™ USB cable into a free USB port on your computer. Do not unplug
your mouse
Install Tiger Woods PGA TOUR on your PC.
Learn to play the game with the mouse. You will use the mouse for all game
functions except swinging!
Launch Tiger Woods PGA TOUR and start a game.
Select your club and choose your shot type and direction, then place the cursor near
the player’s hands until it looks like a curved arrow. Do NOT click
Place the ball in the home position between the sensors either on the turf or on the tee provided
Follow the status light indications as shown below:
Status Light
L-Sensor
left-handed shots
R-Sensor
P-Sensor
right-handed shots
Use the L or R sensor to
activate Golf•Launchpad™
for all shots except putts.
For putts activate with the
P sensor.
putts
The red light means that
Golf•Launchpad™ is waiting
to be activated. To activate,
hold your club over either
the P, R or L sensor.
continue holding your
club for 2 seconds until
the amber light turns
green…
Golf•Launchpad™ is ready for your
shot. Address the ball and swing
directly over the sensors. Fore!
5
playing tips
Following these simple rules will enhance your gaming pleasure…
Clean your clubs: Golf•Launchpad™ works best
when the soles of your clubs are clean. Soiled clubs
may result in reduced shot accuracy.
Routine inspection:
Using Golf•Launchpad™ while any of its parts are incorrectly installed, loose
or worn-out can cause premature failure of the unit. Worse, loose or
DO
• Always use the True Swing Vertical
mode of the game when playing with
Golf•Launchpad™
• Always swing straight over the sensors,
and set the shot direction using the
onscreen golfer.
• Enjoy the game!
damaged parts can come off during play, causing injury or property damage.
Replacement parts can be purchased by calling +1-(416)-410-1166, or from our
website at www.electricspin.com.
Shot Type: Always use the True Swing Vertical mode in Tiger Woods PGA Tour 2002 and newer with Golf•Launchpad. Varying
the shot settings from novice to expert will increase the sensitivity of the game to mishits, increasing the level of accuracy,
realism and difficulty.
Shot Direction: Set your shot direction by adjusting the orientation of the animated player in the game but your shots over
Golf•Launchpad™ should always be straight over the sensors to avoid unintentional hooks and slices.
Driving: If you don’t have swing room for your longer clubs, you can swing a shorter club instead. Choose the best club for the shot in the
game, even if you will swing with a different club. To compensate for reduced club speed, use the power boost function in the game
software.
Short Game: Activate Golf•Launchpad™ using the ‘L’ or ‘R’ sensors as you would for drives. When playing a
chip or bump-n-run shot, set the game to FULL or PITCH mode [see Note 6]. Use the power slider to fine
tune the chipping distance.
Putting: Use the grid function and choose various camera angles to read the green, then set your shot
direction using the on-screen player. Putt straight over the sensors.
6
taking care of your Golf•Launchpad™
Certain components of Golf•Launchpad™ will experience wear from
normal use and will eventually require replacement. This is a normal
consequence of use and not a defect.
Replacement parts may be ordered online from electricspin.com or by
calling 1-866-571-7746 or +1-(416)-410-1166.
Routine care
• Golf•Launchpad™ is a sophisticated computer, treat it with care: avoid excessive humidity, elevated temperatures and
dusty environments. Keep away from moisture
• Never clean Golf•Launchpad™ with anything other than a soft, dry cloth. Periodically vacuum the turf lightly to pick up
dust and debris. Do not insert anything into the sensor openings
• Always store Golf•Launchpad™ on a flat, clean and dry surface to avoid damage.
Replacing the tethered ball
1. Rotate the pivot until the ball and tether face the net and the “•” marks on the pivot and its base line up.
2. While swiveling the pivot-top back and forth slightly, lift the pivot-top straight up to remove the pivot-top from the
pivot-base
3. See page 3 for instructions on how to install a new pivot and ball assembly.
Replacing the turf
1. Remove the worn turf by prying at the edges and lifting straight up. There are several buttons that hold the turf in place,
each button will yield when the turf is pulled straight up firmly. While removing the old turf, avoid bending the turf or
the buttons could break
2. Remove the backing strips from the adhesive tape on the replacement turf
3. Line up the replacement turf over the base and press down to snap into position. Wait 30 minutes for the adhesive to set
before using.
7
troubleshooting
Status light OFF
- Check that the USB cable is plugged in and secure and the PC is powered on.
- Verify that the USB port is functional [see note 2].
- Some laptops are unable to power Golf•Launchpad. In this situation please use a
powered USB hub with Golf•Launchpad.
Status light not changing, shots not read
- Ensure that you are activating Golf•Launchpad™ correctly (pg. 4).
- Ensure that your club path passes directly over the sensor grid.
- Ensure that your clubs are clean. Some dark or unusually colored clubs may not
work reliably with Golf•Launchpad.
Status light changes but game does not work:
- Check game software has been prepared for taking a shot [see note 3].
- Read the game software’s manual and learn how to play the game with a mouse.
- Your PC must have a generic USB mouse driver installed [note 4] — without the game running, activating
the Golf•Launchpad™ and taking a shot should cause the mouse cursor to move.
Not responding to ‘Activation’, status light flashing red:
- The ball is placed over or too close to one of the sensors. Place the ball on the turf centered between
the sensors (pg. 4).
- Ensure that your club is placed directly over the appropriate activation sensor and is not over or near any
other sensor.
- Ensure that nothing is blocking any of the sensors.
Shot hit hard, distance not accurate:
- For all shots other than putts, ensure that the full shot type is selected within the game and
Golf•Launchpad™ is activated using either the L or R sensor depending on left-handed or right-handed
use. For putts, activate Golf•Launchpad™ using the P sensor for both left- and right-handed use (pg. 4).
8
notes
1. If your PC does not have a free USB port, you may add additional USB ports to your PC by connecting a
USB hub. A few laptop models are unable to power Golf•Launchpad. If this applies to your laptop, please
insert a powered USB hub between your laptop and Golf•Launchpad.
2. Verify that your PCs USB port is functional by testing a generic USB device, such as a mouse, on that
port.
3. Please read the game software’s manual on how to ready it for a mouse swing. Golf•Launchpad™ will
only work with the True Swing Vertical mode that is available in Tiger Woods PGA TOUR 2002 and newer.
4. If your Windows PC does not have a generic USB mouse driver installed, plugging in Golf•Launchpad™
will cause the Windows Operating System to prompt you to install a mouse driver. Follow the instructions
that came with your operating system software to install the driver.
5. For best accuracy, keep your clubs clean and periodically vacuum debris off the turf. Do not insert
anything in the sensor holes — vacuuming lightly over the turf should pick up any dust off the sensors.
6. For accuracy in your short game from around the green, set the game to FULL or PITCH mode regardless
of the shot you play with your clubs.
7. A 120 mph drive applies a force to the ball that is equivalent to over a ton. Fore!
9
limited warranty
Electric~Spin Inc. (E~S) warrants to the original purchaser that each of the constituent products comprising
Golf•Launchpad™ except for the included game software (hereinafter “Products”) shall be free of defects in
material and workmanship for a period of ninety (90) days from the date of purchase (“Warranty Period”) by the
original purchaser.
If any of the Products is determined to be defective during the Warranty Period, E~S’s liability shall be limited to
the repair or replacement of the defective Product. You must call E~S at 1-416-410-1166 or email [email protected]
to receive instructions on obtaining warranty service.
The warranty shall not apply if this product: (A) is used for commercial purposes (including rental); (B) has been
modified or tampered with; (C) is damaged by misuse, abuse (including improper assembly), negligence, accident,
wear and tear, unreasonable use or by other causes unrelated to defective materials or workmanship; (D) has had
its serial number or warranty seal altered, defaced or removed. Wear and tear from normal use is specifically
excepted from this warranty.
Proof of purchase in the form of a bill of sale or receipted invoice providing evidence that the unit is within the
warranty period must be presented to obtain warranty service. Repair or replacement as provided under this
warranty is the exclusive remedy of the purchaser. In no event shall E~S be liable for consequential or incidental
damages, however caused.
This warranty gives you specific legal rights. In addition to these you may have other rights which vary by State or
Province. This warranty is valid only in Canada and the contiguous states of the United States. The included game
software is provided as-is. For warranty of the included game software, please contact the software’s publisher.
You may register your warranty online at www.electricspin.com/register
This document is available online at electricspin.com
Copyright 2004 Electric~Spin Corporation. All rights reserved.
UMC1-10147