1
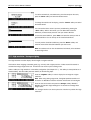
User manual
METTLER TOLEDO
Compact scales BBA462 / BBK462
-,/
1
&
ab
4
gh
2
c
3
de
i
5
pq
f
jkl
7
6
rs
mn
8
o
tuv
.
+ ...
wx
0
9
yz
C
www.mt.com/support
9
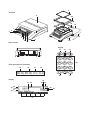
Overview
9
9a
9b
10
1
3
2
10b
4
8
5
6
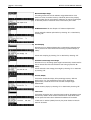
Rear of Scale
10a
7
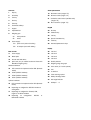
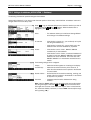
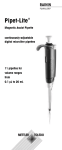
Keypad
23
24
25
1
2
3
-. / &
abc
def
4
5
6
ghi
jkl
mno
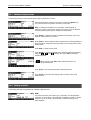
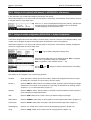
Scale specifications (example)
19
20
21
22
Max1: 3kg
Max2 6kg
Min1: 20g
Min2: 40g
e1: 1g
e2 2g
d1: 1g
d2: 2g
7
8
9
qprs
tuv
wxyz
.
0
C
+...
26
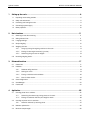
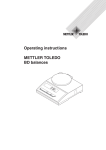
Display
36
33
34
29
35
37
38
30
39
31
40
32
41
27
28
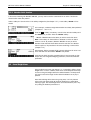
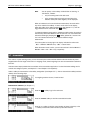
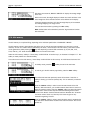
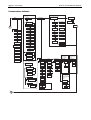
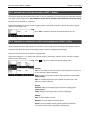
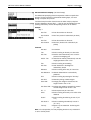
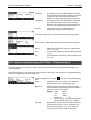
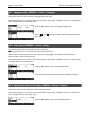
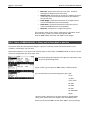
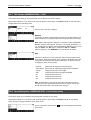
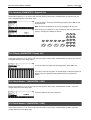
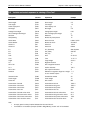
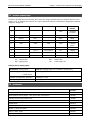
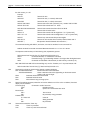
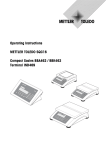
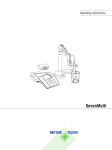
Overview
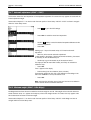
Scale specifications
1
Display
19
Maximum loads (ranges 1/2)
2
On/Off key
20
Minimum loads (ranges 1/2)
3
Tare key
21
4
Zero key
Verification scale interval (certified scale)
(ranges 1/2)
5
Enter key
22
Max. resolution (ranges 1/2)
6
Command softkeys
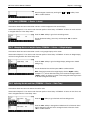
7
Keypad
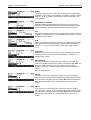
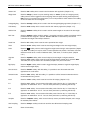
Keypad
8
Adjustable feet
23
Shift key
9
Weighing pan
24
Database key
10
9a:
wind protector
25
Info key
9b:
shield
26
Special characters key
Power supply:
27
Clear key
28
Numeric/alphanumeric keys
10a: power cord (scale w/o battery)
10b: AC adapter (scale with battery)
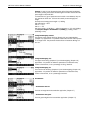
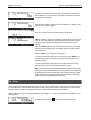
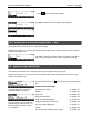
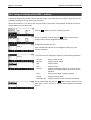
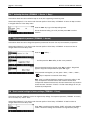
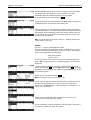
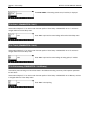
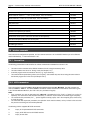
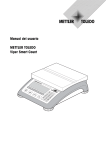
Display
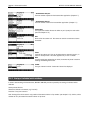
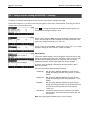
Rear of scale
29
Info line 1
11
Power supply
30
Info line 2
12
Model plate
31
Info line 3
13
Hole for anti-theft device
32
Info line 4
14
Spirit level (only on certified scales and those with
MonoBloc weighing cells)
33
Stability detector
34
Weighing range bar graph
35
Active scale (in 2-scale systems)
36
Unit
37
no function
38
Piece counting symbol
39
Battery discharge status
40
Net weight indicator
41
Softkeys 1…6
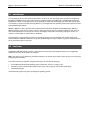
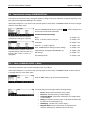
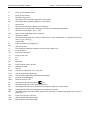
Standard Interfaces:
15
PS2 connector for keyboard and/or BCR (Barcode
reader)
16
COM3 (RS232C interface)
17
COM2 (RS232C interface)
18
COM1 (RS232C interface)
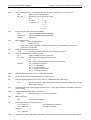
Optional Interfaces:
15 PS/2 connector for keyboard and/or BCR (Barcode
reader)
16
Depending on configuration: RS232C interface or
Analog Base
17
Depending on configuration: Ethernet, USB,
Digital I/O or RS232 interface
18
Depending on configuration:
RS422/485 interface
RS232C
or
Table of Contents
METTLER TOLEDO BBA462 / BBK462
4
1
2
Setting up the scale .........................................................................................................8
1.1
Unpacking and checking contents ..........................................................................................................8
1.2
Safety and environment .........................................................................................................................8
1.3
Positioning and leveling the scale...........................................................................................................9
1.4
Connecting to power supply.................................................................................................................10
1.5
Battery operation.................................................................................................................................10
Basic functions ..............................................................................................................11
2.1
Switching on and off and zeroing .........................................................................................................11
2.2
Setting date and time...........................................................................................................................11
2.3
Language settings ..............................................................................................................................12
2.4
Simple weighing .................................................................................................................................13
2.5
Weighing with tare ..............................................................................................................................14
2.6
3
4
2.5.1
Taring by placing the weighing container on the scale...............................................................14
2.5.2
Entering the tare weight numerically (pre-tare)..........................................................................15
2.5.3
Determining the gross and net weights ....................................................................................16
Recording weighing results ..................................................................................................................16
Enhanced functions ........................................................................................................17
3.1
General Info .......................................................................................................................................17
3.2
Database ...........................................................................................................................................18
3.2.1
Database editing functions .....................................................................................................19
3.2.2
Defining an article .................................................................................................................19
3.2.3
Erasing of individual article attributes.......................................................................................22
3.2.4
Save As Article function ..........................................................................................................23
3.3
Gross Weight Alarm ............................................................................................................................23
3.4
SmartManager....................................................................................................................................24
3.5
FlashLoader .......................................................................................................................................24
Application....................................................................................................................25
4.1
4.2
Counting pieces into a container...........................................................................................................25
4.1.1
Determining the reference by placing pieces on the scale ...........................................................25
4.1.2
Entering the reference when the piece weight is known ..............................................................26
Counting out pieces out of a container ..................................................................................................27
4.2.1
Determine reference by removing pieces ..................................................................................27
4.3
Reference optimization ........................................................................................................................28
4.4
Minimum sample weight .....................................................................................................................28
METTLER TOLEDO BBA462 / BBK462
Table of Contents
5
4.5
Using the info key ...............................................................................................................................29
4.6
Piece counting with 2-scale systems ....................................................................................................30
4.7
Accumulation .....................................................................................................................................31
4.8
Filling ................................................................................................................................................32
4.9
Checkweighing (+/-)...........................................................................................................................33
4.10 Custom Unit .......................................................................................................................................34
4.11 High resolution / Average weighing.......................................................................................................35
4.12 Alibi memory......................................................................................................................................36
5
Vision setup ..................................................................................................................37
5.1
Overview and operation .......................................................................................................................37
5.2
Calling up the menu and entering the password.....................................................................................38
5.3
Menu overview ...................................................................................................................................39
5.4
5.5
5.6
5.3.1
Scale ...................................................................................................................................39
5.3.2
Application ...........................................................................................................................40
5.3.3
Terminal...............................................................................................................................42
5.3.4
Communications ...................................................................................................................43
5.3.5
Diagnostics ..........................................................................................................................46
Scale settings (SCALE) ........................................................................................................................46
5.4.1
Adjust/calibrate (SCALE Calibration)....................................................................................47
5.4.2
Display resolution and weighing unit (SCALE Display) ..........................................................47
5.4.3
Tare settings (SCALE Tare).................................................................................................48
5.4.4
Automatic zero point correction (SCALE Zero).......................................................................48
5.4.5
Automatic save of tare and zero values (SCALE Restart)........................................................49
5.4.6
Adaptation to environmental conditions and weighing mode (SCALE Filter) .............................49
5.4.7
Automatic adjustment (SCALE FACT)...................................................................................50
5.4.8
Minimum weight monitoring (SCALE Min Weigh) .................................................................50
5.4.9
Resetting scale to factory default settings (SCALE Reset)........................................................51
Application settings (APPLICATION) ......................................................................................................51
5.5.1
Settings for piece counting (APPLICATION Counting).............................................................52
5.5.2
Settings for database (APPLICATION Database)....................................................................55
5.5.3
Identification (APPLICATION Identification) ...........................................................................56
5.5.4
Settings for accumulation (APPLICATION Accumulation)........................................................56
5.5.5
Settings for filling/checkweighing (APPLICATION Filling/Checkweighing)..................................57
5.5.6
Settings for the (optional) alibi memory -> APPLICATION-> Alibi memory ....................................58
5.5.7
Settings for softkey configuration (APPLICATION Softkey Configuration) ...................................58
5.5.8
Settings for Info/Help (APPLICATION Info/Help) .....................................................................60
5.5.9
Settings for reset (APPLICATION Reset) ................................................................................61
Terminal settings for device (TERMINAL Device).................................................................................61
Table of Contents
METTLER TOLEDO BBA462 / BBK462
6
5.6.1
Language settings (TERMINAL Device Language) ............................................................62
5.6.2
Sleep function (TERMINAL Device Sleep).........................................................................62
5.6.3
Adjusting the contrast of the display (TERMINAL Device Contrast) ......................................62
5.6.4
Invert (TERMINAL Device Invert) .....................................................................................63
5.6.5
Changing the size of weight display (TERMINAL Device Weight display).............................63
5.6.6
Adjusting the date and time (TERMINAL Device Date Time) ...............................................63
5.6.7
Activating the beep (TERMINAL Device Beep)...................................................................64
5.7
Define supervisor password (TERMINAL Access) ...............................................................................64
5.8
Reset terminal settings to factory settings (TERMINAL Reset) ...............................................................64
5.9
Communication settings (COMMUNICATIONS) .......................................................................................65
5.9.1
Mode (COMMUNICATIONS Mode) .......................................................................................65
5.9.2
Printer (COMMUNICATIONS Printer) only in Printer Mode or Auto Print.....................................66
5.9.3
Parameters (COMMUNICATIONS Parameters).......................................................................67
5.9.4
Define I/O (COMMUNICATIONS Def. I/O – only if Mode is Digital I/0) .......................................68
5.9.5
Reset communications (COMMUNICATIONS Comx Reset Com) .........................................68
5.9.6
Option Settings (COMMUNICATIONS Option) ........................................................................69
5.9.7
PS2 Settings (COMMUNICATIONS PS2) ...............................................................................71
5.9.8
User-defined printer (COMMUNICATIONS User-defined printer)................................................71
Example: Configuration of a printer ......................................................................................................73
5.10 Diagnostic settings (DIAGNOSTICS) ......................................................................................................74
5.10.1 Scale (DIAGNOSTICS Test Scale) .........................................................................................74
5.10.2 Keyboard (DIAGNOSTICS Keyboard Test)..............................................................................75
5.10.3 Display (DIAGNOSTICS Display Test) ...................................................................................75
5.10.4 Serial Number 1 (DIAGNOSTICS SNR1) ................................................................................75
5.10.5 Serial Number 2 (DIAGNOSTICS SNR2) ................................................................................75
5.10.6 List 1 (DIAGNOSTICS List 1)................................................................................................76
5.10.7 List 2 (DIAGNOSTICS List 2)................................................................................................76
5.10.8 List memory (DIAGNOSTICS List Memory).............................................................................76
5.10.9 Working time (DIAGNOSTICS Working time)..........................................................................77
5.10.10 Reset All (DIAGNOSTICS Reset All) .......................................................................................77
6
7
Other important information ...........................................................................................78
6.1
Error messages ..................................................................................................................................78
6.2
Sample reports ...................................................................................................................................80
6.3
Variable and control sequences in entering a "Free Text" .........................................................................81
6.4
Cleaning instructions...........................................................................................................................82
Technical data, interfaces and accessories ......................................................................83
7.1
General data and delivered items..........................................................................................................83
METTLER TOLEDO BBA462 / BBK462
Table of Contents
7
7.2
Dimensions........................................................................................................................................84
7.3
Interface technical data........................................................................................................................85
7.4
Accessories........................................................................................................................................85
7.5
Interface commands ...........................................................................................................................86
7.6
7.7
8
7.5.1
Preconditions........................................................................................................................86
7.5.2
SICS Command set................................................................................................................86
TOLEDO Continuous Mode...................................................................................................................91
7.6.1
TOLEDO Continuous commands .............................................................................................91
7.6.2
Output format in TOLEDO Continuous Mode..............................................................................91
Information for verified scales...............................................................................................................92
Appendix.......................................................................................................................93
8.1
Safety checks .....................................................................................................................................93
8.2
Table of Geo Values ............................................................................................................................93
8.2.1
GEO VALUES 3000e, OIML Class III (European Countries) .........................................................93
8.2.2
GEO VALUES 6000e/7500e OIML Class III (Height ≤ 1000 m)...................................................94
Chapter 1: Setting up the scale
METTLER TOLEDO BBA462 / BBK462
8
1
Setting up the scale
Please read through these operating instructions carefully and adhere to them at all times. If you discover that materials
are missing or that the wrong ones have been supplied, or if you have any other problems with your scale, please refer to
the dealer and salesperson concerned, or if necessary to the METTLER TOLEDO representative responsible.
1.1
Unpacking and checking contents
Remove the scale and accessories from the packaging and check the delivered items:
•
Terminal and weighing platform with installed weighing plan and level indicator (certified scales only)
•
Operating instructions (this document)
•
Special accessories (if any) as per packing list
1.2
Safety and environment
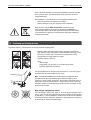
CAUTION!
Do not use BBA462 / BBK462 in hazardous areas!
Our product range includes special devices for hazardous areas.
For service in wet areas or dusty environments, or if wet cleaning is
necessary, scales with IP 65 ingress protection must be used. But even
these scales must not be used in environments where there is a risk of
corrosion. The scales must never be drenched or immersed in liquid.
If the power cord is damaged, the scale must no longer be operated.
Therefore check the cable regularly and ensure that a free space of about 3
cm is left at the rear of the scale, so that the cable is not kinked too severely.
Never tamper with the retaining screws for the load plate support
underneath the weighing pan.
When the weighing pan is removed, never insert a solid object underneath
the load plate support.
Never open the scale by removing the screws in its base.
Use only approved accessories and peripherals.
Handle the scale with utmost care; it is a precision instrument. Blows on the
weighing pan must be avoided, and heavy overloads must not be placed on
it.
METTLER TOLEDO BBA462 / BBK462
Chapter 1: Setting up the scale
9
Parts of the scale coming into contact with foodstuffs have smooth surfaces
and are easy to clean. The materials used do not splinter and are free of
harmful substances.
With foodstuffs, it is recommended to use the supplied protective cover.
-
Clean the protective cover regularly and carefully.
Replace damaged or very dirty protective cover immediately.
When the scale is finally taken out of service, observe the current
environmental regulations. If the scale is equipped with a battery, this
contains heavy metals and therefore must not be treated as normal refuse!
Local regulations for disposing of environmentally hazardous substances
must be complied with.
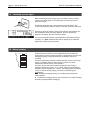
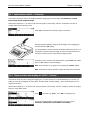
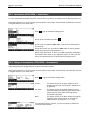
1.3
Positioning and leveling the scale
The correct location is a decisive factor in ensuring accurate weighing results.
-
-
Choose a stable and vibration-free location (particularly important for
high-resolution scales using Mettler Toledo MonoBloc technology). Place
the scale on a surface that is as horizontal as possible and strong
enough to bear its weight when fully loaded.
Check the ambient conditions.
Avoid:
- direct sunlight
- strong drafts (e.g. from fans or air conditioning systems)
- excessive temperature fluctuations.
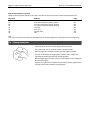
Turn the adjustable feet so that the scale is horizontal. If a spirit level is filled,
the bubble must be located within the inner circle.
Note: The BBA462 / BBK462 has a special filter that accelerates certain
procedures (zeroing, taring, determining the reference weight for piece
counting) in a non-tranquil environment. This inevitably means that there is a
slight loss of accuracy with the results. For high-precision results, care must
be taken to ensure as tranquil and stable an environment as possible, so that
the filter is not activated.
Major changes in geographical location:
The manufacturer adjusts each scale to the local gravity conditions (GEO
value). In the event of major geographical location changes, this setting must
be adjusted by a service technician. Certified scales must also be recertified
observing the national certification regulations. These steps are not necessary
for scales with an internal calibration weight.
Chapter 1: Setting up the scale
METTLER TOLEDO BBA462 / BBK462
10
1.4
Connecting to power supply
Before connecting the power supply plug or AC adapter (AccuPac version),
verify that the voltage stated on the model plate is the same as the local
power line voltage.
Connect the power cord plug or the AC adapter plug to the supply, then
connect the AC adapter (AccuPac version) via the jack at the rear of the scale.
Powering up the scale initiates a display test in which all the segments and
then the software version are briefly displayed. Once the decimal zero
appears in the display, the scale is ready to operate.
For maximum possible precision, adjust/calibrate the scale after installing it
(Chapter 5.4.1). Note: Certified scales must be adjusted by an authorized
organization. Please consult your dealer.
1.5
Battery operation
Scales with a built-in battery can work independently from the mains for
approximately 30 hours in normal operation. A prerequisite for this is that the
background lighting is switched off and that no peripheral devices are
connected.
The device automatically switches to battery operation as soon as the mains
supply is interrupted. When the mains supply is restored, the device
automatically switches back to mains operation.
The battery symbol indicates the present charging level of the battery. 1
segment corresponds to approx. 25 % capacity. When the symbol flashes
the battery must be charged (min. 4 hours). The charging period is extended
if work is continued during charging. The battery is protected against
overcharging.
Note: The battery’s charging capacity can be reduced under continuous
mains operation.
To maintain the charging capacity, after a maximum of 4 weeks discharge
the battery completely before recharging it.
METTLER TOLEDO BBA462 / BBK462
Chapter 2: Basic functions
11
2
Basic functions
This Chapter describes how to switch the scale on and off, zero and tare it, weigh materials and record the results.
All displays are based on default settings “US English”.
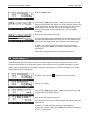
2.1
Switching on and off and zeroing
Briefly pressing «On/Off» key switches the scale on or off.
The scale carries out a display test (Chapter 1.4). Once the weight display
appears, the scale is ready to operate and automatically zeroed.
Note: The screen display shown here may not necessarily be the same as
the display appearing on your scale. Please refer to Chapter 5 on how to
navigate within the 'Vision Setup'-menu and how to define softkeys for each
function.
Note: If necessary, the scale can be zeroed at any time with the line «0»
key.
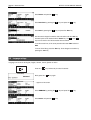
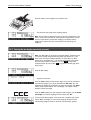
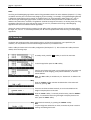
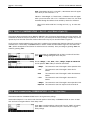
2.2
Setting date and time
Time can be set in 24 hours or 12 hours format, and the date in European or US format.
Press the «
» key continuously for about 2 seconds.
Briefly press the «
» key again.
Select TERMINAL by pressing the «
» key and press the «
» key.
Chapter 2: Basic functions
METTLER TOLEDO BBA462 / BBK462
12
Select Device and press the «
» key.
Select Date Time by pressing the «
Select Date by pressing the «
» key and press the «
» key.
» key and press the «Edit» key.
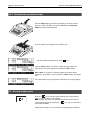
Use the numeric keypad to enter the date and confirm with the «OK» key.
Incorrect inputs can be deleted with the «Erase» key. The « » and « »
keys can be used to scroll the characters that are entered.
To set the correct time, do the same procedure but select Time instead of
Date.
To leave Vision Setup, press the «End» key. Save changes and confirm by
pressing the «Yes» key
2.3
Language settings
Language can be set into US English, English, German, French, Spanish or Italian.
Press the «
» key continuously for about 2 seconds.
Briefly press the «
» key again.
…appears on the screen.
Select TERMINAL by pressing the «
Select Device and press the «
» key and press the «
» key.
» key.
METTLER TOLEDO BBA462 / BBK462
Chapter 2: Basic functions
13
Select Language by pressing the «
» key and then press the «Edit» key.
Choose the desired language and then press the «OK» key.
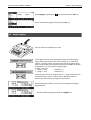
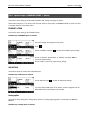
2.4
Simple weighing
Place the object to be weighed on the scale.
The bar graph at the top of the display shows how much of the weighing
range is being used and how much is still available (as % of total scale
capacity). The range symbol at the upper right corner of the display shows
the first or second half of the range of the maximum load. Note: The number
changes from 1 to 2 when set for 2 weighing ranges:
Example: 6 kg scale:
1. Range 0 – 3 kg
Resolution 1 g
2. Range 0 – 6 kg
Resolution 2 g
nd
st
In order to switch from the 2 range back to the 1 range, the load must first
be removed from the scale or it must be zeroed. MonoBloc scales will
automatically switch back to fine range upon load removal.
Wait until the stability detector (a small ring at the left edge of the display)
disappears, then…
… read the indicated net weight and press the «HighRes» key.
Chapter 2: Basic functions
METTLER TOLEDO BBA462 / BBK462
14
The «HighRes» key enables the weighing result to be displayed in control
mode, i.e. with a higher resolution.
Note: Each of the highest possible resolutions will be displayed in DMS
scales. In MonoBloc scales, the resolution will be ten times higher. Control
mode is not available if the maximum resolution has already been selected in
Vision setup (Chapter 5).
Press «Average» key to perform average weighing or press «Cancel» key to
go back to the normal weighing mode. The averaged value corresponds with
the average weight and the procedure takes about 20 seconds.
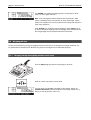
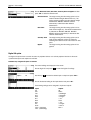
2.5
Weighing with tare
The tare can be specified by placing the weighing container on the scale or by entering the tare weight numerically. The
two possibilities are described below. Moreover, the gross and net weights can be determined separately.
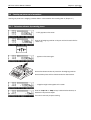
2.5.1 Taring by placing the weighing container on the scale
Place the empty weighing container or packaging on the scale.
Press the «T» key briefly to tare the scale.
The zero display and the “Net” (net weight) symbol appear. Note: If the
automatic tare function has been activated in Vision Setup (Chapter 5.4.3),
there is no need to press the «T» key.
METTLER TOLEDO BBA462 / BBK462
Chapter 2: Basic functions
15
Place the material to be weighed in the container, then…
… read the result (net weight of the weighing sample).
Note: The tare weight is retained until either a new tare is determined, or the
scale is set to zero or switched off. If the automatic taring function is active,
the tare is automatically cleared when weighing is completed and the
weighing pan emptied; the scale is then ready for the next taring and
weighing.
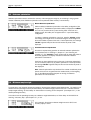
2.5.2 Entering the tare weight numerically (pre-tare)
Note: The «PT» softkey is not given as a standard softkey, because pre-tare
can also be inputted using the Short Input Mode (see Chapter 3.1). This
function key must thus be defined separately in Vision Setup. To define
function keys, see Chapter 5.5.7. You will find an overview of all function
keys that can be defined in Chapter 5.3.2. Press « » to show other
available function keys and press «
» to go back to the first page of the
function keys.
Press the «PT» softkey.
… appears on the screen.
Press the «New» softkey to enter the tare weight. If you want to work further
with other tare weights, you can set and define the «Add. Tare» key. The
additional tare weights will be added to the actual tare weights. The «Undo»
softkey deletes the last defined "Add. Tare Weight". The «Delete» softkey
deletes the whole tare weight.
.
1
5
Press the «New» softkey now and using the numeric keypad, enter the known
tare weight in the current weighing unit and confirm with «OK».
The tare values entered appear in the display with a negative sign and the
symbol “Net” (net weight). As soon as the weighing container with the
corresponding weight is placed on the scale, the zero display appears.
Chapter 2: Basic functions
METTLER TOLEDO BBA462 / BBK462
16
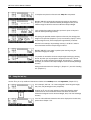
2.5.3 Determining the gross and net weights
Place the empty weighing container or packaging on the scale and then
press the «T» key briefly, or press the «PT» softkey if a known tare
weight has already been established.
Place the material to be weighed in the container, then…
… read the indicated net weight. Scroll on the «
» key.
Press the «Gross» softkey. This function causes the gross weight to be
displayed (the “G” symbol appears and replaces the “Net” symbol).
Note: «Gross» is not given as a standard softkey and must be defined
separately in Vision Setup. In order to define the «Gross» softkey, see Chapter
5.5.7.
After a few seconds, the scale goes back automatically to net weight display.
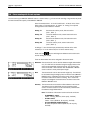
2.6
Recording weighing results
Press the «
» key to send the current weighing result to the peripheral
device (printer, computer) via the interface.
Note: A multiple print out can be generated by entering a number with the
numeric keypad followed by pressing the «
TLP/LP2824, MT8863)
» key. (only for TLP/LP2844,
Please refer to Chapter 5.3.4 for instructions on configuring the interface(s).
METTLER TOLEDO BBA462 / BBK462
Chapter 3: Enhanced functions
17
3
Enhanced functions
This Chapter describes the BBA462 / BBK462 features that simplify working with the application.
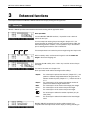
3.1
General Info
BBA462 / BBK462 provides several features which make working with the application easier.
Short Input Mode
For some BBA462 / BBK462 functions, it is possible to use a short-cut
method of user input.
As in the example for entering the pre-tare weight in Chapter 2.5.2, the
normal procedure for initiating user input is to press the function softkey first
before entering the data. However, it is also possible to key in the data first
prior to selecting the function the data is intended for.
.
1
5
This example shows how to enter the pre-tare weight using short-input mode.
While in standby mode, use the numeric keypad to enter the known tare
weight in the current weighing unit.
Then press the «PT» softkey or the «T» key to set this value as the pretare weight.
The result is the same as in Chapter 2.5.2.
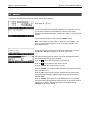
Short-input mode works with the following function softkeys:
«Smpl X»
«Smpl n»
«APW»
«T»
«PT»
«
»
«0»
The value keyed in replaces the value of X (Chapter 5.5.1) and
performs a reference weight determination using the value as
reference number of pieces (Chapter 4.1.1). Default value for X
is 10.
The value keyed in will be used as the reference number of
pieces for the reference weight determination.
The value keyed in will be used as the average piece weight.
The value keyed in will be used as the pre-tare weight.
The value keyed in will be used as the pre-tare weight.
The value keyed in defines the number of printouts (only for
label printer).
The value keyed in defines the threshold for the Gross Weight
Alarm.
BBA462 / BBK462 recognizes if the function softkey pressed is not
compatible with short-input mode and will display a warning indicating so.
Chapter 3: Enhanced functions
METTLER TOLEDO BBA462 / BBK462
18
3.2
Database
The following describes the operations for working with the article database.
Briefly press the «» key.
If in the "Vision Setup->APPLICATION->Database" the ID overview is set "On",
you will enter a submenu into the database in which you can define
additional information/identification. (Please view chapter 5.5.2 for the use of
the IDs).
To enter the article database menu, press the «Datab.» softkey.
Note: If 'Vision Setup APPLICATION Database ID Overview' is not
active, this screen will be skipped and you will be brought directly to the
article database menu.
The first time the article database is accessed, the database will be empty
and BBA462 / BBK462 will prompt you to create a new article.
If articles have been previously defined, you will be presented with several
options for working with the article database:
Press the «
» key to select the previous article in the list.
Press the «
» key to select the next article in the list.
Press the «Search» key to find an article in the list.
Press the «Options» key to perform other operations on the currently selected
article (Chapter 3.2.1).
Press the «OK» key to make the currently selected article the active one for
use with the various BBA462 / BBK462 applications and leave the article
database menu.
Press the «Cancel» key to leave the article database menu. The article that
was active before entering the article database menu will be retained except if
that article was deleted. Other changes made to the database with the
«Options» key will not be undone.
METTLER TOLEDO BBA462 / BBK462
Chapter 3: Enhanced functions
19
3.2.1 Database editing functions
The following describes various operations that could be performed on articles.
With the desired article selected in the article list, press the «Options» key.
You can then choose an operation to be done on the article.
Note: If a password was defined in 'Vision Setup APPLICATION Database Article Password' (Chapter 5.5.2) then you will be asked to
enter the password before you can modify the selected article.
Press «Delete» to remove the current article from the database. You will be
asked to confirm deletion of an article.
Press «Copy» to create a duplicate of the selected article. All the parameters of
the current article, except the name and number, will be copied into the newly
created article.
Press «New» to create a blank article.
Press «Define» to modify the selected article. Select the desired parameter by
using the « », « », or « » softkeys, then press «Edit» to modify the
selected parameter.
A « » softkey in place of the «Edit» softkey indicates that there is a
submenu for the selected item.
Press «Print» to print out the parameters of the selected article.
Press «Close» to leave the article editing menu and return to the article
selection menu.
3.2.2 Defining an article
The following describes the parameters of a BBA462 / BBK462 article.
Name
The name of the article can contain up to a maximum of 24 alphanumeric
characters. If 'Vision Setup APPLICATION Database Article Search
criterion' is set to “By name”, this parameter is used for searching in the
article database.
Chapter 3: Enhanced functions
METTLER TOLEDO BBA462 / BBK462
20
Number
The number of the article can contain up to a maximum of 24 alphanumeric
characters. If 'Vision Setup APPLICATION Database Article Search
criterion' is set to “By number”, this parameter is used for searching in the
article database.
Identification / ID1 and ID2
Additional identification parameters for the article that can contain up to a
maximum of 24 alphanumeric characters. These parameters could be used
to provide additional information about the article in the report printouts.
Tare
Pre-defined tare weight for the article. The pre-defined tare weight can both be
weighed-in or entered manually. Enter the weight value manually, in case the
tare weight is already known.
APW
Define the average piece weight of the article. It is possible to set the average
piece weight for the article by performing a reference weight determination
(Chapter 4.1.1) or by manually entering a known piece weight (Chapter
4.1.2).
Sample size
Define the reference number of pieces. This value will override the one set in
'Vision Setup APPLICATION Counting Sample_X' (Chapter 5.5.1)
while the article is active.
PW optimization
The correction factor for optimizing the piece weight. The new value of the
APW will be adjusted by this factor in relation to the previous APW. Note: This
works only if PW Tol+ and PW Tol- are set and the APW is within the
tolerances, and also if a reference quantity (reference number of pieces) is
defined.
See also below Example.
PW Tol+
The upper limit for a new average piece weight. If the new piece weight is
above this value, a warning will be displayed prompting the operator whether
or not he wants to accept the new piece weight. Note: APW must already be
defined before setting the PW Tol+, otherwise the PW Tol+ entry will be
cleared.
PW TolThe lower limit for a new average piece weight. If the new piece weight is
below this value, a warning will be displayed prompting the operator whether
or not he wants to accept the new piece weight. Note: APW must already be
defined before setting the PW Tol+, otherwise the PW Tol+ entry will be
cleared.
METTLER TOLEDO BBA462 / BBK462
Chapter 3: Enhanced functions
21
Example: In order to have the wearing down of the filling machine reflected,
the already existing value should be rated higher with 20% whereas the new
piece weight is rated with 80%.
To ensure that only 'good' pieces are used to build a new reference, they are
only allowed to derive max. 5% from the currently saved average piece
weight.
Currently saved average piece weight = 0,1000kg
PW Optimization = 80%
PW Tol + = 5%
PW Tol - = 5%
New piece weight = 0,0970kg ( = within the tolerance +/- 5% of 0,1000kg)
=> new piece weight in the database = 0,0976kg (0,1000kg x 20% +
0,0970kg x 80%)
Filling/checkweighing nominal
The nominal value used for the filling (Chapter 4.8) and checkweighing
(Chapter 4.9) applications. It is possible to define the nominal value in pieces
or as weight value. This parameter must be filled in first before defining Tol+
and Tol-.
Filling/checkweighing Tol+
The upper limit for filling (Chapter 4.8) and checkweighing (Chapter 4.9)
applications. It is possible to define this parameter as an absolute value,
relative to the Nominal, or as a percentage of Filling / Nominal.
Filling/checkweighing TolThe lower limit for the filling (Chapter 4.8) and checkweighing (Chapter 4.9)
applications. It is possible to define this parameter as an absolute value,
relative to the nominal, or as a percentage of nominal.
Accumulation
- Accumulation total net
The total net weight for the Accumulation application (Chapter 4.7)
- Accumulation total gross
The total gross weight for the Accumulation application (Chapter 4.7)
Chapter 3: Enhanced functions
METTLER TOLEDO BBA462 / BBK462
22
- Accumulation total pcs.
The total number of pieces for the Accumulation application (Chapter 4.7)
- Accumulation total lot
The total number of lots for the Accumulation application (Chapter 4.7)
Custom Unit
This application enables the user to define any unit (mass) for each article.
(See also Chapter 4.10).
=
Unit
Short-cut for the custom unit. This name can contain a maximum of seven
characters.
Factor
Factor of the custom unit. This can be determined or manually keyed in, in
case it is already known. This menu appears only if "Unit" is chosen.
Note
If a piece weight was entered for an article, the number of pieces is used for
recalling and defining the free unit.
Format
The type of format in which "Custom Unit" should be displayed.
3.2.3 Erasing of individual article attributes
In order to ease working with the data base, BBA462 / BBK462 provides a possibility for erasing of individual article
attributes.
Please proceed like this:
Choose the attribute to be erased (e.g. Free Unit).
Press the 'C'-key now to erase it.
Note: Erasing of the article name is only possible if the search criterion is 'By number' (see chapter 5.3.2). Similar, article
number can only be erased if the search criterion is 'By name'
METTLER TOLEDO BBA462 / BBK462
Chapter 3: Enhanced functions
23
3.2.4 Save As Article function
In the course of working with BBA462 / BBK462, you may wish to save the current state into an article. The Save As
Article function makes this possible.
Define a softkey for "Save As Article" in the softkey configuration (See Chapter 5.5.7). A new softkey «SaveAs» will be
created.
In this example, a reference weight determination has already been performed
(Chapters 4.1.1 and 4.1.2).
Press the « » softkey, if necessary, to scroll to the next set of softkeys unitl
the «SaveAs» key is visible. Press the «SaveAs» softkey…
…BBA462 / BBK462 asks for the Name you wish to use for this article.
Note: If 'Vision Setup APPLICATION Database Article Search
criterion' is set to "By number", BBA462 / BBK462 will ask you for the
Number. Please note that Article Name cannot be used also as a Number.
From this point on, the procedure is the same as defining a normal article
(Chapter 3.2.2).
Note however, that the parameter APW is already defined and its value is set
to the APW that was active before «SaveAs» was pressed.
Aside from the APW, the article parameters that will also be saved are Tare,
Sample Size, the Filling/Checkweighing parameters, and the Accumulation
parameters.
3.3
Gross Weight Alarm
Using the Short-input mode (see chapter 3.1) it is possible to define a Gross
Weight Alarm. In case it is defined, there will be an uninterrupted alarm beep
as soon as the gross weight reaches the defined threshold. The beep sound
will stop as soon as the weight is either below the threshold or any key is
pressed.
Note: After switching off the alarm using a key press, it will only become
active again if the gross weight felt under the threshold for a while before
reaching it again. The Gross Weight Alarm can be deactivated by the 'C' key
or by setting the threshold parameter to 0.
Chapter 3: Enhanced functions
METTLER TOLEDO BBA462 / BBK462
24
3.4
SmartManager
To make working with the article database even easier, as well as to save the settings of the scale and its configuration,
the BBA462 / BBK462 comes with its own (optional) computer program (SmartManager). SmartManager requires MS
Windows XP or 2000. This program offers you the possibility to administer and manage your article data and also gives
you the ability to import and export files using MS Excel. For Configuration and operation please read the operator manual
of the SmartManager software.
BBA462 / BBK462 is able to get direct and immediate access to archived database using SmartManager. BBA462 /
BBK462 functions in this case, as "Client". Hence it directly gets hold of data on an external database. In this mode, its
own internal Database will not be used and will stay unchanged. Please make the necessary settings of "Access" on
"External" in Vision Setup APPLICATION Database.
This functionality is also possible to connect a scale that has access to its own database, with several scales. If the
internal database of BBA462 / BBK462 is being used, SmartManager can create a backup copy of the database and this
will be played back again on the scale.
3.5
FlashLoader
The BBA462 / BBK462 software is stored in flash memory and the FlashLoader program enables you to upgrade the
software of your scale when updates are available.
Note: This should only be operated by authorized personnel. You should always make a back-up copy of your data prior
to performing this procedure.
To be able to update your software using the FlashLoader, you will need the following:
•
•
•
PC with Microsoft Windows ® operating system (version 95, 98, NT 4.0, 2000, or XP)
Computer-to-scale connection cable (RS232 cable, 9-pin sub-D plug m/f, order number 00410024)
FlashLoader program
The FlashLoader program will guide you through the updating process.
METTLER TOLEDO BBA462 / BBK462
Chapter 4: Application
25
4
Application
Your scale has a number of powerful application functions that can be activated in the menu (see Chapter 5.5.1). This
chapter describes the some of the functions that have been activated at the factory.
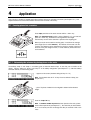
4.1
Counting pieces into a container
Place empty container on the scale and tare with the «T» key.
Note: If the automatic taring function is active (Chapter 5.4.3), you need not
press the «T» key, because the scale registers the tare weight
automatically as soon as the container is placed on the weighing pan.
Before your scale can be used for counting parts, it must know the average
piece weight (the so-called reference). The reference is then used to do the
counting. The reference can be determined by placing a number of pieces on
the scale. If the piece weight is known, it can be manually entered and used
as the reference.
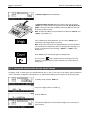
4.1.1 Determining the reference by placing pieces on the scale
The softkeys "Smpl X" and "Smpl n" are already given as standard function keys. In case they are not visible on the
display, define a softkey for "Smpl X" and "Smpl n" in the softkey configuration (See Chapter 5.5.7). After the softkeys
have been defined, do the following steps:
…appears on the screen (standard setting for Smpl X = 10)
Note: The standard value for "X" in Smpl X can be defined in Setup (see
Chapter 5.5.1)
…place 10 pieces of materials to be weighed to determine the reference
weight.
Press the «Smpl 10» key.
Note: If a different number of pieces has been placed on the scale, please
use the Short Input Mode (see Chapter 3.1). The value that you have entered
for "X" is still saved, and will not change until after you overwrite it with a new
value.
Chapter 4: Application
METTLER TOLEDO BBA462 / BBK462
26
A reference weight has been established.
If a different number of pieces has been placed on the scale, press the
«Smpl n» key and choose from among the choices of 5, 20, 30, 40 or 50
pieces. If the number of pieces is different, choose the «Var» key and enter
the desired number of pieces.
Note: The Short Input Mode is also available for the functions «Smpl X» and
«Smpl n» (see Chapter 3.1).
Once a reference has been determined, you can use the «Weigh» key to
switch back to the weight display at any time.
Note: This function is not given as a standard function key, because Gross,
Tare and Net will be continuously shown on the upper left of the display. To
activate it, proceed similar like activating « Smpl X» or « Smpl n» (see
Chapter 5.5.7).
Press «Count» key to switch back again to counting mode.
You can use the «
» key to transmit the piece counting result via the
interface to a peripheral device (printer, computer) (for sample report see
Chapter 6.2).
4.1.2 Entering the reference when the piece weight is known
The softkey "APW" is already given as a standard function key. In case it is not visible on the display, define a softkey for
"APW" in the softkey configuration (See Chapter 5.5.7). After the APW softkey has been defined, do the following steps:
In standby mode, press the «APW» key.
Enter piece weight, example: 0.02931 kg
Press the «OK» key.
The scale has established a known reference weight and is now ready for
piece counting.
METTLER TOLEDO BBA462 / BBK462
Chapter 4: Application
27
4.2
Counting out pieces out of a container
Counting out pieces from a weighing container differs in a few essentials from counting them in (Chapter 4.1).
4.2.1 Determine reference by removing pieces
…initially appears on the screen.
Place the full weighing container on the pan and tare the scale with the
«T» key.
… appears on the screen again.
Remove the reference number of pieces from the weighing container.
Remove further pieces until the desired number has been reached.
… a negative weight value appears on the screen.
Press the «Smpl 10» or «Smpl n» keys to determine the reference, as
described in the previous chapter.
The scale is now ready for piece counting.
Chapter 4: Application
METTLER TOLEDO BBA462 / BBK462
28
4.3
Reference optimization
Reference optimization serves to enhance the accuracy of the average piece weight by re-calculating it using a greater
number of reference pieces. Reference optimization can be performed either manually or automatically.
Manual Reference Optimization
Define a softkey for Reference Optimization in the softkey configuration (See
Chapter 5.5.7). The Reference Optimization softkey is displayed as «PW Enh»
and it will only be active while in piece counting mode. If the scale is in
weighing mode, this softkey will not appear even if it is part of the softkey
configuration.
To perform a reference optimization at any time, press the «PW Enh» softkey.
The average piece weight will be re-calculated using the current weight and
the current number of pieces on the scale. At each optimization, the message
“PW Enh” appears briefly and the new total number of pieces is then
displayed.
Automatic Reference Optimization
No action is required during operation for automatic reference optimization
and it functions both in "Counting in" (Chapter 4.1) and "Counting out"
(Chapter 4.2). The “Auto OPT” symbol (located near the lower right corner of
the screen) appears in the display indicates that automatic reference
optimization is switched on.
Each time you place additional parts on the scale, it optimizes automatically.
You do not have to press a key to perform optimization. At each optimization,
the message “PW Enh” appears briefly and the new total number of pieces is
then displayed.
Note: Automatic optimization only functions if the number of additional pieces
placed on the scale is not greater than the number already on the weighing
pan. If t the differences between the parts are too big, the reference
optimization will not be executed.
4.4
Minimum sample weight
To ensure that a more accurate average piece weight is attained during reference weight determination, it is possible to set
desired minimum percentage accuracy as determined by the reference weight placed on the scale. To enable minimum
sample weight checking, set 'Vision Setup APPLICATION Counting Min. Sample WT' (See Chapter 5.5.1) to the
desired percentage accuracy.
To be able to view the percentage accuracy for a reference weight determination, set 'Vision Setup APPLICATION Counting Accuracy Disp.' (See Chapter 5.5.1) to 'On'.
In this example, the minimum reference weight was set to 99.5% and
accuracy display is active.
METTLER TOLEDO BBA462 / BBK462
Chapter 4: Application
29
10 samples were placed on the scale and «Smpl 10» was pressed.
BBA462 / BBK462 calculates the average piece weight as discussed in
Chapter 4.1.1 but it has determined that the percentage accuracy for the
reference weight is below the value set as Minimum Sample Weight.
It will calculate the number of pieces that you have to place on the pan to
reach the desired percentage accuracy.
After placing the specified number of pieces on the scale, the average piece
weight will be optimized (Chapter 4.3) and, since accuracy display is active,
the percentage accuracy will be displayed for approximately 4 seconds.
Note that in this example, the percentage accuracy is at 99.54% which is
above the desired minimum sample weight of 99.5%.
BBA462 / BBK462 is now ready to perform piece counting using the
optimized average piece weight.
It is possible to override the minimum sample weight checking by pressing
the «C» key when you are prompted to add pieces on the scale. This will
enable you to use the calculated piece weight, but note that a "*" appears on
the display to indicate that the sample weight is below the desired percentage
accuracy.
Adding mode works both with "Counting in" (Chapter 4.1) and with "Counting
out" (Chapter 4.2).
4.5
Using the info key
Use the «i» key to call up additional information as defined in the Info/Help menu under Application (Chapter 5.5.8).
In this example, Info lines 1 to 4 were configured to show the gross weight,
date, time, and percentage accuracy respectively.
i
Pressing the «i» key will toggle between a screen that shows the default
content of the Info lines and another window that shows the additional
information configured such as the Gross Weight, Date, Time and Percentage
Accuracy.
For a list of the additional information that can be displayed on the Info lines,
please refer to Chapter 5.5.8.
Chapter 4: Application
METTLER TOLEDO BBA462 / BBK462
30
4.6
Piece counting with 2-scale systems
You can hook up your BBA462 / BBK462 scale to a second scale, e.g. a floor scale for counting a large number of pieces
that would exceed the capacity of the BBA462 / BBK462.
Select "Communications" "Com1/Com2/Com3" "Mode" in the Vision
Setup menu or “Communications” “Option” “Analog” if an optional
analog second scale interface is installed.
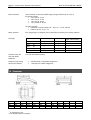
Setting 1/1
Second scale auxiliary scale, first scale active
(Ref: 1, Bulk: 1)
Setting 1/2
First scale reference scale, second scale bulk scale
(Ref: 1, Bulk: 2)
Setting 2/1
Second scale reference scale, first scale bulk scale
(Ref: 2, Bulk: 1)
Setting 2/2
First scale auxiliary scale, second scale active
(Ref: 2, Bulk: 2)
In settings 1/1 and 2/2 the display automatically switches to the scale
selected (for 1/1 to the intern scale, for 2/2 to the external scale).
Press and hold
key for switching from reference scale to bulk scale
and for entering the modes.
There are three modes that can be assigned to the second scale:
Reference The second scale is to be used for reference weight determination
only. The APW will be calculated using the weight placed on the
second scale regardless of the active scale. This is used if the
second scale has a finer resolution than the BBA462 / BBK462
scale to achieve a more precise piece weight.
Bulk
The second scale is to be used as bulk weight only. The APW will
be calculated using the weight placed on the first scale (BBA462 /
BBK462 scale), regardless of the active scale, then the weight on
the second scale will be used for counting. This is used if the
sample to be weighed is heavier than the maximum load of the
BBA462 / BBK462 scale.
Auxiliary The second scale can be used as either reference or bulk scale.
The reference can be determined and also counted on both
scales. The active scale will not be automatically switched after
the reference weight determination.
Note: The interface of the second scale must be set as follows:
-
For BBA/BBK4.. scales:
"Mode": "Dialog" (9600 bd, 8b no parity, Xon/Xoff)
For PB-S scales:
"Mode": "Host" (9600 bd, 8b no parity, Xon/Xoff)
For other METTLER TOLEDO products:
MT-SICS-compatible interface (9600 bd, 8b no parity,
Xon/Xoff)
METTLER TOLEDO BBA462 / BBK462
Chapter 4: Application
31
Note:
You can specify in Vision Setup "APPLICATION Counting Total Pieces", whether…
•
only the counting result of the bulk scale
•
or the counting result of the bulk scale and that of the
reference scale (both scales together) will be displayed.
When an interface is set to one of the three modes above, the scale switch
key will be added to the softkeys. In case it is not visible on the display,
define this softkey in the softkey configuration (See Chapter 5.5.7).You can
toggle between the two scales with the « » softkey.
To determine reference weight while in Reference or Bulk modes, the scale will
automatically switch from reference scale to bulk scale. You can override this
automatic switching by keeping the « » softkey pressed for 1 second. Info
line 4 will indicate which scale will be used for reference weight
determination.
The scale symbol on the top right in the display indicates the active scale:
" 1" = BBA462 / BBK462 scale, " 2" = second scale.
When the second scale is active, you can zero and tare it with the BBA462 /
BBK462 «0» and «T» keys, respectively.
4.7
Accumulation
If the scale is in piece counting mode, you can do several piece counts and then determine the total number of pieces
weighed and their total weight. If the scale is in weighing mode, several weighings can also be accumulated to determine
their total.
There are several report printouts that are available in the Accumulation application. To select the desired settings and to
connect and configure a printer, see Chapter 5.5.4 and Chapter 5.9.3 respectively.
Define a softkey for Accumulation in the softkey configuration (See Chapter 5.5.7). After an Accumulation softkey has been
defined, do the following steps:
If a weighing container is used, it must be tared.
Determine the reference (see Chapter 4.1)
Press the «
» softkey to go to the next menu.
Press the «Accum» softkey to start the accumulation function.
Press the «+» softkey to add the current number of pieces to the total, or the
«-» softkey to deduct the current number of pieces from the total.
Chapter 4: Application
METTLER TOLEDO BBA462 / BBK462
32
The quantity of the first lot has been saved in the memory. If Lot printing is
active (Chapter 5.5.4) the lot number, net weight and number of pieces will
be printed out automatically.
Place the desired quantity of the second lot and press the «+» softkey to add
again or the «-» softkey to deduct.
Press the «n» softkey to limit the number of lots to accumulate.
If Max n is defined, it will only be possible to accumulate as many lots as the
value set. Once the number of lots accumulated reaches the value of Max n,
a warning will be displayed indicating that maximum items have been
reached.
Press the «Delete» softkey to clear all the lots from the memory. A summary
report with the total number of lots, total weight, and total number of pieces
will be printed out.
Press the «Undo» key to discard the last lot added.
To close the Accumulation application at any time, press the «Cancel» key.
This will return the scale to standby mode but the lots accumulated will be
retained in memory.
To close the Accumulation application and clear all the lots from memory,
press the «C» key. This will also generate a summary report.
Note: If an article was active when the Accumulation application was started,
the Accumulation parameters (Chapter 3.2.2) of the article will be updated by
the transactions done with the application. That means the total net or gross
weight, the total pieces, and the number of lots will be added to the values
already stored in the database for the active article.
4.8
Filling
The filling application simplifies weighing of small parts (e.g. liquid or powder) until a target amount or weight is reached.
It provides the user a visual indication of the amount currently on the scale in relation to the target amount. If activated in
the Vision Setup, the scale will also beep if the amount is already within the tolerance limits defined.
Define a softkey for Filling in the softkey configuration (See Chapter 5.5.7). After a Filling softkey has been defined, do the
following steps:
In standby mode, press the «
» softkey to scroll to the next menu.
METTLER TOLEDO BBA462 / BBK462
Chapter 4: Application
33
Press the «Filling» softkey.
In this example, Target (target weight), + Tol (positive tolerance) and – Tol
(negative tolerance) have been defined. The first bar graph that appears is the
coarse range indicator. The fine range, as shown by the gray area in the bar
graph, depends on the tolerance limits set. As the tolerance limits are
increased or decreased, the size of the fine range will also be adjusted
accordingly.
Place sample to be weighed on the scale.
As soon as the weighed amount reaches the start of the fine range, a second
bar graph appears that shows the fine range. For very small tolerance limits,
there will be a third-stage indicator that will appear to show the fine range.
In addition, it is possible to directly switch from Filling to Accumulation.
Therefore, simply press «Accum» and continue as described in Chapter 4.7
Accumulation.
Please refer to the Notes in Chapter 4.9 for additional information.
4.9
Checkweighing (+/-)
The checkweighing application simplifies verification of sample weights or amounts. It provides the user with visual
indicators to show whether or not weight of the sample is within tolerance limits of a specified target weight or amount.
Define a softkey for Checkweighing in the softkey configuration (See Chapter 5.5.7). After a checkweighing (+/-) softkey
has been defined, do the following steps:
In standby mode, press the «
» softkey to scroll to the next menu.
Press the «+/-» softkey.
In this example, Target (target weight), + Tol (positive tolerance) and – Tol
(negative tolerance) have been defined.
Place sample to be weighed on the scale.
The indicators help the user easily verify the weight if the sample is within the
targets defined.
In addition, it is possible to directly switch from Checkweighing to
Accumulation. Therefore, simply press «Accum» and continue as described in
Chapter 4.7 Accumulation.
Chapter 4: Application
METTLER TOLEDO BBA462 / BBK462
34
Notes:
The Filling and CheckWeighing applications use the filling parameters stored in the article database (Chapter 3.2.2) if they
are defined and if they are in the same mode (weighing or piece counting). For example, if Filling/Checkweighing Nominal
is defined as weight and the scale is currently in weighing mode, it will not be possible to define Target, Tol+, and Tolwhile the Filling or Checkweighing applications are active. The values for these parameters will be taken from those
defined in the current article. If however, Filling/Nominal is defined as weight and the scale is in counting mode, the Filling
parameters of the article will not be used and the Target, Tol+ and Tol- parameters of the Filling or Checkweighing
applications will have to be defined inside the application.
Clearing the currently selected article by pressing the «C» softkey while in standby mode will not clear the values defined
for Target, Tol+, and Tol-. To clear these parameters, the «C» has to be pressed while inside the Filling or Checkweighing
applications.
4.10 Custom Unit
The Custom Unit weighing function allows weighing using a unit that can be customized (a unit specified by the
customer). You may choose to use this function through a function key or Database menu.
Define a softkey for Custom Unit in the softkey configuration (See Chapter 5.5.7). After a Custom Unit softkey has been
defined, do the following steps:
In standby mode, press the «
» softkey to scroll to the next menu.
To start the application press the «CU» softkey.
From the main Custom Unit screen you can define the text for the custom unit,
set the factor to use for weighing, recall previous definitions, or save the
current definition.
Note: The «Esc» softkey is available only if a "Custom Unit" is defined in the
database.
Press the «SetUnit» softkey and enter the abbreviation of the custom unit.
Confirm by pressing «OK».
The factor can either be entered manually or can be calculated from the
weight of samples placed on the scale.
Press the «Factor» softkey. To manually enter the factor, press the «SetFact»
softkey. To calculate the factor using the weight of samples placed on the
scale, press the «Build» softkey.
Define the factor manually, by pressing the «SetFact» softkey.
Note
If a piece weight was entered for an article, the number of pieces is used for
recalling and defining the free unit.
METTLER TOLEDO BBA462 / BBK462
Chapter 4: Application
35
To use the automatically calculated factor, place the sample on the scale,
press the «Build» softkey and enter the reference mass.
To change the resolution of the display, press the «Format» softkey and select
the desired format.
You can save the factor and unit you have just defined by pressing the
«Save» softkey. While in this screen, you can delete other Factor/Unit
definitions you have already saved or save your current definition.
To save the current definition, press «Save» and enter the name you wish to
give this definition. You can save up to 25 Factor/Unit definitions.
To recall previous Factor/Unit definitions, press the «Recall» softkey and
select the name of the Factor/Unit definition you wish to use.
Note: the customer unit can also be determined individually in the database
for each single article.
4.11 High resolution / Average weighing
The "High resolution" function displays the net weight at a higher resolution.
This function allows weighing of unstable goods (e.g. animals) with a higher precision. It takes around 20 seconds to
calculate the average weight of the load. This function also works in piece counting mode.
Define a softkey for "High resolution" in the softkey configuration (See Chapter 5.5.7). This softkey is already defined as a
standard softkey. After this softkey has been defined, do the following steps:
Press the «HighRes» softkey in order to display the net weight at a higher
resolution.
Note: When using strain gauge scales, the highest possible resolution will
be shown. For MonoBloc scales the resolution will become 10 times higher.
Place the load on the scale and press the «Average» softkey. BBA462 /
BBK462 will then take weight readings for 10 seconds and average these
weight values.
The "Average" function can also be placed as a function key outside the "High
resolution".
Chapter 4: Application
METTLER TOLEDO BBA462 / BBK462
36
After some more seconds, BBA462 / BBK462 will display the average weight
of the load.
While in this mode, the weight displayed is frozen and small variations in the
actual weight due to the unstable load will not be reflected on the display.
If the load changes more than 10% then the weight display will be released
and Average weighing is no longer active.
You can leave this function by pressing the «Esc» softkey.
Note: Certified scales will automatically leave the "High resolution" function
after 3 seconds.
4.12 Alibi memory
The alibi memory is an optional fitting, depending on the individual specification of the BBA462 / BBK462.
The alibi memory serves to store weighing data of the past, in order to have them accessible at a later time in case of
necessity. As soon as a 'stable value' is generated by the scale, it will be stored in the alibi memory. Such stable values
key, after responding to certain SICS commands (S, SU, SR, SRU, P101,
can be generated by either pressing the
P102, PRN etc.), the 'Toledo Continuous' command P or the Auto Print mode.
Define the "Alibi memory" softkey in "Vision Setup APPLICATION Function keys", as discussed in Chapter 5.5.7. This
softkey is already defined as a standard softkey.
To be able to save in the alibi memory, "Vision Setup APPLICATION Alibi memory On/Off" should be turned "On".
In standby mode, press the «
» softkey to scroll to the next menu.
In order to go to the Alibi memory application, press the «Alibi» softkey.
The entries that have been previously saved will be shown. Press the «*»
softkey to directly go to the last (newest) entry. This is marked by an asterisk
as well.
Press the «Search» softkey in order to reach the search mask of the alibi
memory. With this function, you can define search criteria that will serve as a
basis for searching entries. Press the «Change» softkey and select the desired
search criteria. There are two steps to follow when entering search criteria:
First the "From Border" should be entered and then afterwards the "To Border".
The search criteria "Scale" and "Auxiliary Field" does not give out any
information regarding "From/To".
Press the «Details» softkey in order to reach the detail mask. It represents the
alibi data of the chosen entries located on the side of the screen. This can be
printed out.
METTLER TOLEDO BBA462 / BBK462
Chapter 5: Vision setup
37
5
Vision setup
Vision Setup can be used to change the settings of the scale and to activate functions, thereby allowing the scale to be
adapted to individual weighing needs.
Important: To avoid incorrect operation of the scale in normal use, Vision Setup can be protected with a password. The
scale differentiates between a user and a supervisor. When the scale leaves the factory, the entire menu can be accessed
by both user and supervisor. We therefore recommend you to define your own supervisor password as soon as you set
up the scale (Chapter 5.7). This limits access by the user to a smaller number of menu items (calibration, and settings
for energy-saving mode, as well as date and time).
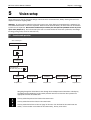
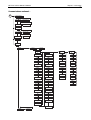
5.1
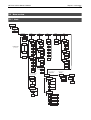
Overview and operation
After switching on...
Standby / weighing mode
Long press on
Password
Type password
End with short press on
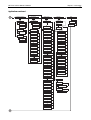
SCALE
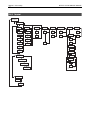
APPLICATION
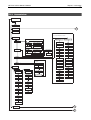
TERMINAL
COMMUNICATIONS
DIAGNOSTICS
Chapter 5.3.1
Chapter 5.3.2
Chapter 5.3.3
Chapter 5.3.4
Chapter 5.3.5
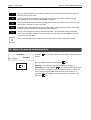
Navigating through the Vision Menu is done through the six softkeys found at the bottom of the display.
The softkeys change depending on the currently selected menu item to allow the user to perform the
appropriate action for the selected item.
This key selects the previous item listed on the current menu.
This key selects the next item listed on the current menu.
This key selects the first item on the next “page” of the menu. If all the items for the current menu are
visible (i.e. there are four or less items for the current menu), this key is not visible.
Chapter 5: Vision setup
METTLER TOLEDO BBA462 / BBK462
38
This key enters the submenu of the currently selected item. If the currently selected item does not have a
submenu, this key is not visible.
This key leaves the current submenu and goes one level up. If the Vision Menu is already at the top
level, pressing this key is similar to pressing «End» (see below).
This key allows the user to edit the value or setting of the currently selected item. If the currently selected
item contains a submenu, this key is not visible.
Some menu items perform specific actions rather than editing. Pressing this key directs the Vision Menu
to perform the action specified by the currently selected menu item.
This key can be pressed at any time to leave the Vision Menu. The Vision Menu will then prompt the
user to save or discard the changes the user has made. The user may also press «Cancel» at this time
to go back to the Vision Menu.
i
5.2
This key allows the user to get an overview of the current location within the Vision Menu structure.
Calling up the menu and entering the password
Press the «
appears.
» key and hold it down until the prompt to enter the password
User: No password required, just press the «
» key.
Supervisor: Enter password (sequence of keystrokes, Chapter 5.7)
immediately and confirm with the «
» key. Otherwise after a few seconds
the scale returns to weighing mode. If an incorrect password is entered, the
menu cannot be called up. Note: When the scale leaves the factory, no
supervisor password is defined, so when the password is requested, just
press the «
» key.
METTLER TOLEDO BBA462 / BBK462
Chapter 5: Vision setup
39
5.3
Menu overview
5.3.1 Scale
Scale
Scale 1
Scale 2
Calibration
Display
Tare
Zero
Restart
Filter
Unit 1
Auto Tare
AZM
Off
Vibration
Start?
-0-
g
xxx g
kg
* Calibration weight
depends on the
type of balance
t
xxx g
lb
oz
- done -
Off
Off
On
0.5d
Low
On
Mid
High
Chain Tare
1d
Process
Off
2d
Universal
On
5d
Filling
Unit 2
AutoClr Tare
10d
g
Stability
Off
Fast
kg
On
Standard
t
Pushb. Tare
Precise
lb
Disable
oz
* Monobloc
Only available in
with
Active
*on the
Resolution depends
type of balance
internal calibration
FACT
*
Only shows if
Min Weigh
value is set
MinWeigh
Reset
Resolution *
Off
Temperature
0.0005
Start?
On
Off
SURE?
1K
0.01
2K
Unit roll
5K
Disable
Enable
Day / Time
Days
Edit Days
Time1
Edit Time1
Time2
Edit Time2
Time3
Edit Time3
Chapter 5: Vision setup
METTLER TOLEDO BBA462 / BBK462
40
5.3.2 Application
Application
Counting
Database
Identification
Accumulation
Sample_X
Article
ID 1
Printout
Value
Display
Edit Value
Printout
Edit display text
A
Com 1..3
Edit printout text
Lot Printing
Freeze
Softkey
Softkey
Off
Autoprint off
Edit softkey text
Edit softkey text
On
Off
By Name
By Number
Off
Sample/Tare
ID 2
Final Printing
Password
Autoprint off
Printout
Edit password text
Edit printout text
Handsfree
User Defined
Template 1...5
On
Active Prompting
Tare/Sample
Standard
Clear with C
Search Criterion
User Prompting
Standard
Clear Database
Template 1...5
Softkey
Def. User Prompt
Start?
Edit softkey text
Summary
Step 1...10
Sure?
Clear with C
Off
Off
ID Overview
On
Prompt Text
Edit prompt text
Prompt Function
Not Used
Off
On
Reach Zero
Printout
Access
Edit printout text
Tare
Auto Tare
Softkey
Internal
AutoClr Tare
Zero
AZM
Sampling
Auto Print
Clear APW
External
On
Mode
Clear with C
Min. Sample WT
Off
Manual
On
Auto +
Off
97.5%
99.0%
99.5%
Auto Clear APW
ID 1
Off
Edit softkey text
Auto Sampling
Print
On
ID 3
APW Enhanc.
Auto Clear APW
Auto Off
On
Accuracy Disp.
ID 2
Off
Off
ID 3
On
On
Auto Sampling
Total Pieces
Article
Scale 1
Auto Scale 1
Scale 2
Off
Bulk Scale
On
Both Scales
Auto Scale 2
Text Only
B
METTLER TOLEDO BBA462 / BBK462
Chapter 5: Vision setup
41
Applications continued….
* only if Alibi Memory is installed
A
Filling/Checkweighing
Alibi Memory
Softkey Config
Info/Help
Beep
Set On/Off
Softkey 1
Line Config
Beeper Off
Off
Beeper On
On
Reset
Info 1
Sure?
Softkey 30
Info 4
Setpoint TolEdit Setpoint
Tol- in %
Auxiliary Field
Not Used
Not Used
Not Used
Sample_X
Article Name
Sample n
Continuous
Article Number
APW
Stable
Article ID1
APW Enhance
Article ID2
Accumulation
ID1
Checkweighing
ID2
Filling
ID3
Custom Unit
Gross Wt.
Weigh Count
APW
Averageweighing
PCS
Alibi Memory
Send Mode
Gross Wt.
Date
Time
Accuracy
Zoom
Timeout
Consecutive No.
Article ID1
Article ID2
Text 1
Text 2
Additive Tare
Database
Multi Tare
ID1
Preset Tare
ID2
Gross
ID3
Scale
* Line 4 only
High Res.
Unit
Big Display
Define String
Text 1
Save As Article
Consecutive No.
Invert
ID1
ID2
ID3
Template
User Prompting
Blank
B
Start?
Edit Text 1
Text 2
Edit Text 2
Chapter 5: Vision setup
METTLER TOLEDO BBA462 / BBK462
42
5.3.3 Terminal
Terminal
Device
* Mains only
* with Accu pack only
POWER OFF
Contrast
Invert
Weight Display
Off
Yes
0
Yes
small
US English
1 minute
No
No
big
German
3 minutes
Language
Sleep
English
French
5 minutes
Date Time
Off
Date Format
EU
10
US
Date
Italian
Edit Date
Spanish
Time
Password
Edit Time
Supervisor Pwd
AM PM
AM
Enter Pwd
PM
Retype Pwd
Reset
Start?
SURE?
Beep
* isonly
if Date Format
US
On
METTLER TOLEDO BBA462 / BBK462
Chapter 5: Vision setup
43
5.3.4 Communications
Communications
COM1
C
COM2
COM3
* only if Digital I/O-Option is installed
Option
Digital In 0...3
Digital Out 0...3
Off
Off
Zero
Stable
Tare
Under MinWeigh
Print
Over MinWeigh
Clear
< Range -
Unit
< Tol -
Sample_X
Good
Sample n
> Tol +
Bulk Scale
Info/Help
> Range +
Auxiliary Scale
Scale
< Max n
Accum +
Max n
Accum -
Star
* only if ETHERNET-Option is installed
ETHERNET
USB
IP Address
Edit IP Address
Subnet Mask
Edit Subnet Mask
Gateway
Edit Gateway
Reset
Start?
Sure?
Not Installed
Installed
Digital I/O
*is Installed
only if Analog-Option
Analog
Reference Scale
PS2
Keyboard
US Internat.
BCR
Not Used
UK
Article Search
French
Tare Weight
Swiss French
APW
Belgian French
ID1
German
ID2
German Swiss
ID3
ByPass
Softkey1 ... 6
Italian
Spanish
Latin America
Define Printout
E
Z
Chapter 5: Vision setup
METTLER TOLEDO BBA462 / BBK462
44
Communications continued…
*Auto
only if mode is Printer or
Print
Mode
Printer *
* only if Mode is Digital I/0
Define I/O *
Parameters
Printer Type
ASCII
C
LP 2824
Printer
Auto Print
Cont Weight
Dialog
LP/TLP 2844
Reset Com
< Range-
Edit <Range -
< Tol-
Edit < Tol-
Good
Edit Good
> Tol+
Edit > Tol+
> Range+
Edit > Range+
Output off
Edit Output off
Start?
SURE?
MT 8807
MT 8808
MT 8857
Reset I/0
2nd Display
Start?
MT 8863/8867
Sure?
Reference Scale
GA-46
Bulk Scale
Other
Auxiliary Scale
Template
Toledo Weight
Standard
Toledo Count
Template 1...5
*if Handshaking
can only be selected *can only be selected
is
if Mode is Toledo
Net422 or Net485
Baud
Digital I/0
* only if Printer Type is ASCII
Parity
Handshake
300
7-none
No
600
7-odd
XonXoff
Net addr *
0
Weight
Checksum *
Off
ASCII Format *
On
31
Line Format
Multiple *
Single *
* only if Line Format is Multiple
1200
7-even
Net 422
2400
8-none
Net 485
4800
8-odd
9600
8-even
Line Length
19200
* Can only be seen in
Com1 and Com 2
VCC is displayed but
cannot be switched
off if Option is
installed
Edit Line Length
* only if Line Format is Single
Delimiter
57600
Edit Delimiter
115200
Z
VCC *
38400
* Com 3 only
Off
On
METTLER TOLEDO BBA462 / BBK462
Chapter 5: Vision setup
45
Communications continued…
E
Define header
Header Line 1
Edit Header line 1
Header Line 5
Edit Header line 5
Def. Free Text
Free Text 1
Edit Free Text 1
Free Text 20
Edit Free Text 20
Template 1
Template 5
Edit
Line 1
Line 23
Data
Font
Not Used
Time
Standard
5 mm
Header
Target
Bold
10 mm
Scale No.
-Tol
Big
15 mm
Gross Wt.
+Tol
Big & Bold
20 mm
Tare Wt.
Deviation
BC Code39
25 mm
Net Wt.
Starline
BC EAN13
30 mm
APW
Empty Line
BC 2 of 5
35 mm
Ref. Count
Form Feed
BC Code128
40 mm
PCS
Consecutive No.
45 mm
Article Name
Factor Wt.
50 mm
Article Number
Accum. net
Article ID1/2
Accum. gross
ID1
Accum. PCS
ID2
Accum. lots
ID3
Free Text 1
Date
Free Text 20
Name
Edit Name
Left Border
Chapter 5: Vision setup
METTLER TOLEDO BBA462 / BBK462
46
5.3.5 Diagnostics
Diagnostics
Test Scale
Keyboard Test
Display Test
SNR 1
01234567
*
Only available in
Monobloc with
Internal Calibration
Start ?
Start ?
SNR 2
* Only if
AnalogOption is
installed
List 1
Start ?
List 2
List Memory
*AnalogOnly if
Start ?
Working Time
Working Time
Weighings
Option is
installed
Reset All
Start ?
Sure?
Internal *
External
Push 1
Printout
Beam Test
Printout
Push 25
5.4
Scale settings (SCALE)
This function block allows the user to change general scale functionality.
Please refer to Chapter 5.3.1. on how to reach the menu position 'Vision Setup SCALE' and how to navigate within the
'Vision Setup'-menu.
Enter the SCALE menu (« »), select the appropriate scale (Scale 1 or 2;
note that this submenu appears only if a second scale is installed with the
analog option) and choose one of the functions listed below.
The screen shows the most important
scale settings as a preview.
The screen shows a preview of the most
important settings of the active item, e.g.
those of scale 1 if 'Scale 1' is active (i.e.
highlighted).
Available functions and settings:
Adjust/calibrate the scale
Chapter 5.4.1
Display accuracy and weighing unit
Chapter 5.4.2
Tare settings
Chapter 5.4.3
Automatic zero point correction
Chapter 5.4.4
Automatic storage of tare and zero values
Chapter 5.4.5
Adaptation to environmental conditions and weighing
mode
Chapter 5.4.6
Automatic adjustment (FACT)
Chapter 5.4.7
Minimum weight
Chapter 5.4.8
Reset 'SCALE' settings to factory settings
Chapter 5.4.9
METTLER TOLEDO BBA462 / BBK462
Chapter 5: Vision setup
47
5.4.1 Adjust/calibrate (SCALE Calibration)
This function enables the scale to be adjusted/calibrated (weighing pan must be empty). Not available on certified
scales without internal calibration weight.
Please refer to Chapter 5.3.1 on how to reach the menu position 'Vision Setup SCALE Calibration' and how to
navigate within the 'Vision Setup'-menu.
Press «Yes» and follow the instructions given on the screen.
After choosing the calibration weight, place the weight on the weighing pan
and then press the «OK» softkey.
It is recommended to use the maximum calibration weight from the list. If it is
not possible to use the maximum weight, at least do not use less than onethird of the maximum load to ensure reliable weighing values.
Calibration is done. Continue with other functions or press «End» and confirm
with the «Yes» softkey to save the changes.
Note: Abort calibration at any given time by pressing the «Cancel» softkey.
Note: Scales with an internal calibration weight are automatically calibrated.
5.4.2 Display resolution and weighing unit (SCALE Display)
This function allows the user to change the weighing unit, to add a second unit (to switch between Unit 1 and Unit 2, a
softkey 'Unit' has to be configured in 'Vision Setup APPLICATION Softkey Config.') and to set the resolution of the
weight (always Unit 1).
Please refer to Chapter 5.3.1 on how to reach the menu position 'Vision Setup SCALE Display' and how to navigate
within the 'Vision Setup'-menu.
Press «
» and select e.g. “Unit 1”, then «Edit» to change the unit.
In order to change the settings of the resolution of the scale, select
"Resolution" (this function is not available on all models).
Chapter 5: Vision setup
METTLER TOLEDO BBA462 / BBK462
48
Use the « » and «
the «OK» softkey.
» softkeys to select the desired resolution and press
5.4.3 Tare settings (SCALE Tare)
This function allows the user to configure all the available tare function of the scale.
Please refer to Chapter 5.3.1 on how to reach the menu position 'Vision Setup SCALE Tare' and how to navigate
within the 'Vision Setup'-menu.
Switch the available functions Auto Tare, Chain Tare, AutoClr Tare or Pushb.
Tare either On or Off.
Automatic tare automatically tares the scale once a load (>=9d) is placed on the weighing pan. If this is active, the icon
AT flashes on the lower right side of the display.
Chain tare allows several tare actions without clearing the tare memory. If this is not active, the tare memory has to be
cleared by pressing the «C» softkey. The tare memory has to be cleared before a new tare can be performed.
Automatic clear tare automatically clears the tare memory once the load is removed from the weighing pan.
Push button tare enables/disables the use of the «T» key to perform manual taring.
5.4.4 Automatic zero point correction (SCALE Zero)
With Auto Zero, small deviations in the weight (in the range of 50% of 1d) are automatically zeroed.
On certified scales this menu item does not appear.
Please refer to Chapter 5.3.1 on how to reach the menu position 'Vision Setup SCALE Zero' and how to navigate
within the 'Vision Setup'-menu.
Press «
» to go to the Auto Zero settings.
Press «Edit» to assign the zero setting range or to switch the function off.
You can select the following ranges: 0.5 d, 1 d, 2 d, 5 d, 10 d.
METTLER TOLEDO BBA462 / BBK462
Chapter 5: Vision setup
49
5.4.5 Automatic save of tare and zero values (SCALE Restart)
This function allows the user to set the scale so that it is able to automatically save the tare and zero values after switching
off or when a power outage occurs. Not available on certified scales. Automatic save switched off is the factory setting.
Block can only be accessed by a supervisor.
Please refer to Chapter 5.2 on how to reach the menu position 'Vision Setup SCALE Restart' and how to navigate
within the 'Vision Setup'-menu.
Press «Edit» to switch the automatic save switch function on or off.
5.4.6 Adaptation to environmental conditions and weighing mode (SCALE Filter)
Vibration function allows the user to set the scale so that it is able to adapt itself to the existing environmental conditions.
Process function allows the user to set the weighing mode of the scale (weighing process adapter).
Stability function allows the user to adjust the weighing speed.
Please refer to Chapter 5.3.1 on how to reach the menu position 'Vision Setup SCALE Filter' and how to navigate
within the 'Vision Setup'-menu.
Press «
» to go to the vibration and process settings menu.
Vibration:
Low: For very stable and stable environment. Scale operates very quickly but
is more sensitive to external influences.
Mild: For normal environment conditions. Scale operates at medium speed
(factory setting).
High: For unstable environment. Scale operates more slowly but is less
sensitive to external influences.
Process:
Universal: Setting for all weighing types and normal weighing goods
(factory setting).
Filling: Setting for dispensing liquids or powdery substances.
Stability:
Fast: The scale operates very fast.
Standard: The scale operates of medium speed.
Precise: The scale operates with the greatest possible reproducibility.
The slower the scale works, the greater the reproducibility.
Chapter 5: Vision setup
METTLER TOLEDO BBA462 / BBK462
50
5.4.7 Automatic adjustment (SCALE FACT)
FACT function allows the user temperature or time dependent adjustment. This menu item only appears on scales with an
internal adjustment weight.
Please refer to Chapter 5.3.1 on how to reach the menu position 'Vision Setup SCALE FACT' and how to navigate
within the 'Vision Setup'-menu.
-
Press «
-
Press «Edit» to select the menu item temperature.
-
» to go to the FACT settings.
Use the « » softkey to select the desired temperature difference for the
automatic adjustment.
Press «OK».
Defining up to 7 days of the week and up to 3 times for automatic
adjustment.
- Select day of the week for automatic adjustment.
7 zeros appear in the display. The first zero stands for Monday, the second
for Tuesday, the third for Wednesday etc.
- Use the key to go to the desired day of the week and enter 1.
The display 0100100 means that Tuesday and Friday are selected as
calibration days.
-
Press «OK».
Time 1 appears in the display.
- Enter the time(s) for the calibration (hours, minutes).
The format for entering the time (EU or US) depends on the settings in the
menu item TERMINAL-> Device, see section 5.6.6
-
Press «OK».
Note: apart from the calibration days at least one time has to be defined in
order to activate the time controlled calibration!
5.4.8 Minimum weight (SCALE Min Weigh)
Min Weigh function allows the user to switch the minimum weight on and off. If the weight on the scale falls below the
stored minimum value, an * appears on the display in front of the weight indicator. This menu item only appears if the
service technician has saved a minimum weight.
Please refer to Chapter 5.3.1 on how to reach the menu position 'Vision Setup SCALE Min Weigh' and how to
navigate within the 'Vision Setup'-menu.
METTLER TOLEDO BBA462 / BBK462
Chapter 5: Vision setup
51
-
Press «
» to go to the Min Weigh settings.
Press «Edit» to switch the minimum weight monitoring on/off.
5.4.9 Resetting scale to factory default settings (SCALE Reset)
This function resets the 'SCALE' block to its original factory settings.
Please refer to Chapter 5.3.1 on how to reach the menu position 'Vision Setup SCALE Reset' and how to navigate
within the 'Vision Setup'-menu.
Press «Yes» to reset the scale settings. 'SURE?' will appear, press «Yes» to
confirm. The scale settings are now reset to its original factory settings.
5.5
Application settings (APPLICATION)
This function block allows the user to change the count application specific settings of the scale.
Please refer to Chapter 5.3.2 on how to reach the menu position 'Vision Setup APPLICATION' and how to navigate
within the 'Vision Setup'-menu.
Enter the APPLICATION menu («
below.
») and choose one of the functions listed
Available functions and settings:
The screen shows the most important
application settings as a preview.
The screen shows a preview of the most
important settings of the active item, e.g.
those of counting if 'Counting' is active
(i.e. highlighted).
Settings for piece counting
Chapter 5.5.1
Database
Chapter 5.5.2
Identification
Chapter 5.5.3
Settings for accumulation
Chapter 5.5.4
Settings for filling/checkweighing
Chapter 5.5.5
Settings for the (optional) alibi memory
Chapter 5.5.6
Settings for softkey configuration
Chapter 5.5.7
Info/Help
Chapter 5.5.8
Reset 'APPLICATION' settings to factory settings
Chapter 5.5.9
Chapter 5: Vision setup
METTLER TOLEDO BBA462 / BBK462
52
5.5.1 Settings for piece counting (APPLICATION Counting)
The Sample_X parameter determines the amount of pieces used to get the average piece weight.
Please refer to Chapter 5.3.2 on how to reach the menu position 'Vision Setup APPLICATION Counting' and how to
navigate within the 'Vision Setup'-menu.
Press « » to change the settings into the desired number of pieces or to
freeze the actual setting of the Smpl X value.
Choose "Value" and press «Edit» to change the settings of the actual value of
Smpl X. After the Smpl X has been changed, the number of references in the
main menu changes accordingly (e.g. 'Smpl 10').
Choose "Freeze" and press «Edit». If this function is set to "On", it is no longer
possible to change the value of Smpl X in Short Input Mode.
User Prompting
This function defines whether a user will be guided actively and step-by-step
through his operating procedure or not. The choice is either to use one of the
predefined user prompting procedures or to define an own one. During
predefined procedures, the bar graph toggles with the user prompts.
By default, 'Active Prompting' is switched off, thus the operator is free to
define his own tasks.
The choice of predefined user prompting procedures:
Tare/Sample - With this setting, BBA462 / BBK462 will guide the user
through the counting procedure using the Tare -> Sample
method.
Sample/Tare - With this setting, BBA462 / BBK462 will guide the user
through the counting procedure using the Sample -> Tare
method.
Handsfree
- With this setting, BBA462 / BBK462 will guide the user
through the counting procedure and will automatically tare
the scale so that the user does not have to press the
«T» key.
User defined - This function allows the user to choose his own defined
user prompting. The prompts need to be defined with 'Def.
User Prompt'.
Note: User prompting should not be used in 2-scale counting.
METTLER TOLEDO BBA462 / BBK462
Chapter 5: Vision setup
53
User-defined User Prompting: (Def. User Prompt)
The defined user prompting allows the supervisor to define a specific flow
process. The user, with the aid of the defined working steps, can work
through a complete flow process.
"Def. User Prompt" function allows the user to define a step-by-step flow
process. Afterwards, choose "Step 1". A text can now be entered for the user
(working instructions) and the corresponding function can be defined.
Example:
Step 1:
User Text
Place the container on the scale
User Function
Auto Tare (scale will automatically be tared)
Step 2:
User Text
Place the container on the scale
User Function
Auto Print (Protocol will automatically be
printed)
Functions:
Not used
no function
Tare
Scale is waiting for the entry of a tare value
Auto Tare
tares the scale automatically once a load is
placed on the weighing pan
AutoClr. Tare
clears the tare memory automatically once the
weight goes back to Zero +/-9d
Zero
Scale is waiting for zerosetting
Auto Zero
small deviations in the weight are
automatically zeroed
Reference
Scale is waiting of the entry of a tare value
Auto Reference
reference determination is automatically
performed
Print
Scale is waiting for pressing the “Print-key”
Auto Print
Automatic printing of stable weights
Clear APW
average piece weight is cleared once the
weight is back to Zero +/-9d
Auto Clear APW average piece weight is automatically cleared
once the weight is back to Zero +/-9d
ID1…3
Scale expects entry of a tare value
Article
Scale is waiting for the entry of an article of the
database
Scale X
Scale is waiting for switching to scale X (X=1
or 2)
Auto Scale X
Scale is switching automatically to scale X
(X=1 or 2)
Text only
Shows only an entered text. Continuing with
„“ – Key
Note: In 2-scale operation, the user prompting function is only available if it
is set to "Auxiliary Scale”
Chapter 5: Vision setup
METTLER TOLEDO BBA462 / BBK462
54
Minimum Sample Weight
This setting controls the limits for reference weight determination. If this
function is active, the relative accuracy of the APW (see accuracy display)
must be greater than the value selected. Otherwise, the user will be prompted
to add more pieces to increase the value of the accuracy of the APW.
APW Enhancement. See also Chapter 4.3 “Reference Optimization”.
Activate automatic reference optimization by choosing "On" or deactivate by
choosing "Off".
Auto Sampling
With this set to on, reference determination is automatically performed once
load is placed on the scale without the user having to press the Sample_X
softkey.
Activate auto sampling by choosing "On" or deactivate by choosing "Off".
Automatic Clear Average Piece Weight
With this set to on, the average piece weight is automatically cleared once the
load is removed from the scale without the user having to press the «C»
softkey.
Activate automatic clear average piece weight by choosing "On" or deactivate
by choosing "Off".
Accuracy Display
This function enables the display of the percentage accuracy. With this
function set to "On", the percentage accuracy will be displayed for
th
approximately 4 seconds on the 4 Info line after a sample weight
determination.
Activate accuracy display by choosing "On" or deactivate by choosing "Off".
Total Pieces
This function allows the user to have the pieces loaded on the reference scale
automatically added to those loaded on the bulk scale: Select 'Both scales'
and the pieces that were used to determine the reference will be added.
If 'Bulk scale' is selected (default) then only the pieces situated on the bulk
scale will be shown.
METTLER TOLEDO BBA462 / BBK462
Chapter 5: Vision setup
55
5.5.2 Settings for database (APPLICATION Database)
The following illustrates the possible settings for the database.
Please refer to Chapter 5.3.2 on how to reach the menu position 'Vision Setup APPLICATION Database' and how to
navigate within the 'Vision Setup'-menu.
Press « » to go to database settings menu. Select the item that you wish to
modify by using the « » and « » softkeys. When the desired item is
highlighted, press « » to modify the item.
Article
-
This submenu allows you to define and change different
article strings in the Database settings.
ID overview
-
If this function is turned "On", you can directly call up the
IDs using the Database key.
-
If this function is turned "Off", you are directly led to the
Database menu once the Database key is pressed.
-
If this function is set to "Intern", BBA462 / BBK462
considers only its own Database.
-
If this function is set to "Extern", an external Database will
be asked. In this case, BBA462 / BBK462's own internal
Database will not be considered. This is the case if the
BBA462 / BBK462 is in "Host-Mode" and functions as a
satellite.
Access
The following settings can be configured:
Display
-
Define the text that appears as a heading on the display.
Function keys
-
Define the text of the function key in the menu list, in
which the article database can be opened or the selected
ID can be edited.
Search criterion -
Set the field that will be used for searching, scrolling, and
sorting of the list of articles in the database. It could either
be by name or by number.
Password
Password-protect the article database from being
modified.
-
Note: Press the «Erase» softkey to clear the existing text and type the desired
text using the keypad. Press the « » and « » keys to move cursor from
left to right and vice-versa. Press «OK» when input is done. To deactivate the
ID’s, make their "Softkey" text blank (i.e. Press «Erase» then accept the empty
text by pressing «OK»).
Chapter 5: Vision setup
METTLER TOLEDO BBA462 / BBK462
56
5.5.3 Identification (APPLICATION Identification)
For article-independent identification purposes. If a text for the ID's is entered, the entered text will be displayed printed out.
Please refer to Chapter 5.3.2 on how to reach the menu position 'Vision Setup APPLICATION Identification' and how
to navigate within the 'Vision Setup'-menu.
Press «
» to go to Identification settings menu.
Choose the ID to be edited and press «
».
Choose "Print" and press the «Edit» softkey. Then, enter the intended text to
be printed out.
Choose the "Function key" and press the «Edit» softkey in order to generate
the text for the function key (See Chapter 5.5.7).
Please adjust "Clear with C" to "Off" if you do not want to clear automatically
the contents of the ID by the C-key, respectively adjust it to "ON" if you also
want to clear automatically the ID-contents when pressing the C-key .
5.5.4 Settings for accumulation (APPLICATION Accumulation)
These settings define the configuration/print-out of the accumulation function.
Please refer to Chapter 5.3.2 on how to reach the menu position 'Vision Setup APPLICATION Accumulation' and how
to navigate within the 'Vision Setup'-menu.
Press «
» to go to Accumulation settings menu.
Printout
-
This function allows you to specify whether or not an
automatic printout in the "Accumulation" application will
be generated.
Zero stable
-
This function allows you to specify whether or not the
scale should first find a stable zero-point when a load is
removed from the scale, before continuing with the
Accumulation application.
Mode
-
This function allows you to define, whether to accept the
registration of the weight manually or automatically.
Confirm manually by using the «+» or «-» keys.
If you choose the position "Printout", you can also specify an interface for
your printout in this function.
METTLER TOLEDO BBA462 / BBK462
Chapter 5: Vision setup
57
Lot Printing
-
This function allows you to define whether an automatic
printout should follow after every registration of value and
to specify also the type of format for the printout, or
whether or not every single batch should be printed out.
Final Printing
-
This function allows you to define whether an automatic
printout should follow at the end of the Accumulation
application and to specify also the type of format for the
printout, or if no automatic printout should follow at all.
Summary
-
If this function is active, all single batches will
additionally be printed out after the Total print.
This function allows you to use a specific format for each of your printouts.
Choose "Mode" in order to define the mode of the Accumulation application.
Manual
-
Perform the accumulation manually by confirming with
the «+» or «-» key.
Auto +
-
The scale adds automatically without confirming with the
«+» key.
Auto -
-
The scale subtracts automatically without confirming with
the «-» key.
5.5.5 Settings for filling/checkweighing (APPLICATION Filling/Checkweighing)
This setting controls the use of the built-in beeper, setpoint tolerance and sender mode during the Checkweighing (+/-)
and Filling functions.
Please refer to Chapter 5.3.2 on how to reach the menu position 'Vision Setup APPLICATION Filling/Checkweighing'
and how to navigate within the 'Vision Setup'-menu.
Choose "Filling/Checkw." and press « » to go to the Filling/Checkweighing
menu.
Beeper
If the Beeper is set to "On", there will be a short beep
when the current load is within the target range.
Setpoint Tol-
Defines the value where the I/O Relay-Interface should
become activated. The percentage value to be entered is
meant to be relative to the value Tol-.
Example:
=>
Send Mode
Target:
2000g
Tol+:
2010g
Tol-:
1990g
Setpoint Tol-:
10%
The I/O-relay box will only be activated when
the value reaches 199g (19% of 1990g)
Specify the form of data that the connected I/O-relay box
receives from the scale. If it is set to "Continuous", the
data will be sent constantly. If it is set to "Stable", the
data will only be sent if the weight value is stable.
Chapter 5: Vision setup
METTLER TOLEDO BBA462 / BBK462
58
5.5.6 Settings for the (optional) alibi memory -> APPLICATION-> Alibi memory
In this menu block you can define the settings for the optional alibi memory.
Please refer to Chapter 5.3.2 on how to reach the menu position 'Vision Setup APPLICATION Alibi memory" and how
to navigate within the 'Vision Setup'-menu.
Select "on" or "off" for activating/deactivating the alibi memory. Apart from the
mandatory fields one additional field for additional data can be defined.
150.000 weighings can be memorized in total.
5.5.7 Settings for softkey configuration (APPLICATION Softkey Configuration)
This function configures the task of each softkey in the main display. There are a maximum of 30 definable softkeys, each
of which can be configured to perform various applications and shortcuts to some scale operations.
Please refer to Chapter 5.3.2 on how to reach the menu position 'Vision Setup APPLICATION Softkey Configuration'
and how to navigate within the 'Vision Setup'-menu.
Press «
» to go to Softkey Configuration settings menu.
Select the desired softkey that is to be defined and press «Edit» to designate
its function. It is possible to define up to 30 softkeys.
Note: It is possible to insert a Softkey with the - key
Use the « » and «
then press «OK».
» softkeys to select the desired function of the softkey,
Each softkey can be configured to any of the following functions:
Not Used
Select "Not Used" to indicate the last visible softkey. Softkeys with designated functions but are past
the softkey set to "Not Used" will not be visible in the main display.
Sample_X
Show the «Smpl X» softkey where X is the reference number of pieces to use for average piece weight
determination. The value for X can be defined in 'Vision Setup APPLICATION Counting Ref X'
(Chapter 5.5.1) or in Short Input Mode (Chapter 3.1)
Sample n
Show the «Smpl n» softkey. With this softkey it is possible to select the reference number of pieces to
use for average piece weight determination.
APW
Show the «APW» softkey which is used to enter a pre-defined Average Piece Weight.
APW Enhance
Show the «APWEnh» softkey which is used to perform a manual reference optimization (Chapter 4.3).
Accumulation
Show the «Accum» softkey which is be used to start the Accumulation application (Chapter 4.7).
Checkweighing
Show the «+/-» softkey which is used to start the Checkweighing application (Chapter 4.9).
Filling
Show the «Filling» softkey which is used to start the Filling application (Chapter 4.8).
METTLER TOLEDO BBA462 / BBK462
Chapter 5: Vision setup
59
Custom Unit
Show the «CU» softkey which is used to start the Custom Unit application (Chapter 4.10).
Weigh Count
Show the «Weigh» (if scale is in piece counting mode) or «Count» (if scale is in weighing mode)
softkey which is used to toggle the scale to weighing mode and piece counting mode respectively.
Note: If there is no average piece weight active, it will not be possible to switch modes so this softkey
will not be visible even if it is configured.
Averageweighing
Show the «Average» softkey which is used to start the Average Weighing application (Chapter 4.11).
Alibi Memory
Show the «Alibi» softkey which is used to start the Alibi memory application (Chapter 4.12).
Additive Tare
Show the «AddTare» softkey which is used to add the current weight on the scale to the tare weight
memory.
Multi Tare
Show the «MulTare» softkey. With this softkey, it is possible to enter the number of containers and the
pre-determined tare weight of 1 container. BBA462 / BBK462 will automatically calculate the
cumulative tare weight of the multiple containers.
Preset Tare
Show the «PT» softkey which is used to enter a pre-defined tare weight.
Gross
Show the «Gross» softkey which is used to show the gross weight on the main weight display.
Scale
Show the « » softkey which is used to toggle the weight source during 2-scale operations (Chapter
4.6). Note: This softkey will only be visible if 2-scale operations are possible. That means one of the
interfaces must be set to a mode of "Reference Scale", "Bulk Scale", or "Auxiliary Scale" (Chapter
5.9.1).
High Res.
Unit
Show the «HighRes» softkey which is used to display the net weight at a higher resolution.
Show the «Unit» softkey which is used to toggle the weight display between Unit1 and Unit2. Note:
This softkey will only be visible if Unit1 and Unit2 (Chapter 5.4.2) are not the same.
Big Display
Show the «BigDis» softkey which is used to toggle the display between a large-font weight display
and the normal weight display.
Save As Article
Show the «SaveAs» softkey. With this softkey, it is possible to save the current state of the
applications into a new article.
Consecutive No
Show the «CNo» softkey. With this softkey, it is possible to edit the Consecutive Number which is
incremented after every printout.
Invert
Show the «Invert» softkey which is used to invert the LCD display (Chapter 5.6.3).
ID 1
Show the «ID 1» softkey. You can rename this softkey under "Function key" in "Vision Setup Application Identification ID 1". You can directly enter data by confirming with this key.
ID 2
Show the «ID 2» softkey. You can rename this softkey under "Function key" in "Vision Setup Application Identification ID 2". You can directly enter data by confirming with this key.
ID 3
Show the «ID 3» softkey. You can rename this softkey under "Function key" in "Vision Setup Application Identification ID 3". You can directly enter data by confirming with this key.
Template
Show the «Template» softkey, which is used to directly access your defined template, and to assign
the necessary data interface.
User Prompting
Show the «Prompt.» softkey to be able to reach the user-defined User Prompting menu.
Blank
Show a blank softkey.
Chapter 5: Vision setup
METTLER TOLEDO BBA462 / BBK462
60
5.5.8 Settings for Info/Help (APPLICATION Info/Help)
This function configures the contents of the four Info lines located at the left side of the main display. The info lines can be
accessed by pressing the «i» key while in the main display.
Please refer to Chapter 5.3.2 on how to reach the menu position 'Vision Setup APPLICATION Info/Help' and how to
navigate within the 'Vision Setup'-menu.
Press the «
» softkey to go to the "Info/Help" application.
Choose "Line Config." and then press the « » softkey to enter the list of
available Info that can be designated for each Info line.
Configuration of the four Info lines:
Each of the first three Info lines can be configured to display any of the
following information:
Each Info line can be configured to display any of the following information:
Not Used
Display a blank Info line.
Gross Wt.
Display the gross weight.
Date
Display the date.
Time
Display the time.
Accuracy
Display the percentage accuracy. This line will only be
displayed if a reference weight determination has been
performed.
Zoom
Display the net weight at a higher resolution.
Timeout
Display the timeout status.
Consecutive No.
Display the current value of the Consecutive Number.
Choose "Define String" and press the « » softkey to enter a text that you can
define freely in "Text 1" and Text 2", which can then be displayed on the fourth
Info Line.
METTLER TOLEDO BBA462 / BBK462
Chapter 5: Vision setup
61
Aside from the above information that is already given, a fourth line that
contains further information can be added and displayed.
Article ID 1
For article-dependent identification purposes that refers
only to this article.
Article ID 2
For article-dependent identification purposes that refers
only to this article.
Text 1
Text 1 that will be entered in "Define String Text 1"
Text 2
Text 2 that will be entered in "Define String Text 2"
Database
Capacity of the Database memory.
Example: 4/1613 – 0.25%
- There are 4 defined articles out of the 1613 articles.
- The memory is using 25% of its capacity.
ID 1
For article-independent identification purposes.
ID 2
For article-independent identification purposes.
ID 3
For article-independent identification purposes.
5.5.9 Settings for reset (APPLICATION Reset)
This function resets the 'APPLICATION' block to its original factory settings.
Please refer to Chapter 5.3.2 on how to reach the menu position 'Vision Setup APPLICATION Reset' and how to
navigate within the 'Vision Setup'-menu.
Press «Yes» to reset the application settings. 'SURE?' will appear, press «Yes»
to confirm. The application settings are now reset to its original factory
settings.
5.6
Terminal settings for device (TERMINAL Device)
This function block allows the user to change display and peripheral oriented settings of the scale. If access is blocked by
a Supervisor Password (as discussed in Chapter 5.7), the user will be able to access only the menu "Device".
Please refer to Chapter 5.3.3 on how to reach the menu position 'Vision Setup TERMINAL Device' and how to
navigate within the 'Vision Setup'-menu.
Enter the TERMINAL menu («
below.
») and choose one of the functions listed
Available functions and settings:
The screen shows the most important
terminal settings as a preview.
The screen shows a preview of the most
important settings of the active item, e.g.
those of device if 'Device' is active (i.e.
highlighted).
Language settings
Chapter 5.6.1
Sleep function
Chapter 5.6.2
Contrast
Chapter 5.6.3
Invert
Chapter 5.6.4
Weight display
Chapter 5.6.5
Date and time
Chapter 5.6.6
Beep
Chapter 5.6.7
Chapter 5: Vision setup
METTLER TOLEDO BBA462 / BBK462
62
5.6.1 Language settings (TERMINAL Device Language)
This function allows the user to change the language settings of the scale.
Please refer to Chapter 5.3.3 on how to reach the menu position 'Vision Setup TERMINAL Device Language' and
how to navigate within the 'Vision Setup'-menu.
Press the «Edit» softkey to go to the Language settings menu.
Use the « » and «
press «OK».
» softkeys to select the desired language setting and
5.6.2 Sleep function (TERMINAL Device Sleep)
This function puts the scale into the sleep mode after a certain time.
Note: A selection of the time is not available for scales with internal battery.
When the scale is deriving its power only from a battery and is not plugged in an electrical outlet, this function is
especially useful in order to conserve power.
Please refer to Chapter 5.3.3 on how to reach the menu position 'Vision Setup TERMINAL Device Sleep' and how
to navigate within the 'Vision Setup'-menu.
Press the «Edit» softkey to go to the Sleep settings menu.
The scale will turn itself off automatically when the selected time elapses.
5.6.3 Adjusting the contrast of the display (TERMINAL Device Contrast)
This function allows the user to adjust the contrast of the screen display.
Please refer to Chapter 5.3.3 on how to reach the menu position 'Vision Setup TERMINAL Device Contrast' and
how to navigate within the 'Vision Setup'-menu.
Press the «Edit» softkey to go to the Contrast settings menu.
METTLER TOLEDO BBA462 / BBK462
Chapter 5: Vision setup
63
Select the degree of contrast by scrolling the «
«OK» to confirm selection.
» or «
» softkey. Press
5.6.4 Invert (TERMINAL Device Invert)
This function allows the user to select either a white or a black background of the screen display.
Please refer to Chapter 5.3.3 on how to reach the menu position 'Vision Setup TERMINAL Device Invert' and how
to navigate within the 'Vision Setup'-menu.
Press the «Edit» softkey to go to the Invert settings menu.
Choose the desired setting (Yes or No) and then press «OK» to confirm
selection.
5.6.5 Changing the size of weight display (TERMINAL Device Weight display)
This function allows the user to select either a small or a big weight display on the screen.
Please refer to Chapter 5.3.3 on how to reach the menu position 'Vision Setup TERMINAL Device Weight display'
and how to navigate within the 'Vision Setup'-menu.
Press the «Edit» softkey to go to the Weight Display settings menu. Default
setting is big.
Choose the desired size and then press «OK» to confirm selection.
Note: Changing the mode of the weight display with the «BigDis» softkey
(Chapter 5.5.7) will not affect this setting. If the mode was changed with the
«BigDis» softkey, the display will revert to this setting after switching the scale
on or after leaving the Vision Setup.
5.6.6 Adjusting the date and time (TERMINAL Device Date Time)
This function allows the user to set date and time of the scale.
Please refer to Chapter 5.3.3 on how to reach the menu position 'Vision Setup TERMINAL Device Date Time' and
how to navigate within the 'Vision Setup'-menu.
Press the «
» softkey to go to the Date and Time settings menu.
Press the «Edit» softkey to change format either from US or EU format. Select
Date to change the date and Time to change the clock of the scale. Press
«OK» to confirm selection.
Chapter 5: Vision setup
METTLER TOLEDO BBA462 / BBK462
64
5.6.7 Activating the beep (TERMINAL Device Beep)
This function allows the user to switch the beep on or off, that is appearing on each key press.
Please refer to Chapter 5.3.3 on how to reach the menu position 'Vision Setup TERMINAL Device Beep' and how
to navigate within the 'Vision Setup'-menu.
Press the «Edit» key to go to the Beep settings menu.
Choose the desired setting (On or Off) and then press «OK» to confirm
selection.
5.7
Define supervisor password (TERMINAL Access)
This function allows the user to change the supervisor password of the scale. Can only be accessed by a supervisor.
Please refer to Chapter 5.3.3 on how to reach the menu position 'Vision Setup TERMINAL Access' and how to
navigate within the 'Vision Setup'-menu.
Press the «
» softkey …
… and then press the «Edit» softkey to enter a new password.
Enter the password using the keypad, press «Ok» to confirm. 'Retype Pwd'
appears. Retype the new password and press «Ok» again.
If the password was forgotten, you may press «0», «0», «0»,
«
» keys in sequence to access the Vision Setup.
Note: There is no defined Supervisor Password in the factory setting. In this
case, the Supervisor Password and the User Password are the same.
If a Supervisor Password has been set, the User Password will only be able to
access the menu "Termainal Device". All other menu settings can only be
accessed by the Supervisor.
5.8
Reset terminal settings to factory settings (TERMINAL Reset)
This function resets the 'TERMINAL' block to its original factory settings. The supervisor password ('TERMINAL Access')
will not be reset, only "Device" block.
Please refer to Chapter 5.3.3 on how to reach the menu position 'Vision Setup TERMINAL Reset' and how to
navigate within the 'Vision Setup'-menu.
Press «Yes» to reset the terminal settings. 'SURE?' will appear, press «Yes» to
confirm. The terminal settings are now reset to its original factory settings.
METTLER TOLEDO BBA462 / BBK462
Chapter 5: Vision setup
65
5.9
Communication settings (COMMUNICATIONS)
This function block allows the user to change the peripheral settings of the scale. Differences will appear depending on the
pack (Options Analog/Ethernet/USB/Digital I/O) installed.
Please refer to Chapter 5.3.4 on how to reach the menu position 'Vision Setup COMMUNICATIONS' and how to navigate
within the 'Vision Setup'-menu.
Enter the COMMUNICATION menu by pressing («
choose one of the functions listed below.
»), select a COM port and
Available functions and settings:
The screen shows the most important
communication settings as a preview.
The screen shows a preview of the most
important settings of the active item, e.g.
those of COM1 if 'Com1' is active (i.e.
highlighted).
Mode
Chapter 5.9.1
Printer – if mode is Printer or Auto print
Chapter 5.9.2
Parameters
Chapter 5.9.3
Define I/O – if mode is Digital I/0
Chapter 5.9.4
Reset 'COMMUNICATION' settings to factory settings
Chapter 5.9.5
Option Settings (Analog/Ethernet/USB/Digital I/O)
Chapter 5.9.6
PS2 settings
Chapter 5.9.7
User-defined printout
Chapter 5.9.8
5.9.1 Mode (COMMUNICATIONS Mode)
This function enables the user to set the input/output mode of a COM port.
Please refer to Chapter 5.3.4 on how to reach the menu position 'Vision Setup COMMUNICATIONS Mode' and how
to navigate within the 'Vision Setup'-menu.
Press the «Edit» softkey to go to the Mode settings menu.
The mode setting can be changed with the following settings:
•
•
•
•
•
•
Printer, (Manual data transmission to the printer)
Auto Print, (Automatic printing of stable weights)
Continuous Weight, (Continuous transmission of all weight values
via the interface)
Dialog, (Bi-directional communication via MT-SICS commands with
the control of the scale through a PC)
2nd Display, (connection of a second display)
Reference Scale, (Second scale serves as a reference scale.
Automatic switching from reference scale to bulk scale)
Chapter 5: Vision setup
METTLER TOLEDO BBA462 / BBK462
66
•
•
•
•
•
Bulk scale, (Second scale serves as a bulk scale. Automatic
switching from reference scale to bulk scale)
Auxiliary scale, (both scales can be used as a reference as well as
a bulk scale, but it does not switch automatically from reference
scale to bulk scale) =
Toledo Weight, (Continuous transmission of all weight values in
TOLEDO CONTINUOUS Format via the interface)
Toledo Count, (Continuous transmission of the piece counts in
TOLEDO CONTINUOUS Format via the interface)
Digital I/0, (Transmission to a digital I/O relay box)
In this example, COM1 is set to Dialog (also known as "Host Mode" for MTSICS commands). Confirm your choice of settings with «OK».
Press the «End» softkey and confirm with «Yes» to save changes.
5.9.2 Printer (COMMUNICATIONS Printer) only in Printer Mode or Auto Print
This function allows the user to define the settings of a printer to a COM Port. Please note that this function is only
available in "Printer Mode" and "Auto Print".
Please refer to Chapter 5.3.4 on how to reach the menu position 'Vision Setup COMMUNICATIONS COM X Printer'
and how to navigate within the 'Vision Setup'-menu.
The current printer settings are displayed on the right side of the screen. Press
« » to go to the printer settings menu.
Choose "Printer Type" and press the «Edit» softkey to define the printer.
You can choose from any of the following printer types: ASCII
GA 46
LP 2824
LP/TLP 2844
MT 8807
MT 8808
MT 8857
MT 8863/8867
Others*
*The term "Others" mean that you can freely choose any programmable
(label) printer. Please refer also to Chapter 5.9.6 "User-defined printer".
Confirm your choice with «Edit» and then press «Yes» to save your settings.
METTLER TOLEDO BBA462 / BBK462
Chapter 5: Vision setup
67
BBA462 / BBK462 gives you the possibility to generate up to five different
user-defined templates for your individual printouts. However, this must be set
in "Vision Setup COMMUNICATION Define Printer" as described in
Chapter 5.9.6.
After you have defined a template, you can assign this directly to a data
interface found in "Printer Mode" ("Vision Setup COMMUNICATION Printer Template").
The template can also be accessed directly from Weigh Mode. Define a
«Template» softkey as described in Chapter 5.5.7. This softkey will enable
you to directly allocate a defined template of a data interface, without going
inside the scale menu.
If printer type chosen is "ASCII", a new menu "Format ASCII" will appear. The
settings for line format and length of line of ASCII printers can be defined
inside this menu. The settings in this menu are as follows:
Line Format: Multiple
A line number will be automatically sent after each
line. The line has a defined number of characters
in the menu "Line Available". The format of the
characters will be left justified and the weight will
be right justified.
Note: If the Line Available is defined as «0», there
will be no alignment.
Line Format: Single
Data will be sent without line change in a line. A
separator will be inserted between a character and
a value, as defined in the menu "Delimiter”
Note: Adding a semi-colon is recommended when
reading in Excel.
5.9.3 Parameters (COMMUNICATIONS Parameters)
This function allows the user to choose the settings of the parameter for the COM Port.
Please refer to Chapter 5.3.4 on how to reach the menu position 'Vision Setup COMMUNICATIONS Parameters' and
how to navigate within the 'Vision Setup'-menu. (COM X corresponds to the COM Port in which the scale is connected).
The current Baud Rate, Parity and Handshake settings are displayed on the
screen.
- Press « »
-
Press «Edit» to change settings of Baud, Parity or Handshake.
Baud:
Parity:
300
7-none
600
7-odd
1200
7-even
2400
8-none
4800
8-odd
9600
8-even
19200
38400
57600 (only for COM3)
115200 (only for COM3)
Handshake:
No
XonXoff
Net 422
Net 485
Chapter 5: Vision setup
METTLER TOLEDO BBA462 / BBK462
68
Note: If Handshake "Net 422" or "Net 485", a Net Address menu will appear
from which you can select from 0…31.
If Mode is "Toledo Weight" or "Toledo Count", a Checksum menu will appear
which you can turn either "Off" or "On". If checksum is turned "On", the values
transmitted through the interface can be verified by means of a checksum.
-
Select VCC to switch on/off the 5 V voltage on Pin 9, e. g. for a bar code
reader.
5.9.4 Define I/O (COMMUNICATIONS Def. I/O – only if Mode is Digital I/0)
This function defines commands sent by BBA462 / BBK462 to the LC-I/O during Checkweighing and Filling functions. The
commands for the MT-I/O relay box (Order No. 21 202 217) are already set in the factory settings. However, they can be
replaced any time with other commands. Note that this function may only be activated if Mode is Digital I/0.
The I/O relay box must be defined in such a way that it is suitable to the corresponding COM Port of the scale to which it is
connected. Go to "Vision Setup COMMUNICATION COM X Mode and then choose "Digital I/O" and confirm with
«OK». (COM X corresponds to the COM Port in which the scale is connected). Save your settings by pressing «End» and
confirm by pressing «Yes».
Go to "Vision Setup COMMUNICATION COM X Define I/O and then
press « » to change settings for the I/O relay box.
Choose < Range-, < Tol-, Good, > Tol+, >Range+, Output off or Reset I/0
and the press the «Edit» softkey to define the commands.
< Range-
The command to send if the weight is below plausible limits.
< Tol-
The command to send if the weight is below the Toldefined.
Good
The command to send if the weight is within the tolerances
defined.
> Tol+
The command to send if the weight is above the Tol+
defined.
> Range+ The command to send if the weight is above plausible limits.
Output off The command to send if all outputs are to be turned off.
5.9.5 Reset communications (COMMUNICATIONS Comx Reset Com)
This function resets the 'COMMUNICATIONS' block to its original factory settings.
Please refer to Chapter 5.3.4 on how to reach the menu position 'Vision Setup COMMUNICATIONS Comx Reset
Com' and how to navigate within the 'Vision Setup'-menu.
Press «Yes» to reset the settings of the current Com port. 'SURE?' will appear,
press «Yes» to confirm. The chosen Com port is now reset to its original
factory settings.
METTLER TOLEDO BBA462 / BBK462
Chapter 5: Vision setup
69
5.9.6 Option Settings (COMMUNICATIONS Option)
This function allows setting up the attached ETHERNET, USB, Analog and Digital I/O options.
Please refer to Chapter 5.3.4 on how to reach the menu position 'Vision Setup COMMUNICATIONS Option' and how
to navigate within the 'Vision Setup'-menu.
ETHERNET OPTION
This function allows setting up the ETHERNET option.
Available only if ETHERNET option is installed.
The current settings are displayed on the screen.
Press «
».
Choose ETHERNET and press «
» to enter the ETHERNET option settings.
Choose "IP Address", Subnet Mask", or "Gateway" and press «Edit» to
choose the desired setting.
Choose "Reset" to reset to its original factory settings.
USB OPTION
This function shows the current state of the USB option.
Available only if USB option is installed.
Choose USB and press «
» to enter the USB option settings.
The current state of USB option will be shown. A further configuration of the
USB interface within Vision Setup is not available.
Analog option
This function allows setting of the Analog option, wherein an analog weighing platform is connected to the BBA462 /
BBK462.
Available only if Analog option is installed.
Chapter 5: Vision setup
METTLER TOLEDO BBA462 / BBK462
70
Choose Reference Scale, Bulk Scale, Auxiliary Scale or Bypass and then
press «OK» to select the desired mode.
Reference Scale The weight coming from the analog option is to be
used for reference weight determination only. The
analog weighing platform uses the reference weight
determination. BBA462 / BBK462 switches
automatically to Bulk Scale after reference
determination.
Bulk Scale
The weight coming from the analog option is to be
used as bulk weight only. The reference determination
is performed on BBA462 / BBK462. BBA462 /
BBK462 switches automatically to Bulk Scale after
reference determination.
Auxiliary Scale
The weight coming from the analog option can be
used as either reference or bulk. No automatic
switching from reference scale to bulk scale will take
place.
Bypass
The weight coming from the analog option will be
ignored.
Digital I/O option
The Digital I/O option allows to control the scale via peripheral devices or to activate peripheral devices via the scale.
4 potential-free inputs and outputs are available.
Available only if Digital I/O option is installed.
The current settings are displayed on the screen.
Choose Digital I/O and press «
Use the key «
» to enter the Digital I/O settings.
» to select the desired input or output and press «Edit.».
Choose the desired setting for the input selected and press «OK».
The following settings can be assigned to inputs and outputs:
Inputs
Off
Zero
Tare
Print
Clear
Unit
Ref X
Ref n
Info
Scale
Total+ (Totalising)
Total– (Subtracting)
Outputs
Off
Stable
< MinWeigh
> Minweigh
< Range–
< Tol–
Good
> Tol+
> Range+
< Max. n
Max. n
METTLER TOLEDO BBA462 / BBK462
Chapter 5: Vision setup
71
5.9.7 PS2 Settings (COMMUNICATIONS PS2)
This function allows setting up of the peripherals that are attached via the PS2 Interface.
Please refer to Chapter 5.3.4 on how to reach the menu position 'Vision Setup COMMUNICATIONS PS2' and how to
navigate within the 'Vision Setup'-menu.
Select the item you wish to configure.
Keyboard
It is possible to attach a PS2 keyboard to the scale via the PS2 Interface. This
function enables you to specify the layout of the keyboard that you are using.
Note: When a PS2 keyboard is attached, it is possible to work with BBA462 /
BBK462 using only this keyboard. The keys F1-F6 simulate the softkeys, F9F11 simulate the top 3 function keys of the BBA462 / BBK462 scale. You can
press the «Enter» and «Esc» keys to simulate the «OK» and «Cancel»
softkeys respectively. The «Backspace» key simulates the «C» softkey.
BCR
Aside from a keyboard, it is also possible to attach a barcode reader via the
PS2 Interface. This function enables you to specify the designation of the data
coming from the barcode reader used for Direct Input (i.e. when the scale is
in weighing or piece counting mode).
Not Used
Article Search
Tare Wt.
APW
ID1
ID2
ID3
Ignore data coming from the barcode reader.
Use the data for searching through the article database.
Assign the data read to Tare weight.
Assign the data read to Average Piece Weight.
Assign the data read to ID1.
Assign the data read to ID2.
Assign the data read to ID3.
Note: The BCR setting is only used for Direct Input. Whenever the scale is
asking for user input, the barcode reader can also be used to scan in data
and the data will be used in the context of the user input.
5.9.8 User-defined printer (COMMUNICATIONS User-defined printer)
This function allows you to customize your printing tasks according to your needs.
Please refer to Chapter 5.3.4 on how to reach the menu position 'Vision Setup COMMUNICATIONS User-defined
printer' and how to navigate within the 'Vision Setup'-menu.
Choose "Def. Printer" and press the «
printer menu.
» to go to the settings of user-defined
Chapter 5: Vision setup
METTLER TOLEDO BBA462 / BBK462
72
BBA462 / BBK462 enables you to specify the heading lines of your printout
according to your needs. Moreover, you can generate a "Free Text".
Furthermore, there are available templates that you can define.
Press "Def. Heading Line" and confirm with «
».
Choose the heading line to be edited and press «Edit». Using the keypad or a
connected keyboard, enter the texts for the heading line.
Free text enables you to control the output of different printers and generate
user-defined printouts. It can contain variables that can be defined, which will
be replaced by their corresponding values when printing. Control codes can
also be entered, in order to control the connected printer. Any printer can be
controlled using this operation.
Note: A list of variables can be found in Chapter --- Inputting variables and
control codes in "Free Texts")
Example:
Free Text 1: "Today is $DAT\0D\0ATime is $TIM"
This free text contains the variable $DAT (Date) and $TIM (Time), as well as
the code controls \0D (Carriage Return) and \0A (Line Feed). The following
printout will be generated on an ASCII printer.
Today is 30.10.2003
Time is 11:09:14
In order to be able to create a free text, choose the corresponding text and
press «Edit». Using the keypad or a connected keyboard, enter the texts for
the free text.
It is also possible to generate a "Template". Choose the template that you
wish to edit and press « ». Choose «Edit» and then press « » to change
the settings of this template. Choose "Name" and press «Edit» to give a name
to the chosen template.
Choose the line to be edited and press « ».
Note: It is possible to insert a line with the - key
Choose "Date" to define the desired information for the line that was chosen.
A detailed list of all functions can be found on the menu diagram (see
Chapter 5.3.4 "COMMUNICATION Def. Heading Line Template 1-5 Edit Line 1-23 Data").
Choose "Font" to change the layout of the printout. (This menu is not
available in printer type "ASCII" and "Others")
Choose "Left Margin" to specify the distance of the left margin. (This menu is
not available in printer type "ASCII" and "Others")
METTLER TOLEDO BBA462 / BBK462
Chapter 5: Vision setup
73
Example: Configuration of a printer
The configuration of a printer is illustrated with the help of this example. A label printer (Zebra LP 2824) is used as a
printer.
Connect the printer and BBA462 / BBK462 in accordance with the user's manual of your printer.
Select the COM port where you have connected your printer in "Vision Setup"
menu under "COMMUNICATION". In our example, COM Port 1 (COM1) is
used. Press « ».
Choose "Mode" and press the «Edit» softkey.
Choose "Printer" and confirm with «OK».
The menu "Printer" now appears in the list of choices. Choose this parameter
and press then press « ».
Choose "Printer Type" and then press «Edit».
You may now choose a printer. In our example, the printer "LP 2824" is
selected. Confirm selection with «OK».
In case you want to use "Template" in your printouts, you may also assign
this to the corresponding data interface. Choose "Template" and press «Edit».
(Templates can be created in "Vision Setup" menu under "COMMUNICATION
Def. Printout)
The desired template can now be selected. "Standard" as active is the factory
settings for the template. A saved template can be deleted by pressing the key
«C».
Go back one step back to the menu by pressing «Back» and then choose
"Parameter". You may now change the settings for baud rate ("Baud"), parity
and handshake. See the user's manual of your printer and verify the correct
data. In our example, the value of the left picture to be made visible is turned
on.
Note: If a printer driver of your printer is available, as in the case of our
example, its corresponding parameters will automatically be set.
If you are done making the necessary settings of your printer configuration,
press the «Back» softkey and confirm with «YES» to save your settings.
You can now generate your printouts using the «
» key.
Chapter 5: Vision setup
METTLER TOLEDO BBA462 / BBK462
74
5.10 Diagnostic settings (DIAGNOSTICS)
This function block allows the user to verify if all keys are functioning properly.
Please refer to Chapter 5.3.5 on how to reach the menu position 'Vision Setup DIAGNOSTICS' and how to navigate
within the 'Vision Setup'-menu.
Enter the DIAGNOSTICS menu («
below.
») and choose one of the functions listed
Available functions and settings:
Test Scale
Chapter 5.10.1
Keyboard Test
Chapter 5.10.2
Display Test
Chapter 5.10.3
Serial Number 1
Chapter 5.10.4
Serial Number 2
Chapter 5.10.5
List1
Chapter 5.10.6
List2
Chapter 5.10.7
List Memory
Chapter 5.10.8
Working Time
Chapter 5.10.9
Reset All
Chapter 5.10.10
5.10.1 Scale (DIAGNOSTICS Test Scale)
Please refer to Chapter 5.3.5 on how to reach the menu position 'Vision Setup DIAGNOSTICS Test Scale' and how to
navigate within the 'Vision Setup'-menu.
Press «
» to enter the settings for the scale test.
Choose whether you use an internal or an external calibration weight.
Press «Yes» to start the scale test.
Internal calibration weight
After completion of the test, *d=0.0g briefly appears in the display, after
which the scale changes to the next menu item Keyboard Test.
External calibration weight
1. The scale checks the zero point.
–0– appears in the display. The test weight flashes in the display.
2. If necessary, change the displayed calibration weight.
3. Put the calibration weight on the scale and confirm with «
».
4. The scale checks the calibration weight put on.
5. After the test is completed, the deviation from the last calibration
briefly appears in the display, ideally *d=0.0 g, after which the
scale changes to the next menu item Keyboard Test.
METTLER TOLEDO BBA462 / BBK462
Chapter 5: Vision setup
75
5.10.2 Keyboard (DIAGNOSTICS Keyboard Test)
Please refer to Chapter 5.3.5 on how to reach the menu position 'Vision Setup DIAGNOSTICS Keyboard Test' and
how to navigate within the 'Vision Setup'-menu.
In order to check if all the keys are functioning properly, press «Yes» to start
the keyboard test.
Note: The test can be aborted at any time by pressing the «C» key (25).
Press all 25 keys in sequence. If a key is functioning, the scale jumps to the
next key. The keys are numbered as follows:
5
1
6
7
2
8
9
3
10
4
11
12
13
14
15
16
17
18
19
20
21
22
23
24
25
5.10.3 Display (DIAGNOSTICS Display Test)
Please refer to Chapter 5.3.5 on how to reach the menu position 'Vision Setup DIAGNOSTICS Display Test' and how
to navigate within the 'Vision Setup'-menu.
In order to check if the screen is functioning properly, press «Yes» and…
The display on the left will appear. An inverted display of the same screen will
appear if any key is pressed. Pressing further any key will end the test
display.
5.10.4 Serial Number 1 (DIAGNOSTICS SNR1)
Please refer to Chapter 5.3.5 on how to reach the menu position 'Vision Setup DIAGNOSTICS SNR1' and how to
navigate within the 'Vision Setup'-menu.
The serial number of the scale is displayed.
5.10.5 Serial Number 2 (DIAGNOSTICS SNR2)
Please refer to Chapter 5.3.5 on how to reach the menu position 'Vision Setup DIAGNOSTICS SNR2' and how to
navigate within the 'Vision Setup'-menu.
Chapter 5: Vision setup
METTLER TOLEDO BBA462 / BBK462
76
5
The serial number of the analog second scale, if installed, is displayed.
5.10.6 List 1 (DIAGNOSTICS List 1)
Please refer to Chapter 5.3.5 on how to reach the menu position 'Vision Setup DIAGNOSTICS List 1' and how to
navigate within the 'Vision Setup'-menu.
Press «Yes» to print out the current settings of the entire Vision Setup menu.
5.10.7 List 2 (DIAGNOSTICS List 2)
Please refer to Chapter 5.3.5 on how to reach the menu position 'Vision Setup DIAGNOSTICS List 2' and how to
navigate within the 'Vision Setup'-menu.
7
Press «Yes» to print out the current settings of analog option, if installed.
5.10.8 List memory (DIAGNOSTICS List Memory)
This function prints out listing of all the articles stored in the database including a summary of the important parameters
for each article.
Please refer to Chapter 5.3.5 on how to reach the menu position 'Vision Setup DIAGNOSTICS List Memory' and how
to navigate within the 'Vision Setup'-menu.
Press «Yes» to start printing.
METTLER TOLEDO BBA462 / BBK462
Chapter 5: Vision setup
77
5.10.9 Working time (DIAGNOSTICS Working time)
This function displays the working time of the scale, as well as the number of weighings that are carried out by the scale.
Please refer to Chapter 5.3.5 on how to reach the menu position 'Vision Setup DIAGNOSTICS Reset All' and how to
navigate within the 'Vision Setup'-menu.
Press "Working Time". The working time, as well as the number of weighings
will immediately be displayed on the right side of the screen.
5.10.10 Reset All (DIAGNOSTICS Reset All)
This function resets the all blocks of the whole Vision Setup Menu to its original factory settings. The supervisor password
('TERMINAL Access') will not be reset.
Please refer to Chapter 5.3.5 on how to reach the menu position 'Vision Setup DIAGNOSTICS Reset All' and how to
navigate within the 'Vision Setup'-menu.
Press the « »key to go to the List Memory settings menu and press the
«Yes» key to reset all.
Chapter 6: Other important information
METTLER TOLEDO BBA462 / BBK462
78
6
Other important information
This Chapter gives information on error messages and instructions for cleaning your scale. It also includes the declaration
of conformity and technical data.
6.1
Error messages
Overload
Reduce the load on the scale or the preload.
Underload
Place weighing pan on the scale and ensure that it can move freely.
Weight reading does not stabilize
• Ensure a tranquil environment.
• Ensure that the weighing pan is free to move.
• Change the setting of the vibration adapter (Chapter 5.4.6)
Not possible to zero scale
Ensure that the zeroing is only carried out in the permissible range and not
under overload or underload conditions.
No valid value from reference scale
This message is only given when piece counting with a 2-scale system.
Check the connecting cable between the scales and the interface settings.
No calibration/adjustment
Disconnect the power cord plug and then plug it in again. (If operating on the
battery, switch the scale off and then on again.) If the error message
reappears, calibrate/adjust the scale (Chapter 5.4.1). If this does not help,
contact your dealer or local representative.
Value out of range
This message is shown when a tare value is entered, exceeding the max.
capacity of the scale.
METTLER TOLEDO BBA462 / BBK462
Chapter 6: Other important information
79
Reference piece weight too small
When defining the reference weight, the scale has found that the resultant
weight of one single piece is below the permissible limit. Piece counting is not
possible for articles as small as this.
Unstable weight when determining the reference weight
When determining the reference weight, the reading did not stabilize, and the
scale therefore cannot determine the reference weight of a single piece.
1. Ensure a tranquil environment.
2. Ensure that the weighing pan is free to move.
3. Change the setting of the vibration adapter (Chapter 5.4.6).
EAROM checksum error
Disconnect the power cord plug and then plug it in again. (If operating on the
battery, switch the scale off and then on again.) If the error message
reappears, contact your dealer or local representative.
Chain Tare not allowed
Chain Tare is deactivated in the Vision Menu ('Vision Setup SCALE Tare
Chain Tare'). This means it is not possible to tare the scale once there is
already a value in the tare memory.
Pushbutton Tare not allowed
The scale cannot be tared using the «T» key because this feature was
deactivated in the Vision Setup ('Vision Setup SCALE Tare Pushb.
Tare').
Key not allowed in short input mode
The function softkey that was pressed while in Short Input Mode (Chapter
3.1) is not compatible with Short Input Mode.
No valid input of reference pieces
The reference number of pieces that was entered via «Smpl n» «Var» or
Short Input Mode «Smpl n» was invalid. The reference weight
determination will not be performed.
Search string not found
This warning appears if the bar code reader was configured for article
searching ('Vision Setup COMMUNICATIONS PS2 BCR') and the text
read in by the bar code reader was not found in the article database.
Chapter 6: Other important information
METTLER TOLEDO BBA462 / BBK462
80
6.2
Sample reports
Weigh mode
Weigh mode with article
(c) Mettler-Toledo GmbH
http://www.mt.com
------------------------
(c) Mettler-Toledo GmbH
http://www.mt.com
------------------------
Date
Time
Caramel 1365
Toffee Factory
000124245672
G
T
N
17.07.2002
15:28:12
0.0370 kg
0.2843 kg
0.3213 kg
************************
Date
Time
G
PT
N
17.07.2002
15:32:32
0.6549 kg
0.0630 kg
0.5919 kg
************************
Count mode
Count mode with article
(c) Mettler-Toledo GmbH
http://www.mt.com
------------------------
(c) Mettler-Toledo GmbH
http://www.mt.com
------------------------
Date
Time
English Toffees 1060
Toffee Factory
000124254467
G
T
N
Piece Wt
Out of
QUANTITY
17.07.2002
15:13:51
0.4122 kg
0.0630 kg
0.3492 kg
14.11524 g
10 PCS
25 PCS
************************
Date
Time
G
PT
N
Piece Wt
QUANTITY
17.07.2002
13:46:50
0.3980 kg
0.0630 kg
0.3350 kg
3.450000 g
97 PCS
************************
METTLER TOLEDO BBA462 / BBK462
Chapter 6: Other important information
81
6.3
Variable and control sequences in entering a "Free Text"
Description
Variable
Explanation
Example
Scale No.
$SCL
Number of the scale
1
Gross weight.
$GRS
Gross weight
3.5
Tare weight.
$TAR
Tare weight
1.5
Actual Display Unit
$UNT
Actual display unit
g
Net weight
$NET
Net weight
2.0
Average Piece weight
$APW
Average piece weight
0.35
Unit of Average Piece Weight
$APU
Unit of average piece weight
g
Ref Count
$REF
Reference
10
PCS(Quantity)
$PCS
Number of pieces placed
15
Article Name
$ANA
Name of article
U-Stahl 10X15
Article Number
$ANU
Number of article
221365/7
Article ID1
$AI1
Article ID1
12345
Article ID2
$AI2
Article ID2
67890
ID1
$ID1
ID1 (Customer)
AlMa Systems
ID2
$ID2
ID2 (Order)
220703
ID3
$ID3
ID3 (Lot)
17
Date
$DAT
Date
21.05.03
Time
$TIM
Time
11:52:17
Target
$TGT
Target weight
2123.5
Tol -
$TOM
Negative tolerance
10
Unit of Tol-
$TMU
Unit of negative tolerance
%
Tol +
$TOP
Positive tolerance
123.4
Unit of Tol+
$TPU
Unit of positive tolerance
%
Deviation
$DEV
Difference in regards to target as a weight - 1.5
or as a number of piece
-4
Consecutive No.
$CNO
Consecutive number
23
Factor weight
$CUW
Factor weight
13
Factor Unit
$CUU
Unit of factor
BRT
Accumulation Total Net
$ACN
Accumulation total net
7500.4
Accumulation Total Gross
$ACG
Accumulation total gross
7825.2
Accumulation Total Pieces
$ACP
Accumulation total pieces
2345
Accumulation Total Lots
$ACL
Accumulation total lots
214
Accumulation Total Net active article
$ATN
Accumulation total net active article
23.4
Accumulation Total Gross active article
$ATG
Accumulation total gross active article
35.7
Accumulation Total Pieces active article
$ATP
Accumulation total pieces active article
1250
Accumulation Total Lots active article
$ATL
Accumulation total lots active article
25
Note:
•
•
An empty space is always inserted between the value and the unit.
If a variable is not available (Example: $APW in Weigh Mode), the text "n/a" will be inserted.
Chapter 6: Other important information
METTLER TOLEDO BBA462 / BBK462
82
Entry of control codes in free texts:
Control codes are generally entered as Hex-Code. The format is always \xx, where xx stands for hexadecimal value.
Hex-Value
01
02
03
04
0A
0C
0D
1B
Meaning
SOH (start command for specific printers)
STX (start command for specific printers)
ETX (send command for specific printers)
EOT (send command for specific printers)
Line Feed
Form Feed
Carriage return
ESC
Input
\01
\02
\03
\04
\0A
\0C
\0D
\1B
Note:
This is only a list of the most commonly used sequences. All available sequences can be derived from any ASCII-Table.
6.4
Cleaning instructions
Disconnect the scale from the power supply before cleaning it!
Use a damp cloth (do not use acids, alkalis or strong solvents).
Wet cleaning is only allowable on scales with IP65 ingress protection.
If heavily contaminated, the weighing pan, protective cover (if fitted) and
adjustable feet must be removed and cleaned separately.
With the weighing pan removed, never use a solid object to clean underneath
the load plate support!
Observe your organization’s internal rules and industry-specific regulations for
cleaning intervals and permissible cleaning agents.
METTLER TOLEDO BBA462 / BBK462
Chapter 7: Technical data, interfaces and accessories
83
7
Technical data, interfaces and
accessories
In this chapter you will find technical specifications for your scale, information about standards and directives, and a list of
currently available accessories.
7.1
General data and delivered items
Applications
Weighing
Piece counting / Piece counting with second scale
nd
Totaling weighings and piece countings (also with 2 scale)
nd
Weighing and piece counting to a target value (also with 2 scale) (Filling)
nd
Checkweighing and counting (with Accumulation) (also with 2 scale)
Custom Unit
Average Weighing
Database
Settings
5 units of weight (g, kg, t, oz, lb)
Adding mode for reference definition (piece counting)
Automatic reference optimization (piece counting)
Vibration adapter
Weighing process adapter
Automatic tare function
Automatic zero correction
Power-saving shutoff
Display backlighting
Automatic saving of tare and zero
Display
Active point-matrix display, 35 mm high, with CFL backlit (235 x 64 pixel)
Interface
3 built-in RS232C interface (for data, see Chapter 7.3)
PS2 interface for keyboard and barcode reader
Optional interfaces (Ethernet, USB , Analog 2-scale connection, RS485, Digital I/O)
Ambient conditions
Use
Altitude
Temperature range BBA4..
Temperature range BBK4..
Overvoltage category
Contamination level
Relative humidity
Indoor use only
up to 2000 m
–10 .. +40 °C / 14 .. 104 °F
+10 .. +30 °C / 50 .. 86 °F
II
2
Maximum relative humidity 80 % for
temperatures up to 31 °C / 88 °F,
decreasing linearly to 50 % relative
humidity at 40 °C / 104 °
Chapter 7: Technical data, interfaces and accessories
METTLER TOLEDO BBA462 / BBK462
84
Mains connection
Direct connection to the mains (MAINS supply voltage fluctuations up to ±10% of
the nominal voltage):
230 V, 50 Hz, 70 mA
240 V, 50 Hz, 70 mA
120 V, 60 Hz, 90 mA
100 V, 50/60 Hz, 90 mA
For battery operation:
Connection via mains adapter: 90 – 264 V, 47 – 63 Hz, 300 mA
Infeed on the unit: 24 V, 1.3 A
Battery operation
If the voltage supply is interrupted, the unit automatically switches over to battery operation.
Net weight
Protection Class (IEC
529, DIN 40050,
EN60529)
Resolution of the analog
second scale interface
7.2
XS
SM
LA
1)
Modell
Without battery
With battery
BBA4.. – .. SM
4,6 kg
5,3 kg
With internal calibration
weight (without battery)
–
BBA4.. – .. LA
8,2 kg
8,9 kg
–
BBK4.. – .. XS
4,9 kg
5,6 kg
5,4 kg
BBK4.. – .. SM
4,7 kg
5,4 kg
5,2 kg
BBK4.. – .. LA
10,5 kg
11,2 kg
11,7 kg
IP43 (not with Ethernet interface)
300.000 points in noncertified configuration
7.000 points in certified configuration
Dimensions
A
335
335
370
B
265
265
360
C
100
100
115
All dimensions in mm
* with adjustable feet fully screwed in
D
240
240
350
E
200
200
240
F
46
46
52
G
276
276
310
H
208
208
304
I
216
216
310
K
165
L
165
METTLER TOLEDO BBA462 / BBK462
Chapter 7: Technical data, interfaces and accessories
85
7.3
Interface technical data
The scale is provided with an EIA RS-232C (CCITT V24/V.28) voltage-controlled interface as standard. Maximum cable
length is 15 m. All interfaces are in the form of a 9-pin D-sub female connector. Instructions for configuring the interfaces
are given in Chapter 5.9.
PIN
RS232
1
RS422
RS485
Digital I/O
Analog
interface
–
–
GND
+ Excitation
(+8.2VDC)
2
TxD1/2
TxD1–
TxD1–/RxD1–
OUT0
+ Sense
3
RxD1/2
RxD1–
–
OUT1
Shield
4
–
–
–
OUT2
- Sense
5
GND
GND
GND
OUT3
- Excitation
(GND)
6
–
–
–
IN0
-
7
–
TxD1+
TxD1+/RxD1+
IN1
+ Signal
8
–
RxD1+
–
IN2
- Signal
9
VCC
VCC
VCC
IN3
-
TxD:
Transmit data
RxD:
Receive data
GND: Signal ground
VCC:
Power supply +5V
Technical data for 'Analog' option:
A/D-Converter ('analog' option)
Load cell (weighing bridge to be connected to analog option)
Resolution (approved): 7'000 e OIML
Power supply: 8.2 V
10'000 d NTEP
Resolution (not approved): 300'000 d
Impedance: > 80 R
Input signal (approved): 1.3 µV/e
Output signal: 2 mV/V
7.4
Accessories
Article No.
Auxiliary display RS-PD/PASM
21302875
RS232 cable for auxiliary display 1.8m (9-pin D-Sub, m/m parallel)
21302921
Protective cover for small platform scale
21203207
Protective cover for large platform scale
21203206
Antitheft device
00229175
"Sprinter 1" printer, EURO version
21253399
"Sprinter 1" printer, UK version
21253745
"Zebra LP 2844" printer
22009327
"Zebra LP 2824" printer
22009328
Chapter 7: Technical data, interfaces and accessories
METTLER TOLEDO BBA462 / BBK462
86
RS232 cable for "Sprinter 1" printer 1.8 m (D-Sub 25/9-pin, m/m, null modem)
21253677
RS232 cable for "Zebra LP...." 1.8 m (D-Sub 9/9-pin, m/m, null modem)
21252588
nd
RS232 cable for 2 scale 1.8 m (D-Sub 9-pin, m/m, null modem)
21252588
RS232 cable for PC 1.8 m (D-Sub 9-pin, m/f, parallel)
00410024
Relay box LC-I/O
21202217
Relay box 4 ID7
22001088
RS232 cable with open cable end (for connection Relay box 4 ID7 with digital I/O interface)
21254225
Miniature PS2 keyboard (US Version)
21900944
Protective cover for miniature PS2 keyboard
21900945
PS2 Barcode reader (with Y-cable to be connected to PS2 keyboard)
21900881
Draft shield adapter for BBK462 with XS load plate
22011304
Draft shield for BBK462 with XS load plate (matching to 22011304)
00225269
SmartManager Software
22009973
7.5
Interface commands
Your scale can be configured and operated, and can communicate from a PC via RS232C interface (as well as Ethernet
and/or USB interface), i.e. data transmitted to a PC.
7.5.1 Preconditions
The following preconditions must be fulfilled to achieve communication between the scale and a PC:
•
The scale must be connected to the RS232C interface of the PC using the necessary cable.
•
The scale interface must be set in “Dialog” mode (see Chapter 5.9.1).
•
A terminal program must be available on the PC (e.g. “Hyper Terminal”).
•
The communications parameters (protocol, bits and parity, data transfer rate) must be set using the same values in
the terminal program and in the scale (see Chapter 5.9.3).
7.5.2 SICS Command set
Your scale basically supports the Mettler Toledo Standard Interface Command Set (MT-SICS). The SICS command set
used are “Level 0”, “Level 1”, and some “Level 2” commands. Detailed information on the interface commands is given
in the “MT SICS Reference Manual” (No. 22011459, only available in English).
Notes:
• Every command line must be terminated with <CR><LF> (corresponding to the “Enter” or “Return” key on the PC
keyboard). The command is then executed immediately. To correct a line, this needs to be entered again completely.
• For commands with parameters, the “_” symbol signifies an empty space, and in the examples given, serves solely
to clarify the syntax.
• For commands that require text parameters, the quotation marks must be entered, as they indicate to the scale that
they enclose a text string and not another parameter.
The following lists the supported MT-SICS commands:
I0
Inquiry of all implemented MT-SICS commands.
I1
Inquiry of MT-SICS level and MT-SISCS versions.
I2
Inquiry of scale data.
METTLER TOLEDO BBA462 / BBK462
Chapter 7: Technical data, interfaces and accessories
87
I3
Inquiry of scale software version.
I4
Inquiry of serial number.
S
Send stable weight value.
SI
Send weight value immediately irrespective of scale stability.
SIR
Send weight values repeatedly irrespective of scale stability.
Z
Zero the scale.
ZI
Zero the scale immediately irrespective of scale stability.
@
Reset the scale to condition after switching on but without a zero setting being performed.
D
Write text into scale display. (E.g. D_“text”).
DW
Switch back to weight display after D command.
K
Configure key control.
SR
Send current stable weight value and then continuously on weight change equal to or greater than the preset
value. (E.g. SR_10.00_g).
T
Tare the scale.
TA
Inquire or preset the tare weight value.
TAC
Clear the tare value.
TI
Tare immediately regardless of whether the current value is stable or not.
C2
Initiate calibration.
I10
Inquire or set the scale ID.
I11
Inquiry of scale type.
I12
ID 1
I13
ID 2
DS
Short beep
DAT
Inquire of set the date on the scale.
LST
Send menu settings
P
Print text
P100
Print out text on the printer. (E.g. P100_“text”).
P101
Print out current stable weight value.
P102
Print out current weight value irrespective of scale stability.
PM
Set values for checkweighing
PWR
Switch the scale on or off.
ST
Send stable weight after pressing the «
SU
Send stable weight value with currently displayed unit.
SIU
Send weight value with currently displayed unit immediately irrespective of scale stability.
SIRU
Send weight value with currently displayed unit immediately and repeat.
SRU
Send stable weight value with currently displayed unit and repeat on weight change greater than or equal to
preset value.
TIM
Inquire or set the time on the scale.
TST2
Start test function with external weight
TST3
Start test function with internal weight
» key.
Chapter 7: Technical data, interfaces and accessories
METTLER TOLEDO BBA462 / BBK462
88
Aside from the standard MT-SICS commands, BBA462 / BBK462 also provides the following commands for working with
the scale:
M01
Inquire or set the weighing mode ('Vision Setup SCALE Filter Process': Chapter 5.4.6).
M01
Inquiry of weighing mode.
M01_0
Set weighing mode to “Universal”.
M01_1
Set weighing mode to “Filling”.
M02
Inquiry or setting of the stabilization detection ("Vision Setup scale Filter Stability”: Chapter 5.4.6).
M02 inquiry or setting of the stability detection
M02_0
"precise"
M02_1
"normal"
M03_2
"fast"
M03
Inquiry or setting of AutoZero ('Vision Setup SCALE Zero Auto Zero': Chapter 5.4.4).
M03
Inquiry of AutoZero mode.
M03_0
Set “AutoZero” to off.
M03_1
Set “AutoZero” to on.
M09
Inquiry or setting of display contrast ('Vision Setup TERMINAL Device Contrast': Chapter 5.6.3)
M09
Inquiry of display contrast.
M09_x
Set the display contrast to x% where x can have a value of 0-100.
M10
Inquiry or setting of weight display size ('Vision Setup TERMINAL Device Weight display': Chapter
5.6.5).
M10
Inquiry of weight display size.
M10_0
Select small weight display.
M10_1
Select big weight display.
M11
Inquiry or setting of the beeper status ('Vision Setup TERMINAL Device Beep': Chapter 5.6.7).
M11
Inquiry of beeper status.
M11_0
Switch beeper off
M11_1
Switch beeper on.
M14
Inquiry or setting of language ('Vision Setup TERMINAL Device Language': Chapter 5.6.1).
M14
Inquiry of language setting.
M14_x
Set the language to the value of x where x can be:
0 = English
1 = German
2 = French
3 = Spanish
4 = Italian
7 = US English
M16
Inquiry or setting of the sleep (/power off) status ('Vision Setup TERMINAL Device Sleep': Chapter
5.6.2)
M16
Inquiry of “Sleep” status.
M16_x
Set the “Sleep” status to the value of x where x can be:
0 = Off
1 = 1 minute
2 = 3 minutes
3 = 5 minutes
4 = 15 minutes
5 = 30 minutes
M19
Inquiry of adjustment weight.
METTLER TOLEDO BBA462 / BBK462
Chapter 7: Technical data, interfaces and accessories
89
M21
Inquiry or setting of “Unit1” ('Vision Setup SCALE Display': Chapter 5.4.2) and display unit.
M21
Inquiry of “Unit1” and display unit.
M21_Des_x
Set the “Des” unit to the value of x where
Des:
x:
0 = Unit 1
0=g
1 = Display unit
1 = kg
2=t
7 = lb
8 = oz
PW
Inquire or set the value of Average Piece Weight.
PW
Inquire the value of Average Piece Weight.
PW_val_unit
Set the value of the Average Piece Weight.
Example:
PW 100.0 g
REF
Entry of Reference size
REF_x
Entry of Reference size
Example: REF 10
Note: If only “Ref” is entered the value defined in Chapter 5.5.7 (APPLICATION Counting Reference_X) will be taken
PCS
Inquiry of the pieces on the load plate
PCS
The number of pieces which are on the load plate is displayed
I31
Inquire or define the record header for printouts.
I31_x
Inquiry the definition for the x header line.
I31_x_”text”
Define the text for a specific header line where:
x
1..5
text String of characters with a maximum of 24 characters.
Example:
I31_1_“Mettler Toledo GmbH”
I31_2_“U. d. Malesfelsen”
I31_3_“D-72458 Albstadt”
I31_4_“Telefon ++49/7431/140”
I31_5_“Internet www.mt.com”
SWU
Switch the displayed unit from “Unit1” to “Unit2” and vice versa.
PRN
Initiate a printout of the current stable weight or number of pieces.
ICP
Configure customer-defined printout ('Vision Setup COMMUNICATIONS Def. String').
ICP_?
Send this command to get a response from the scale with details about how to use the
ICP MT-SICS command.
SIH
Send the current weight value displayed in control mode, i.e. with a higher resolution, immediately irrespective
of scale stability.
SNS
Enables switching between Scale 1 and Scale 2.
SNS x
RST
Restart of the scale.
RST
CU
The scale number x (1 or 2) will be controlled.
The scale will be restarted.
Transfers the custom unit including its value
CU S Value Unit
once a stable result is reached
CU D Value Unit
if the result is unstable.
Example:
CU S 200 meter
AMR
Available only in scales with optional Alibi Memory. This command enables the user to send his data saved in
Chapter 7: Technical data, interfaces and accessories
METTLER TOLEDO BBA462 / BBK462
90
the alibi memory, to a PC.
Example:
AMR ALL
Transmit all data
AMR LAST
Transmit the last (i.e. newest) data record
AMR FIRST
Transmit the first (i.e. oldest) data record
AMR ID 1000 2000
Transmit data record with (constantly incr.) number 1000 to 2000
AMR DT 06.02.03
Transmit data records from 6. 2. 2003
AMR TM 08:00:00 09:00:00
Transmit data records stored from 08:00 to 09:00
AMR S 2
Transmit data of second scale
AMR N 1 2
Transmit data records with net weight from 1 to 2 [current unit]
AMR T 0.1 0.2
Transmit data records with tare weight from 0.1 to 0.2 [current unit]
AMR PT 1
Transmit only data records with pre-tare weights.
AMR AUX A
Transmit all data records with an auxiliary field that starts with 'A'
AMR SEP “;“
Set separator character between data records as ';'
The commands starting with AMR ID, and below, can also be combined in one command line:
AMR ID 100 200 DT 01.05.2003 31.05.2003 TM 8:00:00 9:00:00 S 2 N 1 3 T 0.5 1 PT 1 AUX B
The response contains always all the following data, separated by spaces:
AMR B IncrNo Date Time Net Tare [P]T Scale AuxiliaryField<CR><LF>
AMR A
Command executed, i.e. transmission is finished
AMR L
Parameter wrong, e.g. incrementing number is 0 or higher than the highest record
AMR I
Command not executable at the moment (no alibi memory, scale busy etc)
Note: AMR FIRST and AMR LAST are transmitting only one line. Therefore, an 'A' is placed instead of 'B':
AMR A IncrNo Date Time Net Tare [P]T Scale AuxiliaryField<CR><LF>
SDA
Command to activate an article from the internal or external database
SDA “ArticleNameOrNumber”
Activate Article from Article Database
ArticleNameOrNumber
Name or Number of the article (depending on the chosen search
criterion) with max 24 digits
SDA A
Database article found and activated
SDA I
Database Article not found
SDA L
STA
Article Name to long or wrong syntax
Special Tare setting command, where the unit can be defined or not. If the unit is not defined, the actual
display unit will be taken.
STA Value [Unit]
Command to set the Tare value
Value
Desired tare value
Unit
Optional unit of the desired tare value
Internal Scale
STA A
Tare value set
STA L
No parameter, wrong parameter
External Scale
TA A Value Unit
Value set
TA L
Wrong parameter
STA L
CLR
No parameter
Command to execute the "Clear" key
CLR A
"Clear" key activated
CLR I
"Clear" key could not be activated
METTLER TOLEDO BBA462 / BBK462
Chapter 7: Technical data, interfaces and accessories
91
7.6
TOLEDO Continuous Mode
7.6.1 TOLEDO Continuous commands
The scale supports the following input commands in TOLEDO Continuous mode:
Command
Meaning
P <CR><LF>
Print the current result
T <CR><LF>
Tare the scale
Z <CR><LF>
Zero the display
C <CR><LF>
Clear the current value
Tx.xxx <CR><LF>
Define tare
7.6.2
Output format in TOLEDO Continuous Mode
Weight values are always sent in the following format in TOLEDO-Continuous-Mode:
Status
Field 1
Field 2
1
2
3
6
7
8
9
10
11
STX
SWA
SWB SWC MSD –
–
–
–
LSD
MSD –
4
5
12
13
14
15
16
17
18
–
–
–
LSD
CR
CHK
Field 1
6 digits for the weight value that is sent without a decimal point and unit
Field 2
6 digits for the tare weight that is sent without a decimal point and unit
STX
ASCII characters 02 hex, characters for "start of text"
SWA, SWB, SWC
Status words A, B, C, see below
MSD
Most significant digit
LSD
Least significant digit
CR
Carriage Return, ASCII characters 0D hex
CHK
Checksum (2-part complement of the binary sum of the 7 lower bits of all previously sent
characters, incl. STX and CR)
Status word A
Status Bit
Function
Selection
6
5
Decimal
position
X00
0
1
4
3
2
1
0
0
0
0
X0
0
0
1
X
0
1
0
0.X
0
1
1
0.0X
1
0
0
0.00X
1
0
1
0.000X
1
1
0
0.0000X
1
1
1
Chapter 7: Technical data, interfaces and accessories
METTLER TOLEDO BBA462 / BBK462
92
Numerical
increment
X1
0
1
X2
1
0
X5
1
1
Status word B
Status word C
Function/value
Bit
Function/value
Bit
Gross/net: Net = 1
0
0
0
Sign: Negative = 1
1
0
1
Overload = 1
2
0
2
Movement = 1
3
Print request = 1
3
lb/kg: kg = 1
4
Extended = 1
4
1
5
1
5
Powerup = 1
6
Manual taring, only kg = 1
6
7.7
Information for verified scales
Important notice for verified weighing instruments in EC countries
M
M
Weighing instruments verified at the place of manufacture bear the preceding mark on the packing label and a
green “M” sticker on the descriptive plate. They may be set to work immediately.
Weighing instruments which are verified in two steps have no green “M” on the descriptive plate and bear the
preceding identification mark on the packing label. The second step of the verification must be carried out by
the approved Mettler-Toledo service or by the W&M authorities. Please contact your Mettler-Toledo
organization.
The first step of the verification has been carried out at the manufacturing plant. It comprises all tests according to
EN45501-8.2.2.
If national regulations in individual countries limit the period of validity of the certification, the operator of such a scale is
himself responsible for its timely re-certification.
METTLER TOLEDO BBA462 / BBK462
Chapter 8: Appendix
93
8 Appendix
8.1
Safety checks
The compact scales of the series BBA462 / BBK462 have been checked by accredited testing institutions. They have
passed the safety checks listed below and carry the relevant test symbols. Production is subject to production monitoring
by the inspection offices.
Country
Test symbol=
Standard
CAN/CSA-C22.2 No. 1010.1-92
Canada
UL Std. No. 61010A-1
USA
Other countries=
8.2
CB Scheme
(no identification)=
IEC/EN61010-1 :2001
Table of Geo Values
For weighing instruments verified at the manufacturer’s, the geo value indicates the country or geographical zone for which
the instrument is verified. The geo value set in the instrument (e.g."Geo 18") appears briefly after switch-on or is specified
on a label.
Table GEO VALUES 3000e shows the geo values for European countries.
Table GEO VALUES 6000e/7500e shows the geo values for different gravitation zones.
8.2.1 GEO VALUES 3000e, OIML Class III (European Countries)
Geographical latitude
Geo Value
46°22' - 49°01'
49°30' - 51°30'
41°41'- 44°13'
42°24' - 46°32'
48°34' - 51°03'
54°34' - 57°45'
57°30' - 59°40'
59°48' - 64°00'
64°00' - 70°05'
41°20' - 45°00'
45°00' - 51°00'
47°00' - 55°00'
34°48' - 41°45'
45°45' - 48°35'
51°05 - 55°05'
63°17' - 67°09'
35°47' - 47°05'
55°30’ - 58°04'
49°27' - 50°11'
47°03' - 47°14'
53°54' - 56°24'
18
21
16
18
20
23
24
25*
26
17
19*
20
15
19
22
26
17
23
20
18
22
Country
Austria
Belgium
Bulgaria
Croatia
Czech Republic
Denmark
Estonia
Finland
France
Germany
Greece
Hungary
Ireland
Iceland
Italy
Latonia
Luxembourg
Liechtenstein
Lithuania
Chapter 8: Appendix
METTLER TOLEDO BBA462 / BBK462
94
50°46' - 53°32'
57°57' - 64°00'
64°00' - 71°11'
49°00' - 54°30'
36°58' - 42°10'
43°37' - 48°15'
55°20' - 62°00'
62°00' - 69°04'
45°49' - 47°49'
47°44' - 49°46'
45°26' - 46°35'
36°00' - 43°47'
35°51' - 42°06'
49°00' - 55°00'
55°00' - 62°00'
* factory setting
21
24*
26
21
15
18
24*
26
18
19
18
15
16
21 *
23
The Netherlands
Norway
Poland
Portugal
Romania
Sweden
Switzerland
Slovak Republic
Slovenia
Spain
Turkey
Great-Britain
8.2.2 GEO VALUES 6000e/7500e OIML Class III (Height ≤ 1000 m)
Geographical latitude
Geo Value
00°00’
-
12°44’
5
05°46’
-
17°10’
6
12°44’
-
20°45’
7
17°10’
-
23°54’
8
20°45’
-
26°45’
9
23°54’
-
29°25’
10
26°45’
-
31°56’
11
29°25’
-
34°21’
12
31°56’
-
36°41’
13
34°21’
-
38°58’
14
36°41’
-
41°12’
15
38°58’
-
43°26’
16
41°12’
-
45°38’
17
43°26’
-
47°51’
18
45°38’
-
50°06’
19
47°51’
-
52°22’
20
50°06’
-
54°41’
21
52°22’
-
57°04’
22
54°41’
-
59°32’
23
57°04’
-
62°09’
24
59°32’
-
64°55’
25
62°09’
-
67°57’
26
64°55’
-
71°21’
27
67°57’
-
75°24’
28
71°21’
-
80°56’
29
75°24’
-
90°00’
30
METTLER TOLEDO BBA462 / BBK462
Index
95
Index
2
2nd display ....................................................... 65
2-scale ....................................................... 30, 46
A
Accessories ....................................................... 85
accumulation..................................................... 31
accumulation settings......................................... 56
accumulation total gross weight........................... 21
accumulation total net weight .............................. 21
accumulation total number of lots ........................ 22
accumulation total number of pieces .................... 22
accuracy display................................................ 54
additive tare....................................................... 59
article database ................................................. 18
article identification............................................. 20
article name ................................................ 19, 20
article number.................................................... 20
article sample size ............................................. 20
article tare weight ............................................... 20
auto sampling ................................................... 54
auto zero........................................................... 48
automatic clear average piece weight ................... 54
automatic clear tare...................................... 48, 53
automatic reference optimization.......................... 28
automatic tare.............................................. 48, 53
automatic taring................................................. 25
auxiliary scale ....................................... 30, 59, 70
average piece weight 17, 20, 25, 28, 29, 53, 54, 58
average weighing......................................... 35, 59
average weight .................................................. 36
B
bar graph .......................................................... 33
barcode reader connection .................................. 71
baud rate .......................................................... 67
beep ................................................................. 64
beeper .............................................................. 57
big display ........................................................ 59
blank info line.................................................... 60
blank softkey ..................................................... 59
bulk scale ....................................... 30, 59, 65, 70
bypass.............................................................. 70
C
calibration ......................................................... 47
chain tare.......................................................... 48
checksum ......................................................... 68
checkweighing......... 33, 57, 58, 30, 65, 66, 67, 68
consecutive number ........................................... 59
consecutive number info line ............................... 60
continuous weight .............................................. 65
contrast............................................................. 62
Count key.......................................................... 26
D
database ........................................................... 55
date .................................................................. 29
date and time............................................... 11, 63
date info line...................................................... 60
Digital I/O .......................................................... 68
dialog ............................................................... 65
Digital I/O .......................................................... 70
display.................................................. 11, 31, 35
display test ........................................................ 75
E
erasing of individual article attributes .................... 22
error messages .................................................. 78
ETHERNET- Option.............................................. 69
F
FACT ................................................................. 50
factor ................................................................ 34
factor/unit weighing ...................................... 34, 59
filling........................................................... 32, 58
filling/checkweighing lower limit........................... 21
filling/checkweighing nominal value ..................... 21
filling/checkweighing upper limit .......................... 21
fine range .......................................................... 33
G
gross weight .......................................... 16, 29, 59
gross weight alarm............................................. 23
gross weight info line.......................................... 60
H
Handsfree.......................................................... 52
handshake ........................................................ 67
high resolution info line....................................... 60
HighRes - softkey ............................................... 59
I
identification ................................................ 56, 59
Info line ................................................. 60, 62, 64
Info/Help key................................................ 29, 60
interface .......................................... 16, 26, 30, 31
interface commands ........................................... 86
invert........................................................... 59, 63
K
keyboard connection .......................................... 71
keyboard test ..................................................... 75
L
language..................................................... 12, 62
M
manual reference optimization ....................... 28, 58
Min Weigh ......................................................... 50
minimum reference weight............................. 28, 54
mode settings .................................................... 65
Index
METTLER TOLEDO BBA462 / BBK462
96
multi tare........................................................... 59
N
negative tolerance .............................................. 33
P
parity ................................................................ 67
password ........................................ 37, 38, 55, 64
percentage accuracy..................................... 28, 29
percentage accuracy info line .............................. 60
piece counting mode .......................................... 59
piece weight lower limit....................................... 20
piece weight optimization.................................... 20
positive tolerance ............................................... 33
power cord plug................................................. 10
Piece weight upper limit ...................................... 20
preset tare ......................................................... 59
pre-tare ............................................................. 15
pre-tare weight................................................... 17
printer ................................................... 16, 26, 71
printout ............................................................. 76
push button tare................................................. 48
R
range symbol .................................................... 13
reference ........................................................... 25
reference number ............................................... 58
reference optimization......................................... 28
reference scale................................. 30, 59, 65, 70
reference weight ................................................. 25
reference weight determination....................... 17, 28
reset ......................................... 51, 61, 64, 68, 77
resolution .............................................. 35, 47, 48
S
Sample reports................................................... 80
Sample/Tare ...................................................... 52
save as article ................................................... 59
Save As Article function ....................................... 23
Scale test........................................................... 74
search criterion .................................................. 55
Sendemodus ..................................................... 57
serial number .................................................... 75
setpoint tol- ....................................................... 57
short-input mode................................................ 17
SICS command set ............................................. 86
sleep function .............................................. 62, 88
softkey .............................................................. 58
softkey configuration........................................... 58
Stability ............................................................. 49
stability detector ................................................. 13
summary report ................................................. 32
T
tare................................................................... 14
tare memory ...................................................... 48
tare weight......................................................... 15
tare weight memory............................................ 59
Tare/Sample- ..................................................... 52
target weight ...................................................... 33
time .................................................................. 29
time info line ...................................................... 60
timeout status .................................................... 60
tolerance limits............................................. 32, 33
U
unit - toggle Unit1 / Unit2 .................................... 59
user prompting................................................... 52
user specified user prompting .............................. 52
V
vibration settings ................................................ 49
W
Weigh key ......................................................... 26
weighing mode .................................................. 59
weighing range .................................................. 13
weight display size ............................................. 63
Z
zeroing.............................................................. 11
Subject to technical changes.
Printed on 100% chlorine-free paper.
For the sake of our environment.
© Mettler-Toledo GmbH 2005
22011396A
Printed in Germany
Mettler-Toledo (Albstadt) GmbH, U. d. Malesfelsen 34, D-72458 Albstadt
Tel. +49-7431 14-0, Fax +49-7431 14-371, Internet: http://www.mt.com
0805/2.12