1
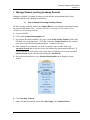
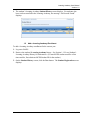
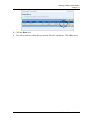
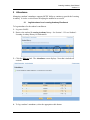
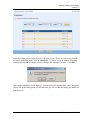
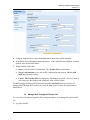
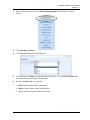
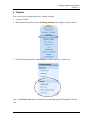
The Office of
Information and Organizational Systems
MCPS
Online Administrative Student
Information System (OASIS)
Learning Academy
User Manual
Version 1.2
Revised: March 19, 2006
Learning Academy User Manual
Version 1.2
Table of Contents
Introduction............................................................................................................................... 1
1
2
3
4
5
Manage Student Learning Academy Records................................................................... 2
1.1
View a Student’s Learning Academy History .......................................................... 2
1.2
Add a Learning Academy Enrollment ...................................................................... 3
1.3
Update a Learning Academy Enrollment ................................................................. 5
1.4
End a Learning Academy Enrollment....................................................................... 5
1.5
Delete a Learning Academy Enrollment................................................................... 7
Attendance ........................................................................................................................ 9
2.1
Log Attendance for a Learning Academy Enrollment.............................................. 9
2.2
Retrieve a List of Students for Attendance Logging .............................................. 10
Manage Staffing.............................................................................................................. 13
3.1
Add Staff to Centers................................................................................................ 13
3.2
Manage Staff Through the Teacher List ................................................................. 14
Reports ............................................................................................................................ 16
4.1
Weekly Statistical Report ....................................................................................... 17
4.2
Staff Totals.............................................................................................................. 18
4.3
Student List ............................................................................................................. 19
Common Tasks ............................................................................................................... 22
5.1
Log On and Off of OASIS ...................................................................................... 22
5.2
Search for Students ................................................................................................. 22
5.3
Select a School........................................................................................................ 25
ii
Revised: March 19, 2006
Learning Academy User Manual
Version 1.2
Introduction
The Learning Academy is a tutoring and mentoring program that enhances the academic
performance and achievement of students in grades 1 through 12. On Saturday mornings,
from 8:30 to 11 a.m., certified teachers and volunteer tutors work with students on core
subjects and teach successful learning/studying strategies.
The primary users of this Module are:
•
Center Administrators
•
Center Directors
•
Lead Tutor trainer
This User Guide will provide step by step instructions for using the Learning Academy
module to manage student and staff records. The instructions assume that the user has
logged in to OASIS. The section on Common Tasks provides information on how to perform
tasks common to most OASIS modules.
1
Revised: March 19, 2006
Learning Academy User Manual
Version 1.2
1 Manage Student Learning Academy Records
Managing a student’s Learning Academy records includes understanding their history,
enrolling students, and ending their enrollment.
1.1
View a Student’s Learning Academy History
For the Learning Academy module, the Student History screen displays enrollment records
for previous and current years. A student will have no record prior the student’s first
enrollment in a Learning Academy. .
1. Log on to OASIS.
2. Click on the Student Demographics tab.
3. If you know the desired student’s ID, enter it in the Find Another Student: field on the
left-hand side, navigation menu. Click Go. Below the Student Detail tab, the student’s
name and certain related information displays. Continue with step 5.
4. If the student ID is not known, you need to search by name or other field: click
Advanced Search and see Section Search for Students for information on this task. If
several students are retrieved by your search, they will appear on a list on an expanded
Student Search screen; click the desired student’s Student ID.
5. Hover the mouse pointer over the Student Demographics tab to display its menu
choices.
6. Click Learning Academy.
7. On the left-hand navigation menu, under Data Input, click Student History.
2
Revised: March 19, 2006
Learning Academy User Manual
Version 1.2
8. The student’s Learning Academy Student History screen displays. For students who
have not been enrolled in the Learning Academy, the message “No Records Found”
displays.
1.2
Add a Learning Academy Enrollment
To add a Learning Academy enrollment for the current year:
1. Log on to OASIS.
2. Retrieve the student’s Learning Academy history. See Section 1.1 View a Student’s
Learning Academy History for information. (If a non-MCPS student would be a first
time enrollee, first obtain an MCPS Student ID for the student.)
3. On the Student History screen, click the New button. The Student Registration screen
displays.
3
Revised: March 19, 2006
Learning Academy User Manual
Version 1.2
4. Select the Enroll Date on which the student will begin, using the drop-down list. The
date can be any of the days the Learning Academy is in session.
5. Select the Center the student will attend.
6. Select the student’s Grade.
7. As requested, enter the parent’s name, address, phone numbers, and e-mail address. If
there is no cell phone or email address, leave the fields blank.
8. When finished, click either:
•
Save to save the enrollment and return to the Student History
4
Revised: March 19, 2006
Learning Academy User Manual
Version 1.2
•
Cancel to return to the Student History. No enrollment is saved.
Notice that on the Student History, the Save and New buttons are unavailable. New will
be available when the previous session has ended (see Section 1.4 End a Learning
Academy Enrollment).
1.3
Update a Learning Academy Enrollment
You can only edit the most recent application for the current year. Previous year applications
cannot be edited.
To update a student’s Learning Academy enrollment:
1. Log on to OASIS.
2. Retrieve the student’s Learning Academy history. See Section 1.1 View a Student’s
Learning Academy History for information.
3. Click the Edit App link. The Student Registration screen displays.
4. Make any appropriate updates.
5. When finished, click either:
•
Save to save the enrollment and return to the Student History
•
Cancel to return to the Student History. No enrollment is saved.
Note: No new enrollment can be added unless an end date has been assigned to the
previous enrollment
1.4
End a Learning Academy Enrollment
Ending an enrollment indicates that the student will not attend more sessions for the current
year, or that the year’s sessions are ended. Should the student attend sessions in the current
year after the enrollment is ended, no attendance will be logged.
A New enrollment application can be added for the student only after an End Date has been
assigned.
To indicate the end of the enrollment:
5
Revised: March 19, 2006
Learning Academy User Manual
Version 1.2
1. Log on to OASIS.
2. Retrieve the student’s Learning Academy history. See Section 1.1 View a Student’s
Learning Academy History for information.
3. Under End Date, click End. When asked to confirm that the student’s enrollment is
ending, click OK.
4. Using the drop-down list, select the End Date.
5. When finished, click either:
•
Save to save the change and return to the Student History
•
Cancel to return to the Student History. No enrollment is saved.
6
Revised: March 19, 2006
Learning Academy User Manual
Version 1.2
To check that the student’s Attendance record, click Edit Att. The Attendance screen
displays the student’s attendance from the begin date through the end date of enrollment. As
the screen message notes, the student’s attendance record may be updated.
1.5
Delete a Learning Academy Enrollment
Only enrollments for the current year can be deleted. In addition to deleting the enrollment,
all attendance associated with the enrollment is also deleted. To do so:
1. Log on to OASIS.
2. Retrieve the student’s Learning Academy history. See Section 1.1 View a Student’s
Learning Academy History for information.
7
Revised: March 19, 2006
Learning Academy User Manual
Version 1.2
3. Click the Delete link.
4. You will be asked to confirm that you want to delete the enrollment. Click OK to do so.
8
Revised: March 19, 2006
Learning Academy User Manual
Version 1.2
2 Attendance
Managing a student’s attendance supports MCPS’ ability to continue to provide the Learning
Academy. It is also a critical factor in helping the student be successful.
2.1
Log Attendance for a Learning Academy Enrollment
To log attendance for the student’s enrollment:
1. Log on to OASIS.
2. Retrieve the student’s Learning Academy history. See Section 1.1 View a Student’s
Learning Academy History for information.
3. Click the Edit Att link. The Attendance screen displays. Note that it includes all
sessions.
4. To log a student’s attendance, select the appropriate radio button:
9
Revised: March 19, 2006
Learning Academy User Manual
Version 1.2
•
P to indicate that the student was Present
•
A to indicate that the student was Absent
5. When finished, click either:
•
Save to save the updated attendance record and return to the Student History
•
Cancel to return to the Student History. No change is saved.
2.2
Retrieve a List of Students for Attendance Logging
You can retrieve lists of students enrolled in the Learning Academy by date, center, or grade.
This can help log attendance more efficiently.
1. Log on to OASIS.
2. Hover the mouse pointer over the Student Demographics tab to display its menu
choices.
3. Click Learning Academy.
4. Click Attendance on the left-hand menu. The Attendance screen displays.
10
Revised: March 19, 2006
Learning Academy User Manual
Version 1.2
5. Using the drop-down list fields, select the Date, Center, and Grade.
6. When finished, click Get List. The Attendance screen and list displays.
7. Update the attendance for the students as needed.
8. When finished, click either:
•
Save to save the updated attendance records and return to the Student History.
•
Cancel to return to the Student History. No change is saved.
In the following Attendance screen, the information message indicates a successful save.
11
Revised: March 19, 2006
Learning Academy User Manual
Version 1.2
Normally a Save action returns the user to the prior screen. If that does not occur, from the
left menu, under Data Input, click on Attendance. If you see a pop-up window informing
you that clicking OK to continue will lose changes, this message is in error. Click OK.
The original Attendance screen displays. You can now select another date, center, and grade.
(If you call up the same options you last selected, you will see that any change you made was
indeed saved.)
12
Revised: March 19, 2006
Learning Academy User Manual
Version 1.2
3 Manage Staffing
You can easily determine and track staffing for Learning Academy sessions.
3.1
Add Staff to Centers
There are two ways to add staff to centers: through the Teacher List (see Section 3.2 Manage
Staff Through the Teacher List) or through the Add Staff menu.
To add Learning Academy staff information from the menu:
1. Log on to OASIS.
2. Hover the mouse pointer over the Student Demographics tab to display its menu
choices.
3. Click Learning Academy.
4. Click Add Staff on the left-hand menu. The Add Staff page displays.
13
Revised: March 19, 2006
Learning Academy User Manual
Version 1.2
5. Using the drop-down list, select the Center where the person will be stationed.
6. In the fields, enter information about the teacher. If the staffer has no cell phone or email
address, leave those fields blank.
7. When finished, click either
•
Save to save the staffer’s information. The Teacher List screen displays.
•
Save & Add Another to save the staffer’s information and open an addition Add
Staff page for the next entry
•
Cancel. The Teacher List screen displays. No changes are saved. Select a Center if
you want to see the teachers and volunteers at the selected center.
To add Learning Academy staff information from the Add Staff screen (see Section 3.2
Manage Staff Through the Teacher List), click the New button. Follow the instructions as
noted above.
3.2
Manage Staff Through the Teacher List
To view a list of teachers assigned to the Learning Academy, or to manage the teacher/staff
list:
1. Log on to OASIS.
14
Revised: March 19, 2006
Learning Academy User Manual
Version 1.2
2. Hover the mouse pointer over the Student Demographics tab to display its menu
choices.
3. Click Learning Academy.
4. Click Teacher List on the left-hand menu.
5. You need select a Center. Use the drop-down list to do so. An expanded Teacher List
screen displays the staff at the selected center.
6. From the Teacher List, you can click
•
Edit/View to update teacher information
•
Delete to remove that teacher’s information
•
New to add a new staff member to the center.
15
Revised: March 19, 2006
Learning Academy User Manual
Version 1.2
4 Reports
You can easily view online reports for Learning Academy
1. Log on to OASIS.
2. Hover the mouse pointer over the Learning Academy tab to display its menu choices.
3. From left Navigation Menu, under Reports, click the report you want to run.
Note: The Teacher List option is discussed in Section Manage Staff Through the Teacher
List.
16
Revised: March 19, 2006
Learning Academy User Manual
Version 1.2
4.1
Weekly Statistical Report
1. Hover the pointer over the Student Demographics tab, click Learning Academy.
Below Reports, click Weekly Statistical Report. The Weekly Statistical Data screen
displays.
2. You will be asked to select a Center and a Date. Use the drop-down lists to do so.
3. Click Run to view the report.
4. The report is displayed. (The preceding screen shot displays the report format only, not
an actual report.)
17
Revised: March 19, 2006
Learning Academy User Manual
Version 1.2
4.2
Staff Totals
1. Hover the pointer over the Student Demographics tab, click Learning Academy, then,
below Reports, click Staff Totals. The Staff Totals page displays.
2. You will be asked to choose a Center. Use the drop down list to do so
3. The Staff Totals report displays.
18
Revised: March 19, 2006
Learning Academy User Manual
Version 1.2
4. Click on View to see the Teachers List page. From that page, you can Edit/View, or
Delete staff information and staff members. Click New to add staff.
4.3
Student List
1. Hover the pointer over the Student Demographics tab, click Learning Academy.
Below Reports, click Student List. The Student List page displays.
2. On the Student List screen, from the drop-down list fields, select the date, center, and
George B. Thomas Learning Academy (GBTLA) grade level for the desired list. In the
latter field, select “All” if you want to see all grade levels.
3. Click Get List. An expanded Student List screen displays.
19
Revised: March 19, 2006
Learning Academy User Manual
Version 1.2
4. Long lists will display on multi-page screens. Click Show Pages to display the entire
list.
5. Besides the GBTLA grade, each MCPS student’s MCPS grade level is listed. NonMCPS students are listed as being in grade level code 16.
6. Click on Multi Sort to view the Multi-Column Sort pop-up window for your viewing
options. In the window that follows, the last Student List report will be sorted first by the
MCPS home school (in ascending alphabetical order) and secondly by the students’
surnames.
20
Revised: March 19, 2006
Learning Academy User Manual
Version 1.2
7. Click Do Sort after you have set sorting options, or click Cancel to exit the pop-up.
8. To see another date/center/grade level report, select the desired combination from
Student List screen drop-down fields and click Get List. Or, click Cancel. The
Student Search screen displays.
21
Revised: March 19, 2006
Learning Academy User Manual
Version 1.2
5 Common Tasks
5.1
Log On and Off of OASIS
To log on to OASIS:
1. Enter your User name and Password. Select the appropriate domain from the Log on to:
drop-down list.
2. When finished, click Go.
To log off of OASIS, click the Log Out link in the upper right-hand corner.
5.2
Search for Students
To search for the student’s record.
1. On the OASIS menu, click the Student Search link in the upper right-hand corner. The
Student Search page displays.
22
Revised: March 19, 2006
Learning Academy User Manual
Version 1.2
2. Enter search criteria in one or more fields. You can search for a student using the Student
ID, social security number (SSN), Last Name, First Name, or a combination of fields.
Use the percent sign (%) as a wildcard to enter part of a name or number. For example,
entering a Last Name and R% in the First Name field retrieves all students with the
designated last name and whose first name begins with R.
3. For Status, click an the option button to search by status:
•
Active: All active students that meet the search criteria
•
Inactive: All inactive students that meet the search criteria
•
Either/Don’t Know: All students that meet the search criteria regardless of their
active/inactive status
4. Click Search. If you entered either a first or last name, you see the list of students that
match the search criteria.
23
Revised: March 19, 2006
Learning Academy User Manual
Version 1.2
5. To see a student’s record, click the Student ID.
The student whose record is retrieved is now the current student. Student-based work
that you perform in this module will pertain to that student until you retrieve another
student’s record.
In many cases, secondary information about the student is available, but is hidden by
default on the page.
•
Click its Open button to view that information.
•
Click its Hide button to hide the information.
Note: You can search for a new student at any time while you are working in a module.
Enter a Student ID number in the Find Another Student field on the left-hand menu
and click Go.
6. Some students have enrollments in more than one school, including non-MCPS schools.
If you select Scheduling Æ Secondary Drop Add Æ Student Class Drop/Add, all
enrollments will appear. Click View Schedule for the school schedule you want to view.
24
Revised: March 19, 2006
Learning Academy User Manual
Version 1.2
5.3
Select a School
If you are involved in more than one school, you be asked to select the appropriate one. To
do so,
1. On the right-hand menu, see the School Detail tab.
2. Under Select Another School:, click the down arrow. A list of schools appears.
3. Click the school name to select it.
25
Revised: March 19, 2006