1
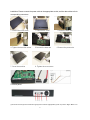
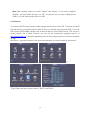
H.264 DVR Quick Start Guide
Version 1.a
Model: ES00M140, ES00M180
Before You Begin
1 Introduction ................................................................................................................................................. 2
1.1 Safety Information ............................................................................................................................ 2
1.2 Contents of the box.......................................................................................................................... 2
1.3 Hard disk installation ....................................................................................................................... 2
1.4 Front panel........................................................................................................................................ 3
1.5 Rear panel ......................................................................................................................................... 4
1.6 Mouse Control
………………………………………………………………………………………….…..4
2 Basic operation ........................................................................................................................................... 5
Login System ............................................................................................................................ 5
2.2 Main Menu .................................................................................................................................. 5
2.2.1 System setup ................................................................................................................. 6
2.2.2 Format Hard Drive …………………………………………………...…………………….. 8
2.2.3 Record ................................................................................................................................ 9
2.2.4 Playback ......................................................................................................................... 10
2.2.5 Network ........................................................................................................................... 12
2.2.6 Web View........................................................................................................................ 13
2.1
3 Appendix ……………………………………………………………………………………………………………..14
A. Network Security Setting……………………………………………………………………………………14
B. Connection Setting…………………………………………………………………………………..………15
1
1. Introduction
1.1 Safety Information
•
Before setting up the DVR, carefully read all the documentation that came with your package.
•
To prevent fire and shock hazard, never expose the DVR to rain or moisture.
•
If the power supply is broken, do not try to fix it by yourself. Contact a qualified service
technician or your retailer.
•
Before using the product, make sure all cables are correctly connected and the power cables
are not damaged. If you detect any damage, contact your dealer immediately
•
The DVR should be operated only by the type of power source indicated on the label. If you
are not sure of the type of power supplied to your home or office, consult your dealer or the
local power company
1.2 Contents of the box
1.
2.
3.
4.
5.
6.
DVR device
Quick Start Guide
CD
Remote Control
Power and Power cord
Mouse
1.3 Hard disk installation
Before the first use,please install the hard disk.
Before you can record onto your HDD it should be formatted by the DVR system,
because standard PC formatting is not compatible. The format process can take several
minutes.
Your HDD should be installed inside the DVR. Please connect the(Hard Disk (HDD) in the following
way. Screw the HDD into the HDD brackets or DVR base. All necessary cables are included in the
package with the DVR. Use the instructions that came with the hard drive for exact wiring and
2
installation. Please connect the power cable to the appropriate socket, and the data cables to their
corresponding connectors.
1. Loosen the cover screw
2. Remove the cover
4. Tighten the hard disk screw
5.Connect the data wire
7. Cover the machine
8. Tighten the cover screw
3. Insert the hard disk
6.Connect the power wire
1.4 Front panel
(1) IR remote receiver (2) Record indicator light (3) Power indicator light (4) ESC (5) Left / Up / Down / Right / Menu/ Enter
3
1.5 Rear panel
8CH
4CH
(1) Video inputs
(2) BNC outputs
(3) Audio input
(4) Audio output
(5) USB
(6) Network
(7) Power supply
(8) VGA output
(9) Power Switch (ESOOM140 without this switch)
1.6 Mouse Control
You can use a mouse to operate the DVR as well. The mouse operates just like a mouse on a
Windows PC. Please connect the mouse tone of the USB connectors (#5) in the back panel and
please note that you can hot-plug the mouse.
Right clicking
In live display mode, right clicking will either display or hide the tool bar.
In main menu or sub menu mode, right clicking will exit current menu.
Note: the settings will not be saved after right clicking.
Left clicking
When in menu unlock mode in the tool bar left click on the SYSTEM SETTINGS icon to enter into
the main menu.
After entering the main menu, left clicking will enter sub menus.
On [detail files] menu mode, left clicking will playback one recording file.
By left clicking you can select values in edit boxes or pull-down menus The system supports
Chinese character inputs, special symbols, numbers and letters.
On the playback interface left clicking can control the >> forward function, << reverse function, >> I
Slow play function, I > frame play function, > Play function, and X exit function.
You can left click to adjust color control bar, volume control bar and screen control bar.
On the main menu, sub menu or playback view, you can left click “x” to exit the current menu.
You can left click to change the status box of a check box in the motion detection area.
Double clicking
On the live view or playback video, double-clicking will maximize the screen.
left key
Double clicking on the maximized screen will return it to the multi camera view.
Mouse drag
In the Motion Detection setting interface, you can left click to drag
Mouse, and drag the frame to set the motion detection area.
Use the mouse to select menu items.
.
4
Getting Started and Main Menu
2. Basic operation
2.1 Login System
In preview mode you can right click the mouse to get a desktop shortcut menu.
Right click the mouse again, and you will see the following:
Input your username and password and select OK.
Note: The default password for admin is blank when you receive the new DVR.
2.2 Main Menu
After logging into preview mode, you can right click the mouse to get a desktop shortcut menu.
Right click mouse again and select the Main Menu
5
When the Main Menu appears, click the system icon in the main menu shown below:
2.2.1 System setup
Set all the system parameters by clicking each icon .i.e. Language, Date/Time, Account, GUI
Display, and Video. After setting all the parameters, click “Exit” on the System Menu.
—>
6
—>
Click [Language] ---> Select your language from the drop down menu.
Then click “OK”.
【System time】Set the system date and time on the Date/Time Menu
Enter the month, date, and time using the virtual keypad
7
【DST】Click for Daylight Saving Time.
Daylight savings time “On” means DST is enabled. You can setup the start time and end time of DST.
2.2.2 Format Hard Drive
If you install a new hard drive (HDD), you must format the HDD before using it to record. To format a
drive, go back to the main menu, click > the HDD Manage Icon on the Main Menu screen
—>
—>
Select the preferred HDD > on the HDD Manage screen. Click【Format Disk】 then Click 【OK】 to
complete.
8
2.2.3 Record
The User needs to install and format a HDD, and set all the recording parameters before recording.
There are 2 record modes: Scheduled, and Manual, along with Stop for (No record).
Note: Record frame rate, resolution, quality and hard drive space will affect the total recording time of
DVR system.
Note: All parameters will affect the recording time length for HDD. Recording higher quality images at
a higher frame rate will result in a shorter recording time for the same size HDD.
—>
—>
To set the recording parameters click the “Record icon” on the Main Menu. You will set the recording
parameters on the following screen.
【Resolution】Indicates the setup resolution and code rate for recording. There are four options:
D1.HD1, CIF and QCIF.
【Frame Rate】In this section, you can choose the recording frame rate (frames per second) for the
current channel. The higher the record frame rate, the more natural movement you will see in
playback mode.
【Quality】There are several options: Choose the one that is the best for your purpose.
【REC. Mode】There are three options: Schedule, Manual and Stop. Click the REC. Mode field and
you will be taken to the menu below.
SCHEDULE: This setup function allows you to create a schedule for recording tasks throughout the
week, so that only certain selected events are actually recorded on the HDD. For example, you may
setup the system to record non-stop throughout your normal business hours, making it a
9
schedule-triggered recoding at lunch time (that means no recording will be performed unless an
alarm event happens), night time being set to motion detection recording with certain hours made
more secure with the combined schedule and motion detection triggered recording, finally making it
more sophisticated by specifically setting a no-record time slot when you stay in the office alone in the
wee hours of weekday mornings. You can setup any schedule that fits your needs..
Please note that manual recording overrides all record settings and will be carried on until stopped by
the operator.
CHANNEL: You can select all channels or just one channel. You can also copy the settings from one channel to
other.
—>
【REC. Size】It will pack by the time you selected.
Click “OK” and “OK” again in each following menu to return to the Main Menu.
Note: ES00M140,ES00M180 both do not have the “ Alarm” function.
2.2.4 Playback
The DVR supports live recorded playback, and time search. Select Main Menu > Playback > Search
—>
10
—>
—>
【Search】Use the Quick click button
virtual keypad, then click the search button
and enter the time period you want to search using the
Enter the time period you want to search, and click the search button
Then, select one file, and click the play button
or double click the file
Note: Record setup will affect the total channels you can playback at the same time.
Note: If the recording mode is set to D1 resolution at 30 FPS for all 4 channels in the 4
channel DVR, the user can only use 2 channels for simultaneous playback. The User can
either reduce the resolution or the frame rate of the recording setup in order to increase the
number of channels the user can use for simultaneous playback.
Note: After you playback, you can change the time based on the selected channel. If you want
to change both time and channel, you need to start over the search function.
11
Note: The recording mode set to both “Regular” and “Detect”. If you want to playback
“Regular”, you must select file type to be “All”, not general. And you want to playback the
“Detect”, you can choice the file type to be “MD”.
2.2.5 Network
To connect the DVR to the internet, certain settings must be input to the DVR. To access your DVR
from the internet, you will need either a Static IP from your internet service provider (IPS) or a router
with Dynamic DNS (DDNS) capacity and an account with an online DDNS service. This service is
country specific, but in many countries, you can use the manufacturer suggested service id
http://www.dyndns.org. If the below parameters are not clear, please contact your network consultant
for help.
Main Menu > Advanced> Network, then enter the parameters you need to setup for the network
—>
—>
—>
【Type】there are three options: Static IP, DHCP, and PPPoE
12
【Media Port】Transfers video data between client and device, default is 34567
【Web Port】Sets up the port of IE browser via HTTP,default is 80
【IP Address】Set up the IP address
【Subnet Mask】Set up the Subnet mask
【Gateway】Set up the default gateway
【DNS】Set up the domain name sever
【DDNS】Click the button
. This will take you to the following screen.
2.2.6 Web
Open IE browser, input the correct IP address and port number, and you will see the following screen.
Input the correct name and password, and then click the Login button.
Note: Make sure all the active controls for internet security on your PC are enabled. For IE, you can
go to Tools > Internet Options > Security.
Note: The default user ID is “admin”. Default password is blank
Note: RESTRICTION:
To ensure the PC‘s stable interfacing with the DVR, we recommend Windows XP or Windows Vista
operation system, and IE 6.0, IE 7.0 browsers.
13
After you login, you will see the following screen. Click the Ok button
If you want to exit at this point, please select the Logout button
[Main Stream] This choice will provide the user with the best image to view but will affect the frame rate
the user can receive.
[Extra Stream] This choice will provide the user with a lower grade image; however, the picture will run
smoother due to the higher frame rate.
[Auto Prompt] After logging in using the web viewing mode, the screen will auto prompt the window of
stream choice to user when you select the function.
App
A. Network Security Setting
Prior to controlling installation, please program the network security level by using the following
operations:
(1) Open the IE browser and click [Tools→ Internet Options].
(2) Choose the “Security” tab in the dialogue box.
14
(3) Click “Customization level” to enter into the security Setting
Set the ActiveX control and pluggable unit. Select the following options
√ ActiveX control auto-prompting
√ Run the script of the ActiveX control which is marked to safely implement the script.
√ Implement initialization and run the script of the ActiveX control which is not marked to safely
implement the script.
√ Binary system and the script behavior
√ Download the unsigned ActiveX control
√ Download the signed ActiveX control
√ Perform the ActiveX control and pluggable unit
It’s extremely importation to “enable” the items above.
Prompt: Before control installation, please turn off the fire wall and the anti-virus software.
B. Connection Setting
The remote access for the hard disk recording machine should be carried out through the network. In
the local area network connection, the IP address of the client-side computer must be on the same
network section with that of the hard disk recording machine. While in the wide area network
connection, just ensure that two sides can access the public network, and connect through the IP
address or the dynamic domain name. The following will mainly focus on connecting and setting the
method for the local area network.
Step 1: Right click on “Network neighborhood” and click “Attribute” in the ejected menu to open the
“Network connection”.
Step 2: Double click to open “Local connection”.
Step 3: Click “Attribute”.
15
Step 4: Double click “Internet protocol (TCP/IP)”.
Step 5: Examine the IP address, subnet mask, and default gateway on the PC.
Step 6: Set the corresponding IP address, subnet mask, and default gateway on the DVR. If the
subnet mask and default gateway on the DVR are the same as those of the PC, then the IP address
must be in the same network section but cannot be the same as the used one. Otherwise, it will cause
IP address conflicts. Take the figure above as an example, the IP address should be: 192.168.0.X,
wherein, X cannot be 40 or 1 (including other IP addresses currently being used), and cannot surpass
255, the subnet mask is 255.255.255.0, and the gateway is 192.168.0.1.
16