1
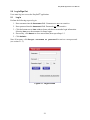
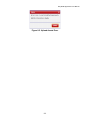
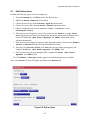
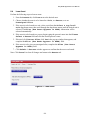
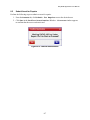
EasyStaff® Application
User Manual
4 February 2014
Systems Definition, Inc.
5904 Richmond Highway
Suite 330
Alexandria, VA 22303
703-717-0222
Copyright © 2014 Systems Definition, Inc., All Rights Reserved.
EasyStaff® Application User Manual
TABLE OF CONTENTS
1.0 SCOPE ................................................................................................................................................. 1-1
1.1 IDENTIFICATION ............................................................................................................................... 1-1
1.2 DOCUMENT ORGANIZATION ............................................................................................................ 1-1
1.3 DOCUMENT CONVENTIONS .............................................................................................................. 1-1
2.0 LOG IN/SIGN OUT ............................................................................................................................ 2-1
2.1 LOG IN .............................................................................................................................................. 2-1
2.1.1
Retrieve New Password ............................................................................................................ 2-2
2.2 SIGN OUT.......................................................................................................................................... 2-4
3.0 GETTING STARTED ......................................................................................................................... 3-1
4.0 ROSTER .............................................................................................................................................. 4-1
4.1 ROSTER SELECTION SCREEN ............................................................................................................ 4-1
4.2 ROSTER ASSIGNMENT SCREEN ........................................................................................................ 4-2
4.2.1
Assign Available Personnel to Roster....................................................................................... 4-4
4.2.2
Assign Personnel from Other Units to Roster........................................................................... 4-5
4.2.3
Save Roster ............................................................................................................................... 4-6
5.0 REPORTS ............................................................................................................................................ 5-1
6.0 QUICK COMPLIANCE REPORT ..................................................................................................... 6-1
7.0 ADMIN ................................................................................................................................................ 7-1
7.1 EDIT ASSIGNMENTS.......................................................................................................................... 7-2
7.1.1
Edit Existing Assignment ......................................................................................................... 7-3
7.1.2
Create New Assignment ........................................................................................................... 7-4
7.2 EDIT WORKGROUPS ......................................................................................................................... 7-5
7.2.1
Edit Existing Workgroups ........................................................................................................ 7-6
7.2.2
Create New Workgroup ............................................................................................................ 7-7
7.3 EDIT UNITS ....................................................................................................................................... 7-8
7.3.1
Edit Existing Unit ..................................................................................................................... 7-9
7.3.2
Create New Unit ..................................................................................................................... 7-11
7.4 EDIT PERSONNEL ............................................................................................................................ 7-13
7.4.1
Edit Existing Personnel........................................................................................................... 7-14
7.4.2
Add New Personnel ................................................................................................................ 7-15
7.4.3
Upload Multiple People .......................................................................................................... 7-16
7.4.4
Search Personnel ..................................................................................................................... 7-18
7.5 EDIT SHIFTS .................................................................................................................................... 7-19
7.5.1
Edit Existing Shift................................................................................................................... 7-20
7.5.2
Create New Shift..................................................................................................................... 7-21
7.6 EDIT STATUS OPTIONS ................................................................................................................... 7-22
7.6.1
Edit Existing Status................................................................................................................. 7-23
7.6.2
Create New Status................................................................................................................... 7-24
7.7 EDIT USERS .................................................................................................................................... 7-25
7.7.1
Edit Existing User ................................................................................................................... 7-26
7.7.2
Create New User ..................................................................................................................... 7-27
7.8 ADJUST SETTINGS .......................................................................................................................... 7-28
7.9 UPLOAD IMAGE .............................................................................................................................. 7-29
7.10
REGISTER APAA ........................................................................................................................ 7-30
8.0 ASSETS ............................................................................................................................................... 8-1
8.1 ADD NEW ASSET .............................................................................................................................. 8-2
8.2 UPLOAD ASSETS ............................................................................................................................... 8-3
8.3 EDIT EXISTING ASSET ...................................................................................................................... 8-5
8.4 LOAN ASSET ..................................................................................................................................... 8-6
8.5 SUBMIT ASSET FOR REPAIRS ............................................................................................................ 8-7
8.6 MARK ASSET AS REPAIRED.............................................................................................................. 8-8
ii
EasyStaff® Application User Manual
TABLE OF FIGURES
Figure 2-1. Login Screen ................................................................................................................................................. 2-1
Figure 2-2. Retrieve New Password ................................................................................................................................ 2-2
Figure 2-3. Password Change Required .......................................................................................................................... 2-3
Figure 2-4. Success Window ........................................................................................................................................... 2-3
Figure 2-5. Sign Out ........................................................................................................................................................ 2-4
Figure 4-1. Roster Selection Screen ................................................................................................................................ 4-1
Figure 4-2. Roster Assignment Screen ............................................................................................................................ 4-3
Figure 4-3. Roster Icons .................................................................................................................................................. 4-3
Figure 4-4. Assign Available Person to Roster................................................................................................................ 4-4
Figure 4-5. Person Search Window ................................................................................................................................. 4-5
Figure 4-6. Save Roster Window .................................................................................................................................... 4-6
Figure 5-1. Roster Report ................................................................................................................................................ 5-1
Figure 5-2. Roster Report Example ................................................................................................................................. 5-1
Figure 6-1. Quick Compliance Report............................................................................................................................. 6-1
Figure 7-1. Admin Screen ............................................................................................................................................... 7-1
Figure 7-2. Edit Assignments Tab ................................................................................................................................... 7-2
Figure 7-3. Edit Existing Assignment ............................................................................................................................. 7-3
Figure 7-4. Create New Assignment ............................................................................................................................... 7-4
Figure 7-5. Edit Workgroups Tab.................................................................................................................................... 7-5
Figure 7-6. Edit Existing Workgroup .............................................................................................................................. 7-6
Figure 7-7. Add New Workgroup.................................................................................................................................... 7-7
Figure 7-8. Edit Units Tab ............................................................................................................................................... 7-8
Figure 7-9. Edit Existing Unit ....................................................................................................................................... 7-10
Figure 7-10. Create New Unit ....................................................................................................................................... 7-12
Figure 7-11. Edit Personnel Tab .................................................................................................................................... 7-13
Figure 7-12. Edit Existing Personnel ............................................................................................................................. 7-14
Figure 7-13. Add New Personnel .................................................................................................................................. 7-15
Figure 7-14. Upload New People .................................................................................................................................. 7-16
Figure 7-15. Upload New People .csv File Format ....................................................................................................... 7-17
Figure 7-16. Upload New People Error ......................................................................................................................... 7-17
Figure 7-17. Person Search Window ............................................................................................................................. 7-18
Figure 7-18. Edit Shifts Tab .......................................................................................................................................... 7-19
Figure 7-19. Edit Existing Shift ..................................................................................................................................... 7-20
Figure 7-20. Create New Shift ....................................................................................................................................... 7-21
Figure 7-21. Edit Status Options ................................................................................................................................... 7-22
Figure 7-22. Edit Existing Status ................................................................................................................................... 7-23
Figure 7-23. Create New Status ..................................................................................................................................... 7-24
Figure 7-24. Edit Users Tab .......................................................................................................................................... 7-25
Figure 7-25. Edit Existing User ..................................................................................................................................... 7-26
Figure 7-26. Create New User ....................................................................................................................................... 7-27
Figure 7-27. Adjust Settings .......................................................................................................................................... 7-28
Figure 7-28. Upload Image ............................................................................................................................................ 7-29
Figure 7-29. Register APAA Tab .................................................................................................................................. 7-30
Figure 7-30. Successful APAA Registration ................................................................................................................. 7-30
Figure 8-1. Asset List ...................................................................................................................................................... 8-1
Figure 8-2. Add New Asset ............................................................................................................................................. 8-2
Figure 8-3. Upload Assets ............................................................................................................................................... 8-3
Figure 8-4. Upload Assets .csv File Format .................................................................................................................... 8-3
Figure 8-5. Upload Assets Error ...................................................................................................................................... 8-4
Figure 8-6. Edit an Asset ................................................................................................................................................. 8-5
Figure 8-7. Loan Asset .................................................................................................................................................... 8-6
Figure 8-8. Confirm Deactivation ................................................................................................................................... 8-7
Figure 8-9. Mark As Repaired ......................................................................................................................................... 8-8
iii
EasyStaff® Application User Manual
1.0 Scope
1.1
Identification
This user manual documents the EasyStaff® software application and contains instructions for
general and administrative users.
EasyStaff® is a web-based software application developed by Systems Definition, Inc. (SDI) that
allows Fire Operations personnel to quickly and easily fill out tour rosters and to define radio
identification data to support safety and accountability efforts. The application is easy-to-use
software refined for real-world use, honed from lessons learned building accountability applications
for New York City Fire Department (FDNY).
EasyStaff® enables rapid and accurate roster preparation and streamlined reporting. EasyStaff® links
Unit, assignment, personnel, and radio identification information, by tour, to support fireground
safety and accountability activities. Features include streamlined spare radio management to ensure
identification accuracy when spare radios are used in the field.
The application requires minimal computing resources and eliminates clunky paper-based forms.
EasyStaff readily integrates into daily Fire Operations and is a valuable tool geared for Operations
personnel closest to the action. Data generated in EasyStaff® can be output to SDI’s patented
mayday roll-call software applications to support firefighter identification and accountability on the
fireground. For example, EasyStaff® interfaces to SDI’s APX® Personnel Accountability
Application (APAA) for use with the Motorola suite of APX® hand-held radios.
1.2
Document Organization
This document is organized into the following major sections:
1.0 – Scope
2.0 – Log In
3.0 – Roster
5.0 – Reports
6.0 – Quick Compliance Report
7.0 – Admin
8.0 – Assets
1.3
Document Conventions
Throughout this document, text in Courier Bold reflects actual text on the application screen,
usually on a button or title bar.
Orange text, boxes, ovals, and arrows are used for labeling purposes and do not appear on the actual
application screen.
_____________
EasyStaff is a registered trademark of Systems Definition, Inc.
APX is a registered trademark of Motorola Trademark Holdings, LLC
1-1
EasyStaff® Application User Manual
2.0 Log In/Sign Out
Users must log in to access the EasyStaff® application.
2.1
Log In
Perform the following steps to log in:
1. Enter username into the Username field. Usernames are not case-sensitive.
2. Enter password into the Password field. Passwords are case-sensitive.
3. Click the button next to Yes or No to choose whether to remember login information.
Selecting Yes saves the username for future logins.
4. If necessary, click Reset to clear entered data, then repeat Steps 1-3.
5. Click Submit.
Note: If necessary, click Forgot username or password? to retrieve a new password
(see section 2.1.1).
Figure 2-1. Login Screen
2-1
EasyStaff® Application User Manual
2.1.1 Retrieve New Password
Users who cannot remember their username and/or password can retrieve new passwords.
Perform the following steps to retrieve a new password:
1. Click Forgot username or password? in the Please Log In box. The
Enter Email to Retrieve New Password window appears (see Figure 2-2).
2. Enter username into the Username field or enter email address into the Email field,
first name into the First Name field, and last name into the Last Name field.
3. Click Submit. The EasyStaff® application will send an automatically generated
password to the provided email address.
4. Log in with the new password. Upon logging in, the Password change required
window appears (see Figure 2-3).
5. Enter a new password into the Password field.
6. Enter the same new password into the Enter Password Again field.
7. Click Submit. A Success window appears to confirm that the password was changed
successfully (see Figure 2-4).
Figure 2-2. Retrieve New Password
2-2
EasyStaff® Application User Manual
Figure 2-3. Password Change Required
Figure 2-4. Success Window
2-3
EasyStaff® Application User Manual
2.2
Sign Out
To sign out of the EasyStaff® application, click Sign Out in the upper-right corner of the
screen as shown in Figure 2-5.
Figure 2-5. Sign Out
2-4
EasyStaff® Application User Manual
3.0 Getting Started
This section describes the optimum order of entering Department organization data when using
EasyStaff® for the first time (Administrative User privileges are required to configure
EasyStaff®).
Setting up the Department structure and radio identification data (or other asset data such as
SCBA ID) in EasyStaff® is very important, and it is a good idea to have the Department’s
organization chart/matrix and list of radios on hand. This critical information is entered under the
Admin tab in the application. After this initial data entry is completed, features such as Roster
and Quick Compliance can be used.
Information should be entered in the order listed below. Assignments are entered first since they
will be required when entering the Units, Units are entered second since they will be required
when entering Workgroups, and so forth. Each item builds on the previous item.
1. Assignments (e.g., Battalion Chief)—see section 7.1
2. Units (e.g., Battalion 5)—see section 7.3
3. Workgroups (e.g., Franklin Station)—see section 7.2
4. Shifts (e.g., 24 Hour)—see section 7.5
5. Assets (e.g., Radios and BAs)—see section 8.0.
3-1
EasyStaff® Application User Manual
4.0 Roster
The Roster tab allows users to view and edit roster assignments. All users have access to this
tab.
4.1
Roster Selection Screen
The Roster Selection Screen is displayed after successfully logging in. Perform the following
steps to select a roster:
1. Select a unit from the Please select a unit… drop-down menu.
2. Click in the Select day field to open a calendar, then select the desired date. Note
that rosters may only be completed one day in advance.
3. Select a shift from the Please select a shift… drop-down menu.
4. Click Select Roster to begin roster assignment.
Figure 4-1. Roster Selection Screen
4-1
EasyStaff® Application User Manual
4.2
Roster Assignment Screen
After selecting a specific roster, the Roster Assignment Screen for the shift is displayed. The
screen may be unpopulated when first launched unless it has been filled out for the day and shift
already. The screen displays the assets (radios and masks) assigned to each position.
The Roster Assignment Screen provides the following options to create and modify rosters:
•
•
•
Available People: View the personnel available to be assigned to the roster.
Personnel in this list are members of the selected unit and shift. Names with a red
background indicate personnel already assigned to a roster.
People in other units: Search for personnel in other units to assign to the roster.
•
Roster Position (Battalion Chief, Officer, etc.): Click and drag names of
available people into the Person fields to assign them to roster positions. Icons for any
assigned Assets such as radios and Breathing Apparatuses (BAs) are displayed beside
each name.
Notes for this roster: If desired, enter any notes into this field.
•
Print this roster: Print a copy of the roster on a single sheet of paper.
•
Download this roster: Download a copy of the roster as a Portable Document
Format (PDF) file.
Save this roster: Save the roster displayed on the screen.
•
•
•
Clear this roster: Clear the assigned personnel from the roster and remain on the
roster assignment screen.
Leave this roster: Exit the roster without saving changes and return to the Roster
Selection Screen.
Figure 4-2 shows an example roster of 5th Battalion personnel during the 24-hour shift of January
22, 2014. Figure 4-3 shows the Asset icons used in the roster.
4-2
EasyStaff® Application User Manual
Figure 4-2. Roster Assignment Screen
Breathing Apparatus 9001 assigned to Margaret Felix
Radio 5002 Assigned to Jeffery Young
Figure 4-3. Roster Icons
4-3
EasyStaff® Application User Manual
4.2.1 Assign Available Personnel to Roster
Perform the following steps to assign available personnel to the roster:
1. Click and drag names from the Available People list to the roster position fields as
shown in Figure 4-4. Names with a red background indicate personnel already assigned
to a roster. If necessary, click the X to the right of a person’s name to remove the person
from the roster.
2. If desired, type notes into the Notes for this roster field.
3. Click Save this roster to open the Save Roster window.
4. Select a status from the Select status drop-down menu, then click Submit. A
Success window appears to confirm that the roster was saved.
Note: To cancel roster submission, click Cancel or click the X in the upper-right corner of the
Save Roster window.
Figure 4-4. Assign Available Person to Roster
4-4
EasyStaff® Application User Manual
4.2.2 Assign Personnel from Other Units to Roster
Perform the following steps to assign personnel from other units to a roster:
1. Click People in other units to open the Person Search window.
2. Type the desired person’s name or a portion of the desired person’s name in the search
field, then click Search.
3. Click and drag the desired person’s name to the correct position in the current roster. If
necessary, click the X to the right of a person’s name to remove the person from the
roster.
4. If desired, enter notes in the Notes for this roster field.
5. Click Save this roster to open the Save Roster window.
6. Select a status from the Select status drop-down menu, then click Submit. A
Success window appears to confirm that the roster was saved.
Figure 4-5 shows the process of replacing the Chief’s Aide by clicking People in other
units, searching for a new name, then dragging that employee into the Chief’s Aide
Assignment.
Figure 4-5. Person Search Window
4-5
EasyStaff® Application User Manual
4.2.3 Save Roster
Save this roster saves the assignments displayed on the screen. The user can save the
roster with any created status (refer to Section 7.6). Perform the following steps to save a roster:
1.
2.
3.
4.
Click Save this roster to open the Save Roster window.
Select a status from the Select status drop-down menu.
Click Submit.
A Success window appears to confirm that the roster was saved.
Figure 4-6. Save Roster Window
4-6
EasyStaff® Application User Manual
5.0 Reports
The Reports tab (see Figure 5-1) displays roster information for a selected unit and its
subordinates. All users have access to this tab. If there have been multiple roster submissions for
a shift, there will be one tab for each status in the report, with the current status appearing first.
Perform the following steps to view and print a report:
1.
2.
3.
4.
5.
6.
7.
8.
Click the Reports tab.
Click in the Select day field to open the calendar, then select the desired date.
Click the drop-down menu labeled Select a shift, and choose the desired shift.
Click the drop-down menu labeled Select a top-level unit, and choose the
correct top-level unit. Work through the drop-down menus until the desired unit is
selected.
Click Generate report to view the report. The report contains one tab for each
roster submission and contains the date and time each roster was saved.
If desired, click Print Report to open a print-ready report in a new window, then
print the report.
If desired, click Download Report to download the report as a PDF file.
Click Leave Report to leave the report.
Figure 5-2 shows an example report of Battalion 5’s roster during the 24-hour shift of January
22, 2014.
Figure 5-1. Roster Report
Figure 5-2. Roster Report Example
5-1
EasyStaff® Application User Manual
6.0 Quick Compliance Report
The Quick Compliance Report displays the roster status of all units for the selected shift. All
users have access to Quick Compliance Reports. To view the report, click Quick
Compliance Report at the bottom-left of the EasyStaff® screen. The default report
displayed is the report for the current shift. Click the arrow buttons at the top of the window to
view previous reports. View reports for other shifts by clicking the shift tab (e.g. 24-Hour,
Admin).
Units are grouped by hierarchy in a table. The report columns display the following information:
•
Name: Unit name.
•
Status: Name of status or No Entry if a roster was not saved.
•
Subordinates: Count of all nested units with related roster status.
Figure 6-1 shows the pop-up window that appears when the Quick Compliance Report
button is clicked.
Figure 6-1. Quick Compliance Report
6-1
EasyStaff® Application User Manual
7.0 Admin
The Admin tab allows users with Administrator privileges to perform the following functions:
•
Edit Assignments: Edit an existing assignment or create a new assignment.
•
Edit Workgroups: Edit an existing workgroup or create a new workgroup.
•
Edit Units: Edit an existing unit or create a new unit.
•
Edit Personnel: Edit existing personnel or create new personnel.
•
Edit Shifts: Edit an existing shift or create a new shift.
•
Edit Status Options: Edit existing status options or create a new status.
•
Edit Users: Edit an existing EasyStaff® user or create a new EasyStaff® user.
•
•
Adjust Settings: Change EasyStaff® settings for viewing, editing, and saving
rosters.
Upload Image: Upload an image.
•
Register APAA: Register the APX™ Personnel Accountability Application (APAA).
Figure 7-1. Admin Screen
7-1
EasyStaff® Application User Manual
7.1
Edit Assignments
Assignments are the positions that appear in each unit’s roster. The Edit Assignments tab
allows administrative users to edit existing assignments and to create new assignments.
Figure 7-2. Edit Assignments Tab
7-2
EasyStaff® Application User Manual
7.1.1 Edit Existing Assignment
Perform the following steps to edit an existing assignment:
1. Select an assignment from the drop-down menu, then click Edit.
2. Enter changes into the Name field to change the name that will display on a roster. The
Units field displays units that will be affected by changes made to the assignment.
3. Click the up ▲and down▼ arrows in the bottom-right corner to change the display
position of the assignment.
4. Click Save to save the changes. A Success window appears to confirm that the
changes were saved.
Note: Click Deactivate to remove an existing assignment, and click Cancel to clear all
changes and return to the Edit Assignments tab.
Figure 7-3 shows Battalion Chief in the Edit Assignments tab, where it can be
renamed or moved up or down in the sort order.
Figure 7-3. Edit Existing Assignment
7-3
EasyStaff® Application User Manual
7.1.2 Create New Assignment
Perform the following steps to create a new assignment:
1. Click Create New Assignment.
2. Complete the Name field with the name of the new assignment.
3. Click the up ▲and down▼ arrows in the bottom-right corner to change the display
position of the assignment.
4. Click Save to save the changes. A Success window appears to confirm that the
assignment was created.
Note: Click Cancel to clear all changes and return to the Edit Assignments tab.
Figure 7-4 shows the screen to add a new Assignment, where users can designate the name and
the correct place in the sort order.
Figure 7-4. Create New Assignment
7-4
EasyStaff® Application User Manual
7.2
Edit Workgroups
Workgroups are groups of units to which personnel are assigned (e.g. 30 people may be assigned
to two units that form a workgroup). The Edit Workgroups tab allows users to edit existing
workgroups and to add new workgroups.
Figure 7-5. Edit Workgroups Tab
7-5
EasyStaff® Application User Manual
7.2.1 Edit Existing Workgroups
Perform the following steps to edit an existing workgroup:
1. Select the desired workgroup from the drop-down menu and click Edit.
2. Modify the Description and Abbreviation fields as needed.
3. Click Save to save changes. A Success window appears to confirm that the changes
were saved.
Note: Click Deactivate to remove an existing workgroup, and click Cancel to clear all
changes and return to the Edit Workgroups tab.
Figure 7-6. Edit Existing Workgroup
7-6
EasyStaff® Application User Manual
7.2.2 Create New Workgroup
Perform the following steps to add a new workgroup:
1. Click Create New Workgroup.
2. Complete the Description and Abbreviation fields.
3. Click Save to save changes. A Success window appears to confirm that the changes
were saved.
Note: Click Cancel to clear all changes and return to the Edit Workgroups tab.
Figure 7-7. Add New Workgroup
7-7
EasyStaff® Application User Manual
7.3
Edit Units
Units are the different groups of fire personnel and can be as large as city-wide fire departments
or as small as ladders and special units. The Edit Units tab allows administrative users to
edit existing units and to create new units. Administrative users may click the Download
Units/Assignments button to download a list of all units and assignments.
Figure 7-8. Edit Units Tab
7-8
EasyStaff® Application User Manual
7.3.1 Edit Existing Unit
Perform the following steps to edit an existing unit:
1. Select a unit from the Select a top-level unit drop-down menu and work
through the drop-down menus until the desired unit is selected.
2. Click Edit to display the Editing window.
3. Modify the Unit Description field with the name of the Unit (e.g. 5th
Battalion). This is used to select the unit when completing a roster.
4. Modify the Unit Code field. This is the abbreviated name associated with the unit (e.g.
BAT 5).
5. Check the Roster Required box if a roster is required for the unit.
6. Use the Parent Unit drop-down menus to select the correct commanding unit.
7. Use the Workgroup drop-down menu to select the correct workgroup.
8. Click Add Assignments to open the Assignments window.
9. Click and drag the desired assignments into the blank fields located below the last
assignment position. If necessary click the x to the right of an assignment name to
remove the assignment.
10. When all assignments have been added, click the x in the upper-right corner of the
Assignments window to close the window.
11. Use the up ▲and down▼ arrows at the bottom right of the screen to change the sort
order. This is the order in which the unit appears in the Please Select a unit…
drop-down menus and Reports tab.
12. Click Save to save the changes to the unit. A Success window appears to confirm that
the changes were saved.
Note: Click Deactivate to remove an existing unit, and click Cancel to clear all changes
and return to the Edit Units tab.
Figure 7-9 shows Battalion 5 in the Edit Units tab, where it can be renamed, have
Assignments added/removed, and go up or down in the Station sort order.
7-9
EasyStaff® Application User Manual
Figure 7-9. Edit Existing Unit
7-10
EasyStaff® Application User Manual
7.3.2 Create New Unit
Perform the following steps to create a new unit:
1. Click Create New Unit.
2. Complete the Unit Description field with the name of the Unit (e.g. Battalion 5).
This is used to select the unit when completing a roster.
3. Complete the Unit Code field. This is the abbreviated name associated with the unit
(e.g. BAT 5).
4. Check the Roster Required box if a roster is required for the unit.
5. Use the Parent Unit drop-down menus to select the correct Parent Unit. This is the
selected unit’s commanding unit.
6. Use the Workgroup drop-down menu to select the correct workgroup.
7. Click Add Assignments to open the Assignments window.
8. Click and drag the desired assignments into the blank fields located below the last
assignment position. If necessary, click the X to the right of an assignment name to
remove the assignment.
9. When all assignments have been added, click the X in the upper-right corner of the
Assignments window to close the window.
10. Use the up ▲and down▼ arrows at the bottom right of the screen to change the sort
order. This is the order in which the unit appears in the Please Select a unit…
drop-down menus and Reports tab.
11. Click Save to save the changes to the unit. A Success window appears to confirm that
the changes were saved.
Note: Click Cancel to clear all changes and return to the Edit Units tab.
Figure 7-10 shows New Unit in the Edit Units tab where it can be renamed, get a new code,
and moved up or down in the sort order.
7-11
EasyStaff® Application User Manual
Figure 7-10. Create New Unit
7-12
EasyStaff® Application User Manual
7.4
Edit Personnel
The Edit Personnel tab allows the user to edit existing Fire Department personnel and to
create new personnel. Once created, personnel can be assigned to rosters and can be assigned
assets.
Figure 7-11. Edit Personnel Tab
7-13
EasyStaff® Application User Manual
7.4.1 Edit Existing Personnel
Perform the following steps to edit existing personnel:
1. Select the desired name from the drop-down menu and click Edit.
2. Modify the First Name, Last Name, Middle Name, Rank, and (Ref Num)
fields as needed.
3. Use the Workgroup drop-down menu to change the workgroup if needed.
4. Click Save to save changes. A Success window appears to confirm that the changes
were saved.
Note: Click Deactivate to remove existing personnel, and click Cancel to clear all changes
and return to the Edit Personnel tab.
Figure 7-12 shows Jeffery Young’s Personnel information in the Edit Personnel tab, where
his Rank, Ref Num, and Workgroup can be updated.
Figure 7-12. Edit Existing Personnel
7-14
EasyStaff® Application User Manual
7.4.2 Add New Personnel
Perform the following steps to add new personnel:
1. Click Add New Person.
2. Complete the First Name, Last Name, Middle Name, Rank, and Ref Num
fields.
3. Use the Workgroup drop-down menu to select a workgroup.
4. Click Save to save changes. A Success window appears to confirm that the people
were added.
Note: Click Cancel to clear all changes and return to the Edit Personnel tab.
Figure 7-13. Add New Personnel
7-15
EasyStaff® Application User Manual
7.4.3 Upload Multiple People
Multiple people can be added at once to save time. Perform the following steps to upload
multiple people:
1. From the Edit Personnel tab, click Upload New People.
2. Create a .csv file with the Last Name, First Name, Middle Name, Reference
Number, Rank, and Workgroup for each person organized into six columns as
described in Figure 7-14. Note that reference numbers cannot exceed 10 characters.
3. Click Choose File and select the correct .csv file. Refer to Figure 7-15 for a sample
correctly formatted .csv file.
4. Click Show Preview to view a preview of the assets before uploading (refer to Figure
7-15). If necessary, click Cancel to return to the Edit Personnel tab.
5. Click Upload to upload the people. A Success window appears to confirm that the
people were uploaded.
Figure 7-14 shows an example of using a .csv file to upload multiple personnel at once.
Figure 7-15 shows a properly arranged .csv file with personnel information.
Note: If the .csv file was formatted incorrectly, an Error window identifies the location of the
formatting error, as shown in Figure 7-16.
Note: Click Cancel to return to the Edit Personnel tab.
Figure 7-14. Upload New People
7-16
EasyStaff® Application User Manual
Figure 7-15. Upload New People .csv File Format
Figure 7-16. Upload New People Error
7-17
EasyStaff® Application User Manual
7.4.4 Search Personnel
Perform the following steps to search for, then edit personnel:
1. Click Search People.
2. Begin typing the desired person’s name in the empty field. A drop-down list will appear
with possible matches.
3. Click on the desired person’s name to select the person.
Figure 7-17. Person Search Window
7-18
EasyStaff® Application User Manual
7.5
Edit Shifts
Shifts are scheduled periods of work (e.g. Day, Evening, 24-Hour), and each roster covers one
shift. The Edit Shifts tab allows users to edit existing shifts and to create new shifts.
Figure 7-18. Edit Shifts Tab
7-19
EasyStaff® Application User Manual
7.5.1 Edit Existing Shift
Perform the following steps to edit an existing shift:
1. Select the desired shift from the drop-down menu and click Edit.
2. The screen displays the shift name. To edit the shift name, click inside the Name field
and make changes.
3. Click Save to save changes. Refresh the web browser in order for saved changes to take
full effect.
Note: Click Deactivate to remove an existing shift, and click Cancel to clear all changes
and return to the Edit Shifts tab.
Figure 7-19. Edit Existing Shift
7-20
EasyStaff® Application User Manual
7.5.2 Create New Shift
Perform the following steps to create a new shift:
1. Click Create New Shift.
2. Complete the Name field with the name of the new shift.
3. Click Save to save the changes. A Success window appears to confirm that the
changes were saved.
Note: Click Cancel to clear all changes and return to the Edit Shifts tab.
Once created, the shift will appear in the Shifts drop-down menu located in the Reports
window and in the Quick Compliance Report window.
Figure 7-20. Create New Shift
7-21
EasyStaff® Application User Manual
7.6
Edit Status Options
The Edit Status Options tab allows administrative users to edit existing roster statuses
and to create new statuses. This allows users to differentiate between roster statuses (e.g. Draft,
Final).
Figure 7-21. Edit Status Options
7-22
EasyStaff® Application User Manual
7.6.1 Edit Existing Status
Perform the following steps to edit an existing status:
1. Select the desired status from the drop-down menu and click Edit.
2. The screen displays the status name. To edit the status name, click inside the Name field
and make changes.
3. Click Save to save changes. Refresh the web browser in order for saved changes to take
full effect.
Note: Click Deactivate to remove an existing assignment, and click Cancel to clear all
changes and return to the Status Options tab.
Figure 7-22. Edit Existing Status
7-23
EasyStaff® Application User Manual
7.6.2
1.
2.
3.
Create New Status
Click Create New Status.
Complete the Name field with the name of the new shift.
Click Save to save the changes. A Success window appears to confirm that the
changes were saved.
Note: Click Cancel to clear all changes and return to the Edit Status Options tab.
Once created, the status will appear in the menu upon roster submission and in the Quick
Compliance Report window.
Figure 7-23. Create New Status
7-24
EasyStaff® Application User Manual
7.7
Edit Users
The Edit Users tab allows administrative users to edit existing EasyStaff® users and to create
new users.
Figure 7-24. Edit Users Tab
7-25
EasyStaff® Application User Manual
7.7.1 Edit Existing User
Perform the following steps to edit an existing user:
1. Select the desired user from the drop-down menu and click Edit.
2. Modify the First Name, Last Name, Rank, Email, and Login Name fields as
needed.
3. Change the user’s password by clicking the Change Password button and completing
the Password and Enter Password Again fields that appear.
4. Check whether to give the user Assets (Loan, Return), Assets (Edit,
Add), and/or Administrator privileges. Users with Assets (Loan, Return)
privileges can loan and return assets, and users with Assets (Edit, Add) can edit,
add, loan, and return assets. Administrators can view and modify all items in the Admin
tab. Note that both Assets options must be checked in order for Administrators to view
and modify assets.
5. Click Save to save changes. A Success window appears to confirm that the changes
were saved.
Note: Click Deactivate to remove an existing assignment, and click Cancel to clear all
changes and return to the Edit Users tab.
Figure 7-25 shows User Rich in the Edit Users tab.
Figure 7-25. Edit Existing User
7-26
EasyStaff® Application User Manual
7.7.2 Create New User
Perform the following steps to create a new user:
1.
2.
3.
4.
Click Create New User.
Complete the First Name, Last Name, Rank, Email, and Login Name fields.
Complete the Password and Enter Password Again fields.
Check whether to give the user Assets (Loan, Return), Assets (Edit,
Add), and/or Administrator privileges. Users with Assets (Loan, Return)
privileges can loan and return assets, and users with Assets (Edit, Add) can edit
and add assets. Administrators can view and modify all items in the Admin tab. Note that
both Assets options must be checked in order for Administrators to view and modify
assets.
5. Click Save to save changes. A Success window appears to confirm that the user was
created.
Note: Click Cancel to clear all changes and return to the Edit Users tab.
Figure 7-26. Create New User
7-27
EasyStaff® Application User Manual
7.8
Adjust Settings
The Adjust Settings tab allows users with administrative privileges to change how roster
items are displayed and saved. This tab contains the following options:
•
•
•
•
Carry Rosters Forward?: Choose whether to automatically populate future
rosters with the previous roster’s information to save time.
How to Choose Units for Rosters?: Choose whether to use autocomplete or
a drop-down menu when selecting units for rosters.
How to Display Assets Within a Roster?: Choose whether to sort assets
by alias or by ID.
Viewing Assets in Reports?: Choose whether to view only loaded assets or all
assets in reports.
To adjust settings, select the radio button next to the desired settings and click Save. A
Success window appears to confirm that the changes were saved, and users are logged out
automatically and must log in again.
Figure 7-27. Adjust Settings
7-28
EasyStaff® Application User Manual
7.9
Upload Image
The Upload Images tab allows users with administrative privileges to upload an image for
the department. The image will appear on the EasyStaff® login screen and in the upper-right
corner.
To upload an image, click Browse to navigate to the image file, then click Ok. Note that only
.png, .jpg, and .gif files are accepted. A Success window appears to confirm that the image
was added.
To remove an image, click Remove Current Image. A Success window appears to
confirm that the image was removed.
Figure 7-28. Upload Image
7-29
EasyStaff® Application User Manual
7.10
Register APAA
The Register APAA tab allows users with Administrator privileges to generate the license
key for the APAA installation. This is necessary for installations on systems without access to
the internet. To generate the license key, complete the Hardware ID, Windows SID,
Computer Name, and optional Extra Identifier fields, then click Submit.
The license key and the number of remaining installs appears under the form (see Figure 7-30).
Click Clear to hide the license key. To retrieve a license key that has been generated already,
complete the Hardware ID, Windows SID, and Computer Name fields, then click
Submit.
Figure 7-29. Register APAA Tab
Figure 7-30. Successful APAA Registration
7-30
EasyStaff® Application User Manual
8.0 Assets
The Assets tab displays a list of all regular and spare radios and masks and their attributes.
Users with Assets (Loan, Return) and/or Assets (Edit, Add) privileges have
access to this tab and can perform the following functions:
•
Filter: Check and uncheck asset attributes to filter asset list results.
•
Refresh Asset Table: Refresh the list of assets.
•
Add Asset: Add a new asset (only available to users with Assets (Edit, Add)
privileges).
Upload Assets: Upload a list of new assets (only available to users with Assets
(Edit, Add) privileges).
•
•
Download Assets: Download a .txt file report of assets.
•
•
Edit: Edit an existing asset (only available to users with Assets (Edit, Add)
privileges).
Loan: Loan an existing asset.
•
Submit For Repairs: Submit an existing asset for repairs.
To sort assets by their attributes, click the arrows in each column header. To search for an asset
or assets, begin typing an attribute (e.g. 2306, REGULAR) in the Search field in the upperright corner.
Figure 8-1. Asset List
8-1
EasyStaff® Application User Manual
8.1
Add New Asset
Perform the following steps to add a new asset:
1.
2.
3.
4.
From the Assets tab, click Add Asset in the upper right corner.
Choose the correct type from the Asset Type drop-down menu.
Choose the correct status from the Asset Status drop-down menu.
Choose whether the asset is to be assigned to a Unit, to a Person, or to an
Unassigned Alias.
5. If the asset is to be assigned to a unit, select a unit from the Select a top-level
unit drop-down menu, then work through the drop-down menus until the desired unit is
selected. The Alias (How Asset Appears in APAA) information will be
selected automatically.
6. If the asset is to be assigned to a person, begin typing the person’s name into the Please
Select a Person field and click the desired person’s name.
7. If desired, click Custom Alias, click Yes in the pop-up window that appears, and
complete the Alias (How Asset Appears in APAA) field.
8. If the asset is to be given an unassigned alias, complete the Alias (How Asset
Appears in APAA) field.
9. Click Submit. A Success window appears to confirm that the asset was added.
Note: Click Cancel to clear all changes and return to the Assets tab.
Figure 8-2. Add New Asset
8-2
EasyStaff® Application User Manual
8.2
Upload Assets
Multiple assets can be created at once to save time. Perform the following steps to upload
multiple assets:
1. From the Assets tab, click Upload Assets in the upper right corner.
2. Create a .csv file with the asset Type, ID Number, Alias, and Status organized
into four columns as described in Figure 8-3.
3. Click Browse and select the correct .csv file. Refer to Figure 8-4 for a sample correctly
formatted .csv file.
4. Click Upload to upload the assets. A Success window appears to confirm that the
assets were created.
Note: If the .csv file was formatted incorrectly, an Error window appears (refer to Figure 8-5).
Note: Click Cancel to return to the Assets tab.
Figure 8-3 shows an example of using a .csv file to upload multiple assets at once.
Figure 8-4 shows a properly arranged .csv file with asset information.
Figure 8-3. Upload Assets
Figure 8-4. Upload Assets .csv File Format
8-3
EasyStaff® Application User Manual
Figure 8-5. Upload Assets Error
8-4
EasyStaff® Application User Manual
8.3
Edit Existing Asset
Perform the following steps to edit an existing asset:
1.
2.
3.
4.
5.
From the Assets tab, click Edit next to the desired asset.
Modify the Asset Number field as needed.
Choose the correct type from the Asset Type drop-down menu.
Choose the correct status from the Asset Status drop-down menu.
Choose whether the asset is to be assigned to a Unit, to a Person, or to an
Unassigned Alias.
6. If the asset is to be assigned to a unit, select a unit from the Select a top-level
unit drop-down menu, then work through the drop-down menus until the desired unit is
selected. The Alias (How Asset Appears in APAA) information will be
selected automatically.
7. If the asset is to be assigned to a person, begin typing the person’s name into the Please
Select a Person field and click the desired person’s name.
8. If desired, click Custom Alias, click Yes in the pop-up window that appears, and
complete the Alias (How Asset Appears in APAA) field.
9. If the asset is to be given an unassigned alias, complete the Alias (How Asset
Appears in APAA) field.
10. Click Submit. A Success window appears to confirm that the asset was edited.
Note: Click Cancel to clear all changes and return to the Assets tab.
Figure 8-6. Edit an Asset
8-5
EasyStaff® Application User Manual
8.4
Loan Asset
Perform the following steps to loan an asset:
1. From the Assets tab, click Loan next to the desired asset.
2. Choose whether the asset is to be loaned to a Unit, to a Person, or to an
Unassigned Alias.
3. If the asset is to be loaned to a unit, select a unit from the Select a top-level
unit drop-down menu, then work through the drop-down menus until the desired unit is
selected. The Alias (How Asset Appears in APAA) information will be
selected automatically.
4. If the asset is to be loaned to a person, begin typing the person’s name into the Please
Select a Person field and click the desired person’s name.
5. If desired, click Custom Alias, click Yes in the pop-up window that appears, and
complete the Alias (How Asset Appears in APAA) field.
6. If the asset is to be given an unassigned alias, complete the Alias (How Asset
Appears in APAA) field.
7. Click Submit. A Success window appears to confirm that the asset was loaned.
Note: Click Cancel to clear all changes and return to the Assets tab.
Figure 8-7. Loan Asset
8-6
EasyStaff® Application User Manual
8.5
Submit Asset for Repairs
Perform the following steps to submit an asset for repairs:
1. From the Assets tab, click Submit for Repairs next to the desired asset.
2. Click Yes in the Confirm Deactivation Window. A Success window appears
to confirm that the asset was deactivated.
Figure 8-8. Confirm Deactivation
8-7
EasyStaff® Application User Manual
8.6
Mark Asset as Repaired
Perform the following steps to mark an asset as repaired:
1. From the Assets tab, click Mark As Repaired next to the desired asset.
2. Click Yes in the Mark As Repaired. A Success window appears to confirm that
the asset was deactivated.
Figure 8-9. Mark As Repaired
8-8