1
Administrator and User Manual
© 2009 Interverbum Technology AB
2 (36)
Administrator and User Manual
TermWeb® Professional Version 3.5
General information ______________________________________________ 4
Log in __________________________________________________________ 4
Overview _______________________________________________________ 1
Set the source language, target language and how much you want to view in
the result pane___________________________________________________ 5
Search for a term_________________________________________________ 5
Advanced search _________________________________________________ 6
Fuzzy searches - searching for approximate strings__________________________________ 6
Search in multiple fields __________________________________________________ 6
Use filters to search and export _____________________________________ 7
Temporary and saved filters ________________________________________________ 7
Example: ____________________________________________________________ 8
Enter a new term record
_______________________________________ 10
Enter a new term record based on an existing term record
Change a term record
____________ 10
_________________________________________ 11
Add a term to an existing term record_________________________________________ 11
To undo changes in a term record ___________________________________________ 11
Add cross-references, pictures and other objects to term records__________ 13
Show a picture that is associated with a term record ___________________ 14
Creating and displaying relations ___________________________________ 15
Printing term data
____________________________________________ 16
Check the history of a term record __________________________________ 17
What is a dictionary? ____________________________________________ 18
What is a section? _______________________________________________ 18
Show a particular domain or subdomain _____________________________ 18
Move a term record ______________________________________________ 19
Remove a term record
_________________________________________ 19
Remove a term__________________________________________________ 19
Import and export term data_______________________________________ 20
Send feedback
_______________________________________________ 20
© 2009 Interverbum Technology AB
Admin_and_User_Manual_TWPro_V3.5_R1A_EN_UTAN_REVMéRKEN.rtf
3 (36)
Log out________________________________________________________ 20
Administration
(for administrators only) __________________________ 21
New Dictionary Wizard: Add a new dictionary_________________________ 22
Dictionaries: Edit/delete dictionary, export/import dictionary definitions ___ 22
Export a dictionary definition ______________________________________________ 23
Import a dictionary definition ______________________________________________ 23
Sections: Working with sections____________________________________ 23
History: Show changes in the structure of a dictionary and undo changes __ 23
Edit Domains: Add, edit and delete domains and subdomains_____________ 25
Subclasses: Create subclasses of term records _________________________ 26
Edit Views: Add, change, and delete views for a specific dictionary. _______ 26
Import: To import term data
___________________________________ 27
Export: To export term data
____________________________________ 29
Groups: Add, modify or delete groups _______________________________ 30
Add a group _________________________________________________________ 30
Change information about a group ___________________________________________ 30
Remove a group_______________________________________________________ 30
Guest Account: Activate/deactivate and change information about guest users
______________________________________________________________ 30
Users: Add, edit, deactivate/activate or delete a user ___________________ 32
Add a user __________________________________________________________ 32
Change information about a user ____________________________________________ 32
Remove a user ________________________________________________________ 32
Group Members: Indicate which user is a member of a particular group and to
which groups a particular user belongs ______________________________ 33
Access Editor: Set the user group access to dictionaries and sections ______ 33
Example of procedures for authority settings ____________________________________ 33
Change Password: Change your password ____________________________ 35
Administrator Tools: Reindex a dictionary ____________________________ 35
Usage Statistics _________________________________________________ 35
Dictionary _____________________________________________________ 36
Index _________________________________________________________ 36
© 2009 Interverbum Technology AB
Admin_and_User_Manual_TWPro_V3.5_R1A_EN_UTAN_REVMéRKEN.rtf
4 (36)
General information
The following description covers all the functions available in Term Web Professional V3.
The functions to which you have access, i.e. certain dictionaries and their sections, are associated
with your user group and authorization.
Log in
Enter your company name (Client) if it has not been automatically entered, your User name and
Password issued by the administrator and then click Log in.
If you are already logged in but want to log in using a different authorization, log off (click Log
out in the top right-hand side of the window), enter the new User name and Password issued by
the administrator and click Log in.
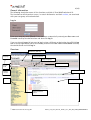
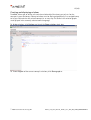
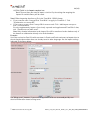
Overview
Dictionary selector
Source
language
Section selector
Target language
Toolbar
Search
field
Cross-reference
Domain
selector
Term list
Result pane
Advanced Search
button
© 2009 Interverbum Technology AB
Admin_and_User_Manual_TWPro_V3.5_R1A_EN_UTAN_REVMéRKEN.rtf
5 (36)
Set the source language, target language and how much you want to view in
the result pane
If you want to find a term in a language other than the current source language, then select the
desired source language from the droplist in the Source field.
You can also limit your search to one target language.
Click the box beside Target above the result pane and choose the desired target language.
If you would like all languages to be displayed, choose All languages in the Target box.
To specify how much term information is shown for each language in the dictionary:
Click on Custom view and choose which languages should be shown along with the level of
detail you want for each language (e.g. the term only or all term information).
Then choose Custom from the Target droplist.
If you would like to display the term’s history (information about when and by whom the term
record was created and changed), click Settings and check the Show history box. De-select the
Show history check box when you want to hide the information.
Note!
The administrator can also specify which fields are displayed for each user, e.g. which level of
information is shown. A single term record can be displayed differently depending on which user
is logged in.
Search for a term
You may want to choose the dictionary first. See What is a dictionary?.
If you want to limit the search to certain sections in the dictionary, begin by choosing the
desired sections. See the section What is a section?.
Select the language of the term you want to find.
If you want to search for a term in Spanish, for example, then select Spanish from the Source
droplist.
Then type the search string in the Search field.
If you want to limit the search to a certain domain or subdomain, click Domain search under
the search field and select the domain(s). See also the section entitled Show a particular domain
or subdomain.
Example 1: Type dog* and click Search. A list of all the terms beginning with “dog” will be
shown.
Example 2: Type *dog* and click Search. A list of all the terms that contain the text string “dog",
e.g. 'dog', 'army dog training centre' and 'watchdog' will be shown.
Example 3: Type dog and click Search. A list including the term “dog" and adjacent terms will
be shown.
Click the term you want to see.
If more than two languages are displayed and you want to see all the information in a
particular language for a given term, click the term in the desired language. The term and all of
its detailed information will be shown in the result pane.
(See also information for customizing the display under “Set source language, target language
and level of detail for the result pane” above.)
© 2009 Interverbum Technology AB
Admin_and_User_Manual_TWPro_V3.5_R1A_EN_UTAN_REVMéRKEN.rtf
6 (36)
Advanced search
If you are not sure of the spelling or wish to search the term in fields other than the term field
then you can use the Advanced search options. When doing an advanced search, do not use
asterisks (unless the text you are looking for includes asterisks).
Fuzzy searches - searching for approximate strings
If you are unsure of the exact spelling of the term:
1. Click on the advanced search button ( ).
2. Check the box Enable fuzzy search and then click Apply.
.
3. The button for advanced searches changes color:
4. Write the term “plattform" or a part of the term (without asterisks) in the search field, with
Italian as the source language. The terms that approximately match the search string will be
shown, e.g. piattaforma.
Search in multiple fields
If you want to search for a particular string that might be found not only in a term but even in
a definition or comment:
1. Click on the advanced search button ( ).
2. Check the box Enable multi-field search. Check then the Selected fields box and choose the
fields that you want to search. Click Apply.
© 2009 Interverbum Technology AB
Admin_and_User_Manual_TWPro_V3.5_R1A_EN_UTAN_REVMéRKEN.rtf
7 (36)
3. Type the search string (without asterisks) in the search field. All the term records are then
shown where some part of the chosen fields (on the concept level as well as the source
language) includes the search string. Note that the advanced search arrow changes color
when the multi-field search option is activated.
Use filters to search and export
If you want to search for term records or term equivalents that fulfill specific criteria, e.g. all
term records that do not have a definition, all term records that do not have a term equivalent
in a certain language or term equivalents with a certain status, you can use the filter function.
Note! A filter limits the search to the selected dictionary. A filter can be defined to be private
(only accessible for the creator) by setting its visibility to Owner or accessible for a certain
group selected in the Visibilty droplist, or to all users, if Default group is selected in the Visibilty
droplist. However, only the owner of the filter, or an administrator, can edit or delete a filter.
If an administrator is unable to delete a filter, it is because it is in use (in an export setting or as
a standard filter for a group).
You can use several combinations of conditions in the filter.
You can create a set of filters for a certain dictionary and then select them from the Filter
droplist or by clicking the Filters icon and then > Apply filter. Note that the term list gets a
yellow background to signal that a filter is applied. Filters can also be applied to term export by
clicking on the Admin icon and then on the Export icon. The filter is then chosen under Export
settings in the Select concepts by filter field.
The conditions for the field contents can be set as follows:
a) fields that contain an exact string (typed after “EQUALS” or, if you do not enter a search
string, empty fields)
b) fields that contain the string and additional contents (typed after “CONTAINS”)
c) fields that do not contain the string (typed after “NOT CONTAINS”)
d) fields that are not equivalent to a specific string (typed after “NOT EQUALS” or, if you do not
enter a search string, fields that contain something; i.e. “not equal to nothing")
e) fields that start with a certain string (typed after STARTS WITH)
f) for certain fields: that fulfill a specific time value, e.g. that were changed before (BEFORE) or
after (AFTER) a specific point in time (date and time) or on a specific date (EQUALS), or outside
of a specific date (NOT EQUALS)
g) for numeric fields: where the field value EQUALS, NOT EQUALS, is LESS THAN or GREATER
THAN a typed-in integer value
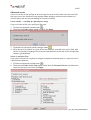
Temporary and saved filters
You can create a temporary filter. (If you want to reuse it you can save it later.)
To create a temporary filter:
1. Click
beside the Search button.
© 2009 Interverbum Technology AB
Admin_and_User_Manual_TWPro_V3.5_R1A_EN_UTAN_REVMéRKEN.rtf
8 (36)
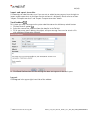
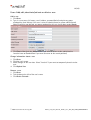
2. Enter filter criteria in the dialog box.
For example:
3. Click Apply.
Only the term records that fulfill the criteria you have entered are shown.
In the example, only those term records are shown that have at least one term (in any
language) that contains the string "frequenc".
The temporary filter is applied to the current dictionary until you create a new temporary
filter for any dictionary.
4. If you want to deactivate the filter, select <No filter> in the Filter droplist box in the upper
left-hand column:
5. If you want to edit or save the filter, click the filters icon
again.
If you want to create and save a filter or edit an existing filter, use the
example below.
button. See the
Example:
You can filter term records on the basis of the concept level fields that apply to the term record
or to the fields that belong to the terms of a certain language (under Term level).
Note! Use only search strings in the field, not wildcard characters.
All filters are private, i.e. connected to a specific user name. Filters that have been created by the
administrator can, however, be used by other users.
Note: All the examples below are taken from the TechniTerm glossary.
Example: To find all the term records with definitions containing the text string phase shift:
1.
2.
3.
4.
Click the Filters icon
.
Click Add new filter>>.
Name the filter. Note! A filter name may not be more than 25 characters.
Indicate whether the filter should be available to yourself only or to all users within a
specific user group in the Visibility field.
© 2009 Interverbum Technology AB
Admin_and_User_Manual_TWPro_V3.5_R1A_EN_UTAN_REVMéRKEN.rtf
9 (36)
5. Replace the text <Select field> with the name of the field, for example Definition. Select
CONTAINS in the box beside it and fill in the search string, e.g. phase shift.
Click Save and then Apply by the filter’s name if you want to use the new filter immediately.
(If the filter is already selected when editing in the future, simply click Close.)
All the term records with definitions containing phase shift will be shown.
6. Click the term you want to see.
Example 2: To find all the term records with phase shift in their definition and key in any of the
English terms:
.
Click the Filters icon
Click Add new filter>>.
Name the filter.
Select a field from the Filter criteria droplist <Select field> such as Definition (make sure
that CONTAINS is selected in the box to the right of Definition), and fill in a search string in
the box that appears to the right of CONTAINS, e.g. phase shift.
Select AND in the droplist below Definition (instead of <No operator>).
Choose Term and EXISTS on the next line.
On the line, under Term Criteria, choose Term and CONTAINS and write key in the field to
the right of CONTAINS.
Choose AND in the droplist (instead of <No operator>).
Choose Language, EQUALS and English on the next line.
Click Save and then Apply by the filter’s name if you want to use the new filter immediately.
5. Click the term you want to see.
1.
2.
3.
4.
Note! 1:
If you want to deactivate the filter, select <No filter> in the Filter droplist in the
left-hand column.
Note! 2:
If you want to use a previously defined filter, then select the filter shown in this
Filter droplist:
Example 3: Find all the term records that have a definition and a term with Usage USA:
1.
2.
3.
4.
Click the Filters icon
.
Click Add new filter>>.
Name the filter.
Replace the text <Select field> in the droplist with Definition.
Make sure that NOT EQUALS appears in the box to the right.
Do not fill in anything in the box that appeared to the right of the NOT EQUALS field.
Then choose AND from the droplist (instead of <No operator>).
Choose Term and EXISTS on the next line.
On the line under Term Criteria, choose Usage and EQUALS and select USA from the droplist
to the right of EQUALS.
Click Save and then Apply by the filter’s name if you want to use the new filter immediately.
5. Click the term you want to see.
© 2009 Interverbum Technology AB
Admin_and_User_Manual_TWPro_V3.5_R1A_EN_UTAN_REVMéRKEN.rtf
10 (36)
Enter a new term record
1. Check first to make sure that the term, with the same or a similar definition, does not
already exist in a dictionary.
See Search for a term above.
Please note that while editing you can “restore” and return to the previous page by pressing
Alt+X, by clicking Cancel at the bottom of the windowpane, or by clicking on the red x icon
in the upper right-hand corner of the windowpane.
2. Click the New icon
.
3. Press Alt+O or click Edit concept level fields.... Enter the information you have for the
concept level fields, e.g. enter the term’s definition and specify the domain and subdomain.
For more information about domains, see the section Show a particular domain or
subdomain.)
In order to show as much of the domain selection frame as possible, you can switch to full
screen view (F11 in Internet Explorer). Specify the term record subdomain(s) by clicking
Select domains and then the plus sign beside the desired domain and subdomain.
Here you can also choose the section in which the term record will be placed.
Then press Alt+S or click on Save.
4. Press Alt+A or click on Add term..., choose the language and fill in the term along with the
information for the chosen language. Then press Alt+S or click on the green tick icon
the upper right-hand corner or click on Save at the bottom of the page.
5. If you want to enter a term in another language, click either
in
Add term...
(Alt+A) or Copy term...
(Alt+C)is used to select the new language
and enter the term as instructed in the previous step.
6. Press Alt+S or click Save when you have finished updating the term record.
If you want to create another term record, press Alt+N or click Save & New.
If you want to create another term record based on the current entry, click
Save & Duplicate (Alt+D). In the latter case, all information will be duplicated, including
the information about the domain(s) and section.
Enter a new term record based on an existing term record
1. Check first to make sure that the term, with the same or a similar definition, does not
already exist in a dictionary.
See Search for a term above.
2. Click on a term from the term list that you would like to use as a template.
3. Click on the Copy icon
.
4. Continue from step 3 Change a term record below.
© 2009 Interverbum Technology AB
Admin_and_User_Manual_TWPro_V3.5_R1A_EN_UTAN_REVMéRKEN.rtf
11 (36)
Change a term record
You can easily change or modify a term record, including the information in the concept level
fields and the information about term equivalents in each language.
For example, if you want to change the information about a German term equivalent:
1. Show the term record. Click on the term in the list in the left-hand column to make the
contents of the term record visible in the result pane to the right.
2.
3.
4.
5.
6.
7.
8.
9.
Click the Edit icon
.
Click the German term (if German has not already been set as the source language).
Click Edit term (Alt+E).
Change or add the desired information in the fields shown.
If you want to copy a certain field value, e.g. “Source” or “Part of speech” to all terms (in all
languages) in the concept, select or type a field value and click the icon to the right of
the field and confirm the operation. The field value will the be copied to the field in all
terms in the concept, replacing any previous content of the field.
Click the green tick mark at the upper right-hand side of the term field box or click Save.
If you want to change a term equivalent in another language:
Click the term in that language.
Click Edit term (Alt+E).
Change the information and then press Alt+S or click on the green tick at the upper righthand side of the window or click Save.
If you want to change the information in the concept level fields, press Alt+O or click Edit
concept level fields..., change the information and then press Alt+S or click Save.
Press Alt+S or Save in the button field at the bottom of the window when you have finished
updating the term record.
Add a term to an existing term record
You can add a new term equivalent in another language to an existing term record.
If you wish to add a Portuguese term equivalent, for example, do the following:
1. Show the term record. Click on the term from the list so the content of the term record will
be visible in the result pane.
2. Click the Edit icon
.
3. Press Alt+A or click on Add term....
4. Add the additional information about the Portuguese term.
(Scroll down if necessary.)
Write the Portuguese term in the “Term" field and change “Language" if necessary, to
Portuguese.
5. Then press Alt+S or click on the green tick in the upper right-hand corner or click on Save.
6. Press Alt+S or Save in the button field at the bottom of the window when you have finished
updating the term record.
To undo changes in a term record
If you want to undo changes that you have made in a term record, click Settings, select the
Show history check box and then click on the restore arrow under Restore beside the earlier
version of the term record which you want to restore.
The system administrator and administrators can also cancel other users’ changes by restoring
previous records.
Notes!
It is not possible to undo a change made using the Restore function described above.
© 2009 Interverbum Technology AB
Admin_and_User_Manual_TWPro_V3.5_R1A_EN_UTAN_REVMéRKEN.rtf
12 (36)
Furthermore, changes in concept relations and attached objects (including thumbnails) are not
registrered in the history and thus cannot be undone.
© 2009 Interverbum Technology AB
Admin_and_User_Manual_TWPro_V3.5_R1A_EN_UTAN_REVMéRKEN.rtf
13 (36)
Add cross-references, pictures and other objects to term records
You can easily add a cross-reference from one of the fields in the term record (excluding the
term name field or fields that may only have numeric contents) to either a specific term record
or to a term in a specific language.
Right click on the field that you want to add a cross-reference to and choose Add Internal Link.
For example, type See also shaft, highlight the word shaft, right click and choose Add Internal
Link.
A search box is then opened and you can search for desired terms or term records in any
language.
(Note! This applies to the sections in the dictionary that you have chosen to display!)
Search for the entry with the English term shaft and click on the desired term.
Then choose if you want to create a link to the term record (concept) with the word shaft or the
actual word (term) itself ("Link is referring to" is linked to Concept or Term) and click Save. In the
case of the former (link to Concept), the term record is shown with the terms in the database’s
order of languages. In the case of the latter (link to Term), the chosen term is shown first.
Note! When making changes, the link is shown in double angle brackets, e.g. «link word». If you
later want to change the link, select the link word including the angle brackets, right click and
choose Edit link.
Note! Links should normally not be created for terms that are not approved. (Term records or
terms should be marked with a status “Approved" or “Correct" if the dictionary offers a status
option.)
If you want to add a link to an explanatory PDF image (or a GIF or JPG image) of a term
record, then save the picture in a picture archive, right click on the link text as in the
instructions above, choose Add External Link and copy to or type a link in the URL field. Finish
by clicking Save.
The link should be typed as a normal web link:
http://www.my_terminology.com/graphics/figure.pdf.
You can also add a link to a website in the same way:
http://www.website.se
If you place all objects to be linked (picture, sound, video clip files etc.) in the TermWeb File
repository, you can then easily create a link to each object by double-clicking the object and
then clicking Save.
To open the File repository, if not displayed: Click File Repository>>.
To search for an object: Enter any text string contained in the object’s file name and click
Search.
To prepare for this; to add files to the file repository, select Admin View > File Repository, click
Add file, browse to and select the desired file and, optionally, add a description of the file. Then
click Create file.
To view (or play) the file, click View file.
It is also possible to upload files in batch to and download files in batch from the file
repository:
To upload files in batch to the file repository, click Import files from a zip file, browse to and
select the ZIP file containing the objects, and then click Import. The ZIP file will be
automatically uploaded and the objects unpacked into the file repository.
To download files in batch from the file repository to a ZIP file, click Export all files in
repository to zip file. You will then be able to save the ZIP file in a selectable directory in your
computer or network.
© 2009 Interverbum Technology AB
Admin_and_User_Manual_TWPro_V3.5_R1A_EN_UTAN_REVMéRKEN.rtf
14 (36)
If you wish to attach a document to the TermWeb concept (to display an image or another
binary object, e.g. a PDF file), write any text that is to be shown before the object symbol (or
illustration thumbnail), click Add Attachment, indicate the text that is to be shown when
someone points to the object symbol in the field Display name and browse to the field or copy
the link to the file that you want to read into the database to the File to attach field.
In this case the object is saved in the internal TermWeb database.
Example of object symbols: ,
To remove a file that has been attached according to the instructions above, do as follows:
1. Edit the term record and right click on the image field in question.
2. Choose Edit Attachments.
3. Click Delete on the line of the file in question and confirm.
4. Save the field in question and the term record (press Ctrl+S twice).
If you want to replace a file that was attached according to the instructions above or add an
informative text to be shown when you point to the object symbol:
1. Edit the term record and right click on the image field in question.
2. Choose Edit Attachments.
3. Click Edit on the line of the file in question.
4. Indicate any “display text" for the file (the object) in the Display name field and/or new
object in the field Replace with file.
5. Click Save.
6. Save the field in question and the term record (press Ctrl+S twice).
Show a picture that is associated with a term record
Some term records include links to web sites, explanatory images or other multimedia objects. In
these cases a link with a different color or possibly text with a small image symbol is visible in
the relevant field.
When you click on one of the latter, the picture will be shown in a new window.
Close the window with the picture by clicking the 'x' in the upper right-hand corner (or on the
Close tab symbol or corresponding for tabbed browsing).
Alternatively to symbols, thumbnails can be displayed (for attached jpg and gif illustrations):
To show illustration thumbnails:
Click Settings and check the Show thumbnails box.
To hide illustration thumbnails and show object symbols only:
Click Settings and de-select the Show thumbnails check box.
© 2009 Interverbum Technology AB
Admin_and_User_Manual_TWPro_V3.5_R1A_EN_UTAN_REVMéRKEN.rtf
15 (36)
Creating and displaying relations
TermWeb allows you to define, edit and view relationships like subset, part-of, etc. for the
concepts in your dictionary. Concept relations are also displayed graphically in a navigable map
to let you find and view the related concepts in an easy way. The terms in the relation graphs
are displayed in the currently selected source language.
To display relations, click Settings and check the Show relations check box.
To view a diagram of the current concept’s relations, click Show graph ».
© 2009 Interverbum Technology AB
Admin_and_User_Manual_TWPro_V3.5_R1A_EN_UTAN_REVMéRKEN.rtf
16 (36)
Here, click View concept to go back to normal view.
You define and delete relations under Add/Edit > Edit concept level fields
If you click Add relation, a list of terms is displayed. Find and select the term you want to create
a relation to. Then define which relation the selected term has to the concept you started out
working with.
An example: If you start out working with the concept chassis, click Add relation, find the car
concept and define the relation as Partitive and Superordinate, as car is superordinate to
chassis.
Printing term data
To print a selected subset of term data, either to a PDF file or to a printer, proceed as follows:
1. Display the selected list of terms, using search criteria, filters etc.
2. In the Search view, click the Print Icon.
3. Now you can select whether to print only the concept currently displayed in the result
window, or all concepts in the term list. Also, you can select to print to your standard printer
(via html) or to a PDF file.
In case you select normal (html) printout with the Print only the selected concept or Print
all concepts in the current list radio button, you can choose to save the html file for later
use.
Furthermore, you can choose to add a list of contained concept ID numbers at the top of the
printout by selecting Create a table of contents.
Please note that the fields appearing in the printout depend on the view used for your user
group.
© 2009 Interverbum Technology AB
Admin_and_User_Manual_TWPro_V3.5_R1A_EN_UTAN_REVMéRKEN.rtf
17 (36)
Check the history of a term record
To show a list of all the important changes made to a term record:
4. Show the term record. Click on the term from the list so the content of the term record is
visible in the result pane.
5. Click Settings and select the Show history box. An overview of changes made to the term
record will appear.
Click the link text under Action, e.g. "The concept was changed" if you want to see more
information about the change.
6. De-select Show history when you want to hide the information.
See also Undo changes in a term record.
© 2009 Interverbum Technology AB
Admin_and_User_Manual_TWPro_V3.5_R1A_EN_UTAN_REVMéRKEN.rtf
18 (36)
What is a dictionary?
A dictionary is a major part of the database of a given structure, e.g. a limited number of
languages and fields.
The fields may be valid for the entire term record (concept level fields), e.g. a definition. They
may also be valid only or for a term in a particular language (term fields), e.g. grammar or
source of a translation of a term in a particular language (a term equivalent).
The administrator defines dictionaries. You specify which dictionary will be shown by clicking
the scroll arrow beside the Dictionary droplist and choosing the dictionary from the list. The list
of terms in the chosen source language is then updated.
What is a section?
A dictionary can contain a number of sections with various types of terms and phrases. For
instance, there might be a section with terms that are still being worked on, one with
abbreviations and acronyms, and one with approved terms that are standard in various
languages.
If you click on All sections, you will see all of the dictionaries and sections that are available to
you.
You can choose to show terms from one or more of the sections:
1. Click to the right of the text “Section:”. Usually the text “All sections ()" is shown here.
2. A list of available sections appears in a box in the result pane. Select the section that you
want to search. Hold Ctrl and select other sections that you want to search.
3. Click Select. (Note that the term list gets a yellow background to signal that only terms from
a subset of the available sections are displayed.) When you then click to the right of the text
“Section:" the names of the sections (e.g. glossaries) which you have selected appear in the
Select sections for searching box in the result pane.
If you want to show terms from all the sections in a dictionary:
1. Click to the right of the text “Section:".
2. Click the words “Select all" in the Select sections for searching box.
3. Click the Select button below the listed sections.
Show a particular domain or subdomain
The terms in a dictionary and its sections can be classified according to their subject areas, i.e.
domains, such as DATA PROCESSING or BUSINESS & ADMINIST.
If you want to only show terms from a single domain or subdomain:
1. Tick the Domain search box.
In order to show as much of the domain selection frame as possible, you can switch to full
screen view (F11 in Internet Explorer).
2. Select the desired domain(s). If you select a domain, its subdomains are also selected
automatically. To select or remove subdomains, first click the plus sign to the left of the
main domain selected and then the subdomain(s)which you want to select.
Click OK at the bottom of the result pane when you are finished.
3. Only terms from the selected domains/subdomains will be visible in the chosen source
language.
You can see which domains and subdomains you have chosen in when you point to the heading
[n] selected domains [change] at the top of the result pane.
© 2009 Interverbum Technology AB
Admin_and_User_Manual_TWPro_V3.5_R1A_EN_UTAN_REVMéRKEN.rtf
19 (36)
Move a term record
To move a term record:
1. Show the term record. Click on the term from the list so the content of the term record is
visible in the result pane.
2. Click the Edit icon
.
3. Press Alt+O or click on Edit concept level fields....
4. Choose a different section from Section box and press Alt+S or click Save at the bottom of
the window when you are finished.
5. Save the term record by clicking Save.
Remove a term record
To remove an entire term record (e.g. a duplicate entry):
(You can also remove a term record by moving it to a section for removed records by following
the instructions under “Move a term record".)
1. Show the term record. Click the term on the list so the content of the term record is visible in
the result pane.
2. Click the Delete icon
.
3. Confirm that you wish to remove a term record by clicking Delete in the text box shown. The
term list is updated.
Remove a term
You can remove a term equivalent from a term record as follows:
1. Show the term record. Click on the term in the list to the left so that the content of the term
record is visible in the result pane.
2. Click the Edit icon
.
3. Click once on the term you want to remove so that it is appears at the top of the result
pane.
4. Click Delete term
to confirm that you want to delete the term.
(If you change your mind, press Alt+X or click Cancel in the button field at the bottom of
the window. You can also later use the Restore function in Show history.)
5. Press Alt+S or click Save in the button field at the bottom of the window when you have
finished updating the term record.
The term list is updated.
© 2009 Interverbum Technology AB
Admin_and_User_Manual_TWPro_V3.5_R1A_EN_UTAN_REVMéRKEN.rtf
20 (36)
Import and export term data
If allowed by the administrator, even if you are not an administrator, you may have the right to
import and/or export data to and from certain sections of a dictionary. Please refer to sections
“Import: To import term data” and “Export: To export term data” below.
Send feedback
This is how you send a message to the system administrator or the dictionary administrator:
.
1. Click on the mail symbol
2. Select the name of the addressee from the droplist in the To field.
3. Fill in your name, email address, the subject and your message. You can also attach a file
with additional information. (Attach).
4. Click Send. Confirmation that the message has been sent appears in the result pane.
Log out
Click Log out in the upper right-hand side of the window.
© 2009 Interverbum Technology AB
Admin_and_User_Manual_TWPro_V3.5_R1A_EN_UTAN_REVMéRKEN.rtf
21 (36)
Administration
(for administrators only)
If you click on the Admin icon in the search mode (with search field, term list and result pane
visible) the following function icons will appear:
New Dictionary Wizard: Create/add a new dictionary
Dictionaries: Modify or remove a dictionary, export and create a new dictionary by
importing a dictionary definition.
Sections: Add, rename and delete sections
History: View changes in
the overall structure and content of a dictionary and
“undo” the ones you do not want. If you want to “undo” changes (i.e. restore previous
data)for a specific term, go to Search View > Settings > Show history.
Edit domains: Add, edit and delete domains and subdomains
Subclasses: Add, edit and delete subclasses (groups of term records that can be located
in different sections and are viewed in a certain way by all users, except administrators.)
Edit Views: Add, change and remove views for a specific dictionary. Different views, such
as differences in the information that is visible, can be selected for different user groups.
Different views can be used, for example, to hide fields with exclusively administrative
information from most users, except terminologists and administrators.
Import: Import data with variable formats into TermWeb 3
Export: Export a complete dictionary or a (filtered) part of a dictionary
Users: Add, modify, deactivate/activate or delete a user
Guest Account: Activate/deactivate a guest account (for several simultaneous users
without personal user names). Indicate automatic login or normal login to be associated
with a user name and password.
Groups: Add, modify and delete groups (with any filters and views)
Group Members: Assign the user to one or more groups.
Access Editor: Select the level of user group(s’) access to various dictionaries and
sections
File Repository: Work with objects like pictures, sound files, etc. in the internal TermWeb
file repository, import and export objects in batch
Change Password: Change your own password
Statistics: View usage statistics for the installation, listed per client, user etc.
Administrator Tools: Reindex dictionaries to speed up access
Clients (can only be used by the system administrator): Add, modify or delete clients
Specify a maximum number of user accounts and/or a maximum number of individuals
who can be logged in at the same time for each client.
Note!
As an administrator you can always return to the window with the administrator
function icons by clicking Admin View in the upper left.
You can always return to search view by clicking Search View in the bar to the left of
Admin View.
© 2009 Interverbum Technology AB
Admin_and_User_Manual_TWPro_V3.5_R1A_EN_UTAN_REVMéRKEN.rtf
22 (36)
New Dictionary Wizard: Add a new dictionary
Note that a section with the same name as the dictionary is always created as a dictionary is
created.
Note also that authority to a dictionary and its sections is always initially set as Undefined. You
need to define the Users and User groups and their authority if you want to limit access to a
dictionary.
Dictionaries: Edit/delete dictionary, export/import dictionary definitions
You can rename a dictionary as well as the language, concept and term level fields by clicking
the dictionary name. Here, you can also define at which place the dictionary should be placed in
the list of dictionaries (dictionary selector etc.). Type the desired order number in the Sort index
field. Note that this has to be done starting at number 1, and preferably for all dictionaries in
the database.
Field types:
You can create single-line and multi-line text fields, incremental fields (the value of which is
automatically recalculated for each new term record) and a picklist.
Character encoding, mandatory fields and min/max no. of characters allowed:
You can also indicate how character encoding of data, whether or not fields are mandatory,
and the kind of data permitted in the field (see below) as well as the min./max number of
characters allowed.
If Unicode is selected for a field, then it is possible to write or copy in characters other than the
Latin as well special characters, such as a dash. Note that the term field (in all languages) is
specified as Unicode.
Mandatory fields are indicated by an asterisk. If you try to save a term record without filling in
an obligatory field, an error message will appear and/or the field will be indicated with a
colored background.
Data type (Allowed value):
In addition you can indicate what kind of data is allowed in the field, i.e. any text, integer
number (without a decimal or comma to indicate thousands, max 9 characters), or data that
corresponds with a regular expression. An example of the latter is the simplest form of syntax
control of the date, i.e. 20YY-MM-DD:
20\d{2}(-)((0[1-9])|(1[0-2]))(-)((0[1-9])|([1-2][0-9])|(3[0-1]))
If you want to add your own definition of a field on the concept level, with a limited number of
possible values, do as follows:
1. Click the dictionary’s name.
2. Click Add... in Concept Level Fields.
3. Select New custom field and then click Continue.
4. Enter the field name.
5. Specify the type of field in Field type (Picklist).
Note! A single-line field can theoretically contain a maximum of 16,383 characters, but
as the name indicates it is intended for less information, e.g. a maximum of about 70
characters which can be shown on one line in the result pane without scrolling sideways.
A multi-line field can contain a maximum of 16,383 characters, if not otherwise
specified under Data length limit.
6. Select Latin-1 in Encoding if the field only will include Latin characters.
7. Select Value is required if the field must be given a value when a term record is created.
8. Click Add... beside the box for "Picklist items".
9. Enter one of the fixed values in the typing field and click Save beside the typing field.
10. Repeat step 9 for other possible values.
Note that the value you write in first will be shown at the top of the list.
If necessary you can move the various values up or down in the list.
© 2009 Interverbum Technology AB
Admin_and_User_Manual_TWPro_V3.5_R1A_EN_UTAN_REVMéRKEN.rtf
23 (36)
If the field is defined as mandatory, then the upper value of the list will be filled in
automatically when someone creates a new term record.
11. Click Save at the bottom of the box.
12. Click Save Changes if you do not want to add or change more fields.
Note! Initial zeros in numerical fields are automatically truncated when the term record is
saved.
Export a dictionary definition
This is how to create a file with a certain dictionary structure (fields and sections):
1. Click Dictionaries.
2. Click Export beside the dictionary from which you want to export the definition.
(If you want to export the dictionary definition to MultiTerm XDT format, click Export
XDT file beside the dictionary from which you want to export the definition.)
3. Save the resulting XML file in an appropriate location and with an appropriate name.
Import a dictionary definition
This is how to create a new dictionary with the same structure (fields and sections) as one which
you have previously exported:
1. Click Dictionaries.
2. Click Browse and choose an exported dictionary definition file from the Import
dictionary definition from file box.
3. Click Import dictionary and a dictionary with the same languages, fields and
characteristics as the previously exported dictionary is created. If you import the
dictionary definition while logged on as the same client that created the original
dictionary, the new dictionary will have the same name as the exported dictionary
definition but with an added number, e.g. (2).
Note! Term information is not imported, but you can import it via (Export and) Import
in Admin View.
Sections: Working with sections
This is where you add, modify and delete sections.
You add a section by clicking New Section, specifying the name and dictionary for
the section and then clicking Save. Here, you can also define at which place the
section should be placed in the list of sections (section selector etc.). Type the desired
order number in the Sort index field. Note that this has to be done starting at 1, and
preferably for all sections in the dictionary.
You change the name of the section by clicking the section’s name on the list.
You remove a section by selecting the box beside the section’s name on the list and
clicking Delete Selected....
Note! When you remove a section you also delete all content, i.e. all term records in
the section!!!
User groups that should be able to read the terms in the section and change, add or remove
term records (and export and import data) in the section are described under Access Editor.
History: Show changes in the structure of a dictionary and undo changes
If you wish to undo an import, you can do for example as follows:
1) Choose the desired dictionary.
2) Click on the arrow (in Restore column) alongside the position to which you want to restore
the database.
© 2009 Interverbum Technology AB
Admin_and_User_Manual_TWPro_V3.5_R1A_EN_UTAN_REVMéRKEN.rtf
24 (36)
3) Confirm that you want to restore the database to the selected position (e.g. 21 February
9:05).
© 2009 Interverbum Technology AB
Admin_and_User_Manual_TWPro_V3.5_R1A_EN_UTAN_REVMéRKEN.rtf
25 (36)
Edit Domains: Add, edit and delete domains and subdomains
How to specify domains and subdomains. While working you can show or hide subdomains by
clicking on their name.
Add a domain:
1. Select the desired dictionary from the Dictionary droplist.
2. Right click All domains and choose Add domain.
3. Write over the text "New domain" shown in the box at the bottom of the domain list with
the name of your new domain.
Tips (in Internet Explorer): Press shift+Ctrl and type in the name. Confirm by pressing Enter.
4. Repeat steps 2 and 3 for all main domains.
If you want to have subdomains:
5. Right click on a domain and choose Add domain.
6. Write over the text New domain in the box that appears with the name of the subdomain
and confirm by pressing Enter.
7. Repeat steps 5 and 6 for all subdomains of a main domain.
8. Repeat steps 5 and 6 also for other main domains that are to have subdomains.
To rename a domain:
1. Right click on the domain name and choose Edit domain.
2. Write over the domain name that is shown in the box with the new domain name.
3. Confirm by pressing Enter.
To remove a domain:
1. Right click on a domain and choose Delete domain.
2. Confirm with OK (or undo by pressing Cancel).
Note! When you remove a domain, the term records that belonged to that domain will then
belong to the nearest preceding domain (above).
© 2009 Interverbum Technology AB
Admin_and_User_Manual_TWPro_V3.5_R1A_EN_UTAN_REVMéRKEN.rtf
26 (36)
Subclasses: Create subclasses of term records
Terms in a certain subclass can be found in several different sections of a dictionary.
A subclass for a term record is created among the general fields in the same way as for a
section (Edit concept level fields).
Subclasses of term records can be used for two different purposes:
1) To show term records in the subclass in the same way (with the same view) for all users except
the administrator.
2) To limit a specific user group to viewing term records of a certain subclass only.
A) How to create the same view of a subclass for all users except the administrator:
(You can otherwise create a user-group specific view under “Groups".)
1) Create a new view, e.g. without administrative information. See Edit Views
2) Create a subclass: Click New subclass, type in the name of the new subclass, select the
dictionary for which the subclass is to be valid and choose the view created in step 1.
B) How to create a subclass that is user-group specific:
1) Create a filter with the condition that term records belong to a specific subclass
(Subclass EQUALS...).
2) Apply this filter to the user group.
This user group will then only see the term records that belong to this subclass, and with the
view that has been specified for the subclass.
Edit Views: Add, change, and delete views for a specific dictionary.
For example: If you want to hide the fields “Created by", “Creation date", “Changed by", and
“Change date", on the term level for a specific user group, do as follows:
1) Click Edit Views.
2) Click Add view....
3) Give the view a descriptive name.
4) Specify which dictionary applies.
© 2009 Interverbum Technology AB
Admin_and_User_Manual_TWPro_V3.5_R1A_EN_UTAN_REVMéRKEN.rtf
27 (36)
5) De-select the fields that are to be hidden from view.
6) Click Create view.
7) Click Admin View and then Groups.
8) Click the group’s name.
9) Choose the view in View for group droplist and then click Update Group.
The users in the group will not then be able to see the deselected fields in the view or edit mode
(assuming that the group has Write access to a part of the relevant dictionary).
Import: To import term data
1) Click Import.
2) If you want to import a dictionary with an existing settings file, select the setting
file/dictionary name under Available settings and click Import.
To change an existing settings file, select it and then click Edit.
To create new settings file click New..., name the settings, choose a dictionary from the
Import in Dictionary droplist, and specify the new settings for import synchronization,
i.e. how the import file will be synchronized with existing information in the section,
what will be imported, etc.
Click Save, select the settings file and click Import.
3) Click Browse, scroll down and choose the file you want imported.
4) Click Next >.
5) Click Next > if the validation report is OK.
6) If there are fields on the term record concept level in the import file that were not
already connected (mapped) with the fields in the dictionary, select the fields that
should be mapped and then click Map for one field name pair at a time in the Map
concept fields text box.
When you are finished, click Next >.
7) Repeat step 7 if necessary on the term level (Map term fields) and then click Next >.
8) Repeat step 7 is necessary for languages (Map languages) and then click Next >.
9) If you are satisfied with the mapping, click Next > in the Import settings complete text
box.
© 2009 Interverbum Technology AB
Admin_and_User_Manual_TWPro_V3.5_R1A_EN_UTAN_REVMéRKEN.rtf
28 (36)
10) Click Finish in the Import complete box.
Note! The next time you want to import a similar file, the settings for mapping the
import file and dictionary will be saved.
Note! When importing data from a file in the TermWeb 2 XML format:
If you want the same Concept ID in TermWeb 2 to apply in TermWeb 3: Tick
"Synchronize on concept ID".
If you want to create a new Concept ID for term records: Tick “Add import concept as
new" (recommended).
For any supplementary import of previously exported and supplemented TermWeb 2 data,
tick "Synchronize on index term".
Note! Any domain information in the import file will be transferred to the database only if
the domain or subdomains already exist in the database.
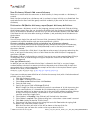
Example:
You have received an Excel file with new terms in French and Dutch and want to import data to
the existing database where there are already terms in other languages. Use the import settings
indicated in the figure below.
Use "Merge parts", however, if you want to supplement with new terms and possibly new
detailed information about existing terms.
© 2009 Interverbum Technology AB
Admin_and_User_Manual_TWPro_V3.5_R1A_EN_UTAN_REVMéRKEN.rtf
29 (36)
Summary:
Fill in parts: Only if there are no values in the database, should data from the import file be used.
Merge parts: New values are written over the values in the database, but if the import file does not have
values, the database values are saved. Note that modified terms (modified names of a term) are
imported as synonyms.
If you want to import synonyms AND supplement data on term level, you can select Synchronize on term
ID or Synchronize on similarity under Term synchronization.
If you just want to add synonyms, select No synchronization under Term synchronization.
Overwrite parts: Completely writes over the chosen parts - all the fields of the chosen language, for
example - even if the import file does not have values for the part, such as the term equivalents. If,
however, synonyms already exist in a language, then only the first synonym is deleted.
If you want to remove some of the detailed information about one or more terms (unmodified names, you should
export all the fields for the language as well as the Concept ID, edit the export file, and then import it with
“Synchronize on concept ID" and choose “Overwrite parts" and the relevant language.
Note! If you want to “undo" a data import and restore the database to the position prior to the
import, select Admin > History. It is not possible to “undo" a complete data import by using the
history function for a term record.
Note! The metadata field cannot be changed by editing the file to be imported. The "Created
by", "Creation date", and "Change date" fields are set to the importer's ID and time of the
import.
Export: To export term data
To export term data, e.g. for review or supplementary information, you can do the following:
If you do not want to export an entire dictionary, create a filter under Search view > Filters.
1. Click Export.
2. Select a completed settings file from Available settings.
To change an existing settings file, select it and then click Edit.
If there are no appropriate export settings files for the dictionary, create a new (New...).
Write the name of the export settings file, for which dictionary it is applicable, whether the
export settings are to be visible for you only (Private) or for other users (Public) and the
desired format of the export file.
You can choose one of the following formats:
- TBX (TermBase eXchange); standard format according to ISO/DIS 30042
- TermWeb 2 XML; compatible with previous versions of TermWeb
- MultiTerm iX XML
- Excel; the section name becomes the tab name and the field name becomes the column name.
Then choose the filter in the Select concepts by filter field.
Indicate which languages and fields you want in the export file.
Click Save when you have finished with the export settings.
3. Select the export settings file and click Export.
4. A picture is now shown with the mapping between the language names from the dictionary
and export files. If you want to change something, you can rename the export file.
Otherwise, click Next >.
5. A picture with the mapping between the concept level fields is shown as described above.
Change as needed (does not apply to pre-defined TBX field names) and then click Next >.
6. A picture with the mapping between the field names at the term level fields is shown.
Change as needed and then click Next >.
The Export complete! box is shown with information about the number of exported term
records.
7. Click Open in browser if you want to review the file. Click Save file and save the file at an
appropriate location and with an appropriate name.
8. Click Finish when you are finished.
© 2009 Interverbum Technology AB
Admin_and_User_Manual_TWPro_V3.5_R1A_EN_UTAN_REVMéRKEN.rtf
30 (36)
Note! You can use the same export settings, with minor modifications if necessary, the next time
you want to create a similar export file.
Note! If you want to check an exported TBX file, the dtd file TBXcdv04.dtd must be in the
same folder as the TBX file.
Note! Concept relations and attached objects are not included in the export file. Externally
linked objects are included but not (apart from web addresses) reimportable. For export of an
entire dictionary, internal links (cross-references between concepts) are included and recreatable
during import to another installation.
Groups: Add, modify or delete groups
If necessary, you can add a new user group.
You can also use a standard filter (for a certain dictionary) and a view (for a certain dictionary)
for the group, but they should be specified first, see the sections “Use filters to search and
export" and “Edit Views: Add, change and delete views for a specific dictionary."
You can also change the name, description, filter and view for the group, or remove the group.
Group members are specified under Group Members.
Which members are to receive access to which sections of dictionaries is set under Access Editor.
Add a group
1. Click Groups.
2. Click the New icon.
3. Indicate the name of the user group, description, and any new view or filter that is to be
applicable for the group.
(Views are defined under Edit Views and filters under Search View > Filters.)
4. Click Create Group.
Change information about a group
1. Click Groups.
2. Click the user group’s name.
3. Change the name, description, view and filter that are applicable to the group
4. Click Update Group.
Remove a group
1. Click Groups.
2. Tick the box to the left of the user group name.
3. Click Delete Selected...
Guest Account: Activate/deactivate and change information about guest users
1. Click Guest Account.
2. Activate a guest account by ticking the box Enable guest account.
3. a) If the guest user is to log in the usual way: Fill in the user name and password and select
Normal.
b) If the guest user is to log in automatically when they visit the web site: Select Automatic.
4. Click Save.
Everyone who visits the web site will now be able either to log in
a) with the specified user name and password or
b) automatically.
Note! Several users can use the guest account at the same time.
What guest users can see is set under Access Editor with filters and views for the user group
Guests.
Guest users cannot change term data; they can only search for terms, use pre-defined filters and
create temporary filters.
© 2009 Interverbum Technology AB
Admin_and_User_Manual_TWPro_V3.5_R1A_EN_UTAN_REVMéRKEN.rtf
31 (36)
If you want you can easily deactivate the guest account by clicking Guest Account, deselecting
Enable guest account and clicking Save.
© 2009 Interverbum Technology AB
Admin_and_User_Manual_TWPro_V3.5_R1A_EN_UTAN_REVMéRKEN.rtf
32 (36)
Users: Add, edit, deactivate/activate or delete a user
Add a user
1. Click Users.
2. Type in a user name, full name, e-mail address, password (twice) and primary group
membership (and indicate if the user is to be an administrator or system administrator).
Note! If you have not defined any group membership this can also be done under Groups.
3. Click Create User (and then Admin View if you want to return to the administrative
function icons or Search View if you want to return to the search position).
Change information about a user
1. Click Users.
2. Click the user’s name.
3. Make changes in the user data. Select "Inactive" if you want to temporarily deactivate the
user.
4. Click Update User.
Remove a user
1. Click Users.
2. Tick the box to the left of the user's name.
3. Click Delete Selected...
© 2009 Interverbum Technology AB
Admin_and_User_Manual_TWPro_V3.5_R1A_EN_UTAN_REVMéRKEN.rtf
33 (36)
Group Members: Indicate which user is a member of a particular group and to
which groups a particular user belongs
Place users in one or more groups.
Columns can be sorted (ascending or descending) on the basis of the group name, number of
users, or user names by clicking on the relevant column heading.
You can either click a group name to find out which users are members of the group or click on
a user name to find out and change the groups to which a user belongs. You move users and
groups by selecting the name, using the blue arrows to move them, and then confirming by
clicking Apply.
When you have completed the task click Admin View or Search View.
Access Editor: Set the user group access to dictionaries and sections
You can specify the following for every combination of dictionary, section and user group:
- which groups can read (or not) the terms in the section (Read Access or No access).
- which groups can add and edit terms in the section (Read/Write access)
- which groups can export, import, or both export and import data in the section
Note that the status for a specific term record can also determine who is able to view and work
with a term record.
Note! Authority for the Default group to All dictionaries/All sections should normally be set to
No access after an administrator group with at least the member Admin is created.
You can then give different authorities to the groups you create in the system.
Example of procedures for authority settings
This section is for a newly installed program (but there must sections).
When setting authority settings at a later point in time, points 1-3 can be skipped.
1. Create a group for administrator(s).
Click Groups > New Group and then specify the name and description of the group.
2. Specify who will be included in the administrator group. Directly after installation, it is the
pre-defined user admin.
Click Group Members and then the admin group’s name. Select Admin and move admin to
the Users in group box with the blue arrow. Click Apply and then Admin View.
3. Remove general authority for everyone.
Click Access Editor and choose
Read/Write Access for the admin group
and
No access for the Default group.
4. Create the user groups that are needed (groups of people that will have special authority to
at least one section).
Click Groups > New Group and specify for one group at a time name, description and which
view and filter will apply.
Click Admin View when you are finished.
5. Create the users that will be in the system.
Click Users > New User and specify user name, full name, and password. You can also choose
which Initial group the user will be a member. (Note! A user can belong to several groups.)
© 2009 Interverbum Technology AB
Admin_and_User_Manual_TWPro_V3.5_R1A_EN_UTAN_REVMéRKEN.rtf
34 (36)
Finish by clicking Create User for each user.
Click Admin View when you are finished.
6. Place the users in groups under Group Members as needed.
7. Specify authority for each group under Access Editor.
When All Dictionaries and All Sections are chosen:
Specify No access for all groups except the administrator's group.
Then specify authority per dictionary and section.
Note! If you import a new section of a dictionary, the authority for the dictionary applies
automatically to the section. If you want to change the authority of a new section, for example
hide it for some groups, choose the dictionary and the section and then specify No access or
Read access for the groups in question.
© 2009 Interverbum Technology AB
Admin_and_User_Manual_TWPro_V3.5_R1A_EN_UTAN_REVMéRKEN.rtf
35 (36)
Change Password: Change your password
Change your password. If you as an administrator want to change passwords for other users,
click Admin view and choose Users.
1. Click Change Password.
2. Enter the old password once and the new password twice.
3. Click Save.
4. Click Search View if you want to return to searching for terms (or Log out).
Administrator Tools: Reindex a dictionary
Sometimes it can be helpful to reindex a dictionary in order to increase the speed of a search. To
reindex:
1. Click Administrator Tools.
2. Select the dictionary you wish to reindex from the Dictionary field.
3. Click Start Reindexing.
4. Click OK when a message that the reindexing has been completed appears in the
window.
Usage Statistics
To display usage statistics over user visits, time spent, and user origin per day, month or year for
your TermWeb installation, proceed as follows:
1. Click Statistics.
2. For usage details regarding a certain day, click Details on the corresponding line.
To show statistics for another month, click the name of month previous or following the
currently displayed month.
© 2009 Interverbum Technology AB
Admin_and_User_Manual_TWPro_V3.5_R1A_EN_UTAN_REVMéRKEN.rtf
36 (36)
Dictionary
Term record: A term record is the part of a structured terminological data omnibus that is
applicable to a specific concept. (This concept is expressed normally by different term
equivalents in various languages.)
Term equivalent: Term equivalent is used to refer to a word or expression that represents the
same or a similar concept in different languages.
Index
concept level fields, general fields
CONTAINS, NOT CONTAINS
dictionary
domain, enter for term record
domain, show entries from a particular domain
EQUALS
filter
history, term record
NOT EQUALS
regular expressions
search for terms in a specific language, (set source language)
section
select sections
show all sections
STARTS WITH
term level fields
© 2009 Interverbum Technology AB
13
6
13
9
4, 13
6
6
4, 12
6
17
4
13
13
13
13
13
Admin_and_User_Manual_TWPro_V3.5_R1A_EN_UTAN_REVMéRKEN.rtf