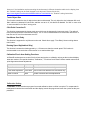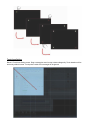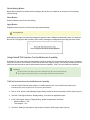
1
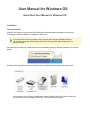
User Manual for Windows OS
Quick Start User Manual for Windows OS
Installation
Default Operation
PulseIR Touch system is a plug and play HID-USB Device which automatically manages device drivers,
eliminating any manual installation or upgrading of the drivers.
If you have Norton Antivirus program running, this may prevent proper installation drivers. If
you encounter problems, please disable Norton Antivirus temporarily while PulseIR device is
being connected.
Connecting the PuseIR unit to a USB connector will automatically display the following message on the bottom
taskbar.
In Windows OS, PulseIR touch screen is detected as an standard HID pointing device as shown below.
Upon connection to a USB port, PulseIR touch system initializes. DO NOT touch the screen while
the "new device found" message box displays – for approximately 3 seconds.
Installing and Using PulseIR Controller Utility Programs
Download PulseIR Touch Utility package for Windows OS. Extract the files and launch
“PulseIRController.exe” application.
To configure a touch screen device, first locate the device on device listing table at the top of the screen. If
more than one touch screen is connected, all PulseIR devices will be listed here. Click on a device icon to
view the current settings for that device.
Touch On/Off
This function enables and disables the touch detection for special testing and set-up needs.
Touch Mode
Mode Purpose
Auto
Automatic OS Detection for OS running(Windows, Linux, Mac)
Stylus Supports stylus operation in Android OS and Multi-touch capability in
Linux OS with Kernel 3.5 or higher version
Mouse Single-Point Mouse mode
When Switching Operating Systems
The configuration settings are preserved by the on-board controller of the touch screen. When changing the Touch Mode, open
the PulseIR Controller application. Click on "Apply" button then wait while the warning not to unplug the USB connector is
shown. When ready, the touch screen will function normally in the new environment.
Mouse R-Click (Apply only in Mouse Mode)
Setting
Effect
Long Down extended touch triggers the Mouse R-Click
event
Disable
do not support Mouse R-Click event
Touch Action (Apply only in Mouse Mode)
Setting
Effect
Drawing
Touch and Drawing support
Touch Only For simple touch detection only – No continuous tracing for
drawing and scripting
Touch Rotation
For special mounting configuration relative to display orientation. If the touch screen is attached to the display in
normal orientation, the rotation of the display is controlled by Windows "Display Setting" dialog box. Select a
desired Orientation for display placement and the touch screen will automatically adjust.
However, if the installation requires mounting the touchscreen in different orientation relative to the display, then
this “Rotation” setting can be used changed to suit the need. Please click the link,
https://www.hightail.com/download/UlRSd0VOWkJwTVhvS3NUQw for ” Rotation” setting instructions
Touch Object Size
This function controls the size of object to have the touch detected. The only object the size is between Min. and
Max. is able to be detected. If both of Min. and Max. are set to “0”, this feature is disabled. The “80” or more value
is recommended for the “Max” setting value.
Click Point Correction R
This function compensates the human touch error which may be happened by inaccurate touch. The radius of
touch point should be set to activate this feature. The “3” mm is recommended for touch screens with the 55” or
less size and “0” mm for touchscreens over 55”.
Use Mouse Over Delay
This function is supported in only Mouse touch mode. Check this to apply “Time Delay” when touching down a
menu button.
Drawing Speed Up(Ambient Skip)
This function increases the drawing speed by 1-1.5 times more than the normal speed. This function is
recommended to use under the environment of no or weak ambient light.
Calibration/Touch Area Setting Functions
All PulseIR touchscreens are custom fit to the frame and require no calibration as long as the touch and display
areas are matched. For special situations, "Calibration," "Touch Area" and "Reset" buttons enable custom touch
point alignment and area adjustments.
Function
Button
Description
Touch Coordinate
Calibration
Adjustment
Touch Area Adjustment Touch Area
Corrects touch coordinate misalignment
Reset to Default
Resets coordinate and area adjustments
Reset
Use to limit touch detection to a sub-section only
Calibration Setting
“Calibration” button launches a program for manual calibration when an offset is required. To compensate for
misalignment between the touch screen and the display, launch this program and touch the 4 points as they are
presented.
Touch Area Setting
Below is Touch Area Setting screen. Drag a rectangular area from top to bottom diagonally. Touch detection will be
active only within this area. Touch points outside of this rectangle will be ignored.
Default Setting Button
Resets the touch screen to default mode according to the OS. But, the calibration is not reset even if executing
“Default Setting”.
Reset Button
Initialize Calibration and Touch Area setting.
Apply Button
Programs the touch screen controller with newly selected settings.
Warning Message
When applying changes, the following message box appears and the USB port automatically resets. It is important
that you do not unplug the USB connector. Wait until this message box disappears before using the touch screen.
Using PulseIR TUIO Interface Tool for Multi-touch Capability
In Window 7/8, the touch screen will automatically operate as a Multi-Touch input device as auto mode. In Windows
Vista and XP however, the OS does not have built-in multi-touch support. Hence TUIO industry standard protocol for
multi-touch devices must be used to demonstrate multi-touch capability. TUIO Tool is provided for this purpose.
Assumption
We assume that the user already has a basic understanding of TUIO protocol and functionality.
We can support TUIO protocol interface by using PulseIR Controller tool described above.
TUIO Set-Up Instructions for the Multi-touch Capability
1. Launch PulseIR Controller utility program, “PulseIRController.exe” in the PulseIR utility folder (Note:
PulseIRController utility program must be previously downloaded. )
2. Click on “Edit” button of “Multi Display Support Setting” below the device information window. (See Figure A)
3. Then the TUIO support window, “Display Setting”, for multi-touch application opens.
4. In the TUIO support window, “Display Setting”, please set parameters as follows :
- Mouse emulation : “Off”
- TUIO Support : “On”
5. Then click “Setting” at the bottom of the window to finish the TUIO support.(See Figure A)
<Figure A>
6. In PulseIR utility folder installed, please run “PulseIRService.exe” to run TUIO server.(See Figure B)
<Figure B>
7. Test it with TUIO client program to see if TUIO works.