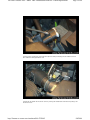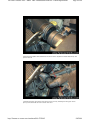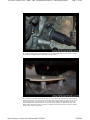
1
VWvortex Forums: DIY - MKIV VR6 Transmission Removal / Clutch Replacement
Page 1 of 44
My Profile | Active Users | Help | Search | Google Search
You are logged in as Massboykie, Log out
VWvortex Forums Golf IV & Jetta IV DIY - MKIV VR6
Transmission Removal / Clutch Replacement [Archived]
FaelinGL
Member
DIY - MKIV VR6 Transmission Removal / Clutch
Replacement
« » 1:34 AM 7-92006
Offline
Member Since
11-27-2004
854 posts
DIY - MKIV 12v VR6 Tranny Removal / Clutch Replacement
For Clutch replacement or for Lower Timing Chain replacement
Charlotte NC
2000 Jetta VR6,
150k and
counting.
The MKIV VR6 transmission removal is required to perform lower timing chain replacement, as well
as upgrading or replacing the clutch. To fully understand how the clutch operates, there are some
excellent articles in the manual transmission forum, but I will cover the basics before we begin.
In order to take the rotation force provided by the engine and send it to the transmission, we have
two basic methods. The first, used in automatic transmissions, is called a Torque Converter. In the
torque converter, two impellers (like propepeller blades) are placed inside a chamber filled with
fluid. As one impeller rotates, it transfers its energy into the fluid, which also rotates. The force
travels through the fluid, and eventually rotates the second impeller. This motion allows the engine
to rotate at a different speed while the transmission and wheels catch up.
The second is the use of friction. In a manual transmission, the rotation from the engine ends with
the flywheel. The flywheel provides a mating surface between one side of the clutch disc, and on
the other side, the pressure plate. So as the flywheel turns, frictional force turns the clutch, which
is pressed against the flywheel by the pressure plate. When you step on the clutch pedal, you are
seperating the pressure plate from the clutch disc. Since the pressure plate is what keeps the
clutch disc pressed against the flywheel, seperating the two reduces the force transferred from the
engine to the clutch. To get the force to the transmission, the center of the clutch has a splined
shaft that the transmission input shaft goes in to.
A word of note from your friend and mine, Gary (VgRt6):
"When the tranny is out, it's the perfect time to replace the thermostat on a VR6. That job is a real
PITA when the tranny is in place."
This is exactly what I did (and you can see why later on in the thread) but it will add a couple of
extra hours to your job. Seriously worth it if you have not done it yet. It will fail. And I recommend
draining the crack pipe before pulling anything off if you decide to do it by performing step 15 of
the T-stat replacement DIY as follows:
"15: Drain the crack pipe. This one is messy. The drain has to be accessed from underneath the
car, and is just next to the block where the water pump housing fits. The stock pipe will need a
flathead screwdriver and a turn or two, then it pops off. WEAR EYE PROTECTION!!!"
Here's the plug, you can only see it from underneath the vehicle. If you just crack it about a half
turn open, a nice steady stream of coolant will come out into your awaiting bucket. Wait 1/2 hour
while draining and take a break...MUCH MUCH better then spilling G12 all over your garage floor.
http://forums.vwvortex.com/zerothread?id=2703042
9/8/2006
VWvortex Forums: DIY - MKIV VR6 Transmission Removal / Clutch Replacement
Page 2 of 44
Some very important cautions:
PLEASE label all the connectors, parts, and bolts you remove from the vehicle. This will really help
when you are ready to put it all back together. Also, some bolts are different lengths but look
exactly the same as other bolts. Use whatever labeling scheme works for you, I used about 50
zip-loc bags and a magic marker and some paper.
Parts Required
-Moly grease/lubricant (available at your local auto-parts store, also called Spline Lube)
-New Clutch, pressure plate, throwout bearing(if you are doing this procedure, I recommend
replacing regardless of mileage)
-New Flywheel (optional)
-Lots of Zip-loc bags (or similar, for labeling)
-2 Liters of MT-90 or similar manual transmission fluid (or reuse the old fluid)
-10 new 10 mm triple square flywheel bolts (if removing/replacing the flywheel)
-6 new 10 mm 12 point pressure plate bolts
-New bolts for the pendulum (dog-bone) mount if you are replacing them (recommended)
Tools Required
-27 mm socket
-10 mm socket
-13 mm socket
-16 mm socket
-18 mm socket
-10 mm 12 point socket
-17 mm allen wrench (optional, but recommended)
-10 mm Triple Square (12 point) bit
-12" ratchet extension
-ratchet
-Magic Marker
-Small blade screwdriver
-Large Vise-grips
-Spray penetrating lubricant
-Medium phillips head screwdriver
-Impact wrench (optional, but HIGHLY recommended)
-Rubber mallet
-Two jackstands
-Two jacks
-Small blocks of wood
http://forums.vwvortex.com/zerothread?id=2703042
9/8/2006
VWvortex Forums: DIY - MKIV VR6 Transmission Removal / Clutch Replacement
Page 3 of 44
Note: I cannot be held responsible if something goes wrong during the performance of this
procedure. I have done my best to make it as accurate as possible, but there may be some
mistakes. Please use your head when working with the jacks and the engine/transmission combo.
Before you begin....
i. Drive the vehicle to a well lit spot and chock the rear tires. You will be here for a couple of
hours, so make sure you can leave the car here undisturbed.
ii. Once the vehicle is parked, raise the hood.
iii. You may need the radio code for OEM radio if you still have yours since the battery will be
disconnected for a while.
1. Start by removing some interior components. Perform steps 1.a) through 2.e) of the Starter
Motor Grind Fix/Replacement DIY.
2.a. Remove the air filter. To do this, unscrew the two phillips head screws at the top of the air
box cover. They will not come all the way out.
b. Lift up on the top of the air box cover, and slide the air box off of the retaining clips.
http://forums.vwvortex.com/zerothread?id=2703042
9/8/2006
VWvortex Forums: DIY - MKIV VR6 Transmission Removal / Clutch Replacement
Page 4 of 44
c. Lift up on the air filter to remove it from the air box.
3. Disconnect the MAF air sensor. Insert a screwdriver blade in to the small hole at the end of the
connector, pry up gently, and slide the connector off.
http://forums.vwvortex.com/zerothread?id=2703042
9/8/2006
VWvortex Forums: DIY - MKIV VR6 Transmission Removal / Clutch Replacement
Page 5 of 44
4. Using a pair of Vise-grips, open and lock open the clamp connecting the air header to the air
box. Leave the clamp opened for now.
5. Slide the air header off the air box cover by rocking the header back and forth and pulling it off
the air box cover.
http://forums.vwvortex.com/zerothread?id=2703042
9/8/2006
VWvortex Forums: DIY - MKIV VR6 Transmission Removal / Clutch Replacement
Page 6 of 44
6. Disconnect the plastic hose attached to the air box cover. Squeeze the ribbed sides firmly and
pull the hose off.
7. Release the clamp around the outlet of the air box cover by releasing the Vise-grips. At this
point you should be able to remove the air box cover.
http://forums.vwvortex.com/zerothread?id=2703042
9/8/2006
VWvortex Forums: DIY - MKIV VR6 Transmission Removal / Clutch Replacement
Page 7 of 44
8. Remove the one additional bolt holding the air box inlet in place with a 13 mm socket.
9. Slide the air box out of the engine bay by pulling it to the passenger's side and lifting it up and
out.
http://forums.vwvortex.com/zerothread?id=2703042
9/8/2006
VWvortex Forums: DIY - MKIV VR6 Transmission Removal / Clutch Replacement
Page 8 of 44
10. Remove the circlip holding the gate selector cable in place by lifting up on the raised tab with
a small blade screwdriver and sliding the clip off.
11. Locate the shifter weight retaining nut.
http://forums.vwvortex.com/zerothread?id=2703042
9/8/2006
VWvortex Forums: DIY - MKIV VR6 Transmission Removal / Clutch Replacement
Page 9 of 44
12. While holding the shifter weight, remove the retaining bolt with a 13 mm socket and
extension.
13. Spray a little penetrating lubricant into the spline area of the shifter weight. While it is settling,
note that there is one thicker spline then the others. This ensures the shifter weight goes in only
one way. Also see the white guide rail on the left side. This provides rotational guidance for the
shift weight.
http://forums.vwvortex.com/zerothread?id=2703042
9/8/2006
VWvortex Forums: DIY - MKIV VR6 Transmission Removal / Clutch Replacement
Page 10 of 44
14. Once the spray has settled for a few minutes, wiggle the shifter weight back and forth to slide
it off the spline. This is a shot with the weight removed and the white plastic guide rail exposed.
15. Remove the connector for the reverse light indication. The connector is rather difficult to get
to, but it will come out.
http://forums.vwvortex.com/zerothread?id=2703042
9/8/2006
VWvortex Forums: DIY - MKIV VR6 Transmission Removal / Clutch Replacement
Page 11 of 44
16. Unclip the power steering hose attached to the black metal bracket.
17. Remove the three 13 mm bolts holding the black metal bracket in place. It is still attached to
the transmission selector cables; leave them attached.
http://forums.vwvortex.com/zerothread?id=2703042
9/8/2006
VWvortex Forums: DIY - MKIV VR6 Transmission Removal / Clutch Replacement
Page 12 of 44
18. Slide the gate selector cable out of the transmission connection. Note the plastic sleeves on
either side of the shaft. Remove these as well.
19. Located towards the rear of the transmission, find the heat shielding bag that encloses the
vehicle speed sensor(VSS). Unsnap the two snaps that close the bag, and slide it up the cable.
http://forums.vwvortex.com/zerothread?id=2703042
9/8/2006
VWvortex Forums: DIY - MKIV VR6 Transmission Removal / Clutch Replacement
Page 13 of 44
20. Remove the connector from the VSS. Again, this may be difficult to get to.
21. Now you are ready to get underneath the vehicle. Raise the front end of the vehicle and
remove the front wheels.
22. Remove the center splash guard by performing step 3 of the VR6 12V Oil Change DIY.
23. Remove the driver's side splash guard by inserting a long blade screwdriver into one of the
slots on on the star shaped washer. Then unscrew the washer, and it will work the guard off of the
stud in the frame. There are two of these washers for the guard. Once removed, the guard will
drop right out.
http://forums.vwvortex.com/zerothread?id=2703042
9/8/2006
VWvortex Forums: DIY - MKIV VR6 Transmission Removal / Clutch Replacement
Page 14 of 44
24. Remove the driver's side fender well piece by unscrewing the 10 or so Torx-25 screws at the
front and the back of the well. Once removed, the plastic piece should fall right out.
http://forums.vwvortex.com/zerothread?id=2703042
9/8/2006
VWvortex Forums: DIY - MKIV VR6 Transmission Removal / Clutch Replacement
Page 15 of 44
25. Remove the starter motor by performing steps 3.a) to 5.b) of the Starter Motor Grind
Fix/Replacement DIY.
26. Remove the two 16 mm bolts holding the black support member in place. The bolt on the left
actually has a nut, so do not forget to remove and bag it as well.
http://forums.vwvortex.com/zerothread?id=2703042
9/8/2006
VWvortex Forums: DIY - MKIV VR6 Transmission Removal / Clutch Replacement
Page 16 of 44
27. Remove the two bolts holding the slave cylinder in place with a 13 mm socket.
28. Carefully slide the slave cylinder out of the transmission. Do NOT depress the clutch pedal
while the slave cylinder is removed, or you risk rupturing the rubber boot. The base of the slave
cylinder is plastic, so be gentle as you remove it.
http://forums.vwvortex.com/zerothread?id=2703042
9/8/2006
VWvortex Forums: DIY - MKIV VR6 Transmission Removal / Clutch Replacement
Page 17 of 44
29. Locate the white plastic heat shield protecting the passenger's side CV joing. Remove the two
bolts holding the plastic shield in place with a 13 mm socket.
30. You can see the passenger's side CV joint here. It is held to the transmission output flange by
6 twelve point bolts. This 12 point bit is commonly called a Triple Square bit, and is found in your
local auto parts store. Remove the six 10 mm twelve point bolts, and the passenger's CV joint
should separate from the transmission. If you have an extra person, it helps if they step on the
brakes while removing the bolts. I had a lot of trouble removing these bolts until I got an impact
wrench. Then they came right out.
http://forums.vwvortex.com/zerothread?id=2703042
9/8/2006
VWvortex Forums: DIY - MKIV VR6 Transmission Removal / Clutch Replacement
Page 18 of 44
Modified by FaelinGL at 4:36 AM 7-9-2006
Modified by FaelinGL at 7:23 PM 7-9-2006
Modified by FaelinGL at 1:43 AM 7-13-2006
Modified by FaelinGL at 11:52 PM 7-19-2006
Tired of getting ripped off at the STEALERSHIP?
Step by step MKIV DIY Video DVD's are HERE!
50% off for Vortex Members!!!
Email me at [email protected]
FaelinGL
Member
Re: DIY - MKIV VR6 Transmission Removal / Clutch
Replacement (FaelinGL) »
« » 1:35 AM 7-92006
Offline
Member Since
11-27-2004
854 posts
Charlotte NC
2000 Jetta VR6,
150k and
counting.
31. Secure the passenger's side CV joint out of the way with some wire.
http://forums.vwvortex.com/zerothread?id=2703042
9/8/2006
VWvortex Forums: DIY - MKIV VR6 Transmission Removal / Clutch Replacement
Page 19 of 44
Note: Steps 32 through 34 are OPTIONAL, but again, HIGHLY recommended. You will spend many
hours trying to get the passenger's side transmission output flange past the flywheel, but after
removing the flange, the transmission came right out. However, in order to remove the flange,
you must first drain the transmission.
32. Place a drip pan underneath the transmission and remove the 17 mm allen bolt under the
transmission. This will drain all the transmission fluid. Once drained, reinstall the bolt until it is
tight.
33. Locate the 5 mm conical bolt holding the passenger's side transmission output flange in place.
While holding the output flange, or having someone step on the brakes, remove the conical bolt.
The output flange has a spring on the inside, and should pop right out. Be gentle when removing
the flange, as it has two sealing surfaces to keep the transmission fluid in.
http://forums.vwvortex.com/zerothread?id=2703042
9/8/2006
VWvortex Forums: DIY - MKIV VR6 Transmission Removal / Clutch Replacement
Page 20 of 44
34. Repeat steps 30 and 31 for the driver's side CV joint.
http://forums.vwvortex.com/zerothread?id=2703042
9/8/2006
VWvortex Forums: DIY - MKIV VR6 Transmission Removal / Clutch Replacement
Page 21 of 44
35. Remove the pendulum mount (aka: dog-bone) by unscrewing the two 18 mm bolts connecting
the mount to the transmission. The engine/transmission may swing down about an inch, so be
prepared for it to move once the bolts are removed. Then remove the two 16 mm bolts holding
the mount to the frame.
36. Support both the engine and the transmission with jacks. Use a piece of wood to even out the
load. Make sure both jacks are supporting some of the weight.
This is also your opportunity to verify nothing else is connected to the transmission. Tie up any
cables, wires, or connectors so they are out of the way.
http://forums.vwvortex.com/zerothread?id=2703042
9/8/2006
VWvortex Forums: DIY - MKIV VR6 Transmission Removal / Clutch Replacement
Page 22 of 44
Note: This step will remove the transmission support from the frame! Only the jack will be
supporting the weight of the transmission.
37. Unscrew the two 18 mm transmission mount bolts. Make sure the jack is supporting the
weight before you remove them fully.
http://forums.vwvortex.com/zerothread?id=2703042
9/8/2006
VWvortex Forums: DIY - MKIV VR6 Transmission Removal / Clutch Replacement
Page 23 of 44
38. Locate the three bolts on the driver's side of the transmission. These three secure the
transmission to an intermediate metal piece. You will need to lower the engine/transmission a bit
to access these bolts. Start by lowering the engine jack a bit, then lower the transmission jack a
bit, and repeat until you can see the three bolts.
39. Here the engine/transmission is lowered enough to access the three bolts. Remove them with
a 16 mm socket.
http://forums.vwvortex.com/zerothread?id=2703042
9/8/2006
VWvortex Forums: DIY - MKIV VR6 Transmission Removal / Clutch Replacement
Page 24 of 44
40. Once the three bolts are removed, remove the intermediate metal piece by pulling it up and
away. You may need to lower the engine/transmission a touch more to get it out.
41. Now you are ready to start seperating the engine from the transmission. Start with the combo
bolt near the top of the transmission. Remove the 13 mm nut
connecting the ground strap to the combo bolt and slide off the ground strap. Then remove the 18
mm combo bolt.
http://forums.vwvortex.com/zerothread?id=2703042
9/8/2006
VWvortex Forums: DIY - MKIV VR6 Transmission Removal / Clutch Replacement
Page 25 of 44
42. Remove the other 18 mm combo bolt towards the front of the transmission, still on the top. I
swear it is underneath this mess of rubber and pipe, to the right of the starter motor socket.
43. This is a better view of the second 18 mm combo bolt.
http://forums.vwvortex.com/zerothread?id=2703042
9/8/2006
VWvortex Forums: DIY - MKIV VR6 Transmission Removal / Clutch Replacement
Page 26 of 44
44. Looking at the front of the engine/transmission, remove the two 18 mm and one 16 mm bolts.
If yours looks like this, you may want to call MJM at this point and express-mail a crack pipe and
T-stat housing kit.
http://forums.vwvortex.com/zerothread?id=2703042
9/8/2006
VWvortex Forums: DIY - MKIV VR6 Transmission Removal / Clutch Replacement
Page 27 of 44
45. Remove the two 16 mm bolts towards the rear of the engine/transmission, near the
passenger's side CV joint. Note: The output flange is not removed in this picture, disregard this
discrepancy.
http://forums.vwvortex.com/zerothread?id=2703042
9/8/2006
VWvortex Forums: DIY - MKIV VR6 Transmission Removal / Clutch Replacement
Page 28 of 44
46. Remove the last 16 mm bolt on the bottom of the connecting the engine and the transmission.
I do not have a picture of this bolt, but it is the farthest one down on the transmission.
47. The transmission will not immediately seperate from the engine because the transmission
input shaft is still inside the flywheel. To seperate the two, give the mating joint a couple of raps
at each segment. Then gently work the transmission off of the engine. Remember, the jack is your
friend. It will support the weight of the transmission for you, but it cannot move the transmission.
Seperate the two just a little bit for now.
48. Remove the transmission from its place in the engine bay. Easier said then done. The best
advice I can offer is to raise the engine to a little below its normal ride height. Work the black A/C
line until it is above the transmission, and lower the transmission jack a bit. Slide the transmission
off a bit, and lower the jack a bit more. You will need to turn the transmission counterclockwise to
get it around the subframe, and then it will drop right down. If you are
http://forums.vwvortex.com/zerothread?id=2703042
9/8/2006
VWvortex Forums: DIY - MKIV VR6 Transmission Removal / Clutch Replacement
Page 29 of 44
relatively strong, you can bench the transmission (it weighs about 80 pounds) and work it out.
Use the jack as a resting point when you are tired. This could take a while, so if you need to take
a break, make sure the transmission is supported and rest for a bit.
49. Finally out! While out, take the opportunity to clean things up. Remove the clutch fork by
unclipping the metal retaining clip at the bottom. Press the metal fingers up and out of the hole in
the fork. Then slide the fork off of the transmission input shaft along with the throwout bearing.
50. Once the fork is out, clean the input shaft. Remove any dirt or corrosion products, and apply a
light coat of moly grease to the input shaft. You want to grease both the splined part AND the
smooth part of the shaft. This allows the throwout bearing to glide easily on the shaft. Also apply a
thin film of moly grease to the fork pivot at the bottom of the transmission.
51. Replace the old throwout bearing on the fork with the new one. This is very easy to do, you
will see how once you get the fork out. Once replaced, reinstall the fork. You may find it easier to
remove the retainer spring from the fork pivot, install the spring into the fork, and press the
retainer onto the pivot.
52. Check the operation of the new throwout bearing. It should slide very easily on the input
shaft.
53. Remove the pressure plate and clutch disc by unscrewing the six 10 mm 12 point bolts. Then
use a medium screwdriver and slowly work the pressure plate out. Be careful, because once the
pressure plate comes out, the clutch disc will fall out as well.
54. Perform this step ONLY if you need the flywheel removed, ie: for timing chain replacement or
if installing an upgraded flywheel. Remove the ten 10 mm triple square bolts holding the flywheel
to the engine output flange. An impact wrench is really useful here. If you are using a breaker bar,
you will need someone to hold the crank pulley with a 27 mm socket to prevent the engine from
rotating.
---------At this point, the transmission, the pressure plate, the clutch disc, and the flywheel are all
removed. The following steps are for reinstallation of the above components.
----------
Tired of getting ripped off at the STEALERSHIP?
http://forums.vwvortex.com/zerothread?id=2703042
9/8/2006
VWvortex Forums: DIY - MKIV VR6 Transmission Removal / Clutch Replacement
Page 30 of 44
Step by step MKIV DIY Video DVD's are HERE!
50% off for Vortex Members!!!
Email me at [email protected]
FaelinGL
Member
Re: DIY - MKIV VR6 Transmission Removal / Clutch
Replacement (FaelinGL) »
« » 1:35 AM 7-92006
Offline
Member Since
11-27-2004
854 posts
Charlotte NC
2000 Jetta VR6,
150k and
counting.
55. Reinstall the flywheel by aligning it to the engine output flange. There is one bolt hole that is
offset a little bit from the rest to guarantee the flywheel is installed properly. Once you have
aligned this one bolt hole, install all 10 bolts finger tight. Using a diagonal tightening pattern,
tighten the flywheel bolts to 44 ft-lbs plus 1/4 of a turn. You will need someone else to hold the
crank pulley with a 27 mm socket while you are tightening the bolts.
56. Reinstall the clutch disc. You will need to center it on the flywheel so that the transmission
input shaft slides onto the clutch disc properly. The easiest way to do this is to find a socket
(metric or standard) that fits into the center of the disc and into the center of the flywheel. Then,
place the clutch disc onto the face of the flywheel with the socket pressed into the flywheel. The
clutch disc will sag until the pressure plate is installed, so don't worry right now if the alignment is
not perfect.
57. Reinstall the pressure plate. The pressure plate will align only one way with the dowels on the
engine and allow you to install all six bolts. When you have found the proper orientation of the
pressure plate, press it onto the dowels. Gently tap around the edges on the pressure plate with a
rubber mallet to press the plate flush against the engine. When installing the screws, it is
important at first to tighten the six screws only finger tight. 58. Once the pressure plate screws
are installed finger tight, re-align the clutch disc. Use the socket to press the clutch disc in the
appropriate direction until the hole in the clutch disc is perfectly aligned with the hole in the
flywheel. Once you are satisfied with the centering, torque the pressure plate bolts in a diagonal
pattern to 10 ft-lbs.
58. Reinstall the transmission. Again, easier said then done. You will need to lift the transmission
up into the engine bay and align the input shaft so it slides into the clutch and the dowels on the
engine line up with those on the transmission. Don't forget to bring the black A/C line underneath
the transmission.
59. Once the transmission is flush with the engine, reinstall the bolts you removed holding the
engine/transmission together. Hopefully, you labeled them so that you know exactly which bolt
goes where. Torque the 16 mm bolts to 30 ft-lbs, and the 18 mm bolts to 60 ft-lbs.
60. Reinstall the ground strap to the top combo bolt and tighten the 13 mm nut to 15 ft-lbs.
61. Reinstall the intermediate metal piece to the side of the transmission. Torque the 16 mm bolts
to 37 ft-lbs.
62. Jack up the engine/transmission until you can install the two 18 mm transmission mount bolts.
With the mount faces flush (ie: no preload), torque the 18 mm bolts to 74 ft-lbs.
63. Remove the wire holding the driver's side CV joint in place and slide the CV into the
transmission output flange. Reinstall the 6 triple-square bolts into the flange, tightening diagonally
to 52 ft-lbs. I found it very useful to have a friend press the brakes when I applied the torque, and
released when I needed to move to another bolt. I also numbered each bolt on the flange itself so
I knew in what order to tighten each.
64. With the brake applied, slide the passenger's side output flange into the socket. Reinstall the 5
mm conical bolt while pressing in on the flange. You will need to compress the spring quite a bit in
order to get the bolt to catch. Torque the conical bolt to 18 ft-lbs.
65. Repeat step 63 for the passenger's side CV joint and output flange.
66. Reinstall the dog-bone mount. The 18 mm bolts are torqued to 30 ft-lbs, and the 16 mm bolts
are torqued to 15 ft-lbs. (add an extra 1/4 of a turn if you are installing new bolts for both the 18
mm and 16 mm bolts)
67. Refill the transmission by removing the 17 mm bolt at the front of the transmission and adding
gear oil until it begins to drip out of the bottom of the hole. Then reinstall the 17 mm bolt and turn
clockwise until tight.
http://forums.vwvortex.com/zerothread?id=2703042
9/8/2006
VWvortex Forums: DIY - MKIV VR6 Transmission Removal / Clutch Replacement
Page 31 of 44
68. Reinstall the white plastic heat shield and tighten the two 13 mm bolts to 26 ft-lbs.
69. Gently reinstall the slave cylinder into the transmission. You will have to press it in, but make
sure that the shaft is straight when you tighten the bolts. Torque the 13 mm bolts to 18 ft-lbs.
70. Reinstall the black support member and tighten the 16 mm bolts to 18 ft-lbs.
71. Reinstall the starter motor by performing steps 7.a) through 7.e) of the Starter Motor Grind
Fix/Replacement DIY.
72. Reinstall the plastic piece into the driver's side fender well and secure it with the 10 Torx-25
screws.
73. Reinstall the driver's side splash guard by tightening the star washers with the long blade
screwdriver.
74. Reinstall the center splash guard by tightening the four Torx-25 screws.
75. Reinstall the front wheels and torque them to 90 ft-lbs. Once the wheels are installed, lower
the front of the vehicle.
76. Reinstall the connector for the VSS. This is the one on the rear of the transmission, with the
heat shielded bag.
77. Install the heat shielded bag by sliding the bag on top of the sensor and snapping the snaps
into place.
78. Lightly lubricate the inside of the white plastic sleeves from the gate selector cable shaft with
a Q-tip. Then, slide the plastic sleeves into their appropriate spots in the shaft and slide the gate
selector cable shaft into its place in the transmission.
79. Reinstall the black metal bracket to the back of the transmission and tighten the three 13 mm
bolts to 18 ft-lbs.
80. Slide the power steering hose back into its clip on the black metal bracket.
81. Reinstall the connector for the reverse light indication towards the shifter weight spline.
http://forums.vwvortex.com/zerothread?id=2703042
9/8/2006
VWvortex Forums: DIY - MKIV VR6 Transmission Removal / Clutch Replacement
Page 32 of 44
82. Slide the shifter weight into the spline, aligning the thicker spline with the slot in the shifter
weight. Install the 13 mm nut and torque it to 18 ft-lbs.
83. Reinstall the circlip on the gate selector cable shaft by sliding it on, ensuring it locks into
place.
84. Slide the air box into the engine bay, with the air intake and rubber damper sliding into the
right side of the air box. Install the rear 13 mm bolt and tighten it until tight.
85. Reconnect the smaller black plastic hose into the airbox cover by sliding it onto the cover until
the snaps lock it into place.
86. Open and lock open the clamp on the air box cover with a pair of vise-grips, and slide the air
header pipe onto the air box cover. When the header is fully installed onto the cover, release the
clamp.
87. Install the air filter into the air box, and slide the rear hooks of the air box cover into the air
box. Then tighten down the air box cover with the phillips head screwdriver until tight.
88. Reconnect the MAF connector and reinstall the interior components by performing steps 7.f) to
7.j) of the Starter Motor Grind Fix/Replacement DIY.
89. Before you start the car and take it for a test drive, go through all the gears to make sure that
each engages properly. Also make sure the clutch pedal feels proper. Then, start the car and take
it for a very slow test drive. You will need about 500 miles to break in the new clutch.
That's it! Please let me know with any mistakes or corrections. Congratulate yourself on
completing a very intense DIY.
Mike
Modified by FaelinGL at 7:27 PM 7-9-2006
Tired of getting ripped off at the STEALERSHIP?
Step by step MKIV DIY Video DVD's are HERE!
50% off for Vortex Members!!!
Email me at [email protected]
bryan burnick
Member
Re: DIY - MKIV VR6 Transmission Removal / Clutch
Replacement (FaelinGL) »
Offline
awesome DIY, all i need now is the $$ for a new clutch/flywheel
Member Since
9-16-2005
1879 posts
birmingham al
1999.5 jetta vr6
cdkirgis
Member
« » 1:36 AM 7-92006
http://www.youtube.com/watch?v=kVJj5CdC8Bk
http://www.putfile.com/bryanburnick
http://www.villagehobbycentre.com/jokes.html
»
« » 1:39 AM 7-9-2006
Offline
http://forums.vwvortex.com/zerothread?id=2703042
9/8/2006
VWvortex Forums: DIY - MKIV VR6 Transmission Removal / Clutch Replacement
Page 33 of 44
Member Since
7-8-2005
404 posts
Anchorage AK
2004 VW GTI
1.8T
jakanapapa
Member
damn. thanks for the write up. im gonna be doin that soon.
Re: (cdkirgis) »
« » 2:51 AM 7-9-2006
Offline
vortex DIY'ers nevar seize to amaze me
Member Since
12-27-2005
806 posts
Rapids Wi
VW jetta 1.8t
mattyrj
Member
.................=Jakanapapas ride=..................
Re: (jakanapapa) »
« » 6:47 AM 7-9-2006
dayum, Mad props to you son
Offline
Member Since
11-21-2005
952 posts
A High School in
Fl.
A Diesel one
Quote, originally posted by Rob’sVR6 »
I
you so much it hurts....ouch....
TDI nevar looZeS
ႃႃႃ
Depressed? Sad? Emo? Then go here
OhioVr6
Member
Re: (mattyrj) »
« » 6:49 AM 7-9-2006
Offline
Member Since
8-5-2002
4283 posts
This is the reason I love vortex
props
Oxford Ohio
"Nothing in the world can take the place of persistence..."
Dub-Society
Elvir
Member
Re: DIY - MKIV VR6 Transmission Removal / Clutch
Replacement (FaelinGL) »
http://forums.vwvortex.com/zerothread?id=2703042
« » 6:50 AM 7-92006
9/8/2006
VWvortex Forums: DIY - MKIV VR6 Transmission Removal / Clutch Replacement
Page 34 of 44
awsome, great job man!, now go do the 1.8T
Offline
Member Since
10-18-2004
6297 posts
Durty Durty GA
I drive a Mini
Cooper Inspired,
Vtech badged,
hampster
powered, VW
shiftered, one
wheel drive, Geo!
1.8TIM
Member
Elvir
Nopi Naitonals '06 | September 16-17
H2O International | September 22-25
I cannot help but think a curious event is this life of mine.
Re: DIY - MKIV VR6 Transmission Removal / Clutch
Replacement (Elvir) »
« » 7:11 AM 7-92006
Offline
Member Since
3-28-2002
4360 posts
QUEENS NY
2003 SS GRAY
GTI 1.8T
http://forums.vwvortex.com/zerothread?id=2703042
9/8/2006
VWvortex Forums: DIY - MKIV VR6 Transmission Removal / Clutch Replacement
Page 35 of 44
looks like either racoon or cat meat all over there.
......a...u...t...o...k...r...i...e...g......
C&M Performance Home of the World's Fastest FWD VW 9.536 @ 148.6mph
FaelinGL
Member
Re: DIY - MKIV VR6 Transmission Removal / Clutch
Replacement (1.8TIM) »
« » 10:20 AM 7-92006
Offline
Member Since
11-27-2004
854 posts
Quote, originally posted by 1.8TIM »
looks like either racoon or cat meat all over there.
http://forums.vwvortex.com/zerothread?id=2703042
9/8/2006
VWvortex Forums: DIY - MKIV VR6 Transmission Removal / Clutch Replacement
Charlotte NC
2000 Jetta VR6,
150k and
counting.
Page 36 of 44
Or a leaky T-stat housing for 30k plus miles
Mike
Tired of getting ripped off at the STEALERSHIP?
Step by step MKIV DIY Video DVD's are HERE!
50% off for Vortex Members!!!
Email me at [email protected]
Blazing GTI
Member
Re: DIY - MKIV VR6 Transmission Removal / Clutch
Replacement (FaelinGL) »
« » 10:54 AM 7-92006
wow, that's exactly what I needed to see! Thanks for all the excellent pictures, it's greatly
appreciated!
Offline
Member Since
3-31-2006
41 posts
Now I just need to figure out if I can pull it off in a weekend.
Quote, originally posted by FaelinGL »
DIY - MKIV 12v VR6 Tranny Removal / Clutch Replacement
Culver City CA
2001 GTI 1.8T
i. Drive the vehicle to a well lit spot and chock the rear tires. You will be here for a
couple of hours, so make sure you can leave the car here undisturbed.
couple hours always turns into couple days plus 9 trips to pep boys for me
"A good friend will bail you out of jail. A best friend will be in jail with you saying, "That was
AWSOME!'"
SPKNGRMN
Member
Re: DIY - MKIV VR6 Transmission Removal / Clutch
Replacement (Blazing GTI) »
Offline
WOW, Mike!!
I won't even ask how long it took you to write up this DIY thread.
That's unreal how thorough it is! Job well done
Member Since
7-24-2002
6421 posts
Indian
Trail/Charlotte NC
'02.5 20VT
tipMODic
LSinLV
Moderator
Offline
« » 11:35 AM 79-2006
-Wes- €€€
soloROGUEstylez
Shuffle Up & Deal
GUCCI sunroof motor covers---->http://forums.vwvortex.com/zerothread?id=2763637
IM me for details
Re: DIY - MKIV VR6 Transmission Removal / Clutch
Replacement (SPKNGRMN) »
« » 11:35 AM 79-2006
will be added to the DIY's...great stuff!!
Member Since
11-24-2001
18981 posts
Larry
Las Vegas Nevada
00 VW GTI VR6
Proudly Brought to you by Wally The Wonder Llama!!!
http://forums.vwvortex.com/zerothread?id=2703042
9/8/2006
VWvortex Forums: DIY - MKIV VR6 Transmission Removal / Clutch Replacement
Futura Yellow and
a very very mad
snail...
"if you are "ballz-deep", then sadly, you have a small weenie." - My Wife
VR6 Seige
Member
Re: DIY - MKIV VR6 Transmission Removal / Clutch
Replacement (FaelinGL) »
Offline
not looking forward to replacing my clutch, but great DIY, thanks
Member Since
9-8-2004
1317 posts
Exton/Pottstown
PA
o1 gtI vR6
VgRt6
Moderator
Forum Rules | FAQ's and New User Guide | Generic OBDII Codes
« » 11:47 AM 7-92006
my car owns me.
-wip**OEM Headlights**
Re: DIY - MKIV VR6 Transmission Removal / Clutch
Replacement (VR6 Seige) »
Awesome job!
Offline
« » 3:36 PM 7-92006
The two of us should go into business together.
I'm adding a link to this in my timing chain DIY. Now I don't have to put my own tranny DIY
together. Thanks for saving me a ton of work (and likely my marriage too
Member Since
3-7-2002
10548 posts
Page 37 of 44
).
Do you have any more pics of the removal of the drive flange from the tranny. That almost
warrants its own DIY (translate, I want more pics because I'll have to do it eventually
)
Germantown MD
99.5 Jetta GLS
VR6
Gary
Now: '99.5 Jetta GLS VR6
(210,000 miles and counting!
Then: '90 Passat GL 16v -
(RIP - i.e., Rest in Pain!!! in a junkyard somewhere you LEMON
... and no CEL!!!
)
POS - still loved her though
)
* Free VAG-COM scans in the DC area - IM me *
* The Official VgRt6 MKIV/VR6 DIY Thread Master List *
FaelinGL
Member
Re: DIY - MKIV VR6 Transmission Removal / Clutch
Replacement (VgRt6) »
« » 7:30 PM 7-92006
Offline
Member Since
11-27-2004
854 posts
Charlotte NC
2000 Jetta VR6,
150k and
counting.
Quote, originally posted by VgRt6 »
Awesome job!
The two of us should go into business together.
I'm adding a link to this in my timing chain DIY. Now I don't have to put my own
tranny DIY together. Thanks for saving me a ton of work (and likely my marriage too
).
Do you have any more pics of the removal of the drive flange from the tranny. That
almost warrants its own DIY (translate, I want more pics because I'll have to do it
eventually
)
Larry, thanks for the additions, it has been done. No worries Gary, I got to keep you going to
300k! BTW, did you check your clutch disc very closely? The disc on mine was in excellent
condition, however I noticed a hairline fracture running along the metal in the center.
http://forums.vwvortex.com/zerothread?id=2703042
9/8/2006
VWvortex Forums: DIY - MKIV VR6 Transmission Removal / Clutch Replacement
Page 38 of 44
As far as the drive flange, what you see above should do it. After draining the tranny fluid,
unscrew the 5 mm conical bolt and slide the flange out. Really, really easy. I would assume the
driver's side is exactly the same. Make sure you have someone stepping on the brakes or you are
holding the flange so it doesn't turn when you remove the conical bolt.
Mike
Tired of getting ripped off at the STEALERSHIP?
Step by step MKIV DIY Video DVD's are HERE!
50% off for Vortex Members!!!
Email me at [email protected]
hawaiian5-0
Member
Re: DIY - MKIV VR6 Transmission Removal / Clutch
Replacement (FaelinGL) »
« » 7:44 PM 7-92006
...very nicely done..you need to have a few of these for that write up..
Offline
Member Since
11-29-2005
483 posts
I hate the 1.8T engine
*The Ohio State University Alum*
princeville hi
2 bad a$$ rides in
the 808
Quote, originally posted by Chacolla »
your driveway looks like it could be used as a half-pipe for the x-games.
JamieK18T
Member
Re: DIY - MKIV VR6 Transmission Removal / Clutch
Replacement (Elvir) »
« » 8:13 PM 7-92006
Quote, originally posted by Elvir »
awsome, great job man!, now go do the 1.8T
Offline
Member Since
1-14-2002
4655 posts
Louisville, KY
01 GTI, 94 Jetta,
87 Jetta Coupe
shadowmilkman
Member
Elvir
not much of difference.
01 GTI
01 Jetta - R.I.P.
1991 Alfa Romeo 164S
1990 Civic B16A
»
« » 8:19 PM 7-9-2006
Offline
Member Since
3-24-2006
890 posts
u should get an award for that like a little sir name on ur SN so that everyone knows that u know
what the hell ur talking about, ur a winner
Bethesda MD
2003,
Volkswagen Jetta
24v GLI
http://forums.vwvortex.com/zerothread?id=2703042
9/8/2006
VWvortex Forums: DIY - MKIV VR6 Transmission Removal / Clutch Replacement
bigmak
Member
Page 39 of 44
« » 8:21 PM 7-9-2006
Re: (shadowmilkman) »
another great faelin diy guide.
Offline
Member Since
1-5-2004
22089 posts
Fairfax /
Blacksburg VA
mhmm
VgRt6
Moderator
Mikey, aim: bigmak040 | my site | 42 draft designs | melissa theuriau
(23:29:25) Bellaheather: i'm such a post whore
(23:29:30) Bellaheather: i cant stop
ႃ eurogruppe: holland, michigan......
Club Whore Status
Re: DIY - MKIV VR6 Transmission Removal / Clutch
Replacement (FaelinGL) »
« » 4:48 AM 710-2006
Quote, originally posted by FaelinGL »
BTW, did you check your clutch disc very closely? The disc on mine was in excellent
condition, however I noticed a hairline fracture running along the metal in the center.
Offline
Member Since
3-7-2002
10548 posts
We checked it very closely. My clutch disc had very little visible wear, even at 147k miles. There
were no cracks visible (I look for them for a living, so I know what to look for
my clutch disc at 147k miles.
). Here's a pic of
Germantown MD
99.5 Jetta GLS
VR6
Quote, originally posted by FaelinGL »
As far as the drive flange, what you see above should do it. After draining the tranny
fluid, unscrew the 5 mm conical bolt and slide the flange out. Really, really easy. I
would assume the driver's side is exactly the same. Make sure you have someone
stepping on the brakes or you are holding the flange so it doesn't turn when you
http://forums.vwvortex.com/zerothread?id=2703042
9/8/2006
VWvortex Forums: DIY - MKIV VR6 Transmission Removal / Clutch Replacement
Page 40 of 44
remove the conical bolt.
So it just slides out easily? Perfect. I heard it was easy, but didn't realize it was that easy. Having
that flange out of the way will make removing and installing the tranny 10 times easier!
Gary
Now: '99.5 Jetta GLS VR6
(210,000 miles and counting!
Then: '90 Passat GL 16v -
(RIP - i.e., Rest in Pain!!! in a junkyard somewhere you LEMON
... and no CEL!!!
)
POS - still loved her though
)
* Free VAG-COM scans in the DC area - IM me *
* The Official VgRt6 MKIV/VR6 DIY Thread Master List *
superherosean
Member
Re: DIY - MKIV VR6 Transmission Removal / Clutch
Replacement (FaelinGL) »
« » 4:56 AM 710-2006
Offline
Member Since
2-26-2006
883 posts
pj ny
2003 VW GTI VR6
infinityman
Member
That's thirty minutes away. I'll be there in ten.
WTB: stock or stubby mirrors. indi or black.
http://forums.vwvortex.com/zerothread?id=2790154
Re: DIY - MKIV VR6 Transmission Removal / Clutch
Replacement (superherosean) »
« » 5:29 AM 710-2006
thumbs up to you mang!
Offline
will this DIY work the same for the 1.8t (AWP) ?
Member Since
9-2-2004
2205 posts
midland mi
2002 GTI
1.8turbo AWP
|Polished Montes|Shaved hatch| R/S/S/R tails|APR|3" TB|n75 H|Koni Yellows|GroundControl
Coilover kit|350/325 eibach springs|SPC camber plates|28mm neuspeed rsb|BFI upper rear tie
bar|20th recaros|710N DV |10mm/20mm spacers|K&N filter|Audi TT short shift|Prothane
dogbone|painted valences|Splitter|Black grill|20th headlights|Hankook RS2's|Stubby|smoked
corners/repeaters|shaved painted engine bay|
Black00vr63
Member
Re: DIY - MKIV VR6 Transmission Removal / Clutch
Replacement (FaelinGL) »
Offline
OMG! This is so sweet! I have hoped a DIY would be done before I have to do mine. Thank you so
much!
Member Since
6-7-2005
558 posts
"Representing Deutschland"
« » 5:38 PM 710-2006
baltimore md
96 Jetta 2.Slow
Sold 03 Gti 1.8T
http://forums.vwvortex.com/zerothread?id=2703042
9/8/2006
VWvortex Forums: DIY - MKIV VR6 Transmission Removal / Clutch Replacement
Page 41 of 44
Gone 2000 Jetta
VR
Vdub12
Member
»
« » 5:46 PM 7-10-2006
****ing sweet.
Offline
Member Since
2-24-2003
11922 posts
PAGPARTS.COM
MEMORYFAB.COM
OPENROADTUNING.COM
Down Your Throat
LazyAzn
Member
Offline
Member Since
7-13-2003
628 posts
Kensington MD
2001 GTI VR6
1992 GTI
8V**SOLD**
1990 GTI
8v**SOLD**
SPKNGRMN
Member
Re: (Vdub12) »
« » 6:01 PM 7-10-2006
This should be added to the DIY section of the MK4 FAQs and with his other DIY too. Great job
1992 8v GTI Project in progress.... The project died Car was sold August 2005
1990 8v GTI Project in progress.... The project died Car was sold
July 2006
2001 VR6 GTI Project in progress...
Re: (LazyAzn) »
« » 6:18 PM 7-10-2006
Mike IS the man!!!
Had him over to the house today. He VAGed, scanned, cleared, coilpacked, and multiple others
things while he was here.
Offline
He's local, and you guys can't have him!!!
Member Since
7-24-2002
6421 posts
Indian
Trail/Charlotte NC
'02.5 20VT
tipMODic
VgRt6
Moderator
-Wes- €€€
soloROGUEstylez
Shuffle Up & Deal
GUCCI sunroof motor covers---->http://forums.vwvortex.com/zerothread?id=2763637
IM me for details
Re: (SPKNGRMN) »
« » 4:29 AM 7-11-2006
This thread was added to the MKIV DIY thread in the transmission section.
http://forums.vwvortex.com/zerothread?id=2703042
9/8/2006
VWvortex Forums: DIY - MKIV VR6 Transmission Removal / Clutch Replacement
Page 42 of 44
Offline
Member Since
3-7-2002
10548 posts
Germantown MD
99.5 Jetta GLS
VR6
Pifiu
Member
Offline
Member Since
1-27-2002
20805 posts
MIAMI
its euro.. thats all
you have to
know. VERY
EURO!
wzcunningham
Member
Gary
Now: '99.5 Jetta GLS VR6
(210,000 miles and counting!
... and no CEL!!!
)
Then: '90 Passat GL 16v -
(RIP - i.e., Rest in Pain!!! in a junkyard somewhere you LEMON
POS - still loved her though
)
* Free VAG-COM scans in the DC area - IM me *
* The Official VgRt6 MKIV/VR6 DIY Thread Master List *
« » 6:14 AM 7-11-2006
Re: (VgRt6) »
WOW!!!! now thats a DIY!
English: I would like to buy a hamburger.
Euro: A wiad like toa bye a damburgaaaar!!
ႃႃႃ
PIFIU
ႃႃႃ
Buy my Oettinger grill
Re: (Pifiu) »
« » 6:19 AM 7-11-2006
Offline
Member Since
3-29-2006
1409 posts
Mount Laurel NJ
2003 GTI 1.8T
5spd all
+OEMness
UntouchableGTI
Member
thank you.
Quote, originally posted by stormdc »
God damn bible thumpers. WHy would a god troll, troll a car forum hahahaha
Re: DIY - MKIV VR6 Transmission Removal / Clutch
Replacement (Elvir) »
« » 10:22 PM 7-252006
"awsome, great job man!, now go do the 1.8T
Elvir"
Offline
Member Since
4-30-2006
1366 posts
Waukesha WI
02 GTI 1.8T
I will have my write up DIY on a 1.8T clutch/ transmission removal by like sunday so keep ur eyes
out for it, i know the vr6 is similar but im sure the 1.8t has a few diff quarks so cant hurt, and i
will be using this diy as a type of guide.
Bump for a great write up
Modified by UntouchableGTI at 10:24 PM 7-25-2006
http://forums.vwvortex.com/zerothread?id=2703042
9/8/2006
VWvortex Forums: DIY - MKIV VR6 Transmission Removal / Clutch Replacement
Page 43 of 44
Pagparts.com
I have a crotch rocket
"THANX BUT I HAVE A MKIV VR6 12V 2.8 // ITS A RARE // BUT ITS FAST LIKE HELL // SMOKED A
MAZDA 6, CRX, INTEGRA,ACCORD, COROLLA SR // AND I ONLY HAVE A COLD AIR INTAKE"
-ivansalazar882006
DeltaP42
Member
« » 1:02 PM 7-27-2006
»
aside from engine-bay removal stuff, would this work for a mk3?
Offline
Member Since
2-7-2006
384 posts
Fond Du Lac WI
1998 GTi Vr6
VgRt6
Moderator
Quote, originally posted by Teufelhunde »
douchebagachu.
****Proud contributor to the "I just sold my $4000 98 Jetta for $12 grand" thread of 2006****
'98 GTi VR6
Ghosts of the past - 98 Neon R/T, 94 Spirit 3.0v6, 89 Lebaron 2.4 turbo (w/stage2 & FMIC), 89
Nissan Pulsar NX
Looking For mk1/2 <$1000 in MI,WI,IL
« » 1:31 PM 7-27-2006
Re: (DeltaP42) »
Quote, originally posted by DeltaP42 »
aside from engine-bay removal stuff, would this work for a mk3?
Offline
Member Since
3-7-2002
10548 posts
Germantown MD
99.5 Jetta GLS
VR6
2002GTI
Member
Offline
Member Since
9-18-2001
4566 posts
Other than the different engine/trany mounts, it should be very similar.
Gary
Now: '99.5 Jetta GLS VR6
(210,000 miles and counting!
Then: '90 Passat GL 16v -
(RIP - i.e., Rest in Pain!!! in a junkyard somewhere you LEMON
... and no CEL!!!
)
POS - still loved her though
)
* Free VAG-COM scans in the DC area - IM me *
* The Official VgRt6 MKIV/VR6 DIY Thread Master List *
« » 3:11 PM 7-27-2006
Re: (VgRt6) »
Amazing DIY write up!
B.T. Stage I.I
TX
» Return to Golf IV & Jetta IV
Golf IV & Jetta IV
http://forums.vwvortex.com/zerothread?id=2703042
Quick Reply
9/8/2006
VWvortex Forums: DIY - MKIV VR6 Transmission Removal / Clutch Replacement
Page 44 of 44
K&L Clutch & Transmission
Clutch Kit Info
Twin Disc Rockford PTO Clark Allison
Distributor
www.klclutch.com
Get Info on Clutch Kit from 14 Search Engines Performance racing, towin
in 1
Torque Converters.
www.info.com/ClutchKit
www.specriteconverters.c
SpecRite Torque Con
For advertising information Click Here
Powered by ZeroForum 2.1.2. ©2005 RelyNet, Inc.
http://forums.vwvortex.com/zerothread?id=2703042
9/8/2006