1
Collaborative Orienteering Mapmaking with Open software
Version: 1.1 (1st English version, 10.08.2012)
CC-BY-SA Török Imre 2012
Introduction
Purpose of this document is describing the method of on-line cooperative orienteering map making for
its potential users. Each step of this description can be performed with free software. This description is
based on the following COMO tutorials from Sweden:
http://wiki.openstreetmap.org/wiki/IOFmapping
http://como.oxtract.se/
Thanks to David Svantesson, who invented the theoretical and technical basis of this method and to Dr.
László Zentai for the revision of this document.
Creating contours
Creating contours is a relatively complicated process, but it is not necessary to perform it by every
user. It is enough if coordinator of a certain map area performs this action then share the osm file
containing the contours.
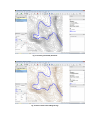
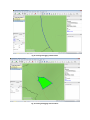
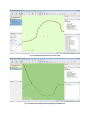
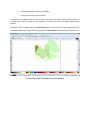
1. 1st method: Generating rough contours from NASA SRTM data base
This method is rather confortable, however the 30m resolution of SRTM data base results in a
rough contour pattern when the standard 5 m contour distance of IOF maps is used. Method is
the following:
• Install
the
Strm2osm
software
(download
site:
http://osm.michispla.net/code/Srtm2Osm-1.9.7.0.zip )
• Run software from command prompt with the following command:
srtm2osm -bounds1 47.5339 18.9651 47.5521 18.9925 -step 5 -cat 1000 25
(First coordinate is the S-W corner; second coordinate is the N-E corner of the map area.
Coordinate format is dd.dddddd.)
• Open the generated osm file in Merkaartor editor
• Select all the contours then add the following OSM tags to them: iof:contour;
type:normal (in left bottom corner of SW window).
• Select the index contours (every 5th) and modify their tags to type:index.
• Export the contours to a new osm file from Merkaartor editor: File > Export.
• Do not upload any contour onto an OSM server; handle them separately during the
whole map making process!
Further description: http://wiki.openstreetmap.org/wiki/Srtm2Osm
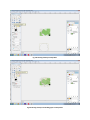
Fig. 1: Contours generated by Strm2osm
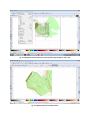
Fig. 2: Brown contours after adding IOF tags
2. 2nd method: Copying contours from existing maps
The Walking paper feature of Merkaartor editor provides an image layer that can be used for
copying objects from existing maps. Using Walking papers is described in a separate chapter.
The copied contours also have to be tagged as iof:contour; type:normal or iof:contour;
type:index (for index contours), then they have to be exported into a separate osm file.
This contour file has to be handled separately during the whole map making process,
uploading contours to OSM server is forbidden!
Editing map
There are several choices for editing Open Street Map (JOSM, web editor, etc.), but Merkaartor editor
fits best for special requirements of IOF mapping. This is the most similar to OCAD editor; therefore
present document describes only this editor. General user manual for Merkaartor editor can be found
at http://merkaartor.be/wiki/merkaartor/Documentation, this document describes only the most
important methods of IOF mapping.
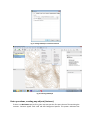
Special settings of Merkaartor SW for IOF mapping
Merkaartor software has no built in support for IOF symbols; therefore ISOM style has to be installed
separately by the following way:
•
Download and unpack zip file of ISOM style into Merkaartor directory.
•
Register ISOM style in the software: Tools > Preferences > Style tab, and then giving the path
of ISOM.mas file.
•
Apply the ISOM style in Merkaartor: Tools > Styles > ISOM.mas
Fig. 3: Setting ISOM style in Preferences Menu
Fig. 4: Selecting ISOM Style
Basic operations, creating map objects (features)
If there is no Merkaartor project for a given map area yet then first open the osm file containing the
contours. Contours appear with small red dots background pattern. This pattern indicates that
exiting OSM map features are not yet downloaded from OSM server for the given area. This
background pattern can be eliminated by downloading the available OSM data, or by unselecting
the Show > Show downloaded areas option.
Clicking onto the Download button Merkaartor SW downloads the available map objects (features)
from OSM server and the red dotted background pattern disappears.
Some basic method for navigating in map window:
• Zoom in/out: mouse wheel
• Move the map: move the mouse with right click
Adding IOF tags to existing OSM features
If there are existing OSM features that should appear on IOF map, but has no IOF tag yet, then the
appropriate IOF tags have to be added to them (in the left bottom corner of SW window). Tags can
be chosen from the table of Annex A: Tagging rules of ISOM symbols. It is recommended to print this
table and keep it in hand while map editing in order to accelerate finding the right IOF tags. If ISOM
style is selected in Merkaartor and tags are given correctly then features appear as ISOM symbols.
It is recommended to check the existing tags of a feature before adding the IOF tag. If there is a
layer tag, then it can make complications during the map generation, as it modifies the drawing
order of map objects. In this case it may be better to make a copy of feature and add IOF tags to the
copy.
Adding new features
New features can be added by clicking onto Node, Road or Area buttons.
• Node button: Creating a simple feature (e.g. pit, tree); every new click onto map area adds a
new feature.
• Road button: Creates linear feature (e.g. path, road, boundary); every click onto map adds a
new point of the linear feature. End point of the feature can be made by double click.
• Area button: Creates area feature (e.g. forest area, settlement area); every click onto map
adds a new point of area boundary. Close the boundary line for finish the process.
After creating the features their IOF tags have to be added in left bottom corner of Merkaartor
window. Several features can be tagged together by using multiple selections. Tagged features
appear with their ISOM symbols (or at least with their quasi ISOM symbols). New or modified
features are marked by a red dot or red line, which indicates that they are not yet uploaded onto
OSM server (Dirty Features). It is recommended to decrease the width of red line by the following
settings: Tools > Preferences > Colors tab, and then change Dirty to 1 pixel.
If 1 pixel red marking is still disturbing (e.g. in case of making a print from Merkaartor) then it can be
eliminated by the following way: Unselecting the Show > Highlight dirty features checkbox.
After adding the necessary features, map should be saved into .mdc file as a Merkaartor project. If
the new or modified features are correct and they have no problems concerning intellectual
property right (own survey or written permission of used map source owner; see
http://www.openstreetmap.org/copyright for more details) then they can be uploaded to OSM
server by Upload button. Uploading requires a registration, which can be made at
http://www.openstreetmap.org/. If new features have IOF tags only then they will not appear on
normal web interface of OSM. However they will appear in OSM web editor as thin black lines or
dots and their tags can also be seen. They appear as IOF map only by using the Merkaartor editor if
ISOM Style is selected.
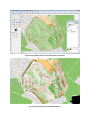
Fig. 5: Dotted background before downloading the existing features
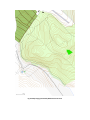
Fig. 6: Map view after downloading OSM data
Fig. 7: Creating and tagging a Node Feature
Fig. 8: Creating and tagging a Road Feature
Fig. 9: Creating and tagging an Area Feature
Fig. 10: Indicating Dirty features by red line or dot
Fig. 11: Red lines/dots disappear after uploading onto OSM server
Fig. 12: Setting line width of Dirty Features marking
Important rules for editing (differences in appearance between Merkaartor
and Osmarenderer)
Unfortunately map appearance in Merkaartor is not exactly the same as the final map generated by
Osmarenderer. This behavior is called almost WYSWYG (What You See is What You Get).
Rules described in this chapter have to be respected in order to have a correct final map after map
generation by Osmarenderer.
Asymmetrical road features
Due to the limitation of Merkaartor style editor it is not possible to define asymmetrical (comb shaped)
symbols (e.g. cliff, fence, tunnel entrance, etc.), therefore approximate quasi symbols are used during
map editing. Osmarenderer always draws the pins of asymmetrical or comp shaped features onto the
right side of their drawing direction. Drawing direction of a feature can be checked in Merkaartor
editor by selecting it, then select the One-way option in its Properties window. There is a separate
button in the menu bar for reversing the direction of a feature.
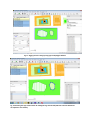
Overlap of Area features
Merkaartor indicates the area features according to their creation order, while Osmarenderer applies
the rendering order of each ISOM symbols, which is defined in isomrules.xml file. This difference can
result that an area feature visible in Merkaartor editor will not be visible on the final map generated by
Osmarenderer.
Following rules define the possible cases when an area feature can be created over another one. In
other cases a hole has to be cut in the existing area feature before adding the new one over it. Else
the new area feature will not appear on the final map.
General rendering order of isomrules.xml (last item will be on the top):
•
•
•
•
•
•
•
open_land
forest
o running:easy
o running:slow
o running:difficult
o running:impassable
open_land_in_forest
settlement
water
road area
building
During definition of above rendering order it was aimed to minimize the need for hole cutting in the
map editing process. The open_land_in_forest tags (as copy of open_land tags) were created
definitively for this reason.
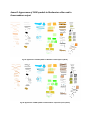
Fig. 13: Examples for allowed area feature overlaps without hole cutting
Fig. 14: Allowed combination of overlapping area features without hole cutting (inner open land tagged as
open_land_in_forest)
Fig. 15: Area feature combinations requiring hole cutting
Fig. 16: Demonstration of rendering order of different road and area features
Cutting holes into area features
If the desired area feature combination cannot be implemented by the overlap rules of previous
subchapter (e.g. a clear forest area within a dense forest area) then a hole has to be cut into the
outer area feature. It is a relatively complicated process, but it can be done quickly after having
practice, and it is has to be done relatively rarely.
Important remark: The in-fill color/pattern of the new hole will remain the color/pattern of outer
area in Merkaartor editor, but it will be rendered properly by Osmarenderer.
Cutting hole into a new area feature
• Click on Area button, and then draw the outline of the area.
• There will be a pop-up window at the closing of the outline (Do you want to add a(nother)
hole to this area?). Choose Yes, and then draw the outline of the hole.
• Tags of complex area features (areas having holes) has to be assigned to the area feature
itself by selecting its outline. Do not add IOF tags to area relations, as they are not
processed by Osmarenderer.
Cutting hole into an existing area feature, which has no hole yet
• Select the outline of area feature then remember its ID (see Properties window)
• Draw the outline of the hole as an area feature then remember its ID
•
•
Select both the outlines of original area feature and the hole (by pushing Shift button during
selection), and then Create > Relation
Add the necessary tags to the relation:
o ID of original area feature outline: role=outer
o ID of hole outline: role=inner
Cutting hole into an area feature, which already has hole(s)
• Draw outline of the hole,
• Add to selection the Relation containing the original area feature and its previous hole(s)
• Add outline of new hole to the relation: Relation > Add Member
• Add relation tag for new hole in the relation properties window: ID of new hole outline:
role=inner
Proper tagging of hole infill
If IOF tags are added directly to outline of the hole, then they will not be processed by
Osmarenderer. Therefore a copy of the hole outline has to be created first, then IOF tags has to be
added to the copy of the hole outline. In this case hole infill will be rendered properly by
Osmarenderer on the final map. Copying of hole outline is simple:
• Select the hole outline then click onto Copy and Paste buttons.
• For selecting the copy of hole outline click onto the outline. Double circles around the points
of outline indicate that there are more features over each other.
• The newly created outline is listed as second one in the left bottom window of Merkaartor,
so click to this list item for selecting the proper outline for IOF tagging (first list item
corresponds to the start point of the new outline).
• It is also possible to use the Tab button of keyboard for selecting the right object in case of
multiple selections.
• If copy of hole outline has been selected then IOF tags for hole infill can be added.
Fig. 17: Tagging for hole cutting by using type=multipolygon Relation
Fig. 18: Selecting the copy of hole outline for adding IOF tags of hole infill (2nd item in the left bottom list
corresponds to new outline)
Infill of areas limited by road features
OSM editors enable creating type=boundary Relation. In this case area can be defined as a relation of
limiting road features, and tags for area infill can be added to this relation. However Osmarenderer
cannot handle IOF tags for relations, so this method shall be avoided in case of o-map creation.
It means that even there are road features limiting an area, outline of area has to be created again in
order to add the IOF tags for area infill. It can be effective to make copy of limiting road objects, cut
their sections limiting the area, then merge these sections into an area outline and add the IOF tags.
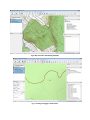
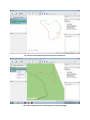
Methods for facilitating map creation
Loading GPS tracks
File > Import menu of Merkaartor enables loading own GPS tracks. Before tagging own GPS tracks it
is recommended to check if these roads are already present in OSM database (Download button).
It is not possible to add tags directly to imported GPS tracks, therefore tracks has to be extracted
into a drawing layer for editing: Right click on label of GPS track layer, then select Extract Drawing
layer. Track in this new extract layer can be edited and tagged as a road feature. From this editing
phase it is recommended to hide the original GPS track layer by clicking onto „eye” icon near the
label of layer.
Useful Merkaartor functionalities for editing and tagging GPS tracks:
• Split button: Enables splitting GPS track into sections that can be selected and tagged
separately (e.g. one section of the track is a road another one is a path). If Split button is
applied when multiple points are selected, then track will be split into multiple sections in
one step. For selecting split points, first select the road feature, and then click onto split
points while pushing the Shift button of keyboard. Finally click onto Split button. This
functionality can also be used for removing the redundant parts of GPS track.
• Break button: It doubles the selected point of a road object, so it will became two
disconnected ending points, which can be moved independently from each other. This
functionality is proposed for separating the branching roads at their junction.
Remark: It is not necessary to have an expensive GPS receiver for creating GPS tracks and way
points. The free Oruxmaps software can be downloaded even to the simplest Android smart phone
and enables recording tracks and way points then exporting them to gpx or kml format that can be
imported by Merkaartor. However dedicated GPS receivers provide more accurate tracks.
Fig. 19: View of imported GPS tracks and way points in Merkaartor
Fig. 20: Extracting GPS data into a drawing layer for editing and tagging
Fig. 21: Splitting GPS track into sections in Extract layer
Fig. 22: Removing redundant parts of GPS track after splitting
Setting on-line map source as background
Merkaartor provides possibility for setting on-line maps as background. For example turistautak.hu
(TUHU) is a good WMS service for Hungarian trekking maps having detailed forest trail network.
Due to IP right issues it is usually forbidden to copy tracks from on-line map sources, but they can
be used for checking distortion of old orienteering maps or checking accuracy of own GPS tracks.
OSM has general agreement for using BING aerial photo, so it is allowed to draw its objects onto
OSM maps
Setting a WMS maps source as background of Merkaartor editor can be done by the following
method (example for turistautak.hu WMS server):
Tools > WMS Servers Editor…, then give the address of WMS server (Server URL):
http://terkep.turistautak.hu/tiles/turistautak-domborzattal/{$z}/{$x}/{$y}.png
Create a new image layer for the on-line map background:
Layers > Add new Image layer; right click on the label of new layer ("Map - None"), then select the
following in the pop-up menu: WMS Adapter > TUHU
It is also useful to set Bing aerial photo as background by the following method: Layers > Add new
Image layer; right click on the label of new layer ("Map - None"), then select the following in the
pop-up menu: Plugins > Bing Maps
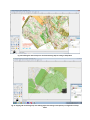
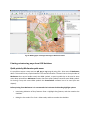
Fig. 23: WMS server settings for turistautak.hu maps
Fig. 24: WMS map source (TUHU) as background image
Walking papers: Setting own scanned map as background
OCAD has a feature for importing and calibrating a scanned map image then set it as background.
Unfortunately Merkaartor has no such functionality; therefore the following complicated method has to
applied:
Generate a Walking paper for the chosen area at http://walking-papers.org/ site. Save the URL of
generated Walking paper as a bookmark because Merkaartor will need this URL for calibrating the
picture. Manipulate the generated Walking paper pdf file in an advanced photo editor (Gimp or
Photoshop) according to the following process.
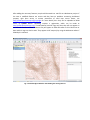
Manipulating a Walking paper (e.g. for using an old orienteering map as background) is a complicated
process. However it not necessary to be performed by each user. It is enough if the coordinator of a
map area performs it once in a period then shares it with the map editing community. Setting a
manipulated Walking paper as Merkaartor background is easy and can be done by each user.
As old orienteering maps (created without GPS survey) can have strong distortions, so their accuracy
has to be checked (e.g. by comparing to a WMS map source, existing OSM tracks or own GPS tracks
for the given map area)
Main steps of the procedure are the following:
• Open the generated Walking paper pdf in an advanced photo editor (Gimp or Photoshop)
• Open your desired background image (e.g. old orienteering map) in a separate window of
the photo editor. Cut the desired area then add it onto the walking paper image as a new
layer.
• Set the transparency of the new layer to highly transparent
• Calibrate the transparent layer containing your desired background image onto the walking
paper by resizing and moving it. Generally several resize/move cycles are necessary for
perfect matching of the background image onto the walking paper. Sometimes a small
rotation is also necessary. In Gimp editor push the Ctrl button while resizing in order to keep
the proportion of vertical and horizontal dimensions. In case of old maps it can happen that
exact matching is not possible due to distortions. In this case consider splitting old map into
smaller areas and calibrate them separately.
• After having exact (or at least acceptable) matching between the original walking paper and
the desired background image, transparency of upper layer can be set back to 0.
• Crop the result image on the edges of original walking paper map. (Walking paper
positioning will be wrong in Merkaartor editor if borders are not removed by this crop
operation).
This process seems complicated (as it is), but having some practice it can be done within a few
minutes. Gimp photo editor is free and can be downloaded http://www.gimp.org/ site.
The above calibration/matching process is called georeferencing.
Setting Walking paper as Merkaartor editor background
Follow the method below in order to have the Walking paper as background of Merkaartor editor:
• Create a new image layer for the background: Layers > Add new Image layer; right click on
the label of new layer ("Map - None"), then select the following in the pop-up menu Plugins
> Walking Papers
• Load the Walking paper into the new image layer: right click on the label of new layer ("Map
- Walking Papers"), then select the following in the pop-up menu Load Image, and give the
access path of the Walking paper image file. Merkaartor will ask the URL of the Walking
paper. This is the URL of the generated Walking paper when generating it at http://walkingpapers.org/ site. This URL is usually contained by the filename of the Walking paper image.
Remarks:
• There is functionality for automatic detection of Walking paper URL using zbar software for
reading the QR code on the image. In this case it is not necessary to manually type in the
URL of Walking paper, but this functionality is not reliable.
•
•
When loading a Walking paper image it is highly recommended to set the map position and
zoom level for matching the map area of editor window with the Walking paper.
If positioning of Walking paper image is wrong then its border probably was not properly
removed after scanning/editing. (Walking paper image has to be borderless for exact
positioning. Removing the borders by cropping can be done by any picture editor software.)
Fig. 25: Original Walking paper (after removing its borders)
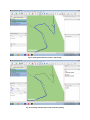
Fig. 26: Selecting the desired map area of old orienteering map for cutting in Gimp editor
Fig. 27: Copying old orienteering map onto walking paper then setting its transparency to a high value in Gimp
editor
Fig. 28: Resizing old map in Gimp editor
Fig. 29: Moving old map onto walking paper in Gimp editor
Fig. 30: Final calibration before reset the transparency of old map
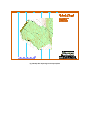
Fig. 31: Manipulated (georeferenced) Walking paper
Fig. 32: Walking paper as background image in Merkaartor editor
Printing orienteering maps from OSM database
Quick prints by Merkaartor print menu
It is possible to export a map area into pdf, png or svg image by using File > Print menu of Merkaartor
editor. This method is very simple however it has several limitations. The main limit is the style editor of
Merkaartor than cannot handle exactly the IOSM symbols, so quasi symbols has to be used in some
cases. Maps printed form Merkaartor contain also these quasi symbols instead of exact ISOM symbols.
For having a map with exact ISOM symbols the Osmarenderer software has to be used (see next
chapter).
Before printing from Merkaartor it is recommended to inactivate the disturbing highlight options:
•
Inactivating indication of Dirty features: Show > Highlight dirty features, and then unselect the
checkbox.
•
Hiding the line nodes: File > Print > Show nodes, and then unselect the checkbox.
Remark: Print Menu of Merkaartor has minor bugs, so only the first exported picture file will be correct.
In case of generating several picture files or having an error at exporting it is recommended to exit the
Print menu, and then select it again.
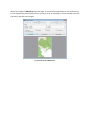
Fig. 33: Print menu of Merkaartor
Fig. 34: Map image generated by Merkaartor Print menu
Map generation by Osmarenderer software
Printing orienteering maps with better quality can be performed by special o-map edition of
Osmarenderer application, which was developed by David Svantesson. Using this method ISOM symbols
appear correctly, however this printing process is more complicated.
It is not necessary to execute this process by each map editing user. It is enough if coordinator of a
given map area performs it once or twice a year, and then publish the printable map file with other
users.
Main steps of generating a printable orienteering map are the following:
•
Unhide all layers containing o-map data in Merkaartor editor.
•
Export map into map.osm file (File > Export menu, then select osm(xml) format)
•
Save the Merkaartor project into an mdc file. It will enable reproducing this map version, and
can be useful for recovery of OSM server database in case of vandalism.
•
Copy the exported map.osm file into the directory of Osmarenderer application then launch the
rendering process by render.bat command from command prompt.
•
Perform the finishing works (corrections, hiding the unnecessary areas, adding north lines and
text labels, etc.) on the resulting map.svg file in a vector graphical editor (e.g. Inkscape or
Adobe Illustrator). Inkscape editor is free and can be downloaded from the following site:
http://inkscape.org/.
•
Do not forget to indicate the Open Street Map logo and the corresponding Creative Commons
license (CC-BY-SA, see http://www.openstreetmap.org/copyright for details) on the map. There
is an intellectual property right violation if these elements are not indicated on the map!
Useful tips for finishing works with Inkscape editor:
•
Hiding the unnecessary parts of map: draw outline of desired map area, select all objects by
Ctrl+A, then select Object > Clip > Set menu, finally save the clipped map into a new file (e.g.
map-clipped.svg).
•
Open the map template (e.g. template_map_A4_landscape.svg)
•
Import the clipped map into the template (File > Import), move the map into the desired
position then send it to background (End button of keyboard)
•
Add your text labels onto map
•
Save the finished map into a svg file.
•
Proposed settings for printing:
o
Inkscape Rendering method: raster 600dpi,
o
Printer driver settings: picture quality
If there are minor problems with the order of layers, then they can be fixed in vector graphical editor. In
Inkscape editor order of objects can be changed by selecting them then pushing the PgDown/PgUp
buttons.
Important remark: standard version of Osmarenderer does not handle any IOF tags. Orienteering maps
can be generated only by special orienteering edition of Osmarenderer developed by David Svantesson.
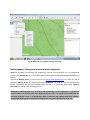
Fig. 35: Drawing outline of desired map area in Inkscape editor
Fig. 36: Clipping the desired map area in Inkscape editor (Ctrl-A; Object > Clip > Set)
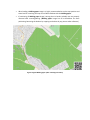
Fig. 37: Clipped map area in Inkscape editor
Fig. 38: Map after importing it into map template
Annex A: Tagging rules of ISOM symbols
(Based on http://wiki.openstreetmap.org/wiki/IOFmapping, but having minor modifications and
updates)
Default values are marked with underlined characters. It is not necessary to add tags for default values.
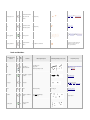
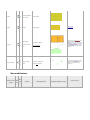
Land forms
It is forbidden to upload contours onto OSM server (other landform objects can be uploaded)!
Contours have to be exported into a separate OSM file, and this file has to be shared within the map editing community.
Value for iof= key
IOF
Type
notation
Comment
Extra key=value pairs
Rendering example (not to scale)
corresponding osm tags
code
101,
type=normal/index/form.
contour
102,
Height contours
altitude=[meter] to specify height over sea
103
Draw slope line for node
slope_line
104
on a contour.
Earth banks. For a small
earth_bank
106
earth bank you could
size=normal/high
use a single node
107,
earth_wall
Earth walls
size=normal/small
barrier=earth_bank orman_made=embank
ment. For earth banks along both sides of a
way alsoembankment=yes or cutting=yes.
Optionaly: height=* so that the renderer can
decide wether a slope is high or not. Should it
be mapped as an area to define a varying
length of the slope lines?
barrier=earth_wall optionalyruins=yes
108
109,
erosion_gully
size=normal/small.
Erosion gully
110
elongated:yes/no.
112,
Knolls too small to be
small_knoll
direction:[0-360] for direction of long side
113
way: barrier=ditch optionalyindistinct
=yes
area=yes/no (for larger erosion gully)
shown by contours.
of elongated knoll.
node: barrier=earth_wall orhistoric=t
umulus orhistoric=archaeological_sit
ewith site_type=tumulus optionaly:direc
tion=* for elongated knolls
Small shallow natural
small_depression
115
depressions and
barrier=ditch withindistinct=yes
depth=[meter]
hollows
Pits and holes with
pit
116
barrier=ditch
depth=[meter]
distinct steep sides.
broken_ground
117
special_landform
118
area: barrier=ditch orbarrier=earth_w
all witharea=yes optionaly:runnability=
*
Broken ground
(something you map appropriately and
configure the renderer to show it as
IOF118_special-landform)
Special land form
Description:User Defined
feature
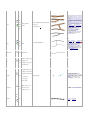
Rocks and boulders
Value for iof= key
notation
Type
IOF
codes
Comment
cliff
201,
203
Passable or
impassable cliffs.
rock_pillars
202
Rock pillars or gigantic
boulders
rocky_pit
204
Rocky pit
cave
205
Cave
Extra key=value pairs
Rendering example (not to scale)
passable:yes/no.
tags:yes/no.
direction:[0-360] for nodes
corresponding osm tags
natural=cliffbarrier=retaining_wallwaterway=
dam
optionaly: foot=passable
natural=cliff area=yes
barrier=ditch node together
withnatural=cliff orbarrier=retaining_wall
direction=[0-360]
see rocky_pit
natural=cave_entrance
boulder
206,
207
Boulders of different
sizes
boulder_field
208
Part of a field of
boulders
size=small/medium/large,
height=[meter]
optionaly indistinct
boulder_cluster
209
A small distinct group
of boulders so closely
clustered together that
they cannot be marked
individually.
stony_ground
210
Stony ground
open_land,
surface:sand
211
Open sandy ground
bare_rock
212
Bare rock
size=normal/large?
natural=scree optionally runability=*,
alternative when area is not a scree, like a
stony forest?
natural=beach, alternative when area is not a
beacharea=yes andsurface=sand
landuse=quarry alternative when area is not
a quarry? natural=bare_rock tag?
Water and marsh
Value for iof= key
IOF
Type
notation
Comment
Extra key=value pairs
Rendering example (not to scale)
corresponding osm tags
code
301,
302,
Water areas (lakes,
bank_line:yes/no.
304,
ponds, rivers)
passable:yes/no (issom)
natural=water (natural=landfor islands
within), waterway=dock, for large rivers
usewaterway=riverbank optionaly:foot=passa
ble
water
305?
Smallest size for river,
bank_line:yes/no.
river
304
waterway=riverwaterway=canal
alternative or combined
passable:yes/no
with water.
301,
Bank lines to water
304
areas (also see water)
bank_line
See water
foot=passable removes bank line for waters
Crossable
305,
watercourse
watercourses. Large
size=large/small/minor ,
watercourses could be
width=[meter]
306,
307
combined with water.
waterway=river withfoot=passable /waterway
=stream orwaterway=drain (medium) / the
latter both optionaly withindistinct=yes.
waterhole
303
Water-filled pit
narrow_marsh
308
A narrow marsh
node: barrier=ditch withnatural=water
way: natural=wetland ornatural=mud
309,
Marsh that could be
marsh
310,
natural=wetland / with:foot=passable / with
"indistinct" / same with nodes, natural=mud?
type=impassable/normal/indistinct
shown as an area
311
well
312
waterway=water_point possiblyman_made=
water_well older proposal
Well
Source of a stream.
When placed on the
start of a watercourse ,
barrier=ditch node with indistinct
and natural=water /natural=spring node
optionaly with a starting waterway
erosion_gully or
spring
313
direction:[0-360]
narrow_marsh the
direction is
automatically oriented
downstream.
special_water
314
Special water feature
amenity|fountain},
{{Tag|amenity|drinking_water},man_made=w
ater_tower,man_made=watermill,man_made
=reservoir_covered, ... (something you map
appropriately and configure renderer to show
it as IOF314_special-water)
Description:User Defined
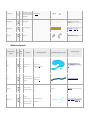
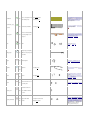
Vegetation
Value for iof= key
IOF
Type
notation
Comment
code
Extra key=value pairs
Rendering example (not to scale)
corresponding osm tags
Different types of open
open_land
401,
land
403,
(No default value for
415
‘surface’ key because
surface: normal/rough/cultivated
open: natural=heathlanduse=village_greenla
nduse=recreation_groundleisure=park cultiva
ted:landuse=farm rough:landuse=meadowna
tural=scrubnatural=fell .
of rendering reasons)
Same as open_land,
but rendered over the
401,
forest area. It means
open_land_in_forest
403,
surface: normal/rough/cultivated
that cutting hole into a
415
forest can be avoided if
this tag is used.
Semi-open land with
scattered trees. To be
402,
used over a forest area
404
(It adds the yellow
scattered
surface: normal/rough
(for scatered trees also tag forest/wood, see
next)
pattern over the
white/green forest.)
Forests with different
running speed. Normal
(white) forest is
405,
normally not needed to
406,
tag.
408,
Very_difficult and
410,
impassable are
411
synonyms
running:easy/slow/ difficult/ very_difficult/
impassable.
forest
one_direction:yes/no,
natural=wood orlanduse=forest shade
according to runnablity=*, impassable
also:barrier=hedge (node, way or area
with area=yes) all
optional:direction=* and wood=*stating the
(wood) vegetation type in an area
(coniferous/deciduous/mixed).
direction:[0-360]
(No default value for
‘running’ key because
of rendering reasons)
An area of dense
407,
undergrowth
undergrowth but
409
otherwise good visibility
running:slow/difficult
barrier=hedge with area=yes,foot=passable
andrunnablity=*
Land planted with fruit
orchard
412
direction:[0-360]
trees or bushes.
vineyard
413
Vineyard
landuse=vineyard
direction=[0-360]
Marking an area or wayindistinct=yes states
it has a less sharp/visible vegetation
boundary (may remove an outline shown). (A
*way*
tagednatural=woodlanduse=forest orlanduse
=farm and area=nomay state a
corresponding single (open loop) vegetation
boundary?)
Different type of
414,
boundary
type=distinct_cultivation/
boundaries between
416
distinct_vegetation
areas
418,
special_vegetation
Special vegetation
Description: User Defined.
feature
display=cross/circle/dot
example could be anatural=tree (something
you map appropriately and configure the
renderer to show it as IOFxxx_specialvegetation_x/o)
419,
420
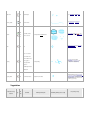
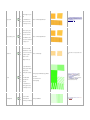
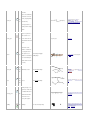
Man-made features
IOF
Value for iof= key
Elem
code
notation
ent
s
Comment
Extra key=value pairs
Rendering example (not to scale)
corresponding osm tags
501,
502,
type=motorway/major/ minor/narrow/track.
Roads suitable for
road
503,
area=yes/no.
vehicles
504,
construction:yes/no.
505
506,
type=large/small/indistinct.
507,
path
Paths
508
narrow_ride
509
501
motorway: highway=motorway,highway=trun
k 502 major
road:highway=primary, highway=secondary
503 minor
road: highway=motorway_link,highway=trun
k_link,highway=primary_linkhighway=reside
ntialhighway=living_streethighway=bus_guid
eway 504
road:highway=unclassified,highway=service,
highway=track withtracktype=grade1 505
vehicle
track:highway=track with tracktype=grade2,h
ighway=bridleway(highway=footway,highwa
y=cycleway, cycleway=track (if distinct way,
not part of a larger road)
Optionaly:width=* (or est_width=*),
andhighway=construction for roads in
construction. (Maybe some rules
usingsurface= orProposed_features/surface
_unification could be usefull to improve
appropriate rendering.)
506
footpath: highway=track withtracktype=grad
e3 and
lower,highway=path withtrail_visibility=excell
ent 506 small
path: highway=path withtrail_visibility=good
andtrail_visibility=intermediate 507 less
distinct
path: highway=path withtrail_visibility=bad,
andtrail_visibility=horrible (consider
adding sac_scale=* classification for hiking
paths: Approved_features/Hiking)
A distinct ride
Whether a junction easily
510,
could be seen in
511
competition speed -> Not
??
?
?
yet implemented
A footbridge with no path
leading to it. The direction
is automatically oriented if
bridge
512
direction:[0-360]
on a watercourse,
A waterway node with bridge=* level -1
below other features and
( foot=designated orfoot=forestry or foot=pa
ssable(perpendicular crossing) / A (trail) way
withbridge=* and level=(above other
features) (angled crossings lige regular)
erosion_gully or
narrow_marsh
Whether a path over a
513,
watercourse have a
bridge:yes
514
use level=* and bridge=* orhighway=ford ap
propriately
bridge over it or not.
Rail
way
Railway
515
railway=* or railway=tram
Powerline.
Pylons are automatically
rendered to each nodes
516,
power_line
517
of line (except beginning
power=line major lines: voltage=* >=
110000V?, cables=* >=5?
also:aerialway=cable_caraerialway=gondola
aerialway=chair_liftaerialway=drag_lift
and end of line)
For major power line a
double power line may be
drawn.
Pylon on a power line ->
Not needed to use as
power_pylon
517
nodes of power line are
See power_line
power=tower
automatically rendered as
pylons.
A way under roads,
railways, etc. which may
be used by the runner.
tunnel
This symbol is used
part:extent/opening/edge.
whether or not the tunnel
width=[meter].?
518
tunnel=yes bridge=* both used together
with layer=*
has a track leading to it.
(maybe smallest as node
on road?)
519,
520,
stone_wall
Walls made of stone
size=normal/ruined/high.
barrier=wall,
alsohistoric=city_wall optionaly:ruins=yes, fo
ot=passable
Fences
size=normal/ruined/high
barrier=fence optionaly:foot=passable, ruins
=yes
521
522,
523,
fence
524
All ways through or over
high fences or walls must
be indicated. Direction is
crossing_point
barrier=gate barrier=entrancebarrier=stile ba
rrier=sally_port
525
aligned automatically if
?
placed onto a fence,
stone_wall or pipeline
building
526
Buildings
For nodes: direction:[0-360]
building=* power=stationpower=sub_station
aerialway=station amenity=sheltertourism=al
pine_hut tourism=chalet
settlement
Houses and gardens and
type=normal/striped
other built up areas.
boundary=yes/no
Permanently forbidden
boundary:yes/no
527
leisure=playground leisure=gardenlanduse=f
armyard,landuse=allotments,landuse=reside
ntial[[Key:|]]=sports_centreleisure=track leis
ure=water_parkleisure=miniature_golf and
maybe a couple more ...
permanent_out_of_
528
bounds
access=no, access=private, foot=no,foot=pri
vate optionaly indistinct
An area of hard standing
paved_area
529
amenity=parkinghighway=pedestrianhighwa
y=servicesjunction=roundaboutamenity=ferr
y_terminalamenity=bus_station ...
used for parking or other
purposes.
ruin
530
firing_range
531
Ruin
building=* with ruins=yes
Firing range (usually way
with two nodes). target at
end of line.
grave
532
A distinct grave.
amenity=grave_yardlanduse=cemetery
533,
pipeline
Pipelines
passable:yes/no
man_made=pipeline optionaly:foot=passabl
e
Tower
size=high/small
amenity=hunting_stand,man_made=tower (
also min.
required:tower:type=*) man_made=water_to
werman_made=lighthouse
534
535,
tower
536
Cairn, memorial stone or
cairn
537
man_made=survey_pointhistoric=memorial
boundary stone
A fodder rack which is
fodder_rack
538
free standing or built on
to a tree.
539,
Special man-made
Description:User Defined.
540
feature
display=cross/circle.
special_manmade
could be a kiln/platform?
(Meilerplateu),barrier=bollardbarrier=cycle_b
arrierbarrier=cattle_gridbarrier=toll_booth a
menity=benchamenity=emergency_phonea
menity=telephoneamenity=waste_basket am
enity=*amenity=grit_bin amenity=signpost(or
tourism=information withinformation=guidep
ost)(something you map appropriately and
configure the renderer to show it as
IOFxxx_speciaal-man-made_x/o)
Annex B: Appearance of ISOM symbols in Merkaartor editor and in
Osmarenderer output
Fig. 39: Appearance of ISOM symbols in Merkaartor editor (quasi symbols)
Fig. 40: Appearance of ISOM symbols in Osmarenderer output files (real symbols)
Table of contents
Introduction .............................................................................................................................................. 1
Creating contours...................................................................................................................................... 1
Editing map ............................................................................................................................................... 3
Special settings of Merkaartor Sw for IOF mapping ............................................................................. 3
Basic operations, creating map objects (features) ............................................................................... 4
Adding IOF tags to existing OSM features ........................................................................................ 5
Adding new features ......................................................................................................................... 5
Important rules for editing (differences in appearence between Merkaartor and Osmarenderer) .. 10
Assimetrical road features .............................................................................................................. 10
Overlap of Area features................................................................................................................. 10
Cutting holes into area features ..................................................................................................... 12
Infill of areas limited by road features ............................................................................................ 15
Methods for facilitate map creation ................................................................................................... 15
Loading GPS tracks .......................................................................................................................... 15
Setting on-line map source as background..................................................................................... 18
Walking papers: Setting own scanned map sas backround ............................................................ 19
Printing orienteering maps from OSM database ................................................................................ 25
Quick prints by Merkaartor print menu .......................................................................................... 25
Map generation by Osmarenderer software .................................................................................. 28
Annex A: Tagging rules of ISOM symbols................................................................................................ 32
Land forms ...................................................................................................................................... 32
Rocks and boulders ......................................................................................................................... 33
Water and marsh ............................................................................................................................ 34
Vegetation....................................................................................................................................... 35
Man-made features ........................................................................................................................ 37
Annex B: Appearence of ISOM symbols in Merkaartor editor and in Osmarenderer output ................ 41
Table of figures
Fig. 1: Contours generated by Strm2osm ..................................................................................................... 2
Fig. 2: Brown contours after adding IOF tags ............................................................................................... 2
Fig. 3: Setting ISOM style in Preferences Menu............................................................................................ 4
Fig. 4: Selecting ISOM Style ........................................................................................................................... 4
Fig. 5: Dotted background before downloading the existing features ......................................................... 6
Fig. 6: Map view after downloading OSM data ............................................................................................ 7
Fig. 7: Creating and tagging a Node Feature................................................................................................. 7
Fig. 8: Creating and tagging a Road Feature ................................................................................................. 8
Fig. 9: Creating and tagging an Area Feature ................................................................................................ 8
Fig. 10: Indicating Durty features by red line or dot ..................................................................................... 9
Fig. 11: Red lines/dots disappear after uploading onto OSM server ............................................................ 9
Fig. 12: Setting line width of Durty Features marking ................................................................................ 10
Fig. 13: Examples for allowed area feature overlaps without hole cutting ................................................ 11
Fig. 14: Allowed combination of overlapping area features without hole cutting (inner open land tagged
as open_land_in_forest) ............................................................................................................................. 11
Fig. 15: Area feature combinations requiring hole cutting ......................................................................... 12
Fig. 16: Demonstration of rendering order of different road and area features ....................................... 12
Fig. 17: Tagging for hole cutting by using type=multipolygon Relation ...................................................... 14
Fig. 18: Selecting the copy of hole outline for adding IOF tags of hole infill (2nd item in the left bottom
list correspontds to new outline) ................................................................................................................ 14
Fig. 19: View of imported GPS tracks and way points in Merkaartor ......................................................... 16
Fig. 20: Extracting GPS data into a drawing layer for editing and tagging.................................................. 16
Fig. 21: Splitting GPS track into sections in Extract layer ............................................................................ 17
Fig. 22: Removing redundant parts of GPS track after splitting ................................................................. 17
Fig. 23: WMS server settings for turistautak.hu maps ............................................................................... 18
Fig. 24: WMS map sorurce (TUHU) as background image .......................................................................... 19
Fig. 25: Original Walking paper (after removing its borders) ..................................................................... 21
Fig. 26: Selecting the desired map area of old orienteering map for cutting in Gimp editor .................... 22
Fig. 27: Copying old orienteering map onto walking paper then setting its transparenchy to a high value
in Gimp editor ............................................................................................................................................. 22
Fig. 28: Resizing old map in Gimp editor .................................................................................................... 23
Fig. 29: Moving old map onto walking paper in Gimp editor ..................................................................... 23
Fig. 30: Final calibration before reset the transparency of old map .......................................................... 24
Fig. 31: Manipulated (georeferenced) Walking paper ................................................................................ 24
Fig. 32: Walking paper as background image in Merkaartor editor ........................................................... 25
Fig. 33: Print menu of Merkaartor .............................................................................................................. 26
Fig. 34: Map image generated by Merkaartor Print menu ......................................................................... 27
Fig. 35: Drawing outline of desired map area in Inkscape editor ............................................................... 29
Fig. 36: Clipping the desired map area in Inkscape editor (Ctrl-A; Object > Clip > Set) .............................. 30
Fig. 37: Clipped map area in Inkscape editor .............................................................................................. 30
Fig. 38: Map after importing it into map template ..................................................................................... 31
Fig. 39: Appearence of ISOM symbols in Merkaartor editor (quasi symbols) ............................................ 41
Fig. 40: Appearence of ISOM symbols in Osmarenderer output files (real symbols) ................................. 41