1
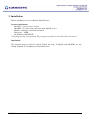
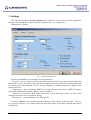
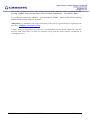
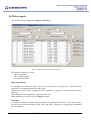
MBUS COMMUNICATOR
(version 1.3)
USER MANUAL
CONTENTS
1. Program purpose ..............................................................................................................................3
2. Installation........................................................................................................................................4
3. Settings.............................................................................................................................................5
4. Working with users in the system ....................................................................................................7
4.1 Register a new user ....................................................................................................................7
4.2 Changing data for a user ............................................................................................................8
4.3 Activate/deactivate a user ..........................................................................................................8
5. Automated readings .........................................................................................................................9
6. Working with meter units ..............................................................................................................11
7. Working with meter groups ...........................................................................................................13
8. Working with tariffs.......................................................................................................................16
9. Configure connection points ..........................................................................................................17
10. Make reports ................................................................................................................................18
11. Make calculation of consumption reports....................................................................................20
12. Status............................................................................................................................................22
13. Main operator’s window ..............................................................................................................23
13.1 User entry...............................................................................................................................23
13.2 Common view of the main window.......................................................................................23
14. Miscellaneous ..............................................................................................................................25
14.1 Lost connection with database ...............................................................................................25
14.2 User ends work.......................................................................................................................25
14.3 Shutting down the program....................................................................................................25
Contacts..............................................................................................................................................26
MBUS Communicator v.1.3 – USER MANUAL
2 / 26
1. Program purpose
The program “MBUS Communicator” is designed for remote reading of water, electricity and
heat meters through MBUS protocol. Received data is registered in a database. From the stored data
reports and calculation of consumption for specified period can be done.
This program is written by „GINEERS” Ltd.
MBUS Communicator v.1.3 – USER MANUAL
3 / 26
2. Installation
Before installation several conditions should be met:
System requirements:
- MySQL 4.1.10 or a newer version
- MyODBC 3.51 drivers for connection with MySQL server
- Monitor, working at 1024х768 resolution
- Disk space – 30МВ
- OS Windows 2000SP4/XP
* Working on Vista is not granted. The program is possible to work but Vista is not tested
Installation:
The program setup.exe must be started. Follow the steps. If MySQL and MyODBC are not
already installed, it is mandatory to install them first.
MBUS Communicator v.1.3 – USER MANUAL
4 / 26
3. Settings
The user should choose System->Settings menu option in order to fine tune the application.
Settings can be changed by a user with rank „administrator” or „configurator”.
Settings has 3 sections:
fig. 3.1 Tuning the application
In section „General” user can choose several parameters:
- Timeout – this is a value in milliseconds which can be used to lower the processor load from
the threads. Lower value means more load and is adequate only when meters are connected directly
to a serial port of the computer. In case of large telegrams or modem connection a higher value
might be the case
- Logging type – has 2 meanings: DEBYG or Normal. Normal is the choice. DEBUG produces
much more details and normally is used to locate a problem.
- Repetition to read data – How many times to try to read data from a meter? If none of the
attempts succeed an error is registered in logs.
- Max log size – is the maximum size of the log file.
In section “Reports” user can fine tune the behaviour of the reports. In the first part – “Reports
for registered measures” are settings which are used when report on the data collected from meters
is generated:
MBUS Communicator v.1.3 – USER MANUAL
5 / 26
- Printer – choose printer to use for reports. Printer should be attached to the system before
program is started. If the printer is not visible in the list – restart the program.
- Paper – choose paper size in use for printing(A4,A5)
- Copies – number of copies of the report to be printed
- Orientation – paper orientation for printing
- Data delimiter – used for the Export option in reports. Exported data is a comma separated
text and can be opened in Excel or similar program. If proper delimiter of data is used, the data will
be loaded in separate columns automatically.
*Note – Data delimiter is a common setting for both sections in Reports
In the second part – “Consumption reports”, several additional parameters can be tuned:
- Show table gridlines – this option allows user to see the gridlines of the table in the report on
screen. If not checked – gridlines are not shown
- Print table borders – this option allows each section of calculation to be in a table in the
printed calculation report. If not checked – table borders will not be printed
- Show all tariffs – this option shows all 4 tariffs for every meter even if no data is registered for
them. Normally this option is not checked.
- Show reactive energy – this option is used only for industrial electricity meters. For all other
types this is not needed. If you do not want the reactive energy fields to be shown in report –
uncheck this.
- Decimal separator is comma – normally decimal separator is a point (‘.’). If someone wants to
change it to a comma this option should be checked. If that is checked it is recommended to use
another delimiter for data export.
The last section – “Security” in Settings concerns remote access to database. This section is
needed if database server is located on another machine. Be very careful granting access from a
distant computer or network. If database and application reside on different machines connection
issues can interfere the normal work of the program. It is recommended the database server and the
program are located on the same machine.
*Note – extreme caution is advised when granting root access from other machines
When configuration is finished – click button „Save”. Changes will be activated permanently.
If no changes are to be saved user can exit clicking on button „Cancel”.
MBUS Communicator v.1.3 – USER MANUAL
6 / 26
4. Working with users in the system
The module is started through the menu System ->User control.
In this module management of users and their rights in the system is done.
Right after installation the only user who can log in is the root user for the database. It is
recommended the first thing to do when logged for the first time – register at least one user with
administrative rights and use this user for additional tasks. Users registered within the program gain
access only to program specific data and not to entire databases. Additionally they cannot log
separately in the database with their accounts.
In the left pane you can see the registered users. When click on a user – the info for the user is
automatically loaded in the right pane. If you want to change anything – click Save button to end
the operation. If you want to just change the password for that user – type the new password and
retype it and save. Because only users with administrative rights have access to this option you do
not need the old password in order to change someone’s password.
:
fig.4.1 Working with users
4.1 Register a new user
If there are registered users the data for the first in the list are automatically loaded. So the first
step to register a new user is to click on the button „Clear”. Loaded data is removed and the cursor
is located to enter user name.
The registration follows several steps:
MBUS Communicator v.1.3 – USER MANUAL
7 / 26
1. Enter user name. This is the name the employee will use to log in the program. The user name
must contain at least 3 symbols (not spaces). Examples: kiril, kirilv, kiril_v, etc.
2. Type a password. The password is a combination of symbols. Its length should be at least 4
characters/symbols.
3. Retype the password. This is a precaution in case of mistakes during first type.
4. Set access level for the user. You have 4 choices:
a) „operator” – can only start manual reports
b) „reports” – additionally to the „operator” level can also make, print and export data for
measures already made.
c) „configuration” – can also tune the system.
d) „administrator” – has full access to the system. The users of this group can access User
control module.
5. Enter the real name of the employee.
6. Enter the job title of the user (optional).
7. Enter remarks for the employee (free text of up to 40 characters)
8. Click button register „Register”. Upon successful registration a confirmation message will
show. Newly registered user is visible on the left pane.
4.2 Changing data for a user
On the left pane choose the user. In the right pane data for the user will show (“password” field
is always empty).
Change whatever data you want or grant user additional rights or revoke some rights.
After all is done – click button “Save”
Note: in case the password field is left empty – current password of the user will remain
unchanged
Note: If you do not want to change anything – just choose other user from the table or click the
button “Cancel”.
4.3 Activate/deactivate a user
Choose the user from the table. Click button „No access”. That user cannot log in the system
any more.
Granting back access rights of a user is straight forward. Select the user from the table and click
on button “Activate”.
MBUS Communicator v.1.3 – USER MANUAL
8 / 26
5. Automated readings
The module is access from Readings->Automated readings.
This module has 2 sections:
Events:
fig. 5.1 Automated events
Here all events are listed. User can activate or deactivate events. In case of activation the
next execution date and time is calculated and the event is placed in the queue. If the event is ‘one
time’ and the date and time of execution is passed – the event is deleted.
MBUS Communicator v.1.3 – USER MANUAL
9 / 26
New event:
fig. 5.2 Register new event
Select type of automated event and the time of execution.
Choose unit type.
Finally click the “Add” button
Example: for every day reading: Check “Read every week”, then check all week days. At the
selected time the units from the selected type will be read.
MBUS Communicator v.1.3 – USER MANUAL
10 / 26
6. Working with meter units
Access the module through Units->Units.
fig.6.1. Working with units
In the upper part a table with active meters is located. Use filter on the right to see only
meters of interest.
Button “Reload” refreshes the info in the table.
Button “Remove” is used to deactivate the meter. Useful when meter is replaced by another
one..
Button “Change” loads all data for the meter in the lower pane.
In the lower part the info of the unit is placed. Here you can register a new unit or change
data for existing one. The type of operation is shown on the upper part of the lower section. If it
reads “Register new unit” – all fields are populated and all you need is enter the data. Finally
click “Add” and the unit will show in the table above.
MBUS Communicator v.1.3 – USER MANUAL
11 / 26
If it reads “Update unit data” info of the selected meter from the table is populated (after
pressing „Update” button for that meter). When finished with changes – click button “Save”.
If you do not want to save changes – just click button “Clear”. All the fields will be emptied
and the status become “Register new unit”.
*Important: it is mandatory the connection point for the unit is registered before registering the
unit. See “Configure connection points”
* Note: prior of registration of a unit it is recommended to enter tariffs. Otherwise you will
need to enter more times in order to associate tariff with the meter and do calculation of
consumption for it.
MBUS Communicator v.1.3 – USER MANUAL
12 / 26
7. Working with meter groups
Accessed through menu Units->Groups.
The module contains 3 parts:
- meter types
- user groups
- buildings
fig.7.1. Unit types
From unit types you can change the name of unit types or register new one. If a registered
type is selected – then changing its name is the action to do. If no selection is made – action
“register new type” will do.
User groups act the same way. If a selection is made – then change of name is the case.
Additionally a button “Group units” is located. When clicked a form to choose units will show
(fig.7.2). On the left select the user group, then check all the meters that will reside in this user
group. Click button “Save”. Choose another group and repeat those action until you finished.
Finally click “Exit”. For example user group can combine meters for an office of a company.
MBUS Communicator v.1.3 – USER MANUAL
13 / 26
fig.7.2. Select meters for a user group
Buildings looks a bit different:
fig.7.3. Buildings
MBUS Communicator v.1.3 – USER MANUAL
14 / 26
Here is a table with registered buildings. When a building is selected – its data is loaded in
the fields below the table and ready for change. Change the info and click “Save”.
If you want to register new building, just press button “New building”. The fields will be
cleared and you can enter building data. When done click “Save”. You can assign user groups to
a building. To do that click button “User groups”. You will see similar to fig.7.2 picture. This
time on the left you will select the building and on the left check all user groups that will reside
in the building.
MBUS Communicator v.1.3 – USER MANUAL
15 / 26
8. Working with tariffs
Tariffs can be started through menu Units->Tariffs.
fig.8.1 Tariff main window
The table shows tariffs according to selected filter type. When a tariff is selected its info is
loaded on the right side of the table. You can change the value and measure unit for that tariff.
Below the table is the section of registering a new tariff. Here you specify a name, value,
measure unit and unit type the tariff corresponds to.
*Note: tariff name is unique. No matter whether a tariff name for the particular meter type
presents or not but if a tariff with that name is registered you must choose another name.
*Note: tariff price is without VAT. VAT is calculated when calculation of consumption report is
made
*Important: if a tariff price is changed, the changed price affects all readings after the change
is made.
MBUS Communicator v.1.3 – USER MANUAL
16 / 26
9. Configure connection points
Access connection points through menu Units->Connection points.
fig.9.1 Connection points
The table shows registered connection points. On selection the data for the point is loaded in
the fields below the table. After doing changes click button “Save”.
To add a new connection – click button “Add”. A window will appear to select a
communication protocol to be used. Note that default serial configuration is used. After adding
the communication protocol you can select the newly added point and fine tune its parameters.
*Note: “Dial number” and “Timeout” are visible only if connection type is “modem”.
If you want to remove a connection point click the button “Remove”. Because the
connection point might be in use it is not removed immediately but instead marked for removal.
When execution is done a cleanup procedure is started automatically.
MBUS Communicator v.1.3 – USER MANUAL
17 / 26
10. Make reports
Access this feature through menu Reports->Measures.
fig.10.1 Making reports for received meter data
This module consists of 3 parts:
- report parameters
- table containing data
- user actions (buttons)
Report parameters
It is mandatory to select the period. If you want a report for a specific date – just choose the
same date as a beginning and end of the period.
Additionally report can be restrained to other condition – report for a connection point and/or
unit type.
Also restriction can be applied to a specific meter only.
When parameters are selected click “Report” button.
Table data
If a data according to search criteria is found it is populated in the table. The table contains
received meter data according to tariffs, date and time of execution, reading type (automated
type or manual)
MBUS Communicator v.1.3 – USER MANUAL
18 / 26
User actions
Button “Report” makes the report according to selected criteria. Data is loaded into table
Button “Preview” shows data as it will be printed.
Button “Print” prints the data on the selected printer (See Settings for details)
Button “Export”
When clicked a window to select where to save data and how to name the file shows. When
location and name are selected , the data is exported as CSV file. This file can later be opened
by Excel or other program.
Button “Cancel” – exits reports
MBUS Communicator v.1.3 – USER MANUAL
19 / 26
11. Make calculation of consumption reports
Access this feature through menu Reports->Calculation.
fig.11.1 Making calculation of consumption report for water
This module consists of 4 parts:
- report parameters
- table containing calculation data
- table containing meter individual measures for the period
- user actions (buttons)
Report parameters
It is mandatory to select the period. If you want a report for a specific date – just choose the
same date as a beginning and end of the period.
Before you can make a calculation report at least one of the fields should contain information: a
building is selected and/or user group is selected and/or service type is selected (water,
MBUS Communicator v.1.3 – USER MANUAL
20 / 26
electricity, heat, etc). When a selection is made the corresponding meters are loaded in
“Individual measure unit”. If none is particularly selected – a calculation for all of them is
started. But if a particular measure unit is selected – only calculation for the selected meter is
made.
When parameters are selected click “Report” button.
Table data
Table contains information about calculation process. There are fields showing the old and new
measure data, price per measure unit (without VAT) and calculated total. If during the period a
change in the tariff price is found, a new row for that tariff is shown calculating consumption
according to the changed price.
At the bottom of table all totals are summed and VAT is calculated upon all of them.
*Important: for the beginning of calculation of consumption for a meter is used the last
measure before 17:00 on the start date. If there is no measure on that date – the first after that
is used as a starting one.
*Important: for the end of calculation of consumption for a meter is used the last measure
before 17:00 on the end date.
Table containing meter individual measures for the period
If a data according to search criteria is found it is populated in the table. The table contains
received meter data according to tariffs, date and time of execution, reading type (automated
type or manual)
User actions
Button “Report” makes the report according to selected criteria. Data is loaded into table
Button “Print” prints the data on the selected printer (See Settings for details)
Button “Export”
When clicked a window to select where to save data and how to name the file shows. When
location and name are selected , the data is exported as CSV file. This file can later be opened
by Excel or other program.
Button “Cancel” – exits calculation report
MBUS Communicator v.1.3 – USER MANUAL
21 / 26
12. Status
Accessed through menu Help->Status.
fig.12.1 Status of the system
This is information for the system about number of active and inactive units, how many
units for connection point exist. How many errors registered while reading units.
MBUS Communicator v.1.3 – USER MANUAL
22 / 26
13. Main operator’s window
13.1 User entry
When the program is started a window appears:
fig.13.1 User log in window
Enter your user name.
Enter your password (for every password of it you will see ‘*’ in the field).
Note: user name and password are received by an administrator.
*Note: if you receive a message that there is no connection with database, contact your
administrator. Database server might not run.
13.2 Common view of the main window
fig. 13.2 Common view of the main window
MBUS Communicator v.1.3 – USER MANUAL
23 / 26
Main window consists of:
— Menu
Options in menu are limited to user access level.
— Table of last made measures
Shows information about last readings of the meters. If a reading is active the last entered
data is in focus.
— List of meters
Only active meters are listed. There a 2 types of grouping units: by unit type (cold water
meter, hot water meter, etc.) or by user groups. Use the radio buttons above the list to select
which type of representation is good for you.
— User actions (buttons)
“Select all” – selects all active meters.
“Deselect all” – unselects all active meters.
“Read selection” – start reading of selected meters. Selected meters are marked for manual
reading. If a group name is selected – all meters in the group will be read.
“Stop reading” – selects all active meters.
“Clear grid” – clears the table.
— Status bar
Show information about the process of reading selected meters.
MBUS Communicator v.1.3 – USER MANUAL
24 / 26
14. Miscellaneous
14.1 Lost connection with database
Even a rare case it is possible to lose connection with database server. In order not to shut down
or restart the application there is a manual option to reestablish connection. For that purpose choose
menu option System->Reconnect.
*Important: if that action does not help call your system administrator. It is possible database
server is not running.
14.2 User ends work
User ends his work selecting menu option System->Change user. The same effect is achieved
clicking on the „x” button at the upper right corner of the main window.
In order to not disconnect accidentally a confirmation window will appear. If no mistake is
made – confirm. Main window disappears and the log in window is shown.
14.3 Shutting down the program
On the log in window click button „Exit”.
If you wish to shutdown the program while in main operator’s window select menu option
System->Exit. A confirmation dialog will appear. If this is not a mistake confirm to exit the
program.
MBUS Communicator v.1.3 – USER MANUAL
25 / 26
Contacts
"GINEERS" LTD - Electronics, automation and software
Sofia 1756, Bulgaria
бул. "Климент Охридски" 18, офис 613
tel./fax: +359 2 975 81 05
[email protected]
If you have problems, suggestions or questions about the program, please, write to:
[email protected]
MBUS Communicator v.1.3 – USER MANUAL
26 / 26