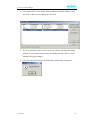
1
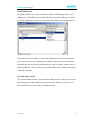
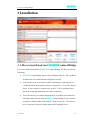
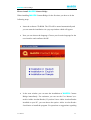
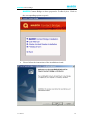
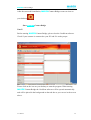
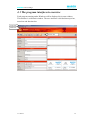
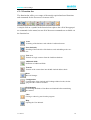
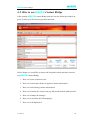
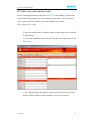
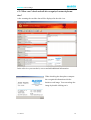
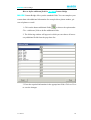
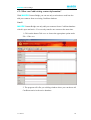
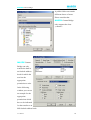
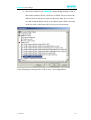
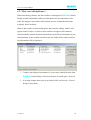
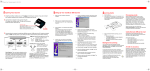
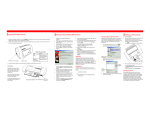
Masch Contact Bridge
The direct link between your
CardScan Scanner and your
Microsoft Exchange address book
User Manual
Within BETA 1 Release of this software, you can download the English user manual from the following
URL address:
http://download.masch.com/contactbridge/help_en.pdf
Masch Contact Bridge
© Copyright September 2006:
OOO MASCH Russland Software & Consulting Services
St. Petersburg
1st Release published in 2006
This document was created before releasing the product. Therefore there is no guaranty that all
parts described hereto will correspond to parts of the final product release.
The information provided in this document represents the topics from OOO MASCH Russland’s
point of view when publishing the final product release.
As OOO MASCH Russland is subject to market fluctuations, it declines all responsibility. The
information accuracy in this document cannot be guaranteed by OOO MASCH Russland after
published. The information in this document applies to the present release and can be used only
for installing. This information can be changed at any time without prior notification.
The present document can be used only for information purposes. OOO MASCH
RUSSLAND EXCLUDES ANY GUARANTEE EXPRESSED DIRECTLY OR INDIRECTLY
TO THE PRESENT DOCUMENT.
© 2005 OOO MASCH Russland Software & Consulting Services. Copyright. All products or
companies names are registered trademarks.
ООО "МАШ Руссланд - программное
обеспечение и консалтинговые услуги"
7-линия В. О., 76, офис 601
199178 С-Петербург, Россия
User Manual
2
Masch Contact Bridge
1 Table of contents
1 Table of contents ............................................................................................ 3
2 Preliminary remarks ....................................................................................... 4
3 Installation .................................................................................................... 10
3.1 How to install and start Masch Contact Bridge...................................10
4 Functional description .................................................................................. 14
4.1 The program interface in overview ........................................................15
4.1.1 Topic bar...........................................................................................16
4.1.2 Menu bar...........................................................................................17
4.1.3 Function bar......................................................................................18
4.1.4 General terms ...................................................................................19
4.2. How to use MASCH Contact Bridge .....................................................20
4.2.1 How can I scan a business card? ......................................................21
4.2.2 How can I check and edit the recognized contact information?.......23
4.2.3 How can I add existing contact information?...................................26
4.2.4 How can I transfer contacts into my MS Outlook address book? ....28
4.2.5 How can I change the settings? ........................................................33
4.2.6 How can I customize the field mapping? .........................................35
4.2.7 How can I edit duplicates? ...............................................................38
User Manual
3
Masch Contact Bridge
2 Preliminary remarks
As per company poll many enterprices still disregard their lead management.
That’s the process in which interests and contact data of prospective and existing
customers are tracked, edited and used. Efficient lead management is an important requirement, in order to respond to customer requirements.
You, as a CardScan user, have already solved this problem and you don’t waste
any time with typing. From the very first beginning CardScan saves your precious time by scanning business cards directly into your PC. You create a database full of precious contact data absolutely without any own input. CardScan
offers you a lot of possibilities to bring contact data there, where you need it
mostly urgent.
Many customers take a step forward and want to see the scanned business card
in their contact manager immediately. Masch Contact Bridge offers you this
possibility. This program is a direct link to your online Outlook address book on
the Microsoft Exchange Server. You insert the business card into your scanner;
the data will be recognized quickly and accurately and will be displayed in Contact Bridge. You are able to transfer this information into your Outlook address
book immediately, no matter if it is saved locally or on your Microsoft Exchange
Server. Even an image of your business card will be attached as a JPEG to your
contact in Microsoft Outlook.
As a skilled CardScan user you will ask yourself, why you should use an accessory program, when the CardScan software includes a synchronization module
for Microsoft Outlook. The major tasks of the CardScan software are to recognize the contact data from the business card, to save it in the database and to administrate it.
User Manual
4
Masch Contact Bridge
Masch Contact Bridge is a bridge to network based applications like Microsoft Exchange with which you can realize a simple and very fast data transfer
into your network address book in only a few seconds. Masch Contact Bridge
is intended for customers, which don’t have much time for searching the necessary functionality, don’t need a wizard and don’t want to waste their time with
drawn-out port configurations.
Masch Contact Bridge is easy to use and ideal for the data transfer.
Masch Contact Bridge combines the following functionalities in one
product:
•
Scanning of any business card using CardScan scanner.
•
Comfortable displaying of contact data.
•
Fast checking of the scan results.
•
Transfer of existing data from the CardScan database.
•
Transfer of contact data into the Microsoft Exchange Server.
•
Simple editing of duplicates.
Masch Contact Bridge transfers your contact data into your Microsoft Outlook address book. The Outlook address book is a range of several address
books or address lists. With these address books you can not only address messages, but can also find names and other information for example addresses and
telephone numbers. The Outlook address book acts only as a display for the contacts in Outlook.
Microsoft Outlook differentiates between four several address books:
User Manual
•
Contacts
•
Public address book
•
Global address list
•
Personal address book
5
Masch Contact Bridge
Address book „Contacts“
When starting Outlook for the first time, Outlook creates the folder Contacts
automatically. The Outlook user is the only one, who can access this folder. But
the user can afford other users to get access on the folder Contacts.
The folder Contacts is mainly used as a primary data memory for addresses and
appropriate information.
Address book: „public contacts / public folders“
When using Microsoft Outlook as a client of the Microsoft Exchange Server,
you have the possibility to create public folders. All users which are logged in on
the Exchange Server can access these folders.
Public folders are an effective opportunity to collect information and to use them
together with other users. Therefore, these folders are often used by project
teams or user groups so that they can benefit from corporate information.
User Manual
6
Masch Contact Bridge
A public folder can include the following news groups:
•
Emails
•
Contacts
•
Calendar
•
Tasks
•
Notes
•
Journal entries
Public folders are listed in the Outlook folder list separately and not in the area
with the personal folders. When clicking on the folder, a directory of subfolders
will be opened. These folders will be created by the network administrator. In
normal cases the users are only authorized to read the folders. Possibly they are
authorized to write.
So they cannot delete, create or move any folders. This option is reserved for the
administrator only. But such authorizations can be arranged by an administrator
or an owner of a “public folder”. If you have the authorization for a public
folder, you can read and add information, but you can only delete information
which was created by yourself. You can also create your own public folders and
you can give other people authorizations for them, if they have the authorization
to create subfolders. In normal cases they will get them from their Microsoft Exchange administrator.
User Manual
7
Masch Contact Bridge
Global address list
The global address list is only available in a Microsoft Exchange Server environment, too. This address list contains all names and email addresses of all users of the organization, which are registered on the Microsoft Exchange Server.
This address book can only be created and maintained by the network administrator, who possesses the authorizations within the Microsoft Active Directory.
Normally the user has only the authorization to read, so that he cannot create or
maintain addresses. He can only use the global address list to address his emails
within the company.
Personal address book
The personal address book is a user-defined address book, in which you can save
and maintain your email addresses and contact data, which you often use. It is
only available for one user and it is installed locally.
User Manual
8
Masch Contact Bridge
Note!!!
Masch Contact Bridge can only transfer the data into Outlook address books,
for which the user has the appropriate authorizations to write. Contrary to the
CardScan desktop software, these address books can also be public folders. They
don’t have to be located on your local workstation but they can also be saved on
the Microsoft Exchange Server.
System Requirements for Masch Contact Bridge:
•
Windows 2000, Windows XP
•
MS Exchange 2003.
•
MS Outlook 2000 und 2003
•
CardScan Software V6.0.6, V7.0.x or V8.0x
•
CardScan Scanner series 600, 700, 800, Personal I or II
•
30 MB free hard-disk storage
User Manual
9
Masch Contact Bridge
3 Installation
3.1 How to install and start Masch Contact Bridge
For a successful functionality of Masch Contact Bridge, you have to note the
following:
•
Masch Contact Bridge requires the CardScan software. The CardScan
Software has to be installed and configured correctly.
•
You can only scan your business cards with business card scanners of
CardScan and the appropriate software version 6.06, 7.0x or 8.0x. Please
check, if your scanner is connected to your PC, if it is working proper
and if the setup and calibration were done completely.
•
You can transfer your contact information in your Microsoft Outlook or
Exchange address book using MASCH Contact Bridge. For the transfer
you have to install a Microsoft Outlook Client on your PC. Your PC has
to be connected correctly with the Microsoft Exchange Server.
User Manual
10
Masch Contact Bridge
How to install Masch Contact Bridge
When installing Masch Contact Bridge for the first time you have to do the
following steps.
•
Insert the software CD-ROM. The CD will be started automatically and
you can start the installation via a pop-up window which will appear.
•
Now you can choose the language. Choose your favorite language for the
user interface and confirm with OK.
•
In the next window you can start the installation of Masch Contact
Bridge immediately. For assistance you can use the User Manual (created in Adobe Acrobat Reader). If you don’t have Adobe Acrobat Reader
installed on your PC, you can choose the option: Adobe Acrobat Reader
Installation to install the program. For questions or suggestions regarding
User Manual
11
Masch Contact Bridge
Masch Contact Bridge we have prepared a Feedback form. Click on
the corresponding option to open it.
•
Please follow the instructions of the installation wizard:
User Manual
12
Masch Contact Bridge
After the successful installation, Masch Contact Bridge creates an icon on
your desktop.
Start Masch Contact Bridge
Note!!!
Before starting Masch Contact Bridge, please close the CardScan software.
Check if your scanner is connected to your PC and if it works proper.
Please click on the icon on your desktop to start the program. When starting
Masch Contact Bridge the CardScan software will be opened automatically
and will be placed in the background on the task bar as you can see in the screen
above.
User Manual
13
Masch Contact Bridge
4 Functional description
Masch Contact Bridge contains the complete functionality for scanning and
transferring contact data into your Microsoft Outlook address book (personal or
public).
The primary task of Masch Contact Bridge is to transfer your contact data
into your favorite contact manager in three steps.
The user interface, the menu and the functions will be explained in the following
chapter.
User Manual
14
Masch Contact Bridge
4.1 The program interface in overview
Each program running under Windows will be displayed in its own window.
This window is called task window. The user interface is divided into topic bar,
menu bar and function bar.
Topic bar
Menu bar
Function bar
User Manual
15
Masch Contact Bridge
4.1.1 Topic bar
Each window has a topic bar. The topic bar of the task window indicates the
name of the application: Masch Contact Bridge.
The buttons in the right margin also belong to the topic bar. With these buttons
you can change the appearance of the window and close the program or the
document as well.
The functions are:
•
Minimize window. Minimizes the window to an entry in the task bar.
•
Maximize window. Maximizes the active window to a frame. It takes
the whole display less the area for the task bar.
•
Reduce window. Reduces the active window.
•
Close window. Closes the active window.
User Manual
16
Masch Contact Bridge
4.1.2 Menu bar
With the menu bar you can access the whole functions of Masch Contact
Bridge.
•
With the menu File you can scan the card, add the backside of the card to
the contact, add an existing contact from the CardScan database, define
additional fields and their allocation to the Outlook address book and you
can transfer your data into your Microsoft Outlook or Microsoft Exchange address book.
•
The menu Edit enables you to copy your contact information as a text
into the Windows clipboard and to paste it into other applications (e.g.
Microsoft Word) via the clipboard. Click on Reset if you want to delete
your changes.
•
You will find the options for the configuration of Microsoft Outlook or
rather of the Exchange address books as well as the necessary customization of the fields in the menu Settings.
•
Under Help you will find the manual, information about the MASCH
Support as well as our feedback form.
User Manual
17
Masch Contact Bridge
4.1.3 Function bar
The function bar offers you a range of the mostly required and used functions
and commands for the fast access via mouse click.
A simple click on a symbol in the function bar replaces the call of the appropriate command via the menu; but not all of the menu commands are available via
the function bar.
Scan
Scanning of the business card with the CardScan Scanner.
Scan (backside)
Scanning of the backside of the business card and adding to the contact.
Take over
Transfer of single contacts from the CardScan database.
Additional fields
Definition of additional fields.
Transfer
Transfer of the contact data into the MS Outlook address book.
Reset
Reset all changes.
Configuration
Configuration of the Outlook and Exchange address books, the language and the conflict resolution.
Field mapping
Customizing the fields of CardScan and Outlook before transferring
the contacts.
Close
Closing or rather log out from the program.
Help
Opening the User Manual.
User Manual
18
Masch Contact Bridge
4.1.4 General terms
Description of the mostly used terms:
•
Menu
shows the available menu items.
•
Menu bar
The menu bar contains commands which provide a fast access to the single modules.
•
Scroll bar
With the scroll bar you can scroll the window to the right, to the left or
down and above.
•
The address book
The address book is a range of address books or address lists. With these
you can not only address messages but also find names and other information for example addresses and telephone numbers.
User Manual
19
Masch Contact Bridge
4.2. How to use MASCH Contact Bridge
After opening Masch Contact Bridge with the icon the following window appears. It offers you all necessary product functions:
In this chapter we would like to answer the frequently asked questions concerning Masch Contact Bridge
1. How can I scan a business card?
2. How can I check and edit the recognized contact information?
3. How can I add existing contact information?
4. How can I transfer the contacts into my Microsoft Outlook address book?
5. How can I change the settings?
6. How can I customize the field mapping?
7. How can I edit duplicates?
User Manual
20
Masch Contact Bridge
4.2.1 How can I scan a business card?
Before scanning the business card with Masch Contact Bridge, please make
sure that all dialog windows are closed and the option Detect cards automatically is deactivated in CardScan. You will find this option under
Edit→Preferences→Scan.
1. Insert the card into the CardScan scanner as described in the CardScan
documentation.
2. Click on the Button Scan as you can see in the screenshot below or use
File→Scan
3. The card will be put through the scanner and will be processed. Afterwards it will be displayed in the summary view for verification.
User Manual
21
Masch Contact Bridge
Note!!!
Masch Contact Bridge edits only one scanned business card. If you have
scanned more than one business card consecutively, the first card will be displayed in the edit view and the other cards will be transferred to CardScan. They
can be transferred into Masch Contact Bridge with the option Take over.
All new contacts are marked with red checks.
User Manual
22
Masch Contact Bridge
4.2.2 How can I check and edit the recognized contact information?
After scanning the card the data will be displayed in the edit view.
In the edit view you can check, correct and add additional information.
When checking the data please compare
the recognized information with the
business card image. You can enlarge the
image by double-clicking on it.
User Manual
23
Masch Contact Bridge
How to define additional fields in Masch Contact Bridge
Masch Contact Bridge offers you the standard fields. You can complete your
contact data with additional information for example direct phone number, private telephone or email.
1. Click on the button additional fields
or choose the option under
File→Additional fields to define additional fields.
2. The following window will appear in which you can choose all necessary additional fields from the pop-down list.
3. Enter the required information in the appropriate fields. Click on Close
to save the changes.
User Manual
24
Masch Contact Bridge
Add the backside of the business card
1. Insert the card in your scanner with the backside on the top.
2. Click on the button Scan (backside)
or choose the appropriate option
under File→Scan (backside).
3. After scanning the card will be added to the contact and will be displayed next
to the front image of the business card.
Note!!!
The text recognition will not be performed for the backside of the business card.
If you have important notes on both sides, as addresses and names, please consider to scan the backside as a separate contact.
User Manual
25
Masch Contact Bridge
4.2.3 How can I add existing contact information?
With Masch Contact Bridge you can not only scan business cards but also
add your contacts from an existing CardScan database.
Note!!!
Masch Contact Bridge can only add your contacts from a CardScan database
which is open and active. You can only transfer one contact at the same time.
1. Click on the button Take over or choose the appropriate option under
File→Take over.
2. The program will offer you a dialog window where you can choose all
CardScan entries in the active database.
User Manual
26
Masch Contact Bridge
3. Select the required dataset and click on OK to transfer the contact into
Masch Contact Bridge.
4. Afterwards the contact will be displayed in the edit view in Masch
Contact Bridge.
Note!!!
When adding the contact from the CardScan database to Masch Contact
Bridge only the standard information like name, address, email, website, miscellaneous and notes will be transferred. The customized fields in CardScan cannot
be included in Masch Contact Bridge. Please use the option Additional fields
to add this information to your contact.
User Manual
27
Masch Contact Bridge
4.2.4 How can I transfer contacts into my MS Outlook address
book?
Masch Contact Bridge transfers the contact information into the Microsoft
Outlook address book.
Which MS Outlook address books are supported by Masch Contact Bridge?
Microsoft Outlook differentiates between the following address books as already
mentioned:
•
Personal contacts
•
Public folders
•
Global address list (Active
Directory)
These address books can be approved as
public folders for other users and do not
have to be located on the local disc. They
can also be saved on the Microsoft
Exchange Server.
Public folders are listed in the Outlook folder list separately and can’t be found
in the area “personal folders”. When clicking on the folder the directory of the
subfolders will be opened.
User Manual
28
Masch Contact Bridge
A public folder can contain
different classes of news.
Please consider that
Masch Contact Bridge
only supports the class
„contacts“.
Masch Contact
Bridge can only
transfer the data in
an Outlook address
book for which the
user has the
appropriate
permissins to write.
In the following
window you can see
an example for the
appropriate
permissions which
have to be indicated
for the transfer to an
MS Outlook address book.
User Manual
29
Masch Contact Bridge
Note!!!
To make sure that the transfer will work fine please have a look on the properties
of the MS Outlook address book. The address book has to have the type IPM
Contact.
User Manual
30
Masch Contact Bridge
How to transfer the contact information into the MS Outlook address
book?
1. Scan a business card as described in chapter 4.2.1 or open a CardScan
contact in Masch Contact Bridge (Chapter 4.2.3).
2. Please check the configurations of Masch Contact Bridge (Chapter
4.2.5).
3. Click on the button Transfer or choose the appropriate option under
File→Transfer.
4. After the data transfer the following confirmation window will appear:
User Manual
31
Masch Contact Bridge
5. Please make sure that the contact information were transferred into the
MS Outlook address book and are displayed correctly.
6. You can display the detail information and the image of the business card
by double-clicking on the transferred contact in the MS Outlook address
book.
User Manual
32
Masch Contact Bridge
4.2.5 How can I change the settings?
Before transferring your contact information into the MS Outlook address book
please check the configuration of Masch Contact Bridge.
1. Click on the Button Configuration or choose the option under Settings→Configuration.
2.
In the following configuration window you can:
•
choose the language between: German, English and French.
•
choose the contact manager. Currently Masch Contact Bridge can
only transfer the data to MS Outlook. Therefore you will only find
the option Outlook under Connection Profile.
•
set up the conflict resolution, activate the option Replace existing
card if you want to overwrite the existing contacts with the new contacts, choose Create new card if you always want to add all cards as a
new contact or mark the option Show collision dialog to compare
new contacts with existing contacts in MS Outlook.
User Manual
33
Masch Contact Bridge
•
choose the address book. Masch Contact Bridge displays a list of
MS Outlook address books, which are available. Please activate the
address book in which you want to transfer the data. If you create a
new MS Outlook address book or an address book which is missing
in the list click on the button Refresh to get a current status.
After defining the settings click on OK to save your configurations.
User Manual
34
Masch Contact Bridge
4.2.6 How can I customize the field mapping?
Different programs could contain various data fields and order identical information often to diverse named fields. The Field mapping is the mapping of the
fields of two applications to each other to assign the data to the right fields when
synchronizing.
In Masch Contact Bridge the field mappings are defined as a preference.
Probably you can retain the preset field structure. If required you can change the
structure.
1. Click on the button Field mapping or choose the option under Settings→
Field mapping.
2. Now the window Field mapping appears. All standard fields are marked
as active by de-
User Manual
35
Masch Contact Bridge
fault.
3. Check the field structure and change it if necessary. Click on the buttons:
Select all or Reset all if you want to activate or deactivate fields.
User Manual
36
Masch Contact Bridge
4. If you want to change the field mapping, choose the required CardScan
field and drop it above or beyond until it is averse across from the appropriate field in MS Outlook.
5. Then click on OK to save your changes or on Cancel to reset the preference of the field mapping.
User Manual
37
Masch Contact Bridge
4.2.7 How can I edit duplicates?
When transferring contacts, the data conflicts could appear if Masch Contact
Bridge and MS Outlook have different information for the same dataset. Normally this happens when data in MS Outlook are new formatted which came
originally from CardScan.
When a data conflict is detected during the data transfer a dialog window will
appear named Conflict resolution. Data conflicts can appear when datasets,
which normally contains identical information have different information in one
field minimum. In the conflict resolution only the fields which contain conflicting information will be displayed.
1. Compare the displayed information. If you want to add all the data from
Masch Contact Bridge, click on the button ContactBrigde→Outlook.
2. If existing changes have priority in Outlook click on Outlook→Contact
Bridge to keep them.
User Manual
38
Masch Contact Bridge
3. You can decide for each single field which data should be added. Double-click on the arrow to change the direction.
4. If you are satisfied click on OK to save the solution and close the dialog
window. If you cancel the procedure, the dialog window will be closed
without saving the changes.
5. After the successful transfer the following confirmation will appear.
User Manual
39
Masch Contact Bridge
6. Open the contact in MS Outlook to check the entry.
User Manual
40