1
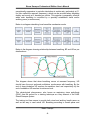
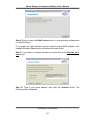
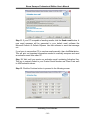
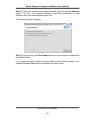
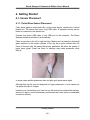
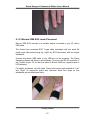
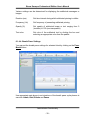
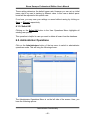
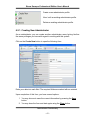
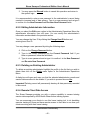
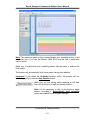
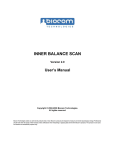
Stress Sweeper
Breathing Exercise Trainer
Professional Edition
User’s Manual
Version 1.0
Copyright© 2007 Advanced Wellness Solutions, LLC. All rights reserved
Advanced Wellness Solutions makes no claim that its products treat or heal. AWS’s products are designed to measure
and monitor physiological change. Professional should work within the scope of their licenses and/or certifications when
interpreting or applying data derived from AWS’s products. This product is to be used for research and educational
purposes only.
Stress Sweeper Professional Edition User’s Manual
Table of Contents
Table of Contents ................................................................................................. 3
Credits .................................................................................................................. 5
Software concept:.......................................................................................... 5
Software design and user interface: .............................................................. 5
Programming:................................................................................................ 5
Quality Assurance: ........................................................................................ 5
Authoring online help and User’s manual: ..................................................... 5
Technical Support................................................................................................. 6
1. Basic Concept .................................................................................................. 7
2. System Setup ................................................................................................. 10
2.1. Package Content ..................................................................................... 10
2.2. Minimum System Requirements .............................................................. 10
2.3. Software Installation................................................................................. 11
2.4. Software Uninstallation ............................................................................ 14
2.5. Enabling the Signal Acquisition Device .................................................... 16
2.5.1. Pulse Wave Sensor ........................................................................... 16
2.5.2. Biocom 3000 ECG Recorder ............................................................. 17
3. Activating Your Software ................................................................................ 18
4. Getting Started ............................................................................................... 26
4.1. Sensor Placement.................................................................................... 26
4.1.1. Pulse Wave Sensor Placement ......................................................... 26
4.1.2. Biocom 3000 ECG Leads Placement ................................................ 27
4.1.3. Respiration Sensor Placement .......................................................... 28
4.2. Start the Stress Sweeper Software .......................................................... 28
5. Login Options ................................................................................................. 29
5.1. Administrator Login .................................................................................. 29
5.2. Regular User Login .................................................................................. 30
6. Administrator Functionality ............................................................................. 32
6.1. Client Operations ..................................................................................... 33
6.1.1. Creating New Client........................................................................... 33
6.1.2. Editing Client Profile .......................................................................... 34
6.1.3. Deleting an Existing Client................................................................. 35
6.1.4. Editing Client Settings ....................................................................... 35
6.1.5. Select All ........................................................................................... 40
6.2. Administrator Operations ......................................................................... 40
6.2.1. Creating New Administrator............................................................... 41
6.2.2. Editing Administrator Information ...................................................... 42
6.2.3. Deleting an Existing Administrator..................................................... 42
6.2.4. Remote Client Data Access............................................................... 42
6.3. Database Operations ............................................................................... 47
6.3.1. Creating New Database .................................................................... 49
Table of Contents
-3-
Stress Sweeper Professional Edition User’s Manual
6.3.2. Opening Database............................................................................. 49
6.3.3. Renaming Database.......................................................................... 50
6.3.4. Backing Up Database........................................................................ 50
6.3.5. Restoring Database........................................................................... 51
6.3.6. Compacting Database ....................................................................... 52
6.3.7. Deleting Database ............................................................................. 52
7. Non-administrative User Operations............................................................... 53
7.1. Non-administrative User Main Menu ........................................................ 53
7.2. Client Operations ..................................................................................... 54
7.2.1. Editing Client Profile .......................................................................... 54
7.2.2. Editing User Settings ......................................................................... 56
8. Conducting a Training Session....................................................................... 57
8.1. Training Goals.......................................................................................... 57
8.2. Training Means ........................................................................................ 57
8.3. Training Protocol...................................................................................... 57
8.4. Start Training Session.............................................................................. 58
8.5. Program Controls and Features............................................................... 62
8.5.1. Controlling the Session Process........................................................ 62
8.5.2. Adjusting the Graph Scales ............................................................... 63
8.5.3. Adjusting the Breath Pacer................................................................ 63
8.5.3. Controlling Audio Features ................................................................ 63
8.5.4. Changing Views ................................................................................ 64
8.6. Finishing the Training Session ................................................................. 71
9. View Training Summary.................................................................................. 72
9.1. Adjusting the Graph Scales...................................................................... 75
9.2. Viewing Printable Report.......................................................................... 76
9.3. Printing Report ......................................................................................... 76
9.4. Entering Session Comments.................................................................... 76
9.5. Viewing Other Sessions ........................................................................... 77
10. View Training History.................................................................................... 78
10.1. Adjusting the Graph Scales.................................................................... 79
10.2. Viewing Printable History Report ........................................................... 79
10.3. Printing Report ....................................................................................... 80
11. Other Session Data Options ......................................................................... 81
11.1. Deleting Selected Sessions ................................................................... 81
11.2. Sending Session Data Over E-mail........................................................ 81
11.3. Exporting Session Data.......................................................................... 81
12. Get Help ....................................................................................................... 83
13. Exit Stress Sweeper ..................................................................................... 84
Table of Contents
-4-
Stress Sweeper Professional Edition User’s Manual
Credits
Software concept:
Vadim Pougatchev, M.D.
Yevgeniy Zhirnov, PhD.
Yevgeniy Gribkov, M.D.
Software design and user interface:
Vadim Pougatchev, M.D.
Programming:
Yevgeniy Gribkov, M.D.
Quality Assurance:
Vadim Pougatchev, M.D.
Authoring online help and User’s manual:
Vadim Pougatchev, M.D.
Ivan Pougatchev
Credits
-5-
Stress Sweeper Professional Edition User’s Manual
Technical Support
Customer Support Phone:
Contact your local dealer
Web-site:
www.awscenter.com
E-mail:
[email protected]
Fax:
360-779-0693
Call your local dealer for:
•
System installation
•
Software installation
•
System troubleshooting
•
Hardware use
•
Software use
According to our customer support policy we charge all customers $60.00 an
hour with $15.00 increments for all incoming calls and $75.00 an hour when we
return calls.
Each new customer has one hour of technical support free. If your computer and
peripherals comply with our system requirements and configured properly, there
is enough time to get the system up and running within this hour.
Any support related to hardware repair, accessories and supplies replacement is
free of charge.
Any reports on possible software bugs found, software comments and
suggestions are more than welcome. Please send them to us by fax or e-mail.
Technical Support
-6-
Stress Sweeper Professional Edition User’s Manual
1. Basic Concept
The human organism is under the continuous control of the autonomic nervous
system (ANS). The ANS is evolutionarily the oldest part of the human nervous
system that cannot be voluntarily controlled by our thoughts. The main purpose
of the ANS is to control all organs and systems to maintain optimum performance
of the organism influenced by various internal and external factors. This control is
carried out by the two branches of the ANS called the sympathetic nervous
system (SNS) and the parasympathetic nervous systems (PNS).
Generally SNS causes the so-called “fight or flight” response needed to mobilize
all of our organisms’ resources to withstand any stress factors (stressors) certain changes in outer or inner environment that cause discomfort or even
harm to our organisms. Once the immediate threat of stressor is alleviated, PNS
takes control of the organism, bringing it back to normal optimum function. Strong
functioning of both the SNS and PNS allows our organisms to function effectively
over time.
Chronic long-term stress often causes malfunctioning of ANS regulatory
functions, which can become a precursor of various detrimental health
conditions. Under chronic stress, the PNS primarily suffers. This results in an
inability to adequately regulate body function. This fact shows a strong reason to
give people a tool to positively affect on PNS to bring it back to normal
functioning.
Everybody knows that human muscles become stronger and function more
effectively if regular physical exercises are given to them. Same can be done to
the PNS. Fortunately there is a key element of PNS that can be positively
affected in a special training regimen serving as a sort of exercise to the PNS.
This is the mechanism of baroreflex. Its basic function is to regulate heart rate
(HR) depending on actual level of blood pressure (BP) in central blood vessels,
primarily in aorta. Its main goal is to provide an adequate blood supply to all vital
organs, such as brain, heart, lungs, etc. There are special sensory cells in the
aorta wall called baroreceptors that sense the level of BP and send the signals to
the brain structures via special nerves. Those baroreceptors, nerve fibers and
specific brain structures are all part of the PNS. Their job is to check the BP level
and send signal back to heart to set certain level of HR. It works in such a way
that if BP in aorta drops, HR rises and vice versa. This mechanism adjusts the
HR to maintain balance and keep the blood supply sufficient.
Thus to train PNS system we need to have a positive impact on the baroreflex
mechanism to cause increased stimulation of PNS. It appears that deep
breathing is an easy mind controlled way to do such stimulation providing an
effective exercise regimen to the PNS. It was found that baroreflex mechanism is
Basic Concept
-7-
Stress Sweeper Professional Edition User’s Manual
exceptionally responsive to periodic stimulation at certain rate, particularly at 0.1
Hz (also called the resonant frequency), which can be provided when breathing
deeply and evenly at 6 breaths per minute. This regimen is especially effective
when such breathing is controlled by a specially established visual and/or
auditory pacer (or metronome).
Below is a diagram describing how baroreflex mechanism works.
Below is the diagram showing relationship between breathing, BP and HR as per
details above.
This diagram shows that when breathing occurs at resonant frequency, HR
should have the most profound oscillations synchronous with breathing. By the
end of deep inhalation HR reaches its maximum level and respectively by the
end of exhalation HR reaches its minimum level.
This physiological phenomenon, also known as respiratory sinus arrhythmia
(RSA), sets the ground for a training technique as a key element of the AWS
Stress Sweeper system.
The training tool has means to provide both visual and auditory breath pacer as
well as the way to read actual HR. Breathing according to breath pacer and
Basic Concept
-8-
Stress Sweeper Professional Edition User’s Manual
observing actual HR establishes a biofeedback loop, which is essential to have a
successful training outcome.
Important! It is important to understand that none of the physiological data
measured by the Stress Sweeper is to be used for diagnostic purpose. The
information being recorded will vary greatly between individuals. Age, heart
irregularities, chronic conditions all could affect the reading by this instrument.
Important! Individuals should use this instrument for achieving better function of
the internal regulatory mechanisms. It is important to understand that no dramatic
improvement could happen overnight. Regular use of this tool (10-20 minutes per
day) should gradually bring your regulatory systems to better function enhancing
your overall health condition.
Basic Concept
-9-
Stress Sweeper Professional Edition User’s Manual
2. System Setup
2.1. Package Content
When you receive the Stress Sweeper package, it must include the following
items:
Pulse Wave Sensor Version:
1. PW-1000 pulse wave sensor device with an ear-clip probe
2. “Stress Sweeper” software CD
3. Quick Setup Guide
4. Warranty Card
Biocom 3000 ECG Version:
1. Biocom 3000 ECG recorder
2. Y-type ECG electrode cable
3. Respiration Sensor with chest strap (Optional)
4. “Stress Sweeper” software CD
5. Quick Setup Guide
6. Warranty Card
Contact Advanced Wellness Solutions or your local dealer if you have any
concerns regarding content of the product received.
2.2. Minimum System Requirements
The Stress Sweeper has the following hardware requirements to ensure its
reliable functioning:
•
CPU Pentium 4 1.0 GHz or better
•
256 MB of RAM
•
Video card with at least 32 Mb of video RAM, supporting at least
1024x768 resolution mode
•
At least 500 MB of free hard disk space
•
CD ROM drive
System Setup
- 10 -
Stress Sweeper Professional Edition User’s Manual
•
One available USB 1.1 port
•
Windows Me/2000/XP/Vista Operating System with Microsoft DirectX 8 or
higher
If you are not sure about your computer, contact your local computer specialist to
verify whether your computer complies with the above requirements.
2.3. Software Installation
To install the Stress Sweeper software:
Step 1: Insert the CD-ROM into the drive.
Step 2: Windows will automatically start software installation process.
In some cases the installation process may not start automatically. To install the
software do the following:
Click the Start button on the taskbar and select Run menu option.
In the “Run” dialog box type “D:\setup”. Click OK.
Note: The Stress Sweeper software might be bundled with other AWS software.
In this case the following command should be used:
D:\SSW\SETUP.EXE
By default CD-ROM device is marked with the letter “D”. However sometimes
CD-ROM drives could be labeled with a letter other than “D”.
Step 3: If the Stress Sweeper software already exists on this computer, the
following window will show up:
System Setup
- 11 -
Stress Sweeper Professional Edition User’s Manual
Select the Repair option, click the Next button then proceed to Step 7.
If there is no Stress Sweeper software on this computer, the following window will
show up:
Step 4: Click the Next button. The following window will show up:
Step 5: Select the I accept the terms of the license agreement option and click
the Next button. The following window will show up:
System Setup
- 12 -
Stress Sweeper Professional Edition User’s Manual
Step 6: Click the Install button to continue installation.
Step 7: The following window will show up to indicate the installation progress:
Step 8: After installation is completed the following window will show up:
Step 9: Click the Finish button to complete the installation process.
System Setup
- 13 -
Stress Sweeper Professional Edition User’s Manual
2.4. Software Uninstallation
To uninstall the Stress Sweeper software:
Step 1: Click the Start button on the taskbar.
Step 2: Select the Control Panel option from the Start menu. The following
window will show up:
Step 3: Select the Add or Remove Programs icon. The following window will
show up:
Step 4: Select the Stress Sweeper Pro from the list and click the
Change/Remove button. The following window will show up:
System Setup
- 14 -
Stress Sweeper Professional Edition User’s Manual
Step 5: Select the Remove option then click the Next button. The system will
prompt you to confirm removing the Stress Sweeper:
Step 6: Click the Yes button to continue uninstallation. The following window will
show up to indicate the uninstallation progress.
Step 7: Once the uninstallation process is over the following window will show
up:
System Setup
- 15 -
Stress Sweeper Professional Edition User’s Manual
Step 8: Click the Finish button to complete the uninstallation process.
Note: All instructions in this section imply you are using Windows XP operating
system. Please look for equivalent options if you have different OS.
2.5. Enabling the Signal Acquisition Device
2.5.1. Pulse Wave Sensor
The Stress Sweeper measures your HR with a device called pulse wave sensor.
It measures instantaneous changes in blood flow through peripheral blood
vessels in ear lobe or finger caused by heart contraction. Each heartbeat creates
an increase in blood blow that propagates through entire vascular system. By
measuring time intervals between peaks of the blood flow instantaneous HR
reading can be calculated.
The AWS PW-1000 pulse wave sensor is shown on this picture.
The PW-1000 unit has a standard USB cable with a flat USB connector.
System Setup
- 16 -
Stress Sweeper Professional Edition User’s Manual
Plug the USB connector into any USB slot in your PC and Windows will
automatically detect it and enable for further use. Windows will remember this
device and quickly enable it every time you plug it in for use by the Stress
Sweeper software.
A small detachable plastic ear-clip probe is connected to PW-1000.
Plug the ear-clip cable jack into round slot on the side panel of the device box.
If your pulse wave sensor device box is equipped with a belt clip, secure it on
your belt or your shirt pocket.
Hook the ear-clip to an earlobe. Make sure it sits securely and does not cause
any pain or discomfort.
If the ear-clip is used on different people, it is a good idea to wipe its inner
surfaces with an alcohol swab.
If for some reason you cannot hook the ear-clip to you your earlobe, you can put
it on your fingertip. This placement should be good enough to acquire clean
pulse wave signal.
2.5.2. Biocom 3000 ECG Recorder
The Biocom 3000 ECG recorder is connected to your PC through a standard
USB port.
Plug its USB connector into any USB slot in your PC and Windows will
automatically detect it and enable for further use. Windows will remember this
device and quickly enable it every time you plug it in for use by the Stress
Sweeper software.
System Setup
- 17 -
Stress Sweeper Professional Edition User’s Manual
3. Activating Your Software
Upon successful installation of any AWS software it must be activated before its
use.
Software activation is a new intellectual property protection technology utilized by
many software vendors. It establishes unique link between specific copy of the
software identified by its serial number and computer on which it is installed.
For demonstration and initial exploration purpose a special 30-days trial period is
allowed upon installation. During trial period activation can be skipped. Upon
expiration of the trial period it will not be possible to use the software.
Step 1. Click this icon on your desktop to start Stress Sweeper. This
will start software activation program.
This software utilizes Microsoft .NET Framework 1.1 software components,
which should be installed on your PC. By default these components are
automatically installed along with Stress Sweeper software from the Stress
Sweeper CD. However in rare occasions they fail to complete installation. In this
case the following message box will appear instead of the window above:
Activating Your Software
- 18 -
Stress Sweeper Professional Edition User’s Manual
You have two options to manually install MS .NET Framework.
1. Click Go to the Microsoft website to install it button. A web browser
window will open and bring you to specific Microsoft web page. Follow onscreen instruction to download and install the software components.
2. Manually install MS .NET Framework from AWS CD:
a. Click on the My Computer icon.
b. Click on the CD-ROM Drive icon.
c. Open the MS Framework .NET 1.1 folder.
d. Choose you specific language folder and open it (e.g. Japanese)
e. Double-click on the DOTNETFX.EXE icon to start installation.
f. Follow the on-screen instructions to complete installation.
g. You may be prompted to reboot your PC.
h. Once installation is complete, try to start Stress Sweeper to get
activation software started.
Step 2. Click Continue to start activation process.
If for some reason you want to terminate software activation program click
Cancel button. The following window appears:
Click Yes to terminate activation or No to continue activation.
Activating Your Software
- 19 -
Stress Sweeper Professional Edition User’s Manual
The following window appears if you continue
If you want to continue software activation, proceed to Step 4.
If you prefer to use the software in trial mode without activation, wait until Trial
Use button becomes enabled.
Step 3. Click Trial Use button to stop activation process and run AWS software
in trial mode.
Step 4. If you choose to continue activation, type in serial number printed on CD
case:
Activating Your Software
- 20 -
Stress Sweeper Professional Edition User’s Manual
Step 5. Click the Continue button. The following screen will appear:
Step 6. If your PC is not connected to the Internet or you prefer to complete
activation via email, proceed to Step 9.
Otherwise choose the Activate via the Internet option and click the Continue
button.
The software will automatically connect to the AWS activation server and perform
activation process:
Activating Your Software
- 21 -
Stress Sweeper Professional Edition User’s Manual
Once it is done, the following screen will appear:
Step 7. Click the Continue button to proceed. The following screen will appear:
Activating Your Software
- 22 -
Stress Sweeper Professional Edition User’s Manual
Step 8. Now you may click Run Product button to close activation software and
run AWS software.
If you prefer just finish activation process without running AWS software, click
standard Windows Close button (red button with white cross).
Step 9. If you prefer to complete activation via email choose the Activate via email option:
Step 10. Type in your email address, then click the Continue button. The
following screen will appear:
Activating Your Software
- 23 -
Stress Sweeper Professional Edition User’s Manual
Step 11. If your PC is capable of sending emails, click the Send e-mail button. A
new email message will be generated in your default email software like
Microsoft Outlook or Outlook Express. Use that software to send that message
out.
If you have to use another PC to send an email manually, then click Print button.
This will print out important information needed to manually compose and send
an activation email from other PC.
Step 12. Wait until you receive an activation email containing Activation Key.
This key is uniquely linked to your Product Serial Number and Client Code sent
to AWS activation server.
Step 13. Click the Continue button to proceed to the following screen:
Activating Your Software
- 24 -
Stress Sweeper Professional Edition User’s Manual
Step 14. Type your Activation Key symbols into this form then click the Continue
button. You may use standard Windows Copy/Paste procedure to copy
Activation Key from email received to this form.
The following screen will appear:
Step 15. Now you may click Run Product button to close activation software and
run AWS software.
If you prefer just finish activation process without running AWS software, click
standard Windows Close button (red button with white cross).
Activating Your Software
- 25 -
Stress Sweeper Professional Edition User’s Manual
4. Getting Started
4.1. Sensor Placement
4.1.1. Pulse Wave Sensor Placement
Pulse wave signal is measured with a pulse wave sensor contained in a small
plastic box. The device box has a long USB cable. A separate ear-clip sensor
probe is connected to the device box.
Connect the device USB cable to any USB port in the computer. The Stress
Sweeper software will detect it automatically.
Place an ear-clip on the left or right ear lobe. Make sure it is placed so that small
glass windows on the inside surfaces of the clip are in good contact with soft
tissue of the ear lobe. Be aware that proper placement will affect the quality of
pulse wave signal. Small ear lobes or earrings may make placement more
difficult.
In some cases earlobe placement does not give good pulse wave signal.
Although this ear-clip was not designed for finger placement, in such cases you
can place this clip on a finger.
However you should keep your hand on any flat and secure surface like desktop,
armrest or laps to avoid unnecessary movements that could cause considerable
movement artifacts.
Getting Started
- 26 -
Stress Sweeper Professional Edition User’s Manual
4.1.2. Biocom 3000 ECG Leads Placement
Biocom 3000 ECG recorder is a portable device connected to your PC with a
USB cable.
The device has a standard ECG Y-type cable terminated with two small flat
plastic pads (that embed large Ag / AgCl dry ECG electrodes) with two elastic
wristbands.
Connect the device USB cable to any USB port in the computer. The Stress
Sweeper software will detect it automatically. Connect a flat RJ-45 connector of
the Y-cable to input “B” on the front panel of Biocom 3000 box (opposite side to
LED indicator).
Put elastic wristbands on both wrists. Place both sensor pads marked as “Left”
and “Right” on respective wrists with electrode disks face down so that
wristbands secure those pads firmly.
Getting Started
- 27 -
Stress Sweeper Professional Edition User’s Manual
4.1.3. Respiration Sensor Placement
If you use Biocom 3000 ECG Recorder, you might have an optional respiration
sensor designed to measure breathing activity. This is a special magnetic strain
gauge sensor measuring changes in chest volume caused by breathing.
Wrap the sensor strap around your chest so that the sensor box is located near
to the lower end of your sternum. Buckle the sensor strap and adjust its length so
that the extensible part of the strap becomes just a little bit expanded and whole
sensor set rests on the body. Do not overstretch the sensor strap because this
could cause respiration signal to go out of scale.
Connect a flat RJ-45 connector of the Y-cable to input “A” on the front panel of
Biocom 3000 box (near side to LED indicator).
4.2. Start the Stress Sweeper Software
You can start the Stress Sweeper software in two possible ways:
Option 1:
Double-click this shortcut icon on the Windows desktop screen to
start the Stress Sweeper.
Option 2:
Use system menu as follows:
Click the Start button on Windows task
bar.
Select All Programs menu option.
Select the AWS folder from the menu
list.
Select Stress Sweeper folder from the
menu list.
Select Stress Sweeper option from the
open folder menu.
Getting Started
- 28 -
Stress Sweeper Professional Edition User’s Manual
5. Login Options
Once the program started, the following application window comes up:
You must login to the system as a user of certain type: administrator or simple
user. Administrators have extra privileges to manage various aspects of the
system performance and user’s data.
Enter an appropriate User ID and password then click on this
button to continue.
Note: Upon first login the default User ID is “Admin” and password is blank. You
can later modify them once inside the program.
Upon logging in, you come to the main menu. The menu you come to depends
on whether you are logged in as an administrator or as a regular (or temporary)
user.
5.1. Administrator Login
The administrator is a special type of the system user. The administrator is
responsible for maintaining the system database. More than one system
administrator is allowed.
Login Options
- 29 -
Stress Sweeper Professional Edition User’s Manual
When you log in as an administrator the system will check the list of
administrators to find an administrator record matching entered User ID and
password.
Once you login as a regular user the following screen will open:
Use top menu or User’s Operations menu options to perform desired functions.
5.2. Regular User Login
The regular user is able to access all of the basic functions of the Stress
Sweeper.
Typically regular users utilize passwords to log into the system.
Once you login as a regular user the following screen will open:
Login Options
- 30 -
Stress Sweeper Professional Edition User’s Manual
Use top menu or User’s Operations menu options to perform desired functions.
Login Options
- 31 -
Stress Sweeper Professional Edition User’s Manual
6. Administrator Functionality
Once you login as an administrator the following screen shows up:
The top menu contains the following menu options:
Manage clients (default).
Manage session records.
Manage databases.
Manage administrators.
Administrator Functionality
- 32 -
Stress Sweeper Professional Edition User’s Manual
Switch to another user by logging off current one
and logging on another.
Exit the software.
Click the selected menu item to perform specific program task.
6.1. Client Operations
Click on the Client button of the top menu to switch to client operations mode.
This will bring the list of clients shown above.
The administrator’s Client Operations Menu is on the left side of the screen.
Here, you have the following options:
Create a new client profile.
View / edit an existing client profile.
Delete an existing client profile.
View / edit program settings associated with
selected client.
Select all existing client profiles.
6.1.1. Creating New Client
This option is helpful when administrator manages a group of clients.
Once you select the Create New menu option the following form will open:
Administrator Functionality
- 33 -
Stress Sweeper Professional Edition User’s Manual
Enter your data into each field. The required fields are marked with an asterisk.
Upon completion of this form, you have several options:
1. You may choose to save the current information by pressing the Save
button.
2. You may clear the form and start again using the Clear button.
3. You may press the Discard button to cancel this operation and return to
the system login.
It is recommended to enter a new password in the client record being created to
increase level of data privacy. Type in a new password and re-type it to confirm it
in the New Password and Re-enter New Password fields.
6.1.2. Editing Client Profile
Once you select the Edit menu option in the Client Operations Menu the client
information form will open. You can modify the client information as described in
the previous section.
You may change the User ID by clicking the Change User ID button and
entering new User ID.
Administrator Functionality
- 34 -
Stress Sweeper Professional Edition User’s Manual
You may change a user password by doing the following steps:
1. Click on the Change Password button.
2. Type in the current password into the Current Password field. If you
have no password, leave the field blank.
3. Type in a new password and re-type it to confirm it in the New Password
and Re-enter New Password.
6.1.3. Deleting an Existing Client
To delete an existing client profile highlight the profile in the list that you wish to
delete then click on the Delete menu option in the Client Operations Menu.
A dialog box will open and warn you that the selected client’s records and
session data are about to be deleted. If you wish to proceed choose Yes.
Important! Deleting client’s record will permanently destroy all data previously
recorded in the client’s record.
6.1.4. Editing Client Settings
You may edit your client settings and preferences by clicking on the Settings
menu option in the Client Operations Menu. The following window should appear:
Administrator Functionality
- 35 -
Stress Sweeper Professional Edition User’s Manual
The form contains three tabs:
General
Various settings of general kind.
Training
Various training settings.
Subliminal Priming
Special settings related to subliminal priming method
used in training.
Once you are satisfied with your settings, you may:
1. Save your settings as the default settings for all profiles by clicking the
Save as Defaults button.
2. Revert back to your default settings by clicking on the Reset Defaults
button.
3. Save your settings by clicking on the Save button.
4. Cancel without saving by clicking on the Discard button.
If you want your new settings to set to all your clients click on the Select to all
clients button.
Administrator Functionality
- 36 -
Stress Sweeper Professional Edition User’s Manual
6.1.4.1. General Settings
Here, you may take any of the following actions:
1. Change your difficulty level to Beginner, Intermediate, or Advanced
(Change the scoring criteria to make achieving a good score easier or
harder).
2. Change the training length to 5 Minutes, 10 Minutes, 15 Minutes, or
Unlimited (Change the length of your actual training sessions).
3. Change the accumulation time to 30 Seconds, 1 Minute, 2 Minutes, or 5
Minutes (Change the amount of time for the program to accumulate
some sample data before your training score will show up).
4. Choose whether or not you wish to automatically start recording your
session data by (un)checking Automatically Start Recording.
5. Choose whether or not you wish to automatically save your recorded data
by (un)checking Automatically Save Result.
6. Toggle the appearance of the breath pacer to assist you in your breathing
by (un)checking Show Breath Pacer.
6.1.4.2. Training Settings
Here, you may set various training settings.
You may set the program playing specific audio files to indicate how well you
have scored in your session. To do this:
1. Set the Use score audio options checkbox.
2. Choose a sound from one of the drop-down lists for each category (or a
custom one by clicking on the + button).
3. You may choose to loop the sound by (un)checking the Loop option.
You may change the sound option to play as a training audio. To do this:
1. Check the Use background sound checkbox.
2. Select the sound from one of the drop-down list (or a custom one by
clicking on the + button).
3. You may choose to play the sound only once the score reaches certain
level by (un)checking the Start at SCORE option and entering the score
threshold level.
4. You may choose to reset playing selected sound on start by setting the
Reset sound on start checkbox.
Administrator Functionality
- 37 -
Stress Sweeper Professional Edition User’s Manual
You may change the sound used for the breath pacer by choosing one of the
presets from the dropdown list, or disable it altogether by (un)checking Use
Breath Pacer Sound.
You may change the option to display specific image on the screen with variable
level of opacity proportional to the training score level. To do this:
1. Check the Use feedback image checkbox.
2. Select the image from one of the drop-down list (or a custom one by
clicking on the + button).
3. You may choose to show the image only once the score reaches certain
level by (un)checking the Start at SCORE option and entering the score
threshold level.
6.1.4.3. Subliminal Priming Settings
Here, you may set various settings related to subliminal priming training method.
You may change the option to display specific subliminal (not clearly visible)
image on the screen. To do this:
1. Check the Use subliminal image checkbox.
2. Select the image from one of the drop-down list (or a custom one by
clicking on the + button).
You may change the option to display specific subliminal (not clearly visible) text
message on the screen. To do this:
1. Check the Use subliminal text checkbox.
2. Enter the subliminal message text in respective text entry field.
You may specify the image to be displayed behind the subliminal messages or
images. To do this select the Subliminal background image from one of the
drop-down list (or a custom one by clicking on the + button).
You may choose to show the image only once the score reaches certain level by
(un)checking the Start at SCORE option and entering the score threshold level.
You may choose to display subliminal messages and images in random positions
on the screen by setting the Random position checkbox.
Administrator Functionality
- 38 -
Stress Sweeper Professional Edition User’s Manual
Various settings can be determined for displaying the subliminal messages or
images:
Duration (ms)
Set time interval during which subliminal priming is visible.
Frequency (Hz)
Set frequency of presenting subliminal priming.
Opacity (%)
Set opacity of subliminal image or text ranging from 0
(invisible) to 100 (non-transparent).
Text color
Set color of the subliminal text by clicking the box and
selecting an appropriate color from the palette.
6.1.4.4. Breath Pacer Settings
You may set the breath pacer settings for selected client by clicking on the Pacer
Model button.
Use appropriate spin-boxes to set durations of the breath pacer cycle phases in
seconds: Inhale, Hold, Exhale and Pause.
Administrator Functionality
- 39 -
Stress Sweeper Professional Edition User’s Manual
These setting determine the default pacer rate. However you can set an initial
pacer rate to be used in training to different value. In this case a default pacer
model will be adjusted to this specific rate.
From here, you may save your settings or cancel without saving by clicking on
Save, or Discard, respectively.
6.1.5. Select All
Clicking on the Select All button in the User Operations Menu highlights all
existing user profiles.
This operation is helpful in case you want to delete all users from the database.
6.2. Administrator Operations
Click on the Administrators button of the top menu to switch to administrator
operations mode. This will bring the following screen:
The Administrator Operations Menu is on the left side of the screen. Here, you
have the following options:
Administrator Functionality
- 40 -
Stress Sweeper Professional Edition User’s Manual
Create a new administrator profile.
View / edit an existing administrator profile.
Delete an existing administrator profile.
6.2.1. Creating New Administrator
As an administrator you can create another administrator record giving him/her
the same privileges you have with regard to working with this system.
Click on the Create New button to open the following form.
Enter your data into each field. The required fields are marked with an asterisk.
Upon completion of this form, you have several options:
1. You may choose to save the current information by pressing the Save
button.
2. You may clear the form and start again using the Clear button.
Administrator Functionality
- 41 -
Stress Sweeper Professional Edition User’s Manual
3. You may press the Discard button to cancel this operation and return to
the system login.
It is recommended to enter a new password in the administrator’s record being
created to increase level of data privacy. Type in a new password and re-type it
to confirm it in the New Password and Re-enter New Password fields.
6.2.2. Editing Administrator Information
Once you select the Edit menu option in the Administrator Operations Menu the
administrator information form will open. You can modify the administrator’s
information as described in the previous section.
You may change the User ID by clicking the Change User ID button and
entering new User ID.
You may change a user password by doing the following steps:
4. Click on the Change Password button.
5. Type in the current password into the Current Password field. If you
have no password, leave the field blank.
6. Type in a new password and re-type it to confirm it in the New Password
and Re-enter New Password.
6.2.3. Deleting an Existing Administrator
To delete an existing administrator highlight the profile in the list that you wish to
delete then click on the Delete menu option in the Administrator Operations
Menu.
A dialog box will open and warn you that the selected administrator records and
session data are about to be deleted. If you wish to proceed choose Yes.
Important! Deleting record will permanently destroy all data previously recorded
in this record.
6.2.4. Remote Client Data Access
The Stress Sweeper provides you with a unique capability to access training
session data acquired by AWS Health Wizard home training system.
You can encourage your clients to use this home training tool to do breathing
exercise training at home and have remote access to that data to see how your
clients are doing with their home training.
Administrator Functionality
- 42 -
Stress Sweeper Professional Edition User’s Manual
The Health Wizard is an Internet based product, which means that your client’s
home training data is stored on remote Internet server. So you need to be able to
connect to that server and access your client’s data. This requires your PC to be
connected to the Internet.
Here is how it works:
1. Once your client agrees to give you an access to his/her training data,
you have to give your client a special unique access key.
2. Your client must enter that key into his/her personal information record in
respective data field and update that record. The Health Wizard system
will then know that you are given permission to access this client’s
records.
3. You need to get access to that remote database and establish a link with
it. The Stress Sweeper will remember that remote database and add it to
the list of databases under your control.
4. Any time you want to access your client’s home training data you would
need to open that remote database and access session data as if it is in
your Stress Sweeper here.
The Remote DB Access Menu is on the left side of the screen. Here, you have
the following options:
Generate new access key.
Update your current access key.
Print a special memo card with your access
key to give to your client.
Access AWS remote database and establish
a link with it.
6.2.4.1. Get New Access Key
Click on the Get Access Key button to generate new access key. The following
form will appear:
Administrator Functionality
- 43 -
Stress Sweeper Professional Edition User’s Manual
You can manually edit this key.
Click on the Save button to store the key.
Click on the Discard button to cancel updating the key.
Click on the Clear button to empty entry fields.
6.2.4.2. Update Access Key
Click on the Update Key button to modify your current access key. The following
form will appear:
Administrator Functionality
- 44 -
Stress Sweeper Professional Edition User’s Manual
You can manually edit this key.
Click on the Save button to store the key.
Click on the Discard button to cancel updating the key.
Click on the Clear button to empty entry fields.
Important: Be careful with modifying your access key. If it is changed all your
clients who have been given your old key will have to get this new one and
update their Health Wizard personal information record to allow you accessing
their home training data.
6.2.4.3. Print Access Key Card
Click on the Print Key Card button to print a special access key card, which
must be given to all your clients to which home training data you want to have
access to. The following form will appear:
Administrator Functionality
- 45 -
Stress Sweeper Professional Edition User’s Manual
Click on the Print Report button to print the card.
Click on the Go Back button to return to the previous screen.
6.2.4.4. Link to Remote Database
Click on the Get Remote DB button to establish a link with AWS remote
database. Upon completion the following form will appear:
Administrator Functionality
- 46 -
Stress Sweeper Professional Edition User’s Manual
Click on the Go Back button to return to the previous screen.
6.3. Database Operations
Click on the Database button of the top menu to switch to database operations
mode. This will bring the following screen:
Administrator Functionality
- 47 -
Stress Sweeper Professional Edition User’s Manual
The Database Operations Menu is on the left side of the screen. Here, you have
the following options:
Create new database.
Open selected database.
Rename selected database.
Backup selected database.
Restore selected database from its backup
copy.
Compact selected database.
Delete selected database.
Administrator Functionality
- 48 -
Stress Sweeper Professional Edition User’s Manual
6.3.1. Creating New Database
As an administrator you can create multiple databases. This could be very helpful
if you wish to separate different groups of your clients.
Click on the Create New button to create new database. A new database named
NewDB will be automatically created and added to the list of databases:
It is recommended to rename this new database to assign more meaningful
name to it.
6.3.2. Opening Database
Select specific database from the list of databases then click on the Open button
to open it.
Once selected database is open its name will appear on the program caption bar
to the right of the software name.
Administrator Functionality
- 49 -
Stress Sweeper Professional Edition User’s Manual
6.3.3. Renaming Database
Select specific database from the list of databases then click on the Rename
button to rename it.
The name of selected database in the list becomes editable:
Modify the name of the selected database and hit <Enter> to complete it. This
should display new name in the list in non-editable format.
Important: Do not rename the “AWS” database because it is very special name
representing the remote Health Wizard database.
6.3.4. Backing Up Database
Select specific database from the list of databases then click on the Backup
button to back it up.
The following dialog box will appear:
Administrator Functionality
- 50 -
Stress Sweeper Professional Edition User’s Manual
Enter backup file name and click the Save button to complete backup process.
6.3.5. Restoring Database
If you created a backup file of any of existing or previously existed databases you
can restore that database from its backup copy.
Click on the Restore button. The following dialog box will appear:
Select desired backup file name from the list and click the Open button to
complete restoring the database.
Administrator Functionality
- 51 -
Stress Sweeper Professional Edition User’s Manual
The database will be restored with its original name.
6.3.6. Compacting Database
You may compact selected database by clicking on the Compact Database
button.
This feature searches through your database and deletes any old records that
have already been deleted from the summary list.
Upon completion of compacting process the following message will be displayed:
6.3.7. Deleting Database
Highlight the database name in the list that you wish to delete then click on the
Delete menu option in the Database Operations Menu.
A dialog box will open and warn you that the selected database and all data in it
are about to be deleted. If you wish to proceed choose Yes.
Important! Deleting database will permanently destroy all data stored in it.
Administrator Functionality
- 52 -
Stress Sweeper Professional Edition User’s Manual
7. Non-administrative User Operations
Once non-administrative user logs in, the following screen will open:
7.1. Non-administrative User Main Menu
The top menu has the following options:
Manage client personal information.
Manage session records.
Switch to another user by logging off current one
and logging on another.
Non-administrative User Operations
- 53 -
Stress Sweeper Professional Edition User’s Manual
Exit the software.
Click the selected menu item to perform specific program task.
7.2. Client Operations
Click on the Client button of the top menu to switch to client operations mode.
This will bring the list of clients shown above.
The Client Operations Menu is on the left side of the screen. Here, you have the
following options:
View / edit an existing client profile.
View / edit program settings associated with
this client.
7.2.1. Editing Client Profile
You may edit your own profile by clicking on the Edit button. The following
window should open:
Non-administrative User Operations
- 54 -
Stress Sweeper Professional Edition User’s Manual
Enter your data into each field. The required fields are marked with an asterisk.
Upon completion of this form, you have several options:
1. You may choose to save the current information by pressing the Save
button.
2. You may clear the form and start again using the Clear button.
3. You may change the User ID by clicking the Change User ID button.
4. You may add or change a user password by clicking on the Change
Password button.
5. You may press the Discard button to cancel this operation and return to
the system login.
To change the user password, click on the Change Password button and type in
the current password into the Current Password field. (If you have no password,
leave the field blank)
Type in a new password and re-type it to confirm it in the New Password and
Re-enter New Password fields.
Non-administrative User Operations
- 55 -
Stress Sweeper Professional Edition User’s Manual
7.2.2. Editing User Settings
You may edit your individual settings and preferences by clicking on the Settings
button.
The details on this option are identical to such option available to administrative
user and described in previous section.
Non-administrative User Operations
- 56 -
Stress Sweeper Professional Edition User’s Manual
8. Conducting a Training Session
8.1. Training Goals
The main goal of the training provided by Stress Sweeper is to stimulate your
baroreflex mechanism and “exercise” your parasympathetic nervous system.
Refer to the description above for details on the physiological background of this
process.
Deep and paced breathing must be used for stimulating baroreceptors and
inspire a response of your parasympathetic nervous system resulting in HR
oscillations synchronous with breath cycle. These oscillations in HR are also
called RSA waves. So the goal of this training session is to achieve high
amplitude RSA waves and keep them high throughout the entire session.
Please stay focused on keeping breathing according to the breath pacer to
generate best RSA waves possible. Loss of focus in paced breathing will cause
loss of synchronicity and decrease of RSA waves, which means a decrease of
the stimulation of the parasympathetic nervous system.
8.2. Training Means
Stress Sweeper employs breath cycle patterns as a tool to trigger, generate and
maintain RSA waves. A specific breath cycle pattern is presented as a breath
pacer you must follow. The software allows you to create various breath cycle
patterns by means of setting specific breathing rates.
8.3. Training Protocol
The Stress Sweeper provides several simple training protocols:
•
5 minutes training
•
10 minutes training
•
15 minutes training
•
Unlimited time training
Each training session starts with a data accumulation phase when physiological
data is being accumulated for proper calculations. You can choose different
options of accumulation time. The shorter accumulation time is the sooner you
will begin getting the training score to show up. However the shorter
accumulation time the less sensitive the score will be to small changes in
Conducting a Training Session
- 57 -
Stress Sweeper Professional Edition User’s Manual
smoothness (coherence) of heart rate oscillations caused by paced breathing
(also known as RSA waves).
Once the accumulation phase is over, the software starts calculating a key
parameter called the Current Score (also referred as Training Score, RSA
Score). This calculation is based on using a patented algorithm that evaluates
oscillations of HR data to quantitatively measure the strength of your HRSA
waves created in response to paced breathing.
By default, the software automatically enables the breath pacer upon starting the
session. You have to follow the pacer throughout the session. However the
software will start showing the Current Score only upon preset accumulation time
elapses. So do not be discouraged when you don’t see the score values at the
beginning of the session.
The height of the breath pacer bar does not represent the volume of your
breathing. It is only there to demonstrate what rhythm your breathing pattern
should take. Adjust your actual breathing volume to a comfortable level (to avoid
hypo- or hyperventilation).
Once the training phase is over, the software automatically brings up a session
summary. Then session data can be either saved to your record or discarded.
8.4. Start Training Session
Before starting a new training session:
If you have a pulse wave sensor option:
1. Have your pulse wave sensor connected to PC.
2. Hook up your ear-clip.
If you have an ECG recorder option:
1. Have your ECG recorder connected to PC.
2. Hook up your ECG leads (and respiration sensor if available).
Then:
3. Start the Stress Sweeper software and bring its main menu.
4. Click on the Session menu option.
The following screen appears:
Conducting a Training Session
- 58 -
Stress Sweeper Professional Edition User’s Manual
Click on the Run New button in the Session Operations menu on the left panel.
The following dialog will appear:
Conducting a Training Session
- 59 -
Stress Sweeper Professional Edition User’s Manual
This dialog is shown by default. However if you use the same settings from
session to session, it would be OK to skip it when starting a new session. To skip
it next time uncheck the Show Next Time checkbox.
Once you uncheck the Show Next Time checkbox it will not appear when
starting new training session anymore. However you may access these options
in the Client Menu by clicking on the Settings button.
You may change any settings in this dialog as it was described in the Settings
section.
Click on the Reset Defaults menu option to set all configuration parameters to
their factory preset values.
Click on the Save as Defaults menu option to save your current settings as
default settings for future use.
Once you configured the new training session click on the Start Session button
to begin the training. The following main training screen appears:
Conducting a Training Session
- 60 -
Stress Sweeper Professional Edition User’s Manual
Note: The green line graph on this screen indicates your breathing activity. It will
be shown only if you use the Biocom 3000 ECG recorder with a respiration
sensor option!
Make sure to synchronize your breathing pattern with the pacer to achieve the
best results.
The session will automatically finish once preset training time elapses.
Important! If you chose the Unlimited duration option, the session will run
indefinitely until you click the Stop Session button.
Make sure you are getting stable readings of HR data
then click this button to start the training session.
Note: It is not necessary to click on this button to begin
session recording if Automatically start recording
option was enabled in the program settings.
Conducting a Training Session
- 61 -
Stress Sweeper Professional Edition User’s Manual
8.5. Program Controls and Features
8.5.1. Controlling the Session Process
If for some reason the quality of the pulse wave (or ECG) signal significantly
decreases so it causes the HR to become unstable (typically jumping
unrealistically high and / or low), this makes your session data of little value.
When this happens it is recommended to restart the session.
Click this button to stop the session and automatically
start it over.
Important! All of your data collected during the session will be permanently lost
when you restart the session.
If for some reason you cannot successfully continue your current training
session, you can terminate it.
Click on this button to terminate the session. The
program will prompt you to confirm you are willing to
terminate the session.
Important! All your data collected during the session will be permanently lost
when you restart the session.
Click on this button to stop the session, but save the data
collected.
There are two indicators at the bottom of the training screen:
This indicator shows how the current
session is progressing.
This indicator shows your pulse wave
OR
ECG trace.
Conducting a Training Session
- 62 -
Stress Sweeper Professional Edition User’s Manual
8.5.2. Adjusting the Graph Scales
At the top right corner of each of the two graphs, there is a series of buttons that
adjust the scale of the graph.
This button maximizes and minimizes the graph.
This button automatically adjusts the vertical (amplitude) scale of the
graph.
This button increases the vertical (amplitude) scale of the graph.
This button decreases the vertical (amplitude) scale of the graph.
This button increases the horizontal (time) scale of the graph.
This button decreases the horizontal (time) scale of the graph.
8.5.3. Adjusting the Breath Pacer
Stress Sweeper allows you to adjust the breath pacer to accommodate your
training exercise to your needs. Although in most cases 6 breaths per minute
pacer rate is used as a default rate you can change it to lower or higher rates
with ease.
Use the + and – controls to adjust the
breath rate.
The adjustment takes effect immediately.
This pacer rate adjustment can only be made before session recording starts.
Once it is started, this control becomes disabled. If Automatically start
recording option was enabled in the program settings this control will be
disabled all the time, so proper pacer rate adjustment has to be made in the User
Settings.
8.5.3. Controlling Audio Features
Stress Sweeper provides two types of auditory feedback:
1. Breath pacer audio
2. Training score audio
Conducting a Training Session
- 63 -
Stress Sweeper Professional Edition User’s Manual
The breath pacer audio is a set of continuously changing musical tones (MIDI),
which represent audible breath pacer model.
It provides auditory distinguishable phases of the breath cycle, so you can
intuitively sense the breath pacer without looking at the visual breath pacer bar.
You may select different pacer audio schemes in the settings window before you
start your session.
Click this button to turn the audible breath pacer on.
Click it again to turn it off.
The training score audio is a set of preconfigured audio files (WAV, MP3), which
are played when current training score hits into one of four score ranges:
•
Low
•
Medium
•
High
•
Superb
A separate audio file is associated with each score range. This association can
be set in the program settings.
The audio file is played once when score value crosses threshold between two
adjacent score ranges.
You may select different score audio schemes in the settings window before you
start your session.
Click this button to turn the score audio on.
Click it again to turn it off.
8.5.4. Changing Views
Stress Sweeper provides several types of views of data during the training
session:
Shows selected image gradually revealing
along with increasing the training score.
This menu item is shown only if this feature is enabled in the program
Conducting a Training Session
- 64 -
Stress Sweeper Professional Edition User’s Manual
settings.
Shows subliminal message (or image) over
background image mask.
This menu item is shown only if this feature is enabled in the program
settings.
Shows heart rate and training score graphs.
Shows heart
spectrum.
rate
graph
and
its
power
Shows heart rate graph and score distribution
chart.
Shows preliminary training summary graphs
including heart rate graph, score graph, power
spectrum and score distribution chart.
5.8.4.1. Feedback View
Click on the Feedback button to see the following view:
Conducting a Training Session
- 65 -
Stress Sweeper Professional Edition User’s Manual
The transparency of the image depends on current training score. The lower
score is the less visible the image is.
You can configure this screen by choosing the images you like.
The image will start showing up once your score reaches a preset level.
5.8.4.2. Subliminal Priming View
Click on the Subliminal Priming button to see the following view:
Conducting a Training Session
- 66 -
Stress Sweeper Professional Edition User’s Manual
A specially configured text message or small image will be displayed for a very
short period of time to pass you a non-visible specific subliminal message.
The subliminal message will start showing up once your score reaches a preset
level.
5.8.4.3. Score Graph View
Click on the Score Graph button to see the following view:
Conducting a Training Session
- 67 -
Stress Sweeper Professional Edition User’s Manual
Note: The green line on the heart rate graph indicates your breathing activity. It
will be shown only if you use the Biocom 3000 ECG recorder with a respiration
sensor option!
5.8.4.4. HR Spectrum View
Click on the HR Spectrum button to see the following view:
Conducting a Training Session
- 68 -
Stress Sweeper Professional Edition User’s Manual
The lower graph shows a power spectrum of the heart rate data being collected.
A high peak in the green zone of horizontal frequency scale indicates that high
level of breathing modulation in heart rate has been achieved due to paced
breathing.
Note: The green line on the heart rate graph indicates your breathing activity. It
will be shown only if you use the Biocom 3000 ECG recorder with a respiration
sensor option!
5.8.4.5. Score Bands View
Click on the Score Bands button to see the following view:
Conducting a Training Session
- 69 -
Stress Sweeper Professional Edition User’s Manual
The lower graph shows a distribution chart of the training score among four main
score bands. This distribution represents a portion of overall training time when
score was within specific band.
Note: The green line on the heart rate graph indicates your breathing activity. It
will be shown only if you use the Biocom 3000 ECG recorder with a respiration
sensor option!
5.8.4.6. Summary View
Click on the Summary button to see the following view:
Conducting a Training Session
- 70 -
Stress Sweeper Professional Edition User’s Manual
Note: The green line on the heart rate graph indicates your breathing activity. It
will be shown only if you use the Biocom 3000 ECG recorder with a respiration
sensor option!
8.6. Finishing the Training Session
If you selected the training protocol of limited duration Stress Sweeper will
automatically finished the session once the specified duration is elapsed.
Use the Abort Session button if for some reason you have to finish your training
session before session automatically finishes. No session data will be stored in
the user record. You will be brought to the user’s home screen.
Use the Stop Session button to finish your training session if you selected the
protocol of unlimited duration. You can also stop the session with preset duration
before its time elapses. Once session is stopped the session data will be stored
in the user’s record and you will then be taken to the Training Summary Page
(see a detailed description below).
Conducting a Training Session
- 71 -
Stress Sweeper Professional Edition User’s Manual
9. View Training Summary
This mode is used to view the details on selected training session.
To view the training summary, click on the Session menu option.
The following screen appears:
1. Select a session from the list.
2. Click the View Selected button.
The following screen appears:
View Training Summary
- 72 -
Stress Sweeper Professional Edition User’s Manual
Note: The green line on the heart rate graph indicates your breathing activity. It
will be shown only if you use the Biocom 3000 ECG recorder with a respiration
sensor option!
If other view is selected click on the Session Summary menu option to see this
view again.
By default this screen shows 2-dimentional view of the power spectrum of entire
record of the heart rate. By clicking on the 3D Spectrum button you can switch
the spectrum to its 3-dimentional view showing the history of the power spectrum
during the session:
View Training Summary
- 73 -
Stress Sweeper Professional Edition User’s Manual
You can go back to 2-dimentional spectrum view by clicking on the 2D Spectrum
button.
Click on the HR+Score Graphs button to show the following view:
View Training Summary
- 74 -
Stress Sweeper Professional Edition User’s Manual
Note: The green line on the heart rate graph indicates your breathing activity. It
will be shown only if you use the Biocom 3000 ECG recorder with a respiration
sensor option!
9.1. Adjusting the Graph Scales
Here, you can use the buttons at the top right corners of each screen to adjust
the graphs.
This button maximizes and minimizes the graph.
This button automatically adjusts the vertical (amplitude) scale of the
graph.
This button increases the vertical (amplitude) scale of the graph.
This button decreases the vertical (amplitude) scale of the graph.
This button increases the horizontal (time) scale of the graph.
This button decreases the horizontal (time) scale of the graph.
View Training Summary
- 75 -
Stress Sweeper Professional Edition User’s Manual
9.2. Viewing Printable Report
To view a printable version of a session summary report, you must first select the
Session menu option.
Highlight a session and click on View Selected.
Now, click on the Printable Report button to view a printer friendly version of the
session summary report.
9.3. Printing Report
To print out a hard copy of a session summary report, go into the printable report
and click on Print Report.
9.4. Entering Session Comments
You may write comments and attach them to a session summary report. To do
this go into a session summary report and write in the field at the bottom of the
screen.
View Training Summary
- 76 -
Stress Sweeper Professional Edition User’s Manual
You may save the comments by clicking on the Save button.
9.5. Viewing Other Sessions
To view the session summary reports for other sessions, simply select the date /
time of that session from the list on the left panel.
The program will automatically update the current view to show selected session
data.
View Training Summary
- 77 -
Stress Sweeper Professional Edition User’s Manual
10. View Training History
This mode is used to view the history of training achievements across all training
sessions stored in the record.
To view the training history:
1. Click on the Session menu option.
2. Click on the View History button on the menu on the left.
The following screen appears:
This screen displays the history of session averages of heart rate and regulatory
power.
You can click on the Score Bands button to view the history of session training
results: training score and consistency as well as the training score distributions
among the standard score bands:
View Training History
- 78 -
Stress Sweeper Professional Edition User’s Manual
10.1. Adjusting the Graph Scales
You can adjust the scales of these graphs using the buttons in the top right
corners of the graphs.
This button maximizes and minimizes the graph.
This button increases the vertical (amplitude) scale of the graph.
This button decreases the vertical (amplitude) scale of the graph.
10.2. Viewing Printable History Report
To view a printable version of a session summary report, you must first go into
the Session section.
Click on View History.
View Training History
- 79 -
Stress Sweeper Professional Edition User’s Manual
Now, click on the Printable Report button to view a printer friendly version of the
history report.
10.3. Printing Report
To print out a hard copy of a history report, go into the printable report and click
on Print Report.
View Training History
- 80 -
Stress Sweeper Professional Edition User’s Manual
11. Other Session Data Options
From the Session page, you may also choose to:
Delete any selected session data.
Send your session data as a .zip file over email.
Export your session data.
Select all existing sessions.
11.1. Deleting Selected Sessions
To permanently delete a session summary, highlight the summary(ies) and click
on the Delete button. The following window should pop up:
Click Yes to delete. You may click on the Select All button to select all session
summaries for deletion.
11.2. Sending Session Data Over E-mail
To send a selected session summary as an e-mail, click on the Send as E-Mail
button. This opens your default e-mail client from where you can specify the data
recipient’s address. The file is already attached to the e-mail.
You may click on the Select All button to select all session summaries for
sending.
11.3. Exporting Session Data
Stress Sweeper gives you the option to export your session data. When you
export your data, you create a new standalone file on your drive.
Other Session Data Options
- 81 -
Stress Sweeper Professional Edition User’s Manual
When you choose to Export a session summary, the following window opens:
Here, you may choose:
•
•
•
Which data to send.
What format to export it into.
Where to save exported data to on your computer.
The different formats available are:
•
•
•
Comma-separated values (creating a .asc file).
Excell Worksheet (a standard Microsoft Excell .xls file).
XML file (also readable in Microsoft Excell).
When you are satisfied with your settings, click on the Export button.
Other Session Data Options
- 82 -
Stress Sweeper Professional Edition User’s Manual
12. Get Help
To obtain help information about software operation, click the Help at the top of
the screen. The following menu options will be shown in the dropdown menu:
•
Help Content
•
Visit AWS website
•
About Stress Sweeper Pro
•
Check for updates
If you select the Help Content menu option, it will open this document in a
separate window. Use the table of contents to navigate through the document.
Close the Help window to go back to the program window.
Select the Visit AWS website menu option to open it in a separate web browser
window.
If you select the About Stress Sweeper Pro menu option the following window
will be shown:
Click OK to close it.
If you select the Check for updates menu option the software will connect to
AWS server and check if new update is available. If so the update will be
downloaded and you will be prompted to install it.
Get Help
- 83 -
Stress Sweeper Professional Edition User’s Manual
13. Exit Stress Sweeper
To exit the Stress Sweeper software, click on the Exit button at the top of the
screen.
Exit Stress Sweeper
- 84 -