1
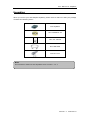
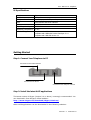
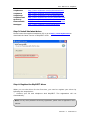
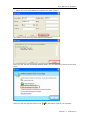
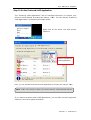
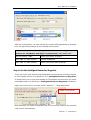
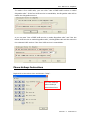
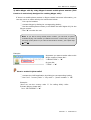
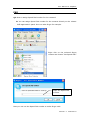
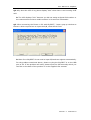
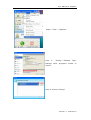
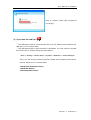
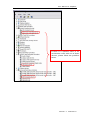
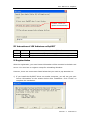
User Manual for SkyDECT
Unpacking.................................................................................................................2
Introduction..............................................................................................................3
I Overview .............................................................................................................3
II Additional Features ...........................................................................................3
III System Requirements .......................................................................................3
IV Specifications ...................................................................................................4
Getting Started .........................................................................................................4
Step 1: Connect Your Telephone to PC .................................................................4
Step 2: Install the latest VoIP applications............................................................4
Step 3: Install the latest driver...............................................................................5
Step 4: Register the SkyDECT driver ....................................................................5
Step 5: Set the Preferred VoIP Application ...........................................................7
Step 6: Set the Intelligent Router for SkypeOut.....................................................8
Phone Hotkeys Instructions .....................................................................................9
General Functions ..................................................................................................10
I How to make calls? ...........................................................................................10
How to make regular calls? ....................................................................10
How to make PC-PC calls?.....................................................................10
How to make VoipOut calls? ..................................................................11
II How to receive calls? .......................................................................................12
FAQ ........................................................................................................................13
Appendix ................................................................................................................15
I Indications of SkyDECT Driver Icons ..............................................................15
II Update the Driver ............................................................................................19
III Instructions of LED Indicators on SkyDECT................................................20
IV Register Notice ...............................................................................................20
Version 1.1 2006-05-16
User Manual for SkyDECT
Unpacking
When you receive your VoIP adapter SkyDECT, please check to make sure that your package
contains the following items:
One SkyDECT
One installation CD
One user manual
One USB cable
One RJ11 line
Note:
This manual is written for the SkyDECT driver version 1.1.0.1.
Version 1.1 2006-05-16
User Manual for SkyDECT
Introduction
I Overview
As a perfect solution for wireless VoIP, SkyDECT is the next generation USB VoIP
adapter that allows the use of various VoIP applications, including Skype and many
other popular VoIP softwares such as VoipBuster, VoipStunt, VoipCheap,
VoipDiscount ,Internetcalls, NetAppel, and SparVoip, etc, to work with DECT phone
(or other regular phones). It is such a smart companion for you that you can
conveniently make or receive any calls, no matter ordinary calls or VoIP calls, on the
same phone set!
SkyDECT brings you about the following benefits:
²
Upgrade your phone to be a PSTN/VoIP Dual mode phone.
²
Seamlessly
integrated
with
Skype,
VoipBuster,
VoipStunt,
VoipCheap,
VoipDiscount, SparVoip, Internetcalls, and NetAppel, etc.
²
Enjoy wireless VoIP if you have a DECT phone or another cordless phone
²
The standby mode is on PSTN channel (It is necessary for emergency calls
such as 911)
²
Call Alert for PSTN incoming call when you are on a VoIP call.
²
Call Hold allows you to handle VoIP calls and PSTN calls at the same time
²
Intelligent Router for SkypeOut calls
²
Speed-dial up to 99 contacts
²
FSK Caller ID
²
Auto reply with an instant message when you are unavailable
II Additional Features
²
²
²
²
²
Compact and delicate design.
Fully functional FXS port.
Echo cancellation technology ensures smooth and clear sound.
USB interface PnP. No external power/sound card needed.
Live update the driver automatically.
III System Requirements
² Pentium 400 HMz or above, with 128MB RAM
² Windows 2000/XP
² DECT phone or other analog phone
² LAN/ADSL/33.6K modem or faster Internet connections.
Version 1.1 2006-05-16
User Manual for SkyDECT
IV Specifications
Weight
95g
Dimension
75*100*21mm
Telephone Interface
One FXS port, one PSTN port for pass-thru
LED
VoIP indicator and Power indicator
Voltage
4~5.25 V
Operating Humidity
5~95% RH
Operating Temperature
0~40℃
Standard Support
Compliant with USB V 1.1
Compliant with USB Audio Device Class Spec V 1.0
Compliant with USB HID Version 1.1
Getting Started
Step 1: Connect Your Telephone to PC
Connected to the PSTN / PBX line
Connected to the Phone
Connected to the USB port of the PC
Step 2: Install the latest VoIP applications
The latest version of Skype (Version 2.0 or above) is strongly recommended. You
can download it from Skype’s official website:
http://www.skype.com/download/skype/windows/
Other VoIP applications can be downloaded in the following websites:
Version 1.1 2006-05-16
User Manual for SkyDECT
VoipBuster
http://www.voipbuster.com/en/download.html
VoipStunt
http://www.voipstunt.com/en/download.html
VoipCheap
http://www.voipcheap.co.uk/en/download.html
VoipDiscount
http://www.voipdiscount.com/en/download.html
SparVoip
http://www.sparvoip.de/de/download.html
Internetcalls
http://www.internetcalls.com/en/download.html
NetAppel
http://www.netappel.fr/fr/download.html
Step 3: Install the latest driver
Please insert the supplied installation CD or go to http://www.skydect.net to
download the latest version of SkyDECT driver.
Step 4: Register the SkyDECT driver
When you run the driver for the first time, you need to register your driver by
following the steps below:
① Connect your PC and telephone with SkyDECT. The registration will run
automatically.
Note: For any more problems concerning registration, please refer to Appendix in this
manual.
Version 1.1 2006-05-16
User Manual for SkyDECT
② Input your own information to register and click “Next>”.
And now you can see your own license information:
Now you will see the following window when you use SkyDECT driver for the first
time:
Now you can see a green driver icon
on the bottom-right of your windows.
Version 1.1 2006-05-16
User Manual for SkyDECT
Step 5: Set the Preferred VoIP Application
The “Preferred VoIP Application” will be activated whenever you switch your
phone to VoIP channel by dialing the hotkey “*#*”. You can set the “Preferred
VoIP Application” by following the steps below:
Right click on the driver icon and choose
“Options”
Select a preferred
VoIP application
Now, you can activate the preferred VoIP application by pressing the hotkeys “*#*”.
Note: “*#*” is the hokey to switch your phone between VoIP and PSTN channel.
If you want to activate other VoIP applications, you can also set their respective
hotkeys in the driver panel as follows.
Version 1.1 2006-05-16
User Manual for SkyDECT
After the configuration, you can activate the needed VoIP application by pressing
their corresponding hotkeys as the example shown below.
Suppose the preferred VoIP application is set to be Skype, and the
hotkeys for VoipBuster and Skype is respectively “*2*” and “*1*”.
Dial the hotkey “*#*”
Switch your phone to Skype
Dial “*2*” on VoIP channel
Activate VoipBuster
Dial “*1*” on VoIP channel
Switch your phone back to Skype
Step 6: Set the Intelligent Router for SkypeOut
There are some other famous VoIP applications except Skype providing cheaper
or free VoipOut service for subscribers. The “Intelligent Router for SkypeOut”
is designed for you to enjoy this cheaper or free VoipOut services when you make
a SkypeOut calls. You can set the “Intelligent Router for SkypeOut” as follows:
Right click on the driver icon and choose “Options” ---“VoIP Application”
Select a VoIP service
Now whenever you make a SkypeOut call, the call will be routed to the selected
VoIP service automatically.
Version 1.1 2006-05-16
User Manual for SkyDECT
To make a free VoIP calls, you can click “Use a FREE VoIP service to make
SkypeOut calls”. If the free VoIP service is unavailable, the SkypeOut calls will be
made thru SkypeOut service.
If you click both “Use a FREE VoIP service to make SkypeOut calls” and “Use the
below VoIP service to make SkypeOut calls”, the SkypeOut calls will be routed to
the selected VoIP service if the free VoIP service is unavailable.
Phone Hotkeys Instructions
Right click on the driver icon and choose “Help”.
You can read the
phone hotkeys
instructions here.
Version 1.1 2006-05-16
User Manual for SkyDECT
General Functions
I How to make calls?
How to make regular calls?
Just pick up the handset and make calls as usual.
How to make PC-PC calls?
1) Make PC-PC calls by using Speed Dial Number
If you have assigned a Speed Dial number for your contact, you can use this
Speed Dial number to make calls by the instructions below:
① Pick up the handset.
② Activate the needed VoIP application by dialing its corresponding
hotkey, and then you will hear a musical dial tone.
③ Dial Speed Dial number.
④ Dial “#” to make the call.
Note: “#” is the default hokey to make a VoIP call.
For how to assign Speed Dial for contacts and how to set preferred VoIP
application, please refer to FAQ Q1 in this manual.
For how to activate the needed VoIP channel, please refer to the content
“Configure the Preferred VoIP Application” in the chapter of “Getting
Started”
Example:
Suppose the Speed dial number of the contact is “10”. You can dial “10 #” to
make a PC-PC call after activating the needed VoIP application.
2) Make PC-PC calls on the VoIP application’s panel directly.
① Pick up the handset
② Activate the needed VoIP application by dialing its corresponding
hotkey, and then you will hear a musical dial tone.
③ Double click by mouse on the selected contact to make a call.
(Or you can dial the hotkeys “**1” and “**2” to scroll up or down the
contact list to select a contact, and then dial “#” to make the call)
Version 1.1 2006-05-16
User Manual for SkyDECT
3) Make Skype calls by using Skype Contact’s mobile phone number (This
function is exclusively designed for making Skype calls).
If there is a mobile phone number in Skype contact ’s account information, you
can also use it to make calls by the instructions below:
① Pick up the handset
② Activate Skype by dialing its corresponding hotkey.
③ Dial the mobile phone number (or AT LEAST the last 5 digits of it) for the
Skype contact.
④ Dial “#” to make the call
Note: If you dial a wrong mobile phone number, you will hear a system
reminder saying “The number you dialed is incorrect”. In this case, you need
not hang up the phone. If you want to dial another number, just repeat step
③ and ④.
Example:
Supposed you want to make calls to this
Skype contact. Please dial :
“13632977356” + “#”
Or just dial:
“77356” + “#”
How to make VoipOut calls?
① Activate the VoIP application by dialing its corresponding hotkey;
② Dial “00”+ “country code” + “city code” + “phone number” + “#”.
Example:
(Here we use the country code "1" for calling USA): After
activate Skype, please dial:
“00 1 555 1234567”+ “#”
Version 1.1 2006-05-16
User Manual for SkyDECT
II How to receive calls?
When there is an incoming call from VoIP or PSTN, just pick up the handset to
answer it directly.
If it is an incoming VoIP call, the green VoIP indicator will be on. And if your phone
has a caller ID display function, then you can see the LCD display of the caller’s
account information, including account name and phone number/Speed Dial
number of the contact.
Call Hold Function:
If there is an incoming PSTN call when you are on a VoIP call, you will hear
the call alert (beep) and you can switch to PSTN channel by dialing “*#*”. In
this case, the VoIP call will be held automatically.
If you want to end the PSTN call and resume the VoIP call, just switch to VoIP
channel by dialing “*#*”.
Version 1.1 2006-05-16
User Manual for SkyDECT
FAQ
Q1: How to assign Speed Dial number for the contacts?
A: You can assign Speed Dial number for the contacts directly on the related
VoIP application’s panel. Here we take Skype for example.
Right click on the selected Skype
contact and choose “Set Speed-Dial”
Input the Speed Dial
number
Now you can use the Speed Dial number to make Skype calls.
Version 1.1 2006-05-16
User Manual for SkyDECT
Q2: Why does the LCD of my phone display “000” when there is an incoming VoIP
call?
A: The LCD displays “000” because you did not assign a Speed Dial number or
the contact does not have mobile number in his account information.
Q3: After connecting the Phone to PC with SkyDECT, I saw a pop-up window as
below in which required me to input the S/N, what should I do?
A: Most of our SkyDECT do not need to input S/N and can register automatically.
For the problem mentioned above, please re-plug the SkyDECT in to the USB
port of PC. If the problem still exist, please input the S/N manually which you
can find on the back of the product or in the supplied user manual.
Version 1.1 2006-05-16
User Manual for SkyDECT
Appendix
I Indications of SkyDECT Driver Icons
ICON
Color
Indications for SkyDECT Driver Icons
Green
The SkyDECT works normally.
Grey
The SkyDECT fails to communicate with the VoIP application.
Red
The SkyDECT fails to communicate with your computer.
1) if you see the grey icon
① please check whether there is any VoIP application running at the
moment. If not, please run a VoIP application;
② If you are using Skype, please check whether you can see the icon
in the Skype Windows.
But if you cannot see this icon, please follow the steps below:
Version 1.1 2006-05-16
User Manual for SkyDECT
Step1: “Tools” —“Options”.
Step
2:
Manage
“Privacy”--“Related
other
program’s
Task:
access
to
Skype”.
Step 3: Choose “Change”
Version 1.1 2006-05-16
User Manual for SkyDECT
Step 4: Choose “Allow this program to
use Skype”
2) if you see the red icon
,
① the USB phone fails to communicate with your PC. Please check whether the
USB port is in a normal state.
② the USB phone fails to work normally in Windows. You may need to reinstall
the device driver. Please follow the steps below:
“Start”—“Setting”—“Control Panel”—“System”—“Hardware”—“Device Manager”
Then, you will see the following window. Please check whether these three
devices below are in a normal state.
“USB Human Interface Device”,
“USB Audio Device”
“USB Composite Device”
Version 1.1 2006-05-16
User Manual for SkyDECT
If there is a question mark or an
exclamation mark with one of these
devices, please follow the guideline
below.
Version 1.1 2006-05-16
User Manual for SkyDECT
Right click the device and
choose
“Uninstall”.
Then
REPLUG THE SKYDECT into
the USB port. Windows will
reinstall the device driver.
II Update the Driver
As we constantly develop our products, it can happen that we have newer versions
of driver than that included on the installation CD. If you want to check the latest
version of driver, please follow the guideline below:
Right click the green icon
and choose
“Check for Update”.
And if you click before “Check for update automatically” in the driver panel as
below, the driver will notify you if there is a new version released.
Right click on the driver icon and choose “Options”
Version 1.1 2006-05-16
User Manual for SkyDECT
Choose “Check for
update automatically”
III Instructions of LED Indicators on SkyDECT
LED
Color
Instructions of the LED Indicators
Power
Red
The power supply is OK
VoIP
Green
The phone is on VoIP mode or there is an incoming VoIP call.
IV Register Notice
After the registration, your own license information will be recorded in the back-end
server. You need not re-register except for reinstalling Windows
However, there are some cases listed below that you need to pay attention to:
1) If you install the SkyDECT driver on another computer, you will see your own
license information as the window below after installation. Click “Finish” to
complete the installation.
Version 1.1 2006-05-16
User Manual for SkyDECT
2) If you install the SkyDECT driver for the first time (or the license information is
not what you registered before) and see the above window, please contact your
local dealer because some one might have used your serial number.
3) If you see the below window after inputting the serial number, it indicates the
register is failed because the serial number has been used for too many times. And
if it is the first time you used the serial number, you should contact the local dealer
to solve this problem.
Version 1.1 2006-05-16