1
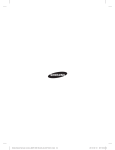
Technical Specification
Range: 0 - 5,000 psi
Resolution: 1 psi Accuracy*: + 6.33 psi (+ 0.044 MPa)
*Worst case measurement system uncertainty. See included Measurement
Uncertainty Worksheet for the actual uncertainty of your kit.
PosiTest AT Verifier
Instruction Manual v. 1.0
NOTE: Device displays imperial units only.
Conversion Factor:
1 megapascal (MPa) = 145 pounds/inch2 (psi)
Returning for Service
If you need to return the PosiTest AT Verifier for service, describe the problem fully
and include reading results, if any. Be sure to include contact information including
your company name, company contact, telephone number and fax number or email
address. defelsko.com/support
Limited Warranty, Sole Remedy and Limited Liability
DeFelsko’s sole warranty, remedy, and liability are the express limited warranty,
remedy, and limited liability that are set forth on its website:
www.defelsko.com/terms
Simple. Durable. Accurate.
www.defelsko.com
Introduction
The PosiTest AT Verifier kit is ideal for checking the accuracy and operation of
adhesion testers and is an important component in fulfilling both ISO and in-house
quality control requirements.
The kit is ready to use with all PosiTest pull-off adhesion testers. All setup
information has been preset by DeFelsko. No additional configuration is required
or recommended. If the Smart Sensor Indicator (SSI) settings are mistakenly
altered, see Reconfiguring the SSI Device (pg. 3).
©DeFelsko Corporation USA 2014. All Rights Reserved
This manual is copyrighted with all rights reserved and may not be reproduced or transmitted,
in whole or part, by any means, without written permission from DeFelsko Corporation.
DeFelsko and PosiTest are trademarks of DeFelsko Corporation registered in the U.S. and
in other countries. Other brand or product names are trademarks or registered trademarks
of their respective holders.
Protection provided by the equipment may be impaired if the equipment is used in a manner
not specified by the manufacturer.
Every effort has been made to ensure that the information in this manual is accurate.
DeFelsko is not responsible for printing or clerical errors.
4
Kit includes:
- Smart Sensor Indicator (SSI) Device
- Load Cell with steel 20mm Loading Fixture (dolly)
- Built-in rechargeable Lithium Ion Batteries
- Universal AC power adaptor/charger
- Instruction Manuals (2)
- Certificates of Calibration (2)
- Sample Certificate of Accuracy
- Measurement Uncertainty Worksheet
- Hard shell carrying case
Load Cell to SSI
Connection Cable
Smart Sensor Indicator (SSI)
Loading
Fixture
Load
Cell
How to Perform a Test
Verification of Test Results
1. Connect the PosiTest AT actuator to the load cell. Ensure the quick coupling is
locked in place over the dolly fixture. PosiTest AT-M (manual) models only: Close
the pressure relief valve (turn clockwise).
When verifying PosiTest AT Adhesion Tester accuracy, it is recommended that
several verification points be tested. See the included Sample Certificate of
Accuracy for recommended verification points.
2. Press [Power] button to power-up the Smart Sensor Indicator (SSI).
Test results should fall within the combined accuracy of the PosiTest AT Adhesion
Tester (+ 30 psi full scale) and PosiTest AT Verifier (pg. 4).
3. Press and release the [TARE] button to ZERO the SSI.
4. Press and release the [PEAK] button to hold the maximum pressure value at
the completion of the test. PEAK will display on the SSI.
The included Measurement Uncertainty Worksheet and Sample Certificate of
Accuracy documents have been pre-populated with data unique to your PosiTest
AT Verifier.
5. Power ON the PosiTest AT by pressing the green
button.
-Ensure units are set to psi and dolly size to 20 mm.
-Important: PosiTest AT-A (automatic) models: Set the pull rate to 30 psi/sec
If any of the verification points are outside of these combined accuracies, the
PosiTest AT may require recalibration. Contact DeFelsko or your local dealer for
information on returning your adhesion tester for recalibration.
6. Press the
button to ready the PosiTest AT.
7. Press the
button again to start the test.
-PosiTest AT-A models will automatically begin building pressure*
-PosiTest AT-M models: slowly prime the pump until the priming pressure is
reached (100 psi)*. Return pump handle to its full upright position and maintain a
single slow, continuous pump at approximately 30 psi/sec until a verification point
has been reached.
*Make no comparisons between PosiTest adhesion tester and SSI measurements
until the priming pressure (100 psi) has been exceeded.
8. Stop the test when the verification point has been reached.
-PosiTest AT-A users press the red
button. Reading will flash and
actuator will automatically release pressure.
-PosiTest AT-M users simply release the pump handle and open the pressure
relief valve (turn counter-clockwise).
Certification
The PosiTest AT Verifier includes a Certificate of Calibration for the SSI device and
one for the load cell. For information on returning your PosiTest AT Verifier for
recertification, contact DeFelsko or your local dealer.
The PosiTest AT Verifier, with a valid Certificate of Calibration, can be used to check
the accuracy of PosiTest Adhesion Testers. A sample Certificate of Accuracy is
included.
Reconfiguring the SSI Device
The SSI device comes pre-configured for verification of PosiTest AT-M and AT-A
pull-off adhesion testers. No additional configuration is required or recommended.
If the SSI is mistakenly altered, configuration can be restored by following the
steps outlined in our Reconfiguration Guide. Contact DeFelsko for more
information.
9. Record values from PosiTest AT and Smart Sensor Indicator.
10. Prepare for next test verification point.
-Power-down the SSI by pressing the [Power] button.
-Ensure all pressure has been released within the adhesion tester by pushing
the PosiTest AT actuator handle completely down. The actuator should be relaxed
over the loading fixture.
Repeat steps 2-10 for each additional verification point. See included Sample
Certificate of Accuracy for recommended verification points.
2
3
Technical Specification
Range: 0 - 5,000 psi
Resolution: 1 psi Accuracy*: + 6.33 psi (+ 0.044 MPa)
*Worst case measurement system uncertainty. See included Measurement
Uncertainty Worksheet for the actual uncertainty of your kit.
PosiTest AT Verifier
Instruction Manual v. 1.0
NOTE: Device displays imperial units only.
Conversion Factor:
1 megapascal (MPa) = 145 pounds/inch2 (psi)
Returning for Service
If you need to return the PosiTest AT Verifier for service, describe the problem fully
and include reading results, if any. Be sure to include contact information including
your company name, company contact, telephone number and fax number or email
address. defelsko.com/support
Limited Warranty, Sole Remedy and Limited Liability
DeFelsko’s sole warranty, remedy, and liability are the express limited warranty,
remedy, and limited liability that are set forth on its website:
www.defelsko.com/terms
Simple. Durable. Accurate.
www.defelsko.com
Introduction
The PosiTest AT Verifier kit is ideal for checking the accuracy and operation of
adhesion testers and is an important component in fulfilling both ISO and in-house
quality control requirements.
The kit is ready to use with all PosiTest pull-off adhesion testers. All setup
information has been preset by DeFelsko. No additional configuration is required
or recommended. If the Smart Sensor Indicator (SSI) settings are mistakenly
altered, see Reconfiguring the SSI Device (pg. 3).
©DeFelsko Corporation USA 2014. All Rights Reserved
This manual is copyrighted with all rights reserved and may not be reproduced or transmitted,
in whole or part, by any means, without written permission from DeFelsko Corporation.
DeFelsko and PosiTest are trademarks of DeFelsko Corporation registered in the U.S. and
in other countries. Other brand or product names are trademarks or registered trademarks
of their respective holders.
Protection provided by the equipment may be impaired if the equipment is used in a manner
not specified by the manufacturer.
Every effort has been made to ensure that the information in this manual is accurate.
DeFelsko is not responsible for printing or clerical errors.
4
Kit includes:
- Smart Sensor Indicator (SSI) Device
- Load Cell with steel 20mm Loading Fixture (dolly)
- Built-in rechargeable Lithium Ion Batteries
- Universal AC power adaptor/charger
- Instruction Manuals (2)
- Certificates of Calibration (2)
- Sample Certificate of Accuracy
- Measurement Uncertainty Worksheet
- Hard shell carrying case
Load Cell to SSI
Connection Cable
Smart Sensor Indicator (SSI)
Loading
Fixture
Load
Cell