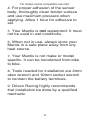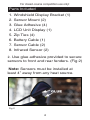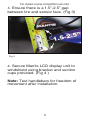
1
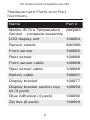
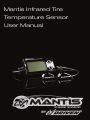
Mantis Infrared Tire
Mantis Infrared Tire
Temperature Sensor
Sensor
Temperature
User Manual
Manual
User
1
Contents
Important Information About Your
Mantis.................................................... 1
Installation............................................. 3
Programming......................................... 7
Replacement Parts
and Part Numbers................................. 9
Troubleshooting................................... 10
Warranty Information........................... 11
For closed-course competition use only!
Before You Get Started:
Important Information About Your
Mantis
Welcome! You are now the proud owner
of the Mantis infrared tire temperature
sensor by Driven Racing. Carefully
follow the instructions in this manual to
get the most use out of your Mantis.
1. The Mantis infrared tire temperature
sensor is for closed-course competition
use ONLY.
2. Make sure that your bike uses a 12v
battery before connecting the battery
leads.
3. Test handlebars after installation and
prior to riding. Nothing should limit the
movement of the handlebars, any of the
controls, or any other component of your
bike.
1
For closed-course competition use only!
4. For proper adhesion of the sensor
body, thoroughly clean fender surface
and use maximum pressure when
applying. Allow 1 hour for adhesive to
set.
5. Your Mantis is not waterproof. It must
not be used in wet conditions.
6. When not in use, always store your
Mantis in a safe place away from any
heat source.
7. Your Mantis is not make or model
specific. It can be transferred from bike
to bike.
8. Tools needed for installation are 2mm
allen wrench and 10mm socket wrench
to connect the battery terminals.
9. Driven Racing highly recommends
that installation be done by a qualified
mechanic.
2
For closed-course competition use only!
Installation and Programming
Installation
1. Remove the Mantis from its
packaging and lay it out on a clean
surface.
2
3
1
4
5
8
6
Visual Display of Parts Included
3
7
For closed-course competition use only!
Parts Included
1. Windshield Display Bracket (1)
2. Sensor Mount (2)
3. Glue Adhesive (4)
4. LCD Unit Display (1)
5. Zip Ties (4)
6. Battery Cable (1)
7. Sensor Cable (2)
8. Infrared Sensor (2)
2. Use glue adhesive provided to secure
sensors to front and rear fenders. (Fig 2)
Note: Sensors must be installed at
least 4” away from any heat source.
Fig 2
4
For closed-course competition use only!
3. Ensure there is a 1.5”-2.5” gap
between tire and sensor face. (Fig 3)
Fig 3
4. Secure Mantis LCD display unit to
windshield using bracket and suction
cups provided. (Fig 4 )
Note: Test handlebars for freedom of
movement after installation.
5
For closed-course competition use only!
Fig 4
5. Connect power cables to your bike’s
12v battery.
6. Run cable from bike battery to Mantis
display unit. Connect cable to the
display unit.
7. Run sensor cables from front and
rear sensors to the display unit. Connect
cables to the display unit.
8. Secure cables to bike using zip ties
(provided).
6
For closed-course competition use only!
Note: For your safety and proper bike
operation, cables must be untangled
and kept away from direct contact with
hot parts (e.g. exhaust and engine case).
9. Turn Mantis LCD display on by
pressing and holding the power button
at top of unit. Top and bottom readouts
should be visible.
Programming
To program the LCD display:
1. Locate the “Adjust” and “Mode”
buttons next to the display.
2. Press “Mode” button to cycle
through high alarm, low alarm, and
current temperature display.
3. To set an alarm press the adjust
button while current temperature is
displayed.
4. The display will now show the high
alarms with the selected alarm value
7
For closed-course competition use only!
blinking. By pressing the adjust
button you will cycle your selection
through the alarms. (High, Low,
Front and Rear)
5. To edit an alarm value, select the
alarm to be edited then press the
“Mode” button. You’re now editing
the selected alarm value. Press the
“Adjust” button to raise the value or
the “Mode” button to lower the value
until you reach the desired value.
6. Press and hold either “Mode” or
“Adjust” to save and return to the
current temperature display.
7. Temperature units can be switched
between Celsius and Fahrenheit by
pressing (without holding) the power
button.
8. Mantis LCD display programming is
now complete.
8
For closed-course competition use only!
Replacement Parts and Part
Numbers
Name
Part #
Mantis IR Tire Temperature A00003
Sensor - complete assembly
LCD display unit
100084
Sensor stands
A00008
Front sensor
100085
Rear sensor
100086
Front sensor cable
100088
Rear sensor cable
100089
Battery cable
100091
Display bracket
100077
Display bracket suction cup
kit (3 pack)
100090
Glue Adhesive (4 pack)
100092
Zip ties (6 pack)
100093
9
For closed-course competition use only!
Troubleshooting
Problem
Solutions
Unit does not Make sure cable is
power on.
connected securely to
battery.
Make sure battery has
power.
Make sure battery
cable is connected
securely to display unit.
LCD display
shows lines
instead of
numbers.
Make sure sensor
cables are connected
securely to display unit.
LCD display
numbers
are flashing
above and
below alarm
settings.
Reboot display unit by
holding power button
down for 3 seconds.
Unplug and reconnect
cables if necessary.
10
For closed-course competition use only!
Warranty Information
Thank you for purchasing a Mantis
infrared tire temperature sensor! Driven
Racing is pleased to offer this limited
warranty.
This warranty is valid for a period of
60 days from date of purchase. All
manufacturing defects are covered.
Any and all modifications to the Mantis
will void this warranty. Any damage
due to faulty installation will void this
warranty.
Any Mantis with a manufacturing defect
should be returned to Driven Racing.
Please call 818-775-0041 to obtain an
RA number prior to returning defective
product.
All warranty claims must include:
• Driven Racing issued RA number
• Original, paid and dated receipt
11
For closed-course competition use only!
• The complete Mantis (all components
must be included)
• The complete name, address and
phone number of original purchaser
Please return defective product to:
Driven Racing
c/o Mantis
21143 Itasca Street
Chatsworth, CA 91311
12