1
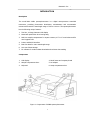
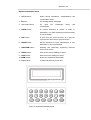
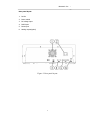
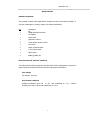
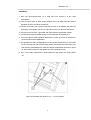
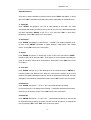
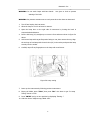
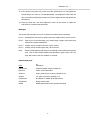
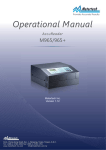
Provide Accurate Results
Operational Manual
Visible Spectrophotometer
SP-880
Metertech Inc.
Version 1.10
Metertech Inc.
Metertech Inc. provides this publication “as is” without warranty of any kind, either
express or implied, including, but not limited to the implied warranties of
merchantability or fitness for a particular purpose.
All rights are reserved, including those to reproduce this publication or parts thereof in
any form without permission in writing from Metertech Inc.
Information in this publication is subject to change without notice and does not
represent a commitment on the part of the vender.
Any errors or omissions which may have occurred in this publication despite the utmost
care taken in its production will be corrected as soon as possible, but not necessarily
immediately upon detection.
Copyright© Metertech Inc. 2005
‧63-2, ChengGong Rd., Sec. 1, NanGang, Taipei, Taiwan, ROC
E-Mail: [email protected] ‧ Web Site: www.metertech-inc.com
Tel: 886-2-2783-2854 ‧ Fax: 886-2-2783-1764
Metertech Inc.
1
Metertech Inc.
Contents
Introduction
--------------------
3
Description
--------------------
3
Components
--------------------
3
Keyboard and display layout
--------------------
4
Rear panel layout
--------------------
5
Specifications
--------------------
6
--------------------
7
Standard equipment
--------------------
7
Environmental and electrical conditions
--------------------
7
Installation
--------------------
8
--------------------
10
Powering up the equipment
--------------------
10
Absorbance and Transmittance measurements
--------------------
10
Concentration measurement with a factor
--------------------
11
Concentration measurement with a standard
--------------------
12
System functions
--------------------
13
Data saving and retrieve
--------------------
15
Printer
--------------------
15
Analog output
--------------------
15
--------------------
16
Routine care
--------------------
16
Replace the lamp
--------------------
16
Messages
--------------------
18
Replacement parts
--------------------
18
--------------------
19
Installation
Operation
Maintenance
SP880 Grabber Installation and Operation
2
Metertech Inc.
INTRODUCTION
Description
The model 880 visible spectrophotometer is a digital microprocessor controlled
instrument, providing photometric absorbance, transmittance and concentration
measurements with the wavelength range of 330 to 1100 nm. The spectrophotometer
has the following unique features:
1. Two-line, 16-large character LCD display
2. Motorized optical filter wheel and grating
3. Multi-use sample compartment for square cuvettes, 0.5” & 1” round tubes and 50
mm longpath cells
4. Printer and RS232 interface
5. Base-line data for entire wavelength range
6. 100 sets of data storage
7.
PC software for machine data download and real-time data reading
Components
1. LCD display
4. Model name and company brand
2. Sample compartment door
5. AC adapter
3. Keyboard
6. Lamp compartment door
Figure 1: Components of SP880 spectrophotometer
3
Metertech Inc.
Keyboard and display layout
1.
A/T/C button:
Switch among absorbance, %transmittance and
concentration modes
2.
λbutton:
For entering desired wavelength
3.
Numerical buttons:
For
input
the
wavelength,
factor,
and
concentration
4.
ENTER button:
To confirm selections or entries of fields or
parameters, or to start measuring process according
to current setting
5. ESC button:
To quit from the current process, or to quit the
current screen and return to previous screen
6. BLANK button:
Set the instrument to 100% transmittance, or zero
absorbance or zero concentration
7.
FUNCTION button:
Selecting
and
performing
supporting
shown in the screen
8. PRINT button:
Print out the current reading on screen
9.
SAVE button:
Save the current reading in memory
10. VIEW button:
Review the stored data sequentially
11. Display panel:
16 large characters by 2 lines LCD
Figure 2: Keyboard and display layout
4
functions
Metertech Inc.
Rear panel layout
1. DC fan
2. Power switch
3. DC voltage input
4. RS232 port
5. Printer port
6. Analog output(option)
Figure 3: Rear panel layout
5
Metertech Inc.
Specifications
_______________________________________________________________
Wavelength
330 ~ 1100nm
Bandwidth pass
2nm
Wavelength accuracy
+/- 0.8 nm
Wavelength repeatability
+/- 0.35nm
Photometric range
-0.300 ~ 3.500Abs
Measurement mode
A / %T / C
Factor
0.1 ~ 9,999.9
Photometric accuracy
1%
or
0.003A(from
0.000
to
2.500A),
whichever is greater by NIST SRM930e
Stability
< 0.003Abs/hr at 500nm after one hour
warm-up
Baseline flatness
+/- 0.005 Abs(at 400 ~ 1100nm)
Stray light
< 0.1% at 340nm by NIST SRM2031
Light source
12V halogen lamp
Detector
Si photodiode
Wavelength scanning speed
4500nm/min
Cuvettes
10mm square cuvette, 10 ~ 13mm round tube,
16mm round tube(option), 50mm rectangular
cell, and 1 inch round tube
Light beam height
8.5mm at measurement position
Data storage
100 sets
Analog output
0.000 ~ 4.000V(option)
Display
16 x 2 large characters LCD
Interface
RS232 and parallel printer
Function
Initial
wavelength,
lamp
tuning,
system
validation, resolution
PC software
Data collection from saved memory; real time
data display and storage
Power
100 ~ 240V at 50/60Hz
Dimension
400(W) x 300(D) x 145(H) mm
Weight
7.5 kgs
Ambient temp/humidity
room temperature 15 ~ 35
℃,
humidity < 80%
_______________________________________________________________
Specifications subject to change without notice
6
Metertech Inc.
INSTALLATION
Standard equipment
The package contains items listed below. Unpack the carton and inspect carefully. If
any part is damaged or missing, contact your dealer immediately.
Qty
Description
1
SP880 spectrophotometer
1
AC adapter
1
Power cord
1
Operator’s manual
5
10mm plastic square cuvette
1
Dust cover
1
50mm cuvette bracket
1
1 inch tube bracket
1
RS232 cable
1
SP880_grabber CD
Environmental and electrical conditions
The instrument has been designed to operate and meet the specifications on previous
pages under the electrical and environmental requirements listed below.
Line voltage
100-240Vac, 50-60 Hz
Environment conditions
℃
Ambient temperature from 15
℃
to 35
humidity from 20% to 80% and maintained at +/-5%.
7
℃; relative
and maintained at +/-2
Metertech Inc.
Installation
1. Place the spectrophotometer on a solid and level surface in a dry, clean
environment.
2. Leave an open space at least 50mm distance from rear panel and side walls to
guarantee air flow around the instrument.
3. Connect the female end of power cord into the inlet of AC adapter, and then the
outlet plug of AC adapter into the DC input hole on the rear panel of instrument.
4. Plug the power cord into a grounded wall outlet with the appropriate voltage.
5. Connect the Centronics parallel printer to the instrument at the print port.
6. Turn on the power switch and allow instrument to warm up at least 30 minutes for
electronic and thermal stabilization.
7. The standard cell holder is adaptable for 10 mm square cuvette and 1/2” round tube.
For 50 mm long-path cell measurement, please unscrewing two white knobs (#1)
and removing metal bracket #2 inside the sample compartment as shown in figure
4a, then locate bracket #3 and tighten two knobs again(figure 4b).
8. For 1” round tube measurement, orient bracket #4 and tighten two knobs (figure
4c).
Figure 4a: Standard cell holder for 10 ~ 13 mm cuvettes
8
Metertech Inc.
Figure 4b: 50 mm rectangular cell holder
Figure 4c: 1” cylindrical cell holder
9
Metertech Inc.
OPERATION
Powering up the instrument
1. Empty the cell holder and close the cell compartment lid.
2. Power on the 880 spectrophotometer, LCD shows “-- SP880 --, Metertech Inc.” for 2
seconds.
3. Then “Initialize, Zeroing…” for monochromator and filter wheel initialization. It takes
less than one minute to finish optical zero-search.
4. Then start base-line scanning for another minute, and finally reach the default
wavelength 500nm with unit "ABS" for the first time operation.
5. The LCD shows “ WL
: 500 nm, READ: X.XXX A”.
6. Allow the instrument to warm up for 30 minutes before using it.
Note:
‧
Error–1 message with beeping may show up, if there is sample in cell holder
or lid is opened during initialization. Please power off machine, correct the
mistake, and power on again.
Absorbance and Transmittance measurements
1. Press “A/T/C” to select the absorbance or transmittance mode.
2. press “λ” then press numerical key (0-9), and then “ENTER”. The machine will go to
the assigned wavelength, and use base-line data to calculate ABS or %T and display
it on LCD. During keying in number, press “ESC” if you want to change the current
value.
3. Insert blank solution into the cell holder and close the sample compartment lid.
4. Press “BLANK”. LCD shows “Blank…” on lower screen and then "100.0 %T" or
"0.000A".
5. Remove blank solution and insert sample solution in the cell holder. The sample
reading is real-time showing on the display.
10
Metertech Inc.
Concentration measurement with a factor
2. Press “A/T/C” to select the concentration mode.
3. At conc&factor mode, the display begins with “Conc @ Factor, ->ENTER”.
4. Press “ENTER” into this mode and display shows concentration unit and its reading.
5. Press “ESC” and display shows current factor “F: XXX” with blinking at the first digit.
Users can enter value (0-9999.9), and then “ENTER” to get concentration reading.
6. Insert blank solution into the cell holder and close the sample compartment lid.
7. Press “BLANK” to set “0.000C”.
8. Remove blank solution and insert sample solution in the cell holder. The sample
reading appears on the display.
9. Users can press “A/T/C” to other mode, or press “ESC” and back to step 4 to enter
new factor, or step 6 to “BLANK” again.
Note:
‧
If wavelength needs changing in concentration mode, please go to A/%T
mode first to key in the number and “ENTER”. Then follow the above
procedure.
‧ While power off the instrument, the current keyed-in factor will be saved in
memory and used as initial value for following powering on.
11
Metertech Inc.
Concentration measurement with a standard
1. Press “A/T/C” to select the concentration mode.
2. At conc&standard mode, the display begins with “Conc @ Stand, ->ENTER”.
3. Press “ENTER” and LCD shows “WL: XXX nm, C: 0.000” with blinking at the first
digit.
4. Key in standard concentration here (0-99999.9). Then “ENTER” to show “C: XXXX,
Stand BLANK”.
5. Insert blank solution into the cell holder and close the sample compartment lid.
Then press “BLANK” to get “ABS: 0.000, Put Stand->ENTER”.
6. Put standard solution into cell holder and press “ENTER”. LCD shows “FTR: XXX.X,
Sample BLANK” with calculated standard factor shown on the screen.
7. Insert blank solution into the cell holder and press “BLANK” again to get “WL: XXX
nm, C: 0.000”.
8. Put in sample solution to get its live concentration reading.
9. Users can press “ESC” and back to step 3 to repeat the whole process, or return to
step 7 by “BLANK”, or press “A/T/C” to other measurement mode.
Note:
‧
If wavelength needs changing in concentration mode, please go to A/%T
mode first to key in the number and “ENTER”. Then follow the above
procedure.
‧ While power off the instrument, the calculated factor will be saved in memory
and used as initial value at factor mode for following powering on.
12
Metertech Inc.
System Functions
There are 11 options available in system functions. Press “FUNC” and display “1: Initial
WL”. Press “ESC” repeatedly will display each option sequentially as explained below.
1. Initial WL
Press “ENTER” and displays “nm: 500 A” with blinking at first digit. The initial
wavelength and reading unit after power up are set up here. Key in desired wavelength,
and then repeatedly “ENTER” to get “A” or “%T”, and then “ESC” to save these
parameters. Press “ESC” again to the next option.
2. Resolution
Press “ENTER” and displays “<Stand Resol>, ->ENTER”. The reading resolution is set
up here. Press “ENTER” repeatedly to switch between <High Resol> and <Stand
Resol>. Press “ESC” twice to the next option.
3. Printer
Press “ENTER” and shows “3: Printer OFF, 0: OFF 1: ON”. Users can enforce “PRINT”
button be OFF/ ON by entering “0/1”. If the printer is not connected to parallel port,
press “1” will show “Printer Error” and results in “Printer OFF”. Press “ESC” twice to the
next option.
4. Conc Unit
Press “ENTER” and get “[0] C” with blinking at the unit number. Keep on “ENTER” to
increase number with different unit. When the current unit is desired, press its unit
number. The blinking disappears and this unit will be picked and memorized. This unit
will apply to concentration measurement modes. Press “ESC” twice to the next option.
5. Data Erase
Press “ENTER” and shows “->0: No 1: Yes”. The saved data are all cleared
here by entering “1”. The display shows “Erasing…”, and please wait several seconds to
finish the job by showing “Done”. Press “ESC” twice to the next option.
6. Data Print
Press “ENTER” and shows “->0: No 1: Yes”.
Saved measured data up to 100 sets can
be all printed out by pressing “1” (printer must be set “ON” at option 3) or stopped any
time by pressing “ESC”. Press “ESC” twice to the next option.
13
Metertech Inc.
7. Data to PC
Saved measured data are transferred to PC through RS232 port, please refer to “SP880
grabber Installation and Operation” instructions at the rear section of this manual for
further details. Press “ESC” to the next option.
8. Validation
Empty cell holder and press “ENTER”. LCD shows “[1]Bandwidth, [2]WL Accuracy”. To
measure optical bandwidth, press “1”. The machine goes to zero position and takes
measurement. The result shows “Measure BW, BW: X.XX nm”. Press “2” and start to
measure wavelength accuracy at 361nm and 536 nm by a built-in HY-1 filter. The result
shown on display is “361nm 536nm, X.XXnm X.XXnm”. X.XX is the difference between
actual wavelength and ideal wavelength. Press “ESC” twice to the next option.
9. Lamp Tuning
Please see the explanation starting from step 7 of section “Replacement the lamp”.
Press “ESC” to the next option.
A. Version X.X
The software version of this machine is shown here. Press “ESC” to return to the first
option.
Note:
‧All parameters set or data viewed in each option can be printed out by pressing
“PRINT”.
‧To return to measurement mode, press “FUNC” again.
Data saving and retrieve
1. The current reading, wavelength and measuring unit at any measuring mode can
be saved permanently in memory by pressing “SAVE” to display “[00] Name: M “.
2. Then enter name MXX at blinking position by numerical value from 00 to 99, and
press “ENTER”.
3. There are totally 100 sets of data can be stored and increase from sequence
14
Metertech Inc.
number 00. If data number is larger than 99, it is restarted from 00 and update last
saved data.
4. All saved data can also be checked by “VIEW” key. The latest stored data shows
up first. These data are displayed sequentially at one-second interval.
5. Users can hold the current data by pressing down “VIEW”, or “ESC” to quit during
viewing all data.
Printer
User can print out any data with wavelength shown on LCD at any measuring mode by
pressing “PRINT”. In concentration modes, it also prints factor value. The printer type
available includes Epson dot metrics, and Epson/ Hp ink jet.
Analog output
In measuring mode, the dc analog output voltage at the rear panel of machine offers
value the same as LCD reading for A and T. It ranges from 0 to 4V with precision at
0.001V.
15
Metertech Inc.
MAINTENANCE
Routine care
Very little maintenance is required to keep the instrument in good working condition.
The interior should be kept as dust free as possible and the sample compartment
cleaned regularly; wipe off spilt chemicals immediately.
WARNING: Do not remove the cover of the instrument.
CAUTION: Do not allow moisture to leak into the instrument.
The exterior of the instrument can be cleaned periodically as follows:
SWITCH OFF first the instrument and disconnect from the mains supply.
Using a lint free cloth dampened with a weak solution of detergent and water,
wipe the exterior surface of the instrument as necessary.
Wipe over with a soft cloth dampened with clean water.
Dry the surface with another soft cloth.
Replace the lamp
CAUTION: Switch off and disconnect the instrument from the mains supply and allow
the lamp to cool down at least 10 minutes before proceeding.
Figure 5a: Lamp change
16
Metertech Inc.
WARNING: Do not touch lamps with bare hands.
Use glove or cloth to prevent
staining of the bulb.
WARNING: Pay extreme attention not to touch parts other than those as instructed.
1. Turn off and unplug the instrument.
2. Allow the lamp to cool for at least 10 minutes.
3. Open the lamp door on the right side of instrument by loosing the knob in
counterclockwise direction.
4. Pull the old lamp (#1) straight up to remove it from socket as shown in figure 5a
above.
5. Hold a new lamp with tag at flat portion facing to user, then remove the tag. Align
the two legs of new lamp with the two holes (#2) in the socket, and press the lamp
securely into the socket.
6. Carefully wipe off any fingerprints on the lamp with a soft tissue.
Figure 5b: Lamp tuning
7.
Power up the instrument by following previous instructions.
8. Empty cell holder, press “FUNC”, then press “ESC” nine times to get “A: Lamp
Tuning” shown on LCD.
9. Press "ENTER" and go to zero position by displaying “Zeroing…”.
10. LCD then shows "Adjust Lamp, READ: XXX".
17
Metertech Inc.
11. In the lamp house (figure 5b), loosen the white thumbscrew (#1) and adjust the
vertical flange (#2) close to it forward/backward. The displayed number XXX will
vary in accordance with flange movement. Find the largest number and tighten the
thumbscrew.
12. Close the lamp door with knob tightened. Power off and Power on again the
instrument to complete lamp alignment.
Messages
This section lists messages for errors or abnormal conditions during operation.
Error-0
Grating photo-interrupter or grating motor has malfunctioned, call for service.
Error-1
Light source is not functioning or too weak/ bright, change with proper lamp
supplied by original manufacturer.
Error-2
Grating motion exceeds lower limit, call for service.
Error-3
Grating motion exceeds upper limit, call for service.
Beep
Beeping while blanking with lid open or blanking solution absorbance greater
than 1.5A, or while sample reading with absorbance greater than 4.0A. The
beep will continue until the condition is resolved.
Replacement parts
Part#
Description
0960870100
Tungsten-halogen lamps, package of 2
870207A
16mm round tube holder
A00001-1
10mm plastic square cuvette, package of 100
A00003
1/2” glass round tube, package of 6
0770870100
AC adapter for SP880 spectrophotometer
0570870101
Analog output cable
OP880
SP880 spectrophotometer operational manual
18
Metertech Inc.
SP880 GRABBER INSTALLATION AND OPERATION
1. PC system requirement
CPU model need be newer than Pentium-100, equipped with CD driver.
Microsoft Windows XP/98SE.
Video card capable supporting 800X600 pixels and 16 bit (Hi color) color
resolution at least.
Mouse, keypad, one serial communication port for RS232 and one 9 pin
connector.
2. SP880 grabber installation
Put the SP880_ grabber CD into a CD driver.
Select the installation program “Setup.exe” under the “SP880_ grabber”
directory, and make execution.
Please follow instructions to complete the installation work. A program
“SP880_grabber.exe”
will be generated under C:\program files\SP880
_grabber directory.
3. Online operation
Make sure 9-pin connector is plugged on the RS-232 output of SP880 and
COM2 of PC.
Power up PC and SP880, and then go to Program Files of Windows PC, find
“SP880_grabber” file under “Metertech” and click it. The SP880_grabber is
executed and a new window comes up with default nm=500 & A=0.000
displayed.
Click “Setting” on the menu bar and click “Comport port” under it, and a
dialog box “COM Port Setting” will show up. The default setting is COM2 and
user can select whichever is suitable for real environments. After selecting the
proper port, press “Port Open” button to proceed. If COM port is successfully
communicated and SP880 machine is ready in measuring mode (A/T/C), the
live reading on machine LCD will also be displayed on PC screen.
19
Metertech Inc.
4. Real-time data reading and saving
Press icon “Capture Data”, current data is recorded in table below. Press
“Clear Data” to erase table content. The tabulated data can be saved in
internal file by “Save Data” and can also be read by “Load Data”. Tabulated
data can be printed out by “Print Data”, or formatted as external files by
“Export Data to File”. These files can be processed under Microsoft Excel/
Word environments.
5. SP880 data download
Click “Manipulate” on the menu bar, and then click “Read Memory Data”
under it.
Now press “FUNC” on SP880, then press “ESC” repeatedly until
seeing “8: Data->PC” on LCD.
Press “ENTER” and “1”, LCD shows
“Sending…”. Click “Get Data” on PC and stored data in SP880 are transferred
to PC. All the data are decreasingly numbered. The newest measured data is
located at the top of data column. After data transfer is completed, LCD shows
“Done” at SP880. The downloaded file can be saved, cleared, printed and
exported similar to “Read Real-Time Data” mode.
20