1
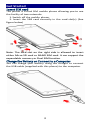
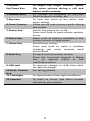
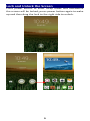
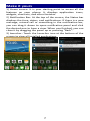
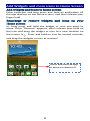
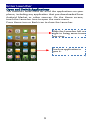
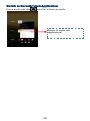
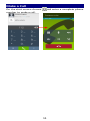
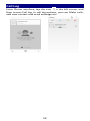
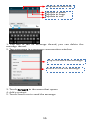
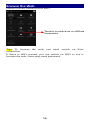
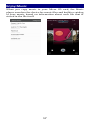
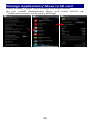
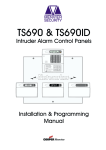
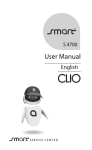
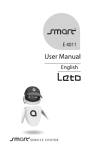
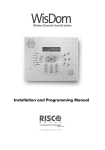
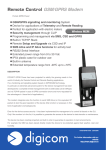
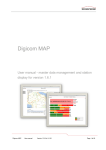
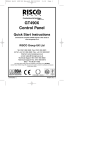
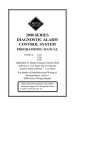
Information for user manual
The content of the manual is correct as and when it is
released. This manual is for information only and subject to
change without prior notice. Reasonable efforts have been
made in the preparation of this manual to assure its
accuracy and Digicom Trading (pvt) Limited assumes no
liability resulting from any errors or omissions in this
manual, or from the use of the information contained
herein.
Digicom Trading (pvt) Limited operates on a policy of
continuous development. Digicom Trading (pvt) Limited
reserves the right to make improvements, changes or
revisions in the design of the phone or the information
contained in the manual without any obligation to notify
any person of such revisions and changes and without prior
notice.
Some of the contents in this manual may differ from your
phone, depending on the software installed, your SIM card
or your service provider and is subject to change without
prior notice.
You may incur additional charges for usage of data services,
such as messaging, uploading and downloading,
auto-syncing, or using location services. To avoid additional
charges and details, please contact your service provider.
1
Content
Information for user manual ................................ 1
Get Started .......................................................... 3
Insert SIM card .........................................................3
Charge the Battery or Connect to a Computer ........3
Keys and Parts ...................................................... 4
Lock and Unlock the Screen .................................. 6
Make it yours ....................................................... 7
Add Widgets and more icons to Home Screen ....... 8
Add widgets and icons to home screen ...................8
Rearrange or remove widgets and icons on your
Home screen ............................................................8
Enter Launcher ..................................................... 9
Open and Switch Applications .................................9
Switch to Recently Used Application......................10
Make a Call ........................................................ 11
Call Log .............................................................. 12
Reject a Call by Sending a Busy Message ............. 13
Add a Contact .................................................... 13
Send and Receive Message(s) ............................. 14
Browse the Web ................................................. 16
Enjoy Music........................................................ 17
Download Applications From Android Market .... 18
Manage Applications/ Move to SD card .............. 19
Maintenance & Safety ........................................ 20
Legal information ............................................... 22
2
Get Started
Insert SIM card
The phone is a Dual SIM mobile phone allowing you to use
the facility of two networks.
1. Switch off the mobile phone.
2. Insert the SIM card correctly in the card slot(s) (See
figure below)
Note: The card slot on the right side is allowed to insert
either Micro SD card or NANO SIM card. It can support the
expandable memory or Duel SIM function
Charge the Battery or Connect to a Computer
You can charge your battery using the charger or connect
the USB cable (supplied with this phone) to the computer.
3
Keys and Parts
The smart phone gives you marvelous feelings to
experience on Camera, Video recorder, FM radio, Music and
Sound recorder. Let you install various APPs, games, and
more (supports APK format) by downloading from Android
11
Market.
2
10
3
4
5
1
6
7
8
12
9
4
1.Volume
Up/Down Key
2.Headset port
3.Receiver
4.Front Camera
5.Power Key
6.Menu Key
7.Home Key
8.Back Key
9.USB jack
10.Back Camera
lens
11.Flashlight
12.Speaker
To adjust the ringer volume, adjust
the voice volume during a call and
adjust media volume.
To connect an earphone so you can
listen to music or radio, etc.
To hear the voice of the other side
when calling.
Allow you to take pictures while facing
the screen.
Switch the phone on or off.
Press and hold to open phone options
menu.
Open a list of options available in the
current screen or application.
Go to home screen;
Press and hold to open a window
showing you most recently used
applications.
Go back to the previous screen;
Close the on-screen keypad, a dialog
box, an options menu, or the
notification panel.
To connect charger or USB data cable
for data exchange.
For taking photos.
To take photos in low-light conditions.
To listen to music, and other sounds
offered by your phone.
5
Lock and Unlock the Screen
Press power button to enter Sleep mode and meanwhile
the screen will be locked; press power button again to wake
up and then drag the lock to the right side to unlock.
6
Make it yours
1) Home screen: It is your starting point to access all the
features on your phone. It displays application icons,
widgets, shortcuts, and other features.
2) Notification Bar: At the top of the screen, the Status bar
displays the time, status, and notifications. If there is a new
message, missed call or something in the notification bar,
you can drag it down to open notification panel and click
the desired one to have a view. When you finished, you can
close it by dragging the panel up or pressing “Back”.
3) Launcher: Touch the Launcher icon at the bottom of the
screen to view all installed applications.
7
Add Widgets and more icons to Home Screen
Add widgets and icons to home screen
Enter Launcher and long press and hold an application till
the app displays on the home screen, and then release your
finger hold.
Rearrange or remove widgets and icons on your
Home screen
a). Long press and hold the widget or icon you want to
move. Once “Remove” appears, don't release your hold on
the icon and drag the widget or icon to a new location on
the screen. b . Press and hold on icon for several seconds,
and drag the widgets or icon to remove!
Touch and hold an app
to move or remove it!
8
Enter Launcher
Open and Switch Applications
The Launcher holds icons for all of the applications on your
phone, including any application that you downloaded from
Android Market or other sources. On the Home screen,
touch the Launcher Icon to open the main menu.
Press Home icon or Back icon to close the Launcher.
Slide the Launcher left or
right to bring more icons
into view.
Touch an application to
open it.
9
Switch to Recently Used Application
Press and hold the
icon for a few seconds.
Touch to open the
application
10
Make a Call
On the start screen choose
number to make a call.
and enter a complete phone
11
Call Log
Enter Phone interface, tap the icon in the left corner, and
then access Call log. In call log options, you can Make calls,
add new contact and send message etc.
12
Reject a Call by Sending a Busy Message
While there is an incoming call, you are inconvenient to
accept the call, and then you can send a busy message for
rejecting the call.
Drag the circle up to
, some busy messages will show on
the screen, short tap any of them to send out.
Add a Contact
Tap and enter Contacts and then add a contact (see
figure below.)
Tap to add a new contact to Phone or SIM card.
13
Send and Receive Message(s)
Enter Messaging, and then compose new message. You touch
a text field where you want to enter text, to open the
keyboard.
Tap this to select
desired contact from
phonebook.
Touch once to capitalize
the next letter you type.
Touch and hold for caps.
Press space or a
punctuation mark to
enter the highlighted
suggestion.
a.
When you are composing a new text message, you
can select text for cutting or copying. The selected text is
highlighted in blue.
Touch the text field or portion that contains text. (see the
below figure) You can select all contexts, copy, cut and paste.
b.
When a new message comes, you can read by
dragging notification panel and click the message, or entering
Message to read it directly.
14
Tap this to select all.
Tap this to paste.
Tap this to copy.
Tap this to cut.
1. Tap one of the all message thread, you can delete the
message thread.
2. Tap a message in a message conversation window.
Tap to forward the message.
Touch to lock the message.
3. Touch Forward in the menu that opens.
4. Add a contact.
5. Touch Send icon to send the message.
15
Browse the Web
Switch on Data connection or WiFi
Touch it to switch on or off Data
connection
Tips: To browse the web, you need switch on Data
connection.
If there is WiFi around, you can switch on WiFi to use it
browse the web. Some may need password.
16
Enjoy Music
When you copy music to your Micro SD card, the Music
player searches the device for music files and builds a catalog
of your music, based on information about each file that is
stored in the file itself.
17
Download Applications From Android Market
Add a Google account
Enter Android Market (Play Store) and download apps.
18
Manage Applications/ Move to SD card
Enter Setting >Apps, then manage the applications.
As you install downloaded Apps, you need switch on
“Unknown sources” in Security settings.
19
Maintenance & Safety
Please read and observe the following information for safe
and proper use of your phone and to prevent damage. Also,
keep the user guide in an accessible place at all the times
after reading it.
1.
After sales service
Kindly refer to the Warranty Card provided in the sales
package box.
2.
Charger and Adapter Safety
Charger and adapter are designed for indoor use only.
3.
Battery Information and Care
o
Please do not disassemble the rear cover of the
mobile phone, since the battery is inbuilt.
o
Recharge the battery after long periods of non-use to
maximize battery life.
o
Battery life will vary due to usage patterns and
environmental conditions.
o
The self-protection function of the battery cuts the
power of the phone when its operation is in an abnormal
status. In this case, remove the battery from the phone,
reinsert it, and turn the phone on.
4.
General Notice
o
Do not place items containing magnetic components
such as a credit card, phone card, bank book, or subway
ticket near your phone. The magnetism of the phone may
damage the data stored in the magnetic strip.
o
Talking on your phone for long period of time may
reduce call quality due to heat generated during use.
o
When the phone is not used for a long period time,
store it in a safe place with the power cord unplugged.
o
Using the phone in proximity to receiving equipment
(i.e. TV or Radio) may cause interference to the phone.
o
Do not immerse your phone in water. If this happens,
remove the battery and take it to an Authorized Service
Center.
o
Do not paint your phone.
o
The data saved in your phone might be deleted due to
careless use, repair of the phone, or upgrade of the software.
Please backup your important phone numbers. (Ring tones,
text messages, voice messages, picture, and videos could also
be deleted.) The manufacturer is not liable for damage due to
the loss of data.
o
Do not turn your phone on or off when the phone is
20
close to your ear.
o
The suitable temperature for the phone and
accessories is -10 ~45 .
o
When charging, please place the phone in an
environment that has a normal room temperature and good
ventilation. It is recommended to charge the phone in an
environment with a temperature under 40 . Please ensure
to use only the charger offered by the manufacturer. Using
unauthorized charger may cause danger and violate the
authorization of the phone and the guarantee article.
o
Dispose of used batteries according to the
instructions.
o
Excessive sound pressure from earphones and
headphones can cause hearing loss.
Warning: Company will not bear any responsibility for any
incompliance with the above guidelines or improper use of
the mobile phone. Our company keeps the right to make
modifications to any of the content here in this user guide
without public announcement in advance. The content of this
manual may vary from the actual content displayed in the
device. In such case, the latter shall govern.
21
Legal information
All rights reserved. Reproduction, distribution, translation, or
transmission in any form or by any means, electronic or
mechanical, including photocopying, recording, or storing in
any information storage and retrieval system, without the
prior written permission of Digicom Trading (pvt) Limited is
prohibited.
1. Trademarks
• Digicom Trading (pvt) Limited, Q Mobile and the Q Mobile
logo are registered trademarks of Digicom Trading (pvt)
Limited.
• The Android logo, Google™, Google Maps™, Google Mail™,
YouTube™, Google Play™ Store, and Google Talk™ are
trademarks of Google, Inc.
• Bluetooth® is a registered trademark of Bluetooth SIG, Inc.
worldwide.
• Wi-Fi®, Wi-Fi Protected Setup™, Wi-Fi Direct™, Wi-Fi
CERTIFIED™, and the Wi-Fi logo are registered trademarks of
the Wi-Fi Alliance.
• All other trademarks and copyrights are the property of
their respective owners.
2. Disclaimer
The contents of this document are provided "AS IS". This
manual could contain technical inaccuracies, typographical
errors and out-of-date information. This document may be
updated or changed without notice at any time. Use of the
information contained in this manual is therefore at your
own risk.
Digicom Trading (pvt) Limited makes no representations,
warranties, or conditions whether express or implied with
respect to this manual or its contents. Digicom Trading pvt
Limited disclaims all warranties, whether express or implied,
including, but not limited to, the implied warranties of
merchantability, fitness for a particular purpose, durability
and accuracy related to the performance or non performance
of any software mentioned in this manual.
Digicom Trading (pvt) Limited nor its affiliated companies
and their respective directors, officers, employees or
consultants shall be liable for any direct economic,
commercial, special, consequential, incidental, exemplary or
indirect damages including loss of business revenue or
earnings, loss of data howsoever caused.
Digicom Trading (pvt) Limited reserves the right to revise
this document or withdraw it at any time without prior
22
notice
Rechargeable batteries have a limited number of charge
cycles and may eventually wear out. In the event the talk and
standby times are noticeably shorter than normal, please
replace the battery.
23