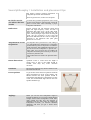
1
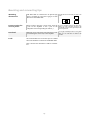
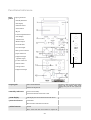
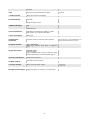
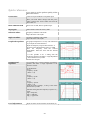
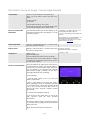
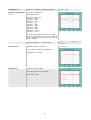
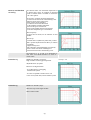
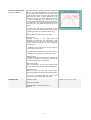
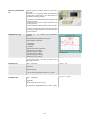
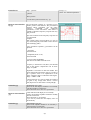
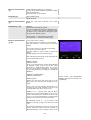
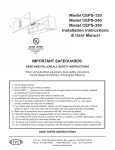
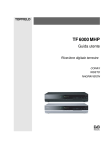
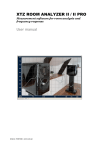
XTZ SUB AMP1 DSP
Subwoofer Amplifier
User manual
© 2009 XTZ AB , www.xtz.se
Table of contents
Page
Contents
3
About XTZ
4
Technical presentation
5
Preparations
6
Sound philosophy / Installation and placement tips
7
Mounting and connection tips
9
Functional reference
10
Quick reference
12
Functions/ Area of usage/ Sound adjustment
13
Technical explanations
21
Technical specifications
23
Service & Support
24
- 2-
Contents
Contents
XTZ SUB AMP1 DSP offers a wide range of
possibilities. In order to utilize your new amplifier
in the best way, you should carefully read through
this manual before using the amplifier for the first
time. It may take some patience in order to make
the hifi equipment sound optimal.
If you have no previous experience of these kinds of
installations, or if you have any questions, feel free
to contact our free of charge support and we will
help you. (See further under the heading of
Support on the last page of this manual).
- 3-
About XTZ
Philosophy
Our reference and starting point is to reproduce a
natural sound, but also in respect to the fact that
acoustics always is a matter of personal taste.
XTZ Goals
To provide the optimal relation
between price, performance and quality
on the market.
Our concept:
- To produce the perfect compromise.
- Cost-effective manufacturing in large volumes.
- Our priority is product quality before marketing,
so the customer should get the best ratio of price
and quality.
- Reduce the number of middlemen.
Contact us
Website: www.xtz.se
E-mail: [email protected]
- 4-
Technical presentation
SUB AMP 1 DSP works just as good for those who
want to power the passive subwoofers (XTZ 99
W10.17P) or any other subwoofers. SUB AMP1 DSP
can be perfect as an amplifier for bi-amping full
range speakers.
By using one or two subwoofers (with correct
placement), it is often easier to achieve a better
frequency response. SUB AMP1 DSP gives you
valuable benefits when struggling with the room
modes.
Why buy an active
Amplifier with
integrated DSP?
Finding an acoustically acceptable listening room is
often hard. Normally you can not change your
living room that much and you need to accept a lot
of losses in the sound quality. This is a known fact,
but many brands do not touch this issue because it
is not easy to solve this problem with traditional
analogue technology.
It’s impossible to construct a normal analogue
subwoofer that sounds perfect in every room.
Every room has unknown and unique acoustical
characteristic that affect the sound quality. The
biggest problems are found in the low-frequency
spectrum. A regular (not acoustically treated) room
has severe resonances and dips in this spectrum
caused by so called standing waves. Depending on
listening
positions
they
produce
severly
unbalanced sound.
The frequency response of a good loudspeaker
should be in the range of ± 3dB, but a normal room
can introduce variations of ± 15dB. This leads to
the conclusion that even a very good loudspeaker
can perform poor in a "bad" room. And the fact is
that most regular rooms suffer from acoustical
problems.
To build a perfect listening room is extremely
expensive.
With the DSP technology we can create a good
balanced sound in every room.
Amplifier
We have equipped the XTZ SUB AMP1 DSP with a
very powerful 300 watt amplifier and a large heat
sink for effective cooling. For professional use
(studio, PA etc.), it is equipped with a balanced
input. The terminal connectors are gold-plated and
very solid.
To achieve a high power and long durability, the
amplifier is built with a large ring-coil transformer,
large electrolyte capacitors, and has MosFet
transistors in the output stage.
DSP
The built-in DSP module is equipped with 24bit/96-kHz AD/DA converters and the best
software on the market today allowing you perfect
adaptation of the subwoofer to the room
characteristic and adjustment of the sound
character, always maintaining the best possible
- 5-
quality of sound.
In order to provide the highest sound quality the
DSP runs advanced low-noise filter algorithms with
32-bit calculation precision. The software consists
of parametric and graphic equalizer, phase
correction, low-cut and high-cut filters, and delay.
There are many "cheap" equalizers on the market,
but most of them are not good enough to maintain
the high sound quality for low frequencies because
of using not appropriate algorithms. The DSP
software used in the subwoofer has been developed
by a world leading German company with 25-years
tradition in professional audio.
There are many years of development behind the
software we use in SUB AMP1 DSP.
The cabinet
The cabinet is made of MDF. The surface is
varnished, black piano paint, giving it a proper
look.
Preparations
Unpacking
Carefully unpack the speaker, and pay attention so
you don't break anything. If possible, save the
packing box for future transportations. If there
should be any damage on the product, please
contact your retailer.
Check that the mains voltage marking on the back
panel matches your local mains voltage.
If the product is cold, wait until it reaches room
temperature before connecting the power cord. If
you don’t do this you can cause damage of the
product.
Accessories
Mains power cord
User manual
Logotype
Rubber feet
PC-Remote
PC-Remote is a software, allowing you to control
SUB AMP1 DSP from a PC.
You can sit in listening position and do all settings.
The program is included in price, but you need to
download the software from www.xtz.se
- 6-
Sound philosophy / Installation and placement tips
This chapter contains common information on
loudspeaker placement and installation.
These are general rules, so there are exceptions.
In which room do
you achieve the best
sound?
No matter how good the equipment is, in the wrong
listening environment it will inevitably sound bad.
There are some basic rules concerning a proper
loudspeaker installation:
Reflections
Carpets, curtains and soft furniture absorb mid
range and high frequency sound, and this is
preferrable. Big empty areas, on the other hand,
reflect it and produce hard reflections that may
lead to a blurry dialogue. Apart from colouring the
sound, also the perspective of the sound will
deteriorate. Reflections in the room can roughly be
compared to the reflections that yield ghost
pictures on a TV screen.
Amplification of bass A loudspeaker that is placed near a wall, ceiling or
floor will amplify lower frequencies in a sometimes
frequencies
not desirable way (since it may lead to an indistinct
sound recreation). This amplification becomes even
more obvious if the loudspeaker is placed near a
corner. Thus, for a sound as clear as possible, the
loudspeaker should be placed at least 30 cm (about
12 inch) away from the wall
Some constructions are made to be placed closed to
a wall.
Room dimensions
Quadratic rooms or rooms where the length is
exactly twice as long as the width should be
avoided, since they may create unwanted
resonance.
Furniture
Be aware that furniture may vibrate and thus create
bad sound at loud bass.
Front speakers
To get the best result the front speakers should be
placed symmetrical in front of the listener. The
distance between the front speakers should be
around 80% of the distance to the listener. In other
words, the recommended angle between the front
speakers should be 45°
Angling?
Either you can have the loudspeakers angled in
towards the listener or you can have them directed
straight ahead. Some loudspeakers sound better
when angled, but this may also depend on
reflections from the side walls. By angling the
loudspeakers inwards, you decrease unwanted
reflections and thus you get a better stereo
perspective.
- 7-
Placement of the
subwoofer
The placement of the subwoofer in the room
dramatically affects the overall frequency response
and sound level of the system. At low frequencies
the effect of the room is strong. Even a slight
change in the subwoofer's location can make a
significant difference in the frequency balance.
Patience and methodical experimentation is needed
to find an optimal placement. The placement
affects the phase difference between the main
loudspeakers and the subwoofer.
One basic rule is to place the subwoofer together
with or near the front system (especially important
if the front loudspeaker also propagate bass
frequencies) as this will minimize the risk of phase
eliminations in the room.
The correct height
If the loudspeakers are small, they should be placed
on stands or tilted so that they are on the same
level as the ears.
Cables
Try to keep them as short as possible. By its
electrical parameters, a long conductor will have a
bigger influence on the sound than a short one.
The subwoofer cable should be shielded, to avoid
noise.
Make sure that all connections are clean and not
oxidised. All connections should be mechanically
stable, both power, signal and loudspeaker cables.
Signal cables should be separated from other
cables.
Finally
Please remember that good sound is a matter of
taste, so you have to experiment to obtain your
favourite one. We wish you best of luck!
- 8-
Mounting and connecting tips
Mounting
alternatives
SUB AMP1 DSP is constructed to be placed lying Mount the feet on the side you want to be
down or standing up. Place the logotype in same down.
direction as SUB AMP1 DSP
Connect using the
correct phase
Always connect using the correct phase, from the If you by accident connect the other way,
+-pole on the amplifier to the +-pole on the there is no risk of damage. However, the
sound will not be correct, especially in the
loudspeaker and corresponding for minus (-).
lower frequencies.
Overload
With high power load under long time there is risk If you play extremely loud for a long time
there is a big risk that you destroy the
of overloading the driver and/or the amplifier.
product.
Load
We recommend that no more than 2pcs of 8 Ohms
subwoofer should be connected to SUB AMP1 DSP.
This is because the impedance could be extremely
low.
- 9-
Functional reference
Rear 1. Input gain meter
panel
2. Standby indicators
3. LCD display
4. Function button
5. Value buttons
6. IR port
7. Contrast adjustments for
LCD Display
8. Volume knob
9. Balanced input
10. Ground select
11. Low level input
12. RS-232 PC connector
13. Input selections
14. High level input
(speaker input)
15. Power connector
16. Mains switch
17. Voltage select
18
18. High level Output
1 Input gain
Should be as high as possible but without
getting the red INPUT GAIN diode
flashing; this gives the best signal/noise
ratio.
INPUT GAIN METER
Indicate the input level.
2 Standby indicator
Turns red in standby.
Turns blue when the subwoofer is ON.
3 LCD display
LCD Display that shows all functions and values.
4 Function button
FUNCTION
Select function with this two buttons.
5 Value buttons
VALUE
Select value with this two buttons to adjust the
- 10-
functions.
6 IR
Infrared eye for possible remote control
7 LCD Contrast
Adjust the contrast in the display
8 Volume knob
VOLUME
Not in use
Adjust the main volume.
9 Balanced input
XLR
Balanced input.
10 Ground choice
Depending on equipment us "GRD" or "LIFT".
Only in use if you connected with XLR.
11 Low level input
RCA input.
12 RS 232 PC
connector
Connector for PC. For the PC-remote software.
13 Input selector
INPUT SELECTOR
Select input between: XLR ,RCA or High-level
input
14 Speaker input
SPEAKER INPUT
High-level input.
If your amplifier does not have subwoofer output
use this input from your normal speaker output.
15 Power connector
Mains power connector.
16 Main switch
Main switch for main power.
17 Power switch
Select your local mains voltage.
18 High Level Output
High level output. To connect to your subwoofer
- 11-
The program is in price included but you
need to download it from www.xtz.se
230V in EU
110V in USA
Quick reference
If you want to use the product quickly, follow
these instructions.
Connection
Connect to input: XLR, RCA or Speaker input.
Select your local mains voltage with the power
switch. Connect the power switch and turn the
main switch on.
INPUT SELECTOR
Choose one of: XLR, RCA or Speaker input.
Input gain
INPUT GAIN : Select the value 15.0dB
Subsonic Filter
Frequency: Select the value 20Hz
Slope: Select the value 24dB
High-Cut Filter
Frequency: Select the value 120Hz
Slope: Select the value 24dB
Graphical Equalizer
The graphical Equalizer is an easy and well-known
way to adjust the sound character.
Adjust the frequency response in functions 2-11.
The level can be adjusted in the range of ± 12dB
Select
the
frequency
with
the
buttons
"FUNCTION". Select the level with the buttons
"VALUE".
It is also possible to do a setting with the
parametric equalizer and make a rough adjustment
to the sound character you like.
Read the next chapter.
Parametrical
Equalizer
It is possible to do a setting with the parametrical
equalizer and make a rough adjustment to the
character you like.
Do the following:
PE Q 1
Frequency : 40 Hz
Q-factor : 1.40
PE Q 2
Frequency : 90 Hz
Q-factor : 1.40
PE Q 3
Frequency : 140 Hz
Q-factor : 1.40
Adjust the levels on PEQ 1, 2 and 3 to the sound
character that you like.
With this setting the bass frequency is split in to 3
bands:
PEQ 1 =deep bass,
PEQ 2 = mid bass,
PEQ 3 = upper bass.
Level adjustment
Adjust the main volume with the volume knob ( 8 )
- 12-
Functions / Area of usage / Sound adjustments
Connection
Connect to input: XLR, RCA or Speaker input.
Select your local mains voltage with the power
switch.
Europe: 230Volt
US: 110Volt
Turn the main volume to a low value.
Connect the power cable and turn the main switch
on. Now the LCD display show "INPUT Gain".
How to control the
functions
Functions that indicated on the LCD display can be PC-Remote is a software allowing you to
controlled by buttons below LCD display or via the control SUB AMP1 DSP from a PC.
You can sit in listening position and do all
PC-remote program.
settings.
The program is in price included but you
need to download it from www.xtz.se
The manual for PC-remote can you also
download from www.xtz.se
Select function
With the "FUNCTION"-buttons, you select which
function you want to change
Select value
With the "VALUE"-buttons, you select which value One push = One step
Hold down the button = Quick step.
you want for each function.
Function 1
INPUT - Gain
Adjust the input gain.
The level indicates the input gain on the display.
In the left bottom corner of the Function 1 display
the number of recently selected preset (e.g. P4) and
the time of day is shown.
How to use function 1 The level indicates the signal level at the input of
the DSP module. In order to get the best signal-tonoise ratio it is very important to adjust the proper
gain. You should try to adjust the Gain with the
Value buttons as high as possible, but just below
getting the red LED ("clip") is flashing.
Do the following:
1. Turn the main volume to zero (0) or low level
with the volume knob.
2. Play a laud music CD observing the “INPUT
GAIN” LED display while you adjust the Gain with
the “VALUE” buttons. All, but the red LEDs should
flash or be on. If the red LED (“Clip”) turns on
decrease the “Gain” with the “VALUE” buttons
appropriately.
Use a music CD with high output level.
If you not want to play music loud, you can do the
same operation with the main speakers
disconnected.
The level should be as high as possible but without
the red Input Gain is getting on, this gives the best
signal/noise ratio.
Adjust main volume with the volume knob.
- 13-
One step = 0,1 dB
Function 2 - 11
Function 2 - 11 contents the graphical equalizer.
How to use functions
2 - 11
The graphical equalizer has
10 band (frequencies)
One step = 0,1 dB
Band centre frequencies :
Function 2 – 16Hz
Function 3 – 20Hz
Function 4 – 25Hz
Function 5 – 31,5
Function 6 – 40Hz
Function 7 – 50Hz
Function 8 - 63 Hz
Function 9 – 80Hz
Function 10 - 100 Hz
Function 11 - 125 Hz
The level can be adjusted in the range of ± 12dB.
Select the band (frequency) of interest with the
buttons "FUNCTION" and adjust the level with the
buttons "VALUE".
Function 12
How to use function 2 - 11 via PC-remote.
Software can
www.xtz.se
SUBSONIC FILTER - Frequency
One step = 1 Hz
Low-cut filters to cut the lowest frequencies.
Adjustable from 10-40Hz.
Function 13
SUBSONIC FILTER / Slope
Select the slope on the subsonic filter.
Select 12dB or 24dB.
- 14-
be
downloaded
from
How to use function
12 and 13
The subsonic filter cuts unwanted frequencies in
the deepest bass range. An example of unwanted
sound is "rumble" from a turntable or wind noise
from a microphone.
The reason to cut these unwanted frequencies:
- To decrease the noise level in the listening room.
- Subsonic noise causes unnecessary
high power from the amplifier.
- To decrease non-linear distortions
in the amplifier and the loudspeaker.
- Increase the power "headroom"
- Some rooms amplify the lower frequencies
so the bass frequencies get "uncontrolled".
Select frequency:
A typical value is 20Hz, but use whatever is most
suitable.
Select slope:
A normal value is 24dB but try what suits you best.
With a perfect adjusted subsonic filter you achieve
the benefits:
- Higher useful power
(the subwoofer can handle higher sound levels).
- More control and a better sounding bass
- Decreased noise level in the listening room.
The functions 14, 15, 16 and 17 are dependant on
each other and should therefore be used in a
certain order.
Function 14
HIGH-CUT FILTER / Frequency
High-cut filters cut the upper frequencies.
Adjustable from 40-250Hz.
Reason to use high-cut filter:
-To avoid frequency overlapping
with the main system
-To create an optimal acoustical cross-over
to the front system and/or home cinema system.
Function 15
HIGH-CUT FILTER / Slope
Select the slope on the high-cut filter.
Select 12dB or 24dB.
- 15-
One step = 1 Hz
Function 16
OUTPUT / Polarity
Select polarity.
Select: Negative or Positive
Here you can select the polarity.
You can select either: Negative or Positive.
Function 17
One step = 1 degree
OUTPUT / Phase 1st Ord.
Phase.
The phase adjusts from 0 - 180 degrees.
Incorrect phase alignment between the main
loudspeakers and subwoofer causes a drop in the
frequency response of the whole system at the
crossover frequency. The graphs to the right (Fig. 1)
show the effect of phase difference to the frequency
response. The phase difference between the main
loudspeakers and subwoofer at the listening
position is dependent upon the position of the
subwoofer, so the phase adjustment should be done
only after the preferred position is found.
- 16-
How to use function
14, 15, 16 and 17
Incorrect frequency, polarity and phase alignment
between the main loudspeakers and subwoofer
causes a gap in the frequency response of the whole
system at the crossover frequency. The graph to the
right shows the effect of phase difference to the
frequency response. The phase difference between
the main loudspeakers and subwoofer at the
listening position is dependent upon the position of
the subwoofer, so the phase adjustment should be
done only after the preferred position has been
found.
To choose the right high-cut frequency is very
important but this is also depending on the setting
of polarity (function 16) and phase (function 17).
These setting should be done in this order:
Select polarity:
Normally "positive" is the right value but
depending on placement and equipment try find
the mode that gives the most bass energy (the
polarity change is equivalent to change the phase
by 180 degree).
1. Adjust the level of the bass to the equal level as
the front speaker bass level.
2. Switch between "Negative" and "Positive" and try
to find the mode that gives you most bass energy.
Select the slope:
Normally the 24dB/octave is the best value but set
the slope for the best sound balance between the
subwoofer and the main loudspeakers.
Select of frequency:
Select the frequency for the best sound balance
between the subwoofer and the main loudspeakers.
Select the phase:
Adjust the phase for the best sound balance
between the subwoofer and the main loudspeakers.
If you not are satisfied whit the setting repeat
iteratively the steps above again and again.
Function 18
One step = 0,021 ms or 0,719 cm
OUTPUT / Delay
Adjust the time delay.
Adjustable from 0 to-50ms or from 0 to
17,261 m
- 17-
How to use function
18
With the function OUTPUT /Delay you can store a
time delay.
Therefore you can perfectly adapt SUB AMP1 DSP
together with a subwoofer to your main speaker to
avoid time and phase problem.
1. Measure the distance between main speaker and
listening position.
2. Measure the distance between subwoofer and
listening position.
3. Set the difference between these values as delay.
If you not can delay the signal to the main speakers
avoid having longer distance to the subwoofer than
the main speaker.
Function 19 - 33
Function 19 - 33 contains the parametrical
equalizer.
The parametrical equalizer has 5 bands.
Each band has 3 functions.
1. Frequency
2. Amplitude
3. Q-factor
Each band contains 3 functions:
Function 19,20,21= PEQ 1
Function 22,23,24= PEQ 2
Function 25,26,27= PEQ 3
Function 28,29,30= PEQ 4
Function 31,32,33= PEQ 5
Symbolic picture
We only show PEQ 1; the other 4 bands work in
exactly the same way.
Function 19
One step = 1 Hz
PEQ 1 - Frequency
Frequency.
Select frequency.
You can select frequencies between 16 - 250 Hz.
Funktion 20
One step = 0.2/0.3dB
PEQ 1 - Amplitude
Amplitude.
Adjust amplitude (boost or cut).
You can select amplitudes between +12dB - -24dB.
- 18-
Function 21
One step = 0.1
Q-factor - See: Technical explanations.
PEQ 1 - Q Factor
Q-Factor.
Select Q-factor.
You can select Q-factor between 0.5 - 50
How to use Function
19-33
The parametrical equalizer is a precision tool to
achieve perfect sound balance. The parametrical
equalizer allows controlling over the centre
frequency,
bandwidth,
and
amplitudes
(parameters) of the bell filters. That makes it
possible to adjust the frequency response with very
high precision.
Dips and overshoots in the frequency response can
be compensated.
Example:
With a high Q-factor (narrow filters) you can cut
very narrow frequency band which can be used for
hum cancelling (50Hz).
In the parametric equalizer 3 parameters can be
adjusted:
1. Frequency
Measured in Hz.
2. Amplitude (boost or cut)
Measured in dB
3. Q-factor (filter bandwidth)
This refers to the width of the bell curve.
Frequency is measured in Hz (Herz) and decides
were in the spectra compensation can be done.
Range: 16-250Hz
Amplitude is measured in dB and decides how
much compensation should be done on a mode or
dip. A positive value is an amplification of the
signal. A negative value is a reduction of the signal.
Range: +12dB to -12dB
Q-Factor between 0.5 and 50 settles the width of
the peak or dip. A high value means a narrow
peak/dip and a low value means a wide peak/dip.
Function 34
BACKLIGHT AUTO-OFF
Choose if the LCD display should be on constantly
or be shut off after a certain time.
Choose between ON or Auto-off 1-30 minutes.
How to use Function
34
In ON mode the LCD display is on constantly.
In Auto-off mode the amplifier switched to standby
after the chosen time.
Choose between 1 to 30 minutes.
If you use any button the LCD display turns on
automatically.
Function 35
AMPLIFIER AUTO-OFF
Choose if the amplifier should be on constantly or
be shut off after a certain time.
Choose between ON or Auto-off 1-30 minutes.
- 19-
How to use Function
35
In ON mode the amplifier is on constantly.
In Auto-off mode the amplifier switched to standby
after the chosen time.
Choose between 1 to 30 minutes.
Function 36
REAL-TIME CLOCK
Adjust the clock.
How to use Function
36
Adjust the clock with "Function" and "Value"
buttons.
Function 37 - 46
PRESET
These functions handle the presets.
You can store different settings for different rooms,
choices of music, front system, surround system
etc. Then it’s very convenient to change the sound
character with different presets.
Recall (VALUE -) = Selects the stored setting.
Store (VALUE +) = Store the chosen setting.
How to use Function
37-46
If you want to store a setting:
Go to the preset that you want to store the setting.
Push the "VALUE +" button (store) to store the
setting.
If you want to restore a previously saved setting:
Go to preset you want to restore.
Push the "VALUE -" button (recall) to restore the
setting
All DSP setting can be stored in the presets.
After switching off and again on the subwoofer the
last used preset will be active.
PRESET 1 MUSIC
Suitible for music.
Preset 1 is special read-only setting which flattens
all equalizer bands and set up all the other
parameters to useful default values. If you have
done too many changes resulting in a bad sound
you can easily discard your setting by re-calling the
PRESET 1.
PRESETs 2 HOMECINEMA
Suitible for homecinema
Preset 2 and 3 are preinstalled
settings, but have no security for
PRESET 3 FLAT
Settings for deep bass and more energy in the overwriting.
higher bass area. Broad band settings fron 20100Hz
Preset 2 and 3 are two settings examples that you
can adapt to your needs. However as soon as you
overwrite them using “Store” they are lost.
PRESET 10 is a special preset with all filters
switched to off and equalizer flatten. It is used for
system measurement in full-band mode in the
factory. It is not recommended as a useful setting
and can be overwritten by user specific setting.
All remaining presets (4 – 9) are equal to the
PRESET 1, but only as long as you do not overwrite
them.
Be aware that with the PC-remote you can store the
internal subwoofer presets and any number of
additional settings in your computer. They can be
- 20-
re-called any time. Last recorded preset is shown in
function 1, to the left of the clock.
- 21-
Technical explanations
Slope
The slope is commonly used to describe the
steepness degree of the filter. A higher slope value
indicates a steeper filter.
Boundary
frequency/Cut off
frequency
Cut off frequency (fc) is the frequency either above
which or below which the power output of a circuit,
such as a line, amplifier, or filter, is reduced to ½ of
the pass band power.
Graphical equalizer
(GEQ)
An electronic or DSP equalizer that allows to
increase or decrease (boost or cut) signal amplitude
in a fixed number of frequency bands of an audio
equipment.
Parametric equalizer
(PEQ)
An electronic or DSP equalizer that allows control
over the centre frequency, bandwidth, and
amplitude of so called bell filters for precise
adjustment of the frequency response of an audio
equipment.
Q-factor
This is a so called quality factor which refers to the
width of the bell curve. The higher the Q-factor, the
narrower the bandwidth. A high Q means that only
a very narrow frequency range is affected, whereas
a low Q-factor affects more frequencies.
- 22-
Room modes
Room modes come from reflections in the room.
Sound directly from the speakers and sound
reflections forms a pattern in the room.
Same frequency in phase gives you room modes
Dip
If the frequency is in opposite phase, they will put
out each other and you get a dip.
- 23-
Technical specifications
Construction type
Amplifier Class AB
Dimensions
376 x 396 x 225 mm (HxWxD)
(22mm more with the feet)
Weight
18.5 kg/pcs
Connections
Gold plated RCA
XLR Balanced input
Speaker input: Banana plug/Pole screw
Speaker output: Banana plug/Pole screw
Power amplifier
300 W RMS in 4 ohm
400 W RMS in 2 ohm
PC-Remote
PC-Remote is software allowing you to control
SUB AMP 1 DSP from a PC, via the RS 232 port.
You can sit in listening position and do all settings.
The program is included in the price but you need
to download the newest software from www.xtz.se
Following setting is needed to get PC-Remote to
work,
Port: Com 1
Bits per second: 9600
Parity: None
Stop bits: 1
Flow control: None
If using a USB-> RS 232 converter, make sure the
port is changed to COM1.
- 24-
Service & support
Service
If you need service contact your local dealer.
You are always welcome to contact us if you have
problems
with
product
by
e-mail:
[email protected]
Webpage: www.xtz.se
Support
Please contact our “free-of-charge” support if you
need installation advice, or if any problems occur
during the installation.
Contact us by e-mail [email protected] and include
your phone number if you require help, and we will
ring you back.
- 25-
ALWAYS pack the product / part very
carefully. Unfortunately damages during
transportation are very common. If the
package is weak, the transporting
company does not compensate damages.
Always enclose a copy of the receipt and a
description of the defect.