1
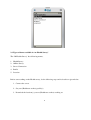
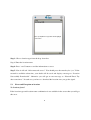
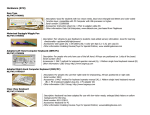
Usermanual for the
Real-Time Biosurveillance Program (RTBP)
Mobile Phone Health Data Collection Software
Application
IITM’s Rural Technology and Business Incubator (RTBI),
ESB #331, Indian Institute of Technology Madras (IITM), Chennai – 600 036
Website: www.rtbi.in
LIRNEasia*
12 Balcombe Place,
Colombo 8 Sri Lanka
Tel: +94 11 452 7647 Fax: +94 11 452 7648
E-mail: [email protected], Web site: www.lirneasia.net
The International Development Research Centre
1
Introduction
The Real-Time Biosurveillance Program (RTBP) is an m-Health pilot project aiming to answer
the question: “Can software program that analyze health statistics and mobile phone applications
that collect and report health information potentially be effective in the early detection,
intervention, and prevention of disease outbreaks?” This pilot aims to study the technology,
human, and policy predicaments in introducing the RTBP to Sri Lanka and India.
This document’s objective is to explain how to install and handle the Mobile Application
“Application Name” to the field healthcare workers.
1.1 Outline
The healthcare worker (ex.VHN or Suwacevo) has to carry the mobile phone with health
application installed, to the villages or health facilities at the time of health visit. They have to
fill the health survey form and send the data to the RTBP server through GPRS.
The application has two parts:
•
Local setting – Application has provision to store the local setting like healthcare workers
profile and their working location. First, the lookup values such as the location types,
health worker type, disease, symptom, and sign lists must be downloaded from the server
through GPRS.
•
Health survey – Healthcare worker has to fill the health survey form and sends data to
RTBP server. In case of problem in GPRS or signal, the form will store the data in the
mobile (persistence storage). Later after getting the signal, the healthcare worker has to
resend the stored data to RTBP server.
1.2
Features
The “Application Name” has following features, which enables the easy and efficient way of
usage to the healthcare workers.
2
•
The User Interface consists of J2ME GUI components like Forms, Buttons, Canvas,
Textbox, Text fields, Alert boxes and Lists.
•
User has the options to change the settings both locally and remotely.
•
Healthcare workers are provided to create, edit and delete their profiles and locations.
•
Single phone has the provision to create and access multiple healthcare workers profiles.
•
To save time from typing the values through keypad, popup menus are created.
•
Compared to WAP portal, this application takes less downloads and very less bandwidth.
2.
How to use this Application
Need to follow
•
Before you start survey please check whether the mobile have sufficient charge or not. If
not you have to charge your mobile and then take survey.
•
Make sure whether the signal is available when you start working on “Server
connection”, ”Profile”, ”Location”. Without signal you cannot work on these forms.
•
While doing “Download” do not press the cancel or exit button until you get
“Successfully download” message.
2.1 How to open our “Health Survey Form”
There are different ways to open the “M-Health Survey’.
1. Opening the application from Memory Card ( indicate ‘Choose’)
Menu Applications Memory Card RTBP Health Survey
3
2.2 Types of forms available in “m-Health Survey”
The “M-Health Survey” has following menus,
1. Health Survey
2. Offline Survey
3. Server Connection
4. Profile
5. Location
Before start working on the Health survey, do the following steps and its details are given below
1. Connect the server
2. Set your (Healthcare worker) profile(s)
3. Download the location(s) you are (Healthcare worker) working on
4
3. Server connection
3.1 Server connection Instruction
It is a simple process. Just select the “Server connection” menu from “m-Health Survey”. Now
the list will be downloaded automatically and you will get a status message as “Server connected
successfully”
3.2 Error and exception on Server connection
Network Error! Try after some times
Generally this error occurs when you are not having network coverage or GPRS failed. So please
try this process once you have proper network coverage.
4. Profile
4.1 Profile Menu Options
•
Save – To save the entered data to server
•
Reset – Clear the textbox, display a new form
•
Back – return back from the current form
5
4.2 Profile Instruction
Here you have to provide your personal details for the registration process. These instructions
will help you to fill up the profile page:
Step 1: Choose the “Profile” menu from the “m-Health Survey”
Step 2: The following fields are available in the profile and mandatory fields are marked with an
asterisk (*). If you leave these fields as blank then it will give you warning message as “Fill the
Required Values (*)”.
ID: (*) Here you have to type your Healthcare Worker’s ID.
Retype ID: (*) Here you should retype your Healthcare worker’s ID for confirmation. If the
6
“ID” and “Retype ID” values are not same, it will give you an error message as “ID is
mismatching”.
First Name: (*) Type your first name.
Last Name: Type your last name, if any. You can type your initial instead.
Type: (*) Here we have three options. i.e VHN, DDHN and Health Inspector from there
please choose one option. To Choose, Press the enter key and use down arrow to choose the
option and again press the enter key. Now the chosen option will display
Phone: Give your contact number. It is not mandatory.
E-Mail: Enter your email ID. It is also not mandatory.
Step 3: Now to “save” your record please press the left side first key, you will get 3 options
•
Save – Save the filled data to server
•
Reset – If you want to enter a new profile data press this option now all the profile for
fields are cleared and you will get a blank application
•
Back – If you want to skip from the current application press this option, your application
will be skipped and will display the “main form” window.
Step 4: Once you press the “save” It will ask “Allow network access?” You should press the
enter key for “yes”. If the network access is available at that time, your details will be saved and
it displays a message as “Successfully saved”. Otherwise you will get an error message as
“Network Error! Try after some time”. It means your data was not saved. In such case, you
have to give your information again, once you get the signal.
4.3 Error and Exception on Profile
Fill the Required Values (*)
Mandatory fields are marked with an asterisk (*). If you leave those fields as blank, it will give
7
you warning message as “Fill the Required Values”. To avoid this error you need to fill all the
mandatory fields.
ID is mismatching
If the “ID” and “Retype ID” values are not same then it gives you an error message as “ID is
mismatching”. To avoid this error, you need to give same value for ID and Retype ID fields.
Network Error! Try after some times
Generally this error occurs when you are not having network coverage or GPRS failed. So please
try this process once you have proper network coverage.
5.
Location
5.1 Location Menu options
•
Save – To save the entered data to server
•
Reset – Clear the textbox, display a new form
5.2 Location Instruction
Here you have to fill up your location type and location name To download your villages. E.g
location type = “HSC” and location name = “makibalanpatti”
Step 1: Choose the “Location” menu from our “m-Health Survey”
Step 2: It has two fields, there are
•
Location Type Location Name
8
Step 3: Choose location type from the drop down box.
Step 4: Enter the location name
Step 4: Press “send” button to send the information to server.
Step 5: Now it will ask “Allow network access?” You should press the enter key for “yes”. If the
network is available at that time, your details will be saved and display a message as “Location
Successfully Downloaded”. Otherwise you will get an error message as “Network Error! Try
after some times”. In such case, you have to download the location once you get the signal.
5.3
Error and Exception on location
No locations found
If the location type and location name combination is not available in the server then you will get
this error.
9
Fill the Required Values (*)
Mandatory fields are marked with an asterisk (*). If you leave those fields as blank, it will give
you warning message as “Fill the Required Values”. To avoid this error you need to fill all the
mandatory fields.
Network Error! Try after some times
Generally this error occurs when you are not having network coverage. So please try this process
once you have proper network coverage.
6. Health Survey
6.1 Health Survey Menu Option
Next – This option will be available on the first page of health survey and used to go to the next
page.
Update – Used to save the data to server.
6.2 Health Survey Instruction
Once the process on Profile, Location and server connection has been completed you can start
working on our health survey. The following picture shows our health survey details:
10
Fields available:
1. Date
2. Location
3. ID
4. Patient First Name
5. Last Name
6. Notes
7. Sex (*)
8. Age Group (*)
9. Search Disease
11
10. Disease
11. Symptoms (*)
12. Signs
13. Status
1. Date
Here it displays the patient symptom reporting date and time to health worker. By default it is set
to current date and time automatically. If you want to edit the field press the “enter” button to
place the cursor on that field and change the value and then press “save” button.
2. Location (*)
Here it will display the list of villages which you have downloaded already using the location
form. Here you cannot edit the village name. To choose a village press the enter button and now
it will display the options, using up or down arrow place the cursor on an option and again press
the enter button. Now the chosen village will be displayed.
3. ID
It displays the healthworker ID automatically here. You cannot edit it but should select the one
relevant to you.
4. Patient’s First Name (*)
Enter the Patient’s first name with their initial. This is optional if you need the health record
anonymous.
5. Patient’s Last Name
Enter the patient’s last name here; this field is not mandatory.
12
6. Note
This can be used to enter additional information about the patient
7. Gender (*)
Select the patient gender from the list. This field is a mandatory field. To choose a Sex press the
enter button and now it will display the options, using up or down arrow place the cursor on an
option and again press the enter button. Now the chosen Sex will be displayed.
8. Age Group (*)
Select the age group from the drop down list. This field is a mandatory field. To choose a Age
Group press the enter button and now it will display the options, using up or down arrow place
the cursor on an option and again press the enter button. Now the chosen Age Group will be
displayed.
The first page is completed here. To go to the next page please press the option button it will
display ‘next’ button, press that. Now you can see the next page.
9. Search Disease
If you enter the first letter of the disease, it will display a list of disease starts with that letter.
You can choose any one from this list. If the disease is not available in the list, you can use the
“others” option. .
10. Disease
You will get a result of your search here and please choose the disease from the drop down box.
To choose disease we have to use up and down scroll button and place the cursor on an option
and then press the enter button, then go to Symptoms option.
10.1 Others
If the disease is not available in the list, you can choose the “others” option from the disease
13
box and enter the disease name in the ‘search disease’ text box .
.10.2
Unknown
If you are not able to diagnosis the disease name of the patient, choose this “unknown” option
from the disease list box
11. Symptoms (*)
When you select a disease, the related symptoms will be displayed here. You can Add, Edit,
Delete the symptoms here. If you have not selected a disease from the list, then no symptoms
will be displayed here. You have to enter the symptoms.
12. Signs
When you select a disease, the related signs will be displayed here. You can Add, Edit, Delete
the signs here. If you have not selected a disease from the list, then no signs will be displayed
here. You have to enter the signs.
13. Status
This drop down box has three values such as Treated, Referred and Unknown. This field is not
14
a mandatory. To choose a status press the enter button and now it will display the options, using
up or down arrow place the cursor on an option and again press the enter button. Now the
Chosen status will be displayed. If you don’t know the case status then you can select
‘Unknown’ from the list.
Once you have filled the required fields, you can save the data. If there is no signal the data will
be stored in the “Offline Survey“form. While doing survey if you want to go back to the first
page from the current page press the option button and use back button.
6.3 Error and exception on Health Survey
Fill the Required Values (*)
Mandatory fields are marked with an asterisk (*). If you leave those fields as blank, it will give
you warning message as “Fill the Required Values”. To avoid this error you need to fill all the
mandatory fields.
7
Offline Survey
7.1 Offline Survey Instruction
If you do not have signal when doing survey, the data will be stored here. After getting the
signal, just press the “Offline Survey” form. Now the data will send to the server and the offline
survey form will be empty.
7.2 Error and exception on Offline Survey
Network Error! Try after some times
Generally this error occurs when you are not having network coverage. So please try this process
once you have proper network coverage.
15
8. Basic Instructions
8.1 Need to follow
Keep your mobile out of the reach of small children.
Do not use the options on Security code, PIN code and PUK code.
Keep the device dry, if your device does get wet, remove the battery, and allow the
device to dry completely before replacing it.
Do not drop, knock or shake the device. Rough handling can break internal circuit boards
and fine mechanics.
Do not use harsh chemicals, cleaning solvents or strong detergents to clean the device.
Don’t store the device in hot and dusty areas.
If the device is not working properly, report to the team immediately.
8.2 Install SIM card and battery
Always switch the device off and disconnect the charger before removing the battery.
Don’t change the battery. Always use original Nokia batteries.
The SIM card can be easily damaged by scratches or bending, so be careful when
handling, inserting, or removing the card
8.3 Charge the battery
Check the model of any charger before use with this device. This device is intended for
use when supplied with power from the AC-3 or AC-4 charger.
Do not leave a fully charged battery connected to a charger, since overcharging may
shorten its lifetime.
16
If the battery is completely discharged, it may take several minutes before the charging
indicator appears on the display or before any calls can be made.
8.4 Warning
User only batteries, chargers and enhancements approved by Nokia for use with this particular
model. The use of any other types may invalidate any approval or warranty, and may be
dangerous.
1. Connect the charger to wall socket
2. Connect the lead from the charger to the socket on the bottom of your device
If the battery is completely discharged, it may take a few minutes before the charging indicator
appears on the display or before any calls can be made.
The charging time depends on the charger used. Charging a BL-5c battery with the AC-3 charger
takes approximately 2 hours and 45 minutes while the device is in the standby mode.
8.5 Antenna
Your device has an internal antenna.
Note: As with any other radio-transmitting device, do not touch the antenna unnecessarily when
17
the device is switched on.
8.6 Keypad lock
To prevent accidental key presses, select Menu, and press * within 3.5 seconds to lock
the keypad.
To unlock the keypad, select Unlock, and press * within 15 seconds.
To answer a call when keygaurd is on, press the call key. When you end or reject the call,
keypad automatically locks.
8.7 Time and Date
To change the clock type, time, time zone and date setting, select Menu Settings Time and
Date Time Time, Date, Zone or Auto update of Date and Time
8.8 Your Device – Nokia 3110C
18
8.9 Switch the device on and off
To switch the device on or off, press and hold the power key.
The device may prompt you to set the time and date. Enter the local time, select the time zone of
your location in terms of the time difference with respect to Greenwich Mean Time (GMT), and
enter the date.
8.10 Display
19
8.11Indicators
This completes the User-Manual for our M-Health Survey Application. If any doubt, please
contact our team for further clarification.
20