1
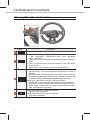
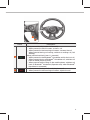
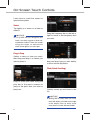
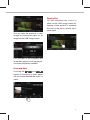
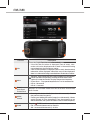
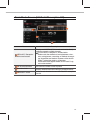
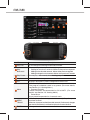
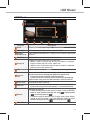
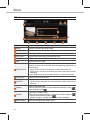
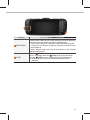
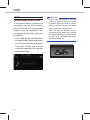
KIA Navigation System
QUICK REFERENCE GUIDE
B2END08
Thank you for purchasing this multimedia system.
•
This user’s manual explains how to use the KIA Motor multimedia system.
Before using the product, read the contents of this user’s manual carefully
and use this product safely.
• The screens shown in this manual may differ with the actual screens of the product.
• The design and specification of this product may change without prior notification for
product improvement.
• When transferring the vehicle to another individual, include this user’s manual so
that the next driver can continue its use.
Precaution for safe usage
•
•
•
•
•
•
•
•
•
•
Driving while distracted can result in a loss of vehicle control, that may lead to an accident, severe personal injury, and death. The driver’s primary responsibility is in the safe
and legal operation of a vehicle, and use of any handheld devices, other equipment, or
vehicle systems which take the driver’s eyes, attention and focus away from the safe
operation of a vehicle or which are not permissible by law should never be used during
operation of the vehicle.
Do not operate the multimedia system while driving.
Do not disassemble, assemble, or modify the multimedia system.
Do not watch the screen for prolonged periods of time while driving.
Set the volume to a level which allows the driver to be aware of external conditions.
Do not operate the multimedia system for prolonged periods of time with the vehicle ignition in ACC. Such operations may lead to battery discharge.
Be cautious not to spill water or introduce foreign objects into the device.
Do not cause severe shock to the device. Direct pressure onto the front side of the monitor may cause damage to the LCD or touch panel.
In case of product malfunction, please contact your place of purchase or service center.
When cleaning the touch screen, make sure to turn off the device and use a dry and
smooth cloth. Never use tough materials, chemical cloths, or solvents (alcohol, ammonia,
benzene, thinners, etc.) as such materials may damage the device panel or cause color
and quality deterioration.
WARNING
• Driving while distracted can result in a loss of vehicle control that may lead to
an accident, severe personal injury, and death. The driver’s primary responsibility is in the safe and legal operation of a vehicle, and use of any handheld
devices, other equipment, or vehicle systems which take the driver’s eyes,
attention and focus away from the safe operation of a vehicle or which are not
permissible by law should never be used during operation of the vehicle.
•
•
•
•
•
•
All Map Database cannot be copied without permission.
Important Notice: This is protected by U.S. copyright laws. All rights
not expressly granted are reserved.
You may not otherwise reproduce, modify, and distribute the content
without M&Soft, Inc's prior written consent.
SiriusXM service requires a subscription, sold separately, after 3-month trial
included with vehicle purchase. If you decide to continue your SiriusXM service at
the end of your trial subscription, the plan you choose will automatically renew and
bill at then-current rates until you call Sirius XM at 1-866-635-2349 to cancel. See
our Customer Agreement for complete terms at www.siriusxm.com. Programming
subject to change. Sirius satellite service is available only to those at least 18 and
older in the 48 contiguous USA, D.C., and PR (with coverage limitations). Traffic
information not available in all markets. See siriusxm.com/traffic for details. Sirius,
XM and all related marks and logos are trademarks of Sirius XM Radio Inc.
•
•
Infinity is a trademark of Harman International Industries, Inc.
®
®
At launch, the Apple iPhone will be the only UVO eServices compatible device. iPhone
is a registered trademark of Apple Inc. Apple iOS6 compatibility expected early 2013.
Additional compatible devices expected late 2013.
App Store is a service mark of Apple Inc. No charge for the UVO eServices app. App
runs on your smartphone cellular data service. Normal data rates will apply.
HD Radio™ and the HD Radio™ logo are proprietary trademarks of iBiquity Digital
Corporation.
24-hour Roadside Assistance is a service plan provided by Kia Motors America,
Inc. Certain limitations apply. Coverage details are available in the Kia Warranty and
Consumer Information Manual. For access to Enhanced Roadside Assistance, a connected mobile phone via Bluetooth within the cellular service coverage area is required.
Vehicle Diagnostics do not take the place of regularly scheduled maintenance. Feature
checks powertrain, chassis, and airbag systems only. For factory-recommended maintenance schedule, see the Maintenance Feature of UVO eServices or the Owner’s Manual.
911 Connect activates after an airbag deployment. Feature requires a connected mobile
phone via Bluetooth. Dependant on cellular service coverage.
The rear-camera display is not a substitute for proper and safe backing-up procedures. The
rear-camera display may not display every object behind the vehicle. Always drive safely and
use caution when backing up.
Table OF Contents
Table OF Contents..................................................................1
Controls and Functions........................................................2
On-Screen Touch Controls...............................................6
Setup ..................................................................................................8
Home Screen...............................................................................9
FM/AM...............................................................................................11
USB Music .....................................................................................17
USB Image ....................................................................................19
iPod .....................................................................................................20
AUX .....................................................................................................22
Bluetooth Audio..........................................................................23
My Music .........................................................................................24
Using Bluetooth..........................................................................26
Voice Recognition ....................................................................31
FAQ .....................................................................................................41
Navigation ......................................................................................44
Pandora Radio............................................................................63
SiriusXM Data .............................................................................64
1
Controls and Functions
Head Unit
Name
Description
RADIO
Converts to FM/AM/SiriusXM™ mode
• Each time the key is pressed, the mode is changed in order of
FM → AM → SiriusXM™ → FM
MEDIA
Converts to MEDIA mode
• If the media is not connected or is or CD player not available for
Model, Media mode will not be activated.
• Press this key to move to the last mode that you accessed in
Media. Press it once again to display the screen where you can
select a Media mode.
UVO
Displays the UVO mode
When key is pressed shortly. (under 0.8 seconds)
• FM/AM mode : plays previous/next frequency
• SiriusXM™ mode : plays the previous/next channel
• MEDIA (USB/iPod/My Music) modes : changes the track, file or
chapter (except USB Image and AUX)
When key is pressed and held. (over 0.8 seconds)
• FM/AM mode : continuously changes the frequency until the key
is released SiriusXM™ mode : continuously changes the channel
until the key is released and plays the current channel
• MEDIA (USB/iPod/My Music) modes : rewinds or fastforwards the
track or file (except USB Image, Bluetooth Audio and AUX)
MAP
VOICE
NAVI
2
VOICE Displays the map for the current position
Moves user to the menu screen where you can find your destination and
set the route.
Name
PHONE
INFO
SETUP
Description
Takes user to home phone screen
Displays the information mode
Displays the Setup mode
PWR/
VOL
• When power is off, press to turn power on
• When power is on, press and hold (over 0.8 seconds) to turn
power off
• When power is on, press shortly (under 0.8 seconds) to turn
Audio off
• Turn left/right to control volume
TUNE
• In FM/AM mode, changes the frequency
• In SiriusXM™ mode, changes the channel
• In USB, iPod, My Music modes, changes the track, file or chapter(except USB Image, Bluetooth Audio and AUX)
RESET
Resets the system settings. (Preset radio channels and other data
will not be deleted.)
SD Card insert slot
3
Controls and Functions
Steering Wheel Remote Controller
Name
VOLUME
MODE
Description
Controls the volume
• Each time this key is pressed, mode is changed in order of FM
→ AM → SiriusXM™ → USB Music or iPod → AUX → Bluetooth
Audio → My Music
• If the media is not connected, corresponding modes will be disabled
• Press and hold the key (over 0.8 seconds) to turn the Audio
system on/off
• When power is off, press the key to turn power back on
When keys are pressed shortly. (under 0.8 seconds)
• FM/AM mode : searches broadcast frequencies saved to
Presets
• SiriusXM mode : searches broadcast channels saved to Presets
• Media(MP3/USB/iPod/My Music) mode : changes the track, file
or chapter (except USB Image, Bluetooth Audio and AUX)
When keys are pressed and held. (over 0.8 seconds)
• FM/AM Mode : Automatically searches broadcast frequencies
• SiriusXM™ mode : automatically searches broadcast channels
• Media mode : Quickly looks up songs (excluding USB images,
AUX, and Bluetooth audio files)
When pressed shortly. (under 0.8 seconds)
• Activates voice recognition
When pressed and held. (over 0.8 seconds)
• Ends voice recognition
4
Name
Description
When pressed shortly. (under 1.2 seconds)
• When pressed in the dial screen, makes a call
• When pressed in the incoming call screen, answers the call
• When pressed during call waiting, switches to waiting call (Call
Waiting)
When pressed and held. (over 1.2®seconds)
• When pressed in the Bluetooth Handsfree, redials the last call
®
• When pressed during a Bluetooth Handsfree call, switches call
back to mobile phone (Private)
• When pressed while calling on the mobile phone, switches call
®
®
back to Bluetooth Handsfree (Operates only when Bluetooth
Handsfree is connected)
• When pressed during a call, ends the phone call
• When pressed in the incoming call screen, rejects the call
5
On-Screen Touch Controls
Learn how to touch the screen to
operate the system.
Select
Tap lightly on a menu or an item to
select it.
Drag the frequency bar to the left or
NOTICE
• The system will not recognize your
touch if you wear a glove or other nonconductive material. Touch the screen
using your finger, an electrostatic
touch-screen glove, or a stylus pen.
right to move to the frequency that
you want.
Drag & Drop
Select a menu or item you want,
then drag and drop it to where you
From the My Menu Settings screen,
want to place it.
drag and drop icons to add, delete,
or move to/from My Menu.
Flick (Quick Scrolling)
Drag or touch the slider along the
play bar in the music screens to
jump to the point that you want to
play from.
Quickly moves up and down in the
list.
NOTICE
• Moving the list when there are many
items will display a handler on the right
of the display. You can easily move
many items at a time with the handler
6
Zoom In/Out
You can maximize the size of a
photo on the USB Image screen by
tapping it twice quickly. To minimize
the size of the photo, quickly tap it
twice again.
You can view the previous or next
image by flicking left/right on an
image on the USB Image screen.
Flick left/right on the frequency bar
in the radio player to look up the previous/next frequency available.
Press and Hold
Pressing the
and
buttons in the music or video player
will fast forward/rewind the music or
video.
7
Setup
Setup is the screen to control system settings of the AVN.
To enter the screen, select the
Setup
key of the device or the
Setup
button in All menus.
[Option 1]
Features
Description
Voice
Provides the Guidance
Recognition and Priority settings.
Features
Description
Provides Normal/
Navigation Screen/Guidance/
Route/Safety Settings.
8
Sound
Provides the sound
control options for
Position, Bass, Mid,
Treble, Volume, Ratio
and Advanced settings.
Display
Provides the Adjust/
Mode settings.
Phone
Provides the Bluetooth
Connection/
Auto Download/
Auto Connection Priority/
Phone Ringtone/Audio
Streaming/System
Bluetooth Information
settings.
Clock
Provides the Time and
View settings.
Keyboard
Provides settings to
switch keyboard layouts.
Screen
Saver
Provides the Clock/
Image/None settings.
System
Info
Provides software and
storage space information.
Provides the Display
Display Off Off (touch activation)
function.
Home Screen
Controls Menu Configuration for the Home Screen
Features
Description
Navigation
Widget
• Provides a brief view of the navigation map and the route screen.
• Touch any area on the screen to move to the navigation screen.
AV Widget
• Shows brief information on the radio media currently playing.
• Touch the area to move to the mode for what you are listening to.
All Menu
Shows all of the items in the system menu.
POI Name
Directly moves to the screen where you can search for your destination.
My Menu
• You can add and save up to eight menu items.
• Add your favorite menu items to have quick and easy access to them.
Information Display on the Status Bar
Displays the date and time, along with the system status shown by the various
icons to the right of the clock.
The icons in the following table indicate the various types of system status
details and events.
AV-Mute
Navigation-Mute
Making a call and Bluetooth connection
ICON
Navogation Bluetooth phone HF
Description Mute AV sound Mute
sound
remaining battery connection
Making a call
Bluetooth phone
using BT phone reception sensitivity
ICON
Description
Connecting to
music stream
ICON
Description
HF+
streaming
connection
Mute Bluetooth
phone microphone
ICON
Description
Downloading
contacts/
recent calls
9
Home Screen
Adding Your Favorite Menu Items
to My Menu
From the Home screen, select
My Menu ▶and then Edit .
From the My Menu Settings screen,
select menu items from the list on
the right, then drag and drop them to
a desired place on the left.
On the other hand, if you drag items
from the left and drop them on the
right, they will be deleted from My
Menu instead.
i Information
• Up to eight items can be added to My
Menu.
10
FM/AM
Accessing FM/AM Mode
You can access the radio player either by pressing the Radio hard key or by
selecting the Radio menu option from All Menus on the Home screen.
i Information
• If you press the Radio hard key when the power is off, then the power will turn on and a
radio broadcast will be tuned up.
• If you are in the FM/AM mode, select the FM/AM radio widget from the Home screen to
access the radio player.
Features
Description
Mode Display
• Displays currently operating mode
• If select wanted mode tap, it will change to selected mode in Radio.
Preset
• Shows saved presets for user selection
• After selecting frequency → press and hold (over 0.8 seconds) the preset button. A 'beep' will sound and the frequency is saved to the selected preset button.
A total of 24 frequencies with 12 preset frequencies each
for FM/AM modes can be saved.
Frequency
Bar
• Flick the frequency bar left/right to search for available radio
channels to the left or right of the current channel.
• Dragging: Drag the frequency bar to the left/right to find the
radio channel that you want.
Frequency
Displays the current frequency
Broadcast
station
Displays the current broadcast station name.
Scan
Plays frequencies with superior reception for 5 seconds each
HD Radio™
on/off
Used to set whether to turn HD Radio™ reception On/Off.
11
FM/AM
Features
12
Description
Info
Turns the Radio Text information on and off
• If the ON Text On button is displayed (Text off state), information will not be displayed even if there is information being
transmitted from the broadcast station.
• If the Off Text Off button is displayed (Text on state), then broadcast
information will be displayed. Information may not be displayed if
there is no information being transmitted from the broadcast station.
Menu
• Autostore - Saves frequencies with superior reception to Preset buttons
While Auto Store is operating, pressing the Auto Store button
again will cancel the function and play the previous frequency.
• Preset Scan - Plays preset frequencies for 5 or 10 secodes each
• HD on : 10 seconds
• HD off : 5 seconds
Scan/
Auto Scan/
Preset Scan
Displays an activated mode from the Scan/Auto Scan/Preset
Scan modes.
SEEK/
TRACK
• Pressing this button briefly (less than 0.8 seconds) : Seeks
the previous/next frequency.
• Pressing and holding this button (longer than 0.8 seconds) : Moves
quickly through all of the frequencies. From the moment that you
release the button, the system will seek the next available frequency.
TUNE
Turn the TUNE knob to manually seek available frequencies.
• FM : Increment/decrement by 200 kHz
• AM : Increment/decrement by 10 kHz
Basic Mode Screen (HD Radio™ reception ON)
Name
HDRadio™ Reception
&Channel buttons
Description
Displays main HD Radio™ channels and used to directly
select the currently available channels
As HD Radio™ reception is included within
Radio mode, the methods of moving between channels, saving presets, searching, or methods of searching frequencies are identical. However, while the HD
Radio™ related icon display will become
active when within regions where an HD Radio™ signal can be received.
HD Channel Number
HD Channel number saved in preset
Broadcast Info
Displays detailed information about the current broadcast
HDRadio™ on/off
Used to set whether to turn HD Radio™ reception
On/Off.
13
FM/AM
SiriusXM™ Mode
SiriusXM™ Mode Hard Key Controls
You can access the radio player either by pressing the Radio hard key or by
selecting the Radio menu option from All Menus on the Home screen. Select
the SiriusXM™ tab from the radio player.
i Information
• If you press the Radio hard key when the power is off, then the power will turn on and a
radio broadcast will be tuned up.
• If you are in the SiriusXM™ mode, select the SiriusXM™ radio widget from the Home
screen to access the radio player.
• When the power is off, pressing the Radio key will turn the power on and play a
SiriusXM™ Radio broadcast.
14
SiriusXM™ Mode Display Controls
Features
Description
Mode Display
Displays currently operating mode.
If select wanted mode tap, it will change to selected mode in Radio.
Preset
Shows saved presets for user selection
After selecting frequency → press and hold (over 0.8 seconds)
the preset button. A 'beep' will sound and the frequency is
saved to the selected preset button.
A total of 18 frequencies for SiriusXM™ modes can be saved.
Channel Logo
Displays the current channel logo
Channel Info
Displays the current channel number and name
Contents Info
Displays the artist, title and other informationabout the current
playing song
Category Info
Displays the current playing category
Scan
Plays all receivable channels for 10 seconds each
Direct Tune
Used to search for channels by entering channel numbers
Category
If you press Category, when search channels through SEEK,
Tune and Scan, search it in the current category.
Category
Selection
Buttons
Used to select the previous/next category
15
FM/AM
Features
16
Description
Play Live
It will change to listening live broadcast mode.
Skip
Backward
Repeats the previously broadcasted program.
• Holding for less than 2 seconds: Moves to the previous segment.
• Holding for less than 0.8 seconds : Moves to the previous segment
• Holding for longer than 0.8 seconds: Moves to the previous 5 seconds
Play Pause
Pauses/plays the currently broadcasting program.
Skip Forward
Moves to the next segment.
List
Displays SiriusXM™ Radio Categories/Channel Lists
Menu
What’s on My Preset?
The program schedule saved in my preset. (For more details,
see Section 2.5. Viewing Menu.)
• Featured Favorite
Theme channels recommended by SiriusXM™. (For more
details, see Section 2.5. Viewing Menu.)
• Preset Scan
Plays preset frequencies for 5 seconds each.
SEEK/
TRACK
When key is pressed shortly.(under 0.8 seconds) Plays the previous/next channel
When key is pressed and held.(over 0.8 seconds) Continuously changes
the channel until the key is released and plays the current channel
TUNE
Changes the channel
USB Music
USB Music
Features
Description
Mode
Displays currently operating mode
File Index
Shows the current file/total files within the USB
Repeat/
Shuffle/Scan
From Repeat/Shuffle/Scan, displays the currently operating
function
Play Time
Displays the current play time/total play time
Song Info
Displays the information of the current track
• When a track in the file tab on the list screen is selected :
Displays folder, file, title, artist, album info
• When a track in the other tabs on the list screen is selected :
Displays artist, title, album info
List
Moves to the list screen
Previous
File
If press button short (less than 0.8 seconds) : Moves to the previous file or
play the current file from the beginning (Depends on the play time)
• If play time is less than 3 seconds, moves to previous file
• If play time is over than 3 seconds, play the current file from the beginning
If press button long (over than 0.8 seconds) it rewinds the track
Play/Pause
Plays/pauses the current file
Next File
• If press button short (less than 0.8 seconds) : Moves to the next file
• If press button long (over than 0.8 seconds) : It fast-forwards the track
Repeat
Repeats the current file
• If select the song in the file tab on the list screen : Press the REPEAT
, repeating folder
button to switch between repeating one song
, and turning repeat off
• If select the song in the other tabs (Playlist, Artist, Song, Album,
Genre) on the list screen : Press the REPEAT button to switch
and turning repeat off
between repeating one song
Back Button
Converts to basic mode screen
17
USB Music
Features
Description
Plays files in random order
• If select the song in the file tab on the list screen : Press the
, Shuffle All
SHUFFLE button to switch between Shuffle Folder
Shuffle
, and turning shuffle off
• If select the song in the other tabs (Playlist, Artist, Song, Album, Genre)
on the list screen : Press the SHUFFLE button to switch between Shuffle
and turning shuffle off
Category
Scan
Scans the beginning parts of USB files (approx. 10seconds per file)
• If select the song in the file tab on the list screen : Press the SCAN button to switch
, Scan All
, and turning scan off
between Scan Folder
• If select the song in the other tabs (Playlist, Artist, Song, Album, Genre)
on the list screen : Press the SCAN button to switch between Scan cateand turning scan off
gory
Menu
• Add to Playlist : Add the current track to the Playlist Playlist is placed on the
left tab in the list
• Save to My Music:You can save the current track to My Music.You can play saved
track from My Music without USB. Access to My Music in the Media mode.
If press button short (less than 0.8 seconds) moves to previous/next file
or play the current track from the beginning
SEEK/
• If play time is less than 3 seconds, moves to previous/next file
TRACK
• If play time is over than 3 seconds, play the current file from the beginning
If press button long (over than 0.8 seconds) it will rewind/fast-forward the track
TUNE
18
TUNE knob to search a desired track. If the desired track is
Turn the
displayed, press the TUNE knob to play the track.
USB Image
USB Image
Features
Description
Mode
Displays currently operating mode
Folder Name
Displays folder name where image is located
File Index
Shows the current file/total files within the USB
Slideshow
images as slideshow in 5, 10, 20, 30 second intervals
Rotate
Rotate image in clockwise direction
Save Image
image as frame screen displayed when the system power is
turned off
Info
Shows the file name, resolution and file type of current image
Adjust Image
Size
Enlarge/reduce (zoom-in/zoom-out) image size
List
Moves to the list screen
Previous/
Next Image,
Enlarge/
Reduce Image
• Swipe image left or right to see previous/next image
• Maximum Image : Touch the screen twice quickly
• Minimum Image : Touch the maximum screen twice quickly
19
iPod
iPod
Features
Description
Mode
Displays currently operating mode
Song Index
Shows the current song/total songs
Repeat/Shuffle From Repeat/Shuffle, displays the currently operating function
20
Play Time
Displays the current play time/total play time
Song Info
Displays the artist/song title/album info
List
Moves to the list screen
Previous File
If press button short (less than 0.8 seconds) : Moves to the previous file or play the current file from the beginning (Depends on
the play time)
• If play time is less than 3 seconds, moves to previous file
• If play time is over than 3 seconds, play the current file from the
beginning
If press button long (over than 0.8 seconds) it rewinds the track.
Play/Pause
Plays/pauses the current file
Next File
• If press button short(less than 0.8 seconds), Moves to the next file
• If press button long(over than 0.8 seconds), it does fast-forward
the track.
Repeat
Repeats the current file
Press the REPEAT button to switch between repeating 1 track
and turning repeat off
Shuffle
Plays files in random order
When pressing shuffle button, it changes to shuffle category
→ deactivate shuffle then repeat
• Shuffle Category : Shuffle song in the current category
Back Button
Move to home/previous mode screen
,
Features
Description
SEEK/TRACK
If press button short (less than 0.8 seconds) moves to previous/
next file or play the current song from the beginning
• If play time is less than 3 seconds, moves to previous/next file
• If play time is over than 3 seconds, plays the current file from
the beginning
If press button long (over than 0.8 seconds) it will rewind/
fast-forward the track
TUNE
TUNE knob to search a desired track. If the desired
Turn the
track is displayed, press the TUNE knob to play the track.
If the TUNE knob is not pressed within 5 seconds of
searching tracks, the track info for the current track is
restored.
21
AUX
AUX
Connecting an External Device
If an external device connector is
connected with the AUX terminal,
then AUX mode will automatically
operate. Once the connector is disconnected, the previous mode will
be restored.
• AUX mode can be used only when
an external audio player (camcorder,
car VCR, etc.) has been conne cted.
• The AUX volume can also be
controlled separately through the
connected device.
22
NOTICE
• If only cable connected to the AUX
without an external device, the mode
changed to AUX, but noise may occur.
When an external device is not being
used, remove the connector jack.
• When the external device power is
connected to the power jack, playing
the external device may output noise.
In such cases, disconnect the power
connection before use.
Bluetooth Audio
Bluetooth Audio
Features
Description
Mode
Displays currently operating mode
Phone Name
Displays name of connected phone
Artist Info
Name of current artist
Title
Name of current song
Previous
File
• If play time is less than 3 seconds, moves to the previous file
• If play time is over than 3 seconds, plays the current file from
the beginning
This function may differ depending on the model of mobile phone
Play/Pause
Plays/Pauses Bluetooth Audio
Next File
Moves to the next file
Connections
Moves to the Bluetooth Settings screen. You can pair a new
device or change/delete paired device(s)
SEEK/TRACK
Plays the previous/next file
TUNE is not supported.
TUNE
i Information
•
Artist info
and
Title
may not supported by mobile phone
23
My Music
My Music
Features
Description
Mode
Displays currently operating mode
File Index
Shows the current file/total files
Repeat/Shuffle/ From Repeat/Shuffle/Scan, displays the currently operating funcScan
tion
24
Play Time
Displays the current play time/total play time
Song Info
Displays track/artist/title/album info
• If select the song in the file tab on the list screen : Displays File,
artist, title, album info
• If select the song in the other tabs on the list screen : Displays
artist, title, album info
List
Moves to the list screen
Previous File
If press button short (less than 0.8 seconds) : Moves to the previous file or play the current file from the beginning (Depends on
the play time)
• If play time is less than 3 seconds, moves to previous file
• If play time is over than 3 seconds, play the current file from
the beginning
If press button long (over than 0.8 seconds) it rewinds the track
Play/Pause
Plays/pauses the current file
Next File
• If press button short (less than 0.8 seconds) : Moves to the next file
• If press button long (over than 0.8 seconds) it will fast-forward the file
Repeat
Repeats the current file
• If select the song in the file tab on the list screen : Press the
REPEAT button to switch between repeating one song
.
and turning repeat off
• If select the song in the other tabs (Playlist, Artist, Song,
Album, Genre) on the list screen : Press the REPEAT button
and repeating one
to switch between repeating category
and repeating category
song
Features
Description
Shuffle
Plays files in random order
• If select the song in the file tab on the list screen : Press the SHUFFLE
and turning shuffle off
button to switch between shuffle
• If select the song in the other tabs (Playlist, Artist, Song, Album,
Genre) on the list screen : Press the SHUFFLE button to switch
and turning shuffle off
between shuffle
Scan
Scans the beginning parts of USB files (approx. 10seconds per file)
• If select the song in the file tab on the list screen : Press the SCAN
and turning scan off
button to switch between scan
• If select the song in the other tabs (Playlist, Artist, Song, Album,
Genre) on the list screen : Press the SCAN button to switch
and turning scan off
between scan
Menu
• Add to Playlist: Adds the current song to the Playlist
Playlist is placed on the left tab in the list
• Delete Current File: Deletes the current track from My Music.
SEEK/
TRACK
If press button short (less than 0.8 seconds) moves to previous/next
file or play the current song from the beginning
• If play time is less than 3 seconds, moves to previous/next file
• If play time is over than 3 seconds, plays the current file from the beginning
If press button long (over than 0.8 seconds) it will rewind/fast-forward the track
TUNE
TUNE knob to search a desired track. If the desired track
Turn the
is displayed, press the TUNE knob to play the track.
If the TUNE knob is not pressed within 5 seconds of searching
tracks, the track info for the current track is restored.
25
Using Bluetooth
Bluetooth
Connection
Pairing a New Device
Before you can use the Bluetooth
feature, you must first pair/connect
your mobile phone to your car.
The default passkey is 0000.
Up to 5 Bluetooth devices can be
The device name above is an exam-
paired.
ple. Check the actual information on
Only one Bluetooth device can be
the product.
connected at a time.
Connecting Bluetooth
Devices
Pairing a New Device by Selecting
Phone/Call
Connects the Bluetooth devices that
Select
you add.
PHONE
in the head unit or
in the steering wheel remote
control. ▶ Select YES . ▶ Pair your
car after your mobile phone detects
the Bluetooth device. ▶ Enter the
passkey or accept the authorization
popup. ▶ Connect Bluetooth.
Pairing a New Device Through the
Phone Settings
Select
Select
SETUP
Phone
in the head unit. ▶
. ▶ Select
. ▶ Select
▶
. Pair your car after
Bluetooth Connection
Add New Device
your mobile phone detects the
Bluetooth device. ▶ Enter the
passkey or accept the authorization
popup. ▶ Connect Bluetooth.
26
Connecting Devices by Selecting
Phone/Call
Select
PHONE
in the head unit or
in the steering wheel remote
control. ▶ Select the name of the
device to connect. ▶ Connect
Bluetooth.
Connecting Devices Through the
Phone Settings
in the head unit. ▶
. ▶ Select
Bluetooth Connection . ▶ Select the
Select
Select
Name
Description
Keypad
Use the keypad to
enter the phone
number that you
want to call. Press
and hold the last
number of a speed
dial to dial a number
that you added to the
Speed Dial list in the
phone
Delete
Delete the numbers
that you entered.
SETUP
Phone
name of the device to connect. ▶
Connect Bluetooth.
Moves to a screen for
Connections making a Bluetooth
connection.
Call
Dial
Dials a call after the Bluetooth
devices are connected.
• Select
PHONE
Makes a call after
you dial a number
and select CALL. If
the number is listed
in Dialed Calls, you
can select the number and press CALL
to automatically dial
that number again.
in the head unit or
in the steering wheel
remote control. Select
All Menus
from the full screen display ▶
Phone .
Information
• Some types of mobile phones may not
support the Speed Dial function.
27
Using Bluetooth
Using the Menu
During a Phone Call
When making a call, you can use
the following menu items.
28
Name
Description
Use Private
Switches a voice
call from the car
hands-free to the
mobile phone.
End
Ends a call.
Contacts
Displays the
Contacts list.
Outgoing
Volume
Displays the Mic
Volume settings. You
can adjust the in-call
volume that the
other party hears
(level 1 - 5).
Keypad
Moves to a screen for
entering ARS numbers.
Switch
Switches to a call
on hold, if any. You
can also switch
calls by selecting
the number in the
Information Display.
The Switch function
switches the current
call to a waiting call
in order to answer a
new incoming call.
Call History
Select
then
PHONE
Call History
in the head unit ▶ and
.
Name
Description
Received
Calls
Lists the calls that you
have received.
Dialed
Calls
Lists the calls that you
made.
Missed
Calls
Lists the calls you
missed.
Displays all of your
call histor y. Select
Call History
from the list to dial the
number.
Displays the details of
Information your call history information.
Download
Downloads the call history information from
your mobile phone.
Delete
Items
Deletes the items
that you select from
your Call History
Information.
Delete All
Deletes all of the
items from your Call
History Information.
Call
Dials the selected
number in your Call
History Information.
Contact
Info
Goes to the Contact
Information screen if
the number has been
stored.
Delete
Deletes your call
history information.
29
Using Bluetooth
Contacts
Select
PHONE
and then
Favorites
in the head unit ▶
Select
PHONE
and then
Contacts
in the head unit ▶
Favorites
Name
.
Description
Lists the phone numbers
saved as Favorites. Select
Favorites
from the list to dial the number.
Name
Description
The list of Contacts.
Contacts List Select from the list to
dial the number.
30
Information
Displays contact information.
Download
Downloads
contacts from your
mobile phone.
Search by
Name
Searches Contacts
for the name that you
enter.
Search by
Number
Searches Contacts
for the number that
you enter.
Add to
Favorites
Adds a phone number to Favorites.
Add New
Adds a new number to
Favorites.
Delete
Items
Deletes numbers
that you select from
Favorites.
Delete
All
Deletes all of the numbers
from Favorites.
Voice Recognition
Precautions Required
for Successful Voice
Recognition
6. In the following cases voice recognition will be affected by ambient noise.
1) The sound of the wind if any
1. Voice recognition supports only
the commands that are displayed
on the screen and written in the
User’s Guide.
2. To ensure the correct recognition
and execution of your command,
say your command when you hear
the beep after a voice prompt.
3. Voice recognition automatically
ends if:
window or the sun roof is
open.
2) A strong wind blowing from
the air vents. Set climate control to blow softer than level 3.
3) Vibrations from passing
through a tunnel.
4) Vibrations from driving on an
uneven road.
5) Storms and heavy rain.
1) A call is incoming or outgoing
2) A media (USB or iPod, etc.) is
connected or disconnected
3) The front or rear view camera
is operated (optional)
4) The car engine starts or stops
5) A system key, such as
Radio or Media is selected
6) An emergency occurs, for
example re-searching for the
route after the navigation
route has been lost
4. The microphone that recognizes
your voice is located over the
head part in the driver’s seat.
To make your commands better understood, keep your body
straight in the driver’s seat when
speaking the command.
5. Speaking naturally and clearly will
ensure better recognition of your
voice commands.
31
Voice Recognition
Starting/Ending
and Setting Voice
Recognition
Starting Voice
Recognition
Press the
key briefly (less
than 0.8 seconds) on the steering
wheel remote control to activate
voice recognition.
32
Ending Voice Recognition
1. Select “Exit” to the left of the bottom to end voice recognition.
2. Press and hold (over 0.8 secon the steering
onds) the
wheel remote control to end voice
recognition.
Skipping Prompt
Messages
When you hear the prompt message, lightly touch the voice recognition icon on the steering wheel
remote control to skip the message
and go directly to standby mode to
say your command.
This results in faster operation when
you feel the message is too long or
you already know the command to
use.
33
Voice Recognition
Voice Recognition Screen Overview
Start Screen
Name
Most frequently
used commands
Displays the six most frequently used commands.
Not available
command
Displays commands that are not available due to a failure
in meeting the conditions for using them and thus need
additional settings. The conditions required for using them
will be described briefly under each command.
Voice recognition
status icons
34
Description
Standby
Voice guidance
Voice command process
User's speaking
volume being
recognized
Displays the voice command volume in real time.
Recognized
results
Displays the voice recognition result.
Help button
Displays all available help commands in a tree format.
Exit button
Ends the voice recognition.
Voice Commands
Types of Commands
Voice recognition commands are classified as “Global Commands
“ and “Local Commands.”
1. Global Commands ( ): Commands that can be used immediately after activating voice recognition.
2. Local Commands (◯): Commands that can be used when a multimedia,
navigation, or Bluetooth call is running, or displayed on the screen, after
activating voice recognition.
Phone Commands
* Check the following before using call commands :
1. Voice commands related to phone calls can be used after connecting the
Bluetooth device.
2. To call a person, for example “Call <John Smith>” whose name is listed in
Contacts, you must first download the Contacts list. For details on downloading contacts, see “Part 3. Using Bluetooth > Chapter 3. Bluetooth Phone
> 3.6 Contacts”.
3. After downloading the Bluetooth contacts, it will take some time to convert
the Contacts into voice data during which time you cannot make a call by
name yet. The time takes to convert voice data may vary depending on the
number of Contacts downloaded.
35
Voice Recognition
Command
Operation
Call
Displays downloaded Contacts, after this you can make a call
by saying the name.
Call <Name>
You can directly call a person by <Name> in the downloaded
Contacts.
You can call a person directly <Name> to the number that is
Call <Name>
saved as "Mobile" in the downloaded Contacts.
on Mobile
e.g.) Call “John Smith” on Mobile
You can call a person directly <Name> to the number that is
Call <Name>
saved as "Office" in the downloaded Contacts.
in Office
e.g.) Call “John Smith” in Office
You can call a person directly <Name> to the number that is
Call <Name>
saved as “Home” in the downloaded Contacts.
at Home
e.g.) Call “John Smith” at Home
You can call a person directly <Name> to the number that is
Call <Name> saved as other than “Mobile, Home, or Office” in the downon Other
loaded Contacts.
e.g.) Call “John Smith” on Other
36
Dial Number
Displays a screen where you can say a phone number to dial.
Dial
<Phone #>
You can directly say the number to call.
e.g.) Dial 111 555 1234
Redial
Directly calls at the number that you last dialed.
Call History
Displays your Call History, where you can say the list number
to make a call.
Navigation Commands
* Check the following before you use navigation commands :
1. Search for and find addresses located in the state or province your car is
currently in.
If you want to search in another state, say the name of state/province and
then look it up.
Find Address is classified by states/provinces to provide you with faster service.
2. Some commands such as “Cancel Route” are available only when the destination is fixed.
Command
Find Address in
<State>
Find Address
Operation
• Finds the address in <State> and sets it as the destination.
e.g.) Find Address in California
• To find an address, you should say “House Number →
Street → City” (in order, excluding the state).
e.g.) 300 (Three Zero Zero) Main Street, Almond
Finds the address and sets it as the destination.
Find the Nearest Find the nearest points of interest from your current location.
After this command, you can find the name of a location step-by-step.
POI
Find the Nearest Immediately finds <Category> nearest to your current location.
For details of <Category>, see “5-8. List of Nearest Locations”.
<Category>
e.g.) Find the Nearest “Bank”
POIs Near
Destination
Finds POIs near the destination.
After this command, you can find the name of a location step-by-step.
Finds <Category> nea r the destination.
<Category>
For details of <Category>, see Owner’s Manual, “5-8. List of
Near Destination Nearest Locations” e.g.) “Bank” Near Destination
Map
Moves to the current position on the navigation map
Previous Points
Displays a list combining Previous Destinations, Previous
Searches, and Previous Starting Points all together.
You can then set a destination by saying the list number.
Previous
Destinations
Displays a list of recent destinations that you can return to
by saying the number in the list.
Previous
Searches
Displays a list of recent searches, where you can set a destination by saying the number in the list.
Previous
Starting Points
Displays a list of recent starting points that you can return to by
saying the number in the list.
Traffic
Information
Moves to the Traffic Information menu screen.
Go Home
Set the destination to your home.
Your home must first be set in the navigation system.
Go to Office
Set the destination to your office/work.
Your office/work must first be set in the navigation system.
37
Voice Recognition
Command
Operation
Turn Guidance On
Turns on the voice guidance system.
Turn Guidance Off
Turns off the voice guidance system.
Zoom All the Way Out Zooms in on the navigation map to the fullest.
Zoom All the Way In
Zooms out from the navigation map to the fullest.
Cancel Route
Cancels the route to the fixed destination and exits
guidance.
Destination
Information
Tells you the remaining distance and time to your destination.
Route Options
Restarts the route to your destination.You can then
select either “Faster Time” or “Shorter Distance”.
Find Faster Time
Route
Starts a new route to your destination that will take the
least amount of time.
Find Shorter Distance Starts a new route to your destination that will use the
Route
shortest distance.
38
Emergency Services
Displays a list of nearest Police Station, Hospital,
Dealership, or Road Assistance.
You can then set a destination by saying the list number.
Police Station
Displays a list of the nearest police stations.
You can then set a destination by saying the list number.
Hospital
Displays a list of the nearest hospitals.
You can then set a destination by saying the list number.
Dealership
Displays a list of the nearest car dealerships.
You can then set a destination by saying the list number.
Road Assistance
Displays a list of the nearest road assistance locations.
You can then set a destination by saying the list number.
Show Route
Displays a map overview of the entire route to your
destination.
Radio Commands
Command
Operation
Radio
Plays the most recent radio channels from FM, AM, and SiriusXM™.
FM
Plays FM radio.
FM
<87.5~107.9>
Tunes to FM <Frequency> according to what you say.
e.g.) FM 87.5: FM eighty seven point five
SiriusXM™
Plays SiriusXM™ radio.
SiriusXM™
Channel
<0~999>
Tunes to SiriusXM™ Channel <Channel Number> according
to what you say.
e.g.) SiriusXM™ Channel 23: SiriusXM™ Channel twenty three
AM
Plays AM radio.
AM <530~1710>
Tunes to AM <Frequency> according to what you say.
e.g.) AM 530: AM five thirty
◯
Preset <1~18>
Tunes to your preset stations (1 to 18).
◯
Channel
<0~999>
In SiriusXM™ Radio mode, turns on the <Channel Number>
that you say.
Media Commands
* Check the followings before you use media commands.
1. If no media is connected or if no playable files exist at the time when you use these
commands, a voice message will tell you that this is not available at present.
2. If you say the name of the media that is currently playing again, then that
media will continue playing. e.g.) Saying “USB” while USB content is playing.
Command
Operation
Media
Continues the last media you played.
This command includes images.
Music
Continues the last media you played.
This command does not include images.
iPod
Plays the iPod currently connected. This will work the same when an iPhone is
connected. If a USB is connected, then it will be played instead of the iPod.
USB
Plays the music on the USB currently connected.
If an iPod is connected, then the iPod will be played instead of the USB.
Bluetooth Plays the music on the Bluetooth phone currently connected.
This may not be supported depending on the Bluetooth connection status.
Audio
AUX
Plays external devices that are currently connected.
My Music Plays My Music files stored in the system.
Pandora
Radio
Plays Pandora Radio that is currently connected.Pandora Radio
operates according to the iPod currently connected.
39
Voice Recognition
3. Bluetooth Audio / AUX Command
• Bluetooth Audio supports different functions according to connected devices,
therefore some commands are unavailable, including Play, Stop, Previous
Song, and Next Song.
• For external devices (AUX) and some commands are unavailable, including
Play, Stop, Previous, and Next.
Other Commands List
(Commands used in List / Help)
Command
Operation
Help
Moves to the voice recognition help screen.
All available commands can then be identified and used.
◯
Line 1~5
(One~Five)
When you cannot select a certain name, such as in Call
History, you can select it using numbers.
Simple numbers can be recognized, such as “One” or “Two."
◯
Yes / No
When voice recognition is activated, this command is used when
an answer is requested for a confirmation question.
Manual Input
When Dial or POI Name search results are displayed, this command is used to search manually, rather than to search with a
voice command.
Voice recognition stops after this command is used.
◯
40
FAQ
About Pairing Mobile Phones
Q
I cannot pair my mobile phone, what is the cause?
A
Check to see that the mobile phone supports Bluetooth function. If your
®
®
phone is a Bluetooth phone, then check to see whether the Bluetooth
setting within your phone has been set to ‘Hidden’. If the device is set to
hidden, please un-hide the device (set to unhidden state).
Q
What is the difference between pairing a mobile phone and connecting a
mobile phone?
A
Pairing occurs through authenticating the head unit and mobile phone.
Mobile phones paired to the head unit can be connected and disconnected
until the paired mobile phone is deleted from the system. Bluetooth
®
Handsfree features, such as making/answering calls or managing
Contacts, are supported only in mobile phones connected with the head
unit.
Q
What is a Passkey?
A
A passkey is the password used to authenticate the connection between
the head unit and mobile phone. The passkey only needs to be entered
once when pairing the mobile phone for the first time.
The initial passkey is 0000. The passkey can be changed by pressing
SETUP ▶ Phone ▶ Bluetooth System Info ▶ Passkey menu.
41
FAQ
About Making/Answering Phone Calls
Q
How can I answer a call?
A
When there is an incoming call, a notification pop-up will become displayed.
To answer the incoming call, press the
Reject
seconds) the
Q
button using the center
key on the steering remote controller. To reject the
controller or the
call, press the
Accept
button on the screen or press and hold (over 0.8
key on the steering remote controller.
What should I do if I am talking on the Handsfree but want to switch the call
to the mobile phone?
A
While on a call, press the
press the
Private
key on the steering remote controller or
button at the bottom of the Phone screen to switch the
call to your mobile phone.
Q
Why does call quality sometimes worsen?
A
Check the reception sensitivity of the mobile phone when call quality
becomes worsened. The call quality may deteriorate when the signal
strength is low. Call quality may also worsen if metal objects, such as beverage cans, are placed near the mobile phone. Check to see if there are
metal objects in the vicinity of the mobile phone. The call sound and quality
may differ depending on the type of mobile phone.
42
About Voice Recognition
Q
System cannot recognize my voice. What is the cause?
A_1
When start voice recognition, you can hear BEEP sound after system
saying “Please say a command”. System recognizes your voice after
this BEEP sound, for this reason when overlap BEEP sound and voice,
system cannot recognize. Please wait and say after the BEEP sound.
A_2
This system can recognize already defined commands. You can find
these commands on the screen and Voice Recognition session in
Owner’s Guide.
Q
System cannot recognize “Call John Smith”. What is the cause?
A_1
To call by name using voice recognition, please check these required
conditions.
1. Connect the Bluetooth phone.
2. Contacts are downloaded.
3. Check if the name is stored on the downloaded contacts.
(ex: John Smith)
A_2
When you say “Call John Smith”, “John Smith” has to be stored in downloaded contacts. If “John Smith” is stored named “My Friend” system
cannot recognize “Call John Smith” instead of “Call My Friend”.
43
Navigation
Basic Features
Name
Description
Move to the Home
screen.
Operating Navigation
Screen
Change the map
view mode.
A basic features on the map screen.
Mute On/Off.
Zoom in the map.
Set the zoom
level automatically
according to the
guidance.
Zoom out the map.
Menu
Quick and easy
selection of a destination and options.
Touch to scroll the
map.
Set a
Destination
Add
Waypoint
Add to
Address Book
POI
Quick and easy
selection of a destination from the
map screen.
Set a waypoint to
the current route.
Store frequently
used address to
address book.
Find a POI(Point
Of Interest) around
the current position.
View the vehicle’s
current position on
the map screen.
44
Changing Map View
Zoom In /Zoom Out
zoom the screen in and out.
Touch the compass arrow icon to
toggle between a map oriented to
Press
the North, or oriented parallel to the
level
+
or
-
to set the zoom
vehicle’s heading.
Map Scale
Voice Guidance
Volume On/Off
Set the zoom level automatically
according to the road class
Press the button to toggle the voice
guidance between on or off.
Name
Description
Scale Fix
Fix the displayed
scale
Auto Scale
Change the map
scale automatically
depending on the
road class
45
Navigation
Menu
Detour
Route
Press Menu button on the bottom
left of the screen ▶ Press Route
button
The
Detour
button is activated only
when the route is planned.
Press the
Route
Route Option
and
button to set
Detour
.
Route Option
Try to find a different route to make
a detour within a selected distance
ahead from current vehicle’s position.
Name
Faster Time
Shorter
Distance
Done
Detailed
Route Settings
46
Description
Set an option based
on the fastest time
of arrival.
Set an option based
on a shorter distance.
Store the option.
While the destination is set, use the
selected option to
calculate the route
immediately.
Set details.
Using Map
Press the
button to set
Name
Description
the section to avoid the current route
Set the sound to mute.
on the map.
Reduce the volume.
Name
Description
Increase the volume.
Shorter
Reduce the length of the
section to avoid.
Slide to set the volume
Longer
Increase the length of the
section to avoid.
Detour
Start the calculation of the
route by detouring the set
section to avoid.
Nearby POIs
Display the information on nearby
POIs on the map and to search and
edit.
Navigation Volume
Press the
Navi Volume
button to
View Nearby POIs
Menu
Select the
on the bottom of
the left screen ▶ Select the
adjust the volume.
POI
button.
Press the
Navi Volume
button.
Press
ON
,
OFF
button to dis-
play or disappear the relevant POI
information as an icon on the map.
To select the sub-business type of
the POIs move to the list. Select the
desired business type (ex. gas station).
47
Navigation
The list of gas stations nearby is displayed.
Display in order of distance, name
by price.
Select the desired gas station to
check the location information.
Name
Description
Make a call the place
(After paring a phone
with a Bluetooth)
Set as
Destination
Set as
Waypoint
48
Set the place as a
destination.
Set the location as a
waypoint.
Add to
Address Book
Store the location.
POI
Search nearby POIs.
Search
Name
Address
Set destination by address search.
Press the
NAVI
head unit key. ▶
tab. ▶ Select
Select the
Destination
the
icon.
Address
Description
First select the state to
search.
How to Search Address
Enter the house number. If
you don’t know the house
number, press the Skip
button.
Enter the street name.
To allow actually existing
street name only to be
entered, the keys on the
keyboard are automatically
enabled or disabled, and
if necessary, words are
automatically completed.
Press the Done button to
display the corresponding
street name and then
select the item. If there
are several cities with the
same street name, the
list of cities is displayed.
Otherwise, enter a city on
the keyboard and select
the street and then the
address search is completed.
Before entering the street,
possible to select a city.
Search by address only
based on the streets in
the city.
49
Navigation
Possible to arrange by all, latest
Enter the address to check the loca-
destinations, latest searched places,
tion information on the map.
and latest departing places.
Name
Description
Set as
Destination
Set the location as a
destination.
Set as
Waypoint
Set the location as a
waypoint.
Add to
Address Book
POI
Possible to arrange in order of date and
name.
Name
All
Destinations
Display previous
destination places for
route guidance
Start Points
Display previous
departing places for
route guidance
Store the location.
Search nearby POIs.
Previous Destination
Search destination with the previous
search information.
Press the
Select the
the
50
NAVI
head unit key.▶
tab. ▶ Select
Destination
Previous Destination
icon.
Description
Display all destinations, departing
places, and searched
places.
Searches
Display previous
searched places for
route guidance.
But, not displayed
when the searched
places are set as
destination.
POI Name
POI Categories
NAVI
Press the
head unit key.▶
Select the Destination tab. ▶ Select
the
POI Name
icon.
Press the
NAVI
Select the
Destination
the
POI Categories
head unit key.▶
tab. ▶ Select
icon.
Search POI Name to search the
destination.
Select the desired item.
Enter the desired facility name and
press the
Done
button.
Select the desired item in the
sub-categories.
Possible to select the desired
destination among the search
items.
51
Navigation
Possible to select the desired destiName
Description
nation among the searched items.
Select the desired destination
among the searched items and
add it as a way point.
Arrange in order of
Name .
Distance
and
,
Select the
Near Destination
Along Route
,
Near Scroll Mark
Near City Center .
Search a restaurant.
Press the
Arrange in order of
Near Current Position
Restaurants
and
the
NAVI
head unit key. ▶
tab. ▶ Select
Destination
Restaurants
Gas Station
Search a gas station.
Press the
NAVI
Select the
Destination
the
Gas Stations
head unit key.▶
tab. ▶ Select
icon.
Possible to select the desired destination among the searched items.
52
Emergency
Address Book
Search an emergency facility.
Search the destination with the
address book.
Press the
Select the
the
NAVI
head unit key. ▶
tab. ▶ Select
Destination
Emergency
Press the
NAVI
head unit key.▶
Select the Destination tab. ▶ Select
the Address book
Possible to check the current location information and select the
Select the desired group.
desired item in the sub-menu (ex.
Store it in the Favorite Places and
police station).
then set the route rapidly with Go
Home, Office and three buttons on
the bottom of the menu screen.
Possible to select the desired destination among the searched items.
53
Navigation
Press the
Name
Description
Possible to select the desired destination from the searched items.
Go Home
button and then
popup appears. Press the
Yes
but-
ton for setting.
Possible to edit the destination.
Possible to register a new
destination.
Possible to delete the desired
item.
My Home
Specially Registered Places
Register
Set the route with the specially reg-
searching methods. By using the
istered places.
same methods, possible to register
head unit key. ▶
Select the Destination tab. ▶ Select
Office, Special 1, Special 2, and
Press the
NAVI
in various
Special 3.
the Specially Registered Places button.
Press the registered special point
On the button where locations are
button to search a route as shown
not registered, the
above.
icon is dis-
played. When a location is registered, the
button disappears and
the buttons 1 to 3 are displayed as
the registered place names.
54
Route Setting
All Routes
After searching the destination, possible to set a route.
When the Alternative Routes option
is enabled in Navigation Setting,
While the destination is set, the
buttons
Change Destination
Add Waypoint
and
appear. Press each
button to change a destination or
display two routing options based on
faster time and shorter distance.
• Faster Time : Select time-optimized
route, being the fastest roads.
• Shorter Distance : Select short dis-
add a waypoint.
tance, irrespective of how fast or slow
Destination Setting(Change)
progress will be
Name
Faster Time
Set as Destination
button to
set the location as a destination and
Display total distance, travel time,
and toll fees. Select
the desired route.
Start Guidance
Start the guidance
with the route.
Route Options
Change the route
option.
Route Preview
Preview turn-byturn list.
After searching the destination,
press the
Description
Edit Route
search a route.
Edit the route.
Total
Display total distance
of the route
Freeway
Display length of
freeway on the
route
Toll Road
Display length of toll
road on the route
Ferry
Display length of
Ferry route on the
route
55
Navigation
The route will be calculated using
the option “Faster Time” by default.
Remaining time
: Display he esti-
mated time of arrival
Alternative routes can be suggested
if necessary, SETUP key ▶ Navigation
Icon ▶ Route ▶ Alternative : on
Arrival Time
Route Guidance
Possible to get the detailed information on route guidance.
Route Guidance Screen
56
: Display the time for arrival
Name
Description
Display the distance and direction
to the first turn
point.
Display the distance and direction
to the second turn
point.
Display the lane
information at the
current location.
Display the recommended direction
in white, travelable
direction in white,
and the non-travelable direction in
grey.
Route
Canceling Route
Cancel the route.
Press the
the
Route
Cancel Route
Click
hard key. ▶ Press
tab. ▶ Select
NAVI
.
Cancel Route
the icon.
Displays the distance to the destination and the
estimated time of
arrival. Press the
button to check the
detailed information.
Cancel the route.
Possible to change
to preliminary guidance, TBT guidance, and zoom-on
guidance screens.
Destination Info
Press the
Yes
button to cancel the
route.
Displays the destination information.
57
Navigation
Display Route Information
NAVI
Press the
the
Route
Route Info
hard key. ▶ Press
tab. ▶ Select
.
Route Overview
Check the information on route
including the distance, expected
time, toll fees, etc.
NAVI
Press the
the
Route
tab. ▶ Select
Route Overview
Press the
Route Info
hard key. ▶ Press
.
icon.
Press the
Route Overview
icon.
Possible to check the information on
the route. Select the desired item to
check the map information.
Name
Click the
Avoid Street
button to avoid
the street or road.
Check the desired item and press
the
58
Done
button to finish.
Description
Route Options
Change the search
option.
Route Preview
Preview turn-byturn list.
Edit Route
Provide information on surrounding facilities.
Editing Route
Edit the current route.
hard key. ▶ Press
tab. ▶ Select
NAVI
Press the
the
Route
Edit Preview
.
Add the waypoint through various
searching methods.
Route Options
NAVI
Press the
the
Press the
Edit Preview
Name
icon.
Route
hard key. ▶ Press
tab. ▶ Select
Route Options
.
Description
Display the selected
point on the map
screen.
Press the
Route Options
icon.
Move the selected
item up.
Move the
selected item
down.
Delete the
selected item.
Press the Done
button to finish editing.
Add Waypoint
Designate the route options to guide
the route.
Press the
button
Add Waypoint to
add an waypoint.
59
Navigation
Navigation Settings
Avoid Street
Search new route by avoiding the
General
selected street(s).
Press the
the
Route
Avoid Street
NAVI
hard key. ▶ Press
Change general settings.
tab. ▶ Select
.
Name
Description
Change the unit of
Press the
Avoid Street
icon.
mile
,
Km
.
Press the ON , OFF button
to change the previous destination view setting when
starting the navigation. When
the navigation is started without the route planned, a list of
previous destinations can be
displayed or not by setting.
Check the GPS information.
Press the
Done
to plan new route
after selecting the street(s) that you
want to avoid.
60
Press the Default Settings button to initialize.
Display
Change the display environment set-
Guidance
Change the guidance setting.
tings.
Name
Description
Change the map colors and the
Set the guide frequently
route guidance line colors.
Less guidance will be given
Much guidance will be given
Press the ON or OFF
button to change the curve
alert setting.
Press the ON or OFF button to change the speed limit
alert setting.
Change the vehicle symbol.
61
Navigation
Route
Traffic
Change the route setting.
Change the traffic information setting.
Press the
ON
or
OFF
button to
button to
change the [Alternative Routes] set-
Press the
ting.
change the settings.
• Alternative on : Alternative routes
• Show Traffic Information On/Off
will be suggested(depending on
the route preference between
“Faster time” and “Shorter
Distance”
ON
or
OFF
: Select whether to display traffic
information or not
• Traffic Event Popup Freeway On/
Off : Select whether to display
popup massage for traffic informa-
NOTICE
• Alternative routes can be shown only
while the vehicle is not moving.
tion on freeway
• Traffic Event Popup Surface Road
On/Off : Select whether to display
popup massage for traffic informa-
• Alternative off : No alternative routes will be suggested.
Guidance will start right after calculating with the route preference
(Faster time or Shorter distance)
62
tion on surface road.
Pandora Radio
Pandora Radio Mode
Press the “Pandora” icon after selecting All Menus or the Info hard-key to enter
Pandora Radio mode.
Pandora Radio Mode Screen Controls
Name
Description
Mode
Displays currently operating mode.
Station Info
Shows the station name currently playing.
Track Info
Shows the artist/title information currently playing.
Play Time
Displays the current play time.
Thumb up
If you like the genre of the music currently playing, press this button to send a "Thumb Up" signal to Pandora so that more similar
music will play.
Thumb
Down
If you don't like the music currently playing, press this button to
move to the next music and to minimize the number of playbacks
of similar genre music.
You can move to next song up to specific times which pandora allows
Play/Pause
Plays/pauses the current song
SKIP
Moves to the next track
You can move to next song up to specific times which pandora allows
Station List
Moves to the station list screen.
Menus
• Bookmark Track
Adds the music currently playing to the bookmarks list.
• Bookmark Artist
Adds the artist of the music currently playing to the bookmarks list.
You can view your bookmarked artists and songs from your
Pandora profile online. Go to pandora.com, then click on the
“Your Profile” button above the player. That will bring up a page
with your stations, bookmarked artists, and bookmarked songs.
63
SiriusXM Data
About SiriusXM™ Data Service
The SiriusXM™ Data Service is a
paid membership Satellite radio service which provides users
with traffic, stock, spor ts, and
weather information.
However, weather information is not
supported for vehicles purchased in
Canada.
Accessing
SiriusXM™ Data
Press the “SiriusXM Data” icon after
selecting
All Menus
or the
INFO
hard-key to enter the SiriusXM™
Warnings and Advisories
Data mode.
This service provides weather
warnings and advisories, such as
tornado, storm, Floodflood, etc. as
symbols on the Navigation map.
Weather Forexcast
This ser vice provides current
weather information and weather
forecasts for the
next five days in your region. To
change the region, press the Other
City button and select the desired
region.
64
SiriusXM™ Fuel
Price Information
Select the
★
button to the right of
the list to register key locations as
At the “SiriusXM Data” screen, press
a Favorite Station so that you can
the “Fuel Prices” icon to enter the
go there again with the “Favorite
Fuel Prices Information mode.
Stations” menu. Select the list to
move to navigation destination select
screen to receive guidance.
Search for Nearby Stations,
and Register Key Locations as
Favorite Stations.
My Fuel Type Settings
Search for nearby stations with the
With the “Filters” menu, you can
“Nearby Stations” menu.
select fuel types and favorite brands.
It shows station locations, starting
When searching for Nearby Stations,
from the nearest one, and select
the results will reflect selected fuel
“Nearest” menu on the top right side
types and brand information.
to further sort them by price or brand
name.
65
SiriusXM Data
SiriusXM™ Stock
Information
SiriusXM™ Sports
Information
In the “SiriusXM Data” screen, press
Press the “Sports” icon to enter the
the “Stocks” icon to enter the Stocks
Sports mode.
mode.
This service provides real-time
updated information on scores and
Stocks is a feature that shows the
schedules for major sports, such as
current value and change of stocks.
NFL, NBA, NCAA football, NCAA
For symbols which you are inter-
basketball, NHL, MLB, NASCAR
ested in, press the icon to save the
and more.
symbol as a part of Saved symbols
can be viewed from the My Favorites
button on the Stock Main screen.
My Favorites
My Favorites shows a list of stocks
added by the user. When entering
the Stocks menu for the first time,
a screen is displayed for you to add
My Teams
your favorite stock information. Press
You can save teams which you are
the “Add” button to move to the stock
interested in as part of My teams
search screen.
to easily view related scores and
schedules.
Select the My Teams menu and then
press the
Add
button to search for
and register your favorite teams.
Search for your favorite teams and
press the
★
button on the right to
add it to the “My Teams” list.
66
SiriusXM™ Movie
Information
Press the “Movies” icon to enter the
Movie mode.
You can check recent movies and
nearby theaters, and also register
your favorite theater locations.
Press the team name to check daily
results and recent schedules for that
team.
Search for Nearby Theaters, and
Register Any Key Locations as
Favorite Theaters.
In the “Nearby Theaters” menu, you
can search for any nearby theaters.
It shows theaters, starting from
the nearest one, and selecting the
“Nearest” menu at the top right side
will sort them by name.
67
SiriusXM Data
In the “Top Movies” menu, you can
check for any movies that are currently popular. Press
button to
the right of a movie title to view the
plot summary and any other detailed
information.
Select the
★
button to the right of
the list to register your favorite theater so that you can always check it
again using the “Favorite Theaters”
menu and selecting the
button to
view the current movie information
for that theater.
Select from the list to move to the
select navigation destination screen
and receive directions.
68
MEMO
69
MEMO
70
71
MEMO
72
KIA Navigation System
QUICK REFERENCE GUIDE
B2END08