1
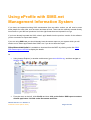
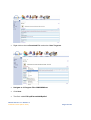
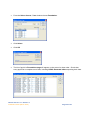
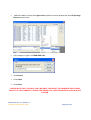
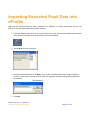
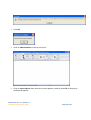
eP
Pro
ofile
e v3.
v 1
R lea
Rel
ase
e5
In
nsttallatiion
n
Gu
G ida
anc
ce
C
Conte
ents
ey Notice ........................................................................ Error!! Bookmark
k not defined. eSafte
Introd
duction ....................................................................................................................... 3 What you
y need to do nex
xt ................................................................................................. 5 Installlation on a Stand Alone Computer ....................................................................... 12 Using the softw
ware for th
he first tim
me .............................................................................. 13 Using eProfile with
w
SIMS.net Mana
agement In
nformation
n System ................................. 15 Using eProfile with
w Faciliity (CMIS)................................................................................. 21 gement Information
n System .................................................................................. 21 Manag
Imporrting Extra
acted Pupiil Data into
o eProfile ................................................................ 27
ndix 1 ....................................................................................................................... 32 Appen
Imporrting a Rep
port into SIMS.net
S
................................................................................... 32
ndix 2 ....................................................................................................................... 33 Appen
Imporrting a Rep
port into Facility
F
...................................................................................... 33
Appen
ndix 3 ....................................................................................................................... 34 Printin
ng the Use
er Manuall ................................................................................................ 34
acts ........................................................................................................................... 35 Conta
eProfile Ve
ersion 3.1 R
Release 5
Installation Notes (Marcch 2010)
Page 2 of 35
eSafety Notice
PTP Software is a standalone piece of software which consists of a database containing pupil’s data.
Due to the issues surrounds Data Protection we strongly advise that this software is only installed on
secure data encrypted laptops and USB (memory ticks).
Under all circumstances pupil / staff data should be held, transported and processed in accordance
with the Data Protection Act.
The following link provides access to information on this important area – it is the responsibility of
individual schools to ensure that the requirements of the act are met
http://myweb.bgfl.org/esafety/content/view/119/84/
eProfile Version 3.1 Release 5
Installation Notes (March 2010)
Page 3 of 35
Introduction
Please note that the eyeProfile software has been renamed back to its
original name ‘eProfile’.
Following the guidance notes will enable you to install eProfile v3.1release 5 or upgrade from eyeProfile
v3 to eProfile v3.1 release 5 and get your pupil’s details into it.
All existing copies of eyeProfile v3 should be upgraded to eProfile v3.1
release 5
You MUST use version 3.1 release 5 for pupils in the current Foundation Stage 2009-2010. The
upgrade should be seamless; any existing data entered into version 3 being automatically imported into
version 3.1.
You are advised to print out a copy of the User Manual in order to help you use this
new version. Instructions for printing the User Manual are included in Appendix 3.
In most schools the software is just used on a single computer (or a number of stand-alone computers),
and this is the setup for which the following notes apply.
eProfile Version 3.1 Release 5
Installation Notes (March 2010)
Page 4 of 35
What you need to do next
Before downloading and upgrading to the new version you MUST make a backup of the data in the
current version of eyeProfile.
I already have a version of the software on my computer:
•
•
Check what version of the software you currently have installed on all workstations.
Download and install the new eProfile (v3.1 release 5) software.
I haven't used the eProfile software before and it isn’t on my computer:
•
Download and install the new eProfile (v3.1 release 5) software.
In addition after installing the software you may need to:
•
Type in some details about your setting such as name and URN/DCSF number
Enter the children’s details for your current foundation 2010 cohort if you are using the software
for the first time or haven't imported them from an earlier backup. Enter the details by typing
them in or import all the details in one go from SIMS.net or Facility.
•
For detailed instructions on how to perform these tasks please see the corresponding section
in these notes.
If you have entered assessment data against the 2010 cohort in eyeProfile
v3:
•
Start up eyeProfile v 3, select the 2010 cohort and log in.
•
There is no need to change any data. Just quit the software. When asked if you want to make a
backup of the data select YES.
•
Quit eyeProfile
If you have historic assessment data against other cohorts in eyeProfile v3:
•
Start up eyeProfile version 3, select the 2009 cohort and log in.
•
There is no need to change any data. Just quit the software. When asked if you want to make a
eProfile Version 3.1 Release 5
Installation Notes (March 2010)
Page 5 of 35
backup of the data select YES.
•
Repeat for any other cohorts you wish to back up.
•
Quit eyeProfile
Schools that have already started entering results for 2010 in eyeProfile
v3:
•
Existing results for 2010 can be transferred across after the eProfile v3 release5 is installed.
•
This is automatic, the eProfile v3.1 release 5 attempts to pick up the relevant 2010 data when it
is used for the first time.
•
Please note this only works if eProfile and eyeProfile have both been installed in the default
way without changing file locations.
Schools that have previous year’s data in the eProfile that they wish to
retain.
•
Data for previous years is retained in a ‘capped’ version of the older software. This enables
you to access data recorded in previous years (up to 2008).
Warning:
You should ensure that all copies of the eProfile software are upgraded within your setting e.g. if you
use the software in the classroom and sometimes transfer assessments to an office computer you
should make sure both versions are upgraded to version 3.1 release 5 of the software. If this isn’t
done it can cause problems in the future if you attempt to move assessments between computers and
you may lose work or corrupt data.
After you have run the upgrade, you should only use eProfile V3.1 release 5 to record the current
2010 cohort’s assessments and view historic data for 2009 cohort.
The capped eProfile V2 should only be used to view your historic data.
eProfile Version 3.1 Release 5
Installation Notes (March 2010)
Page 6 of 35
Downloading and Installing eProfile
•
Using Internet Explorer (or another web browser) go to www.link2ict.org and then navigate to
Schools, MIS.
•
From the menu on the left, click eProfile and then click on the link to the latest version of
the eProfile software (v3.1 release 5) under Documents and Files.
•
Right click on the text and select ‘Save Target As’
•
In the Save In dialogue box select the C:\Downloads folder on your computer.
If you do not have a Downloads folder, right click anywhere in the window and select New
from the dropdown menu. Name the folder Downloads. Double click on this new folder name.
•
Click on Save. A File Download window will appear that will indicate the progress of the
download.
•
Right-click on the Start button at the bottom of your screen. Click on Explore.
eProfile Version 3.1 Release 5
Installation Notes (March 2010)
Page 7 of 35
•
Find and open the C:\Downloads folder into which you saved the program
•
Double click on the file fsp315.exe.
•
This will start the installation process.
eProfile Version 3.1 Release 5
Installation Notes (March 2010)
Page 8 of 35
•
Click on Next
•
The Select Destination Location window appears.
•
The window shows the default installation folder. Do not change the default path, but just
click on Next.
•
If you received a message that a folder already exists, click yes to install to the folder
anyway.
Please note that this software should be installed on a LOCAL drive and NOT a
NETWORK drive.
•
The next window is Select Additional Tasks.
eProfile Version 3.1 Release 5
Installation Notes (March 2010)
Page 9 of 35
•
Here you are asked if you want to create a Desktop icon and Quick Launch Icon.
Ensure both checkboxes are ticked. The Quick Launch Icon will be placed on the taskbar
at the bottom of the desktop and means the icon will be visible at all times.
•
Click Next
•
Ready to Install
•
Click Install
eProfile Version 3.1 Release 5
Installation Notes (March 2010)
Page 10 of 35
•
When the installation process has been completed. Click on Finish.
eProfile Version 3.1 Release 5
Installation Notes (March 2010)
Page 11 of 35
Installation on a Stand Alone
Computer
In order to install the software on a computer not attached to the network it will first be necessary to
download the program file fsp315.exe into the folder C:\Downloads, following the instructions above.
This will download the software onto a networked school computer.
•
You will then need a memory stick to transfer the program installation file (ftp315.exe) onto the
stand alone computer.
•
Insert the memory stick which has the downloaded software on it into a USB port on the
computer.
•
Right click on Start. Click on Explore.
•
Find the folder into which the eProfile installation program has been downloaded. Double click
on the yellow folder next to the folder name. This will open up the folder and you can see the
contents on the right hand side of the window.
•
Right-click on the file name fsp315.exe to highlight the name and select Copy from the
dropdown menu.
•
Browse down the left hand side of the window until you find a disk drive labelled Removable
Disk (E:) (or something similar, to indicate that the disk drive is a temporarily available storage
drive).
•
Double click on the Removable Disk drive. In the right-hand window, right-click and select
Paste. The fsp315.exe name should appear in the file list on the right.
•
Browse down the left hand side of the window until you find a disk drive labelled Removable
Disk (E:) (Or something similar, to indicate that the disk drive is a temporarily available storage
drive) and right click. Click on Eject.
•
Remove the memory stick and insert it into a USB port on the standalone computer. On the
standalone computer tight –click on Start , then select Explore.
•
Browse down the left hand window until you find the Removable Disk Drive (E:) (Or something
similar).
•
Follow the steps detailed in the preceding section to carry out the software installation.
eProfile Version 3.1 Release 5
Installation Notes (March 2010)
Page 12 of 35
Using the software for the first time
When you use the eProfile software for the first time you will be asked for some details about your
setting.
If you have imported assessments from an earlier copy of the eProfile you may not
need to enter these details again.
The settings you enter can be easily changed at any time within the software.
•
You may get a welcome message. Click on ‘Yes’.
•
You will then be prompted to enter your correct school name, LA name and 4digit DCSF
number.
•
Please ensure that School is selected and then enter the details required.
•
You will be prompted for the password.
•
The default password is ‘password’
The password
is ‘password’
eProfile Version 3.1 Release 5
Installation Notes (March 2010)
Page 13 of 35
•
You will then need to select the correct cohort.
•
In the Academic Year 2009/2010 please select 2010
•
You now ready to add the Foundation pupils into eProfile; these can be entered directly into
eProfile or imported from your MIS by following the notes for either Facility or SIMS.net.
eProfile Version 3.1 Release 5
Installation Notes (March 2010)
Page 14 of 35
Using eProfile with SIMS.net
Management Information System
If you have not imported existing 2010 assessments from an earlier version you will need to enter
some details for each child, such as name and data of birth. These can be manually entered directly
into eProfile or your MIS can produce a list in the right format that can imported in one go.
If you have already imported the 2010 cohort’s pupil details into the previous version of the software
you do not need to re-import their details.
If you are using SIMS .net you should already have the extract report on your system which you will
need to run to extract pupil details from SIMS .net, if you do not have the report.
FSPupilExtract2008.RptDef it is available to download from the BGFL by clicking on the link SIMS
FSP extract report: 10/01/08 to display the details.
Or
•
Using Internet Explorer (or another web browser) go to www.link2ict.org and then navigate to
Schools, MIS.
•
From the menu on the left, click eProfile and then click on the link to ‘SIMS report to extract
eProfile pupil data: 10/01/08’ under Documents and Files.
eProfile Version 3.1 Release 5
Installation Notes (March 2010)
Page 15 of 35
•
Right click on the text Download File and select ‘Save Target as’
•
Navigate to C:\Program Files \SIMS\SIMS.net
•
Click Save.
•
The file is called FSPupilExtract2008.RptDef.
eProfile Version 3.1 Release 5
Installation Notes (March 2010)
Page 16 of 35
•
Before extracting any data form SIMS.net it is necessary to check that ALL pupils have a UPN.
•
To extract pupil data from SIMS.net it is necessary to import this report (if you do not already
have it) into SIMS.net. This report should be imported into SIMS. net using the guidance
notes in Appendix 1.
•
Once the report is available in SIMS.net it should be run.
•
Click on Reports
•
Double click on Focus, Double click on Student.
•
Scroll down until you find the report called FSPupilExtract2008.
•
Double click on the report name and the report will run automatically.
•
When the report has produced the output file you will see a success message.
•
The data produced should be exported into a file called C:\SIMS\FSP.csv. This is a text file,
but the CSV extension means that data items are separated by commas.
•
Click OK.
•
Unfortunately the format of the date of birth as extracted by SIMS.net is not the right format for
the eProfile software so it is necessary to modify the format as follows:
eProfile Version 3.1 Release 5
Installation Notes (March 2010)
Page 17 of 35
•
Load Microsoft Excel.
•
Load the data file you have just saved (C: \SIMS\FSP.csv.). In order to enable the file to
display in the list of files you will need to change the file of type at the bottom of the dialogue
box to text files.
•
Highlight FTP and click Open
•
Click on the E at the top of the DOB column. The whole column should then be highlighted.
eProfile Version 3.1 Release 5
Installation Notes (March 2010)
Page 18 of 35
•
Move the cursor over the highlighted column and the cursor should change to a white cross.
•
Right click anywhere in the highlighted column and select Format Cells.
•
Click on Custom. In the Type column find the format dd/mm/yyyy and highlight this setting.
If this format does not exist type in dd/mm/yyyy in the editing box which is located immediately
eProfile Version 3.1 Release 5
Installation Notes (March 2010)
Page 19 of 35
under the heading Type.
•
Click on OK
•
Click on File
•
Click on Exit
•
You will be asked if you want to save the changes you have made. Click on Yes.
•
Do not change the file location, just click on Save.
•
When asked if you want to replace the existing file, click on Yes.
A pop-up window warns about compatibility issues, just click on Yes.
PLEASE NOTE THAT YOU WILL ONLY BE ABLE TO EXPORT THE NAMES DETAILS FROM
SIMS.net IF YOU CURRENTLY STORE THE DETAILS OF YOUR FOUNDATION PUPILS
IN THE SYSTEM.
eProfile Version 3.1 Release 5
Installation Notes (March 2010)
Page 20 of 35
Using eProfile with Facility (CMIS)
Management Information System
If you have already imported pupil details into the previous version of the software you do not need to
re-import their details.
If you are using Facility you should already have the extract report on your system which you will
need to run to extract pupil details from Facility.
If you do not have it, it is available to download from the BGFL by clicking on the link CMIS FSP
Extract Report: 21/01/2008
Or
•
Using Internet Explorer (or another web browser) go to www.link2ict.org and then navigate to
Schools, MIS.
•
From the menu on the left, click eProfile and then click on the link to ‘CMIS report to
extract eProfile pupil data: 21/01/08’ under Documents and Files.
eProfile Version 3.1 Release 5
Installation Notes (March 2010)
Page 21 of 35
•
Right click on the text and select ‘Save Target as’
•
Navigate to C:\Admin
•
Click Save.
•
The file is called eprofiledata0507.rp
•
Before extracting any data from Facility it is necessary to check that ALL pupils have a UPN &
Postcode.
•
To extract pupil data from Facility it is necessary to import this report (if you do not already
have it) into Facility. This report should be imported into Facility using the guidance notes in
Appendix 2.
eProfile Version 3.1 Release 5
Installation Notes (March 2010)
Page 22 of 35
•
Log into Facility once the report has been imported.
•
Click on Reports/ Reports
•
In the window that opens double click on the yellow folder called Student Lists.
•
This is the folder where the report you have imported is stored. The report is called ED
Report For Eprofile Import (05/07)
eProfile Version 3.1 Release 5
Installation Notes (March 2010)
Page 23 of 35
•
Highlight the report and click on Generate
•
When the Scope of Report window appears click on the tick box next to Course / Year.
Ensure that Exclude Those left is selected if this option appears at the top of the window.
•
Click OK
eProfile Version 3.1 Release 5
Installation Notes (March 2010)
Page 24 of 35
•
From the Select Course / Year window choose Foundation.
•
Click Select
•
Click OK
•
The list of pupils in Foundation stage will appear on the screen in class order. Check that
every pupil has a complete set of data, including UPN & Postcode before exporting their data.
eProfile Version 3.1 Release 5
Installation Notes (March 2010)
Page 25 of 35
•
If all of the data is correct then right click anywhere in the list window and select Exporting /
Export from the menu.
•
In the empty box type in C:\TEMP\FSP.CSV
•
Click Export.
•
Click Close.
•
Click Close.
PLEASE NOTE THAT YOU WILL ONLY BE ABLE TO EXPORT THE NAMES DETAILS FROM
FACILITY IF YOU CURRENTLY STORE THE DETAILS OF YOUR FOUNDATION PUPILS IN THE
SYSTEM.
eProfile Version 3.1 Release 5
Installation Notes (March 2010)
Page 26 of 35
Importing Extracted Pupil Data into
eProfile
Now that the required data has been exported from SIMS.net or Facility and saved into the file
FSP.csv it can be imported into the eProfile software.
•
From the desktop either click once on the EYfsp icon on the quick launch taskbar at the bottom
of the screen or double-click on the EYfsp icon on the desktop.
•
Select 2010 from the cohort list.
•
Enter the password and click on Enter. If you make a mistake whilst entering the password,
but fail to correct the error and click on Enter, the program will stop running and drop back to
the desktop.
The password
is ‘password’
•
Click OK
eProfile Version 3.1 Release 5
Installation Notes (March 2010)
Page 27 of 35
•
Click OK
•
Click on Administration on the top menu bar.
•
Click on Import Names from the menu list that appears, and then click OK on the pop-up
window that appears.
eProfile Version 3.1 Release 5
Installation Notes (March 2010)
Page 28 of 35
•
Change the Files of Type from CTF to Text or CSV.
•
Browse through the folders to the location you used to store the ftp.csv file you have created.
C:\TEMP\FSP.CSV for Facility and C:\SIMS\FSP.csv. for SIMS.net .
eProfile Version 3.1 Release 5
Installation Notes (March 2010)
Page 29 of 35
•
Highlight the file name FSP.CSV and click on Open.
•
Click OK to message to say that the data has been imported correctly.
•
If you close the software down it will ask if you want to make a backup. It is advisable to do so.
It will not overwrite the previous backup taken today as you will be using a different cohort.
eProfile Version 3.1 Release 5
Installation Notes (March 2010)
Page 30 of 35
•
Click Yes
eProfile Version 3.1 Release 5
Installation Notes (March 2010)
Page 31 of 35
Appendix 1
Importing a Report into SIMS.net
•
Select Reports then Import to open the Import report(s) dialogue.
•
Click the Open button to open the Select the report file to Import dialogue.
•
Navigate to the folder containing the file called FSPupilExtract2008.RptDef. This should be in
C:\Program Files \SIMS\SIMS.net
•
Click the Open button to return to the Import report(s) dialogue.
•
The status of the selected report should be pending and there should be a tick in the
checkbox.
•
Click the Import button to complete the import process.
•
When the status changes to imported click the Close button.
eProfile Version 3.1 Release 5
Installation Notes (March 2010)
Page 32 of 35
Appendix 2
Importing a Report into Facility
•
Before starting the import procedure ensure that you have sufficient access rights to enable
you to carry out the report import process.
•
Click on Reports on the top menu bar.
•
Click on Reports from the drop-down menu.
•
In the window that opens double click on the yellow folder called Student Lists (or pupil lists in
some schools).
•
Click on the Advanced button.
•
Click on Import.
•
When asked if you want to import into the current folder select Yes.
•
Navigate to the folder where the report file eprofiledata0507.rp is located (C:\Admin).
•
Highlight the file name (eprofiledata0507.rp) and click on Open.
•
The new report (eprofiledata0507.rp) for eProfile Import will initially appear at the end of the
list.
eProfile Version 3.1 Release 5
Installation Notes (March 2010)
Page 33 of 35
Appendix 3
Printing the User Manual
You will need to have Adobe Acrobat Reader installed on the computer before you can access the
eProfile Manual. If you do not have Adobe Acrobat Reader installed you can download it using the
internet from http://www.adobe.com/products/acrobat/readstep2.html and then install from the
downloaded program file.
•
To print the manual that comes with the FSP software click on
•
Start > Programs > Foundation Stage Profile > V 3 User guide
•
When the guide opens you can click print.
eProfile Version 3.1 Release 5
Installation Notes (March 2010)
Page 34 of 35
Contacts
For technical installation queries and assistance
Please contact the Link2ICT Service desk:
Telephone: 0121 303 5100
Fax:
0121 303 3552
For assistance on using eProfile
Please contact the Assessment Unit:
Telephone: 0121 303 8837
eProfile Version 3.1 Release 5
Installation Notes (March 2010)
Page 35 of 35