1
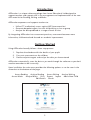
accelerating progress, raising achievement
User Manual
Version 1.0
accelerating progress, raising achievement
Contents
Introduction ..................................................................................................................................................3
Getting Started ......................................................................................................................................3
Adding Pupils to the Database ......................................................................................4
Assessing Children ............................................................................................................................5
Assessment Screen Overview ..........................................................................................6
Making Judgements ........................................................................................................................8
Data Analysis ..............................................................................................................................................9
Printing Data............................................................................................................................................12
Exporting Data ....................................................................................................................................12
Importing Data ....................................................................................................................................13
Printing Assessment Sheets ............................................................................................14
Introduction
APPtracker is a unique software package from Iccom Educational Ltd designed to
support teachers and support staff in the management and implementation of the new
APP materials for Reading, Writing and Maths.
APPtracker empowers and supports teachers to:
•
•
•
Utilise ICT to effectively assess against APP Assessment foci
Generate bespoke targets for each child withing a class or group
Analyse the data produced at a range of levels or tiers
By integrating APPtracker into assessment practises, assessment becomes more
informative, child-centred and focused on academic improvement.
Getting Started
Using APPtracker broadly follows a three step process:
1.
2.
3.
Populate the database with the details of your pupils
Carry out assessments on the children
Create and print targets and analyse the data you have entered
APPtracker automatically saves the data as you work through the software so you don’t
need to remember to do it manually.
Upon installation the main menu provides the following options as can be seen in the
screenshot at the bottom of the page:
Assess Reading
Analyse Reading
Assess Writing
Analyse Writing
Assess Maths
Analyse Maths
Print
Export
Import
Add a New Child
Edit Details
Search
3
Adding a New Pupil
Prior to assessing any children, the database needs to first be populated with pupil
details. This is a simple process to complete, and once entered all details are
automatically saved. The class teacher will simply need to update the details as and
when circumstances change by clicking on the 'Edit Details' icon from the Main Menu.
This is particularly pertinent if a child moves onto or from the SEN register during the
school year.
It is important that all these details are entered correctly at this stage as it forms the
basis for the filters later on in the data analysis section.
All children will only need to be added to the database once and are automatically
saved when the entry page is navigated away from.
To begin entering the pupil details, click on the 'Add New Child' icon on the
Main Menu and you will be taken to the following screen.
UPN, First Name and Last
Name are added by simply
typing into the text box.
Use the drop down menu to
select the child's gender and
date of birth.
Select any fields that apply to
the child being entered into the
APPtracker software using the
check boxes. Children involved
in intervention groups can also
be identified, as can A, G and T.
Once again the class, year
group and academic groups
are text fields. This means
that they can be personalised
to reflect the groupings or
class names that are used
within your specific school.
Any data that is entered is
remembered and is available
from a drop down menu
which saves repetition when
entering information.
When all the relevant details have been entered, click on 'Add Another'.
Continue this process until all children have been entered into the database from the
chosen class, group or year group.
The assessment record sheets can now be used to assess the children that have been
added. These can be accessed through the icons on the 'Enter Pupil Details' page or
by returning to the main menu.
4
Assessing Children
Upon selecting 'Assess' for one of the three subjects on the main menu, a screen similar
to the one below will be displayed. This layout will contain all the children that have
been added to the database. Select the child you wish to assess by clicking on the
name.
You will then be taken to an assessment screen that retains the integrity of the original
APP materials. This is to make the transition from paper documents to on-screen
recording easier.
The Assessment Screen
Each assessment screen for Reading, Writing and Maths displays all levels from 1 - 6.
This enables to assessment documentation to follow individual children throughout
their primary years. Each screen mirrors the APP Guidance sheets and can be easily
navigated via the grey tabs across the top of each screen. As with the APP materials,
the AF's are listed across the top. Within each AF there are statements (in black) which
relate directly back to the APP documentation. Below each black statement there are
red statements which are EXAMPLE 'I can' statements. These can be used as a starting
point from which to generate targets for individual children. The next page has an
example screenshot so you can become familiar with the Assessment layout.
The process of assessment is the same for each curriculum area. For support on
making overall level judgements either hover over or click on the question mark
icon next to the 'Overall Level Assessment' at the bottom of each level.
Use the assessment screen in the same way the paper versions of the APP materials
would be used. There are three main differences:
•
Each statement has a check box to indicate when it has been 'achieved'. This
replaces the highlighting which would otherwise have to be carried out.
•
In order to make an 'achieved' judgement an evidence base will need to be
identified from which the judgement can be substantiated for moderation or
monitoring purposes. Boxes are provided to type in where evidence is located as
well as drop-down date fields to indicate when the evidence was produced.
•
Print boxes allow the user to indicate which statements that have not yet been
achieved need to be added to the child's target label. When checked, these
statements are able to be added to the label preview. (see screenshot overleaf)
5
Tabs enable the user to move between
assessment sheets easily. APPtracker
automatically takes you to the relevant tab
based on Overall Level when you navigate here.
Blue icons enable easy
navigation between children's
data, access to the list if
required and other functions
All statements within each AF have been labeled as B1, B2 and B3. These are referenced within the
data analysis section, which is explained later on in the manual.
Child currently being assessed
is displayed at the top of the
assessment layout along with
their current Overall Level
Assessment Screenshot
6
Before Assessing
If Achieved
Statement greys out
to show it has been
achieved when
'Achieved' box has
been selected.
Checking the print box tags
the target (red statement) for
inclusion in the label preview
ready for editing.
Boxes provide space for
evidence to be recorded
including a date when the
evidence was produced.
When assessing is complete for a child the target statements can be selected by
clicking 'Print'. When the user clicks on the 'Preview' button next to the label, the
target 'I can' statements are copied into the label preview (shown below) along with the
child's name and the date the targets were set. These label preview boxes appear at
the top of each assessment layout, regardless of which tab you are currently viewing.
This is particularly useful if you have children working on statements across different
level boundaries.
Remember, information does not need to be saved. Apptracker will automatically store
data when the user moves to assess another pupil.
The 'Preview' icon copies the
targets that have their 'Print'
box checked into the label
preview box where they can
be edited if required.
The 'Clear' icon removes any
targets from the label
preview and unchecks any
'Print' boxes that are checked
throughout the assessment
sheet.
NB. 'I CAN' STATEMENTS ARE TO BE USED AS A POSSIBLE STARTING POINT.
LABEL PREVIEW BOXES ALLOW EASY EDITING TO MAKE TARGETS BESPOKE TO CHILDREN
IN ANY GIVEN CLASS OR SCHOOL.
7
Making Judgements
The software will not make level judgements for the user. APPtracker values the
importance of teacher judgement in the APP process. Therefore, after carrying out an
assessment the user will need to decide whether the child is; 'Working Within', 'Below
Level' or has 'Insufficient Evidence' for each AF. This is done by selecting from the
options at the bottom of the each AF column within each level.
Finally, using the APP judgements flowchart attribute a Low, Secure or High judgement
to the child. This judgement will then be displayed alongside the child's name within
the assessment sheet for ease of reference.
Once all the necessary children have been assessed the user can immediately analyse
the data to inform his/her planning and grouping.
This analysis section is explained further on the following page.
8
Analysis
The analysis section of APPtracker has been designed to provide informative feedback
relating to the progress of all children added to the database. It is simple and easy to
use and requires no processing on behalf of the user. As soon as your assessment data
has been entered, the analysis section is automatically updated.
To access the analysis section from the main menu click on the
associated to the area you would like to analyse.
symbol
The first screen provides an overview of attainment by Level with L, S and H
representing Low, Secure and High within each level. An 'X' in a particular column
shows which level each child has achieved, and the column headings also show totals
and percentage of the current cohort within each level.
In this, and the other analysis screens it is possible to filter the list of pupils so you can
single out particular groups to evaluate their progress. This is achieved by using the
four drop-down menus at the top of the screen. You can filter by status, which includes
all the criteria selected when the pupil was added or edited such as gender, FSM, LAC,
SEN etc, year and class which are more for head teachers, or group which links back to
the academic groups that the children have been allocated to. You can filter the data
as many times as you like to continually refine the list of pupils displayed. A history of
the first four filters you perform appears at the top of the screen as you work. As you
filter, the group the percentages and totals are automatically updated.
Totals &
Percentages
Filters
Filter History
To start the filtering
process again at any
time just click 'Show
All'. This will enable
you to start filtering
again from scratch.
This is an incredibly useful tool. However, there remain two further tiers of assessment
data that can be analysed.
9
AF View
The second tier of analysis enables users to scrutinize data at the AF level. From the
initial Overall Level layout, click on the AF icon to be taken to the AF view.
In the screenshot below we can see how the data is set out.
X's represent the children working within each level for each AF, I's represent
Insufficient Evidence and B's Below Level. Ordinarily in standard assessment practices
where B (Below Level) was identified, it would be expected that the corresponding AF
in the level below would have been completed or at least attempted.
Click anywhere in the coloured blocks to go
to Bullet Point View for that level
From the data it is immediately possible to identify
which children need support in specific AF's. This may form whole class focuses or
simply lead to the alteration of guided reading groups for example.
Hovering the cursor over each AF column heading will display a small text box
explaining what the AF is. This reduces the need to revisit the assessment sheets to
clarify which AF is which.
Again, the filters at top of the screen enable the user to target the achievement of
particular groups of children.
The third and final tier of assessment data relates to the individual statements within
each AF. To access this the user simply needs to click anywhere in the level (coloured
block) for which further analysis is required.
10
Bullet Point View
All statements that, through the marking process, have been identified as being
achieved show up as X's on the chart. From this level of analysis it is obvious where to
target teaching in order to move learning forward and achieve the statements within
the APP materials. The letters 'B1' and 'B2' etc relate to the bullet points within each
AF. These are clearly indicated on the assessment layouts (see overview page 6).
Shown above is the achievement of the pupils broken down into statement within
Level 2. This supports teachers in identifying targeted areas of need and supports the
grouping of children for guided group work.
Different levels can be examined using the navigational icons above the chart.
As with the previous layouts, the filters are fully functional.
To return to AF view or Overall Level click on the icons in the top right corner of the
screen.
11
Printing Data
All data generated in the analysis section can be printed. If you need to print off the
tables or charts, click on the 'Go to Print View' icon, then select the 'Print' icon.
Exporting and Importing Data
Whole class data and individual assessment data can be Exported and Imported using
the Export and Import icons.
To export data
From the Main Menu select the 'Export Data' icon. You will then need to
select which data you wish to export by clicking on the relevant icon.
Once you have chosen the type of data to export, you need to select which pupils you
wish to export data for. In the screen that follows you can check boxes to manually
select the children you wish to export, or you can click on the 'Select All' icon if you
need to export data for every pupil. The option to manually select children is
particularly important if you have classes which are splitting at the end of the year. This
way you can select and export the specific children to the correct class without the
need for the receiving teacher to do a complete import, then delete all the information
he/she doesn't need.
When you have made your choice, click on the 'Export' Icon and select the destination
for your file. This can be the machine which is running APPtracker, a memory stick or a
shared network drive - anywhere you could save a Word document for example.
NB MAKE SURE THAT IN THE FILETYPE DROP DOWN MENU YOU SELECT .csv AS THE FILE TYPE,
OTHERWISE THE IMPORT FUNCTION MAY NOT FUNCTION CORRECTLY.
12
To Import Data
Importing data is the opposite of exporting and will read the contents of an
exported file back into APPtracker.
From the Main Menu select the “Import Data' Icon. Just as you select which type of
data to export, you have to tell APPtracker which type of data you are going to import
back in. Once you click on one of the icons then you will be prompted to navigate to
the appropriate file. If you attempt to import data which is different to the icon you
clicked on, you will get an error message.
If your import file does not appear where you expect it to be, change the file type on
the import dialog box to ‘All Files’ or .csv. You should now see you export file’s icon
and be able to select it for import.
APPtracker will then read the information from the file and add it into the database. If
it finds data relating to a child that is already in your copy of APPtracker, that child's
assessment data will be overwritten with the contents of the import file. If APPtracker
finds no record of the child you are importing in your database, then it will add that
pupil on to the list.
As soon as data has been imported, all the assessment and analysis sections are
automatically updated.
13
Printing Assessment Sheets
APPtracker recognises there will be occasions when teachers need to produce paper
versions of the assessment guidance to support with moderation etc. To this end,
APPtracker has a 'Print Sheet' function.
In order to produce a hard copy, click on the 'Print Sheet' icon at the top of the tab you
are working in on the relevant child's assessment layout.
The initial screen you will see will be an accurate reproduction of the APP Guidance
Sheets as published by the DCSF. These contain two levels of data per sheet as per the
original documentation. However, there may be occasions when it is desirable to have
the blue evidence boxes in place on your print out, so to facilitate this we have created
APPtracker views as well. These feature only one level per sheet but with the boxes
present as well. You can navigate to them using the icons on the right hand side of the
screen. Once you have decided which layout you would like to print, simply click on
the 'Print' icon which will bring up a dialog box enabling you to send the sheet to your
printer.
Screenshots of both versions are shown overleaf.
All the print layouts are automatically updated when you enter your assessment data.
This means that paper versions can be quickly produced for whole school, cross key
stage, phase team or even cluster moderation without the need to highlight new
sheets.
14
Standard View
Decisions made during
the assessment process
are automatically mapped
into the print sheet.
The overall level
appears here
APPtracker View
15
Achieved statements
are greyed out.
accelerating progress, raising achievement
Designed and built by Iccom Educational Ltd
APPtracker concieved and developed by
Chris Pearce and Jimmy Pewtress
Iccom Educational Ltd
70 Bondgate
Helmsley
York
YO62 5EZ
Registered in England and Wales: 6807262
VAT Registration Number: 970 1038 43