1
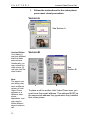
Intel Create and Share™ Software Deluxe ® User’s Manual Copyright © 1999, Intel Corporation. All rights reserved. Intel Corporation, 5200 NE Elam Young Parkway, Hillsboro, OR 971246497 Intel Corporation assumes no responsibility for errors or omissions in this manual. Nor does Intel make any commitment to update the information contained herein. The sample images included with the Intel® PC Camera Pro Pack are provided courtesy of PhotoDisc. © Copyright 1999 PhotoDisc, Inc. All rights reserved. Music for the images is provided courtesy of Opus 1. © Copyright 1999 Opus 1. All rights reserved. Portions of this product were created using LEADTOOLS ©1991-1996 LEAD Technologies. All rights reserved. This software is based in part on the work of the Independent JPEG Group. Portions of this product were created using Mabry Internet Mail Control ©1996-1998 by Zane Thomas, Mabry Software, Inc. All rights reserved. *Other product and corporate names may be trademarks of other companies and are used only for explanation and to the owners benefit, without intent to infringe. First Edition August 1999 Contents 1 Overview 1 2 Using Intel Create & Share Software 7 Starting the Intel Create & Share Software .................................4 Quick Tour .........................................................................................5 The Home Screen .............................................................................5 What are galleries? ............................................................................7 Taking snapshots ...............................................................................9 Automatically taking snapshots........................................................10 Record a video .................................................................................12 Record audio....................................................................................14 Make and send an email postcard ...................................................14 Creating a movie ..............................................................................17 Creating a home page .....................................................................18 Using other devices .........................................................................20 Play a camera game ........................................................................20 3 Internet Video Phone Call 21 Appendix A Troubleshooting 30 Appendix B Telephone Video Calls 36 Appendix C System Requirements 42 Preparing for your first call ...............................................................21 Making an Internet video phone call ................................................21 Helpful hints for making video phone calls.......................................28 Other tips .........................................................................................29 Whats in this appendix ....................................................................30 General troubleshooting...................................................................30 Video Phone troubleshooting ...........................................................35 World Wide Web Support 1 Overview The Intel® PC Camera Pro Pack includes the Intel PC Camera Pro and the Intel® Create & Share Deluxe Software that lets you use your PC to communicate in a variety of new ways. Features include: Intel® Video PhoneNow you can talk to and see others at the same time using the Intel Video Phone to make video phone calls over the Internet. For information about making Internet phone calls, see Chapter 3 Internet Video Phone Call. You may also be able to make telephone video calls over regular telephone lines if you are running Windows 98 and have a video-ready modem. See Appendix B Telephone Video Calls for more information. Intel® Email PostcardIncorporating snapshots, video files, and sound files into the supplied templates or into a template you design, you can create email postcards and send them to family, friends, or business associates. To learn how to create a postcard, see Chapter 2 Using Intel® Create & Share Software Deluxe. Intel Movie BuilderCreate movies and multimedia business presentations with title cards, video clips, still images, voice-overs, special effects, and audio. You can send your movies over the Internet to friends, family, and business associates, or include them in your home pages. To learn how to use the Intel Movie Builder, see Chapter 2 Using Intel® Create & Share Software Deluxe. 1 C H A P T E R 1 2 Overview • Intel Home Page BuilderConstruct home pages with words, graphics, still images, and video automatically using the supplied templates or in a template you design. To learn how to create web pages see Chapter 2 Using Intel® Create & Share Deluxe Software. Home ScreenThe starting place for all activity. From here you can access your galleries, create new media files, launch the video phone, email postcard application, the home page builder application, the movie builder application, PC camera games software, and set up the camera to take snapshots automatically. Intel AutoSnapshotSet up the camera to take snapshots at regular intervals for including on a web site, saving to your hard disk, or sending through email. For more information see Chapter 2 Using Intel® Create & Share Software Deluxe. PC Camera GamesUse the Intel PC Camera Pro to put yourself into a virtual reality where you can pop the falling bubbles, shoot baskets, or hold the whole world in your hands. To put yourself in the action, click the PC Camera Games icon on the Home screen. See Chapter 2 Using Intel Create & Share Deluxe Software. Intel GalleryThe project and media file manager within the software. From the gallery, you can open and organize projects and video, image, and sound files, collectively called media. To learn more about the gallery, see Chapter 2 Using Intel® Create & Share Deluxe Software. Overview C H A P T E R 1 Intel Snapshot Quickly and easily take snapshots using your PC camera. These snapshots can be assembled into your own online photo galleries, sent to others using email, or printed. To learn how to take and use snapshots, see Chapter 2 Using Intel® Create & Share Software Deluxe. Intel Scene RecorderRecord and trim video clips to spice up a web page, add interest to a presentation, or share a video moment of your children with their grandparents. To learn how to make and share these videos, see Chapter 2 Using Intel® Create & Share Software Deluxe. Intel Audio Recorder Make audio files that record your babys first words, narrate a business presentation, or send an audio message in an email postcard. For information about making and sharing audio files, see Chapter 2 Using Intel® Create & Share Software Deluxe. 3 C H A P T E R 1 Overview Starting Intel® Create & Share Software Deluxe From the Windows Start menu click Intel Create & Share Software or double-click the software desktop icon. The online version of the Intelâ Camera Pro Pack with the Intel Create & Shareä Software Deluxe Getting Started Guide can be found at: Start> Programs> Intel Create & Share Software> Manual>Getting Started Guide To run the Configuration Wizard again, go to: Start> Programs> Intel Create & Share Software> Set Up Audio & Video. To register later, go to: Start> Programs> Intel Create & Share Software> Register Online. 4 Online Manuals Each time you start the software you are given the opportunity to view or print the online manuals. Choose the manual you are interested in, continue without looking at any manual, or check the Dont prompt to view manuals on startup to prevent the message from appearing again. The first time you run the Intel Create & Share Software Deluxe: 1 The Configuration Wizard guides you through configuring your system. Be sure to run the default tests.You must complete all of the tests and supply all user information to successfully use the software. 2 For instructions on completing the Configuration Wizard see the Getting Started Guide. A splash screen presents you with the options of running the Quick Tour or using the software. We suggest you run the Quick Tour to get an overview of the many things you can do with your new Intel PC Camera Pro. The second time you run the Intel Create & Share Software Deluxe: The Intel Registration Wizard appears so you can register your program. If you choose to register now, complete the requested information. Remember to connect to the Internet to register online. Overview C H A P T E R 1 Intel Quick Tour Intel Quick Tour, a multimedia demonstration, introduces the Intel Create & Share Software Deluxe and shows you how to do some basic tasks. Look for step-by-step instructions for these tasks in the online Help or in Chapter 2 Using Intelâ Create & Shareä Software Deluxe. To run the Quick Tour Go to Start> Programs> Intel Create & Share Software> Quick Tour Note Be sure to register to Stay in the Loop. Registered users are periodically informed of updates, upgrades, and special offers. The Home screen The Home screen is the starting place for all Intel Create & Share Software Deluxe activities. Following is a picture of the Home screen and descriptions of some of its features. 5 Overview Title/Menu bar Full Gallery button Click to expand the gallery and see more of your media files. Gallery list Click the arrow to select another gallery. Gallery sorter Sorts your media files alphabetically, by date and time, or by media file type. Intel Gallery Task Icons Click a task icon to begin that activity. Insert button Inserts the selected file into your email postcard 6 Snapshot tool Video tool Use Intel Snapshot to Use Intel Scene take a snapshot using Recorder to record video your PC Camera using your Intel PC Camera.Pro Audio tool Use Intel Audio Recorder to make a sound recording. Other Devices tool Access any other device attached to your computer such as a scanner or digital camera. Home icon Click here anytime to return to the Home screen. CHAPTER1 Click here to find out how to do more with your camera 2 Using Intel Create & Share Software Deluxe With the Intel® Create & Share Software Deluxe you can organize your media files into galleries. These media files can include snapshots, videos, and audio files. Incorporate these media files into email postcards, movies, or web pages you create and send to family and friends, play a virtual reality game that puts you in the picture shooting hoops, popping bubbles or bouncing objects all over the screen, or set up the camera to automatically take snapshots. Let your own imagination guide you through the possibilities. What are galleries? A gallery is a collection of video, audio, image files, and project files. Individual files can be a part of many galleries. For instance, an image of the beach could be an element of a vacation gallery and also a landscape gallery. From within a gallery you can: Physically and logically copy and move media files using drag-and-drop operations. Two galleries are included as a part of the software: Main Gallery Clipart Open individual files by double-clicking on the thumbnail. Sort media files according to the name, date, or file type. Print individual or all of the thumbnail still images in a gallery. 7 C H A P T E R 2 Using Intel Create & Share Software Deluxe Move between galleries by clicking on the button next to Galleries list and selecting another gallery from the list. Galleries can be: created deleted printed renamed viewed all at once See the online Help for more information about galleries. To view the full gallery: Click Full Gallery on the Home Screen OR From the Gallery menu, choose View. Did you know? To get information about a media files properties: 1 Open a gallery. Click here to see properties 8 In the gallery, click a file once to select it. 3 Click the lower right corner of the thumbnail and the Properties dialog appears. 4 Click OK when you have finished. The properties differ according to the kind of media file selected: Still Image 2 File Name File Location Modification date File Size Resolution Color Depth Format Video File Name File Location Modification date File Size Resolution Length in frames Length in seconds Channels Video Compression used Audio Compression used (if audio is present) Audio file File Name File Location Modification date Format Channels Sample Rate Sample Size Using Intel Create & Share Software Deluxe C H A P T E R 2 To rename media files: On the Properties dialog, type the new file name. Taking snapshots Snapshots taken using your Intel PC Camera Pro can be organized into galleries, included in other sources like electronic presentations, added to email postcards, or included on your web pages. To take a snapshot: 1 On the Home Screen click Take Snapshot. 2 3 When you have the image you want in the Live View window, click the Snapshot button or press the snapshot button on your camera. The snapshot appears in the Snapshot window. Click Save in the Snapshot window. Your snapshot is saved automatically to your default gallery location. Did you know? You can click the right mouse button in the Live View window and choose Options to: Enable snapshot sounds Set a 5-second delay before taking the snapshot Prompt to save unsaved snapshots Sharpen the image Take larger snapshots Drag the Live View window to change its size Specify the file type of the snapshot Note When renaming media files, do not change the files extension. Note To disable the automatic save feature: 1 2 From the File menu, choose Options. On the Images tab, select Prompt for file names and locations when saving files. Note You can also take snapshots by clicking the Intel Snapshot icon on the desktop. Some of the features may work differently. For more information on Intel Snapshot, consult the online Help. 9 C H A P T E R 2 Using Intel Create & Share Software Deluxe Automatically taking snapshots With Intel Auto Snapshot you set up the Intel PC Camera Pro to take snapshots at specified intervals or when motion is detected, and have the snapshots saved to your hard drive, sent to an email address, or posted to your home pages. Note Snapshots saved to the disk have the automatic filename of AutoSnapxx, where xx is the number of the snapshot. The default number of snapshots to save is 10, unless you change it. Once the default limit is reached the subsequent snapshots are renumbered starting with 01, meaning that the eleventh snapshot becomes AutoSnap01.jpg. To take snapshots automatically: 1 On the Home Screen click Setup an Auto Snapshot. 2 Choose the snapshot trigger. The triggers are: when motion is detected by the camera, or by a specified time interval. If you choose Motion Controlled snapshots, determine the amount of motion the camera should detect before taking a snapshot. If you choose Timer Controlled snapshots, set the time interval between snapshots. The timer defaults to 15 minutes. The upper limit is 24 hours, 59 minutes, and 59 seconds. 3 Choose what to do with those snapshots. You can save auto snapshots to disk, post auto snapshots to a web page, or send auto snapshots via email. If you decide to save the snapshots to disk, specify a location on the disk. If you post auto snapshots to a web page, you must specify an Internet Service Provider (ISP), and depending on your ISP, your User name and Password. For more details, see the Enable Auto Dialing for Intel Auto Snapshot topic in the online help. If you send the snapshots via email, enter the email address. 10 Using Intel Create & Share Software Deluxe C H A P T E R 2 4 Add a caption to the snapshots. You can optionally choose to add a specified text string to each snapshot as well as the date and the time of the snapshot. There is a default caption provided. 5 Turn Intel Auto Snapshot ON. You must turn Auto Snapshot On to have the camera take automatic pictures according to your settings. After the Intel Auto Snapshot settings have been made, the application icon resides in your system tray. To turn it OFF you can click the right mouse button on the icon and choose Off. To have the application quit, click the right mouse button on the icon and choose Exit. When enabling the autodial feature many variables can affect the success rate of automatically sending your snapshots. Some of these variables include: Telephone connection ISP connection ISPs server settings We suggest checking the Auto Snapshot error log and if needed exit and restart Auto Snapshot. To check the error log: 1 In the system tray, click the Intel Auto Snapshot icon. 2 Click Show Errors from the shortcut menu. Note: When Auto Snapshot is set to autodial and ICQ, or a similar application is waiting for an Internet connection, problems can occur. When Auto Snapshot connects, ICQ senses the connection and tries to connect to the ICQ server. To avoid this you can: Disable Windows* autodial Disable the ICQ NetDetect Agent. 11 C H A P T E R 2 Using Intel Create & Share Software Deluxe Did you know? The stand-alone version of Intel Auto Snapshot has additional options including: Saving an unlimited number of snapshots to your disk. Supplying a return email address for those snapshots sent via email. This means the recipient knows who sent them. Adding the snapshot caption to the top or bottom of the snapshot. When taking pictures based on motion, you can also specify how long to wait before taking snapshots after the motion is detected. Setting the timer to work 24 hours a day or only during certain times. To access the stand-alone version of Intel Auto Snapshot: 1 Go to Start>Program>Intel Create & Share Software>Intel Auto Snapshot.(Or if you have already set up the Intel Auto Snapshot, doubleclick the icon in the system tray.) 2 To set up or change the settings, click Configure. 3 Click OK when done. Record a video You can record live video using your Intel PC Camera Pro. These videos are stored in your galleries and can be added to email postcards. Note The Record button is available only while you are viewing live video. 12 To record a video: 1 On the Home Screen click Record Video. 2 To begin recording the video click Record. 3 When you have finished recording the video click Stop. Using Intel Create & Share Software Deluxe C H A P T E R 2 4 Options: 5 Click Save. Type a filename and select a gallery from the Add to gallery list. 6 To play back your video click Play To trim your video click Trim. Click Save. To trim the video: 1 Click the Trim button. Trim markers appear below the video window. 2 Trim the video by moving the trim markers at either end of the scale. The area outside the Trim marker will be gray. Current position slider Left trim marker 3 Note By default videos are automatically saved. To disable the automatic save feature: 1 From the File menu, choose Options. 2 On the Record Video tab, select Prompt for file names and locations when saving files. Right trim marker Move the trim markers by dragging them: - Drag the left trim marker to the position you want to mark as the beginning of the video. - Drag the right trim marker to the position you want to mark as the end of the video. - Drag the trim markers to new positions to undo trimming. Did you know? You can extract a still image from a previously recorded video and save it in your gallery. 1 From the gallery, double-click the .avi file you want to open. 2 Move the current position slider to the position in the video you want to save. 3 Click Save Frame to take a frame shot. You can capture video from an external device with Scene Recorder. See the Intel PC Camera Pro Pack with Intel Create & Share Software Deluxe Getting Started Guide for instructions. 13 C H A P T E R 2 Using Intel Create & Share Software Deluxe 4 The frame is saved automatically to your default gallery location. Record audio You can record audio files using the Intel Audio Recorder. You could use these files in a presentation to narrate some important point or to add a sound greeting to an email postcard or a home page. To record audio: 1 On the Home Screen, click Record Audio. To add another cutout to the postcard: 1 2 3 14 From the Insert menu, click Still Image Item. The new cutout appears on the postcard. Position the new cutout on the postcard, or resize existing cutouts before moving the new one. 2 Click Record to begin recording, then speak into your microphone. 3 Click Stop when you have finished recording audio. 4 Option: Click Play to review the recording. 5 Click Save. Type a filename and select a gallery from the Add to gallery list. 6 Click Save. For detailed information on recording audio files, consult the online Help. Make and send an email postcard Suppose you are interested in sending a birthday greeting to your childrens grandmother that includes stills of your children, text, and an audio greeting from the children to their grandmother. To create the postcard: 1 Take some snapshots of your children that you want to include. Save them in the desired gallery. Using Intel Create & Share Software Deluxe C H A P T E R 2 2 Have your children record an audio file and save it to the desired gallery. 3 On the Home screen, click Send an Email Postcard. 4 Click Create a new postcard. 5 Select the Birthday template from the Home & Family category. Click Next to continue. 6 The cutouts already in the template can accept text and video/image files. Drag one of the snapshots you just took into the image cutout. 7 Double-click in the text cutout to add the birthday greeting. 8 Add the newly recorded audio file to your postcard by clicking the Insert menu and choosing Audio Item. Choose the recorded audio file from the gallery and click OK. Click Next to continue. 9 Add text and grandmas email address to the back of the postcard. Click Next to continue. 10 Choose a method to send your postcard. You can send it automatically or save the file to disk and attach it to an email message. The saved file can be found in the POSTCARDS directory. a Click Preview to see how the card looks. b Click Next to continue. 11 Congratulations! Your email postcard has been sent. Now you can choose to continue with the current postcard, create a new postcard, or return to the Home Screen. If you want to finish your postcard later or reuse the postcard you created, create a postcard project. To create an email postcard project: From the File menu, choose Save Project. See the online help for information about overlapping cutouts on an email postcard. To close the Preview of the postcard, click the Close (X) in the upper right corner. Note If you are unsure how to attach a file to an email message, check your email programs online Help. Note Project files have an .iep extension. For more information about email postcard projects, consult the online Help 15 C H A P T E R 2 Using Intel Create & Share Software Deluxe Did you Know? If you send your email postcard with its own viewer, the recipient can extract and save the media files (video, still images, and audio) you have added to the postcard. To extract and save the files, the recipient needs to: 1 Click Extract on the viewer. 2 Click the item to extract. 3 Click Extract Selected Item. 4 In the Save As dialog, type a filename. 5 Click Save. By default the media files in sent email postcards cant be extracted. While you are creating the email postcard, you can make it possible for the recipient to extract the files: 16 1 From the File menu, choose Options. 2 On the Postcard tab, select Allow recipient of postcard to extract media from postcard. 3 Click OK. Using Intel Create & Share Software Deluxe C H A P T E R 2 Creating a movie Using the Storyboard You can combine video, audio, still images and titles into sequential storyboards using Intel Movie Builder. The currently selected scene item is highlighted. If a Storyboard contains more scene items than can fit on your screen, you can click the blue triangles or drag the slider to move forward and back through the Storyboard. When you drag a scene item to a new location on the Storyboard, a cursor appears between items to indicate where the item is placed when you release the mouse button. You can then compile the storyboard into a video file that is saved in the Gallery, for inclusion in your home pages, sending to other people in an email postcard, or used in a presentation. To build a movie: 1 Click Build a Movie on the Home Screen to bring up the Intel Movie Builder. 2 Click Create a new movie to create a new movie project. A blank storyboard displays, to which you can add still images, video, or titles. 3 Add and organize scene items on the Storyboard. 4 Select the transitions, background colors and display times of scene items. 5 Add text to any title or image scene items. 6 To add audio to a scene item, click a scene item on the Storyboard and drag and drop an audio scene item from the gallery to the editing screen of the scene item. 7 Click Preview at any time while creating the movie to verify the its content and organization. 8 Click Build the movie to create a video file of the movie. See the online help for specific details. 17 C H A P T E R 2 Using Intel Create & Share Software Deluxe Did you know? You can identify the type of media file in a storyboard by the border on the file. Title Note: Added pages have the same background as the initial page, but there are no cutouts. To add media files to these pages: Drag and drop media files from the gallery onto the page. 18 Video Still Creating a home page You can build a home page and other Web pages that incorporate sounds, images, or videos. When you complete your Web pages you can post them to your Internet Service Provider. This collection of Web pages is now your Web site. To create and publish web pages: 1 Click Build a Home Page on the Home Screen to bring up the Intel Home Page Builder. 2 Choose Create a new home page. 3 Click the template that you want to use. Use the scroll bars to view additional templates. 4 Click Next. 5 Drag and drop audio files, video files, or still images from the gallery to the cutouts on the page. If necessary, size and position the cutouts so they do not overlap. 6 Click Next. 7 Click Add Page to add more pages. 8 To automatically create links between all pages on your site, choose the Link All Pages check box. Using Intel Create & Share Software Deluxe 9 C H A P T E R 2 Publish the site to a drive on your computer or to your Internet Service Provider. Did you know? You can create links from an object on a page of your Web site to any other page on the Internet. When a reader views the page in a browser and clicks a link, the browser opens the linked page. To create a hyperlink: 1 Click the cutout for the item to link. 2 From the Cutout menu, select Add/Remove Hyperlink. The HyperLink Properties dialog appears. 3 From the Type of hyperLink list, choose the type. 4 In the URL of hyperlink box, type the URL of the hyperlink. 5 Click OK. To add an Auto Snapshot cutout to a web page: 1 Click Add New Item 2 Choose Auto Snapshot. 3 Position the cutout on the page. When Intel Auto Snapshot is set up to send a picture to the home page, it displays in the added cutout. See Automatically taking snapshots for instructions on setting up Auto Snapshot. Note: When making a text hyperlink, select the text in the cutout before you make the link. To select the text: Position the cursor on the text you are interested in and highlight the text you want linked. 19 C H A P T E R 2 TWAIN A program that lets you acquire an image directly into an application. TWAIN-compliant devices include scanners and digital cameras. Using Intel Create & Share Software Deluxe Using other devices You can add new media to your galleries from any attached TWAIN-compliant devices such as a scanner or a digital camera using the Other Devices tool on the New Content bar. Play a camera game Put yourself in the action! These games let you interact with virtual objects on your computer screen. Your image is captured through the Intel PC Camera Pro and displayed on the screen so you can pop bubbles, bounce a ball from hand to hand, or play virtual basketball. For more information on camera games, consult its online Help. To start a camera game: 1 Click Play a PC camera game on the Home screen. 2 Click the button of the game you wish to play. 3 When you are finished playing, press any key to end the game. Did you know? You can set up one of the PC Camera Games to be your screen saver. 20 1 From the Home Screen, click on the PC Camera Games icon 2 Click Configure games. 3 In the Configure FreeAction Sampler dialog, select the game, adjust its settings, and click Set as Default Screen Saver. 4 Click OK. 3 Internet Video Phone Call Preparing for your first call One of the most popular uses of the Intel Create & Share Software Deluxe is to make Internet video phone calls using Intel Video Phone software. There are different versions of Intel Video Phone software. Setup automatically installs the version that works best with your modem, operating system, and computer. You can make Internet video phone calls with anyone who has a H.323-standards compatible video phone application (such as NetMeeting*). The following sections describe how to make an Internet video call using an email address - the easiest way to call other Intel Video Phone users because each users email address is registered automatically in the same directory listing service as yours. More information about directory listing services is provided later in this chapter. Depending on your modem, operating system, and computer, you may also be able to make telephone video calls over your regular telephone lines. For system information about telephone video calls, see Appendix B: Telephone Video Calls. Making Internet video phone calls 1 Note For more information on this feature and other calling methods, consult the Intel Video Phones online Help. Identify your video phone. Start the Intel Create & Share Software and click the Make a Video phone call icon on the Home Screen. 21 C H A P T E R 3 Internet Video Phone Call 2 Follow the instructions for the video phone yours most closely resembles: Version A See Section A. Version B Note Your dialer (1) may look different than the dialer pictured here. Additionally, you may not see the video phone (2) until you click the video button. Note The person you are calling may have a different version of Intel Video Phone software or a different video phone application, and may need to follow different steps to place a call. 22 Version B See Section B. 1 2 To place a call to another Intel Video Phone user, you must know their email address. This address MUST be the same email address they typed when they installed their video phone. Internet Video Phone Call C H A P T E R 3 To check the email address of the person you are calling have them: 1 Open their video phone. 2 From the Tools menu on their video phone, choose Options. 3 The email address is found on the User Info tab. Section A If your video phone looks like Version A 1 2 Start Intel Video Phone. Start the Intel Create & Share Software, and then click Make a Video phone call on the Home screen. Establish an Internet connection. Click the Internet button or the Internet On button. In many cases, this displays the Connect To dialog box where you type your user name and password. If you are using an Online Service Provider, such as America Online (AOL*), you must manually connect to the Internet before clicking the Internet button. 3 Place an Internet video call. a When Internet Ready appears in the status area at the top of the video phone, click the Call button. b Type the email address of the person you are calling. c If you call someone who has a non-Intel video phone application and who is registered with a different directory service, you must type the name of their directory listing service in the Directory Services dialog box. Note In other versions of Intel Video Phone software the email address might be found under the Options or Set Options buttons. Note The person you are calling must have their video phone running and be connected to the Internet. Tip To make a test call open your browser and type this address: www.intel.com/ PCcamera/ portals/ testcall.htm Reminder: Mail your Intel Video Phone Send to a Friend Software CD to a friend or family member so you can call them over the Internet. 23 C H A P T E R 3 Internet Video Phone Call d e Note The person you are calling may have a different version of Intel Video Phone software or a different video phone application, and may need to follow different steps to place a call. Note In other versions of Intel Video Phone software: 1 From the Tools menu choose Options. 2 The email address might be found on the User Info tab or under the Set Options button. 24 4 For example, if the person you are calling is using Microsoft NetMeeting*, type ils.microsoft.com in the Directory Services box. Click OK. After establishing your audio connection, you can talk to the person you called. To add video, one person clicks the Video button. After your video connection is established, the person you called can see and hear you. If they have a camera on their PC, you can see and hear them. End the call. Click Hangup to end the call. Section B If your video phone looks like Version B To place a call to another Intel Video Phone user, you must know their email address. This address MUST be the same email address they typed when they installed their video phone. To check this, ask the person you are calling to verify their email address. To find their email address, have them: 1 Open their video phone 2 Click the Options button on the video phone. 3 The email address is found on the General tab. To make an Internet video phone call: 1 2 3 Establish an Internet connection. Connect to the Internet using your normal method. Start Intel Video Phone Start Intel Create & Share Software, and then click Make a Video phone call on the Home screen. Place an Internet video call. a Click the Internet button on the dialer. b Type in the requested information in the Setting Your Caller Information dialog box. Internet Video Phone Call c d e f g 4 C H A P T E R 3 Unless this information changes, you do not need to do this every time you use your video phone. The Internet button on the dialer is now lit. Click the Call button on the dialer. Type the email address of the person you want to call. If you want to call someone who has a nonIntel video phone application and is registered with a different directory service, you must type the name of their directory listing service in the Directory Services box. For example, if the person you are calling is using Microsoft NetMeeting*, type ils.microsoft.com in the Directory Services box. Click OK. Click the Place a video call button. The status of your call appears in the Placing an Internet call dialog box. After connection is established, you can talk to the person you have called and they can see you. If they have a camera on their PC, you can see them. End the call. Click Hangup to end the call. Did you know? Intel Video Phone software is now designed to take advantage of high-speed Internet access and supports a variety of broadband Internet connections, including cable modems, Digital Subscriber Line (DSL), Asymmetric Digital Subscriber Line (ADSL), and Local Area Network (LAN). If you have a high-bandwidth, or "broadband," Internet connection, you can receive video at rates of up to 384Kbps*. Reminder Your dialer may look and function slightly differently from the one described here. Note The person you are calling must have their video phone running and be connected to the Internet. Tip To make a test call open your browser and type this address: www.intel.com/ PCcamera/ portals/ testcall.htm Reminder: Mail your Intel Video Phone Send to a Friend Software CD to a friend or family member so you can call them over the Internet. 25 C H A P T E R 3 A high-bandwidth Internet connection supports data rates of 64Kbps and higher. 56Kbps modems are not highbandwidth connection devices. For information about obtaining high-bandwidth Internet service, contact your Internet Service Provider, your telephone company, or your television cable company. To see the version of your Intel Video Phone software: 1 From the Help menu on the video phone, choose About. 2 The version of the software is shown in the About box. 26 Internet Video Phone Call To receive high-bandwidth-enhanced video on Intel Video Phone software, both you and the person you are talking to needs: A network card, cable modem, or digital telephony device such as an ISDN or DSL digital 'modem' that supports a data rate of 64Kbps or higher. These devices use highbandwidth data transports such as network cables, television cable services, or digital telephone services to connect to the Internet through a high-bandwidth Internet Service Provider. A 300MHz or faster processor. Faster processor speeds are necessary due to compression and decompression of a large amount of video data. Intel Video Phone software limits the bandwidth that can be sent and received by a computer based on its processor speed. Intel Video Phone Version 3.2 or greater When both ends of a video phone call meet the above requirements, each party can receive increasingly faster and smoother video.* Visit http://support.intel.com/support/videophone/ 3x/index.htm for more details on using Intel Video Phone software over high-bandwidth Internet connections. * Intel Video Phone software's performance over high-bandwidth Internet connections is dependent on the speed of your processor and Internet connection, the speed of the recipients processor and Internet connection, and the amount of traffic on the Internet. Actual tramission speeds may vary, based on these factors and others. Internet Video Phone Call Note: You can make the Internet Bandwidth Control pop up automatically whenever you make a highbandwidth connection. On the Tools/ Options/Internet tab, check the box labeled Show the Internet Bandwidth Control when starting Internet video calls.. C H A P T E R 3 To make a high-bandwidth Internet call with Intel Video Phone: 1 From the Tools menu, choose Options. 2 In the Options dialog, choose the Internet tab. 3 Make sure the box next to "My computer has a Cable, DSL, ISDN or LAN Internet connection" is checked. This enables the Internet Bandwidth Control in the Tools menu. 4 Make an Internet Video Phone call. See the instructions for this earlier in this chapter. 5 When the video is connected, from the Tools menu choose Internet Bandwidth Control. 6 Use the slider in the dialog box to increase your video bandwidth. Be sure to wait several seconds for your changes to take effect. 7 When you are satisfied with the audio and video quality, close the Bandwidth Control dialog and continue your call. 8 In some instances you may set the Internet Bandwidth Control slider to a level higher than your partners system can send (or than your end-to-end Internet connection can support). If the slider is set too high, you may experience audio and video delay. If this happens, scale back the slider speed until the delay is reduced or eliminated. 27 C H A P T E R 3 Internet Video Phone Call Helpful Hints for making video phone calls To improve the sound quality: Full-duplex When both parties in a video call can speak at the same time. Speak slowly and clearly into the microphone Wait until the other person stops speaking before you reply. Eliminate background noise from your area. Consider using a headset instead of speakers. This allows you to use full-duplex audio, eliminates feedback, and reduces background noise. Headsets with built-in microphones work as well. Keep the microphone away from the speakers to avoid feedback Ensure that the microphones volume is not too loud. If you are experiencing difficulties: Mute the video and ask the other person to do the same. Your audio will remain connected. - Click the drop-down menu on the Mute button. To improve the video quality: Make your My video and Guest video windows smaller and ask the other person to do the same: -Click the View menu and select a smaller size. Put light in front of you, not behind you for a welllit image. 28 Internet Video Phone Call C H A P T E R 3 Other tips: Remember, the person you are calling may have a different version of Intel Video Phone software or a different video phone application. Be patient while making a call. Place the camera on top of your computer and the microphone at least 6 inches from a computer speaker. Disable call waiting on your regular telephone line. (Consult your telephone directory for details.) Make sure your phone and modem are properly connected to your computer. You'll get a better connection quality if you try to avoid connecting to the Internet at peak times. These peak times are during evenings, on holidays, and weekends If your modem supports it, a 56kbps connection to the Internet means better Internet phone calls. For further instructions and solutions to common problems, consult the online Help. For customer support, check the Intel customer support Web site at: http://support.intel.com/support/createshare/ camerapack. 29 A Troubleshooting See the Intel® Create & Share Software Deluxe online Help for additional troubleshooting information or use the Troubleshooting Assistant located on the Web site at http://support.intel.com/support/ createshare/camerapack/tsa.htm. You can find other customer support information in the World Wide Web Support section at the end of this manual. Whats in this appendix? The information presented here contains the following sections: For troubleshooting problems that occur after setup, see the section entitled General troubleshooting. For video phone problems, see the section entitled Video Phone troubleshooting. General troubleshooting Symptom Solution The Configuration Wizard locks up during the DirectDraw* test. The DirectX* hardware acceleration features of your system may be interfering with the test. Disable DirectX hardware acceleration before running the Configuration Wizard: 1 2 3 Click Start> Run. Type C:\PROGRAM FILES\DIRECTX\SETUP\ DXTOOL.EXE and click OK. In the DirectX Driver Tool dialog, clear the Use Direct3D Hardware Acceleration and Use DirectDraw Hardware Acceleration check boxes and click OK. Continued on next page... 30 A P P E N D I X Troubleshooting A Continued from previous page. 4 Run the Configuration Wizard again. Go to Start > Programs> Intel Create & Share Software> Set Up Audio & Video. After successfully completing the Configuration Wizard, you can re-enable the hardware acceleration features in the DirectX Driver Tool dialog. The audio is not recorded with the video Make sure your microphone and speakers are connected properly. When recording from an external audio device, ensure that the correct audio source is selected. To verify your audio source: a b Click Record Video on the Home screen. On Scene Recorder, click A/V Input. c In the Video and Audio Input dialog, verify the device to record audio from in the Audio Source. To record audio, you must install a sound card or have sound support on your motherboard. If you already have a sound card installed, check the sound card setup; make sure the software is installed correctly. Check your record and playback abilities. For Windows 95: Click Start> Programs> Accessories> Multimedia >Sound Recorder. For Windows 98: Click Start> Programs> Accessories> Entertainment> Sound Recorder. Continued on next page 31 Troubleshooting Symptom A P P E N D I X Solution Continued from previous page. The audio sounds too low or quiet A Check the cable connections to your sound card or motherboard. Disconnect and reconnect your cables. Your audio input source (microphone, VCR, laserdisk) must be connected to either Microphone or Line In on your sound card. Check the audio level in the mixer software; make sure your sources are not muted. Use the Configuration Wizard to adjust the microphone volume. To run the Configuration Wizard go to Start> Programs> Intel Create & Share Software> Set Up Audio & Video. Check the sound cards mixer software; make sure the audio input (Line In or Microphone) is correctly set for the device you are using. Also make sure the mixer settings are set to Record. Contact your sound card manufacturer for help. Consult your system documentation and sound card documentation for detailed instructions to run these checks. Use the Configuration Wizard to adjust the microphone volume. To run the Configuration Wizard go to Start> Programs> Intel Create & Share Software> Set Up Audio & Video. Continued on next page 32 A P P E N D I X Troubleshooting A Symptom Continued from previous page Solution Check the sound cards mixer software. Some software includes an option for boosting microphone gain. If the mixer software includes this option, be sure that it is selected. When including audio from an external source, change the settings by: a b Go to Start>Programs> Accessories> Entertainment>Volum e Control. From the Options menu, choose Properties. c Select Recording in the Adjust volume for option. d Check the volume controls you are interested in changing. e Click Ok. f On the Recording Control, adjust the volumes of the controls. Consult your computer and sound card documentation for more information. Occasionally, the system appears busy when working with camera applications. Wait a few seconds to see if video continues normally. If your problem persists, contact your computer manufacturer or your display driver manufacturer to obtain updated drivers. They are usually found on the manufacturers Web site. Video display is green, distorted, is taking random snapshots, or the live video is corrupted by flashing horizontal, colored lines. A short term solution may be to decrease the hardware acceleration of your video display card. To adjust the hardware acceleration: a Go to Start> Settings> Control Panel. b Double-click the Display icon. Continued on next page 33 Troubleshooting A P P E N D I X Continued from previous page c d e f g h A Click the Settings tab. Click the Advanced Properties button. Click the Performance tab. In the Graphics box, drag the slider to decrease the Hardware Acceleration one setting at a time. Click Apply. Click OK. Repeat steps a-h if necessary. Note: Decreasing the hardware acceleration will affect your computers performance and should only be used as a short term solution. As a long term solution, obtain the latest video card drivers from the display card manufacturer. Most manufacturers provide the most current drivers available on their Web site. See the video display card documentation for more information. When viewing live video the screen is solid black, blue, or green. When lighting conditions change, the image color changes. Make sure the camera is on, the cable is connected, and the lens cover is open. Check which video source is selected. To verify the video source use Adjust Video, Video Settings, or Camera Controls, depending on the application. Check that any external video device connected is on and Play has been selected on the device. Wait for 20 - 30 seconds while Automatic Color adjusts. 34 A P P E N D I X Troubleshooting A Video Phone Troubleshooting Symptom Solution Want to make a test call to verify that the video phone is working. To test your Intel Video Phone over the Internet, check out http:// www.intel.com/PCcamera/portals/ testcall.htm. To test your Intel Video Phone over regular telephone lines, call 504-2645809 (in the U.S.). See Appendix B for information on whether your Intel Video Phone can make calls over regular telephone lines. Symptom Solution Why cant I get a full-screen display when running the video phone? Intel Video Phone uses a DirectDraw function for displaying the remote video window full-screen and for dynamically stretching the video windows to different sizes. The DirectDraw test checks your graphics card driver for the overlay function of DirectDraw. If the overlay function is not found, the full-screen display and window stretching features of the Intel Video Phone are not available. All other video phone features work correctly, and you can continue to change the Window sizes manually using the View menu or by pressing the right mouse button in the video window. 35 B Telephone Video Calls Depending on your computer system, you may be able to make telephone video calls (H.324) over regular telephone lines to another telephone video phone user. To do so, your computer must include: Factory-installed Intel Video Phone software and a VideoReady modem OR Windows 98 and a Video-Ready modem. During installation process, your system configuration is checked automatically. If your computer meets requirements, you may be able to make telephone video phone calls in addition to Internet video phone calls. For instructions on making a telephone video call, look for the video phone that most closely resembles the video phone you have, and go to the corresponding section. To see which version of Intel Video Phone you have: 1 From the Windows Start menu click Intel Create & Share Software or double-click the software desktop icon. 2 Double-click Make a Video phone call icon on the Home Screen. 36 APPENDIX B Telephone Video Calls If your video phone most closely resembles: Version A See Section A. Version B Note Your dialer (1) may look different than the dialer pictured here. Additionally, you may not see the video phone (2) until after you add video to a call. See Section B. 1 2 37 Telephone Video Calls APPENDIX B Version C Note Your dialer (1) may look different than the dialer pictured here. Additionally, you may not see the video phone (2) until after you add video to a call. See Section C. 1 2 Section A 1 Prepare to make a telephone video call. Have the telephone number of the person you wish to call. 2 Start Intel Video Phone. Start Intel Create & Share Software, and click Make a video phone call on the Home screen. 3 Place the call. a Click the Telephone button. b Click the Call button, after Telephone Ready appears in the status area at the top of the video phone. c Follow the directions on the screen. You can make a test call to an Intel pre-recorded message by typing 503-264-5809. When typing the telephone number of the person you are calling, you must include special characters if you need to access an outside line or if you use Call Waiting (you must disable Call Waiting when using your modem). For example, you might need to enter 9 to get an outside line. Check your telephone book for the characters to disable Call Waiting. Type the special characters, separated by commas, before the actual phone number, (i.e. 9, *71, 555-1234). 38 APPENDIX B d 4 Telephone Video Calls To add video to the call, follow the wizard on the screen or one person can click Video. Remember, the person you are calling may have a different version of Intel Video Phone or a different video phone application. You may need to wait up to 30 seconds for the video to come through clearly. End the call. Click Hangup to end the call. Section B If your video phone looks like Version B: 1 Prepare to make a telephone video call. Have the telephone number of the person you wish to call. 2 Start Intel Video Phone. Start Intel Create & Share Software, and click Make a video phone call on the Home screen. Initially, you may only see the dialer. 3 Place the call. a Enter the phone number of the person you want to call. The numbers will appear in the status area above the word Ready. You can make a test call to an Intel pre-recorded message by typing 503-262-5809. When typing the telephone number of the person you are calling, you must include special characters if you need to access an outside line or if you use Call Waiting (you must disable Call Waiting when using your modem). For example, you might need to include to enter 9 to get an outside line. Check your telephone book for the characters to disable Call Waiting. Type the special characters, separated by commas, before the actual phone number, (i.e. 9, *71, 555-1234). b On the dialer, click the Call button. c After audio is connected and you are ready to start the video, one person can click the video button, labeled Start Video or Video. Video Phone appears. d Adjust the audio and video settings if necessary. e If your video or audio is unclear, stop the video by clicking the Video button on the dialer. Intel Video Phone closes, but your audio is still connected. 39 Telephone Video Calls 4 APPENDIX B End the call. Click Hangup to end the call. Reminder: Your dialer may not look exactly like or be labeled exactly like the dialer pictured in Version B. Use the buttons which most likely correspond with the buttons described above. Section C If your video phone looks like Version C: 1 Prepare to make a Telephone video call. Get the telephone number of the person you wish to call. 2 Start Intel Video Phone. Start Intel Create & Share Software, and then click Make a video phone call on the Home screen. Initially, you may see only your dialer. 3 Place the call. a Enter the phone number of the person you want to call. The numbers will appear in the status area above the word Ready. You can make a test call to an Intel pre-recorded message by typing 503-264-5809. When typing the telephone number of the person you are calling, you must include special characters if you need to access an outside line or if you use Call Waiting (you must disable Call Waiting when using your modem). For example, you might need to include to enter 9 to get an outside line. Check your telephone book for the characters to disable Call Waiting. Type the special characters, separated by commas, before the actual phone number, (i.e. 9, *71, 555-1234). b On the dialer, click the Call button. c After the audio is connected and you are ready to start the video, one person can click the video button labeled Start Video or Video. Intel Video Phone appears. Initializing Video appears in the My Video window and Connecting appears in the Guest Video window. d Adjust the audio and video settings if necessary. 40 APPENDIX B e 4 Telephone Video Calls If your video or audio is unclear, you can stop the video by clicking the Video button on the dialer. Intel Video Phone closes, but your audio is still connected. End the call. Click Hangup to end the call. Reminder: Your dialer may not look exactly like or be labeled exactly like the dialer pictured in Version C. Use the buttons which most likely correspond with the buttons described above. Helpful Hints for making telephone video calls To improve the sound quality: Speak slowly and clearly into the microphone. Wait until the other person stops speaking before you reply. Eliminate background noise in your area. To improve the video quality: Make your My video and Guest video windows smaller and ask the other person to do the same: - Click the Video Size button OR - Click the View menu and select a smaller size. Put light in front of you, not behind you. Other tips: Remember, the person you are calling may have a different version of Intel Video Phone or a different video phone application. Be patient while making a call. Place the camera on top of your computer and the microphone 6 inches from a computer speaker. Disable call waiting. Ensure the phone and modem connected to your computer are properly connected. For further instructions and solutions to common problems, consult the online Help. For customer support, check the Intel customer support Web site at: http://support.intel.com/support/createshare/camerapack. 41 C System Requirements System requirements To install the software, your system must meet the following minimum requirements: Pentium® processor, 166MHz with MMX Technology or higher Available Universal Serial Bus (USB) Port Windows* 95 OSR2 or Windows* 98 and 32 MB RAM 800x600 display, 16-bit color 150 MB available hard disk space 4x CD-ROM drive Windows compatible sound system with speakers and microphone Internet Service Provider and 28.8 Kbps or higher modem to make video phone calls over the Internet Netscape Navigator* 3.01 (Communicator* 4.0 or higher recommended) or Microsoft Internet Explorer* 3.01 (4.0 or higher recommended). 42 Intel World Wide Web Support You can reach Intels automated support services 24 hours a day, every day at no charge. The services contain the most up-to-date information about Intel products. You can access installation instructions, troubleshooting information, and general product information. Intel Help Files: View the online help in each application and the README files included with the product for detailed information on product features and functions. If you dont have access to automated services: Contact your local retailer or call one of Intels Customer Support Centers. World Wide Web Customer Support: http://support.intel.com/support/createshare/ camerapack/ Troubleshooting Assistant: http://support.intel.com/support/ createshare/camerapack/tsa.htm. Intel Customer Support Technicians North America: For 90 days you are entitled to speak to our technical support professionals, however, standard phone charges will apply. After your initial 90 days of unlimited technical phone support, you can pay per incident using a credit card. Important: At the time of your call, please be at your computer and have your serial number ready. Support options are subject to change without notice. Country Telephone Number North America 1-916-377-7000 Spare parts and additional accessories are available for your camera pack. Please refer to http://support.intel.com/support/createshare/camerapack/1839.htm.