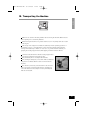
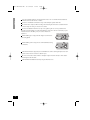
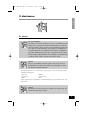
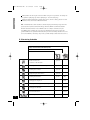
1
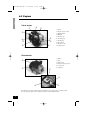
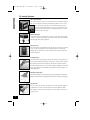
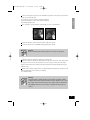
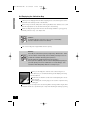
2541 HL-Primo-En 17-01-2008 12:25 Page 1 English HANDLEIDING - MANUAL - MANUEL - ANLEITUNG Primo 2541 HL-Primo-En 17-01-2008 12:25 Page 2 2541 HL-Primo-En 17-01-2008 12:25 Page 3 1. Introduction English 1.1 Carefully read this operating instruction manual Eliet machines are designed for safe and reliable use if they are operated in accordance with the instructions given. Carefully read this operating instruction manual for using the machine. Failure to observe this may result in personal injury or damage to the equipment. 1.2 Identification data – ELIET PRIMO Write the identification data relating to your machine in the boxed areas. Engine Power Serial number 2. Warranty 2.1 Warranty card To be eligible to obtain warranty you must mail the completed warranty card within one month of the date of purchase to the address specified below. ELIET NV Zwevegemstraat 136 B-8553 Otegem Belgium Phone: (++32) (0)56 77 70 88 - Fax : (++32) (0)56 77 52 13 3 2541 HL-Primo-En 17-01-2008 12:25 Page 4 English 3. Welcome Welcome to the family of ELIET customers. We would like to thank you for the confidence that you have placed in ELIET and we are convinced that you have purchased the very best machine. The life expectancy of your ELIET machine is much dependent on the way you care for your machine. This user manual and the engine manual provided will assist you in this respect. If you follow the instructions and suggestions in these manuals, your ELIET machine will operate for a very long time in optimal condition. Read this instruction manual carefully before operating this machine. This will prevent you from operating the device incorrectly. For your own safety, take into account the safety instructions given in the appropriate chapter. Even when you are thoroughly familiar with operating such equipment, it is still advisable to read these pages carefully. ELIET is constantly working on further developments for all machines and devices ; bearing this in mind, we also reserve the right to supply equipment that can differ slightly in terms of shape, technology and accessories. The descriptions and technical data in this manual are accurate as of this printing. Certain illustrations and descriptions may not be applicable to your specific machine, but instead relate to a different version of the machine. In turn, we trust that you will understand if the texts and illustrations in this manual cannot lead to any claims. If you still have any questions after you have read this manual, we request you to contact your ELIET dealer. ELIET AT YOUR SERVICE Zwevegemstraat 136 B-8553 Otegem Belgium 4 Phone: (++32) (0)56 77 70 88 Fax: (++32) (0)56 77 52 13 Email: [email protected] 2541 HL-Primo-En 17-01-2008 12:25 Page 5 4. Table of Contents English 1. Introduction . . . . . . . . . . . . . . . . . . . . . . . . . . . . . . . . . . . . . . . . . . . . . . . . . . . . . . . . . . . . . . . . . . . . . . . . . . . . . . . . . . . . . . . . . . . . . . . . . . . . . . . . . . . . . . . . . . . . 3 1.1 Carefully read this operating instruction manual. . . . . . . . . . . . . . . . . . . . . . . . . . . . . . . . . . . . . . . . . . . . . . . . . . . . . . . 3 1.2 Identification data - Primo . . . . . . . . . . . . . . . . . . . . . . . . . . . . . . . . . . . . . . . . . . . . . . . . . . . . . . . . . . . . . . . . . . . . . . . . . . . . . . . . . . . . . . . . . 3 2. Warranty . . . . . . . . . . . . . . . . . . . . . . . . . . . . . . . . . . . . . . . . . . . . . . . . . . . . . . . . . . . . . . . . . . . . . . . . . . . . . . . . . . . . . . . . . . . . . . . . . . . . . . . . . . . . . . . . . . . . . . . . . . 3 2.1 Warranty card . . . . . . . . . . . . . . . . . . . . . . . . . . . . . . . . . . . . . . . . . . . . . . . . . . . . . . . . . . . . . . . . . . . . . . . . . . . . . . . . . . . . . . . . . . . . . . . . . . . . . . . . . . . . 3 3. Welcome . . . . . . . . . . . . . . . . . . . . . . . . . . . . . . . . . . . . . . . . . . . . . . . . . . . . . . . . . . . . . . . . . . . . . . . . . . . . . . . . . . . . . . . . . . . . . . . . . . . . . . . . . . . . . . . . . . . . . . . . . . 4 4. Table of contents . . . . . . . . . . . . . . . . . . . . . . . . . . . . . . . . . . . . . . . . . . . . . . . . . . . . . . . . . . . . . . . . . . . . . . . . . . . . . . . . . . . . . . . . . . . . . . . . . . . . . . . . . . . . 5 5. Operator Safety Warnings . . . . . . . . . . . . . . . . . . . . . . . . . . . . . . . . . . . . . . . . . . . . . . . . . . . . . . . . . . . . . . . . . . . . . . . . . . . . . . . . . . . . . . . . . . . . . . 6 5.1 For Your Information . . . . . . . . . . . . . . . . . . . . . . . . . . . . . . . . . . . . . . . . . . . . . . . . . . . . . . . . . . . . . . . . . . . . . . . . . . . . . . . . . . . . . . . . . . . . . . . . . 6 5.2 Caution . . . . . . . . . . . . . . . . . . . . . . . . . . . . . . . . . . . . . . . . . . . . . . . . . . . . . . . . . . . . . . . . . . . . . . . . . . . . . . . . . . . . . . . . . . . . . . . . . . . . . . . . . . . . . . . . . . . . . 6 5.3 Warning . . . . . . . . . . . . . . . . . . . . . . . . . . . . . . . . . . . . . . . . . . . . . . . . . . . . . . . . . . . . . . . . . . . . . . . . . . . . . . . . . . . . . . . . . . . . . . . . . . . . . . . . . . . . . . . . . . . . 6 6. Main Parts . . . . . . . . . . . . . . . . . . . . . . . . . . . . . . . . . . . . . . . . . . . . . . . . . . . . . . . . . . . . . . . . . . . . . . . . . . . . . . . . . . . . . . . . . . . . . . . . . . . . . . . . . . . . . . . . . . . . . . . 7 6.1 Machine Survey . . . . . . . . . . . . . . . . . . . . . . . . . . . . . . . . . . . . . . . . . . . . . . . . . . . . . . . . . . . . . . . . . . . . . . . . . . . . . . . . . . . . . . . . . . . . . . . . . . . . . . . . . 7 6.2 Engines . . . . . . . . . . . . . . . . . . . . . . . . . . . . . . . . . . . . . . . . . . . . . . . . . . . . . . . . . . . . . . . . . . . . . . . . . . . . . . . . . . . . . . . . . . . . . . . . . . . . . . . . . . . . . . . . . . . . . 8 7. Safety Regulations . . . . . . . . . . . . . . . . . . . . . . . . . . . . . . . . . . . . . . . . . . . . . . . . . . . . . . . . . . . . . . . . . . . . . . . . . . . . . . . . . . . . . . . . . . . . . . . . . . . . . . . . . . 9 7.1 Safety messages . . . . . . . . . . . . . . . . . . . . . . . . . . . . . . . . . . . . . . . . . . . . . . . . . . . . . . . . . . . . . . . . . . . . . . . . . . . . . . . . . . . . . . . . . . . . . . . . . . . . . . . . 9 7.2 Safety Features . . . . . . . . . . . . . . . . . . . . . . . . . . . . . . . . . . . . . . . . . . . . . . . . . . . . . . . . . . . . . . . . . . . . . . . . . . . . . . . . . . . . . . . . . . . . . . . . . . . . . . . . . 11 7.3 General Safety Precautions . . . . . . . . . . . . . . . . . . . . . . . . . . . . . . . . . . . . . . . . . . . . . . . . . . . . . . . . . . . . . . . . . . . . . . . . . . . . . . . . . . . . . 12 8. Dealer Preparation . . . . . . . . . . . . . . . . . . . . . . . . . . . . . . . . . . . . . . . . . . . . . . . . . . . . . . . . . . . . . . . . . . . . . . . . . . . . . . . . . . . . . . . . . . . . . . . . . . . . . . . . 14 9. Operating instructions . . . . . . . . . . . . . . . . . . . . . . . . . . . . . . . . . . . . . . . . . . . . . . . . . . . . . . . . . . . . . . . . . . . . . . . . . . . . . . . . . . . . . . . . . . . . . . . . . . 16 9.1 Preliminary Checks . . . . . . . . . . . . . . . . . . . . . . . . . . . . . . . . . . . . . . . . . . . . . . . . . . . . . . . . . . . . . . . . . . . . . . . . . . . . . . . . . . . . . . . . . . . . . . . . . . . 16 9.2 Filling up with Petrol . . . . . . . . . . . . . . . . . . . . . . . . . . . . . . . . . . . . . . . . . . . . . . . . . . . . . . . . . . . . . . . . . . . . . . . . . . . . . . . . . . . . . . . . . . . . . . . . 17 9.3 Preparing the Operating Area . . . . . . . . . . . . . . . . . . . . . . . . . . . . . . . . . . . . . . . . . . . . . . . . . . . . . . . . . . . . . . . . . . . . . . . . . . . . . . . . . 18 9.4 Starting the Petrol Engine . . . . . . . . . . . . . . . . . . . . . . . . . . . . . . . . . . . . . . . . . . . . . . . . . . . . . . . . . . . . . . . . . . . . . . . . . . . . . . . . . . . . . . 18 9.5 Using the Machine . . . . . . . . . . . . . . . . . . . . . . . . . . . . . . . . . . . . . . . . . . . . . . . . . . . . . . . . . . . . . . . . . . . . . . . . . . . . . . . . . . . . . . . . . . . . . . . . . . 20 9.6 Emptying the Collection Bag . . . . . . . . . . . . . . . . . . . . . . . . . . . . . . . . . . . . . . . . . . . . . . . . . . . . . . . . . . . . . . . . . . . . . . . . . . . . . . . . . . 22 9.7 What To Do about Engine Stalling . . . . . . . . . . . . . . . . . . . . . . . . . . . . . . . . . . . . . . . . . . . . . . . . . . . . . . . . . . . . . . . . . . . . . . . . . . . 23 9.8 Cleaning the Machine . . . . . . . . . . . . . . . . . . . . . . . . . . . . . . . . . . . . . . . . . . . . . . . . . . . . . . . . . . . . . . . . . . . . . . . . . . . . . . . . . . . . . . . . . . . . . 24 10. Transporting the Machine . . . . . . . . . . . . . . . . . . . . . . . . . . . . . . . . . . . . . . . . . . . . . . . . . . . . . . . . . . . . . . . . . . . . . . . . . . . . . . . . . . . . . . . . . . 25 11. Maintenance . . . . . . . . . . . . . . . . . . . . . . . . . . . . . . . . . . . . . . . . . . . . . . . . . . . . . . . . . . . . . . . . . . . . . . . . . . . . . . . . . . . . . . . . . . . . . . . . . . . . . . . . . . . . . . . . . 27 11.1 General . . . . . . . . . . . . . . . . . . . . . . . . . . . . . . . . . . . . . . . . . . . . . . . . . . . . . . . . . . . . . . . . . . . . . . . . . . . . . . . . . . . . . . . . . . . . . . . . . . . . . . . . . . . . . . . . . . . . .27 11.2 Servicing Schedule . . . . . . . . . . . . . . . . . . . . . . . . . . . . . . . . . . . . . . . . . . . . . . . . . . . . . . . . . . . . . . . . . . . . . . . . . . . . . . . . . . . . . . . . . . . . . . . . . 28 11.3 Lubricants . . . . . . . . . . . . . . . . . . . . . . . . . . . . . . . . . . . . . . . . . . . . . . . . . . . . . . . . . . . . . . . . . . . . . . . . . . . . . . . . . . . . . . . . . . . . . . . . . . . . . . . . . . . . . . 28 11.4 Routine Checks before the Start of each Work Session . . . . . . . . . . . . . . . . . . . . . . . . . . . . . . . . . . . . . . . . . 29 11.5 Maintenance after 20 Running Hours . . . . . . . . . . . . . . . . . . . . . . . . . . . . . . . . . . . . . . . . . . . . . . . . . . . . . . . . . . . . . . . . . . . . 32 12. Off-Season Storage . . . . . . . . . . . . . . . . . . . . . . . . . . . . . . . . . . . . . . . . . . . . . . . . . . . . . . . . . . . . . . . . . . . . . . . . . . . . . . . . . . . . . . . . . . . . . . . . . . . . . 36 13. Equipment Specifications . . . . . . . . . . . . . . . . . . . . . . . . . . . . . . . . . . . . . . . . . . . . . . . . . . . . . . . . . . . . . . . . . . . . . . . . . . . . . . . . . . . . . . . . . . . 37 14. EC Declaration of Conformity . . . . . . . . . . . . . . . . . . . . . . . . . . . . . . . . . . . . . . . . . . . . . . . . . . . . . . . . . . . . . . . . . . . . . . . . . . . . . . . . . . . . 38 15. Parts List . . . . . . . . . . . . . . . . . . . . . . . . . . . . . . . . . . . . . . . . . . . . . . . . . . . . . . . . . . . . . . . . . . . . . . . . . . . . . . . . . . . . . . . . . . . . . . . . . . . . . . . . . . . . . . . . . . . . . 39 5 2541 HL-Primo-En 17-01-2008 12:25 Page 6 English 5. Operator Safety Warnings Certain symbols in this manual are used for additional information and for your safety. 5.1 For Your Information For Your Information: This symbol is used to denote either specific information and/or actions, or where to find additional information regarding the related subject. 5.2 Caution Caution: This notice identifies safe usage habits. This, in order to avoid erroneous actions prone to be source of personal injury or damage to the machine. 5.3 Warning Warning: This notice is used to denote danger to consider in these specific circumstances. Thus remain alert, in order to ensure your own safety. 6 2541 HL-Primo-En 17-01-2008 12:25 Page 7 6. Main Parts English To fully grasp the contents of this operator's manual, you need to be thoroughly familiar with the terminology used for the descriptions. In this chapter you can find a set of parts identified by name. It's a good idea to take time to study the machine beforehand for an improved understanding of the descriptions given in this user's manual. 6.1. Machine Survey ¬ Input ¬ 1) Loading hopper 2) Anti-kick back guard 3) Handle for transporting 4) Collection bag 5) Collection bag locking 6) Sieve screen 7) Sieve screen locking pins 8) Safety switch 9) Discharge Output 7 2541 HL-Primo-En 17-01-2008 12:25 Page 8 English 6.2 Engines Petrol engine 1) Choke 2) Engine speed control 3) On/Off switch 4) Dipstick 5) Oil filler cap 6) Oil drain plug 7) Spark plug 8) Air Cleaner 9) Reservoir cap 10) Starter rope Honda GC135 Electromotor 1) Switch 2) Plug 3) Plug holder 4) Overcurrent protection 5) Cooling fan 6) Capacitor Your machine can vary slightly from the illustration; for safety reasons, carefully follow the safe operation practices recommended by the engine manufacturer. 8 2541 HL-Primo-En 17-01-2008 12:25 Page 9 English For Your Information: Reference in this manual to right or left hand side, back or front of the unit is observed from the machine operator facing the branch feed. For Your Information: Your ELIET dealer is at your service, ready to provide you with maintenance or advice so that your ELIET machine always remains in optimal condition. Parts and lubricants can be obtained from your ELIET Dealer. These service parts are manufactured to the same stringent accuracy and degree of craftsmanship as the original equipment. Warning: For your safety, use only genuine ELIET parts on ELIET machines. 9 2541 HL-Primo-En 17-01-2008 12:25 Page 10 English 7. Safety Regulations 7.1 Safety messages: Decal location : Near to the collection bag handle on the flat face of the motor bed plate at the rear of the machine. Warns of danger of hand injuries. Always wait until the shred knives have come to a complete stop before opening the shredding screen of the shredding chamber. It is essential to ensure that the engine is shut off prior to removing the collecting bag. (Part n°: BQ505 010 070) Decal location : On the L.H. side of the motor bed plate. This decal is used to denote all the safety precautions using icons. 1. Read this owner's manual carefully in its entirety before attempting to operate this unit. 2. Always wear the appropriate protective garment when operating the machine (protective gloves, safety goggles, hearing protectors). 3. Performing maintenance or operating the machine can be source of hand injuries. The need for safe operation practices is something that cannot be overemphasized ! (Part n°: BQ 505 010 050) 10 2541 HL-Primo-En 17-01-2008 12:25 Page 11 English Decal location : Again, on the L.H. side of the motor bed plate. This sticker reminds the user to shut the engine off and to remove the sparking plug cap prior to carrying out any maintenance. (on machines equipped with a petrol engine only) (Part n°: BQ 505 010 040) Decal location : On the safety screen inside the feed hopper. This sticker warns the user of the danger of hand injuries and of flying debris. These are two risks – inherent in chipping branchy material –which are catered for by the safety screen. This sticker reminds the user how to operate the brush chipper in a safe way. No attempt should be made to put your hands past the safety screen ! (Part n°: BQ 505 010 140) Decal location : Again, on the L.H. side of the motor bed plate. This sticker reminds the user to keep bystanders out of the area during machine operation. (Part n°: BQ 505 010 150) This sticker is used to indicate all the machine identification data: • Year of manufacture • Model • Type number • Serial number • Power • Weight • Guaranteed A-weighted sound power level Also, this sticker is used to denote the name and address of the manufacturer. The sticker carries the EC mark of conformity in EC label format. 11 2541 HL-Primo-En 17-01-2008 12:25 Page 12 English 7.2 Safety Features: The collection bag: The collection bag is located on the underside of the machine. Remove the collection bag and the motor automatically shuts off. In so doing, the collection bag prevents you from inserting your hands into the rotating shred knives. In order to prevent the collection bag from opening when shredding, it must be secured in position using a slide pin. Discharge funnel: A discharge funnel is available as an option and provides an alternative to the collection bag supplied as standard. The latter fully complies with all applicable safety legislation. Safety screen: The steel sheet located within the infeed opening, is specially designed to protect the operating personnel against flying wood chips. Any attempt by the operator to insert his hands beyond this steel sheet is strictly forbidden. Loading hopper: The shape of the loading hopper ensures the safety of the operator and is a protection against his personal carelessness. If the operator ignores the warning, and inserts his hands beyond the debris deflector shield, then this hopper impedes access to the shredding chamber in asmuch as injury caused by the shredding knives through the infeed opening is virtually impossible. Rugged construction: The robust construction not only adds to the long operating life of the machine but also provides extra user safety whenever there is an unforeseen emergency. Safety wear: For your safety, we strongly recommend to use the safety kit supplied as standard. It contains your Personal Protective Equipment (PPE). This safety set consists of safety glasses, ear defenders and a pair of riggers gloves. 12 2541 HL-Primo-En 17-01-2008 12:25 Page 13 English Socket with a plug holder and a cable bracket: The clamp secures the plug in position in the socket and the cable holder avoids accidentally pulling the plug. This avoids short circuit conditions. Cable holder: The cable holder prevents accidentally pulling and damaging the plug, which in turn avoids short circuit conditions. Thermal overload relay: This safety contact protects the electromotor windings from overheating when overloading. 7.3 General Safety Precautions The owner must retain the manual during the complete operating life of the machine. It serves as a reference for the user, and enables the machine to be used and maintained in accordance with the correct instructions. This machine is designed solely for shredding branchy material, prunings, leaves and all kinds of organic garden debris. Any use other than the designated operation is at the risk and responsibility of the operator. At Eliet, we recommend a maximum branch capacity of 30 mm on machines powered by an electromotor, and 35 mm on petrol engine powered machines. Branch feed is not mechanically limited to this stated capacity ; it follows that any attempt to introduce thicker branches must be avoided. For your own safety on no account should any attempt be made to introduce stems thicker than the stated capacity. Never attempt to shred branches that are frozen. Warning: Accepting branches with diameter up to 35 mm, this machine, however, is not designed for continuous shredding to the stated capacity. For your own safety we encourage you to take into account this limitation. 13 English 2541 HL-Primo-En 17-01-2008 12:25 Page 14 This equipment must only be operated when stationary. Here, make sure the tires and the frame are brought into contact with the ground. The operator's position when shredding is the surrounding area within arm reach located on the front of the infeed opening. Never use a step for feeding the machine with material. The equipment must under no circumstances be modified. Carefully follow all safety instructions when using the ELIET machine ! Carefully read the instructions on using the machine. Al these instructions relate to your personal safety. For Your Information: Also, read the engine manual that is also supplied with the machine. This contains the necessary information for the correct use and maintenance of the engine. Read the chapter that is meant for the Dealer (see Chapter 8) to find out that the machine has been delivered as per instructions. When you purchase the machine, first allow the Dealer or a professional to give you some instruction. Read and observe all safety messages posted on the machine in the form of decals. It is assumed that the operator of this machine is mature enough and has enough common sense to make decisions by himself. All persons using the machine are assumed to be familiar with the safety instructions. The operator is fully liable for the use of the machine in regard to himself and to third parties. Underage persons must not operate the machine. However, this does not apply to youths above the age of 16 years, who are learning to operate the machine under the supervision of an experienced operator. Children and animals must be kept well away from the machine. ELIET recommends that the machine should not be lent to others. However, if this is done, only lend it to persons who are familiar with the machine. Always ensure that the user is aware of the potential hazards, and ensure that he reads the manual before he uses the machine. This machine must only be operated by persons who are in a good physical condition. If one becomes tired during the work, one must take a rest in due time. Persons consuming alcohol or drugs must not operate this machine. 14 2541 HL-Primo-En 17-01-2008 12:26 Page 15 English You must wear proper apparel to operate this machine. That is, clothing covering the whole body, heavy protective gloves and closed nonslip footwear. Do not wear loose fitting clothing (a shawl, for instance, should be avoided by all means). Long hair should be contained using a cap or a headband, or worn in a ponytail. Caution: For the protection of the most sensitive senses, ELIET recommends hearing protectors and a safety goggle. These are included with the machine. Never work in conditions where the light intensity is less than 500 Lux. During work parties, do not allow bystanders to come within the risk zone that stretches up to 5 m around the machine. When leaving the machine, the engine must be switched off. When parts must be renewed as a result of wear or failure, you must always request genuine ELIET service parts from your ELIET dealer. This is important in the interests of your own safety. Use the machine in a manner respecting environmental regulations. a) Avoid unnecessary machine running while not at work. b) Avoid spilling petrol while refilling. c) Service the engine regularly in order to achieve optimum combustion. For a machine equipped with an electric motor, the following guidelines must be observed as well. The machine may only be connected to a grounded circuit. The circuit must be protected by a RCD (Residual Current Device) with a minimum sensitivity of 30 mA. When the connection is made to a socket that is located outside, this socket must conform to protection rating IP65. It is forbidden to operate the machine during rainy weather. Never expose the machine to water ingress. 15 2541 HL-Primo-En 17-01-2008 12:26 Page 16 English 8. Dealer Preparation Warning: As an ELIET Dealer you should familiarize your customers with the functioning of the machine and also point out the possible dangers while using it. You are expected to carefully go over the maintenance points of the machine together with the new owner. He will repeat these instructions until the new owner has fully understood everything. The manufacturer, ELIET wishes to re-emphasize that the Dealer must expressly point out to the customers that they must examine the bolts which retain the shredding knives for security of fixings after the first 5 operating hours. When the machine has been removed from its packaging, it is still not completely assembled. Your ELIET Dealer is expected to complete these preparation steps. Following are a few guidelines. Following parts are found in the packaging on unpacking: • • • • Machine Loading hopper Collection bag Bag with fasteners (contents : 4 M8 bolts, 5 nuts and 4 washers) • Personal Safety Equipment kit • Owner's Guide 16 2541 HL-Primo-En 17-01-2008 12:26 Page 17 English The loading hopper is secured to the frame using 4 bolts. The upper part of the loading hopper is fit to the machine whilst making sure the mounting holes align with one another. From the inside, insert the bolts in the hopper first and then fasten the nuts from the outside of the hopper. The collection bag is fitted tot the frame using plastic click profiles. The cut-outs in the click profile match the shape of the frame. With machines powered by a petrol engine: The machine is packed without oil or petrol. The Dealer is expected to replenish with the correct oil and petrol as per instructions contained within this manual (or those within the engine manuals). With petrol engines, engine speed is factory set at 3,200 rpm. Caution: In the event of a petrol engine, the Dealer will pay particular attention to setting the correct engine speed. If the number of revolutions is too high, this will cause additional vibration with the resultant increase in wear rate. If the number of revolutions is too low, the machine will sacrifice power. The Dealer performs a test run on the machine and confirms that everything is functioning properly (such as the safety contact at the collection bag). Lastly, the Dealer makes sure the warranty card is filled in completely and signed. This, in order to avoid any warranty disputes. Read the warranty conditions. 17 2541 HL-Primo-En 17-01-2008 12:26 Page 18 English 9. Operating instructions 9.1 Preliminary Checks Caution: Before commencing the work, it is recommended to get into the habit of checking the following points. Checklist 1.* Check the oil level of the machine. To this effect, remove the dipstick and make sure the oil level has not fallen to danger level. (in necessary cases, see Chapter 11.3.2). 2.* Check ample petrol in tank beforehand. If not,… add fuel (see Chapter 9.2). 3.* Make sure that the orifices of the air cleaner are not clogged (if necessary, see Chapter 11.3.3) 4. Satisfy yourself that the shredding knives are firmly in place and in good condition. If they need to be sharpened, this must be done first. Check the knives for cracks and nicks and replace immediately as needed. (see Chapter 11.4.5). 5. Make sure the sieve screen located at the bottom of the machine is securely at tached and correctly fitted (always switch off the engine prior to making this check !). 6. Verify that all of the machine’s safety items are operating correctly (see Chapter 7.2 ). 7. On machines equipped with an electromotor ascertain that the fan grid is clear and free of obstructions. * these check items apply to petrol engine powered chippers only. Once these items have been checked and approved, you can prepare the area of operation (see Chapter 9.3) and move the machine to the work site. 18 2541 HL-Primo-En 17-01-2008 12:26 Page 19 9.2 Filling up with Petrol English Top up if the machine runs short of petrol. Use only clean fresh gasoline. Use lead free fuel, gasoline with a minimum of 98 or 99 octane is to be preferred. Warning: Under certain conditions, gasoline is extremely flammable and extremely explosive. Fire and explosion caused by gasoline can result in serious burns or damage to property. Thus, always take note of the following points. Never fill tank when engine is running. Topping up with gasoline may never occur while an engine is running. Always allow a few minutes for the engine to cool off before topping up with fuel. Use only fresh gasoline. In order to reduce air pollutant emissions, ELIET recommends lead-free gasoline. In order to extend storage life, mix additives with the fuel. Store gasoline in an approved tank. Keep this tank out of reach of children. Never top up gasoline at a location where work will be performed later. Always keep the area of operation clear of all persons (10 m minimum). This is to prevent any fire risk. Clean the area surrounding the fuel tank cap and then remove this cap. Never fill a tank to over 85% of the tank's capacity. Top up allowing approximately 10 mm of tank space. Thus, do not fill the tank completely to the opening in the tank. Always use a funnel or spout to pour the petrol into the tank. Suitable funnels can be obtained from your ELIET dealer. Refit the cap onto the tank. If petrol is spilt during the filling, the engine must be immediately cleaned. Be careful not to spill petrol onto clothing. Should clothing become contaminated be careful to change clothes as soon as possible. It is unsafe and therefore expressly forbidden from filling the fuel tank in the vicinity of smokers or a naked flame. If fuel comes into contact with the eyes or is taken internally, get prompt medical attention. 19 2541 HL-Primo-En 17-01-2008 12:26 Page 20 English 9.3 Preparing the Operating Area Clear the area first where the machine is to be used. In addition, the paths along which the plant trimmings are removed, must be kept clear, thus releasing the operator from the worries of tripping up over them. The operator must also ensure that his safety is not compromised. On slopes, never operate the machine (no forward or lateral slope.). The material to be shredded is sorted beforehand. In this way, the operator is sure that no foreign objects will enter the machine with the material to be shredded. With foreign objects are meant : any non-organic object or branchy material in excess of the stated capacity (such as metal, stone, plastic, pvc, cords,…). Some of these can cause serious damage to your machine or can be ejected, virtually as projectiles towards the user. One will always position the machine so that the wind will blow the dust produced away from the engine. Also, check which way the wind is blowing to make sure the exhaust fumes will be blown away from the operator's position. 9.4 Starting and Stopping the Engine/Motor 9.4.1 Starting the Petrol Engine Caution: Never start never the machine if dust or dirt lies on the engine between the cooling fins or is present on the engine. This prevents optimal cooling of the engine and more importantly can cause fire. You will be unable to start the engine as long as the collection bag or the optional discharge funnel hasn’t been pushed fully in the chassis and locked in position. For Your Information: Also, read the engine manual. In the chapter entitled General (section 6) you can find more nformation on the key engine functions. 20 2541 HL-Primo-En 17-01-2008 12:26 Page 21 Throttle English Prior to running the engine, first check whether adequate oil and fuel is present in the engine, if you didn't already. If considered necessary, read the following chapters. § 11.3.2 Checking the oil level in the engine crankcase § 9.2 Filling up with Petrol It is essential to ensure that the loading hopper is free of any material. Choke Adjust the throttle control lever fully to the right to full speed. Close the throttle valve (“CHOKE”) through pulling the spindle. Warning: Before starting up the machine, make sure to wear ear defenders. Start the engine by giving the starter grip a strong pull. After the engine is running, quickly push the choke lever fully home. This ensures that the engine does not receive too much petrol. If you forget to do this, then the engine will slow down and start to smoke profusely. Eventually, it will stop. Restart the engine without choke. When engine starting is problematic, it signifies that the spark plug is fouled. It follows that the spark plug needs cleaning or replacing (see Chapter 11.4.2). Warning: The blade shaft is driven directly by the engine. The blades remain engaged. This means that the machine becomes dangerous as soon as the engine starts running. Therefore the engine must be switched off immediately whenever you encounter a situation in which you lose control. 21 2541 HL-Primo-En 17-01-2008 12:26 Page 22 English 9.4.2 Starting the Electromotor Caution: Never start the machine if dust or dirt lies on the engine between the cooling fins or is present on the engine. This prevents optimal cooling of the engine and more importantly can cause fire. It is essential to ensure that the discharge funnel is free of any material. Always use an approved extension cord showing no signs of physical damage. First, insert the extension cord plug into an outlet. Always make sure the outlet is found to comply with protection rating IP65. Insert the plug into an outlet nearest the work site in such a way as to make sure the extension cord is as short as possible. If the extension cable is too long, this will result in a considerable resistance with a corresponding loss in power. Warning : Make sure to never expose the machine to water when chipping (such as rain, a sprinkler irrigation system,…). This can result in a short circuit condition. What's more,... the user may be subjected to electrocution. The socket has a plug holder on top of it. The latter secures the plug, thus avoiding accidentally pulling the plug. Securely attach the extension cord to the dedicated extension cord strap to prevent accidentally pulling and damaging the plug when moving the machine. (refer to the procedure as shown below) Fit the extension cord strap to a frame tube. Make a loop and insert the extension cord in the opening prepared in the extension cord strap, and snap the loop onto the protruding hook on the strap. 22 2541 HL-Primo-En 17-01-2008 12:26 Page 23 Turn the switch in the ON state ( I ). English Caution : When wearing ear defenders extreme caution must be taken with every action, as the engine is hard to hear. It is important to note that once the engine is running the blade shaft will run as well, therefore, turning the machine into a dangerous machine. 9.4.3 Stopping the Motor/Engine How to Quickly Turn off the Machine ? Through moving the engine throttle control lever to the left (see engine manual). Through switching the machine OFF at the isolator (0). Sliding the unlocked collection bag backward will also cause the engine to shut off. Prior to switching off the engine, wait for the machine to be empty. 23 2541 HL-Primo-En 17-01-2008 12:26 Page 24 English 9.5 Using the machine 9.5.1 Before Starting Work Wear proper apparel, protective gloves and safety equipment as instructed in this manual (see Chapter 7.3). A good gardener is well organized and plans his work. This will enable him to have an overview of the work and to avoid accidents and incorrect actions with the machine. The wood is systematically stacked before commencing the work : thick branches, thin branches, leaves and damp products. Ensure that the material does not contain any foreign objects. With machines powered by an electric motor, always make sure the extension cord does not cross the access routes for the wood to be shredded. And such in order to prevent the operator from stumbling. The engine must only be started once arrived at the work site. Never run the machine in an enclosed area. If this is done, there is a danger of being poisoned by the fumes from the engine. Always adjust throttle to full speed (throttle control lever up). After the motor has started, allow it to warm up. This ensures that the motor attains its full power. The importance of this cannot be overstressed when shredding branchy material of maximum branch size. Caution : Once the engine is running, the shredding knives are rotating, therefore, irrevocably shredding anything that is introduced into the loading hopper. 9.5.2 During the work The operator must be careful when performing work. While he is operating the machine, he must focus his concentration completely on the work. When inserting the material, always hold it firmly. The rotational direction of the knife drum makes for steady material feed into the hopper. If the operator does not continue to hold the wood firmly, it will automatically be pulled much too quickly into the machine which will inevitably lead to the machine stalling. The operator himself will thus control the speed at which the wood is fed in (faster or slower). The speed at which the wood is fed in will vary according to the thickness of the branch. The operator will listen attentively to the characteristics of the motor when feeding in the wood. If he notices that the speed of the machine drops significantly, he will immediately pull the wood back out in order to allow the engine to speed up again. 24 2541 HL-Primo-En 17-01-2008 12:26 Page 25 English Caution: When feeding in wood, the operator must never insert his hands beyond the steel shield. By raising the safety screen, the operator is no longer protected against wood chips flying out of the machine. If the equipment is primarily used for shredding leaves or damp material using the standard sieve screen, the chances are good that orifices will clog. To alleviate this problem, The ELIET damp material shredding screen is a way around this. Likewise, this shredding screen is available from your ELEIT dealer. If only a small volume of leaves is to be processed, they can be easily shredded using the standard screen. However, in this case, ELIET recommends that leaves and branches should be shredded alternately. In so doing, the wood chips prevent the screen orifices from clogging. As the waste chippings are collected in a collection bag, care must be taken in making sure at regular intervals that the chips will not block the discharge in the collection bag. Collection bag filling can be checked by looking through the grid found beneath the loading hopper. To promote collection bag consolidation, shake the bag regularly to distribute the waste chippings to fill the empty spaces in the collection bag. If the operator should notice that, despite all of the preparation, a foreign object still finds its way into the machine, the engine must be immediately shut off. The foreign object must be removed first and then the machine must be examined for damage. If damaged, have the damage repaired promptly. As a rule, the engine will shut off automatically on removing the collection bag. If not, possibly as the result of an electrical defect, the operator must immediately turn the engine off himself and refrain from using it until repaired. REMOVING THE COLLECTION BAG = MOTOR SHUT OFF 25 2541 HL-Primo-En 17-01-2008 12:26 Page 26 English 9.6 Emptying the Collection Bag The bag needs emptying when the waste chippings in the collection bag has reached the bottom of the discharge chute of the machine. Before doing so however, always turn off the engine/motor first. (failure to dos so, will cause the engine/motor to cut out when removing the collection bag) Failure to empty the bag in time will cause the shredding chamber to get clogged up and finally come to a stop. (see chapter 9.7) Caution : A machine that does clog up is a sure source of overheating with the resultant increase in fire hazard. The collection bag has an approximate 60 liter capacity. Warning : Once full, the collection bag can be pretty heavy. Which means - make sure to hold the collection bag close in towards your body as close as possible first and then lift using your leg muscles. (Lift keeping back straight and bend legs at the knees.) Know your own capability. The mere fact of lifting things beyond your personal capacity a mere few centimeters do serious damage. Seek assistance when lifting things that are too heavy for you. Either you can empty the contents of the collection bag in to a wheel barrow, or you can take the full bag to the dumping area using the wheel barrow. What's more, the machine can be used for transporting the collection bag once full. When refitting the collecting bag you can secure it in position using a locating pin. Alternatively, you can replace the collection bag with a discharge funnel. Again, move the machine in time as to prevent the pile of chips from blocking the discharge opening. 26 2541 HL-Primo-En 17-01-2008 12:26 Page 27 9.7 What To Do about Engine Stalling English Engine stalling can be traced to overloading, overfeeding, discharge blockage or lack of fuel. The engine may well not restart immediately. To remedy the problem, do the following. 1. Check ample petrol in tank (see Chapter 9.2). 2. With machines powered by an electric motor, check overcurrent protection integrity on the motor or the mains fuse. 3. Remove all branches from the feeding aperture. 4. With machines powered by a petrol engine, pull the starter rope once. This allows you to find out whether the knife drum is still jammed. As soon as you feel resistance, and cannot pull the starter rope any further, stop pulling. There is no point in pulling hard on the starter rope, as this can only cause it to break or overload the starter mechanism. 5. When the knife drum got jammed, the shredding chamber needs clearing. Commence removing the collection bag from the machine in order to get access to the shredding screen through the discharge. The screen is secured by two slide pins. Free the hairpin clip from the topmost slide pin, thus allowing you to remove this pin. At that point, the screen is released on one side allowing it to hinge downwards. Warning: The blades are razor sharp, avoid cuts to the hands. Wear gloves ! 6. Remove all wood chips and traces of wood that are in the shredding chamber. Carefully refit the shredding screen and check for correct refitting. 7. Refit the collection bag and restart the shredder (follow the start procedure as outlined in Chapter 9.4). 8. Perform the work more carefully in the future in order to avoid jamming of the machine. If you notice a strange noise during the work, immediately stop the work. Stop the engine and investigate the cause of the defect. Before proceeding, perform the necessary repairs. 27 2541 HL-Primo-En 17-01-2008 12:26 Page 28 English 9.8 Cleaning the Machine If the machine is not cleaned, this will lead to increased wear. If the machine does not operate optimally, this can compromise the safety of the user. Disadvantages associated with non-cleaning 1. Increased wear on bearings 2. Increase in sealing wear rate 3. Reduced cooling efficiency 4. Fire risk 5. risk of short circuit 6. Inability to detect fractures or cracks 7. Damage to paint coating 8. Stickers becoming illegible. Each time after the machine is used, make it a habit to spend some time cleaning the machine. The cleaning of the machine can also be considered to be a visual check. This lets you detect cracks, breaks or lack of lubrication in time. Special attention must be paid to the following locations. The engine must remain free of dust and dirt. In particular, the cooling fins must be clean and the area around the exhaust pipe must be unobstructed. The area around the filler plug must also be kept clean so that dirt does not enter the fuel tank. The bearing bushes must be free of sand and dirt that sticks in the lubricant. After wiping down, reapply lubricant (see the list of lubricants in Chapter 11.2). Using a dry cloth, remove any dirt from the chassis. Pay special attention to places where stickers with safety messages are displayed. Decals used to indicate safety messages, that are no longer legible must be immediately replaced. Obtain these original decals from your ELIET dealer. Caution: Wear proper apparel when cleaning. Gloves are required. Use a dry cloth, a soft brush, etc. for cleaning. To remove grease and lubricants, use a penetrating oil containing molybdenum disulphide. This spray lubricates and also dissolves rust. (Do not use any cleaning products that affect paint or stickers.) Steam cleaning of the machine is permitted on machines powered by a petrol engine only ! However, never point the water jet for long periods in the direction of bearings, electric contacts or filler caps. Water is known to be the main cause of corrosion and must, therefore, be avoided at all times. Allow the engine to cool down prior to cleaning it down with a cold water spray. 28 2541 HL-Primo-En 17-01-2008 12:26 Page 29 10. Transporting the Machine English Make sure to clear the shredding chamber before moving the machine. Make sure the infeed opening is free of branchy material. When moving the machine over greater distances (over 2 m), always take care to turn off the engine. The design of the chipper is such that the stationary and the operating positions of the machine coincide. It follows that in order to move the machine status must be changed from stationary to mobile. In order to do so, pull the machine towards you grasping the loading hopper handle, whilst tipping it forward round the wheels. Continue to tilt the machine until the loading hopper handle is at no more than 80 cm from the ground. Only adults may move or transport the machine. Also, during the transport, do not allow children, unauthorized persons or animals within a radius of 3 m around the machine. It is critical to judiciously select the traffic route in such a way as to release yourself from the worries of tripping up over some obstacles. The transport route is preferably flat with an even bottom. 29 English 2541 HL-Primo-En 17-01-2008 12:26 Page 30 Use slip resistant ramps to load the machine into a van or a trailer. Ensure that these are well secured to the vehicle or trailer. Under no circumstances must the angle of the ramp be greater than 25°. Be careful and composed when loading and unloading the shredder so that the machine does not tip over and give rise to an accident. In the event that the machine does tip over, right it again as soon as possible. This prevents oil from leaking out of the transmission casing on to the air cleaner. Try to prevent the motor from falling over, since these filters are expensive. When walking up a slope push the chipper out in front of you facing uphill. When walking down a slope, move down backwards facing the machine. The machine must be properly tied down within the vehicle during transport. Use sturdy parts of the vehicle’s chassis to attach ropes. Do not overload the vehicle. Refer to Chapter 13 (specifications sheet) to find out the exact weight of the shredder. The maximum allowable lateral slope angle amounts to 10°. 30 2541 HL-Primo-En 17-01-2008 12:26 Page 31 11. Maintenance English 11.1 General For Your Information: The dealer’s personnel are always at your service. The ELIET dealer can always rely on comprehensive support from ELIET mfg.cy, so that they can work together to find a solution for any problem that you may have. For a repair or for the maintenance of the engine you can always contact your ELIET dealer or a maintenance service that is recognized by the engine manufacturer. If you need to contact these services, please furnish us with the Model Number and Serial Number of both the machine and the engine, and also describe the problem in detail. Caution: Only use genuine ELIET replacement parts. These service parts are manufactured to the same strict quality control and degree of craftsmanship as the original equipment. Perform maintenance in a room intended for this purpose. This room must possess the following characteristics : • Spacious • Dust-free • Easy access • Clean and tidy • Well lit • Quiet These characteristics are important to enable maintenance to be performed in an optimal manner. Caution: Maintenance performed in an incorrect manner can subsequently compromise the safety of the operator. 31 English 2541 HL-Primo-En 17-01-2008 12:26 Page 32 Always make sure the engine is shut off when doing service operation. For safety reasons, pull the spark plug cap off the spark plug or disconnect the plug. When performing maintenance, always wear gloves, and also safety glasses for some operations. These are included with the machine. TIP : The maintenance work described can basically be performed by any person who possesses the requisite technical knowledge. However, ELIET recommends that the machine should be handed in to an ELIET dealer for a major overhaul each year. Your ELIET dealer is always at your service for maintenance and advice. He stocks genuine ELIET service parts and lubricants. His personnel can always obtain advice and service from ELIET, so that they can provide you with an impeccable after-sales service. 11.2 Servicing Schedule Major overhaul after 20 running hours Routine check before each time machine is used Procedure Visual check of the § 11.4.1 condition of the machine 32 Checking the oil level of the engine § 11.4.2 Cleaning the air filter § 11.4.3 Sharpening the shred knives § 11.4.4 Cleaning the machine § 9.7.1 § 9.7.1 Changing the engine oil § 11.5.1 Checking or Changing the Spark Plug § 11.5.2 Changing the Air Filter § 11.5.3 General Lubrication § 11.5.4 Reversing and renewing the shredding knives § 11.5.6 2541 HL-Primo-En 17-01-2008 12:26 Page 33 Lubricants Petrol engine (0,75 l) English Bearings and pivot points SUNOCO SUPER DENALUBE SAE 20 W 50 API SF / CC NOVATIO CLEAR LUBE or PTFE OIL 11.3 Routine Checks before the Start of Each Work Session 11.3.1 Visual check Check that no parts are deformed, no welded seams are cracked, and that no parts exhibit excess play. First conduct the necessary repairs if any problems are found. Check whether the machine is running at the manufacturer’s engine speed (3,200 rpm) (a tachometer can be obtained from your ELIET dealer). Never try to change the standard settings of the engine. 11.3.2 Checking the Oil Level in the Petrol Engine Crankcase Park the machine on a level surface making sure the motor bed plate is as close to level as possible. Open the manual at Chapter 6 and locate the oil drain plug and the crankcase filler point. Take a clean cloth and clean the fill area. Unscrew the gray oil filler plug, located to the right of the engine. This will enable you to check for correct oil level. Normally, the oil level should reach the edge of the filler point. If the oil does not reach the edge there is not enough oil. If the oil level is too low, it is simply a matter of replenishing through this filler point. Fill until the desired level is reached. Use a funnel with a built-in sieve. Only use the recommended oil. Immediately clean off any spilled fuel. Caution : Make sure that no dirt enters the casing via the fill stud. 11.3.3 Cleaning the Air Filter The air cleaner is located behind the black safety guard at the L.H. side but on top of the engine. This black safety guard is secured to the filter body using clips. 33 English 2541 HL-Primo-En 17-01-2008 12:26 Page 34 This is a mulitlayered conventional paper element as with cars. The paper filter type can only be cleaned by dusting it off or by blowing it out with compressed air. After cleaning, refit using a reverse sequence to that given for removal. Caution: If the machine accidentally falls over, check air cleaner integrity as soon as possible. If this happens, oil from the crankcase can flow via the carburetor onto the air filter. Oil on the paper element is restrictive to air flow. Dirty air filters need replacing. 11.3.4 Sharpening the Shredding Knives Warning : The knives may continue to rotate for a few seconds after the engine is shut off. Caution : In order to avoid any personal injury, it is imperative that intervention on the machine is performed only when the sparking plug cap is disconnected. Sharp shred knives will give the machine optimum performance and provide maximum operating speed. Enhance your own work comfort by taking some time to check the blades, and if necessary, sharpen them. SHARP BLADES = MAXIMUM OUTPUT For Your Information: The blades do not have to be removed in order to sharpen them. Remove the collection bag from the machine. Raise the rear of the machine to rest on the wheels and the loading hopper (see figure). 34 2541 HL-Primo-En 17-01-2008 12:26 Page 35 English Warning: When tipping the machine, petrol may leak out of the fuel tank through the fill stud. Drain the fuel tank beforehand with the aid of a siphoning kit. Flying sparks when grinding can be source of fire hazard when they come into contact with petrol. Remove the shredding screen from below the machine for easy access to the shred knives. To do this, remove the two slide pins. Sharpen the blade edge of the knives using an angle grinder, Warning: Always wear safety glasses and hearing protection when grinding knives. Gloves, too, are obligatory during maintenance work. Dress along the bevel blade edge of the knife. Ensure that the blade edge is kept at the same angle. The top of the knife is subjected to the heaviest loads under shredding. Sharpen this as little as possible so that it is not weakened. Correct and timely sharpening of the shredding knives will extend their operating life. For Your Information: As soon as the top of the blade edge becomes blunt, the cutting edge has reached the end of its operating life and must be renewed or turned around. After sharpening a knife, refit using a reversal of the procedure given for removal. To permit easier assembly of the screen, apply some grease to the slide pins. 35 2541 HL-Primo-En 17-01-2008 12:26 Page 36 English 11.4 Maintenance after 20 Running Hours 11.4.1 Changing the Engine Oil Locate the bolt that is screwed into the crankcase and which is located at the right side of the engine, at the bottom of the motor bed plate. (See the engine manual.) Position a 1 liter receptacle beneath the sump first and then remove the oil drain plug. Raise the rear of the machine to rest on the loading hopper. Unscrew and remove the oil drain plug (pay attention to the oil). Allow the oil (± 0.75 l) to drain into the receptacle. The used will flow freely from the frame past the motor bed plate. The used oil can easily be collected at the edge of the motor bed plate. Refit and tighten the sump plug. Always clean fluid spills using a clean cloth. Refill the engine with new four-stroke oil. ELIET recommends a high quality detergent oil. SUNOCO DENALUBE SAE 20W50 API SF / CC. Pour ± 0.75 l of oil into the oil filler plug until it reaches the edge of the filler point. After filling, clean up any oil that may have been spilled. Warning: Too little oil in the engine leads to irrevocable serious damage to the engine. 11.4.2 Checking or Changing the Spark Plug With 4hp HONDA GC 135 engines, ELIET recommends the following spark plug. NGK 36 BPR 6 ES 2541 HL-Primo-En 17-01-2008 12:26 Page 37 English Turn the engine off and let it cool for a while. Disconnect the sparking plug cap from the spark plug. Clean the area around the spark plug and remove the spark plug from the cylinder head. Check with the use of feeler gauges whether the gap between the plug electrodes is 0.8 mm. If the spark plug is fouled, replace it. 0,8 mm To check the condition of the ignition, perform the following. 1. Refit the spark plug cap onto the spark plug. 2. Hold the insulator part of the spark plug cap and press the outer electrode against the frame of the engine. 3. Pull the starter rope. 4. Look for sparks between the electrodes. 5. If the sparks are bright and located exactly between the centers of the electrodes, then the spark plug is still OK. 6. If the sparks are weak, irregular and not located exactly between the centers of the electrodes, then the spark plug must be renewed. Caution: Refitting an used or a new spark plug must be effected with great care to ensure that the cylinder head thread is not damaged. Torque the spark plug to 20 Nm. 11.4.3 Changing the Air Filter This is identical to cleaning the air cleaner (see Chapter 11.3.3). New air cleaners of the correct type are available from your ELIET Dealer or from an authorized Honda service center. 11.4.4 General Lubrication ELIET considers it important to use high quality materials because this extends the operating life of the machines under sometimes extremely arduous conditions. Therefore we have chosen use special lubricants at the manufacturing stage. ELIET also recommends that the knife drum bearing is lubricated on a regular basis. 37 English 2541 HL-Primo-En 17-01-2008 12:26 Page 38 Caution: Before lubricating the machine, again, satisfy yourself that it is shut off. Make sure the spark plug cap is disconnected, or the plug is disconnected from the wall socket (as appropriate). Gloves are mandatory since the blades are razor-sharp and can cause deep cuts. The knife drum can be seen by looking from the opening prepared in the outside at the L.H. side of the cutting chamber. Here is where the knife drum is centered using a nylon bearing bush. In order te reduce mechanical friction, it is a good practice to add lubricant to these bearing bush on a regular basis. Spray a little NOVATIO KLEENSPRAY-S in the joints of this nylon bearing bush in such a way as to loosen used lubricant. Leave the cleaning degreaser for a few seconds. Using a cloth, remove all dirt that is lodged around the joints of these bearings. Clean spray traces and wait at least 10 minutes to allow the spray to evaporate. Next, apply a high quality lubricant. To this effect, be over generous in the application of NOVATIO PTFE OIL or NOVATIO CLEARLUBE in the joints of the bearing seals and of the bearing bush. All these greases are available from your ELIET Dealer. Following are more lubrication points on the machine : Throttle control lever pivot point Engine speed regulator pivot points 38 2541 HL-Primo-En 17-01-2008 12:26 Page 39 11.4.5 Reversing and Renewing the Shredding Knives English Warning: Wear protective gloves as the knives are razor sharp ! Knives sharpened at regular intervals ensure a knife life in excess of 50 hours for each blade edge. When one blade edge has reached the end of its service life, simply reverse the knife, thereby enabling the machine to operate for another 50 hours. If both blade edges are worn, renew the knife as a set. To reverse a shredding knife, proceed as follows: For safety’s sake, disconnect the spark plug wire. As with knife sharpening, tip the machine forward to rest on the loading hopper. Be careful to ensure that petrol will not leak out of the reservoir. Remove the shredding screen. In order to do so, remove both slide pins. This ensures easy access to the shredding chamber. For Your Information: Remove and refit one knife at a time. This ensures that reversal is performed in an orderly manner. To remove a knife, simply loosen and remove the three M6 bolts retaining each knife. In this situation always use two ring spanners (10) fitted with long steels. Replace immediately any damaged bolts. Knife discs can occupy six different positions. Prior to removing, number identify the knives from 1 to 6 and the associated positions on the blade holder, using a marker pen. Always start numbering any one of both vertical knife positions. Next, remove one knife at a time from the knife disc using self-grip wrench. Rotate the knife numbered 1 through 180° and fit it to position 4. 39 English 2541 HL-Primo-En 17-01-2008 12:26 Page 40 Rotate the knife numbered 2 through 180° and fit it to position 6. Rotate the knife numbered 3 through 180° and fit it to position 5. Always make sure to refit the bolts in the blade holders in such a way as to ensure the bolt head is on the motor side. To renew a shredding knife, proceed as follows: New sets of knives are available form your ELIET Dealer under the following part number : BU 401 100 201 When renewing the knives, simply remove the old ones and replace them with new items. Before fitting a new knife in between the two knife discs, first remove any dirt that may have built up between both mating discs. To do so, use a stripping knife. With blade holders in an angle position, always make sure the bevelled cutting edge is facing away from the shredding chamber wall, when fitting new knives. On renewing shredding knives, always fit new bolts and nuts. When refitting the shredding knives check that all bolts are tight. Since the large number of retaining bolts, it is a good practice to check the bolts for correct tightness before fitting the shredding screen. When refitting the bolts in the discs, first make sure the nut is located on the side of the nylon bearing bush. This ensures knife drum direction of rotation locks the nuts. The next time you start shredding, consideration should be given that new shred knives take time to stabilize. This means the knives will vibrate loose between the discs. Thus, after the machine has been operating for five hours, retighten the knife bolts. Caution: After reversing or renewing the shredding knives, always check the bolts for correct tightness after expiry of the first 5 hours run. 40 2541 HL-Primo-En 17-01-2008 12:26 Page 41 12. Off-Season Storage English Clean the machine (see Chapter 9.8). When storing the machine for long periods, it is recommended to perform the following steps. Conduct a major overhaul (see Chapter 11.4). Check all nuts and bolts for correct tightness. Checking most bolts for correct tightness simply involves the use of two sets of open-ended spanners (10, 13 and17). Drain the fuel tank. Simply run the engine until the fuel tank is out of fuel and the engine stops. Alternatively, use a siphoning kit to dispense the remaining petrol in the jerry can (see the safety instructions included in Chapter 9.2). Remove the spark plug (see Chapter 11.4.2). Spray some penetrating oil containing molybdenum disulphide into the cylinder through the spark plug hole. Then pull on the starter cord for the piston to reach the top of its stroke. Refit the spark plug. Places where the paint coating is damaged are repainted or covered with grease in order to prevent rust. ELIET original paints are available from your ELIET Dealer. Store the machine in a dry place that is protected against rain, and if necessary, cover it with a tarpaulin. Always allow the machine to cool down before storage. If the machine is to be stored outside, it must be well protected with a tarpaulin. Ensure that water does not directly fall onto the machine. ELIET strongly recommends that the machine is stored at a location that is well protected from the weather, etc. Never keep the machine in a place where it can come into contact with a naked flame source. 41 2541 HL-Primo-En 17-01-2008 12:26 Page 42 English 13. Equipment Specifications Max. branch size . . . . . . . . . . . . . . . . . . . . . . . . . . . . . . . . . . . . . . . . . . . . . . . . . . . . . . . . . . . . . . . . . . . . . . . . . . . . . . . . . . . . . . . . . . . . . . . . . . . . . . . . . . . . . . . . . . . .35 mm Material throughput . . . . . . . . . . . . . . . . . . . . . . . . . . . . . . . . . . . . . . . . . . 8 wheel barrows of waste chippings an hour Dimensions . . . . . . . . . . . . . . . . . . . . . . . . . . . . . . . . . . . . . . . . . . . . . . . . . . . . . . . . . . . . . . . . . . . . . . . . . . . . . . . . . . . . . . . . . . . . . . . . 1390 x 500 x 1330 mm Storage dimensions . . . . . . . . . . . . . . . . . . . . . . . . . . . . . . . . . . . . . . . . . . . . . . . . . . . . . . . . . . . . . . . . . . . . . . . . . . . . . . . . . . . 790 x 500 x 950 mm Feeding aperture . . . . . . . . . . . . . . . . . . . . . . . . . . . . . . . . . . . . . . . . . . . . . . . . . . . . . . . . . . . . . . . . . . . . . . . . . . . . . . . . . . . . . . . . . . . . . . . . . . . . 400 x 200 mm Feed-in height . . . . . . . . . . . . . . . . . . . . . . . . . . . . . . . . . . . . . . . . . . . . . . . . . . . . . . . . . . . . . . . . . . . . . . . . . . . . . . . . . . . . . . . . . . . . . . . . . . . . . . . . . . . . . . . . . . . . 1200 mm Transport wheels . . . . . . . . . . . . . . . . . . . . . . . . . . . . . . . . . . . . . . . . . . . . . . . . . . . . . . . . . . . . . . . . . . . . . . . . . . . . . . . . . . Rubber wheels 200 x 40 Total Weight . . . . . . . . . . . . . . . . . . . . . . . . . . . . . . . . . . . . . . . . . . . . . . . . . . . . . . . . . . . . . . . . . . . . . . . . . . . . . . . . . . . . . . . . . . . . . . . . . . . . . . . . . . . . . . . . . . . . . . . . . . . . . . 32 kg Knife drum . . . . . . . . . . . . . . . . . . . . . . . . . . . . . . . . . . . . . . . . . . . . . . . . . . . . . . . . . . . . . . . . . . Steel shaft with double steel knife discs Blades . . . . . . . . . . . . . . . . . . . . . . . . . . . . . . . . . . . . . . . . . . . . . . . . . . . . . . . . . . . . . . . . . . . . . . . . . . . . . . . . . . . . 6 HS reversible steel shred knives Shredding width . . . . . . . . . . . . . . . . . . . . . . . . . . . . . . . . . . . . . . . . . . . . . . . . . . . . . . . . . . . . . . . . . . . . . . . . . . . . . . . . . . . . . . . . . . . . . . . . . . . . . . . . . . . . . . . . . . . 80 mm Drive . . . . . . . . . . . . . . . . . . . . . . . . . . . . . . . . . . . . . . . . . . . . . . . . . . . . . . . . . . . . . . . . . . . . . . . . . . . . . . . . . . . . . . . . . . . . . . . . . . . . . . . . . . . . . direct, a 1:1 ratio drive Engine . . . . . . . . . . . . . . . . . . . . . . . . . . . . . . . . . . . . . . . . . . . . . . . . . . . . . . . . . . . . . . . . . . . . . . . . . . . . . . . . . . . . . . . . . . . . . . . . . . . . . . . . . . . . . . Honda 4 HP GC 135 . . . . . . . . . . . . . . . . . . . . . . . . . . . . . . . . . . . . . . . . . . . . . . . . . . . . . . . . . . . . . . . . . . . . . . . . . . . . . . . . . . . . . . . . . . . . . . . . . . . . . . . . . . . . . . . . . . . . . 2200W Electric motor Available Options . . . . . . . . . . . . . . . . . . . . . . . . . . . . . . . . . . . . . . . . . Shredding screen for leaves and damp material . . . . . . . . . . . . . . . . . . . . . . . . . . . . . . . . . . . . . . . . . . . . . . . . . . . . . . . . . . . . . . . . . . . . . . . . . . . . . . . . . . . . . . . . . . . . . . . . . . . . . . . . . . . . . . . . . . . . . . . . . . . . . . . Discharge funnel Airborne sound power level LwA . . . . . . . . . . . . . . . . . . . . . . . . . . . . . . . . . . . . . . . . . . . . . . . . . . . . . . . . . . . . . . . . . . . . . . . . . . . . . . . . . . 109 dB(A) 42 2541 HL-Primo-En 17-01-2008 12:26 Page 43 EC Declaration of Conformity English Machine : ELIET PRIMO The previously mentioned machine has been designed and manufactured to comply with the following European CE regulations: PrEN 13684 : Forestry machinery : wood chippers - safety DIN 33402 : Body measures EN 292-1 : Safety of machinery : Basic terminology EN 292-2 :Safety of machinery : Technical principles EN 294 : Safety of machinery : safety distances EN 563 : Safety of machinery : Temperatures of touchable surfaces EN999 : Safety of Machinery : The position of protective equipment in respect of approach speeds of parts of the human body PrEN 1070 : Safety of machinery : Terminology EN 1088 : Safety of machinery : Interlocking devices associated with guards ISO 3767-1 : Symbols for operators control and other displays ISO 3767-3 : Symbols for powered lawn and garden equipement ISO 3767-5 : Symbols for manual portable forestry machinery ISO 3864 : Safety colours and signs ISO 11094 : Acoustics : Testcode for measurement of airborne noise ISO 11684 : Safety signs and hazard pictorials ELIET mfg. cy. hereby declare that a hazard analysis has been conducted such that they are aware of the potential hazards and risks peculiar to the machine. In this knowledge, the necessary steps have been taken in line with Machine Directive 98/392/EEC in order to ensure absolute operator safety to the operator, when used correctly. Date: Signature: Emiel LIETAER CEO ELIET COMPANY 43 2541 HL-Primo-En 17-01-2008 English Parts List 44 12:26 Page 44