1
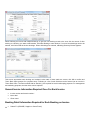
Pre-Training Tutorial Introduction Thank you for choosing Trams Back Office (TBO) software as your accounting and management system. Realistically we know that the implementation of our product will be scheduled in with all the other things you have to do each day. We ask that you devote the maximum time you can for working through this implementation process. We feel strongly about the importance and the benefits of training, and strongly recommend you use all the Trams Back Office Resources available to you as a subscriber. We recommend reviewing this Pre-Training Tutorial so you have a basic understanding of Trams Back Office before your training begins. To have the best experience during this journey, we strongly encourage you to join our Live WebEx classes or our recorded trainings. Please review our Suggested Class Order. Recorded Trainings: All of our Live WebEx classes are recorded and available on our website. Live WebEx Classes: Trams and ClientBase Products and Services bring you live internet based instruction designed to help you maximize the benefits from Trams Back Office. Each session includes a live instructor, lasts approximately 1 hour (50 minutes of presentation followed by 10 minutes of customer Q&A) and can be done from your internet connected desktop. Unlimited access to our support staff by e-mail ([email protected]) or by phone 310-641-8726 (Press 1 for Trams Back Office Support; Press 2 for ClientBase Support) This tutorial has four sections, each concentrating on a different topic: 1 Section 1: Understanding Travel Agency Operations Section 2: Understanding Accounting and the General Ledger Section 3: Understanding Trams Back Office Section 4: Miscellaneous Topics o General ledger integration o Report overview o Interfacing with the GDS Understanding Travel Agency Operations This Chapter contains: Front office vs back office The role of the invoice The anatomy of the invoice The purpose of commission tracking Front Office vs Back Office While most travel agencies don’t paint a line on their office floor to distinguish between the front and the back office, many do physically separate the two functions. In the past, the front office was most often described as the sales office and the back office was labeled bookkeeping. The front office made reservations and generated invoices, and the back office accounted for the sales, collected the money and made the bank deposits. Today, the distinction between the front office and the back office is not as clear because of automation. Agent workstations allow front office consultants to access their GDS (Amadeus, Apollo/Galileo, Sabre or Worldspan), the Internet and customer database software (such as ClientBase) simultaneously. These front office applications capture reservations, itineraries and invoices. The data from these transactions can optionally be sent to the back office through the interface process eliminating the need to manually sales into Trams Back Office. The back office computer system (Trams Back Office) captures and stores the names and addresses of customers, the invoice numbers, amounts and travel dates, etc., to account for each sale and through reporting can make detailed management decisions. The common link between the front office and the back office is the invoice. The invoice is the product of the front office and the entry point of the back office. The successful agency understands the importance of the front office fulfilling any back office needs when issuing these invoices. The Role of the Invoice The invoice contains details of every sale made and is the document that communicates those sales from the front office to the back office. It contains dates, rates, names, addresses, confirmations, payments and more. If every travel agency booking that generates revenue is recorded on an invoice, and every invoice is logged, filed and controlled, the agency has completed the most important step of managing its business. Although lots of information may appear on an invoice, the purpose of creating an invoice should not be lost and that purpose is to document the agency’s sales and track commissions. Invoices always include general information that is common to all aspects of the invoice, as well as booking information which applies only to specific bookings. An invoice may include one or many bookings. For example, an invoice for two travelers flying to Chicago, renting a car and staying in a particular hotel has four bookings: one for the first traveler’s flight; one for the second traveler’s flight; one for the hotel booking; and, a fourth for the car rental. In order for an agent to know when to issue an invoice and for what amount, the travel agency needs to decide when each booking should be recorded as a sale in Trams Back Office. Some bookings, like airline tickets, are recorded as sales on the date they are issued. Others, like hotel and car reservations, are recorded as commission tracking transactions for the purpose of tracking commissions due, and most often the sale will be on the date the commission check is received by the agency. 2 Now that we know the “communications link” between the front and back office is the invoice, we understand that before any back office system can be effective, the procedures for producing invoices must be established. The most common problem causing confusion between the front and the back office is receiving inadequate, inconsistent, or inaccurate information on the invoices. Money Processing Classifications per Booking 1. ARC/BSP --These bookings, primarily airline tickets, occur when the agency collects funds from the client and submits a report to the Airline Reporting Corporation. ARC/BSP transactions are recorded as sales on the date the tickets are printed. An invoice should be issued by the agent every time an ARC/BSP document is generated. 2. SUPPLIER--These bookings, primarily cruises and tours, occur when the agency collects funds from the client and submits payments directly to each vendor. Supplier transactions are recorded as sales on the date the invoice is issued. 3. COMMISSION TRACKING -- These bookings occur when the agency does not collect payment from the client, but rather makes a reservation for which the client pays the vendor directly. For these bookings, the agency “tracks” the commission due the agency from each vendor. Commission tracking transactions are recorded as sales when the agency receives the commission check from the vendor. The Anatomy of the Invoice Certain information is fundamental to proper invoicing, and essential to having proper data available for the back office. As previously discussed, an invoice has two components: General Invoice Information that applies to all portions of the invoice, and Booking Information that only applies to a specific booking. Each invoice component contains both required and optional information. GENERAL INVOICE INFORMATION Required Date of the invoice Invoice number Client Name Optional Sales agent identified Sales agent commission information Notes, etc. BOOKING INFORMATION Required Money processing classification (ARC/BSP, supplier or commission tracking) Vendor or airline Type of travel (air, car, hotel, cruise, etc.) Amount of the sale (amount client is to pay or total fare) Amount of commission (difference between what is collected and what will be paid out) Ticket or confirmation number (required in money processing classification is ARC/BSP) Optional Departure and return dates Itinerary Passenger name, department, etc. Expanded fare information Client notes Vendor notes Final payment information The Invoice and Clients and Vendors The invoice determines the amount of money to be collected from the clients and paid to the vendors. The difference between these amounts is called commission. The total amount of all unpaid invoices, less any deposits for any client, is 3 called the Client Balance (also known as Client Accounts Receivable). The amount of money owed to the vendor, less any deposits, is called the Vendor Balance (also known as Accounts Payable). Sometimes the items listed on the invoice are paid by the traveler directly to the vendor. In this case, you need to track the commission owed by these vendors. Although documented on an original invoice, commission tracking bookings are maintained for management information only (commission tracking, production reporting, etc.) and accounted for only when the agency receives the commission. The ARC/BSP report is submitted electronically every Tuesday for sales, refunds, adjustments by means of IAR (Interactive Active Agent Reporting). A payment is deducted or deposited electronically into the agency’s checking account for each week’s sales report. Trams Back Office works with ARC/BSP to accept the electronic version of the Sales Summary Report to reconcile the report. The IAR Reconciliation Report compares the data in the Sales Summary Report file from ARC/BSP to the information in Trams Back Office and generates an exception report that lists all the differences between your Trams Back Office data and ARC/BSP’s data. Once you know the items that need adjustment, use that report to make changes before completing your ARC/BSP settlement routine. The Purpose of Commission Tracking One of a travel agency’s biggest administrative nightmares can be collecting commission from vendors. This is also one of the biggest sources of income for a travel agency. Travel agencies make many reservations for travelers that are paid for as the trip progresses. These reservations could be for hotels, car rental companies, limousines, etc. Usually the exact cost of the service is not known until the traveler checks out of the hotel, or returns the rental car. Once this cost is known, the vendor should process a commission payment for the agency. If the vendor does not process a payment, the agency with the help of Trams Back Office is tracking which vendors have not paid them. Bookings that are subject to commission tracking such as cars and hotels are not accounted for as sales until the commission is received by the agency. This is because the agency is never certain of the actual amount of the commission, and whether the vendor will ever pay the commission that is due. Information for commission tracking is taken from the invoice, but is not in the accounting portion of Trams Back Office until the commission is received. When the commission is received, Trams Back Office automatically moves the booking from the non-accounting area into the general ledger and accounts for the sale. 4 Understanding Accounting and the General Ledger This section contains: Background What’s the point? What makes up a general ledger? Debits and Credits Financial statements Journal entries: Overview Anatomy of a journal entry and pseudo posting Two ways to make a journal entry Getting started Background The information in other sections makes your life with Trams Back Office easier. The information in this section can make or break your business. Central to accounting systems, computerized or not, is the General Ledger (G/L). It’s from the G/L that an agency’s Income Statements and Balance Sheets, also known as the agency’s Financial Statements, are generated. The G/L is simply a list of journal entries and the balances for each account. In addition to the Income Statement and Balance Sheet reports, reports show an “audit trail” and must be available to show details on how, when, and from where balances in the financial statements were derived. A key to maintaining a G/L is to be sure proper management data are maintained and reconciled, including what Trams Back Office refers to as the Four Core Reports: 1. Client Balances (Accounts Receivable) - A complete listing of any pending client balances. 2. Vendor Balances (Accounts Payable) - A complete listing of any pending vendor balances 3. ARC/BSP Balances - List of unpaid ARC/BSP transitions. Must use ARC/BSP Settlement in TBO to maintain accurate data. 4. Check Register - Automated bank account tracking, including all bank activities and balances. These four reports are a primary source of data for the G/L and are considered the foundation of Trams Back Office. Once these are up and running, the integrity of information on all other reports is verified. You do need to understand certain accounting fundamentals, which is our goal in this tutorial. But you don’t need to be an accountant to maintain a basic G/L, which you give to your accountant to review and to answer any questions. Here, we explore the concepts and outline the steps to maintain your own G/L. What’s the Point? Since most of us are in the business of selling travel, why take the time to learn some accounting fundamentals? This is a question often posed by business people and it answers itself through experience. To run any business effectively, financial information must be available to make on-going decisions. To be successful, plans and goals must also be in place. By viewing financial statements, owners or managers see where they have been, where they are going, and learn to steer a course toward their goal. Financial Statements really serve two purposes: 5 1. To provide information and audit trails to pay taxes. 2. To provide financial information for planning and setting goals. A common dilemma in the travel industry is that our outside accountant often has the expertise for the first, but not for the second. This means that if the accountant is producing financial statements, you may not be getting what you need. On the other hand, you can produce your own financial statements based upon what you need, and then provide that information to your accountant for them to do what they need. What Makes up the General Ledger? The G/L is a list of accounts with their balances. These accounts are divided into Income Statement and Balance Sheet accounts. There are six categories of accounts: 1. Assets Probable future economic benefits 1000 series 2. Liabilities Probably future economic loss 2000 series 3. Capital Owner’s capital 3000 series 4. Income Sales and other revenue 4000 series 5. Cost of Sales Cost of services/goods sold 5000 series 6. Expenses Costs related to operating the business 6000-9000 series Each category has several accounts, and each account has its own name. For example, in Expenses, note the following examples: Salaries Telephone Rent Postage Insurance Utilities Etc. Although the six categories of accounts are always the same from agency to agency, the accounts in those categories may vary from agency to agency since every business is slightly different. The ultimate listing of accounts an agency chooses to work with is called the Chart of Accounts. Each account has a balance, or a summation of the transactions entered in that account. Debits and Credits If you can understand the concept of G/L accounts having either a positive or negative balance (cash could either have a positive balance or be overdrawn), you can understand debits and credits with a few simple cheat-sheets. A “debit” is simply defined as the left side of a journal entry. The “credit” is the right side of a journal entry. Each category of accounts has a natural balance as a debit or a credit. This means the balance of an account increases a transaction when the same balance is used. Transactions with the opposite balance as the natural balance reduce the balance in the account class. Account Class Assets Liabilities Capital Income Cost of Sales Expenses 6 Natural Debit Balance Debit Natural Credit Balance Credit Credit Credit Debit Debit Below is a table showing the six G/L account categories and how debits and credits are either increase or decrease the account balance. Account Class Assets Liabilities Capital Income Cost of Sales Expenses Increase Balance (+) Debit Credit Credit Credit Debit Debit Decrease Balance (-) Credit Debit Debit Debit Credit Credit Financial Statements By maintaining your own G/L, you can produce your financial overview with Financial Statements at any time. A Financial Statement includes a Balance Sheet and an Income Statement. Use the following formulas to create these reports: Balance sheet: Assets – Liabilities = Capital + Profit for the Period Income statement (for the period): Income – Cost of Sales – Expenses = Profit for the Period Here’s a sample general ledger as of January 31, 20xx: Assets (1) Debit Cash in Bank Rent Deposit Furniture Client Balances Credit 18,700 1,500 9,500 2,000 Liabilities (2) ARC Balances 1,800 Capital (3) Retained Earnings Paid-in Capital 16,200 10,000 Sales – Air Sales – Cruise Sales – Tour 80,000 20,000 10,000 Sales (4) Cost of Sales (5) Cost of Sales – Air Cost of Sales – Cruise Cost of Sales – Tour 72,000 17,000 8,500 Expenses (6) Salaries Rent Telephone Insurance Other 7 6,000 1,000 800 500 500 A balance sheet describes the financial condition of a business at a precise point in time. Here is an example of a balance sheet generated from the general ledger: Balance Sheet as of January 31, 20xx ASSETS (1) Cash in Bank Rent Deposit Furniture Accounts Receivable Total Assets $18,700 1,500 9,500 2,000 $31,700 LIABILITIES (2) Accounts Payable Total Liabilities $1,800 $1,800 EQUITY (3) Retained Earnings Capital Contributions Sub-Total Capital Total Income for Period Total Capital $16,200 10,000 $26,200 $3,700 $29,900 Total Liabilities and Capital $31,700 Notice that the amounts for the account category totals (1, 2, and 3) come from the corresponding accounts in the General Ledger. So, any changes in these G/L accounts are reflected in the Balance Sheet, and the Balance Sheet is only up-to-date if the G/L is up-to-date! Notice the formula: Assets (1) – Liabilities (2) = Capital (3) or Assets (1) = Liabilities (2) + Capital (3) The Income Statement shows the profit or loss of all business activities during a specific period of time. Here is an example of the Income Statement generated from the General Ledger: CATEGORY SALES Income Statement: January 1, 20xx – January 31, 20xx ACCOUNT Sales – Air Sales – Cruise Sales – Tour Total Sales (4) $80,000 20,000 10,000 $110,000 COST OF SALES Cost of Sales – Air Cost of Sales – Cruise Cost of Sales – Tour Total Cost of Sales (5) $72,000 17,000 8,500 $97,500 Gross Income (Commission) $12,500 EXPENSES Salaries Rent Telephone Insurance Other Total Expenses (6) $6,000 1,000 800 500 500 Total Income for Period 8 $3,700 Again, notice that the amounts for each account come from the corresponding G/L accounts. Here are the corresponding numbers for the Income Statement Formula: Income (4) – Cost of Sales (5) – Expenses (6) = Total Income Journal Entries Overview A journal entry (J/E) is simply a record of a financial transaction. With no exceptions, anything that affects a business’s financial position must become a journal entry. Information can only enter the G/L as a journal entry, and it is from the G/L that financial statements are generated. One view of Journal Entries is that they comprise an Action and a Reaction, and the total of the actions must equal the total of the reactions. Below are some examples: Original contribution to start a business: Date posted: 1/1/xx Category Action (Debit) Cash in Bank Asset Owner’s Equity Capital Total Purchase desk; $100 down; to pay in 30 days Date posted: 1/1/xx Furniture Cash in Bank Operating A/P Total Category Asset Asset Liability Reaction (Credit) 10,000 10,000 Action (Debit) 10,000 10,000 Reaction (Credit) 200 200 100 100 200 You can see from the above examples that actions and reactions are offsets of each other. In accounting, these offsets are called debits and credits. As explained earlier, you should not think of debits as “good,” or credits as “bad” (or viceversa). What’s important is that they offset each other, and in every case, the total of the debits equals the total of the credits. Journal Entries Overview There are five key items that must be present in each and every journal entry: 1. 2. 3. 4. 5. Date of the journal entry G/L account(s) and the amount(s) to be debited G/L account(s) and the amount(s) to be credited A description/explanation of the journal entry Date journal entry is posted to the general ledger All Journal Entries reside in the Journal Entry Register, which is an ordered list of all Journal Entries. Entering the journal entry information into the G/L is called posting. Once a journal entry has been posted into the G/L, the journal entry is locked and can’t be changed. That way, an audit trail can be maintained, and a source of each G/L entry can be traced. Thus, posting is the process by which journal entries are permanently logged into the GL from the Journal Entry Register. 9 Pseudo Posting Financial statements are generated from the G/L, and information is locked into the G/L when it is “posted” from the Journal Entry Register. What if you want to look at an up-to-date financial statement, but you are not ready to post (and therefore lock) your current journal entry? In Trams Back Office, temporary financial statements can be generated using a unique reporting feature called Pseudo Posting. Pseudo Posting allows you to temporarily reflect the current, unposted journal entries in the G/L and temporarily calculate “what if” balances without performing the function of posting. Thus, you can produce “what if” financial statements prior to reconciling all of your data and also verify that balances appear to be correct before “locking in” the entries. Pseudo Posting does not affect the actual G/L accounts. Since posting permanently locks in Journal Entries, many Trams Back Office agencies run Pseudo-Posted financial statements during a period, and post only upon monthend completion of both the bank and ARC/BSP reconciliations for the period. Two Ways to Make a Journey Entry As previously discussed, anything that affects the financial position of a business must result in a journal entry that is then posted to the G/L. This means that the results of your day-to-day activity, invoices and payments, need to be turned into Journal Entries so that they are reflected in the G/L. With Trams Back Office, if you maintain your day-to-day activities you can easily and effectively have the system do the work of turning the daily entries into journal entries. There are two ways that Journal Entries can be created: 1. Direct Journal Entries - When you make a $500 rent payment in your check register using Check #2034 dated 1/1/xx, you make a manual journal entry updating the appropriate GL accounts as follows: Account Name Cash in Bank Rent Description Debit Credit 500.00 Activity Date 01/01/xx Post Date 01/31/xx 500 Monthly rent 2. Via Supporting Report Register Totals - Rather than creating a journal entry for each transaction, a second, often easier, method is to capture multiple activities into a report and then use the totals from the report to create a single journal entry. One advantage to creating journal Entries via supporting report totals is the ability to make changes to the report prior to creating the journal entry. Client Receipts Register Smith $500 Jones 600 ABC Company 1,200 Total $2,300 Account Name Debit Credit Activity Date Post Date Cash in Bank $2,300 01/15/xx 01/31/xx Accounts Receivable 2,300 Description Client receipts Trams Back Office combines both methods of creating journal entries. Invoices, client and vendor payments are all journalized automatically at month-end by using supporting report totals. “Other” payments, and withdrawals are all journalized individually, and Trams Back Office automatically prompts you to do so when you complete these types of entries. By simply creating journal entries individually when Trams Back Office prompts you to do so and creating the automatic month-end entry using report totals, you have the ability to generate financial statements from the Trams Back Office program. It’s that simple! 10 Getting Started A key to successfully maintaining your own G/L is starting off properly. You do this easily, as long as you address any outof-balances before adding any further entries. Step One: Select a start date for your G/L and be sure it is the beginning of a month, or a quarter, and it is our recommendation that you not go back in time. Step Two: Make sure that your four Core Reports are running smoothly and determine each balance as of the day prior to your G/L start date. If they are not running smoothly, delay your G/L start date until they are! Remember, you can always start Trams Back Office now, or in the future and later backdate beginning balances. The balances that must be determined are: 1. 2. 3. 4. Checking / savings account registers Client balances Vendor balances ARC report balance Take whatever time is necessary to get a handle on these four reports. It is imperative that these four reports are running properly for accurate financial reporting. Step Three: After setting up the Chart of Accounts (your specific list of accounts in your G/L for your agency), create a journal entry establishing the beginning G/L Balances. Note that there are four G/L accounts set up in the General Ledger that corresponds to the four core reports. These four G/L accounts must start with the same balance that is in the corresponding core report. For example if the Core Report balance for Client Balances is $2000, then this is the same balance that needs to go into the Client Balance G/L account. If you don’t have all G/L balances available when you start maintaining the G/L in Trams Back Office, enter the balances you do have from the four Core reports with an offset adjusting account. When you get the remaining General Ledger balances together (which may be several months later), enter them at that time dating the entry the appropriate back date. In the meantime, the G/L can still be maintained and kept up-to-date. 11 Understanding Trams Back Office This chapter contains: Navigating through Trams Back Office The role of the profiles Recording daily activities Establishing the core reports Background Understanding the power of the system is important as you plan the implementation. To imagine that you can get 100% of Trams Back Office up and running in one week may be over-optimistic and even overwhelming. Take it one step at a time. Start with Trams Back Office’s recommended daily routine after establishing the “Core” reports which build a foundation. We also have an area on our website Trams Back Office Getting Started which will help you prioritize the starting up tasks. The Core Reports are your foundation for using this accounting system and should be established and maintained to verify the integrity of the figures you input during your daily routine. Only after the Core Reports are running properly can you post accurate figures to your General Ledger accounts or run accurate reports, such as client and vendor statements. The beauty of setting up these Core Reports is that they can be set up any time, even after you are using Trams Back Office. By exploring Trams Back Office and the setup of the Core Reports at your own pace, you are well on your way to learning the system and fully using Trams Back Office. To simplify the Trams Back Office implementation process, we suggest three distinct phases: 1. Training 2. Setup 3. Maintenance Don’t jump into the maintenance phase before you’re comfortable with Trams Back Office and before you’ve established your daily routine, including Core Reports. Get comfortable with the Trams Back Office program by beginning with Phase One. After you finish each section, sign into Trams Back Office and do the exercises and drills -- hands-on. All the talking in the world won’t prepare you for getting Trams Back Office up and running or for working in the system. So get to your computer and set your mind and your fingers to learn. 12 Navigating Through Trams Back Office There are two types of menus in Trams Back Office - the Main Menu and the Sub-Menus. The Main Menu organizes the system into major sections, while the Sub-Menus lead you to the functions you wish to perform. Once you are where you want to be, the menus end, and the data entry screens begin. Data entry screens have various fields for you to capture required information, run reports, or perform other functions. Although you use your mouse to navigate through the program, you can also use your keyboard. The first step in learning Trams Back Office is getting comfortable with how everything is organized and how to navigate through the program. So let’s step back, and clear travel and accounting from our minds for the moment. We’ll focus on the Trams Back Office menus, and learn about getting around the Trams Back Office program with our mouse and keyboard Organization of Trams Back Office The main menu of Trams Back Office: We can group these menus into categories as follows: 13 File: Contains the Login, Printer Setup and Exit menu options Invoices: Input and maintain all invoice information Payments: Input and maintain all bank account information Adjustment: Input agent commission adjustments Profiles: Input and maintain all the agency’s business contacts: Clients, Vendors, Sales Agents and Others General Ledger: Input and maintain General Ledger entries Interface: Download and maintain all records from the GDS reservation system The Invoices, Payments, Adjustment, Profiles, and General Ledger menus also have a sub-menu called query. With Query retrieve entries for review or modification. You can request it by just about any information already in that transaction). You also access Query for Invoices, Payments, Operating Payables, Journal Entries, and Profiles by clicking on the tabs at the bottom of the Trams Back Office screen. These screens are convenient because they are always open. You can query by type of transaction in a different screen, leave the results on the screen, and check back and forth between the query screens. When clicking on the Main Tab, it takes you to a refreshed program screen. Hot Keys: Hot Keys stand out because they have underlined letters, different from the rest of the letters in a menu option or on a data screen. Using Hot Keys, you can navigate through Trams Back Office with single keystrokes. Hold down <Alt> as you press the underlined key. Output Menu: Reports The next choice in the Main Menu is the “output” menu, Reports. After working in the first seven areas to input and maintain information, go to Reports to view or print the information -- in just about any format desired. Because of the wealth of reports in Trams Back Office, the Reports sub-menu has many choices: 14 Core Reports: The foundation of the Trams Back Office system: Client Balances, Vendor Balances, ARC/BSP Balances, and the Check Register. Once these reports reflect accurate information, the remaining reports are validated. 15 Invoice Reports: Information from the invoice entries, including the ARC/BSP, Activity, Analysis and City Pair reports. Client Reports: Organized by Client, including Activity, Statement and Lists and Labels. Vendor Reports: Organized by Vendor, including Activity, Statement and Lists and Labels. Agent Reports: Organized by Sales Agent, including Activity and Statement. Payment Reports: Information from the payment entries, including Receipts Disbursements, Payment Analysis, and Check Writer. General Ledger Reports: Various reports from General Ledger entries, including Journal Entry Analysis, Account History, Trial Balance, Income Statement, Balance Sheet, Chart of Accounts, and GL Reconciliation. Interface Reports: Various reports from Interface entries, including Invoice List, Record List, Downloading Error Log, and Processing Error Log. Report Generator Reports: Includes pre-built reports and also lets you build your own reports based upon the data captured in the input areas. Utilities Menu Utilities Menu is the area you use to tailor Trams Back Office to fit your agency’s unique requirements before starting any input or output. This menu also includes various functions important to the long term maintenance of the Trams Back Office system. 15 Setup: Customizes Trams Back Office to your requirements. Includes User Profile, Global Defaults, Branches, Travel Types, Bank Accounts, G/L Accounts, Conversion Rates, Checks, Printer Defaults, Headers/Footers, Fare Codes, City Codes, Groups, IC/ Host Codes, CC Processor submenus. Backup: Provides backup. Calculator: By opening up, then minimizing the calculator, it sits right on your toolbar when you need to do calculations. Purge: Purge allows you to automatically delete files in the system that may no longer be of use. Enter Access Code: Area to input new access code. Backup! Don’t Leave Trams Back Office Without It! Why do backup? Because some day your computer will crash. Your data files are stored on the hard disk of your PC. Each time you add or change information, those files are updated. If your computer crashes, the data files can be damaged, and you might be unable to access them. While you can’t prevent an accident, you can insure yourself, and minimize potential loss. Backup is Insurance! Preparing for Backup Backup must be done regularly. If you backup every day, prior to adding more data to the system, you can never lose more than one day's work. Experience has shown that the easiest procedure is creating two sets of back-up media (flash drive, i.e.) and labeling them “A” and “B.” Rotate your media, using one, then the other. It is recommended to also store a backup copy off premised once a week. Help Menu Trams Back Office offers you various forms of help throughout the program. Press F1 Trams Back Office offers you various forms of help throughout the program. The chapters allows you to browse the help file, while the index tab displays topics by typing in a few letters of the item you want to find. The search tab makes it easy to search for topic by typing in one or more keywords. 16 Data Entry Screens Throughout Trams Back Office you see many data entry screens. These are all similar. Here is an invoice data entry screen: To move from field to field in a data entry screen, press <TAB>. To move backwards, use <SHIFT+TAB>. Notice that some of the field headings appear raised. This means you can click on the heading and call up a submenu. By checking the two boxes on the bottom right of the screen, you continue entering data and printing out the data before exiting the data screen. Click OK or press ENTER if the OK key is highlighted to save data. Drop-Down Menus To access drop down menus, click on the arrows you see next to the field: Navigating Through the Trams Back Office Program Drill Now let’s see how good you’ve become. To make sure you are feeling comfortable with the general organization of Trams Back Office and using your mouse and keyboard to move around the entire program, complete the following drill. No data needs to be entered, just navigate your way into the following...remember you can’t hurt anything! 17 Locate in Trams Back Office where you would do each of the following. (Note: Mark off each item as you find it.) 1. 2. 3. 4. 5. 6. 7. 8. 9. 10. 11. 12. 13. 14. 15. 16. 17. 18. 19. 20. Enter a new sales invoice Retrieve an existing profile Run a Payment Analysis report Enter an Agency Disbursement report Enter an ARC/BSP adjustment Run a vendor statement Run an income statement Process interface records Set up your agency’s travel type table. Enter a Spoiled Invoice Enter a Vendor Profile Update General Ledger Accounts Do your daily backup Do an End of Period Set up your bank accounts Set up your printer Do a bank reconciliation Import a payroll program Create a payable Access your calculator Find help on Resubmissions of ARC/BSP items Exit Trams Back Office Navigating Through a Trams Back Office Entry Screen Drill Click on Profile|Client|Leisure. This is called a “data entry screen.” This screen contains several “fields” you may need to collect information on a leisure client. 1. To move forward through each of the fields, one by one, press <TAB>. Go ahead. Hold down the <TAB> key and see how it simply jumps from field to field. 2. To move backwards from field to field, use the combination keys <SHIFT+TAB>. Hold down the <SHIFT+TAB> keys and see how the cursor wraps around the profile field backwards. Hold down <ALT> and press a hot key. This is a key that is underlined in a field. Do you see how you automatically go to that field? 3. Now tab down to OK. Do you see a faint dotted line around that button? Click OK to save any data, or just press ENTER on your keyboard. 18 The Role of Profiles It is important to build a solid profile base. Profiles are where you capture basic information on those with whom your agency does business, often called an “entity.” There are four categories of Trams Back Office profiles: 1. 2. 3. 4. Client Vendor Agent Other There are three reasons for building a profile: 1. For ease of entry and continuity throughout Trams Back Office. If you use a particular vendor frequently, it is much easier to record all information on that vendor once, by building a profile and then simply selecting that profile whenever you again use that vendor. 18 2. For maintaining account balances and historical information. Any entity with an account balance needs a profile so all activities are directed to one account and you can accurately calculate balances. Even accounts without a balance may need a profile simply for historical purposes. For example, a particular corporate account may pay by credit card, but want quarterly summaries. 3. For marketing and mailing lists. Trams Back Office provides marketing capabilities. You can easily print mailing lists, labels, and data in mail merge formats. Often agencies get mailing lists from special interest groups such as ski clubs or museums, and although the client may be Unfamiliar with the agency, you can build a profile for future marketing. Every invoice entered into Trams Back Office is directed to a client and, if applicable, a vendor profile and sales agent profile as well. Every payment is directed to either a client profile, vendor profile or “other” profile. So if profiles are not entered with care, the rest of the system suffers. Although profiles seem like relatively harmless creatures, don’t underestimate their importance! Profiles are also built when interfacing. Be careful when you are first interfacing to only let the system build a profile not already in your system. As an extra precaution, do a weekly profile report to check for duplicate profiles. To get this list and to check for duplicates, incorrect, or incomplete profiles, run the Lists and Labels report found in the Reports Menu under Client and Vendor Reports. A little time spent keeping the profiles accurate saves time later cleaning up errors created from directing daily activity to duplicate profiles. Duplicate profiles are normally a result of a blank Interface ID field. It is important that this field contains a customer number. If you have an endless list of “one-time” entities weighing your agency down, there are shortcuts – but use them with great caution. If, for example, you see a one-way ticket for a client who has paid in full and has no balance, and who you are sure will never need any historical reporting, and whom you have no desire to add to your mailing lists, direct that invoice to a “Walk-In Business” profile. Create a corporate client profile where the name is “Walk-in Business,” and select this profile when entering the type of invoice and payment. Remember, this may save time in these unusual circumstances, but do not turn this shortcut into a crutch. In the long run you may regret it, especially if credit cards don’t go through and there’s no way to find the client. If you do have a profile for each “Walk-In” client, you may one day want to send out a mailing promoting a special or discount to attract this person back into your agency. Without a separate profile, you can’t run a mailing label or mail merge into a letter for this person. Remember, thousands of profiles in Trams Back Office take up very little disk space. In that long run, it is best to create a profile for each billing party. The Elements of a Profile A profile has multiple fields. Some fields are specific to each of the four types of profiles, and some fields are common to all: 19 Profile Number: Every profile captured in Trams Back Office is automatically assigned a sequential number. You don’t need to memorize this number, and it is most often used to indicate the current number of profiles, and for shortcuts. Date Created: Every profile captured in Trams Back Office contains a creation date. This date defaults to the PC’s current date and can be modified. This allows you to pull lists of profiles created in a certain time frame. Name: Every profile has a name field. This is the only mandatory field. Because this field is usually used to select profiles when entering daily invoices and payments, it is important to enter information in this field properly. Address/Phone/E-mail: This information can be captured within your profiles. If statements and labels are to be printed from Trams Back Office, such information is necessary. Think of the profile area as a way of automating your rolodex. Group/Batch: Profiles include this field to link together activities of multiple profiles. “Group” is commonly used when separate profiles are built for each group participant, but you really want consolidated group reports. When used as “Batch,” individual reports print for each profile, linked by the Group/Batch field. So if a number of profiles require the same monthly report, by putting MONTH in this Group/Batch field, you can run the same report for many clients at one time. Tie together vendor profiles that get paid by common clearing houses such as Paymode. When the clearing house receives a check and the profile has been coded PAYMODE in the Group/Batch field, all profiles with this code appear on the payment screen so they can be closed. To set up group names so they are consistent in each profile, go to the Utilities|Setup|Groups. Interface ID: All client, vendor, and agent profiles include this field for capturing the account number assigned within the reservation system for Interface purposes. When hand entering invoices, you usually use the name to select a profile. With Interface, automatic selection of a profile occurs only if an account number has been entered in the PNR and that same account number is entered into the Interface ID field in Trams Back Office. Otherwise, you are prompted to select the profile while processing the interface records. Assign a unique alpha-numeric number (up to 10 characters), easy for your agents to remember. A telephone number with area code works well. Selecting Profiles during Daily Activities Select a profile in either invoices or payments by profile type, then by profile name. We use the name most frequently. When using the Profile Name to select a profile, the system looks for any profiles already built that match what you have entered in this field -- a non-match brings up a “no matching profiles” prompt and asks you to build another profile. Be 20 careful not to create duplicate profiles. Since you won’t have memorized who has been entered into a profile and who has not, you can easily fall into doing this because you don’t want to miss anyone. To avoid building duplicate profiles when you want to select existing profiles, enter as few characters as possible, just two or three letters of the name, in pulling up a list. This way, you are less likely to misspell a name and enter it as another profile. Access Query from the main menu or by clicking the Query tab on the bottom of the screen. Keeping a relatively current listing of all profiles handy may also help, especially during the early stages of starting Trams Back Office, when these types of mistakes are more likely to occur. To get this list and to check for duplicates, incorrect, or incomplete profiles, run the Lists and Labels report found in the Reports Menu under Client and Vendor Reports. A little time spent keeping the profiles accurate saves time later cleaning up errors created from directing daily activity to duplicate profiles. The Role of Profiles: Drill To start getting comfortable with profiles in Trams Back Office, complete the following: 1. 2. 3. 4. 5. Select your top 5 leisure accounts and build an Leisure Client profile for each Select your top 5 commercial accounts and build a Corporate Client profile for each Select your top 5 vendors and update or build Vendor profiles for each Select 5 entities to which you commonly pay expenses, and build an Other profile for each Select your top 5 sales agents and build a Sales Agent profile for each Build Individual Client Profile: Drill 1. Type in your last name in the Last Name field and press <TAB>. Remember to use lower and upper case, just as if you were typing a letter. 2. Press <TAB> to move to the next field First Name. 3. Continue completing this field. Remember, you don’t have to complete all fields, but what you get out is based solely upon what you put in. 4. Check out other available fields of information for each profile by clicking on one of the tabs (Communication, Family Info, Payment Info, Groups, Marketing, and Agents) at the top of the entry screen: 5. Once all fields are completed to your satisfaction, click OK to confirm which saves the profile. If you have checked the box on the bottom right hand corner of the data entry screen called, “Continue entering profiles”, after this profile is saved, Trams Back Office displays another Leisure Client Profile data entry screen so that you can continue building more profiles. Retrieve a Profile in Profile Query: Drill Now, let’s retrieve the profile we just completed. You’ll see how easy it is to add or edit information in that profile. Since the most common method of retrieving a profile is by name, and we know the name of the profile we are trying to retrieve, let’s retrieve the profile we just built, by name. 1. Click on Profile|Query in the Menu at the top of the home screen, or the Profile Query tab on the bottom of the screen. Clicking on either gets you to the same place. 2. In the Name Field, type in the first couple of letters of your last name. 3. Notice the Profile Type defaulted to All. Although there are several other fields that could be completed, this is all that is necessary to retrieve our profile. So to confirm what we have entered, click Query, and the system begins its search for any profiles matching the parameters (the two or three letters of the last name) we established within the fields of the profile query. 21 Once the system has completed its search, it displays a list of any profiles matching the selection criteria. In this case, only one match should appear since this is the only profile in your system. Double-click on the profile line with your name. Now the profile you just built should appear on the screen - and you can view, enhance, or edit. Let’s edit the profile: 1. Move to the Address Field and enter your address. 2. To confirm the data entry screen and save the changes, click OK. The system then returns to the query screen and the list of matching profiles. Recording Daily Activities There are two areas of information that affect the back office of an agency and are recorded systematically into Trams Back Office: Invoice and Payments The link between the front office and back office, and the main source of data captured by the back office system are Invoices. When payments (and other activities that affect your bank account balances) are entered into Trams Back Office, it automates your bank balances and reconciliation routine. Keeping an accurate history of all money received and paid out is not only imperative for your own bookkeeping, but also for audits you may have. When invoices are created, the total fare field in the invoice represents the amount due from the customer. When a commission is entered, TBO can then determine the cost, using the total fare field in conjunction with the commission. These balances are tracked in the Core Reports (Client and Vendor), and balances are updated by entering payments received and made. Payments are tracked on the Check Register, and can then be reconciled to the Bank Statement. To create the appropriate balances when entering invoices into Trams Back Office, each booking in the invoice must be classified in one of three ways, which we refer to as “Submit To.” 22 ARC/BSP creates a Client Balance and ARC/BSP Balance. Supplier creates a Client Balance and Vendor Balance. Commission Tracking (CommTrack) does not create a Client Balance and tracks the amount due from the Vendor. Sales and Cost of Sales are updated once a payment is received. Elements of an Invoice To better understand entering invoices in the Trams Back Office system, let’s take a look at all the elements involved in an invoice. There are two types of invoices: Sales invoices Refund invoices Although Sales and Refunds affect your balances in an opposing fashion, both have the same information. Every invoice has some general information that remains constant throughout the entire invoice. Trams Back Office calls this screen the General Invoice Information Screen: Once these fields are completed, click New, and an additional screen appears with all of the travel details. This screen is called the Booking Detail Screen. Each booking in an invoice (and many times there are several with air, cars, and hotels) has its own separate booking detail screen: 23 24 When retrieving an invoice with multiple bookings, to get from one booking record to the next, click the arrows. If after working on a booking, you want to add another, click New Booking to enter another. If no more new bookings need to be entered, click OK to total the invoice bookings. When all bookings are entered, a Booking Summary Screen appears: This screen summarizes each booking and reviews invoice totals. If these totals are correct, click OK to confirm and Trams Back Office prompts for a payment entry. Following is a list of each field that can be entered into an invoice in Trams Back Office. The items marked with an asterisk (*) are required for basic bookkeeping purposes. For management and marketing purposes, the other items can be captured. General Invoice Information Required Once For Each Invoice Invoice number and branch number* Issue date* Client name* Booking Detail Information Required for Each Booking on Invoice 24 Submit-To (ARC/BSP, Supplier or CommTrack)* Travel type* Flown carrier Passenger name Itinerary Ticket number (for ARC/BSP bookings only)* Airline or vendor name* Confirmation number Travel dates (departure and return) Total fare* Taxes Commission Client and vendor remarks Expanded fare information for reporting, such as fare savings, final payment information, etc. More taxes Agents UDIDs – User-Defined Interface Data to capture additional information Segments – Detailed leg-by-leg fare information Elements of a Payment Entry There are four types of entries made in the Payments Menu in Trams Back Office that affect your bank balance: Received Made Deposit Withdrawal Payments Received and Made The data entry screens in Payments|Received and Payments|Made comprise the same fields, although they have the opposite effect on the bank balance. 25 Let’s take a look at these bank entries (again, the items identified by * are required fields for basic bookkeeping purposes. The other items are optional and may be captured for management and marketing purposes): Amount* Payment date* Bank account* Payment method (Cash, check, EFT, etc.)* Check/Credit Card/ACH Number Payment group Remarks Profile type: Client, Vendor, etc.* Profile name* Name on check Payment code When entering payments for Clients or Vendor, the Trams Back Office system displays the account balance information along with a detailed listing of any open invoices and/or bookings to close off. When entering payments with the Profile type of Other, the system prompts if information is correct since the purpose of “Other” payments is to update the bank balance without affecting Client or Vendor balances. Deposits and Withdrawals Whereas Payments Received and Made update the respective Client and/or Vendor accounts, Deposits and Withdrawals automatically update the bank balance. Therefore, the total of all payments received for the day match the bank deposit. 26 Suggested Procedures for Recording Daily Activities 1. 2. 3. 4. 5. Capture all sale and refund invoices, either through ClientBase, GDS interface or manual entry Enter each receipt in Payments | Received Enter the bank deposit and print deposit slip Enter all agency disbursements in Payments | Made Run Core Reports to view effect of the daily entries 6. DO A FULL BACKUP Establishing the Core Reports Before doing any General Ledger work, it is best to establish beginning balances. Earlier we discussed the concept of establishing a foundation to build upon, that foundation is what Trams Back Office calls the Core Reports: Client balances Vendor balances ARC/BSP balances Check register Except for the ARC/BSP Balances report, these Core Reports are all balance forward reports. That means that to get accurate ending balances, we have to establish accurate beginning balances. The easiest (and recommended) procedure is to enter invoices and payments to balance the Core Reports. Also, checking the Core Reports daily ensures that you catch any errors before they snowball. Remember that without establishing accurate beginning balances, no matter how accurate your current entries are, the Check Register, Client Balances, and Vendor Balances cannot be accurate. Check Register Core Report A Check Register should be established in Trams Back Office for each bank account. You can get your bank balance at the touch of a finger, make corrections retroactively, and most importantly, balance your bank statement in minutes. 1. Choose a start-up date for using your Core Reports which is the ending date of your previous bookkeeping system. 2. Automate each bank account and assign to each a number from 1 - 99. Do this in Utilities|Bank Accounts. Simply enter the name of each account next to the number you choose to assign to it, such as Wells Fargo Operating. 3. Run the Trams Back Office Check Register one day prior to the start-up date and “0” out any balances by either entering a deposit or withdrawal accordingly (withdrawal if amount is positive, and deposit if the amount is negative). 4. Enter your reconciled checkbook balance by going to Payments|Deposits. Enter the beginning bank balance (minus any outstanding checks, EFT’s or deposits), dated one day prior to the start-up date, and the bank account number you just assigned it. Of course, a separate entry needs to be entered for each bank account if your agency has more than one. Next enter all outstanding checks, EFT’s, deposits, or withdrawals dated one day prior to the startup date. Client and Vendor Balances Core Reports The two things that create a client or vendor balance are an open invoice (positive), or money on account (negative). To establish any client or vendor balances, follow these start-up steps: 27 1. 2. 3. 4. Choose a start-up date for using your Core Reports. Make sure it is the same date for starting all four reports. Run and review the Client Balance Report already in Trams Back Office one day prior to the start-up date. Compare this report to your previous accounting system’s report. Make any entries necessary to create balances not already in Trams Back Office. (See below for step-by-step instructions). 5. Review the Client or Vendor Balance Reports one day prior to the start-up date to make sure all is correct in Trams Back Office. ARC/BSP Core Report By entering invoices at any point (either manually or by interface), Trams Back Office automatically starts tracking ARC/BSP balances. 28 Miscellaneous Topics This section contains: General ledger integration Report overview Interfacing with the GDS General Ledger Integration Trams Back Office system includes a fully integrated General Ledger. Because the General Ledger is a direct by-product of the Four Core Reports, the key to successfully implementing the General Ledger in Trams Back Office is to first successfully implement the Four Core Reports. Trams Back Office recommends maintaining the Four Core Reports for at least a few weeks before starting the General Ledger. Before eliminating your current accounting systems, develop some confidence in Trams Back Office’s output. Once the Core reports are up and running and you are comfortable with maintaining them, the General Ledger falls right into place! The most common problems agencies face with the General Ledger happen because they don’t do enough groundwork before they begin. Creating Journal Entries As discussed in the Understanding the General Ledger section of this tutorial, the only type of entry that ultimately affects the General Ledger is a journal entry. In order to maintain a basic General Ledger in Trams Back Office, all basic daily entries, (invoices and payments) are turned into Journal Entries by one of two methods. 1. Journal Entry by Transaction: The system prompts you to create a journal entry and update the General Ledger on a transaction-by-transaction basis when you finish with certain payment entries, specifically “Other” payments and Withdrawals. You don’t need to memorize anything. The system always prompts you when a journal entry by transaction is necessary. 2. End of Period Journal Entry: An automatic month-end journal entry is created from the totals of all invoice, client and vendor balance entries recorded for the period. Any entry recorded in Invoices and Payments are journalized in the End of Period journal entry. You don’t need to know anything about debits and credits, or which accounts to update, to create the End of Period journal entry. The system prompts you only for the time frame you want it to total and it creates the journal entry for you. Posting Journal Entries Maintain an accurate audit trail in your General Ledger by performing a routine locking in journal entries made to-date. This routine is called Posting. Prior to posting, you can change or void journal entries (even an End of Period), but once posted, they are locked. Because of posting’s permanent effect, perform this routine with caution, and do it only after all Core reports are in sync with their corresponding General Ledger accounts by following our recommended month-end routine. Posting journal entries is not just a Trams Back Office function, but a standard accounting procedure. Unique to Trams Back Office, though, is the ability to run financial statements (Income Statements and Balance Sheets) before posting your journal entries. Trams Back Office does this through a feature called “Pseudo Posting” in all General Ledger reports. This means that, as long as all daily activities have been turned into journal entries (by transactions and through End of Period), you can get preliminary financial statements from Trams Back Office while waiting for bank statements and ARC/BSP reports to be reconciled. 29 There are two concepts to understand for maintaining a basic General Ledger in Trams Back Office: Creating journal entries (both when prompted at the end of a transaction and creating the End of Period journal entry); and, Posting journal entries. If you understand and carry out these two concepts, and the Core Reports balance, maintaining financial statements is easy. Setting Up Group General Ledger Accounts The General Ledger has six account classifications (e.g., 1000 = Assets, 2000 = Liabilities, 3000 = Capital, etc.). In each classification, there can be up to 1000 individual accounts which you can name. Although Trams Back Office comes with a default Chart of Accounts, it is important that you modify your Chart of Accounts to your own requirements before implementing the G/L. To print the listing of the default accounts, run a report under Reports|General Ledger|Chart of Accounts. We recommend deleting any account that doesn’t pertain to your agency, renaming accounts so terminology is familiar, and inserting any accounts that may be missing. You can do this quickly and easily in General Ledger|Accounts. None: The system does not prompt you to create any journal entries while entering your daily invoices and payment activities. (Trams Back Office does not recommend using this setting.) Recommended/Prompt: The system prompts you to create a journal entry at the end of a payment transaction only if it is not to be included in the End of Period journal entry (Other payments, Withdrawals). Recommended/Always: (Highly recommended!) Similar to the above. Instead of just prompting you to create a journal entry (J/E) by Transaction, the system takes you directly into the J/E screen when a payment is created that is not to be included in the End of Period J/E, but is immediately written to the G/L upon saving. Once the General Ledger is implemented, this is the Trams Back Office suggested setup. Mandatory: The system demands the creation of a J/E and will not allow you to cancel out of the journal entry. As stressed throughout this entire tutorial, before starting your General Ledger, remember that spending time preparing, planning, and setting up saves countl ess hours later in going back, doing it over, cleaning up, and correcting! Report Overview Trams Back Office is the leading back office system, not only because it’s easy to use but also because of its extensive reporting capabilities. From bookkeeping to general ledger to management to marketing, Tram Back Office automates your entire back office. That encompasses quite a lot. To organize all of this reporting ability, Trams Back Office has established categories of reports. The more familiar you are with these categories and the reports in them, the more you benefit from the system. Anything you put into Trams Back Office reflects the effort required to get the benefits – or the output. Although input is obviously important and must be mastered, output is your payoff. Therefore, it’s worthwhile to understand the reporting capabilities of Trams Back Office. In any Trams Back Office report, choose which data the report includes by using the report selection fields. Once these fields are completed, click Preview to confirm the criteria and begin processing the report. Trams Back Office allows you to “preview” reports to the screen prior to printing, e-mailing, or saving them to a file. This is probably the most popular method of running reports because you can review the report first. You can also select the number of copies you want printed before running any report. 30 Because reports simply output the information in various formats, the data in Trams Back Office is never changed by running a report. So the easiest way of getting comfortable with reports is to run them; you can’t hurt anything. Don’t be afraid to explore and experiment! The reports are grouped into several categories, corresponding to menu selections: Core Reports There are four reports in this category. They are called “Core” reports because they are the foundation of the Trams Back Office system. Once these reports are up and running, the remaining reports are validated. 31 Client Balances: A listing of clients with pending account balances, including open invoice amounts and unapplied money on a client-by-client basis. Vendor Balances: A listing of vendors with pending account balances, including open invoice amounts and unapplied money on a vendor-by-vendor basis. ARC/BSP Balances: A detailed listing of all ARC/BSP documents to be reconciled to what ARC/BSP pays. Check Register: A detailed listing of all bank account activity, including a bank balance based upon all Deposits, Withdrawals and Payments Made, entered for that period. Management Summary: A detailed summary of the four core reports which is used as a tool for analyzing productivity. Invoice Reports These reports are derived from Invoice entries: ARC/BSP: Based on ARC/BSP’s guidelines, and printed for submission to ARC/BSP along with all auditor coupons. It is usually printed after the ARC/BSP Reconciliation report verifies that all tickets are accounted for. Activity: Displays various sales activities by invoice, and can be printed for any date range. It displays Sales, Cost of Sales, and Commission amounts, along with percentages by both Travel Type and ARC/BSP, Supplier and Commission Tracking categories. Analysis: Although several selection fields are available for detailed invoice analysis (e.g., list invoices over $5000 or where commission is under $20.00, etc.), the primary purpose is to verify that all invoices have been accounted for. Voided and spoiled invoices are included, and you can locate missing invoices by the “*” next to an out-of-sequence invoice number. City Pair: Analyze detailed segment information (entered into your invoice bookings) by city pair. Several selection fields are available for flexible reporting. This is a good report for negotiating with airlines. Depart/Arrive Manifest: Print Departure and Arrival Manifests. Invoice Printing: Print invoices from Trams Back Office. TAFP Service Fee: Print the ARC/BSP TAFP report for Service Fees. IAR Reconciliation: Compare data in Trams Back Office to ARC/BSP’s IAR summary file. ARC/BSP Reconciliation: The primary purpose is to verify that all tickets during the ARC/ BSP week have been accounted for. Voided and spoiled tickets are included (if you pick ALL in the Ticket Status field) and you can locate missing tickets by the “*” next to an out of-sequence ticket number. Client Reports The following are some available Client Reports: 32 Activity: Similar to Invoice Activity, reports various sales activities by client, (for any date range). Instead of just telling you what you sold, this report tells you which clients purchased it. Sales and Commission amounts are included. Statement: Statements allow you a more in-depth look at the activity for each client; they are usually intended to be sent to the client. There are four report types: Statement, (bills); Summaries, (all activities); and a Fair Savings Report. Lists and Labels: Mailing lists, labels and mail-merge reports. With multiple selection fields available, you have a sophisticated means of performing targeted marketing to your clients. Vendor Reports The following are some available Vendor Reports: Activity: Similar to the Invoice and Client Activity reports, this report lists sales activities by vendor (for any date range). Instead of just telling you what you sold, this report tells you with which vendors you placed that business – perfect for negotiating with your vendors. Gross, Net and Commission amounts are included. Statement: Get a more-in-depth look at the activity for each specified vendor (usually intended to be sent to the vendor). There are two report types - Statements (bills), perfect for requesting commission due; and Summaries (all activity), and great for providing details on your production with a specific vendor. Lists and Labels: Mailing lists, labels and mail-merge reports. With multiple selection fields available, you have a sophisticated means of reaching out to your vendors. Agent Reports Following are some standard reports available in Trams Back Office by sales agent: Activity: Similar to the Client and Vendor Activity reports, this report lists various sales activities by sales agent (for any date range). Instead of just telling you what you sold, this report will tell you which agent sold that business -- perfect for negotiating with your sales agents. Sales and Commission amounts are included. Statement: More in-depth look at the activity for each agent, usually printed for use in paying a commissioned agent. This report includes activity by payment date or travel date with the flexibility to generate statements when paying your commissioned agents. IC Export: Allows agencies to export payment details to its independent contractors who also use Trams Back Office. Payment Reports The reports available in this category come from entries in the Payment screen: 33 Receipts: Displays total payments entered into Payment Received, and includes any journal entries that may have been created by transactions while doing so. A General Ledger summary is also included at the end of the report. This is the suggested daily report to balance against your manual bank deposit slip. Disbursements: Totals payments entered into Payments Made, and includes any journal entries that may have been created by transaction while doing so. A General Ledger summary is also included at the end of the report. It’s great for summarizing the reasons for your disbursements. Analysis: Allows you to analyze any type of payment entered into the system. Although it can serve many purposes, from providing a history on a client’s unapplied balance, to obtaining W-2 and 1099 information for specified employees, its overall purpose is to provide payment audit trails on specific entities. Check Writer: Preview checks before printing, matching them to your own check format, from the Payments Made menu. CC Merchant: Lists CC Merchant Transactions. Credit Card Reconciliation: Compare data in Trams Back Office to various credit card reconciliation files. Group Profit Anaysis: Run this report to analyze group travel. Operating Payables: Run this report to list operating payables in varied ways. ACH Export: Run this report to export ACH payments into a file that can be submitted to your financial institution for processing. Credit Card Audit: Run this report to review which Trams users have viewed full credit card numbers. General Ledger Reports All reports created from the General Ledger: Journal Entry Analysis: Analyze any type of Journal Entry entered into the system, listed in date order. 34 Account History: Considered your hard copy General Ledger with a detailed history for each account, starting with balance overviews, then history details, for a specified date range. Enter a specific G/L account number or leave the field blank to view all. Trial Balance: Provides all General Ledger account balances at a glance, as of any specified date. As with many accounting systems, it also proves balancing between debits and credits. Income Statement: Also known as a Profit and Loss Statement (P&L), the Income Statement provides the details behind the agency’s profit (or loss) for a given period. It includes all Sales, Costs of Sales and Expenses. Up to four date periods can be displayed, so you can compare Income Statements, including budget information as well as detailed percentages. Balance Sheet: An important Financial Statement providing the financial picture of the business, including all Asset, Liability and Capital account balances as of any date specified. Chart of Accounts: A listing of all General Ledger account numbers and names. No balances appear on this report. G/L Reconciliation: Used only if the General Ledger goes out of balance from the management’s Core reports. It lists any entries that the system suspects may be in error. For example, if a Journal Entry by transaction should have been created and was not, the payment entry appears on this report with the message: “Payment is not journalized and should be.” Interface Reports For agencies that Interface from their GDS to Trams Back Office: Invoice List: A listing of all invoices downloaded from the reservation system, but not yet processed. Great to view after a download to compare to manual invoices and check for accuracy. This report is overwritten with each new download. Record List: A listing of all records included in the last download routine, in the format received from the reservation system. If information does not interface as expected, this is the report the Trams Back Office support desk needs to determine where the error occurred. This report can also be used to re-create interface records. Downloading/Processing Error Log: Log of errors found during Download or Processing. These logs are automatically purged in conjunction with the PNR history purge routine (Utilities|Purge|PNR History. Profiles Allows users to print reports listing details for one or more profile types (Client, Vendor, Agent, Other) at one time Report Generator Although the reports described so far provide a tremendous amount of agency information for management, marketing and accounting purposes, Trams Back Office could never anticipate every possible format an agency wants or needs -there are too many possibilities. Use the Report Generator to design reports according to your needs, with any of the data fields stored by Trams Back Office, based on a large variety of selection criteria. Print Report: Print reports already built by the Report Generator. Trams Back Office includes an abundance of pre-built reports, so you can use this without building any reports of your own. You have pre-designed reports on clients, vendors, agents, airlines, sales and branches. The report generator deals with invoice and booking data only. If you can’t seem to locate just the right report from your other report categories, try the Report Generator. Build Reports: Because you have unique clients, agents, management, etc., your reporting needs may vary from other agencies’ needs. Design your own reports here. Arrange the format, what is included, how it’s sorted and subtotaled, etc. You’ve got lots of flexibility. Your User’s Manual gives complete instructions on how to use the Report Generator to build your own reports. Conclusion Trams Back Office reporting capabilities are extensive. Since you want the biggest return on your energy expended when using Trams Back Office, the better you know the program, the better the program serves you. Embracing change is a constant reminder of how fast we move at the speed of technology. 35 Interfacing with the GDS Interfacing is the process of electronically moving data from your Global Distribution Systems (GDS) to your back office system. Trams Back Office supports entering data manually as well as through electronic interfacing. The results of manual and electronic interfacing are identical - invoice data is entered into Trams Back Office. Please contact your GDS help desk to configure your GDS for interface. Trams Products and Services support does not configure any GDS for interface. Once all GDS setup is complete please e-mail [email protected] to schedule an interface appointment for assistance with setting up Trams Back Office. Establish a two-part routine to electronically interface your invoice information: 1. Downloading: This is how interface records are passed electronically from your reservation system to Trams Back Office 2. Processing: Processing pulls the details of the PNR into the invoice. The invoice cannot be built unless there are client, vendor and agent profiles to link to in Trams Back Office. Remember though, that the data entered in the GDS is passed to Trams Back Office without editing. If the information in the GDS is incomplete, it is incomplete in Trams Back Office, and many times information necessary to the back office is not automatically part of a PNR. This means the agency’s sales personnel become responsible for accurately entering all the information into the GDS, and requires training and monitoring. 36


![STATUTORY INSTRUMENTS S.I. No.[ • ] of 20[ • ] SMALL PUBLIC](http://vs1.manualzilla.com/store/data/005664657_1-1d833bc83c9d446d3d2ea05d8407eb41-150x150.png)