1
Kaltura Management Console
(KMC)
User Manual
Version: Eagle
Kaltura Business Headquarters
200 Park Avenue South, New York, NY. 10003, USA
Tel.: +1 800 871 5224
Copyright © 2012 Kaltura Inc. All Rights Reserved. Designated trademarks and brands are the property of their respective
owners.
Use of this document constitutes acceptance of the Kaltura Terms of Use and Privacy Policy.
Contents
Preface .................................................................................................................................................... 9
About this Manual ............................................................................................................................. 9
Audience ........................................................................................................................................... 9
Document Conventions ..................................................................................................................... 9
Related Documentation .................................................................................................................. 10
Chapter 1 KMC Overview ..................................................................................................................... 11
What Can I Do with the KMC? ........................................................................................................ 11
Media Management and Workflow ................................................................................................. 11
Widget and Application Studio ........................................................................................................ 12
Getting Started ................................................................................................................................ 12
Chapter 2 Uploading and Ingestion ...................................................................................................... 13
What is a Kaltura Entry? ................................................................................................................. 13
Browser-based Ingestion ................................................................................................................ 13
The Kaltura Uploader ...................................................................................................................... 13
The Upload Tab .............................................................................................................................. 13
Upload from Desktop ................................................................................................................ 14
Recorded from a Webcam ........................................................................................................ 15
Submit CSV/XML ...................................................................................................................... 15
Import from Web ....................................................................................................................... 16
Bulk Upload and FTP Upload ......................................................................................................... 16
What is Bulk Upload? ............................................................................................................... 17
Downloading Bulk File Samples ............................................................................................... 18
Automated Content Ingestion via a Drop Folder............................................................................. 18
Using a Drop Folder .................................................................................................................. 18
The Dashboard Tab ........................................................................................................................ 18
Uploading Content Using the Content Tab ..................................................................................... 19
Tracking Your Uploads ................................................................................................................... 19
Your Uploads ............................................................................................................................ 19
Bulk Upload Log........................................................................................................................ 19
Preparing Entries ............................................................................................................................ 20
Prepare Video/Audio Entry ....................................................................................................... 21
Prepare Live Stream Entry ....................................................................................................... 21
Creating Draft Entries ............................................................................................................... 21
Key Benefits and Functionality ................................................................................................. 22
Host Videos at your Preferred Location and Link to Kaltura .................................................... 22
Replacing Video Assets for a Kaltura Entry .............................................................................. 22
Uploading and Modifying Related Files .......................................................................................... 23
Chapter 3 Transcoding and Processing ................................................................................................ 24
Transcoding .................................................................................................................................... 24
Converting Videos into Multiple Flavors (Optimized Output Files) ........................................... 24
Kaltura Management Console (KMC) User Manual
3
Contents
Transcoding Settings Page ....................................................................................................... 25
Editing and Creating Transcoding Profiles ............................................................................... 25
Adding a Transcoding Profile .......................................................................................................... 27
Quick Publishing ....................................................................................................................... 28
Editing Options for Flavors in a Transcoding Profile ................................................................ 29
Assigning a Transcoding Profile to a Bulk Upload.................................................................... 30
Useful Tips for Working with Transcoding Profiles ................................................................... 30
The Flavors Tab .............................................................................................................................. 31
Add Video/Audio ....................................................................................................................... 32
Replacing Media ....................................................................................................................... 34
Supported Formats for the SaaS Edition ........................................................................................ 34
Supported Source Formats ....................................................................................................... 34
Supported Source Codecs ........................................................................................................ 35
Target Formats/Codecs ............................................................................................................ 35
Chapter 4 Creating and Customizing Playlists and Players ................................................................. 36
What is a Playlist? ........................................................................................................................... 36
Creating a Manual Playlist .............................................................................................................. 36
Creating a Rule Based Playlist ....................................................................................................... 37
Defining a Rule ......................................................................................................................... 37
Multiple Rules Based Playlist - Advanced Mode ............................................................................ 39
Additional Playlist Configuration ..................................................................................................... 41
Creating a Player with Multi-tab Playlists.................................................................................. 41
Deleting a Playlist ..................................................................................................................... 42
Removing Videos from a Playlist .............................................................................................. 42
Customizing Additional Features for Playlists .......................................................................... 42
Designing and Configuring a Player ............................................................................................... 43
Player List ................................................................................................................................. 43
Select the Type of Player .......................................................................................................... 43
Configuring the Player Basics Settings ........................................................................................... 44
Editing a Player ......................................................................................................................... 44
Adding Content to a Player ....................................................................................................... 45
Duplicating a Player .................................................................................................................. 45
Deleting a Player....................................................................................................................... 46
508-Compliant Video Player ........................................................................................................... 46
Configuring Captions for the 508 Player ......................................................................................... 47
Configuring the Player Advertising Settings ................................................................................... 49
Configuring the Player Features ..................................................................................................... 49
Features List ............................................................................................................................. 49
Configuring the Player Style ..................................................................................................... 56
Metadata ......................................................................................................................................... 58
Types of Metadata .................................................................................................................... 58
Metadata Actions ...................................................................................................................... 59
Creating and Managing Content Categories .................................................................................. 59
Uploading Content and Setting Metadata ....................................................................................... 59
Upload a Media File and Set Its Metadata ............................................................................... 59
Kaltura Management Console (KMC) User Manual
4
Contents
Ingest a Media File Bundled with Metadata (CSV, XML, API) ................................................. 60
Prepare a Metadata-only "Draft" Entry for Future Ingestion of Media Files ............................. 61
Metadata and Related Files ............................................................................................................ 61
Kaltura Custom Metadata Functionality .......................................................................................... 61
Managing Schemas ........................................................................................................................ 62
Adding a Schema...................................................................................................................... 62
Setting Values for Custom Metadata Fields (Per Entry) ........................................................... 64
Performing a Search Based on Metadata Fields ...................................................................... 66
Chapter 6 Locating Content in the KMC ............................................................................................... 67
Filtering Content in the Entries Table ............................................................................................. 67
Searching Through Entries ....................................................................................................... 67
Defining and Assigning Entry Categories ................................................................................. 68
Using Additional Filters ............................................................................................................. 68
Filtering by Distribution ............................................................................................................. 69
Deleting an Entry ...................................................................................................................... 69
Adding Tags .............................................................................................................................. 69
Removing Tags ......................................................................................................................... 69
Searching Playlists .......................................................................................................................... 69
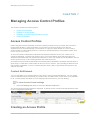
Chapter 7 Managing Access Control Profiles ....................................................................................... 70
Access Control Profiles ................................................................................................................... 70
Content Entitlement .................................................................................................................. 70
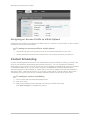
Creating an Access Profile.............................................................................................................. 70
Restricting Domains .................................................................................................................. 71
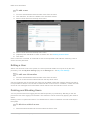
Restricting Countries for Viewing.............................................................................................. 72
Restricting Views by IP Address ............................................................................................... 74
Restricting Views with a Kaltura Session ................................................................................. 74
Pay-Per-View ............................................................................................................................ 75
Assigning an Access Control Profile to an Entry ............................................................................ 75
Assigning an Access Profile to a Bulk Upload .......................................................................... 76
Content Scheduling ......................................................................................................................... 76
Chapter 8 KMC Users and Roles .......................................................................................................... 78
Roles and Permissions ................................................................................................................... 78
Adding a User ........................................................................................................................... 78
Editing a User ........................................................................................................................... 79
Deleting and Blocking Users ..................................................................................................... 79
Purchasing a License for Additional Users ............................................................................... 80
Creating Custom Roles ............................................................................................................. 80
Role Management..................................................................................................................... 81
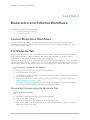
Chapter 9 Moderation and Editorial Workflows..................................................................................... 83
Content Moderation Workflows ....................................................................................................... 83
The Moderate Tab .......................................................................................................................... 83
Previewing Content using the Moderate Tab ........................................................................... 83
Rejecting Content using the Moderate Tab .............................................................................. 84
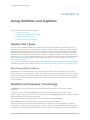
Chapter 10 Using Subtitles and Captions ............................................................................................. 85
Kaltura Management Console (KMC) User Manual
5
Contents
Caption File Types .......................................................................................................................... 85
Searching within Captions ........................................................................................................ 85
Subtitles and Captions Terminology ............................................................................................... 85
Adding Captions to an Entry ........................................................................................................... 86
Editing a Captions File .............................................................................................................. 87
Setting Up Captions for Display ...................................................................................................... 87
Viewing an Entry with Captions in a Player .............................................................................. 88
Captions Options ...................................................................................................................... 88
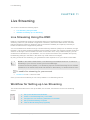
Chapter 11 Live Streaming ................................................................................................................... 89
Live Streaming Using the KMC ....................................................................................................... 89
Workflow for Setting up Live Streaming .......................................................................................... 89
Setting up the Hardware and Software ..................................................................................... 90
Creating a Live Streaming Entry in the KMC ............................................................................ 90
Multiple Bitrate Encoding .......................................................................................................... 91
Configuring the Live Stream Parameters in the KMC............................................................... 92
Setting up the Broadcasting Computer ..................................................................................... 93
Viewing the Broadcasting Setup (Optional) .............................................................................. 93
Advanced Live Streaming Configuration Options ..................................................................... 94
Chapter 12 Content Authoring Tools .................................................................................................... 96
The Content Tab ............................................................................................................................. 96
Editing Entries ................................................................................................................................. 96
Edit Entry Menus....................................................................................................................... 97
Entries Table ................................................................................................................................... 98
Download Files ......................................................................................................................... 98
Add Playlist ............................................................................................................................... 98
More Actions ............................................................................................................................. 98
Preview and Embed .................................................................................................................. 98
Clipping and Trimming Media Files ................................................................................................ 98
Troubleshooting Trimming and Clipping ................................................................................... 99
Choosing a Thumbnail for your Video ............................................................................................ 99
Chapter 13 Publishing to your Site ..................................................................................................... 101
Embedding a Player with a Single Entry on your Site .................................................................. 101
Embedding a Player with a Playlist on your Site .......................................................................... 102
Video Delivery Settings ........................................................................................................... 104
HTTP Progressive Download Delivery ................................................................................... 104
Adaptive Streaming RTMP Delivery with Adaptive Bitrate ..................................................... 105
Akamai HD Network – Allows adaptive bit-rate ...................................................................... 106
Adding the Flavor Selector Module ............................................................................................... 106
Mobile Support ........................................................................................................................ 107
Chapter 14 Distribution and Syndication............................................................................................. 108
Kaltura Distribution Module ........................................................................................................... 108
Key Benefits: ........................................................................................................................... 108
How Does Distribution Work? ....................................................................................................... 109
Adding a Distributor to an Entry .............................................................................................. 110
Kaltura Management Console (KMC) User Manual
6
Contents
Scheduling a Video Package ........................................................................................................ 111
Validating a Video Package .................................................................................................... 112
Removing a Distributor from a Video Package ....................................................................... 117
Managing Distributor Details ................................................................................................... 118
How Does Syndication Work? ...................................................................................................... 118
Syndicating to a Standard MRSS Feed (Yahoo) .................................................................... 119
Search Engine Optimization (SEO) ........................................................................................ 119
Key benefits ............................................................................................................................ 119
Setting Up Syndication .................................................................................................................. 119
Syndicating to Google ............................................................................................................. 120
Google Webmaster Tasks ...................................................................................................... 121
KMC Publisher Tasks for Google Syndication ........................................................................ 121
Syndicating to TubeMogul ...................................................................................................... 123
KMC Publisher Tasks for TubeMogul Syndication ................................................................. 123
TubeMogul Webmaster Tasks ................................................................................................ 124
Syndicating to iTunes ............................................................................................................. 125
KMC Publisher Tasks for iTunes Syndication ........................................................................ 125
Syndicating to Yahoo .............................................................................................................. 127
KMC Publisher Tasks for Yahoo Syndication ......................................................................... 127
Yahoo Webmaster Tasks ....................................................................................................... 128
Flexible Feed Format .............................................................................................................. 130
Chapter 15 Advertising and Ad Networks ........................................................................................... 131
Overview of Advertising with Kaltura ............................................................................................ 131
Player Branding ...................................................................................................................... 131
Connecting with an Ad Server ...................................................................................................... 131
Kaltura Player and Ad Plugins ................................................................................................ 132
Supported Ad Servers ............................................................................................................ 132
Ad Terminology ....................................................................................................................... 132
Creating Kaltura Video Ads........................................................................................................... 132
Adding the VAST Ad Server ......................................................................................................... 132
Configuring VAST Ads .................................................................................................................. 133
Configuring VAST Pre-roll Ads ............................................................................................... 133
Configuring VAST Post Rolls .................................................................................................. 134
Adding a Midroll ...................................................................................................................... 135
Adding an Overlay .................................................................................................................. 136
Creating Bumper Ads .................................................................................................................... 137
Configuring Third Party Ad Plugins ............................................................................................... 139
Tremor Media.......................................................................................................................... 139
Tremor Media Added Functionality ........................................................................................ 140
AdapTV ................................................................................................................................... 141
Configuring Companion Ads ......................................................................................................... 143
Companion Ads in HTML ........................................................................................................ 144
Companion Ads in Flash ......................................................................................................... 145
Targeting with an Ad Server ................................................................................................... 147
Targeting per Viewer .............................................................................................................. 149
Kaltura Management Console (KMC) User Manual
7
Contents
Ad Targeting via ad plugin ...................................................................................................... 149
Ad Targeting with Tremor ....................................................................................................... 149
Advertising for Mobile Devices ............................................................................................... 150
How to Locate the Ad Tag URL .................................................................................................... 150
DFP ......................................................................................................................................... 150
AdapTV (via VAST)................................................................................................................. 152
Connecting with Ad Servers and Networks via adap.tv .......................................................... 152
Connecting with Tremor Media ............................................................................................... 153
Different Types of Ad Servers ................................................................................................. 155
Kaltura Player Additions Related to Ads ....................................................................................... 155
Troubleshooting ............................................................................................................................ 155
Chapter 16 Creating and Tracking Analytics ...................................................................................... 157
Bandwidth Usage Reports ............................................................................................................ 157
View Monthly or Yearly Bandwidth Usage .............................................................................. 157
Content Reports ............................................................................................................................ 157
Top Content ............................................................................................................................ 157
Content Drop-off ..................................................................................................................... 159
Content Interactions ................................................................................................................ 160
Content Contributions ............................................................................................................. 161
User and Community Reports....................................................................................................... 162
Top Contributors ..................................................................................................................... 162
Geographic Distribution .......................................................................................................... 163
Top Syndications .................................................................................................................... 164
Date Ranges for Analytical Reports........................................................................................ 165
Exporting Analytics to a CSV File ................................................................................................. 166
Sending Analytics Events to Third Parties .............................................................................. 166
Kaltura Player Supported Plug-ins.......................................................................................... 166
Chapter 17 Account Information ......................................................................................................... 167
Account Settings ........................................................................................................................... 167
Integration Settings ....................................................................................................................... 168
Account Info .................................................................................................................................. 168
Entry Management.................................................................................................................. 169
Notifications ............................................................................................................................ 169
Access Control .............................................................................................................................. 170
Transcoding Settings .................................................................................................................... 171
Custom Data ................................................................................................................................. 171
My User Settings ........................................................................................................................... 171
Account Upgrade .......................................................................................................................... 171
Kaltura Management Console (KMC) User Manual
8
Preface
This preface contains the following topics:
•
About this Manual
•
Audience
•
Document Conventions
•
Related Documentation
About this Manual
This document provides an in-depth description of the KMC basic concepts and usage.
NOTE: Please refer to the official and latest product release notes for last-minute updates
Technical support may be obtained directly from: Kaltura Support
Contact Us:
Please send your documentation-related comments and feedback or report mistakes to
http://knowledge.kaltura.com/report-issues.
We are committed to improving our documentation and your feedback is important to us.
Audience
This guide is primarily intended for content managers and Kaltura Management Console users and
also contains useful information for developers, integrators, and operations and site administrators
using the Kaltura platform.
Document Conventions
Kaltura uses the following admonitions:
•
Note
•
Workflow
NOTE: Identifies important information that contains helpful suggestions.
Workflow: Provides workflow information.
Kaltura Management Console (KMC) User Manual
9
Preface
Related Documentation
In addition to this guide, the following product documentation is available:
•
Kaltura API documentation.
NOTE: Please remember to review all product release notes for known issues and
limitations.
Kaltura Management Console (KMC) User Manual
10
KMC Overview
CHAPTER 1
KMC Overview
This section contains the following topics:
•
What Can I Do with the KMC?
•
Media Management and Workflow
•
Widget and Application Studio
•
Getting Started
The Kaltura Management Console (KMC) is a media asset management front-end application to the
Kaltura Platform. The KMC provides publishers all the tools necessary to manage and publish their
media assets, in one intuitive interface.
What Can I Do with the KMC?
You can:
•
Upload content and perform bulk ingestion
•
Transcode and manipulate media assets
•
Manage metadata profiles and high-precision temporal-metadata
•
Design and customize branded media players
•
Create static and dynamic rule-based playlists
•
View analytics and gain insights about how well your content is performing
•
Configure live streaming web broadcasts
•
Syndicate and distribute content across the web
•
Configure ads and leverage ad networks
•
Manage access control profiles and limit access to published media
•
Manage your Kaltura account settings
•
Create Kaltura users, roles and assign permissions
and more…
Media Management and Workflow
The KMC provides full media management so that you can organize and track your online video
system, functions and rich-media content. The following presents a simple workflow to manage
content.
•
Uploading and Ingestion - upload and ingest video, audio, images and docs, bulk or individual
file uploads, via browser, desktop applications, email or mobile.
•
Transcoding and Processing – convert videos into multiple flavors (optimized output files) and
create transcoding profiles to ensure optimal viewing experience on all devices.
•
Creating and Customizing Players and Playlists - control player size, color, fonts and
branding. Add or remove buttons, enable subtitles, sharing, and more. Create manually or
dynamically generated playlists.
•
Managing Metadata and Categories - leverage metadata fields to tag, manage, search and
expose content. Populate out-of-the-box fields, or create your own custom metadata schema.
Kaltura Management Console (KMC) User Manual
11
KMC Overview
Create content packages, including a set of video transcodes, multiple thumbnails in different
sizes, metadata, subtitles, scheduling data, and more.
•
Locating Content in the KMC - use categories, tags, and any of your custom metadata fields
to locate any file, or search caption files for phrases within the video.
•
Managing Access Control Profiles - control exactly when and where your content is
published; decide who can do what within the KMC.
•
Configuring KMC Users and Roles - Use out-of-the-box roles and permissions or create your
own custom roles with granular permissions.
•
Moderation and Editorial Workflows - review content to eliminate spam and abusive content
in UGC portals. Implement complex editorial workflows for your various team roles.
•
Using Subtitles and Captions - upload multiple caption files (SRT, XML) and transcripts
(TXT), or reference an external link. Viewers can toggle between different language captions.
•
Live Streaming - schedule and broadcast live events. Includes all the features of on-demand
video.
•
Content Authoring Tools - trim videos, string videos or clips together, add subtitles and cue
points.
•
Publishing to your Site - manage content, create playlists, preview and embed to your sites.
Provide the optimal viewing experience across all devices with seamless mobile and tablet
support.
•
Distribution and Syndication - distribute content to your channels on partner sites such as
YouTube, Hulu, and DailyMotion, or create video feeds for third-party platforms such as
Google, Yahoo! and iTunes.
•
Advertising and Ad Networks - advertise, integrate with ad networks, and enable payment
models.
•
Creating and Tracking Analytics - get the insight you need on viewer behavior with built-in
reports.
•
Account Information- modify user information, integration settings and registration information
Widget and Application Studio
Kaltura’s application studio enables you to configure your player instances. The application studio is
accessed through the KMC Studio tab. For more information see Creating and Customizing Players
and Playlists.
•
Player designs - design your player skin - select the size, color, fonts, etc.
•
Player branding - include your logo on the player as a watermark.
•
Player functionality and added features - decide what buttons to display on the player, create
your own custom buttons, and decide what features to enable as part of playback (for
example, subtitles, sharing, etc.)
•
Player templates - select pre-defined player templates, or create your own.
Getting Started
To login to the KMC
1. Go to the Kaltura Management Console (KMC) at: http://www.kaltura.com/index.php/kmc.
2. Log-in with the credentials you received in the “Kaltura Registration Confirmation” email.
The KMC Dashboard is displayed.
Kaltura Management Console (KMC) User Manual
12
Uploading and Ingestion
CHAPTER 2
Uploading and Ingestion
This section contains the following topics:
•
What is a Kaltura Entry?
•
Browser-based Ingestion
•
The Kaltura Uploader
•
The Upload Tab
•
Automated Content Ingestion via a Drop Folder
•
The Dashboard Tab
•
Uploading Content Using the Content Tab
•
Tracking Your Uploads
•
Preparing Entries
•
Uploading and Modifying Related Files
What is a Kaltura Entry?
A Kaltura Entry is a logical reference to your media asset. An entry encapsulates all physical media
files generated during ingestion (source, “flavors” and thumbnails), standard and custom metadata,
captions, scheduling settings, advertising cue points, specific access control settings and all other
components relating to the content. An entry is generated immediately, once your source media file
starts uploading and transcoding begins.
Browser-based Ingestion
You can upload files from your computer, record a video with your webcam, or import from a selection
of online repositories, or submit a bulk upload request via Kaltura formatted CSV/XML all from within
the Kaltura Management Console. See The Upload Tab.
The Kaltura Uploader
You can use the Kaltura Uploader, also known as the Kaltura Contributor Wizard (KCW) to upload
any type of rich-media file, from any location (computer, websites, record from webcam).
You can upload content through the:
•
Upload Tab
•
Dashboard
•
Content Tab
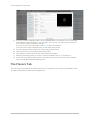
The Upload Tab
The Upload tab presents a list of ingestion options and capabilities to choose from and is used to
Kaltura Management Console (KMC) User Manual
13
Uploading and Ingestion
upload content to Kaltura. The Upload tab opens over any page within the KMC.
The upload process also includes metadata ingestion, See Managing Metadata and Categories.
You can add content to your site in the following ways:
•
Upload from Desktop: Opens a file browser and allows you to select multiple files. See
Upload from Desktop.
•
Recorded from a Webcam: Allows you to capture video content from a webcam connected to
your computer. See Recorded from a Webcam
•
Submit CSV/XML: Allows you to submit a CSV or XML file that points to multiple media files
and includes metadata. See Submit CSV/XML.
•
Import from Web: Allows you to search for videos to ingest from video repositories such as
Metacafe and others, depending on the feature set enabled in your account. See Import from
Web.
You can also prepare a video entry without including the media content in advance, see No Media
Entries. Creating a No Media entry may be useful when metadata settings and media perpetrations
are managed separately and possibly by different operational teams This scenario is used for media
that may be included at a later stage, for example, in a drop folder. See Using a Drop Folder.
Upload from Desktop
Use this option to quickly upload files. You can continue working on other tasks while files are
uploading, and resume the file upload in case of connection failure.
To upload media files from your desktop
1. Select the Upload tab.
2. Click Upload from Desktop (or click Upload from Desktop in the Dashboard.)
3. Select one or more media files. Use the Ctrl key to select multiple files.
Kaltura Management Console (KMC) User Manual
14
Uploading and Ingestion
The Upload Settings window is displayed.
4. Select the Transcoding Profile. See Configuring Transcoding Profiles.
5. Modify the Media Type if needed. The media type is automatically detected from file name
extension. The media types allowed are: video, audio or image.
6. Click Add Files. (Optional).
7. Click Upload.
Recorded from a Webcam
You can upload media that you record from your webcam via the easy-to-use Kaltura Uploader.
To upload media files recorded from a webcam
1.
2.
3.
4.
5.
6.
7.
Select the Upload tab.
Click Record from Webcam.
Select the Transcoding Profile and click Next. See Configuring Transcoding Profiles.
Select a webcam from the dropdown list and click Allow.
Press Record to record your media file.
When done, click Next.
Enter a Name and all other relevant information for the webcam recording and click Next.
The recording is processed and added to the Entries table.
Submit CSV/XML
Kaltura offers bulk import when there is a need to upload files large files and presents a great
advantage to consolidate large amounts of video content in different locations from remote sites. See
Bulk Upload and FTP Upload for more information.
Kaltura Management Console (KMC) User Manual
15
Uploading and Ingestion
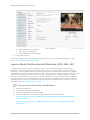
Import from Web
You can import video, audio and photos from common online media websites and applications. The
Metacafe option for importing videos, may address your needs if you are searching for specific
content quickly and easily assuming you want to import videos that are hosted in Metacafe. The
video’s properties (description, running time, brief summary, etc.) can be revealed my mousing over
the thumbnail.
The audio options are Jamendo and CCMixter; the photo options are Flikr and NYPL.
To import content from the web
1.
2.
3.
4.
Select the Upload tab.
Click Import from Web in the Upload tab.
Select the Transcoding Profile and click Next. See Configuring Transcoding Profiles.
Click Search to search through videos on Metacafe, or select the Audio or Photo tab and
search through your data.
5. Select the content to upload and click Next.
6. Enter or modify the descriptive information and click Next.
Bulk Upload and FTP Upload
You can import multiple files per session via a simple comma separated file (CSV) or an XML file.
With these options, you can also ingest files from your own FTP server, or any publicly accessible
file’s host. Metadata fields can be populated from CSV/XML.
The CSV Bulk Upload file is a simple format. You can use the CSV format for simple content ingestion
based on imported source media files and their related metadata. Each entry is added from a single
line in the CSV file. Each line includes a path to a media file that will be uploaded and each uploaded
media file creates an entry. We recommend a maximum of 500 lines/uploaded media files included
within one CSV file.
The XML Bulk Upload file is based on Kaltura’s MRSS format schema for content ingestion. The XML
format enables bulk ingestion of complex video or audio packages.
Complex packages may include:
•
Multiple bit-rate Transcoding Flavors already transcoded by a local transcoder
•
Multiple thumbnails
•
Related metadata and publishing options
Kaltura Management Console (KMC) User Manual
16
Uploading and Ingestion
What is Bulk Upload?
Bulk Upload enables you to ingest multiple entries and files to the Kaltura server in a single action
using a single file. The greatest benefit for bulking uploads is:
•
Importing multiple files in one action thus automating the ingestion process.
•
Ingesting large files which you cannot upload from the desktop via the KMC (larger than 2GB)
•
Populating metadata fields with no need to enter them from the KMC
Bulk upload streamlines publishing, providing the basis for automated bulk ingestion of files and
metadata and overcomes browser and client upload limitations allowing for larger file size ingestion.
There are two methods to upload bulk content: the simple method where you use
a CSV file (Comma Separated Value) and the advanced method where you use an XML file, which
has many extensive bulk upload features. You can customize the structure to the metadata and
elements that are part of your account specific workflow. Using the XML file bulk upload is the
recommended method due to its structured hierarchy, allowing for nested objects and metadata and is
easily extended.
For information on how to download bulk file samples see Downloading Bulk File Samples.
XML Bulk Upload
XML Bulk Upload supports full CRUD (Create, Read, Update, and Delete) operations, allowing for
ingestion of entries, updates to existing entries, and deletion of bulk entries using an XML format.
XML Bulk Upload is the recommended bulk upload option.
In addition, XML supports a hierarchical structure while CSV does not. You can define a complete
content package using the XML Bulk Upload feature that includes the video source file, its metadata,
its custom metadata profiles, distribution profiles, set of transcoding flavors ( for cases when you are
using your own transcoders), thumbnails and other additional relevant data.
The advantages of using XML Bulk Upload are:
•
Simplified integration with other systems (for example, migrating media files including their
complete metadata from one server to another).
•
A streamlined ingestion mechanism, by using XML it is easy to create automated processes
to ingest content.
•
More comprehensive ingestion models that allow you to manipulate all of the media entry
object attributes and their related objects (such as flavors, custom metadata, access control
and distribution profiles, etc.).
The full sets of features supported by the XML Bulk Upload are described in the XSD (the XML
template).
An example XML file can be found here (or downloaded from the KMC Upload menu).
The bulk upload status is monitored through the bulk upload log under the Uploads control tab, see
Tracking Your Uploads. A log file and a copy of the CSV file are made available for troubleshooting or
for historical records of uploaded content.
Whether you are a medium sized video publisher or if you're a media giant, you should consider the
Bulk Upload option.
CSV Bulk Upload
Although CSV bulk uploads are less structured and have fewer features than the XML bulk upload,
CSV bulk upload is easy to use for simply ingesting video files and their related metadata.
CSV files are easy to edit using Microsoft Excel, Google Docs or similar spread sheet applications.
To specify the fields and their order in the CSV file, the first line in the CSV file should start with an ‘*’
(asterisk sign) followed by the list of field names, separated by a commas. Lines with‘#’ (hash sign)
will not be processed, as these are essentially comment lines.
Each line after the fields definition line (which starts with an ‘*’ sign) represents an entry to be ingested
Kaltura Management Console (KMC) User Manual
17
Uploading and Ingestion
and should include the values of every field. Every line is a new entry. All entry fields are processed
according to the definition line and according to the order of the fields.
A full list of fields and example CSV file can be downloaded from the KMC Upload menu. See
Downloading Bulk File Samples.
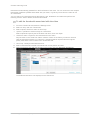
To submit a CSV or XML file
1.
2.
3.
4.
Select the Upload tab.
Click Submit CSV/XML in the Upload tab (or click Submit CSV/XML in the Dashboard.)
Select a file.
Click Open.
A message stating that your import request has been submitted is displayed.
To track bulk uploads, see Tracking Your Uploads.
Downloading Bulk File Samples
To download a sample bulk file
1. Select the Dashboard tab.
2. In the Upload Content section click Download CSV/XML Samples.
or
1. Select the Upload tab.
2. Click Download CSV/XML Samples.
The samples include specific format descriptions and guidelines.
Automated Content Ingestion via a Drop Folder
You can add your media and metadata to a drop folder (on-premise or on the Kaltura servers) and the
Kaltura system will activate an ingestion workflow tailored to your needs.
You can also upload metadata only and deliver media directly from your CDN, or on-premise storage.
Using a Drop Folder
The Kaltura Drop Folders are used to automate the ingestion of content into the Kaltura platform. The
Drop Folder service constantly watches each drop folder for new content, and activates automatic
ingestion of new content to the specific account.
Kaltura offers multiple configuration options for setting each drop folder to a specific workflow. To
learn more read about Drop Folders see Kaltura Drop Folder Service for Content Ingestion.
Commercial users, please contact your account manager to enable this feature in your account.
The Dashboard Tab
You can upload data video, audio or photo files through the Dashboard.
To upload media files from your desktop
1. Click Upload from Desktop in the Dashboard.
2. Select the files to upload and click Open.
Kaltura Management Console (KMC) User Manual
18
Uploading and Ingestion
3. Select the Transcoding Profile. See Configuring Transcoding Profiles.
4. Select the Media Type and click Upload.
Uploading Content Using the Content Tab
You can upload data through the Contents tab. You can add video or audio media to an entry you
prepared (when the entry status is No Media, add new transcoding flavors, add metadata, or replace
content information. See The Flavors Tab.
Tracking Your Uploads
You can track the upload processing in the Contents tab.
Your Uploads
The Your Uploads table lists all the in-progress and pending upload tasks. The list only shows media
file uploads from the desktop that you performed during the current KMC session.
For each uploaded file, you can view details such as:
•
File name
•
File size
•
ID of the Kaltura entry that this file is added to
You can use the table to:
•
Track the progress of each upload task.
•
Reorder upload tasks that are waiting to be processed.
•
Retry failed tasks.
Since file uploads are controlled by the KMC web application, closing or refreshing the browser page
terminates all upload tasks that currently are in progress.
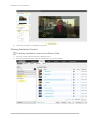
To track the upload progress from your desktop
1. Click the Contents tab and select the Manage menu.
The Upload Control feature, located on the upper right of the screen, indicates the number of
uploads in progress.
2. Click Upload Control to display the file uploads and to view additional information.
Bulk Upload Log
The Bulk Upload Log table shows the completed and in-progress bulk upload jobs for your KMC
account. You can:
Kaltura Management Console (KMC) User Manual
19
Uploading and Ingestion
•
View information related to each bulk upload job.
•
Download original bulk upload files.
•
Download a results log file of each bulk upload job.
To track the Bulk Upload progress from your desktop
You can display completed and in-progress bulk upload jobs. (optional)
1. Click the Contents tab and select the Manage menu.
The Upload Control feature, located on the upper right of the screen, indicates the number of
uploads in progress.
2. Click Upload Control to display the file uploads and to view additional information.
3. Click Switch to Bulk Upload Log, located on the bottom left corner of the screen.
To revert back to Upload Control
•
Click Switch to your Uploads located on the bottom left corner of the screen.
After the upload process is complete, media is managed through the Contents tab.
Preparing Entries
The following options are available:
•
Prepare Video Entry
Kaltura Management Console (KMC) User Manual
20
Uploading and Ingestion
•
Prepare Audio Entry
•
Prepare Live Stream Entry
•
Draft Entries
Prepare Video/Audio Entry
Use this option to prepare metadata and publishing settings for a video/audio entry before its related
media files are ready for upload. This option enables a flexible entry preparation workflow and is
especially useful when video files are:
•
Transcoded by a local transcoder
•
Processed while content editorial work is being done in the KMC
•
Processed after content editorial work is completed in the KMC
Workflow:
1. Prepare a draft entry in the KMC and fill in its metadata and publishing settings. See
Prepare a Metadata-only "Draft" Entry for Future Ingestion of Media Files.
2. Add the media source file or the locally generated Transcoding Flavors to the entry.
Use the entry’s Flavors tab to add files or flavors. See The Flavors Tab.
Ingestion Status
The ingestion status of an entry that you create with the Prepare Video/Audio Entry option
automatically is set to No Media. The status remains No Media until one or more media files are
added to the entry.
Draft Entry
An entry that you create with the Prepare Video/ Audio Entry option is saved as a Draft entry in the
Kaltura system until you add content.
A Draft entry remains available in the Content > Manage tab for further editing.
Prepare Live Stream Entry
Use this option to create a live stream entry.
Select Live Stream Entry, to provision a live stream on the CDN. The live stream should be
configured with your encoder IP address.
After the live stream is provisioned, you can set the entry metadata and specific broadcasting settings
in the KMC's Content > Manage tab.
For more information see Workflow for Setting up Live Streaming.
Creating Draft Entries
Draft entries are entries created without actual content, and are used as a container for adding
content.
Note: You can add or attach content at a later time, by using the BaseEntry>addContent action and use one of the KalturaResource resources. See Kaltura API
documentation.
Kaltura Management Console (KMC) User Manual
21
Uploading and Ingestion
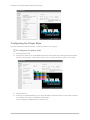
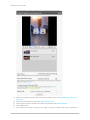
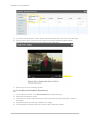
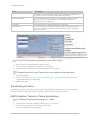
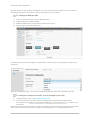
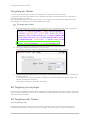
To create a Draft Entry
1.
2.
3.
4.
Select the Upload tab.
Select Video Entry or Audio Entry.
Enter a Name (required) and other information (optional) in the New Entry Window.
Click Save and Close.
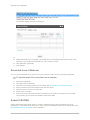
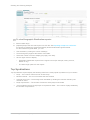
The ingestion status for a Draft entry is No Media. The following is an example of a Draft entry
in the KMC.
Key Benefits and Functionality
You can control the order of ingestion, create a No Media entry with metadata and attach video later.
You can prepare a Kaltura media entry and add the relevant media files after uploading content, to
enable an efficient and fast paced content ingestion operation. You can create a new media entry in
the KMC and set its metadata and publishing information beforehand, or in parallel, to the actual
media processing. You can then add the related media files to the existing entry when ready. For
more information see Metadata and Related Files.
You can use your own transcoders, and ingest the output flavors to Kaltura. See Add the Transcoding
Flavors File.
Publishers can ingest media assets/files that have already been transcoded locally into multiple
flavors and then ingest the files into a Kaltura entry managed from the KMC. This is a Premium option
that can be configured by your Account Manager. Ingestion can be done via uploading through the
KMC UI, linking to an existing hosting site, submitting an XML with file links or using the Kaltura API.
Host Videos at your Preferred Location and Link to Kaltura
This use case is typically combined with transcoding performed on the publisher’s side, after which
the output files are pushed directly to CDN hosting, or to a local intranet delivery source.
In this case, Kaltura essentially only manages the metadata while media files themselves are
delivered directly from the publisher through a CDN to the viewer.
Linking between the files and a Kaltura entry can be done through the KMC, API, or drop folder xml
ingestion. See Using a Drop Folder.
Replacing Video Assets for a Kaltura Entry
Publishers can replace media files of an existing media entry when needed.
This feature:
•
Is especially useful when media assets need to be re-edited by the publishers following
ingestion to Kaltura.
•
Enables seamless replacement of media even if media is already published/
syndicated/distributed – media is replaced in all published instances.
•
Replaces all multiple-bitrate media assets flavors in one transaction.
•
Allows review and approval of new media prior to the actual replacement.
•
Is an integral part of the entry life-cycle and content management workflow
For more information see Replacing Media.
Kaltura Management Console (KMC) User Manual
22
Uploading and Ingestion
Uploading and Modifying Related Files
You can attach files (documents, media) to your entries. Uploaded files will not create new entries but
will receive a unique Kaltura Asset ID. Use the Related Files tab to upload files associated to entries.
Related files are not stored with the entries on the Kaltura platform and are referenced using an Asset
ID.
To upload related files
1.
2.
3.
4.
Select the Content tab and click on an entry.
Select the Related Files tab and click Add More Files.
Select a file and click Open.
Select the File Type from the drop down menu.
The related file will immediately begin uploading. Once the upload is complete, you can edit
the file details (title, description), download the file, or remove it.
5. Click Save.
To edit related files
1. Select the Content tab and click on an entry.
2. Select a File and select Edit Download or Remove.
Kaltura Management Console (KMC) User Manual
23
Transcoding and Processing
CHAPTER 3
Transcoding and Processing
This section contains the following topics:
•
Transcoding
•
Adding a Transcoding Profile
•
The Flavors Tab
•
Supported Formats for the SaaS Edition
Transcoding
When a video is uploaded to the KMC, the video is associated with a conversion profile, also known
as a Transcoding Profile. A Transcoding Profile may be comprised of a single flavor or multiple
flavors. For each upload session, you can select the Transcoding Profile. You can also set a default
Transcoding Profile.
A transcode is made from taking an encoded piece of video and then converting it into one or more
newly and more compressed streams that can then be played in a player on a computer or mobile
device depending on the settings and methods used.
Kaltura flavors are transcoded versions of an entry that are used to specify resolutions and formats.
You can select to generate or add multiple flavors to an entry, including flavors geared towards
displaying media on mobile devices (low bandwidth, small screens, and/or HTML5 supporting
devices). A flavor is a single output file with its specific file type, bit-rate, GOP size, that may be used
for playback, download or editing.
The Kaltura platform supports ingestion of all forms of rich media (including video, images, audio,
PDF, SWF files, etc.), and allows you to define different transcoding profiles, depending on your
publishing needs.
Additional transcoding flavors can easily be added for publishing across different devices, network
bandwidths and screen sizes. Kaltura's transcoding decision layer engine supports more than 60
video and image formats as well as 140 video and audio codecs.
When you upload content you determine what type of flavors you want to associate with your output.
There are three transcoding profiles that are automatically created for new accounts:
•
Default - the flavors included in the default transcoding profile of the account. These flavors
appear in the main Transcoding Settings page.
•
Source Only - uploads the source file, but does not transcode it; the source is the original
file uploaded as is. Other flavors will not be created.
•
All Flavors - transcodes uploaded files into all of the flavors defined in the main
Transcoding Settings page. See Transcoding Settings Page.
Converting Videos into Multiple Flavors (Optimized Output
Files)
Kaltura’s player provides optimal playback by using adaptive bitrate technology that automatically
selects the most appropriate file for playback, based on the viewer’s specific connection and other
parameters.
Kaltura Management Console (KMC) User Manual
24
Transcoding and Processing
Getting content onto the platform is the first step and selecting transcoding information is part of the
upload session. For a quick and simple upload, use the default flavors that are provided and that can
be enabled/disabled from the transcoding profile you want to use. See Default Flavors.
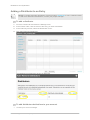
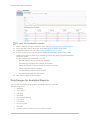
Transcoding Settings Page
To display the default flavors for transcoding your content
•
Select the Settings tab and then select Transcoding Settings.
The Default Transcoding Flavors window is displayed which contains the flavor selection of
the Default Transcoding profile.
Each file uploaded to the system is transcoded into the flavors that are checked.
Editing and Creating Transcoding Profiles
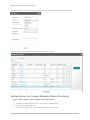
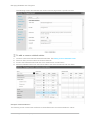
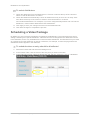
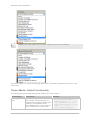
To edit a Transcoding Profile
1. Select the Settings tab and then select Transcoding Settings.
Kaltura Management Console (KMC) User Manual
25
Transcoding and Processing
The Default Transcoding Flavors window is displayed showing the flavors you selected for the
Default Transcoding profile.
.
2. On the lower left corner, click on Switch to Advanced Mode.
The Transcoding Profiles window is displayed.
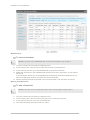
3. Click on a Transcoding Profile (Name) to edit or click Delete to remove a transcoding profile.
Kaltura Management Console (KMC) User Manual
26
Transcoding and Processing
4. Use the checkbox to select flavors to add or remove.
5. Enter the Default Metadata Settings Entry ID (Optional). This feature is useful if you want to
set default metadata settings such as tags/categories to files you ingest. See Upload a Media
File and Set Its Metadata. If your account is used and configured to ingest content from
Remote Storage- select the remote storage name from the menu (Optional).
6. Click Save Changes.
Adding a Transcoding Profile
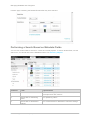
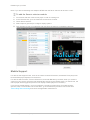
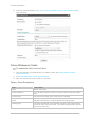
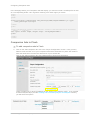
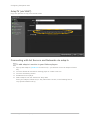
To create a Transcoding Profile
1. Select the Settings tab and then select Transcoding Settings.
2. On the lower left corner, click on Switch to Advanced Mode.
3. Click Add Profile.
Kaltura Management Console (KMC) User Manual
27
Transcoding and Processing
4.
5.
6.
7.
8.
9.
10.
The Add New Transcoding Profile window is displayed. You can view the available
transcoding flavors, or add new Transcoding Profiles and create profiles for different use
cases.
Enter a Name and Description for the Transcoding Profile.
Select the flavors out of the available flavors on your account, to apply to the source video
you upload.
The flavors you select become active.
Edit the flavor’s options. (Optional). Click on an active flavor name to open the flavor settings
in this Transcoding Profile.
For extra fast publishing, set the Impact On Entry Readiness field to Required, for the
minimum set of flavors and the rest of the flavors to Optional.(optional)
Use this option to publish your content even faster. See Quick Publishing .
Enter the Entry ID for the Default Metadata Settings. (optional) See Preparing Metadata for a
Video Entry.
The entry’s metadata fields will be added to the transcoding profile. Each new entry that will
be transcoded using the profile will include those metadata fields. (You can create a
“Metadata template”.) You can use The Metadata entries as “metadata templates” for
adding metadata to multiple files. See Useful Tips for Working with Transcoding Profiles.
Select the Remote storage name, for linking new entries to media assets located on your
CDN or remote storage, if applicable, to your workflow. Otherwise this feature will be disabled
with a N/A indication. See Link to Remote Storage.
Click Create New to create the profile or Save changes if you are editing the profile.
Quick Publishing
A popular requirement for news websites and video publishers is to publish videos as quickly as
possible. Kaltura allows you to control video asset readiness speed by allowing you to configure the
ingestion process to your needs.
By default, a video entry is not at the ‘Ready’ status (for publishing) until all of the required flavors (by
default the required set of flavors is the minimal set of flavors required for web playback) are created.
If many flavors are included in the transcoding profile, the conversion process may take many
minutes, which is often not fast enough for breaking news videos.
Kaltura Management Console (KMC) User Manual
28
Transcoding and Processing
You can configure whether a certain flavor’s readiness is required or not, so that you can publish your
content quickly.
For example, assuming the source flavor is a web-playable entry created using h264 for web and
mobile. You can configure h264 as the required flavor, while all other flavors are optional. The entry
will receive the “Ready” state for publishing immediately after the upload is complete. The other
flavors will then be processed and added to the entry in the background subsequently, after a short
processing period
See http://blog.kaltura.org/extra-fast-publishing for more information.
NOTE: The same flavor may have different settings in a different transcoding profile, which
allows for greater publishing flexibility).
Editing Options for Flavors in a Transcoding Profile
The following options may be edited for each transcoding flavor selected in a Transcoding Profile:
•
Impact on Entry Readiness –Determines the impact of each specific transcoding flavor on
entry readiness for publishing. See Quick Publishing.
The options are:
•
Required – The entry will not be set to a Ready state until the processing of the specific
transcoding flavor is complete. To expedite video readiness we recommend applying the
‘Required’ setting to a single flavor that is required for playback on each required
environment. For example, if the source file is an MOV that cannot be played on the web,
flagging only one lowest quality FLV or MP4 flavor as ‘Required’ will ensure the video will be
published as quickly as possible while the other flavors are being prepared.
•
Optional – The entry may be set to a Ready state before the processing of the specific
transcoding flavor is complete. When no other Transcoding Flavor within the Transcoding
Profile is set as required, completion of the processing of any Optional flavor sets the entry
to the Ready state. We recommend using this option for most flavors to increase speed of
readiness.
•
No Impact – Determining entry readiness is not affected by the presence of this transcoding
flavor. This is usually the default setting for the “Source” transcoding flavor.
•
Use Kaltura Transcoding – Determines whether to use the Kaltura transcoding engine for
generating each specific transcoding flavor. This option is enabled only when your account
is set to support the ingestion of multiple bit-rate transcoding flavors generated by your local
transcoder. If Kaltura performs transcoding of all flavors except the ‘source’ file, this option
should be set to Always.
The options are:
•
Always – Kaltura’s transcoding engine always will be used for generating the specific
Transcoding Flavor.
•
Never – The Kaltura transcoding engine will not generate the specific transcoding flavor.
This is a fixed setting for the “Source Flavor” which always is added to the entry with no
additional processing. This option should also be used when your account’s content
ingestion workflow relies on a local transcoding engine and when the ingestion of the
previously transcoded Flavor to Kaltura should always take place, bypassing Kaltura’s
conversion processing.
•
As a Fallback – The system expects to add this transcoding flavor from a local transcoding
engine, but will use Kaltura’s transcoding engine as a fallback to convert to this flavor when
the flavor is not received as part of the ingestion request. This option adds flexibility when
you want to use your local transcoding engine while utilizing Kaltura’s transcoding engine as
a fallback option.
•
System Name (Optional) – The system name is used to identify the flavor in client-side
Kaltura Management Console (KMC) User Manual
29
Transcoding and Processing
applications. For example, to mark a specific flavor as suitable for playback on iPad devices,
the system name was set to iPad.
•
Flavor Generation Policy – You can bypass Kaltura’s transcoding optimization, and force
specific flavors to be generated even when though they are detected as redundant by the
Kaltura transcoding optimization module.
o
Use Kaltura’s Optimization - Kaltura’s optimization routine decides whether it is worthwhile to create a flavor (For example if the source video is of lesser quality than the flavor,
the optimization routine will not create the flavor).
o
Force Flavor generation –Select this option to override the Kaltura optimization routine
and create a flavor regardless of whether or not it is redundant quality wise (For example,
when a publisher has to distribute the video through a broadcast channel that requires
specific flavor specifications, the flavor must be created.)
Assigning a Transcoding Profile to a Bulk Upload
A default Transcoding profile is included with the KMC. After you create a Transcoding Profile, an ID
is created and listed in the Transcoding Profiles page.
To assign a transcoding profile other than the default profile, to a bulk
upload
•
Set the ID from the Transcoding Profiles to the conversionProfileId in your CSV.
•
Set the ID from the Transcoding Profiles List to the conversionProfileId in your XML file.
Useful Tips for Working with Transcoding Profiles
If you want to configure your KMC account to support automated content ingestion workflows, you can
optionally add default metadata settings from an existing entry. The default entry metadata setting
automatically will populate the new content when using each specific transcoding profile.
For example, you want to target two distinct audiences with your videos, the first is public facing
videos and the second is internal company videos.
You can create two transcoding profiles, one for each of your target audiences, even though you
might convert them to the same flavors you can use different “default metadata settings” so your
public facing videos will have their specific metadata values, while the internal company videos can
have different fields or data. All this is done automatically after you prepare one template entry for the
process.
To use metadata settings with transcoding profiles
1. Create the template entry you want to use:
Create a “Draft” entry, using the Upload tab. See Creating Draft Entries.
2. Prepare the metadata. See Prepare a Metadata-only "Draft" Entry for Future Ingestion of
Media Files
For example: Template Entry for Transcoding Profile X”.
Kaltura Management Console (KMC) User Manual
30
Transcoding and Processing
3. If you use custom metadata, edit the entry metadata fields. For example you can enter data
that reflects the template data for your company, such as your “company name” field since
your company name is unlikely to change.
If you do not use custom metadata, click here to learn more about it.
You next have to set the template entry on the transcoding profile.
4. Go to the Settings tab and select the Transcoding Profiles menu.
5. Select the flavors of your default transcoding profile.
6. Click Switch to Advanced Mode link at the bottom of the page.
7. Edit the transcoding profile you wish to create a template entry for, by clicking on it.
8. In the Edit Transcoding Profile window, enter the Entry ID you want to set as the template
entry in the Default Metadata Settings field.
The Flavors Tab
The Flavors tab in the Edit Entry window allows you to manage the flavors that are available as well
as replace media files and their transcoding flavors.
Kaltura Management Console (KMC) User Manual
31
Transcoding and Processing
Use the flavors tab to:
•
Add video or audio media to a new entry you created (when the entry status is No Media).
•
Replace the media of an existing entry (when the entry status is Ready or Error).
•
View the list of flavors that the system created for an entry and apply the following actions:
o
Preview or delete a flavor.
o
Download the transcoded file to your desktop.
o
Upload a file from your desktop you that transcoded on your own, to serve as a flavor for
an entry.
o
Upload a file from a drop folder to set as the transcoding flavor
o
Import the flavor from a URL.
o
Convert or reconvert to transcode an entry to additional flavors.
After the transcoding process is complete, the new file replaces the old file and the original file is
deleted.
When your KMC account supports direct ingestion of multiple bit-rate Transcoding Flavors, you can
use the Action menu to add or replace a single Transcoding Flavor in an entry.
Add Video/Audio
The Flavors tab displays several Add Video/Audio options when an entry is not yet associated with
any media that is, the entry status is No Media. See Preparing Entries. You can also replace media
content. See Replacing Media.
Upload Files
Use this option to add media to an existing entry by uploading one or more files from your desktop.
Kaltura Management Console (KMC) User Manual
32
Transcoding and Processing
To upload content and flavors to a Draft entry
1. Click on the Draft Entry and then select the Flavors tab.
2. Click Upload File/s to open a standard desktop file selection window.
The uploaded file is treated as the source for generating the required Transcoding Flavors in
Kaltura. When your KMC account supports direct ingestion of multiple bit-rate Transcoding
Flavors, you can select multiple flavor files for the Transcoding Profile.
3. Select the files from your desktop, confirm your selection, and set the relevant Transcoding
Flavor that the uploaded file will be transcoding by.
The Transcoding Flavor options in the menu are set from the selected Transcoding Profile
and its flavor settings.
4. Click Upload to confirm your upload request.
The KMC immediately starts processing the file uploads. The uploaded file will be added to the entry
and flavor conversion processing starts.
Import Files
Use this option to add media to an existing entry by importing a media file from your existing web host
or FTP server. The option is displayed when the entry status is No Media.
To import content and flavors to a Draft entry
1. Click on the Draft Entry and then select the Flavors tab.
2. Click Import Files to set your media file URL.
The imported media file is treated as the source for generating the required Transcoding
Flavors in Kaltura. When your KMC account supports direct ingestion of multiple bit-rate
Transcoding Flavors, you can set multiple URLs.
3. Set the relevant Transcoding Flavor that the imported file will be transcoded by. The
Transcoding Flavor options in the menu are set from the selected Transcoding Profile and its
flavor settings.
4. Click Import to confirm your import request.
An import request is submitted to the Kaltura server. The imported file will be added to the entry and
flavor conversion processing starts.
Link to Remote Storage
Kaltura’s Remote Storage and Delivery solution enables publishers to manage their video assets and
account settings on Kaltura’s hosted video platform while actually storing the content on their own
remote network storage location, and delivering the content from the same remote location. Kaltura’s
remote storage and delivery capabilities are fully integrated with the platform’s ingestion, transcoding
and publishing workflows, and provide system flexibility for addressing publishers’ specific storage
and delivery needs.
You can link content to remote storage from the KMC User Interface. The Link to Remote Storage
option is useful for partners that use their own transcoder and also host and deliver content on/from a
remote storage (e.g. CDN storage, internal organization storage). The partner’s transcoder generates
the flavors. After the files are uploaded directly to the remote storage it is only necessary to indicate
which flavors to link to an entry in Kaltura. The connection of the remote storage profile to the
transcoding profile is used for this purpose.
Contact your Kaltura account manager to learn more about how this feature can simplify your
workflow, and to activate and configure remote storage on your account.
Match Files from Drop Folder
Use this option to match media to an existing entry from your account’s drop folder. This option is
displayed when your account is set with a drop folder configuration. For more information see Kaltura
Drop Folder Service for content Ingestion.
Kaltura Management Console (KMC) User Manual
33
Transcoding and Processing
Replacing Media
You can replace media content when an entry is ready for publishing or when a media processing
error occurred. The entry itself, with its current metadata, entry ID, and analytics information, remains
unchanged.
All Transcoding Flavors are replaced as one unit to ensure that inconsistency errors do not occur
between old and new Transcoding Flavors at any given time.
You can review the Transcoding Flavors of the new media file in a temporary entry that is available for
this purpose only. After you approve media replacement, all of the entry’s existing Transcoding
Flavors are deleted and will be replaced by the new ones.
To replace media
1.
2.
3.
4.
Select the Content tab and click on an entry.
Select the Flavors tab.
Click on an entry.
Select the replacement method.
See Upload Files, Import Files, Link to Remote Storage or Match Files from Drop Folder.
After you trigger the action, a link to review the new Transcoding Flavors generated for the
new media becomes available on the Flavors tab.
Click on Processing – Click here to review to see the transcoding process. You can then
review the new Transcoding Flavors, and approve or cancel your selection...
5. Click Approve Replacement. All current flavors are replaced when you approve the
replacement or click Cancel Replacement to cancel your actions.
When you trim an entry, you trigger a similar process that replaces existing flavors with the trimmed
version.
Display Mixes
The Mixes tab is only displayed used with Kaltura’s legacy editors, for entries that are used inside an
editing mix, and for video mix entries. When the entry you are reviewing is a single file (video, image,
audio), then the Mixes screen will include a table that displays any and all video mixes that the entry
has been used in. If the entry you are reviewing is a Video Mix, then the Mixes screen will include a
table that displays all of the single entries that are included in the mix. When you click on the name of
an entry, you will be routed to the detailed information of that specific entry.
Supported Formats for the SaaS Edition
This section provides information on common formats and codecs supported by the Kaltura SaaS
Video Platform. Additional formats and codecs may be added upon request, please contact Kaltura to
discuss any formats or codecs that are not included here.
Supported Source Formats
The following source formats are supported –, for example, formats that can be ingested by the
Kaltura Management Console (KMC) User Manual
34
Transcoding and Processing
Kaltura platform (Additional formats may be supported as well but have not been verified):
FLV/F4V, MOV/MP4/QT/M4V, AVI, 3GP, ASF/WMV, MPG/M1V/M2V, MKV, Ogg, RM, WEBM
Supported Source Codecs
The following codecs are supported (Additional codecs may be supported as well but have not been
verified):
Input Video Codecs
Dvix (Div3/4/5)/DX50, DV, H263, H264/AVC, MPEG-4 Visual, MPEG-1/2, MJPG, MP42/3, IV40/50
(Indeo codecs), RV30/40, RMVB, FLV1/4, VP3/5/6/7/8, SVQ1/3 (Sorenson), XVid, Theora,
WMV1/2/3, VC1, VP8, ProRes 422, ICOD, DVCPRO. PXLT
Input Audio Codecs
MP3, MP1/2, AC3, AAC, Vorbis, AMR, PCM, WMA7/8/9, WMSpeech, FLAC, QDM2, RA, Nellymoser,
Cook, GSM, SPEEX.
Target Formats/Codecs
The following target formats and codecs are supported– i.e. formats and codecs that can be managed
and/or displayed using the Kaltura platform:
Target Formats
FLV, MP4, AVI, 3GP, OGG, MKV, WMV, Silverlight Smooth Streaming. WEBM, MPEG, MPEG TS
Target Video Codecs
H264, H263/FLV1, Theora, MPEG-4 Visual, WMV1/2, VC1, VP6, VP8, MPEG-2
Target Audio Codecs
MP3, AAC, Vorbis, WMA/Pro, AMR NB
Delivery-specific Formats
In addition to Progressive Download and RTMP delivery methods, Kaltura supports RTSP streaming
(for Blackberry devices), Akamai HD Network and Apple HTTP Live Streaming as well. Akamai HD
Network and Apple HTTP Live Streaming require specially adapted target formats, which Kaltura
supports as well
Kaltura Management Console (KMC) User Manual
35
Creating and Customizing Playlists and Players
CHAPTER 4
Creating and Customizing Playlists and
Players
This section contains the following topics:
•
What is a Playlist?
•
Creating a Manual Playlist
•
Creating a Rule Based Playlist
•
Multiple Rules Based Playlist - Advanced Mode
•
Additional Playlist Configuration
•
Designing and Configuring a Player
•
Configuring the Player Basics Settings
•
508-Compliant Video Player
•
508 Captions Configuration
•
Configuring the Player Advertising Settings
•
Configuring the Player Features
What is a Playlist?
A playlist is a list of media items (videos, audios, images) that can be embedded with a player in your
website. Playlists can serve as the basis for RSS feeds, content feeds to over the top devices or
integrations such as Roku, Boxee. See Content Syndication.
There are two types of playlists available in the KMC:
•
Manual
•
Rule Based
Manual playlists allow you to select a static list of items, while Rule based playlists are dynamic, and
automatically update based on what's currently available in your media library and what rules define
the playlist. After you've created your playlist, you can assign a playlist to a player. See Designing and
Configuring a Player.
A manual playlist can have a maximum of 150 entries. A rule based playlist may have a maximum of
50 entries, however, when the playlist is used in a syndication feed the limitation is 10,000 entries.
Creating a Manual Playlist
To create a manual playlist, you manually select a group of videos to be played in the desired order.
The order in which videos are played can be changed in manual playlists at any time, by using the up
down arrows to set the video to the desired location within the playlist.
To create/add a manual playlist
1. Select the Content tab and then select the Playlist menu.
2. Select Add Manual Playlist.
Kaltura Management Console (KMC) User Manual
36
Creating and Customizing Playlists and Players
3. Enter an informative Name for your playlist.
4. Use the Filters to search for entries you want to include. See Locating Files – Content Search.
The results are displayed in the Entries Table.
5. Add entries to your playlist by moving the desired entries from the Entries Table to the Playlist
Entries. Use the horizontal arrows.
6. Set the order of the entries using the vertical arrows.
Highlight the entry and then use the up down arrows to place the entries in their appropriate
order. Clicking on the entry will open it for editing.
7. Click Save to complete the process.
Creating a Rule Based Playlist
A rule based playlist is a dynamic playlist that is automatically updated when content is uploaded or
edited. To create a rule based playlist, you create a rule that selects the videos to include in the
playlist. The rules may be based on the tags assigned to the videos, or you can create rules for
ordering the videos and for the maximum number of videos to include. For example, you can create a
“Most Viewed” playlist, a “Most Recent” playlist, as well as a playlist based on single or multiple filters,
such as “videos tagged with “dogs” and created during January 2010”.
As you upload videos that match the rule, they are automatically added to the playlist.
Defining a Rule
You can define a rule that will result in your playlist content. You can use any number of filters: you
can define a list of clips that all have the same tag (for example, if you enter the term "dog" into the
search box and click search, a new rule-based playlist will be created for all the clips that have the
Kaltura Management Console (KMC) User Manual
37
Creating and Customizing Playlists and Players
"dog" tag). This list will dynamically change each time a clip is added or deleted to/from your account.
For example, you can define a rule-based playlist that consists of all the 0-4 minute video clips that
were created in the past week. In addition to filtering, at the bottom of the window, you can define a
preferred order for your playlist. You can order it by Most Viewed (overall, last week or last 24 hours)
or Most Recent (for example, most recently added to the KMC).
If, for example, you would like to create a dynamic playlist that at any given moment consists of the
most viewed clips in the last week, all you need to do is create a new filter and select the "Most
Viewed 7 Days" option from the "Order by" drop-down menu.
On the bottom of the playlist you can see the number of entries in the playlist and their total length.
You can automatically limit the number of entries that will be included in the playlist by adjusting the
counter positioned to the right of the "Order by" drop-down menu.
Your playlist can be based on a single rule or multiple rules. If you want to apply more than one rule to
your playlist, click the "Switch to Advanced Mode" link at the bottom of the window. Note that this will
clear all previous information that you have saved in your playlist.
To create/add a single rule playlist
1.
2.
3.
4.
Select the Content tab and then select the Playlist menu.
Select Add Rules Based Playlist.
Enter an informative Name for your playlist (required).
Using the Filters, search for the entries you would like to include.
The results are displayed in the Entries Table.
You can choose more than one type of filter (for instance, text search + date + media type),
the logical relationship between fields will be an "AND" relationship.
5. Select your preferred video order from the Order By drop-down menu.
6. Select the total number of entries you would like to include in the playlist via the Limit Playlist
result box.
7. Click Save Changes to complete the process.
Kaltura Management Console (KMC) User Manual
38
Creating and Customizing Playlists and Players
Multiple Rules Based Playlist - Advanced Mode
Use the Advanced Mode to create playlists based on multiple rules.
Kaltura Management Console (KMC) User Manual
39
Creating and Customizing Playlists and Players
To create/add a multiple rules based playlist
1.
2.
3.
4.
5.
Select the Content tab and then select the Playlist menu.
Select Add Rules Based Playlist.
Click Switch to Advanced Mode.
Enter a Name for your playlist (required).
Click Add Rule to create a new playlist rule. (See Creating a Rules Based Playlist to learn
about creating rules.)
6. Add additional rules.
7. Use the Remove Rule and Edit Rule buttons to make changes to your list of rules.
Kaltura Management Console (KMC) User Manual
40
Creating and Customizing Playlists and Players
Rules are applied to the playlist in the order they appear. Use the arrows to change the order of the
rules.
Additional Playlist Configuration
Other actions that you may apply to playlists include:
•
Creating Multi-tab Playlists
•
Deleting a Playlist
•
Removing Videos from a Playlist
•
Customizing Additional Features for Playlists
Creating a Player with Multi-tab Playlists
A Multi-tab Playlist contains multiple tabs, each containing a different playlist.
To create a multi-tab playlist
1. Select the Studio Tab and then select New Player – Multiple Playlist.
The Basics tab is displayed.
2. Design and configure your playlist. See Designing and Configuring a New Player or Playlist.
3. Select the Content tab and add pre-existing playlists to your new Multiple Playlist.
Use the arrows to select from the list of All playlists and move them to the Playlist tabs list.
4. Save Changes to complete the process.
Kaltura Management Console (KMC) User Manual
41
Creating and Customizing Playlists and Players
The players will appear in the Multiplayer List. Each playlist will be displayed in a new tab.
Deleting a Playlist
To delete a playlist
1. Go to the Content tab and then select the Playlists tab.
2. Select the playlist in the workspace and click Delete.
Removing Videos from a Playlist
To remove videos from a manual playlist:
1. Go to the Content tab and then select the Playlists tab
2. Select the playlist.
3. Select one or more videos from the Playlist Entries and use the horizontal arrows to move
them to the Entries table.
Removing a video from a playlist does not delete it from your content library.
You cannot remove a video from a rules based playlist directly. Instead, you can:
•
Modify the tags of the video so that the video no longer has any of the rules based playlist's
tags.
•
Modify the tags of the playlist so that they no longer include any of the video's tags.
•
Delete the video.
Customizing Additional Features for Playlists
When creating a playlist (either with one or multiple tabs) you will see additional configuration options
under the Playlist Items section. Various types of information for each of the playlist items, such as
number of plays, tags, rank etc. are displayed.
Use options in the Features section to customize the player's design.
Kaltura Management Console (KMC) User Manual
42
Creating and Customizing Playlists and Players
Designing and Configuring a Player
A playlist is a collection of videos that are grouped together in a particular order for playback in the
Kaltura Player. After you've created your playlist, you can assign your playlist to a player. Use the
Studio tab to create configurations and design players and playlists. You can add, remove and adjust
multiple buttons and features, and create a look to match your site.
Player List
The Studio tab displays the list of the players defined in the system. The default players that are
included within the system, as well as players defined and created by administrators via the KMC are
displayed.
The studio has 5 templates of players:
•
Single player
•
Horizontal playlist
•
Vertical playlist
•
Multi playlist
•
Hovering controllers players
A studio template is a collection of features of a specific Kaltura Player configuration. The template is
actually a collection of the player uiConf and another .xml file called features.xml. For more
information, see here.
Workflow to create a player
1. Select the Type of Player
2. Configure the Basics Settings
3. Configure the Player Features
4. Configure the Player Style
Select the Type of Player
To create a player
1. Select the Studio tab.
2. Select the type of player to create.
The Create New Player window is displayed.
Kaltura Management Console (KMC) User Manual
43
Creating and Customizing Playlists and Players
Configuring the Player Basics Settings
To configure the player’s Basics settings
1. Select the Basics tab and enter an informative Player Name (required).
2. Set the Video Ratio – select to keep or stretch your media to fit the player when the media
and player aspect ratios are different.
3. Select Auto-play features.
4. Select the Playlists controls.
If you are creating a Player and a Playlist you will also see the Playlist Controls. Check Automatically
continue to the next entry, to play the playlist media consecutively.
For playlists with images, set the duration for images to be displayed during the continuous play of the
playlist.
Editing a Player
The changes you make to an existing player will propagate to all sites where the player has been
embedded, including syndicated players on other sites.
Kaltura Management Console (KMC) User Manual
44
Creating and Customizing Playlists and Players
To edit a player
1. Select the Studio tab.
2. Click on the relevant player in the Player List.
Players created manually through Kaltura's professional services cannot be edited in this
area.
3. Select Edit from the Select Action drop down.
The player configuration Features tab is displayed. See Player Control Options.
4. Check the control options for the player and then Save Changes.
Adding Content to a Player
To add content to a player
1. Select the Studio tab.
2. Highlight the relevant player in the Player List and select Select Content from the Select
Action drop down.
The Entries list from the Content tab Manage menu is displayed.
3. Select an Entry. You can preview the entry using the player you started off with.
4. Click Preview and Embed and then grab the embed code and copy it to publish the player to
your site.
5. Click Save and Close.
Duplicating a Player
To duplicate a player
1. Select the Studio tab.
2. Click on the relevant player in the Player List.
Players created manually through Kaltura's professional services cannot be edited in this
area.
3. Select Duplicate from the Select Action drop down.
Kaltura Management Console (KMC) User Manual
45
Creating and Customizing Playlists and Players
The player configuration Features tab is displayed. See Player Control Options.
4. Check the control options for the player and then Save Changes.
Deleting a Player
Deleting a player eliminates it from all the locations where the player has been previously embedded.
For example, if you have embedded a player using this design on your site or an external site, after
you delete it from the Player List, the player will no longer appear and a blank area will be displayed
on the website.
To delete a player
1. Select the Studio tab.
2. Click on the relevant player in the Player List.
3. Select Delete from the Select Action drop down.
508-Compliant Video Player
The 508-compliant video player includes functionality and interface design that support federal
accessibility requirements as outlined in the Voluntary Product Accessibility Template. The 508
compliant player is automatically created in the KMC and is not customizable.
To access the 508 player
1. Select an entry and click on Preview and Embed.
2. In The Select Player field choose the 508 player from the dropdown.
The 508 compliant player is statically created and is not available as a studio template.
Kaltura Management Console (KMC) User Manual
46
Creating and Customizing Playlists and Players
The player includes:
•
Support for captions file in timed text or SRT formats for the video/audio file
•
Support for an audio description in a standardized format for the video/audio file
•
Hidden text elements for every non-text element (for screen readers)
•
Tooltips
•
Keyboard tabbing and controls
•
No color coding information
•
High contrast controls
•
No draggable controls
Configuring Captions for the 508 Player
There are additional tasks to configure Captions/Subtitles for the 508 player. Captions files in the 508
player may currently be added using the Custom Data feature.
To configure captions for the 508 player
1. Go to the Settings tab and select the Custom Data menu.
2. Click Add New Schema.
3. Select Add Field and create two additional fields named CaptionsType and CaptionsURL and
then click Save.
These two fields are case sensitive. The CaptionsType field is the type of file you are using
for captions. The CaptionURL is the File Location of the captions file.
You may add an informative description for the Custom Data fields.
Kaltura Management Console (KMC) User Manual
47
Creating and Customizing Playlists and Players
4.
5.
6.
7.
8.
9.
Upload content. See Uploading and Ingestion.
Upload the captions file. See Adding Captions to an Entry.
Copy the URL from the File Location column.
Go to the Content tab and click on an entry.
Go to the Custom Data tab.
Copy and paste the CaptionsType and CaptionsUrl information and click Save.
10. Select Preview & Embed.
11. Use the drop down menu to select the 508 player.
12. Click Play.
Kaltura Management Console (KMC) User Manual
48
Creating and Customizing Playlists and Players
Configuring the Player Advertising Settings
To configure the player advertising settings
1. Select the Studio tab and then select the Advertising tab.
2. Select the Player.
3. Toggle on Yes to Request ads for this player. See Advertising and Ad Networks.
Configuring the Player Features
The Features tab is made up of different sections, controlling the various features of the player.
Use the options in this tab to select the features (buttons, layers and modules) to be included in your
player. The main screen is divided into the Features List on the left and the Preview Pane on the right.
As you select your features from the list, you can preview the changes in real time in the preview pane
on the right.
Features List
The Features List contains the list of configurable features (buttons, layers and modules) available for
this player. Checking the box next to any feature allows you to preview it in the Preview Pane. Most of
the features have in-depth configuration options.
To view and customize the different features
Kaltura Management Console (KMC) User Manual
49
Creating and Customizing Playlists and Players
1. Select the Studio tab and then select a player.
2. Select the Features tab.
3. Click the options link next to each feature name.
Features are grouped by their type/usage as described below:
Controls
The Controls area includes basic player features, such as title text, play, scrubber and more. You can
also access each of these features using the JavaScript API.
Viral & Distribution
The Viral & Distribution area includes features that assist in content distribution, such as the download
and share buttons. Note that the download button only supports downloads of single video files and
does not support mix downloads -contact Kaltura Professional Services to enable download of mix
content.
UGC & User Interaction
The UGC & User Interaction area includes participatory features such as media uploading and
remixing.
Subtitles and Transcriptions
In the Subtitles and Transcriptions area, you can select the type of captions files to use.
Data Layer
The Data Layer includes add-on features such as subtitles and advertising - contact Kaltura
Professional Services to enable download of mix content.
Custom Buttons
The Custom Buttons area requires a higher level of expertise, and enables you to customize your
player via JavaScript. Buttons evoke pre-defined JavaScript functions.
Playlist Items (For players with playlist)
The Playlist Items area allows you to select which information will be presented for each item on the
playlist (for example, show thumbnail, rank, tags and more).
Preview Pane
The Preview Pane enables you to preview the selections you make in the Features List area as well
as define the player size and preview the player in different states (during play, pause, end, etc.).
Player Size
Set the player size by selecting the width. The player height will adjust accordingly based on the width
and the video screen ratio selected in the Template Tab.
Preview States Buttons
Kaltura Management Console (KMC) User Manual
50
Creating and Customizing Playlists and Players
These buttons enable you to preview the player in different states: before play, during play, paused
and end screen. Alternatively you can simply play the demo content within the player, pause the video
manually, etc.
To configure the player’s features
1. Select the Features tab.
2. Expand the menus to configure your player.
3. Any changes you make will appear in the preview area. (Click the Preview button to see the
changes.)
4. Click Save Changes.
Player Controls Options
Kaltura Management Console (KMC) User Manual
51
Creating and Customizing Playlists and Players
Player Viral and Distribution Options
Kaltura Management Console (KMC) User Manual
52
Creating and Customizing Playlists and Players
UGC and User Information
Examples
The following player displays an example of the default player design with a water mark display.
The following player displays a customized player, with a water mark display. Instructions on how to
create the customized watermark follow.
Kaltura Management Console (KMC) User Manual
53
Creating and Customizing Playlists and Players
NOTE: This sample presents only one of many set-up scenarios. There are many configuration
options within this section.
To change the area of the watermark display
1. Select Controls, see Player Control Options, check Your Watermark and then click Options.
2. In the Watermark Location on the video drop-down menu select Top Left.
3. Click Preview and then Apply to confirm your choice.
To change the label of the Share button
1. Select Viral & Distribution; see Player Viral and Distribution Options.
2. Check the Share button and click Options.
3. In the Tooltip field and change the default text to "Share now!", then click Apply.
Kaltura Management Console (KMC) User Manual
54
Creating and Customizing Playlists and Players
To add a download button to the video area only
1.
2.
3.
4.
Select Viral and Distribution.
Check Download button feature and click Options.
Clear the Controls Area option checkbox.
Choose an option from the drop down list.
To change the existing Full Screen button on the control area to Text
button
1.
2.
3.
4.
Select Viral & Distribution; see Player Viral and Distribution Options.
Go to Controls.
Check the Full Screens feature and click Options.
In the Display in Controls Area drop-down menu select Label
if desired, change the label text in the Button Label field.
Kaltura Management Console (KMC) User Manual
55
Creating and Customizing Playlists and Players
Configuring the Player Style
Use the Style tab to select the theme, colors and fonts for your player.
To configure the player style
1. Select the Style Tab.
2. Choose the colors of the icons/labels and online video buttons by clicking the small colored
squares. This will open a color picker where you can select a color or enter a color value.
3. Change the font.
4. Once you are finished defining your player template, features and style, click Save Changes
to complete your player configuration and design.
Your new player is displayed in the Players List.
Kaltura Management Console (KMC) User Manual
56
Creating and Customizing Playlists and Players
Kaltura Management Console (KMC) User Manual
57
Managing Metadata and Categories
CHAPTER 5
Managing Metadata and Categories
This section contains the following topics:
•
Metadata
•
Creating and Managing Content Categories
•
Uploading Content and Setting Metadata
•
Metadata and Related Files
•
Kaltura Custom Metadata Functionality
•
Managing Schemas
Metadata
Metadata fields are used to tag, manage, search and expose content. You can populate out-of-thebox fields, or create your own custom metadata schema. Kaltura provides extensive asset
management and metadata capabilities. Each media entry has a list of predefined metadata fields
including: Name, Description, Tags, Categories, Thumbnails, Duration, Views, etc. See
KalturaMediaInfo in the API Documentation, for a full list of predefined fields.
Types of Metadata
Kaltura supports three types of metadata for its media assets.
1. Technical metadata (read only) – includes the technical attributes of the media file. For
example, the file type, duration, file format.
2. Basic metadata – includes Name, Description, Tags, and Categories’ fields. In addition,
Kaltura allows referencing the media entry using an external identifier which can be stored in
the Reference ID field.
3. Custom metadata – includes custom fields, defined under one or more schemas, which allow
enhancing any media object into a custom business object.
Commercial users, please contact your account manager to enable this feature in your account.
Technical metadata, also known as system metadata, is generated automatically during ingestion and
encoding of the file. All technical metadata information can be accessed through the Kaltura APIs. For
more information see Kaltura API Documentation Metadata Service.
Basic metadata is the information you input to the KMC through the Metadata tab. The Reference ID
field allows storing an external identifier for supporting integrations with systems external to Kaltura or
can be is used to match a filename to an entry using the Drop Folder feature. See Automated
Content Ingestion via a Drop Folder. Tags are comma separated and can be used as filters for
searching through your content. Categories allow assigning media objects to taxonomies.
Custom metadata, also referred to as Custom Data is stored in a schema, also known as a metadata
profile. You can create multiple schemas and assign them to any Kaltura object. The KMC supports
schemas for entries only. To extend the metadata of an entry, you need to create a custom schema.
See Adding a Schema.
Custom data is stored as an XSD schema that you can use to create, edit, and manipulate data. You
can also use the XSD schema to generate you own metadata interface. Custom data XSDs are
account specific.
The form that is displayed in the Custom Data entries drill down is automatically generated from the
Kaltura Management Console (KMC) User Manual
58
Managing Metadata and Categories
XSD schema. You can use that same schema in your media applications to dynamically generate
your own metadata forms. Schema fields are also used by various Kaltura advertising plugins and
distribution connectors.
Metadata Actions
You can manage assets and metadata through the:
•
KMC UI - You can edit basic and custom metadata for a single asset, or apply a change of a
few basic metadata fields to multiple selected assets.
•
KMC Bulk upload (CSV/XML) – You can add assets in batch, combining both media files and
associated metadata. (See Bulk Upload and FTP Upload).
•
Kaltura APIs – All metadata-related functionality available through the KMC can also be
performed using the Kaltura APIs. The APIs also expose additional functionality not available
through the KMC. For more information see here.
Creating and Managing Content Categories
Media entries may be divided into categories. The different categories are built in a tree-like hierarchy
where each category can include multiple sub-categories. All tags are searchable.
You can add or remove categories by clicking on the "Edit" link on the top left corner of the Filter bar,
and then clicking on the "+/-" icons that appear when you hover with your mouse over a specific
category. You can also drag-and-drop categories from one location of the 'tree' to another. In order to
assign a media entry to a specific category, just drag-and-drop in the entry from the entries table on
the right to the desired category on the left.
Categories, Playlists and Channel Building
Categories provide a logical structure for your site and assist with content management. You can use
categories, along with metadata and filters, to create manually or dynamically generated playlists
(also known as Channels). Playlists can be based on a topic (for instance tropical fish), most viewed
videos, highest rated videos and more. See Creating Playlists.
Uploading Content and Setting Metadata
Workflow:
1. Upload a media file then set its metadata.
2. Ingest a media file bundled with metadata (CSV, XML, API)
3. Prepare a metadata-only "draft" entry for future ingestion of media files.
Upload a Media File and Set Its Metadata
To upload a media file and set its metadata
1.
2.
3.
4.
5.
Go to the Upload tab.
Upload a media file. See The Upload Tab.
Go to the Content tab and select the Manage menu.
Select a Video/Audio entry.
In the Metadata tab, add or edit the metadata information.
Kaltura Management Console (KMC) User Manual
59
Managing Metadata and Categories
a. Enter a Name and Description.
b. Enter Tags and Categories.
c. Enter a Reference ID (Optional).
6. Click Save & Close.
The Entry ID assigned to a metadata entry can be used to assign metadata to multiple files. See
Editing and Creating Transcoding Profiles.
Ingest a Media File Bundled with Metadata (CSV, XML, API)
To enable more advanced content ingestion options, the provided CSV/XML samples can be
extended to include multiple/custom metadata items, account specific settings, update action and
advanced content ingestion options (for example, ingestion of multiple transcoding flavors, multiple
thumbnails etc.) Each item element within the XML, and each line in the CSV, represent a single entry
created in the publisher account. Each entry will be populated with the metadata listed in its item
element and the content referenced from it. When submitted, the bulk upload XML/CSV is validated
on the Kaltura server. The validation includes an inspection of the XML structure, and verification of
elements' structure and order compliance with Kaltura's bulk upload XSD (XML schema). For more
information see Bulk Upload and FTP Upload.
To ingest a media file bundled with Metadata
1.
2.
3.
4.
Select the Upload tab.
Click Download CSV/XML Samples.
Enter the metadata in the relevant fields.
For more information on the XML Custom data upload see the following
http://www.kaltura.com/api_v3/xsdDoc/?type=bulkUploadXml.bulkUploadXML#elementcustomDataItems
http://www.kaltura.com/api_v3/xsdDoc/?type=bulkUploadXml.bulkUploadXML#elementcustomData
Kaltura Management Console (KMC) User Manual
60
Managing Metadata and Categories
Prepare a Metadata-only "Draft" Entry for Future Ingestion of
Media Files
To create a draft entry
1. Go to the Upload tab.
2. Prepare a Video Entry or Prepare an Audio Entry.
To add the content (media source file) into the metadata entry
1. Go to the Content tab and select the Manage menu.
2. Select a Draft (No Media) entry.
The Edit Entry- Draft Entry form is displayed.
3. Select the Flavors tab.
4. Add the media source file. Select from one of the following options:
•
Upload Files – upload from your desktop
•
Import Files – import from the web.
o
Enter the File URL and select the Transcoding Flavor.
o
Click Import.
Metadata and Related Files
Related Files are relevant to metadata in relation to transcript and captions/subtitles. Captions and
Subtitles files are considered as metadata files that are time based and related you an entry. For more
information, see time-based metadata for example, cue points.
Kaltura Custom Metadata Functionality
You can create a unique metadata schema. The entire schema management is done via the KMC UI.
You can add fields of the following types:
•
Text field – values are free text
•
Text select list – this is similar to the text field, also known as List of Values, This option
allows the publisher to define a predefined list of fields to be used. After you enter the values,
you are presented with a select box element to select a value from the existing list (for
example countries, months)
•
Date - a date field
•
Entry ID list - a list to a different entry (asset) that can be used to create compound
structure. Examples of this would be, Related Videos, linking trailer to full-length film etc.
The following is an example of a Custom Metadata Schema.
Kaltura Management Console (KMC) User Manual
61
Managing Metadata and Categories
As a best practice we recommend richly mapping your media assets with metadata. This will make
your assets more findable and better used as business objects
You can fill in the values for the defined schema for each media asset (entry). The UI elements are
built per the field type supporting text fields, checkboxes for multiple selections (from predefined
values list), date selector (for date fields), text list (for multiple value fields), and linked entries (for
creating structure).
The schemas you customize may be used for viewing and editing, as well as for filtering, search, and
syndication rules. Custom data may be used as a condition for distributing content. For example if you
are trying to distribute data and a custom data field has been defined and expected by the distribution
channel, if the custom data is not received, the content will not be distributed.
Searching (and creating syndication rules) by a custom field is integrated into the KMC UI and
workflows. See Filtering by Distribution.
Managing Schemas
A schema is a model for describing the structure of information. Each data schema holds a list of
customized fields. An XSD (XML Schema Definition) provides a way to describe and validate data in
an XML environment.
Adding a Schema
To add a schema
1. Select the Settings tab and then select the Custom Data menu.
2. Click Add New Schema.
The New Metadata Schema window appears.
3. Enter a Name and Description.
4. Add custom data fields.
Kaltura Management Console (KMC) User Manual
62
Managing Metadata and Categories
To add custom data fields
1. Select the Settings tab and then select the Custom Data menu.
2. Add a schema. See Adding a Schema.
3. Click Add Field.
The New Field window appears.
4.
5.
6.
7.
8.
Select the Field type. See Kaltura Custom Metadata Functionality.
Enter values for the field or list.
(Optional) Add a Description, or Full Description.
Click Save. The Custom Fields List is displayed.
Use the up and down arrows to change the order of the fields.
Kaltura Management Console (KMC) User Manual
63
Managing Metadata and Categories
The following is an example of entering data as a Text Select list for the field Publish Values.
The following screen displays a schema with an entry ID chosen.
Setting Values for Custom Metadata Fields (Per Entry)
To add values to the custom metadata fields
1. Select the Content tab and click on an entry in the Entries table.
2. Select the Custom Data tab.
3. Add or modify the Custom Data values and click Save & Close.
Kaltura Management Console (KMC) User Manual
64
Managing Metadata and Categories
The following screen demonstrates the values insertion page within a specific schema.
To add or remove related entries
1.
2.
3.
4.
Create a schema and add the Related Entries field. See Adding Custom Metadata Fields.
Select an Entry and then select the Custom Data tab.
Scroll to the Related Entries field and Click +Add/remove Linked Entries.
Move the Related Entries from the Entries table to the Select Entries list and click Save.
Example of Related Entries
The following screen contains the Add/remove Linked Entries link and demonstrates the values
Kaltura Management Console (KMC) User Manual
65
Managing Metadata and Categories
insertion page containing the Related Entries after they were selected.
Performing a Search Based on Metadata Fields
You can use custom fields to search for content and create playlists. To search textual fields, use the
search box, for canned lists use the Metadata Filters. See Searching Playlists.
Footnote
Label
Specification
1
Search text
Search text to apply to all textual custom data, for
example teaser title, authors
2
Search filter for Publishing
Status
For publishing status
3
Search filter for Distribution
settings
For content based on distribution channel’s settings
Kaltura Management Console (KMC) User Manual
66
Locating Content in the KMC
CHAPTER 6
Locating Content in the KMC
This section contains the following topics:
•
Filtering in the Entries Table
•
Searching Playlists
You can use categories, tags, or any of your custom metadata fields to locate any file in the KMC.
Filtering Content in the Entries Table
The list of entries can be filtered according to the parameters that are specified in the filter bars on the
left side of the page. You can filter content using the search criteria, for a specific category, or use
additional filters. If the Entries Table is filtered, a Filtered notification is indicated on the display.
The Filters bar is located to the left of the Entries Table. Use the Filters bar to filter your entry list
according to various parameters and search criteria.
NOTE: You can sort the Entries Table by clicking on the various columns or using the
scroll bar. You can also select how many items to display per page (10 to 500).
Searching Through Entries
The search box enables you to search for specific entries existing in your account.
To search for any word in the entry name, tags or both.
1. Go to the Content tab and select the Manage menu.
2. Enter your search criteria and click the magnifying icon on the right, or press Enter.
You can enter textual fields or, for canned lists use the Metadata Filters.
You can search for content and then create playlists containing the filtered content.
To create playlists based on filtered content
1. Search for content based on a filter.
2. Click Add Playlist to create a playlist. See Creating and Customizing Playlists and Players
To clear the search box
•
Click the X icon on the right.
Kaltura Management Console (KMC) User Manual
67
Locating Content in the KMC
Defining and Assigning Entry Categories
Media entries can be divided into categories. The different categories are built in a tree-like hierarchy
where each category can include multiple sub-categories. You can add or remove categories by
clicking on the "Edit" link on the top left corner of the Filter bar, and then clicking on the "+/-" icons that
appear when you hover with your mouse over a specific category. You can also drag-and-drop
categories from one location of the 'tree' to another.
To assign a media entry to a specific category
1. Go to the Content tab and select the Manage menu.
2. Drag-and-drop in the entry from the Entries Table on the right to the desired category on the
left.
or
Click on the Entry.
3. Enter the Category in the Metadata tab.
4. Click Save and Close
To remove an entry from a category
1. Go to the Content tab and select the Manage menu.
2. Remove the category settings in the Metadata tab.
3. Click Save.
NOTE: When you click Delete in the Entries table. The entry will be deleted
from the account and not only from the category that is currently selected. See
Delete Entry.
Using Additional Filters
To use additional filters
•
Click "Additional Filters" to open more filter options, including:
o
Between any two specific dates
o
By media type (Audio, Video, Image , Video Mix, Live Stream)
o
By Ingestion Status (Ready, No Media, Pending, Uploading, Transcoding, Error)
o
By duration — Short clips (up to 4 minutes), Medium clips (4 to 20 minutes), Long clips
(more than 20 minutes)
o
By Original or Clipped entries – original media, entries created by clipping
o
By Scheduling status (Past, Live now, Scheduled to go live at a later date, Scheduled
between specified dates)
o
By moderation status
o
By Media Replacement Status
o
By Access Control Profile (see Access Control for more details)
o
By video quality (Transcoding Flavor)
You can filter content using a single or multiple criteria.
Kaltura Management Console (KMC) User Manual
68
Locating Content in the KMC
Filtering by Distribution
To display only distributed content in the entries table
•
Select the "Distribution" filter and click one or more distributors to display.
See Distribution and Syndication.
To clear the filter
•
Click the distributor names again.
Deleting an Entry
To delete one or more entries
1. Select the entry you would like to delete (or multiple entries using the CTRL key) and press
the "Delete" button on the bottom of the page.
2. A prompt box will ask you to approve your selection and once you click "Yes" the selected
entries will be deleted.
Note that you can delete more than one entry at a time, but only entries appearing on the
same page of the main list.
Adding Tags
To add descriptive tags to your entry
1. Select one or more entries and clicking the "Add Tags" button on the Manage Tags dropdown menu at the bottom of the page.
2. In the "Add Tags" window that opens, type the tags you want to add, separating the different
tags by commas.
You can add tags to more than one entry at a time, but only on entries appearing on the same
page of the entries list.
3. Click "Save" on the "Add Tags" window to add the tags to all selected entries.
Removing Tags
To remove descriptive tags from your entry
1. Select one or more entries and click the "Remove Tags" button on the Manage Tags dropdown menu at the bottom of the page.
2. In the "Remove Tags" window that opens, select all the tags you want to remove, using the
CTRL key for multiple selection.
Note that you can remove tags from more than one entry at a time, but only on entries
appearing on the same page of the entries list.
3. Click "Remove" on the "Remove Tags" window to remove the tags from all selected entries.
Searching Playlists
Use the Filters pane to search for playlists in your account. You can search for any word in the playlist
name, tags or both. You can also filter by date by select a date range or by clicking the calendar icons
on the Created between fields.
Kaltura Management Console (KMC) User Manual
69
Managing Access Control Profiles
CHAPTER 7
Managing Access Control Profiles
This section contains the following topics:
•
Access Control Profiles
•
Creating an Access Profile
•
Assigning an Access Control Profile to an Entry
•
Content Scheduling
Access Control Profiles
Kaltura supports several publication restrictions allowing limited access to content when business
requirements dictate it. These restrictions can be placed on the entry level but can also be
streamlined to be set automatically or on demand, on a group of items based on a set of criteria,
during upload via a bulk upload CSV file, or during an update transaction using Kaltura’s APIs. See
Kaltura API documentation.
An Access Control Profile defines authorized and restricted domains where your content can or
cannot be displayed, countries from which it can or cannot be viewed, white and black lists of IP
addresses and authorized and unauthorized domains in which your media can be embedded. Use the
Access Control menu to view existing profiles and create new ones.
Controlled access provides authentication and authorization capabilities. Developer authentication is
done using a combination of the Partner ID and one of two “secrets”, each providing a different set of
authorization capabilities. In return, a Kaltura Session token (“KS”) is generated, through which API
calls can be made.
Content Entitlement
You can segregate your content based on your various user groups and audiences. You can create
content channels to be accessed only by certain users, and allow other content items to be available
to all. Access profiles also allow you to manage groups and users on your own identity.
To view Access Control settings
•
Select the Settings tab and then select the Access Control tab.
The Access Control Profiles window is displayed. A default access control profile that permits access
to all is configured automatically.
Creating an Access Profile
Kaltura Management Console (KMC) User Manual
70
Managing Access Control Profiles
To create an access control profile
1. Select the Settings tab and then select the Access Control tab.
The Access Control Profiles window is displayed.
2. Click Add Profile.
The New Access Control Profile window is displayed.
3.
4.
5.
6.
7.
8.
Enter an informative Name and Description for the profile.
Configure the Authorized Domains. See Restricting Domains.
Configure the Authorized Countries. See Restricting Countries for Viewing.
Configure the Authorized IP Addresses. See Restricting Views by IP Address.
Configure the Advanced Security. See Restricting Views with a Server Side Secret
Click Create New.
Restricting Domains
Kaltura’s Access Control mechanism provides the means to restrict content playback from specific
domains. This is useful to prevent scraping of content from your website or re-sharing of content on
other sites that are not yours.
Domain restrictions allow you to define a “white list” of domains that allow only playback attempts of
content placed on these domains to be granted. Any playback attempt via the Kaltura Dynamic Player
placed on a domain not on this list will be denied. In the same manner a “black list” can be defined
performing the opposite constraint. Any playback attempt from these domains will be denied. You can
create a combination of both “white listed” and “black listed” domains.
To restrict content to specific domains.
In the Authorized Domains section, select one of the following options:
Kaltura Management Console (KMC) User Manual
71
Managing Access Control Profiles
•
Toggle All Domains – content will display in all domains.
•
Toggle Only in the following domains - enter a site or list of approved sites to display content.
See Add or Remove a Domain.
•
Toggle Block from the following domains - enter a domain or list of approved of domains to
exclude. See Add or Remove a Domain.
Adding or Removing a Domain
To add a domain
1. Click + Add another domain.
2. Enter the domain name in the format of company.com
To remove a domain
1. Select a domain from the listed domains.
2. Click the Remove selected domains.
3. Click Yes.
Restricting Countries for Viewing
Geographic restrictions, similar to domain restrictions, allow you to define a “white list” or a “black list”
of specific geographical locations, limiting or enabling playback attempts of content for users located
in these locations. For example, a Kaltura Player entry assigned with geo-restrictions where the white
list contains only Spain can be placed on any domain but will only be playable by viewers located in
Spain.
To restrict content to specific countries
In the Authorized Countries section, select one of the following options
•
Toggle Anywhere– content will be displayed in all countries.
•
Toggle Only from the following countries- select a country or list of approved countries that
Kaltura Management Console (KMC) User Manual
72
Managing Access Control Profiles
will display content. See Add or Remove Geographic Regions (Countries) .
•
Toggle Block from the following Countries - enter a country or list of approved of countries to
exclude. See Add or Remove Geographic Regions (Countries).
Adding or Removing Geographic Regions (Countries)
To add a geographic region
1. Click + Add Remove Countries.
2. Use the scroll (Ctrl button for multiple selections) and select the countries from the Countries
List.
3. Use the arrow buttons to transfer the selected countries to the Allowed Countries.
4. Click Save.
To remove a geographic region
1. Click+ Add Remove Countries.
2. Use the scroll (Ctrl button for multiple selections) and select the countries from the Restricted
Countries.
Kaltura Management Console (KMC) User Manual
73
Managing Access Control Profiles
3. Use the arrow buttons to transfer the selected countries to the Allowed Countries.
4. Click Save.
Restricting Views by IP Address
You can restrict content view by IP addresses or ranges and determine which IP ranges will be
allowed to view the content.
To restrict Views by IP Address
•
In the Authorized IPs section, select one of the following options
o
Toggle All IPs – content will be displayed for all IP addresses.
o
Toggle Only from the following IPs- select a range of approved IPs that will display
content. See Add or Remove IP Addresses.
o
Toggle Block from the following IPs- enter a range of approved IPs that should be
excluded from content viewing. See Add or Remove IP Addresses.
Adding or Removing IP Addresses
To add or block IP addresses
1. Click + Add Another IP.
2. Use the notation indicated to enter IP addresses.
3. Click Save.
To remove IP addresses
1. Highlight the IPs you want to remove from the restricted list.
2. Click +Remove Selected IPs.
A warning message is displayed.
3. Click Yes.
Restricting Views with a Kaltura Session
Often, the user authentication/entitlement mechanism that decides whether a user is entitled to
access a specific media entry or not, will reside outside of Kaltura. When the authentication
Kaltura Management Console (KMC) User Manual
74
Managing Access Control Profiles
mechanism resides outside Kaltura, we recommend that you use an Advanced Kaltura Session (KS)
based Access Control mechanism, that permits access to the media only when a valid Kaltura
Session is provided. .The external entitlement mechanism will then generate the valid Kaltura Session
when users should be permitted to view the content.
The session is created using a secret. The external entitlement mechanism will then generate the
valid KS when users should be permitted to view the content. Common examples include When implementing paid content where the payment gateway is not Kaltura, the server processing
the payment will be the mechanism deciding on entitlement. After the payment is processed, the
payment server creates a valid Kaltura Session by calling the Kaltura API and passes that KS to the
Kaltura player.
When implementing a single-sign-on and permissions mechanism using LDAP or other authentication
mechanism outside of Kaltura, the server responsible for user authentication contains the entitlement
logic. The authentication server will call the Kaltura API and generate a valid KS when appropriate.
A Kaltura Player marked with tokenized access requires a “session token” to be created and provided
during every playback. A session token can only be created by a developer possessing valid
credentials and expires after a limited amount of time. Thus, even if an attempt to grab the item’s
direct URL is successful, the playback session will soon expire and without possession of the valid
credentials, regeneration of a new token will not be possible.
This option is useful to prevent scraping of content from your website or re-sharing of content on other
sites that are not yours and provides an additional amount of security to content display.
Pay-Per-View
You can enable paid programming with a video preview, and easy, on-the-fly payment options for full
video access.
To create a Kaltura Session restriction to view content
•
Check Secure viewing of this video with Kaltura Session (KS).
To enable a free preview
1. Check Free Preview.
2. Enter the amount of time in seconds for the free preview display.
Assigning an Access Control Profile to an Entry
You can assign an Access Control Profile to an entry.
To assign an access control profile to an entry
1.
2.
3.
4.
Go to Content tab and select the Manage menu.
Click on the entry to which you want to assign an Access Control Profile.
Go to the Access Control tab and select an existing profile from the drop-down menu.
Click Save Changes to complete the process.
Kaltura Management Console (KMC) User Manual
75
Managing Access Control Profiles
Assigning an Access Profile to a Bulk Upload
A default access profile is included with the KMC. After you create an Access Profile, an ID is created
and listed in the Access Control page.
To assign an access profile to a bulk upload
•
Set the ID from the Access Control List to the accessControlProfileId in your CSV
•
Set the profile ID from the Access Control List to the accessControlId in your XML file.
Content Scheduling
Content Scheduling determines when your media entries will be permitted for viewing (“sunrise”) and
when access should be automatically discontinued (“sunset”). You can set specific scheduling
parameters for your content. You can set the entry to be available for display at any time (for example,
no schedule limitations) or you can set the entry to be available during a limited timeframe (for
example, display this video starting on X date with no end time, or display this video only between X
date and Y date). Note that when users try to access a video that is no longer valid (in terms of its
scheduling), they will receive an error message explaining that this content is no longer valid.
To configure content scheduling
1. Go to Content tab and select the Manage menu.
2. Click on an entry.
3. Select the Scheduling menu and select and set your specific time range.
Click Save Changes to complete the process.
Kaltura Management Console (KMC) User Manual
76
Managing Access Control Profiles
Kaltura Management Console (KMC) User Manual
77
KMC Users and Roles
CHAPTER 8
KMC Users and Roles
This section contains the following topic:
•
Roles and Permissions
•
Content Moderation Workflows
•
The Moderate Tab
Roles and Permissions
Roles and permissions enable organizations to define a user's ability to perform actions based on the
user's responsibilities. Only users with admin permissions can add users, create roles and define
permissions.
A publisher uses the roles and permissions infrastructure to specify actions that a user is allowed to
perform. User roles define permissions granted to the user for the different KMC functionalities.
Adding a User
The following table lists the information that should be provided for adding a new KMC admin user.
Please note that a limited number of users are allocated by default to each KMC account. If you
reached the KMC users quota for your account and need to set additional users, please contact
Kaltura with a request for additional KMC admin users.
Field
Description
Email address
The user’s email address serves as a unique identifier of the user in
the Kaltura system, as the user login username and as a recipient
address for system-generated messages. Upon the creation of a new
user account, a welcome email notification will be sent to this email
address with a link for setting the initial password.
First name, Last name
User’s name
Publisher ID (Optional)
A unique identifier that may be in use by the publisher in different
systems. This will serve as the KMC user identifier as content
contributor in all KMC-related locations. When a publisher ID is not
provided, the user email address will be used as a default value.
User Role
Defines the set of permissions granted to the user for the different
KMC functionalities. This role should be set according to the tasks that
the user needs to work on and the functionalities that the user needs
access to within the KMC. The different KMC user roles are set (by
users who are granted with permission to do so) from the KMC Roles
page (under the Administration tab).
Kaltura Management Console (KMC) User Manual
78
KMC Users and Roles
To add a user
1. Go to the Administration tab and select Users from the menu.
2. Click Add User, and fill in the details in the Add User window.
3. Select a User Role from the drop-down menu.
4. Select a User Role from the drop down menu.
5. (Optional) Click Add Role to create a custom role. See Creating Custom Roles.
6. Click Save.
Once a new user is created, an email will be sent to the specified email address containing a link to
set the account password.
Editing a User
After a user account is set in the system, the user’s personal details can only be set by the user
personally, from the My User Settings page in the Settings tab. See My User Settings.
To edit user information
1. Go to the Administration tab and select Users from the menu.
2. Click on a User and then select Edit from the drop down menu.
Only the Publisher User ID and the User Role may be edited in Edit User window. Please note that it
is not possible to edit the user role that is defined as the Account Owner. In addition, a KMC user with
access to user management functionalities cannot edit the user role selection in their account.
Deleting and Blocking Users
You can prevent users from logging into the KMC temporarily or permanently. Blocking a user will
prevent the user from logging into the KMC. This restriction can be removed by applying the unblock
action.
Deleting a user is a permanent action. The deleted user's content contribution records will be kept in
the system.
To block or unblock a user
1. Select the Administration tab and then select the Users menu.
Kaltura Management Console (KMC) User Manual
79
KMC Users and Roles
2. Click on a User Name.
3. Select Block/Unblock from the Select Action drop-down menu to block a user temporarily.
4. Select Delete from the Select Action drop-down menu to remove a user permanently.
Purchasing a License for Additional Users
Each KMC account is allocated three users.
To request additional users
1. Select the Administration tab and then select the Users menu
The Current Status lists the number of KMC users and the number of available users.
2. Click on the Click here to upgrade your account link.
Creating Custom Roles
When you add a KMC admin user role to a specific publisher account, you should add the relevant set
of permissions in the Add Role window. You can select which KMC functionalities are available to
users with the defined role. Clicking the checkmark next to each permission group name will toggle
the permission level for the specific KMC functionality to the following modes:
•
Full Permission (checked) – Grants access to all KMC functionalities listed under the
permission group.
•
View-Only Permission (partially checked) –Only part of the functionality listed in the group is
selected.
•
No Permission (unchecked) – No access to the KMC pages that are relevant to the KMC
functionalities listed under the permission group.
To create custom roles
1. Go to the Administration tab and select the Roles menu.
2. Click Add Role to create a custom role.
Kaltura Management Console (KMC) User Manual
80
KMC Users and Roles
3. Enter the Role Name and provide a description.
After naming the role and providing a description you will be able to select the specific
permissions required.
4. Most of the permissions are organized under KMC high-level functionalities. For granular
permissions within each category click Expand All. Or click Advanced to open a more detailed
list of the specific KMC functionalities related to the group.
5. Click Save.
You can edit, duplicate or delete any existing role via the using the Select action drop-down menu.
Role Management
After you create roles you can:
•
Edit a role
•
Duplicate a role.
•
Delete a role.
To modify roles
1. Go to the Administration tab and select the Roles menu.
2. Click on a role.
3. Select an option from the Actions menu.
•
Edit a role
Editing a user role affects the access level of the KMC user associated with this role only after
the user logs in to the KMC. We recommend that you edit an “in-use” role when users
associated with this role are not logged into the KMC.
•
Duplicate a role
Duplicating a role is a quick way to create a new KMC user role with a similar, but not
identical, set of permissions as an existing user role. The duplicated role is populated with the
permission set of the duplication source role, so minor changes to this permission set can be
easily made. After you duplicate a role, use the Edit option to modify the permissions.
•
Delete Role
Deleting a role is a permanent action. It is not possible to delete a user role record as long as
Kaltura Management Console (KMC) User Manual
81
KMC Users and Roles
KMC admin users are associated with the role. In such cases, make sure to update the
relevant KMC user accounts with another user role before attempting to delete their existing
role.
Kaltura Management Console (KMC) User Manual
82
Moderation and Editorial Workflows
CHAPTER 9
Moderation and Editorial Workflows
This section contains the following topics:
•
Content Moderation Workflows
•
The Moderate Tab
Content Moderation Workflows
You can review content before it is published to eliminate spam and abusive content in User
Generated Content (UGC) portals. You can also implement complex editorial workflows for your
various editorial team roles.
The Moderate Tab
The Moderate tab located in the Content tab in the KMC, allows publishers to see the moderation
queue, where all entries marked as pending, are waiting to be approved or rejected. Content
moderators can change the moderation status (approve/reject).
This window displays a list of all content that has been flagged as inappropriate by users. By default,
the list is filtered and sorted according to the amount of flags that each entry has received. You can
sort the list by clicking on the various columns and scroll through the pages at the bottom of the list.
To display content for moderation
1. Select the Content tab and then select the Moderate tab.
2. Click on the name of an entry.
The Edit Entry window is displayed. Similar to the Manage tab, the Filters bar to the left of the
entries table is displayed.
3. Filter your moderation entry list according to various parameters and search criteria. See
Filtering Content in the Entries Table.
By default, the list is already filtered by content that was flagged for review. To change this,
click on the "Additional Filters" button (see Use Additional Filters).
Previewing Content using the Moderate Tab
To preview content
1. Select the Content tab and then select the Moderate tab.
2. Click on the name of an entry.
The entry is displayed in the small player to the right of the list.
3. Click on the bottom right of the preview pane, "View full details" link for quickly reviewing or
editing the content of an entry.
Kaltura Management Console (KMC) User Manual
83
Moderation and Editorial Workflows
Rejecting Content using the Moderate Tab
To reject content (one or more entries)
1. Select the Content tab and then select the Moderate tab.
2. Select the relevant entries (for multiple choices, use either the CTRL key or the selection
drop-down menu at the bottom of the page) and press the "Reject Selected" button.
You can reject more than one entry at a time, but only for entries appearing on the same page
of the main list.
Approving Content using the Moderate Tab
To approve content (one or more entries)
1. Select the Content tab and then select the Moderate tab.
2. Select the relevant entries (for multiple choices, use the CTRL key or use the selection dropdown menu at the bottom of the page) and press the "Approve Selected" button.
You can approve more than one entry at a time, but only for entries appearing on the same
page of the main list.
Banning Users using the Moderate Tab
To ban users
1. Select the Content tab and then select the Moderate tab.
2. Click on the "Ban User" link under the preview player. This triggers a notification to be sent to
your website's CMS with a request to ban the specific user that created the selected entry.
Kaltura Management Console (KMC) User Manual
84
Using Subtitles and Captions
CHAPTER 10
Using Subtitles and Captions
This section contains the following topics:
•
Caption File Types
•
Subtitles and Captions Terminology
•
Adding Captions to an Entry
•
Setting Up Captions for Display
Caption File Types
You can upload multiple subtitle and caption files (SRT, DXFP, and XML) and transcripts (TXT), or
reference an external link to a captions file in the KMC. Viewers can then select and toggle between
different language subtitles and captions. Subtitles and captions are fully searchable as a metadata
field. Kaltura’s accessibility player plugin also makes the captions readable via screen readers and
therefore helps organizations adhere to 508 compliancy regulations. Kaltura’s “In Video Search” API
allows users to for a specific phrase within a library of videos and within the search results directs the
user to the exact point in the video where the phrase appears. For more information see Kaltura
Demo Apps for Captions.
You can also automate the creation of subtitles and captions, and transcriptions through our partners
in Kaltura Exchange. For instance check out 3Play Media Interactive Transcript / Captioning Plugin.
Searching within Captions
Publishers can use the Kaltura API and code skeleton to search within the captions and point the
viewer directly to the relevant point in time. The search is done across a catalogue of videos, making
the discovery process easy and accessible, especially when searching in a large amount of content.
Contact your account manager to learn more on how to integrate this functionality into your website
and environment.
Subtitles and Captions Terminology
A caption file contains both the text and information about when each line of text should be
displayed.
A caption is synonymous with subtitle and is usually displayed at the bottom of the screen.
SRT and DXFP are text file formats that contain captions; including the time each subtitle should be
displayed followed by the text of the subtitle.
If the caption includes non-dialog text, the file is considered a closed caption.
Transcriptions are files that contain text of the video without time stamps.
Captions can either be a form of written translation of a dialog in a foreign language or a written
rendering of the dialog in the same language. Closed captions files contain added information to help
viewers who are deaf and hard-of-hearing to follow the dialog, or people who cannot understand the
Kaltura Management Console (KMC) User Manual
85
Using Subtitles and Captions
spoken dialogue or who have accent recognition problems.
For greater accessibility and compatibility with equipment like screen readers, use Kaltura’s 508
Compliant Player. For more information, see 508-Compliant Video Player .
Adding Captions to an Entry
You can add multiple captions files to each entry. For example, you can create subtitles captions in
multiple languages and label each language.
To assign a caption file to an entry
1.
2.
3.
4.
5.
Select the Contents tab and click on an entry.
Select the Captions tab.
Click Add Another Caption.
Select the Type. Choose SRT or DXFP.
Paste an external URL in the File Location or click Upload File and upload an SRT or DFXP
file from your computer.
6. Assign a Language to the caption from the drop down menu.
7. Enter a Label that will appear in the player’s captions drop-down menu. For example:
Japanese.
8. In the Actions column click Set as Default.(optional – use for multiple languages)
9. Select Add Another Caption to add additional captions files and repeat steps 4 to 7.
10. Click Save.
Kaltura Management Console (KMC) User Manual
86
Using Subtitles and Captions
Editing a Captions File
After you upload a captions file you can edit the file, remove it, or set it as the default captions file.
To edit a captions file
1.
2.
3.
4.
5.
Select the Contents tab and click on an entry.
Select the Captions tab.
In the Actions column, click Download File.
Edit the file and then upload the file once again as described in Adding Captions to an Entry .
Select Remove to delete the captions file.
Setting Up Captions for Display
You will need to enable captions in your player or select a player with captions already enabled.
To display captions during playback
1.
2.
3.
4.
Go to the Studio menu, and select Player or Create New Player.
Select a player and select Edit from the drop down menu.
In the Edit Player window, select the Features tab.
Scroll down and select Subtitles and Transcriptions.
5. Check one of the following:
•
Subply Component – Uses the PlyMedia solution. For more information, see 3Play Media
Interactive Transcript / Captioning Plugin.
•
Captions on video - The subtitles/captions will be displayed as an overlay at the bottom of
the video area. You can control the area where the captions will appear on the player.
•
Captions for accessibility – Creates a dedicated area under the video area to display
captions. Check this option if you intend to use the 508 Player.
6. Click Options to modify the text style and background. See Captions Options.
Kaltura Management Console (KMC) User Manual
87
Using Subtitles and Captions
7. Click Apply.
Viewing an Entry with Captions in a Player
To view the captions in a player
1. Select the entry that you added the captions file to.
2. Click Preview and Embed.
3. In the Player window select the player to use to display this entry.
There are different instructions for displaying captions in the 508 player. See 508 Captions
Configuration. The following is an example of an entry with 2 subtitle files where the default language
is English.
Captions Options
The following lists the options you can use to customize your caption file display.
Kaltura Management Console (KMC) User Manual
88
Live Streaming
CHAPTER 11
Live Streaming
This section contains the following topics:
•
Live Streaming Using the KMC
•
Workflow for Setting up Live Streaming
Live Streaming Using the KMC
Kaltura’s Live Streaming solution is the easiest and most cost effective way to incorporate live
streaming video into your website or application. Backed by world-class data centers, and fault
tolerant software architecture, Kaltura is able to provide the reliability and capacity necessary to
handle encoders that are supported by Akamai.
You can broadcast live streams through a Content Delivery Network (CDN) such as Akamai, through
the KMC. The encoding software installed (such as FMLE) encodes your real-time camera signal and
sends it out through a secure RTMP connection to the CDN. Then, using a Kaltura Player, you can
embed the live broadcast in your websites. You can set the live stream entry metadata and specify
broadcasting settings in the KMC in the same way VOD content is managed.
By using a CDN for live streaming, you guarantee a better experience for your viewers world-wide.
NOTE: In the Kaltura SaaS Edition, Live Streaming is an additional service. To add Live
Streaming to your account, contact your Account Manager.
In Kaltura Community Edition, Live Streaming requires a Flash Streaming Server software
installed such as Adobe FMS, Red5 and Wowza or alternatively, an Akamai CDN account.
To enable live streaming for your account
•
Contact us or call +1-800-871-5224
Once your account is enabled you can set up Kaltura’s Live Streaming service.
Workflow for Setting up Live Streaming
This section describes how to set up the KMC, the encoder, and a device for the live streaming
service.
1.
2.
3.
4.
5.
Set up the Hardware and Software.
Create a Live Streaming Entry in the KMC.
Configure the Live Streaming Parameters in the KMC
Set up the Broadcasting Computer
View the Broadcasting Setup (optional)
Kaltura Management Console (KMC) User Manual
89
Live Streaming
Setting up the Hardware and Software
To set up the hardware and software for live streaming
1. Download the Flash Media Live Encoder (FMLE) from here.
2. Install the FMLE on your local Windows machine.
NOTE: Be certain that your system has the minimum requirements. See
http://www.adobe.com/products/flashmediaserver/flashmediaencoder/systemreqs/ for details.
3. Connect your camera to the installed computer.
Creating a Live Streaming Entry in the KMC
To create a live streaming entry in the KMC
1. Login into the KMC and go to the Upload tab.
2. Select Live Stream Entry.
The Add New Stream window appears.
Kaltura Management Console (KMC) User Manual
90
Live Streaming
3. Fill in the values and click Save.
The following table describes the input fields.
Field
Description
Name
The name of the stream that will appear in the KMC entries list.
Description
A description of the stream (optional).
Primary encoder IP
The public address that will be used for streaming (the computer
where the client encoder such as Adobe FMLE is installed).
Note: your IP address can be retrieved by browsing from the
computer where the FMLE is installed to
http://www.whatismyip.com/ 0.0.0.0 cannot be used as your IP
address.
Secondary encoder IP
If you are using two encoders (for redundancy), fill in the secondary
encoder IP. If you are using a single encoder, copy the Primary
encoder IP to the Secondary encoder IP field.
Broadcasting password
This password is required in the client encoder (FMLE) software. If
you do not enter a password the system will automatically create
one for you and it will be displayed in the Live Stream tab of the
entry details window under “Broadcasting credentials”.
NOTE: When using Kaltura’s SaaS edition, Kaltura will provision your new Live Stream
with the CDN (for example, Akamai). The CDN will then populate the information about
the new Live Stream to the CDN’s servers. This may incur up to a 20 minute delay, for the
stream to become available for broadcasting. You should always provision your Live
Stream ahead of time, and be certain that you have at least 20 minutes lead time to going
live.
Kaltura's uses Akamai as the default CDN. You can also use a CDN other than Akamai, however, you
will have to provision the stream via the CDN portal, or through technical support, and then ask
Kaltura Support to create a live stream entry pointing to the provisioned stream.
Multiple Bitrate Encoding
To maintain the best possible viewing experience and video quality, it is often necessary to stream
different versions of the encoded video to different clients using different devices and over variable
connection speeds.
Multiple Bit Rate (MBR) encoding is designed to adjust to fluctuations in bandwidth while maintaining
an acceptable quality. MBR combines several bit rates into a single encoded file. When the file is
accessed, the player determines the appropriate bit rate based on the available bandwidth, and then
Kaltura Management Console (KMC) User Manual
91
Live Streaming
retrieves the encoded file at the optimal bit rate. If the available bandwidth decreases for any reason,
a stream at a lower bit rate can then be served. With a lower bit rate, there is often a decrease in
quality. See Video Delivery Settings for more information.
Configuring the Live Stream Parameters in the KMC
To configure the live stream parameters
1. Go the Content tab in the KMC.
2. Click on the Live Stream Entry in the Entries table.
3. Select the Live Stream tab.
4. Set the MBR. (Optional)
a. When broadcasting with MBR the player will choose the most appropriate bitrate to
stream. Be certain that your client encoder is aligned with the same settings.
b. Determining the right bit rates for your Live Stream is generally dependent on the
quality of your video, the size of the player your viewers will use, the bandwidth your
client encoder computer has and the bandwidth of your viewers. It is common to have
widths of 240, 360, 480, 720 and 1080 with HD content streaming. If you are
broadcasting a webcam, it is generally best to use the default KMC settings. To get
professional assistance, please contact Kaltura’s support.
Kaltura Management Console (KMC) User Manual
92
Live Streaming
Setting up the Broadcasting Computer
To set up the broadcasting computer
1. Connect your camera /recording device to the broadcasting computer.
2. Run the Adobe Flash Media Live Encoder (FMLE).
3. Select the relevant recording Device from the drop-down menu. Copy the details of the live
entry to the Flash Media Live Encoder. You can copy the details manually, or use the “Export
XML to FME” option.
a. Enter or copy the Primary URL in the FMS URL field, and the Backup URL in the
Secondary URL as configured in the KMC.
b. Enter the Stream Name as displayed in the KMC.
c. Enter the MBR settings if you have defined them. See Multiple Bitrate Encoding.
d. Use the Preset dropdown menu in the FMLE to select the MBR.
Enter the Bit Rates as configured in the KMC. If you select to Save to File, you must
append %i to the file name.
NOTE: When using the FMLE, the Stream name includes the %i. If you are using an
encoder other the FMLE, you must append ” _1” to the Stream name.
4. Click Connect.
5. Enter the Broadcasting credentials, (User Name and Password) as configured in the KMC
Live Stream tab and click OK. The system will prompt you twice for the Broadcasting
credentials.
6. Click Start.
You are now broadcasting live.
7. When your broadcast is finished, click Stop.
Viewing the Broadcasting Setup (Optional)
To view the broadcasting setup
1. Return to the KMC and select the Content tab.
Kaltura Management Console (KMC) User Manual
93
Live Streaming
2. In the KMC Entries Table, click the Preview & Embed link for the live stream entry.
3. Select the player from the drop-down menu and copy the Embed Code.
4. Paste the Embed Code within an HTML page.
5. Browse to the page where the embed code was inserted and press Play on the video player.
Advanced Live Streaming Configuration Options
There are multiple factors that can influence the video quality for live streaming. To receive good
results you should optimize the settings based on your specific needs.
The following table can be used as a starting point for optimization and setup. A rough estimate is
provided for the different factors, based on the video dimensions.
Kaltura Management Console (KMC) User Manual
94
Live Streaming
Video
Dimensions
Bitrate
Required
Camera
Requirements
FMLE HW
Requirements
Broadcaster
Uplink,
Viewer
Downlink
Requirements
(Mbps)
Throughput
example
for 1000
concurrent
viewers of
1 hour
broadcast
support frame
size &bitrate
Dual Core
2GB RAM
0.4
135 GB
(Mbps)
320x240
0.3
640x480
1.4
Quad Core
Xeon
3GB RAM
2
630 GB
1024x720
3.5
8 Core
Xeon
3GB RAM
5
1600 GB
For more information about setting up these parameters in the Flash Media Live Encoder, as well as
additional advanced configuration options, see the FMLE guide.
Kaltura Management Console (KMC) User Manual
95
Content Authoring Tools
CHAPTER 12
Content Authoring Tools
This section contains the following topics:
•
The Content Tab
•
Editing Entries
•
Entries Table
•
Clipping and Trimming Media Files
•
Choosing a Thumbnail for your Video
The Content Tab
The Content tab is used to manage your media library and provides all the tools you need, in one
intuitive interface. You can organize your content and metadata, easily search media, edit, moderate,
create playlists, and much more through the Content tab.
Editing Entries
To edit an entry
•
Click on an entry name. The Edit Entry window is displayed.
Use the Edit Entry window to manage all information relating to the entry.
Kaltura Management Console (KMC) User Manual
96
Content Authoring Tools
Edit Entry Menus
•
Metadata: Use to display the entry and edit basic metadata: Name, Description, Tags,
Categories and Reference ID. For video and audio entries, you can also trim or clip the entry.
You can see the Entry ID, type of entry (video, video mix, image or audio), moderation status
(approved, flagged for review or rejected), flags, duration, date of creation, creator, rating,
votes count and number of plays. In this tab you can also trim or create multiple clips from a
single video. Each clip gets its own embed code and metadata, while remaining associated to
the original video. Trimming and clipping tools are available both to administrators and site
users. See Clipping and Trimming Media Files. You can leverage metadata fields to tag,
manage, search and expose content. Populate out-of-the-box fields, or create your own
custom metadata schema.
•
Thumbnails: Use to upload thumbnails, grab a thumbnail from video, crop thumbnails and
select a default thumbnail. You can generate thumbnails from videos or upload external
images. Capture, crop and adjust to get the best result. See Choosing a Thumbnail for your
Video.
•
Access Control: Use to assign an access control profile to an entry. See Managing Access
Control Profiles.
•
Scheduling: Use to specify date ranges for scheduling an entry. See Content Scheduling.
•
Flavors: Lists all related flavors. Use to convert an entry to additional flavors or to re-convert
existing flavors. See Transcoding and Processing.
•
Distribution: Lists distribution channels associated with an entry and use to manage
distributors. See Content Distribution.
•
Captions: Use to manage captions. Use to upload captions, link to external caption files, and
to add additional captions to an entry. See Subtitles and Captions.
•
Advertisements: Use to create midrolls and overlays for each entry. Add cue points to your
video files to enable time-based functionality such as chaptering, display of related files at
specific points, and timed advertisements. See Adding a Midroll.
•
Related Files: Use to upload related files and to assign the files to an entry. See Uploading
and Modifying Related Files
•
Clips: Displayed if clips were created from an original video or audio entry. See Clipping an
Entry.
Kaltura Management Console (KMC) User Manual
97
Content Authoring Tools
Entries Table
The entries table lists the media entries related to your account. You can perform several actions on a
specific entry or several entries simultaneously. To choose multiple entries, use the CTRL key or the
"Select" links at the bottom of the list. You can search through entries, delete entries, preview entries
and grab the embed code to add to your site, as well as other actions.
Download Files
To download files to your computer for offline use
1. Select an entry and click the "Download" button on the bottom of the page.
Note that you can download more than one entry at a time, as long as the entries appear on
the same page of the entries list.
A flavor (format/quality) selection window is displayed for the video files you select to
download.
2. Select your preferred flavor from the drop-down menu and click "Submit" to proceed. A
message will appear stating that links to your downloaded files will be sent to your email.
Click "OK" to proceed.
Add Playlist
The Add Playlist" drop-down menu enables you to quickly create manual or rule-based playlists. You
can select multiple entries in the entries list and then click "Add Playlist" to create a new playlist with
the specific entries included in the playlist. See Creating Playlists for information on how to create
playlists.
More Actions
Set Access Control
Sets access control for all selected entries (see Managing Access Control Profiles for more details).
Set Scheduling
Sets scheduling for all selected entries (see Content Scheduling for more details).
Preview and Embed
To preview and get the embed code for any of the entries on the entries list; click the "Preview &
Embed" link under the Publish column on the main list of entries. In the new window that opens, you
can preview the entry and select the player that you would like to use. See Embedding a Player on
your Site.
Clipping and Trimming Media Files
You can create clips from existing videos, set in and out points. Each clip becomes its own media
entry encoded to multiple flavors, and can be downloaded, distributed and played back on any device.
You can also trim the length of a video directly from within the Kaltura Management Console. The
clipping tool enables you to edit your videos visually or by setting the start time and end time of your
Kaltura Management Console (KMC) User Manual
98
Content Authoring Tools
clip. For additional information see Server Side Clipping and Trimming.
Clipping creates a new entry from an existing entry and allows you to specify the start and end time
for the new entry. For example you can clip an entry that can be used to create a 2 minute intro video
to a long lecture, or clip part of an entry, such as homework assignments. You can also clip a long
lecture to several shorter clips divided by subjects. The new entry will point to its source entry so that
you can always identify the source entry for the clip.
Trimming does not create a new entry. Sometimes, you may want to trim the start and/or end of a
video to remove redundant parts. Trimming is performed on the source flavor of the entry, modifying
that video permanently.
To clip a media entry
1.
2.
3.
4.
Select an entry from the Entries Table.
In the Metadata tab, click Clip This.
Select Add New Clip.
Press Play and Click Set IN as the starting point of the video clip or alternatively, select the
start time.
5. Select Set Out as the end point of the video clip, or alternatively select the end time.
6. Provide a New name and Description for the clip (optional)
The new clip appears in the entries table.
To trim a media entry
1.
2.
3.
4.
5.
Select an entry from the Entries Table.
In the Metadata tab, click Trim This.
Select Add New Clip.
Use the trimming timeline or enter exact in and out times.
Press Play and Click Set IN as the starting point of the video clip or alternatively, select the
start time.
6. Select Set Out as the end point of the video clip, or alternatively select the end time.
7. Provide a New name and Description for the clip (optional)
Troubleshooting Trimming and Clipping
The Trim and Clip feature may be disabled if your transcoding profile does not include the flavor for
the file you want to trim or clip.
When you upload content, new flavors are created from the Source flavor and transcoded to the
flavors you define in your Transcoding Settings.
To add the Source flavor to your transcoding profile
1.
2.
3.
4.
Go to Settings tab and select the Transcoding Settings menu.
At the bottom of the page, click Switch to Advanced mode.
Click on the name of your default transcoding profile
In the Edit Transcoding profile check the Source flavor and then Save Changes.
Choosing a Thumbnail for your Video
You can select a thumbnail for your video after the file transfer is complete and the file is embedded in
your website. Thumbnails are configured in the Thumbnails tab in the Contents menu. By default, a
Kaltura Management Console (KMC) User Manual
99
Content Authoring Tools
thumbnail is automatically grabbed from the first frames of the video. You can choose to have multiple
thumbnails of different qualities associated with your video, or grab any frame from the video to use
as a thumbnail.
You can search for a thumbnail and its dimensions, size, distributors and status and perform the
following actions: Set as default, Download and Delete.
To edit the thumbnails associated with the video
1. Go to the Content tab and select the Manage menu.
2. Select an entry and click Thumbnails.
3. Select Upload, Grab from Video or New Crop.
•
Upload - uploads an external image as a thumbnail.
Select Upload and specify the file location and name, then click Open.
•
Grab from Video -Capture a new thumbnail from the video.
Play the video in the "Grab from Video" window. Pause on the frame you want to use and
click the thumbnail capture icon (camera). A thumbnail will be captured from the highest
quality video flavor. Exit to return to the Thumbnails tab.
• New Crop - Modify thumbnail dimensions.
4. Select a thumbnail and create a thumbnail with a new position and size.
5. Adjust the display area with the handles on the image and click Generate Thumbnail.
The default thumbnail is now displayed in the entries list.
Kaltura Management Console (KMC) User Manual
100
Publishing to your Site
CHAPTER 13
Publishing to your Site
This section contains the following topics:
•
Embedding a Player with a Single Entry on your Site
•
Embedding a Player with a Playlist on your Site
•
Adding the Flavor Selector Module
Embedding a Player with a Single Entry on your Site
To embed a player on your site
1. Create a Player. See Configuring the Player Basics Settings.
2. Add content (an entry) to the player. See Adding Content to a Player.
The Entries list from the Content tab Manage menu is displayed.
3. Click Preview and Embed.
The Embedding window is displayed to select the delivery options.
Kaltura Management Console (KMC) User Manual
101
Publishing to your Site
4. Select your preferred player skin from the drop-down menu. See Configuring the Player
Features.
5. Select the Flash Delivery Type. See Video Delivery Settings.
6. Check Support iPhone & iPad with HTML5 if applicable. See Mobile Support.
7. Click Select Code.
8. Click CTRL+C (on a PC) or option+C on a Mac to copy the embed code to your clipboard or
grab the Embed Code, and add/paste it to your website HTML source.
Embedding a Player with a Playlist on your Site
After you've created a playlist, and have assigned the playlist to a player, see Creating and
Customizing Playlists and Players, you can publish the player to your site.
To embed a player with a playlist on your site
1. Go to the Content tab and select the Playlists menu.
2. Locate the playlist you want to publish on your website and click Preview & Embed.
Kaltura Management Console (KMC) User Manual
102
Publishing to your Site
The Embedding window is displayed to select the delivery options.
3. Select your preferred player skin from the drop-down menu. See Configuring the Player
Features.
4.
5.
6.
7.
Select the Flash Delivery Type. See Flash Delivery Type.
Check Support iPhone & iPad with HTML5 if applicable. See Mobile Support.
Click Select Code.
Click CTRL+C (on a PC) or option+C on a Mac to copy the embed code to your clipboard or
Kaltura Management Console (KMC) User Manual
103
Publishing to your Site
grab the Embed Code, and add/paste it to your website HTML source.
Video Delivery Settings
You can choose between the following types of video delivery settings
•
HTTP Progressive Download Delivery– Allows you to pause the video playback and wait for
the content to download. Typically used where viewers have very limited bandwidth.
•
Adaptive Streaming RTMP Delivery with Adaptive Bitrate– Allows adaptive bit-rate. The
player can adjust the video quality on the fly based on network and CPU conditions. Based
on RTMP protocol.
•
Akamai_HD_Network– Allows adaptive bit-rate. The player can adjust the video quality on
the fly based on network and CPU conditions. Based on Akamai CDN technology.
This option requires that the CDN associated with your publisher account is Akamai which is
the default for all Kaltura customers.
For more information see Best Practices for Multi-Device Transcoding.
HTTP Progressive Download Delivery
With HTTP Progressive download, the digital media begins downloading and once a specified amount
of data becomes available to the video player, the media begins to play while the rest of the data
continues to buffer.
Kaltura Management Console (KMC) User Manual
104
Publishing to your Site
Adaptive Streaming RTMP Delivery with Adaptive Bitrate
Adaptive Bit Rate (ABR) streaming is a technique of detecting a viewer's bandwidth capabilities in real
time, and then adjusting the quality of the video stream accordingly, always delivering the best
possible picture quality. ABR streaming results in less buffering, fast start time and an overall better
experience for both high-speed and low-speed connections.
ABR dynamically shifts bandwidth to higher and lower levels based on availability. For Adaptive
Bitrate Streaming to work, a video is first encoded at different bitrates to accommodate varying
bandwidth connections. Each bitrate version is sliced up into tiny fragments — typically 2 to 10
seconds. The Kaltura player pulls fragments from the different encodings and inserts them into the
stream as bandwidth dictates resulting in faster video start times and a continuous, uninterrupted
video experience.
For example, a movie called The “Big Movie” is streaming. The end user would view a smoothly
playing video. Unknown to the user, multiple streams are actually available and may be seamlessly
switched to, if their connection drops lower or improves. The key here is “seamless”. When adaptive
bit streaming is done correctly, there should be no interruption of playback.
For The Big Movie, a player might be serving up the following all at once:
The Big Movie @ 2612 kbps
The Big Movie @ 1600 kbps
The Big Movie @ 1200 kbps
The Big Movie @ 800 kbps
USE CASE: If a user’s connection dropped from over 2.5 Mbps to 1600kbps, the Kaltura player would
switch, again seamlessly, from the 2612 bit rate down to the 1600. Often the Kaltura player is
designed to begin playing using the lowest possible bit rate so that playback starts immediately. For
this example, the 800 kbps stream might be served up first and then as the Kaltura player realizes
that the user can handle a higher bitrate, the streaming rate would then be switched up higher.
Kaltura Management Console (KMC) User Manual
105
Publishing to your Site
Akamai HD Network – Allows adaptive bit-rate
Akamai's advanced adaptive bitrate streaming technology intelligently adjusts the bit rate of a video
stream to ensure the optimum playback quality based on changing bandwidth conditions. It also
allows for flavor switching without the loss of content. You can send streaming video over HTTP from
an ordinary web server for playback on iPhone and iPad, or other devices, such as desktop
computers, without the limitations of Progressive Downloads.
The Akamai HD streaming protocol supports Multiple Bitrates and adaptively switches to the optimal
bit-rate based on network conditions for a smooth quality playback experience. An optional feature
with this selected delivery setting is that the implementation also provides for media encryption and
user authentication over HTTPS, allowing publishers to protect their work.
The Akamai HD Network is designed and optimized for large-scale broadcasters and film distributors
to increase audience engagement and expand revenues by complementing traditional mediums such
as TV and DVD with the Internet.
Adding the Flavor Selector Module
Any entry is available in various transcoding flavors. The flavor selector module allows you to
manually select the video flavor you want to watch, based on your preferences.
Kaltura Management Console (KMC) User Manual
106
Publishing to your Site
Note: If you are broadcasting with Adaptive RTMP then the flavor selector will be set to “auto”.
To add the flavor’s selector module
1.
2.
3.
4.
Go to Studio tab and create a new player or edit an existing one.
In the Features tab, go to the Features List and click Controls.
Check Flavor Selector.
Select Options (optional) to configure display options.
5. Click Preview to view your selection and click Save Changes to complete the process.
Mobile Support
For devices that support Flash, such as the newer Android OS devices, the Kaltura Flash player will
be the default player displayed on the device.
For devices without Flash, such as iOS devices, and older Blackberry modules, when you view the
content on your device, the player will automatically change to the HTML5 player. On the iPhone, the
native player will be triggered (The iPad can display HTML5 players on browsers).
If you require mobile display, you must configure a specific encoding flavor for mobile support
(iPhone, iPad). To transcode a file to this flavor, go to the Edit Entry window's Flavors tab. See
Transcoding and Processing and check the applicable mobile flavors.
Kaltura Management Console (KMC) User Manual
107
Distribution and Syndication
CHAPTER 14
Distribution and Syndication
This section contains the following topics:
•
Kaltura Distribution Module
•
How Does Distribution Work?
•
Scheduling a Video Package
•
Content Syndication
•
How Does Syndication Work?
•
Setting Up Syndication
Kaltura offers several advanced syndication and distribution services to ensure that publishers
maximize their content’s reach and increase their audience. Kaltura’s tools help publishers save time
and money by making content distribution to a wide range of video destination sites and search
engines extremely easy and streamlined.
Kaltura Distribution Module
Kaltura’s Distribution Module allows you to reach your users on the web and across any mobile
device. The module provides a streamlined and simple workflow so you can distribute your content to
distribution partners, such as YouTube, Hulu, Comcast, MySpace, MSN or an FTP drop folder,
directly from within the KMC.
Key Benefits:
•
Full control over where and when the content is presented.
•
Manage all of your distribution partners through a single user-friendly interface
•
Deliver assets automatically as they are added to your Kaltura account, or require a manual
review, at your discretion
•
Seamlessly push updates to distributed content from a central dashboard
•
Control scheduling sunrise and sunset per asset and per distribution partner
•
Track your content across all distribution partners
•
Simple and straightforward pricing, with no hidden fees or “guesstimates”
•
Kaltura’s system validates content to make sure it’s ready to be distributed to each distributor,
and alerts about any errors that need to be fixed prior to distribution (missing thumbnails,
missing metadata, etc.)
•
Successful delivery to each distribution partner is confirmed for each asset (if supported by
the partner)
Kaltura Management Console (KMC) User Manual
108
Distribution and Syndication
How Does Distribution Work?
Distribution ensures that your content is viewed by as many customers as possible across multiple
video destination sites and improves total views for your content. Kaltura pushes the actual contents
of the video assets to distribution partners for them to host on their sites. Each distribution channel is
unique and depends on the distributor’s capabilities and the extent of their desired exposure.
The Kaltura Distribution Module supports several workflows. You can configure simple as well as
complex asset information to distribute. For example, simple asset information may include the entry
name, description and tags, or metadata alone, that may be used for example, to configure ads based
on metadata. More complex distribution data is configurable by your project manager and depends on
the distributor’s capabilities.
You can define the destinations for each video package and control aspects such as the video
qualities, number and size of thumbnails, metadata, and scheduling data for each distribution
destination.
You can display distributors for each entry, the distribution start and end dates, submission status.
NOTE: You can distribute ALL videos to be pushed automatically to the destination or you can
distribute selected entries MANUALLY to be sent to the destination.
NOTE: Tag based or Rule Based distribution options are currently not available. You can either
distribute ALL entries or NONE. If none, you can manually select which entries will be
distributed to the destination.
A sample distribution configuration may contain the following components for an entry: video,
metadata, thumbnail, scheduling, content availability by Kaltura and removal of distributed content.
The Distribution Module can be configured to update distributed content for metadata, so that the
most updated information is propagated to the distribution site. Other customizable parameters may
be configured for distribution. The Distribution Module also can be configured to remove distributed
content for metadata, so that information that was propagated to the distribution site can be retracted.
With the Kaltura Distribution Module, administrators can control the destinations for each video
package, and for each distribution destination. In addition, administrators can control video
transcodes, multiple thumbnails in different sizes, metadata translations, scheduling data, and more.
The Distribution Module is an add-on module to the KMC, and incurs additional fees based on the
amount of distribution destinations supported for your account. Additional connectors to distribution
destinations can also be developed as custom work. Contact your Kaltura project manager or sales
representative for complete pricing.
Kaltura Management Console (KMC) User Manual
109
Distribution and Syndication
Adding a Distributor to an Entry
NOTE: To enable automatic distribution of all new entries, contact us, or call +1-800-871-5224.
To add more distribution destinations, contact your project manager.
To add a distributor
1.
2.
3.
4.
Go to the Content tab and select the Manage menu.
In the Entries Table, click the name of the entry you want to distribute.
In the Edit Entry window, select the Distribution menu.
Click Add / Remove Distributors.
The Add/Remove Distributors window is displayed.
To add distributor destinations to your account
•
Contact your account manager.
Kaltura Management Console (KMC) User Manual
110
Distribution and Syndication
To select distributors
1. Check the distributors from the Distributor list. Click All or None at the top of the column to
select or clear all the items in a column.
2. Check the Distribute Automatically column to distribute an entry as soon as it is ready. Click
All or None at the top of the column to select or clear all the items in a column.
All includes all distributors. For example, if you have configured Daily Motion and YouTube as
distributors, content will be distributed to both destinations.
3. Click Apply to save your changes and return to the Distribution tab.
4. Click Save Changes to complete the process.
Scheduling a Video Package
By default, an entry's general scheduling is inherited by all distributors. The instructions here are for
setting scheduling for a specific distributor. A Remote ID is the ID assigned to the distributed content
in the distributor, and is only available after content has been distributed. The Remote ID may be used
as a response from the distributor as well as a reference, for example, to reach the page where the
distributed content appears in the distributor.
To schedule when an entry should be distributed
1. Select the Content tab and select the Manage menu.
2. In the Entries Table, click the name of the entry that you want to schedule.
3. In the Edit Entry window, select the Distribution tab and then select the name of a distributor.
The Distribution Details window is displayed.
Kaltura Management Console (KMC) User Manual
111
Distribution and Syndication
4. Set the Start Date and End Date and enter the hour.
5. Click Save to return to the Distribution menu.
6. Click Save and Close to complete the process.
Validating a Video Package
Errors may occur when you specify a video package distributor.
To find and resolve errors
1. Go to the Content tab and select Manage from the menu.
2. In the Entries Table, click the name of an entry for which you added a distributor.
3. In the Edit Entry window, go to the Distribution tab and click the error name in the Submission
Status column to display a description of the error.
Kaltura Management Console (KMC) User Manual
112
Distribution and Syndication
You can also click on the Distributor in the Distribution tab, and then click the error name in
the Distribution Details window.
4. Follow the instructions in the error description.
The following errors may occur:
Missing Flavor Error
To add a flavor:
NOTE: If you click "Go to Flavors Tab" in the error description, skip to step 4.
1.
2.
3.
4.
Go to the Content tab and select the Manage menu.
In the Entries Table, click the name of the entry that is missing a flavor.
In the Edit Entry window, go to the Flavors tab.
In the Action column, click Convert or Reconvert for each transcoding flavor specified in the
error description, and click Save Changes.
Kaltura Management Console (KMC) User Manual
113
Distribution and Syndication
Metadata Error
To correct metadata:
NOTE: If you click "Go to Metadata Tab" in the error description, skip to step 4.
1.
2.
3.
4.
Go to the Content tab and select the Manage menu.
In the Entries Table, click the name of the entry that has a metadata error.
In the Edit Entry window, go to the Metadata tab or the Custom Data tab.
Modify the information in the metadata field specified in the error description, and click Save
and Close.
If the submission status error is still displayed in the Edit Entry window's Distribution tab: go
back to the Edit Entry window, and select the Custom Data tab.
5. Add the missing information specified in the error description, and click Save and Close.
Missing Thumbnail Error
To add a thumbnail
NOTE: If you click "Go to Thumbnails Tab" in the error description, skip to step 4.
1.
2.
3.
4.
Go to the Content tab and select the Manage menu.
In the Entries Table, click the name of the entry that is missing a thumbnail.
In the Edit Entry window, go to the Thumbnails tab.
Click Add Thumbnail and select Grab from Video.
Kaltura Management Console (KMC) User Manual
114
Distribution and Syndication
5. If you have a thumbnail file, select Upload, specify the file location and name, and click Open.
6. Play the video, pause on the frame you want, and click the thumbnail capture button.
A thumbnail will be captured from the highest quality video flavor.
7. Exit to return to the Thumbnails window.
To modify the thumbnail dimensions
1. In the Edit Entry window, click Add Thumbnail and select New Crop.
2. Select the Thumbnail to modify.
3. Check the Lock aspect ratio and scale to option and select the values specified in the error
description.
4. Adjust the display area with the handles on the image.
5. Click Generate Thumbnail, and exit to return to the Thumbnails window.
Kaltura Management Console (KMC) User Manual
115
Distribution and Syndication
6. Click Save Changes to complete the process.
Filtering Distributed Content
To display distributed content in the Entries Table
1. Go to the Content tab and select the Manage menu.
2. Select the Distribution filter and click a destination you want to display.
Only entries that are active for the selected destination are displayed in the Entries Table.
Kaltura Management Console (KMC) User Manual
116
Distribution and Syndication
To clear the distribution filter
•
Click the destination name in the Distribution filter again.
Removing a Distributor from a Video Package
You may want to change your distribution destinations for video packages.
To remove a distributor from a video package
1. Go to the Content tab and select the Manage menu.
2. In the Entries Table, click the name of the entry with a distributor that you want to remove.
3. In the "Edit Entry" window, go to the "Distribution" tab and click "Add / Remove Distributors".
4. In the "Add / Remove Distributors" window, clear a distributor checkbox.
To clear all items in a column, click "None" at the top of the column.
Kaltura Management Console (KMC) User Manual
117
Content Syndication
5. Click Apply to save your changes and return to the Distribution tab.
6. Click Save Changes to complete the process.
Managing Distributor Details
To manage an entry's distributor details
1. Click the distributor's name on the "Distribution" tab.
In the "Distribution Details" window, you can see the distributor's distribution details (status,
remote ID and schedule), the entry's metadata details, the available thumbnails and the video
flavors.
2. In the "Distribution Details" section:
a. To fix an error, click the error name to display an error description and follow the
instructions.
b. To schedule when an entry is available at the distributor, set the start and end dates and
times, and click "Save".
You can set scheduling separately for each distribution so that the same content may
have a different schedule depending on the distributor.
c.
In the "Thumbnails" section, Thumbnails are matched to the distribution point's required
thumbnail size. If you have multiple thumbnails of the same size, click "Swap" to
manually select the one you want.
d. In the "Video Flavors" section, to preview the entry in a specific flavor, click "Preview" and
play the entry in the "Flavor Preview" window.
Content Syndication
Content syndication is a way of making your content available to multiple other sources. This creates
a form of leverage that gives you the ability to create your content once while maximizing your
exposure on the Internet by distributing your content in many places at the same time. Content
syndication is a win-win for both the publisher and the webmaster. As a result of this type of
distribution, publishers receive increasingly more exposure for their content and webmasters receive
new source for additional content.
rd
Kaltura allows you to create video feeds in multiple formats that are ready for submission to 3 party
platforms such as Google, Yahoo!, iTunes and other video sharing sites and social networks. Videos
are distributed via playlist feeds (such as MRSS) to the channels of your choice. The content remains
on the Kaltura host.
RSS syndicates your web content to other sites and builds inbound links, making RSS one of the
most effective SEO strategies today. Using RSS as part of your SEO strategy is advantageous. If you
need help with web content syndication, contact your account manager.
Syndicating to Google in the KMC is used mainly to create video site maps to submit into Google
search engines for indexing.
iTunes syndication in the KMC is used to show content in iTunes and to create a feed for iTunes.
Details on how to syndicate your content to specific destinations are included here.
How Does Syndication Work?
Kaltura provides syndication to the following out of the box formats:
•
Google
•
Yahoo
Kaltura Management Console (KMC) User Manual
118
Content Syndication
•
iTunes
•
TubeMogul
Partners and developers can also syndicate content in Flexible Feed Format, or you can contact
Professional Services to create a customize feed in XSLT or XML. See Flexible Feed Format.
Kaltura’s MRSS Feeds and Syndication services allow publishers to syndicate and track their videos
on a wide range of video sharing sites and social networks via playlist feeds managed through the
Kaltura Management Console. Publishers can then track their videos and tweak their programs and
campaigns based on the results.
Publishers can set up MRSS feeds into major video search engines including Google, Yahoo! and
iTunes from within the KMC. You can create a feed based on all of the content in your KMC account,
or a subset of the content that is determined by a specific playlist see Creating and Customizing
Playlists and Players. You can then add the selected content to a feed by selecting its destination site.
The content of a playlist can change, for example a rule-based playlist can be modified by changing a
rule, or a manually created playlist may be modified by manually adding content to the playlist. The
feed will automatically change according to the modifications. Feeds are cached in the Kaltura server
for 24 hours. The feed refresh is automatic, and the changes are available after that time.
You can shorten the caching time by limiting the feed size.
To shorten the caching time for a syndication feed
•
Manually add the parameter (&limit=50) to the feed URL.
Adding this parameter will limit the feed size to up to 50 items and will reduce the caching
time to 30 minutes
Syndicating to a Standard MRSS Feed (Yahoo)
Yahoo is the standard MRSS feed type which can be used by any MRSS reader for various use
cases. Yahoo also uses the standard MRSS feed to submit site maps. For example, if you create an
MRSS, you can place the link in your site and allow end users to subscribe to the feed, or use the
feed for your own integration. You can create your own video galleries that refresh when you update
the feed, as well as integrate the feed to your site, and extract data from the feed to display the
content, depending on fields you define. There are many clients (for example all browsers), and
desktop applications, and site integrations that know how to read MRSS feeds.
Search Engine Optimization (SEO)
Submitting feeds to major search engines helps to increase your content’s SEO, and ultimately direct
more traffic to your website. See Maximizing Video SEO With Kaltura.
Key benefits
•
Setting up a new feed is simple and quick - easily set-up multiple playlists in the KMC to be
distributed, videos within each playlist are automatically distributed to the relevant channels
on the video sharing sites.
•
Automatic updates – after a one-time set-up, any additional videos that are added to the
selected playlist will automatically be syndicated accordingly based on the feed’s specific
configuration. There is no need for manual updates to the feed.
Setting Up Syndication
To configure syndication settings
Kaltura Management Console (KMC) User Manual
119
Content Syndication
1.
2.
3.
4.
Go to the Content tab and select the Syndicate menu.
Click Create New Feed.
Enter the Feed Name (required).
Select the content to syndicate.
•
All Content – syndicates all entries.
• Only content from this playlist – syndicates content from the playlist you select.
5. Select the Feed Type.
Syndicating to Google
You can submit your videos to the Google search engine which will ultimately direct more traffic from
Google to your website. Submission of video feeds to Google is free of charge, yet requires some
technical knowledge. It is recommended that your website's webmaster be available for assistance.
Google syndication is used mainly for submitting your site map and being certain that your media is
indexed by Google.
The workflow for setting up Google syndication is divided into two tasks:
•
Google Webmaster tasks
•
KMC Publisher tasks
Kaltura Management Console (KMC) User Manual
120
Content Syndication
Google Webmaster Tasks
To configure syndication settings for Google
1. Setup a Google Webmaster account for your website.
2. Setup your website in the Google Webmaster Tool.
Follow the directions here. Make sure your site is valid based on the Google instructions.
3. Submit the Feed to a URL.
Create a server page on your website that redirects to this feed URL.
For example, for a php implementation, save a php file named redirect.php with the following
content (replace the XXXX with your feed URL):
<?php
Header( "HTTP/1.1 301 Moved Permanently" );
Header( "Location : XXXX");
?>
4. Login to the Google Webmaster Tool.
5. In the Google Webmaster Tool, go to Site configuration > Sitemaps > Submit a sitemap.
6. Submit the feed as your redirect page in your site, for example:
http://mysite.com/redirect.php.
KMC Publisher Tasks for Google Syndication
To configure syndication settings for Google
1. Configure the Syndication Settings. See Setting Up Syndication.
2. Select Google from the Feed Type drop-down menu.
The Google parameters are displayed.
3. Enter the Google Parameters, see Google: Feed Parameters and click Add Feed.
Kaltura Management Console (KMC) User Manual
121
Content Syndication
Kaltura Management Console (KMC) User Manual
122
Content Syndication
Google: Feed Parameters
Field
Description
Content Flavor
The format and quality of the content to be syndicated
Landing page
The URL template that you would like to appear in the Google search
results for each video in this feed. The system will append the specific
entry ID for each entry. See feed example below.
Add to default transcoding
profile
Check to add the chosen Content flavor to content that will be
uploaded subsequently, using the default transcoding profile
Playback directly from Google
-
Select if you prefer for Google to display a link to your website only or if
you'd like Google to display the actual video directly within the search
results page (see screenshot below). If you allow Google to playback
the videos directly from the search results page, you can select the
player that will be used for playback. The player may include your
branding, watermark, etc.
Adult content
If selected, videos in this feed should be available only to users with
SafeSearch turned off.
Syndicating to TubeMogul
Kaltura and TubeMogul have partnered to provide a premium syndication service at the most
attractive pricing available.
This service allows you to seamlessly syndicate your content to over 20 video portals including
YouTube, Daily Motion, Metacafe, etc. and to receive aggregated analytics across video portals.
Each time you add a video to your syndicated content, it will be automatically distributed to your
channel in the video portal you selected.
To learn more about this feature and pricing information contact us or call +1-800-871-5224.
KMC Publisher Tasks for TubeMogul Syndication
To configure syndication settings for TubeMogul
1. Configure the Syndication Settings. See Setting Up Syndication.
2. Select TubeMogul from the Feed Type drop-down menu.
The TubeMogul parameters are displayed.
Kaltura Management Console (KMC) User Manual
123
Content Syndication
3. Enter the TubeMogul Parameters, see TubeMogul: Feed Parameters and click Add Feed.
The URL for the feed is generated.
TubeMogul: Feed Parameters
Field
Description
Content flavor
The format and quality of the content to be syndicated.
Add to default transcoding
profile
Check to add the chosen Content flavor to content that will be
uploaded subsequently, using the default transcoding profile.
Feed categories
These categories will be used when pushing your content to the
various sharing websites
TubeMogul Webmaster Tasks
To submit the video feed to TubeMogul
Kaltura Management Console (KMC) User Manual
124
Content Syndication
1. Copy the feed URL you obtained after you added the feed. See KMC Publisher Tasks for
TubeMogul Syndication.
2. Login to your Kaltura–TubeMogul account.
3. Go to Advanced Tools, select More Tools, and then select MRSS Feed Manager.
4. Submit your feed.
Syndicating to iTunes
You can submit your content to the iTunes Store as a podcast. You will need an active Apple ID and
the iTunes application installed. The flavors for feeds for iTunes must either be MP4, or a flavor that is
compatible with Apple iTunes.
KMC Publisher Tasks for iTunes Syndication
To configure syndication settings for iTunes
1. Configure the Syndication Settings. See Setting Up Syndication.
2. Select iTunes from the Feed Type drop-down menu.
The iTunes parameters are displayed.
3. Enter the iTunes Parameters, see iTunes: Feed Parameters and click Add Feed.
Kaltura Management Console (KMC) User Manual
125
Content Syndication
iTunes: Feed Parameters
Field
Description
Name
Name of the feed.
Content selection
You can either select all content, or create a feed of a specific playlist
only.
Content flavor
The format and quality of the content to be syndicated. iTunes supports
these formats: .m4a, .mp3, .mov, .mp4, and .m4v. Refer to here for
more information.
Add to Default Transcoding
Profile
Check to add the chosen Content flavor to content that will be
uploaded subsequently, using the default transcoding profile.
Landing page
The URL template that you would like to appear in the iTunes Store for
each video in this feed. The system will append the specific entry ID for
each entry. The following parameters will be presented in the iTunes
store, as demonstrated in the illustration below:
Feed Author
Feed Landing Page (link back to your website)
Feed Category (will direct iTunes store how to categorize your feed)
Feed Description
Feed Image URL (should be 600x600)
Kaltura Management Console (KMC) User Manual
126
Content Syndication
Field
Description
In addition, the system will add the following relevant information for
every entry: Name, Duration, Create date, Description.
Contact information
The name and email you enter for the feed will be used for iTunes
Store to contact you if necessary. This information will not be
presented in the iTunes Store.
Language
The language of the videos/ audio files in this feed.
Adult content
If you select this, an "explicit" parental advisory graphic will appear
next to your podcast artwork on the iTunes Store, and in the Name
column in iTunes.
To test the feed before submitting to the iTunes Store
1. Copy the URL you obtained after adding the feed.
2. Launch the iTunes application installed on your desktop.
3. Go to Advance > Subscribe to podcast and submit the feed URL.
To submit the feed to the iTunes Store as a podcast/ video podcast:
1. Copy the feed URL.
2. Go to https://phobos.apple.com/WebObjects/MZFinance.woa/wa/publishPodcast(launches
iTunes application in the right page)
3. Submit your feed.
Syndicating to Yahoo
Syndicating to Yahoo in the KMC is used mainly to create standard MRSS feeds. Yahoo syndication
can also be used to create site maps to submit into Yahoo search engines for indexing.
KMC Publisher Tasks for Yahoo Syndication
To configure syndication settings for Yahoo
1. Configure the Syndication Settings. See Setting Up Syndication.
2. Select Yahoo from the Feed Type drop-down menu.
The Yahoo parameters are displayed.
Kaltura Management Console (KMC) User Manual
127
Content Syndication
3. Enter the Yahoo Parameters, see_iTunes:_Feed_Parameters Yahoo: Feed Parameters and
click Add Feed.
Yahoo Webmaster Tasks
To submit the video feed to Yahoo
1. Copy the feed URL you obtained after you added the feed. See KMC Publisher Tasks for
Yahoo Syndication.
2. Go to http://video.search.yahoo.com/mrss/submit.
3. Fill in the form and submit your feed as a “Full feed”.
Yahoo: Feed Parameters
Field
Description
Name
Name of the feed.
Content selection -
You can either select all content, or create a feed of a specific playlist
only.
Content flavor
The format and quality of the content to be syndicated
Add to Default Transcoding
Profile
Check to add the chosen Content flavor to content that will be
uploaded subsequently, using the default transcoding profile.
Landing page
The URL template that you would like to appear in the Yahoo search
results for each video in this feed. The system will append the specific
entry ID for each entry.
Kaltura Management Console (KMC) User Manual
128
Content Syndication
Field
Description
Playbacks directly from Yahoo
Select if you prefer for Yahoo to display a link to your website only or
also if you'd like Yahoo to display the actual video directly within the
search results page. If you allow Yahoo to playback directly from within
the search results page, you can select the player that will be used for
playback. This player may include your branding, watermark, etc.
Adult content
If selected, videos in this feed should be available only to users with
SafeSearch turned off.
The table below maps categories between the different websites.
TubeMogul
Arts &
Animat
ion
Comedy
Entertain
ment
Music
News &
Blogs
Science &
Technolo
gy
Sports
Travel &
Places
5min
Arts/Ot
hers
People/Oth
ers
Home/Ent
ertaining
Music/Oth
ers
Business/O
thers
Tech/Other
s
Sports/Oth
ers
Wheels/Ot
hers
Blip.tv
Art
Comedy
Movies and
Television
Music and
Entertainm
ent
The
Mainstrea
m Media
Technology
Sports
Travel
Break
Animati
on
Funny
Videos
Entertainm
ent
Entertainm
ent
News
Videos
Entertainm
ent
Sports
Videos
Entertainm
ent
DailyMotion
Arts
Funny
Film & TV
Music
News &
Politics
Science &
Technology
Sports &
Extreme
Travel
eBaums
World
Arts
Animati
on
Comedy
Entertainm
ent
Music
News Blogs
Science
Tech
Sports
Travel
Places
Graspr
Arts &
Crafts
Other
Other
Music
Other
Computers
& Internet
Sports &
Recreation
Travel
GrindTV
N/A
N/A
N/A
music
N/A
N/A
N/A
N/A
Howcast
Animati
on
Techniq
ues
Humor &
Comedy
General
Performing
Arts
Making
Music
Videos
Politics &
Citizenship
General
Technology
General
Sports
General
Travel
i2TV
Arts,
Film,
Animati
on
Comedy
Entertainm
ent
Music
News
Technology
Sports &
Games
Travel &
Places
Metacafe
Art &
Animati
on
Comedy
Entertainm
ent
Music &
Dance
News &
Events
Science &
Tech
Sports
Travel &
Outdoors
MSN Video
Movies
Movies
TV
Music
News
Web
Sports
Events
MySpace
Animati
on/CGI
Comedy
and Humor
Entertainm
ent
Music
News and
Politics
Science
and
Technology
Sports
Travel and
Vacations
Sclipo
Arts /
Design
Other
Other
Music
Other
Science /
Technology
Sports
Hobby /
Games
StreetFire
N/A
N/A
N/A
N/A
N/A
N/A
N/A
N/A
StupidVideos
Just
Plain
Stupid:
Laugh
Out
Loud
Just Plain
Stupid:
Laugh Out
Loud
Just Plain
Stupid:
Laugh Out
Loud
Just Plain
Stupid:
Laugh Out
Loud
Just Plain
Stupid:
Office/Wor
kplace
Just Plain
Stupid:
Laugh Out
Loud
Sports:
Other
Just Plain
Stupid:
Laugh Out
Loud
Veoh
Animati
on
Comedy
Entertainm
ent
Music
News
Tech &
Gaming
Sports
Travel &
Culture
VideoJug
Creative
Humour &
Entertainm
Music
Current
Technology
Sports &
Travel
Kaltura Management Console (KMC) User Manual
129
Content Syndication
TubeMogul
Arts &
Animat
ion
&
Culture
Comedy
Entertain
ment
Bizarre
ent
Music
News &
Blogs
Affairs
Science &
Technolo
gy
& Cars
Outdoors
Sports
Travel &
Places
Yahoo
Art &
Animati
on
Funny
Entertainm
ent
Music
News
Technology
& Products
Sports &
Games
Travel
YouTube
Film &
Animati
on
Comedy
Entertainm
ent
Music
News &
Politics
Science &
Technology
Sports
Travel &
Events
Flexible Feed Format
Developers may to create custom syndication feeds. You can customize syndication feeds by creating
an XSLT.
Flexible feed format allows for greater flexibility for creating syndication feeds. You can transform your
feed into any format programmatically and include additional data such as custom data fields, system
data fields, and other fields. For example, you may want to re-format a standard MRSS field, to move
a media item’s description place, or, for example, add the entry duration.
Flexible feed format allows you to determine what content goes into the feed field and the location of
the field. You can change the structure and the content of the feed.
Kaltura Management Console (KMC) User Manual
130
Advertising and Ad Networks
CHAPTER 15
Advertising and Ad Networks
This section contains the following topics:
•
Overview of Advertising with Kaltura
•
Connecting with an Ad Server
•
Creating Kaltura Video Ads
•
Adding the VAST Ad Server
•
Configuring VAST Ads
•
Creating Bumper Ads
•
Configuring Third Party Ad Plugins
•
Configuring Companion Ads
Overview of Advertising with Kaltura
Kaltura’s monetization features contain a comprehensive set of advertising tools, pay-per–view,
subscription models, and built-in reports that let you optimize your strategy based on viewer behavior.
You can target viewers with ads on live videos or VOD, and across multiple devices such as mobile,
PC and set-top-box. With support for a wide range of video ad formats (including all major IAB
standards), and integrated plugins for video ad networks, such as Google DoubleClick DART,
FreeWheel, Ad Tech, Eye Wonder, AdapTV, Tremor Video and others, managing you can optimize
your monetization.
The Kaltura Player supports pre-rolls, mid-roll post-rolls, Flash companion ads and HTML companion
ads. The Kaltura Player is VAST-compliant, supports custom SWFs, bumper videos, and has plugins
for AdapTV, Tremor, and Eyewonder.
Player Branding
Players can be designed and skinned to match any brand and used for your own brand or for
advertisers on your site. See Configure the Player Features.
Connecting with an Ad Server
Integrating your Ad Server with the KMC is a one-time activity performed when you initially set up
video advertising. The ad server has to be VAST compliant or available as a Kaltura plugin. You may
also create a custom swf for the Kaltura Player to support.
After you have selected an ad server and set up an account with that ad server, you integrate the ad
server with the KMC by establishing a connection between that ad server and KMC. Once the
connection is established, all ad requests generated by the Kaltura Dynamic Player are in a format
which the ad server expects, allowing seamless communication between the Kaltura Player and the
ad server.
The Digital Video Ad Serving Template (VAST) is an industry standard for the XML response from an
ad server. Most of the leading Ad Servers and Ad Networks are VAST compliant, and support IAB
standard (VAST 1.0 / VAST 2.0).
Popular ad servers include DoubleClick, Dart For Publisher (DFP), Microsoft Atlas, OpenX,
ScanScout. To see the full list of servers and networks that comply with VAST, refer to the IAB
Kaltura Management Console (KMC) User Manual
131
Advertising and Ad Networks
website:
http://www.iab.net/iab_products_and_industry_services/508676/compliance/679253
In general, ads, tracking, scheduling, and other parameters, are configured on the ad server side.
With VAST, other parameters need to be configured through the KMC or Kaltura Player. Ad
parameters are configured through the Studio tab in the KMC.
Kaltura Player and Ad Plugins
Kaltura partners have the ability to create a custom .swf file to stream ads from their own ad server to
the Kaltura Player. The.swf file acts as an ad plugin. The configured key-value pairs must be defined
to play the relevant ads.
You have to subscribe to an ad server and configure the ads on the ad server side.
Supported Ad Servers
All VAST compliant ad servers are supported. For more information see Kaltura’s Generic Ads Player
Plugin for VAST.
The Kaltura Player all VAST compliant ad servers and supports the following ad plugins:
•
AdapTV
•
Tremor
•
Eyewonder
•
DoubleClick
•
FreeWheel
For more information see Configuring Third Party Ad Plugins.
Ad Terminology
Ad tracking – the ability to define which/if ads play based on specific metadata.
Overlay – an ad that appears as an image (usually with text) over a video, while the video is playing.
Companion ad– a banner ad that accompanies the ad that plays over the video player – this can
either be located in the list area of the playlist or somewhere else on the HTML page.
Ad Tag URL – a URL that is XML that contains all the information about the ad(s) that should be
displayed. VAST works with an ad tag URL system. The XML needs to conform to VAST standard in
order to be considered “VAST-compatible”. That means that it needs to have the proper tags.
The following is an example of a VAST ad tag URL:
http://ad3.liverail.com/?LR_PUBLISHER_ID=1331&LR_CAMPAIGN_ID=229&LR_SCHEMA=vast2
To see the example, insert this URL into your browser.
Ad Cue Points – time based points on an entry that can be used to view mid- roll advertisements.
Creating Kaltura Video Ads
The following is the workflow for configuring a KMC VAST compliant ad.
•
Adding the VAST Ad Server
•
Configuring VAST Ads
Adding the VAST Ad Server
Kaltura Management Console (KMC) User Manual
132
Advertising and Ad Networks
To add an ad server that supports the VAST standard
•
Obtain an Ad tag URL from your ad server. See How to Locate the Ad Tag URL.
Configuring VAST Ads
To configure VAST Ads
1. Select the Studio tab and select an existing player or create a new one. See Designing and
Configuring a Player. The player is configured to display VAST ads only.
2. Select the Advertising tab.
3. Enable Request ads for this player.
4. Configure the Ad Source as VAST Ad server.
Configuring VAST Pre-roll Ads
Pre-roll ads are ads that appear prior to an online video.
To configure pre-roll ads
1.
2.
3.
4.
5.
6.
7.
Configure the Player Advertising Settings.
Click on Pre-Roll Ads.
Toggle on Request PreRoll Ads Enabled.
Paste the Ad Tag URL received from the ad server. See How to Locate the Ad Tag URL.
Select the Display options.
Display X ads assumes that there is more than one ad configured in the ad tag URL.
Before every X video starting with the X video assumes that there is either a playlist on the
page or a gallery. This functionality works with galleries as well as playlists.
Kaltura Management Console (KMC) User Manual
133
Advertising and Ad Networks
Configuring VAST Post Rolls
PostRoll ads are ads that appear after an online video.
To configure PostRoll ads
1.
2.
3.
4.
5.
Configure the Player Advertising Settings.
Click on PostRoll Ads.
Toggle on Request PostRoll Ads Enabled.
Paste the Ad Tag URL received from the ad server. See How to Locate the Ad Tag URL.
Select the Display options.
Kaltura Management Console (KMC) User Manual
134
Advertising and Ad Networks
Adding a Midroll
Midrolls and overlays are cue points that are defined on an entry level in the player configuration
section of the Studio Advertising tab.
To add a midroll
1. Configure the Player Advertising Settings.
2. Select the Content Tab and select an entry.
3. Select the Advertisements tab.
Kaltura Management Console (KMC) User Manual
135
Advertising and Ad Networks
4. Select the method to obtain the midroll add from the File Actions drop down menu.
5. Choose the granularity level for the time-based display. The choices are:
•
100%
•
5 sec
•
1 sec
•
Frames.
6. Identify the exact scene or frame to display the advertisement and insert a cue.
This can be done on the timeline:
7. To edit a cue point, select whether the advertisement will be a video or an overlay.
a. For a video - the entry will stop playing, the ad will play, and then the entry will resume.
For an overlay - while the entry is playing, a banner will appear on the screen. The entry
never stops playing.
8. For both video and overlay, there are 2 options in the provider section: VAST and OTHER.
VAST allows a user to insert a VAST ad tag URL. OTHER is for customers who have created
a custom plugin that allows for creating cue points Other, does NOT refer to existing ad
plugins such as Tremor, Adap.tv, etc.
9. If you select overlay, the display time will be indicated next to the Overlay option:
You can modify the amount of time you want the overlay to appear on the video using the up
and down arrows.
10. To apply the selected cue points to the player, create a new player or edit an existing one
under the “Studio” tab. Within the advertisement portion of the player, make sure that the
“Request Ads From Entry’s Cue points” is set to “Yes”.
Adding an Overlay
An overlay ad is an ad banner that is displayed over the video.
To add an overlay at the entry level
1. Configure the Player Advertising Settings.
2. Select the Content Tab and select an entry.
Kaltura Management Console (KMC) User Manual
136
Advertising and Ad Networks
3.
4.
5.
6.
Select the Advertisements tab.
Click on the + icon to add an overlay.
Select the method to obtain the overlay add from the File Actions drop down menu.
(Required) Select the Ad Type (video/overlay).
For Video the Duration is the length of the video and the field will be greyed out.
For Overlay – enter the amount of time to display in the Duration field.
7. Enter the provider name: VAST or Other and optional values.
8. For VAST enter the Tag URL and a descriptive name for the Midroll or Overlay, For other
providers enter values that you want to pass to the player.
9. Click Save.
To configure an overlay on the player level
1. Configure the Player Advertising Settings.
Within the advertisement portion of the player, make sure that the “Request Ads From Entry’s
Cue points” is set to “Yes”.
2. Click on Ads.
3. Toggle on Request Overlay Ads Enabled.
4. Paste the Ad Tag URL received from the ad server. See How to Locate the Ad Tag URL.
5. Select the Display options.
Creating Bumper Ads
Bumpers are videos that act as ads and do not use an ad server. Bumper videos uploaded to Kaltura
can be inserted before or after a video, to function as pre-rolls or post-rolls. Bumper videos are
independent of actual pre/post-rolls and can be played in addition to ads. Bumper videos are helpful
for Kaltura partners that would like to advertise their logo, or other information, before or after a video,
and for smaller partners that would like to advertise, but do not expect to monetize from their ads.
Kaltura Management Console (KMC) User Manual
137
Advertising and Ad Networks
Bumper videos can be configured in addition to any other ads that are configured. On the bottom of
the Advertising section, the option to add bumper videos only is available.
To configure Bumper ads
1.
2.
3.
4.
In the Ad Timeline section, click on Bumper Video.
Toggle on Bumper Video Enabled.
Paste the Kaltura Entry ID that will be used as the bumper.
Enter the URL in the Click URL field.
A Kaltura partner also has the ability to enable ONLY bumper ads by choosing Bumper Only as the
Ad Source:
While in the Advertising tab, you can also configure bumper pre-rolls, and or bumper post-rolls.
To configure bumper pre-rolls, and or bumper post-rolls
1. Create a bumper video. See Creating Bumper Ads.
2. In the Features tab on the left, select the additional Parameters and Plugins section.
For example enter: bumper.preSequence=0&bumper.postSequence=1 to create a postroll bumper.
Whenever both pre-rolls and bumper videos are enabled, pre-rolls will always play before the bumper
video. This is because the pre-roll is configured as, preSequence=1, and the bumper video is,
Kaltura Management Console (KMC) User Manual
138
Advertising and Ad Networks
preSequence=2. You can change the play order via the uiconf. Post-roll ads will always play AFTER
the bumper post-rolls.
Configuring Third Party Ad Plugins
This section describes how to configure third party ad plugins.
Tremor Media
Tremor Media is an ad network that acts as a connector between ad companies/servers and their
customers. Tremor Media connects with numerous ad sources and partners from a single control
center and works with their customers to provide the appropriate ads from the appropriate ad servers.
To configure the Tremor Media plug in
1.
2.
3.
4.
5.
Go to your Tremor account; define ads, scheduling, targeting, etc. on the Tremor end.
Go to the Studio tab and edit an existing player or create a new one.
Select the Advertising tab.
Enable ads for the selected player.
Select Tremor as the Ad Source.
6. In the key=value section, enter the policy ID. Type in progId=[policy ID].
NOTE: TremorMedia allows users to utilize other ad sources.
Kaltura Management Console (KMC) User Manual
139
Advertising and Ad Networks
NOTE: Tremor also allows users to utilize a different ad source as a fallback.
The Tremor plugin is in charge of displaying specific ads, and all the configurations are done on the
Tremor end.
Tremor Media Added Functionality
The following lists functionality that has been added to the Tremor plugin.
Functionality
Description
Passing dynamic
data
By inserting specific key-value pairs
in the uivars, a Kaltura partner can
define that any Kaltura metadata gets
passed to TremorMedia via the
TremorMedia plugin. Then, using the
Tremor ad server, the partner can
Kaltura Management Console (KMC) User Manual
Example
: <var
key="customAd.paramKey1"
value="duration" />
<var
key="customAd.paramValue1"
value="{mediaProxy.entry.dura
tion}" />
<var
key="customAd.paramKey2"
140
Advertising and Ad Networks
Functionality
Description
decide how to target ads via the
metadata.
To enable this functionality, a custom
ad path must be inserted into the
uiconf.
Example
value="entryId" />
<var
key="customAd.paramValue2"
value="{mediaProxy.entry.id}"
/>
<var
key="customAd.paramKey3"
value="categories" />
<var
key="customAd.paramValue3"
value="{mediaProxy.entry.cate
gories}" />
<var
key="customAd.paramKey4"
value="ContentRating" />
<var
key="customAd.paramValue4"
value="{mediaProxy.entryMetad
ata.ContentRating}" />
<var
key="requiredMetadataFields"
value="true" />
Note: The ContentRating custom data
field, has a slightly different value from
the rest of the metadata.
Internal
companion ads
The ability to insert a companion ad
directly on the list part of the playlist.
The companion ad must be inserted
as a custom ad path via the uiconf or
via additional parameters and
plugins.
Capping ads
A Kaltura partner can cap ads via the
KMC based on the creation date.
To configure the Tremor plugin with
the startDateOffset, with the
parameter key maxAge, add the
following 2 attributes to the XML (if
the file is maintained manually):
paramKey1="duration"
paramValue1="{tremor.create
dAtOffset}"
or the equivalent uivars/flashvars line
paramKey1=duration¶mVal
ue1={tremor.createdAtOffset
}
This is based on the assumption that
the Tremor xml node has the id set
to 'tremor '. If using a studio player
the id would be 'customAd'.
AdapTV
AdapTV has two different models – the standard model and the marketplace. The standard model
allows Kaltura partners to define their own ads. The marketplace provides the customer the ability to
connect with all sorts of ad companies to choose the most fitting ads.
Kaltura Management Console (KMC) User Manual
141
Advertising and Ad Networks
To configure the AdapTV ad plug in
1. Go to your AdapTV account, define ads, scheduling, targeting, and other parameters, on the
AdapTV end.
2. Go to the Studio tab and edit an existing player or create a new one.
3. Select the Advertising tab.
4. Enable ads for the selected player.
5. Select AdapTV as the Ad Source.
6. Enter the Custom SWF URL.
The Kaltura partner administrator should contact their ad server company to obtain the SWF
URL and the proper Key-Value Pairs to insert.
7. In the key-value section insert key=[your AdapTV key]. In AdapTV, many users utilize the
zone to differentiate between different ads. In this case, the customer needs to insert
zone=[zone name] in the key-value section as well.
8. To utilize the latest AdapTV plugin (the current out-of-the-box plugin is utilizing AdapTV’s
legacy integration of AS2, the new plugin utilizes AS3 integration): in the Additional
Parameters and Plugins section of the player, insert key=customAd.path value=
http://cdnbakmi.kaltura.com/flash/kdp3/v3.5.7.6/plugins/adaptvas3Plugin.swf
Kaltura Management Console (KMC) User Manual
142
Configuring Companion Ads
Configuring Companion Ads
Companion Ads are “text, display ads, rich media, or skins that wrap around the video experience,
and can run alongside either or both the video or ad content. The primary purpose of the Companion
Ad product is to offer sustained visibility of the sponsor throughout the video content experience.” See
http://www.iab.net/wiki/index.php/Companion_Ad
VAST
Kaltura’s platform makes it easy to add Companion Ads in either HTML or Flash. After you’ve
configured your player (see Designing and Configuring a New Player or Playlist ), edit the player and
navigate to the Advertising tab. Scroll down to the “Player Configuration” section
Choose whether to configure HTML or Flash-based Companion Ads.
Kaltura Management Console (KMC) User Manual
143
Configuring Companion Ads
Companion Ads in HTML
To add companion ads in HTML
1. Click on the “Add companion div” text in the “Player Configuration” section. Entry fields to
enter the CSS “id” of your companion ad and the dimensions in pixels appear.
2. Enter the CSS div id and dimensions (in pixels) for each ad region. Be certain to enter the
dimensions to match the dimensions of your served ads.
3. Click on the “Add companion div” text multiple times to enter more ad regions.
Kaltura Management Console (KMC) User Manual
144
Configuring Companion Ads
In the web page where your Companion Ads will display, you need to include a JavaScript file as well
as a corresponding HTML <div> tag with a matching id for each region you create.
<html>
<body>
<head>
….
<script src="http://www.kaltura.com/javascript/VAST/companionAdFunc.js" type=
"text/javascript"></script>
….
</head>
<body>
….
<object id="kaltura_player" name="kaltura_player" type="application/x-shockwaveflash" ……… </object>
<div style= "width: 234px; height: 60px;" id="myCompanionAd">
</div>
….
</body>
</html>
Companion Ads in Flash
To add companion ads in Flash
1. Click on the “Add companion div” text in the “Player Configuration” section. You’ll get entry
fields to enter the CSS “id” of your companion ad and the dimensions in pixels. Be certain to
enter the dimensions to match the dimensions of your served ads.
Click on the “Add companion div” text multiple times to enter more ad regions:
There are either two or three possibilities for the “Element ID” pulldown menu. If you created
a Kaltura Playlist Player (see the Creating and Customizing Players and Playlists” section),
you will see three options:
Kaltura Management Console (KMC) User Manual
145
Configuring Companion Ads
If you created a regular (non-Playlist) Player, you will see two options:
The “Custom” option is not available. If your companion ad will appear in the regular player
window above the player controls, then select “Controls”. If your ad will overlay the Playlist,
then select “Playlist”. Enter the dimensions of your ad (in pixels) in the “Dimensions” text
fields.
Example
Here’s a Kaltura Playlist Player in a horizontal configuration:
In the following example, the same player plays a preroll ad in the main player area while a Flash
Companion Ad is displayed in the playlist area:
Kaltura Management Console (KMC) User Manual
146
Configuring Companion Ads
Tremor
To configure companion ads with Tremor Media.
The companion ad needs to be enabled on the Tremor end. Perform the following steps.
1. Add the following script to your page:
<!-- script type="text/javascript"
src="http://cdna.tremormedia.com/acudeo/banners.js"></script>
<script type="text/javascript">
function displayCompanionBanners(banners) {
tmDisplayBanner(banners, "adCompanionBanner", 300, 250);
}
function hideCompanionBanners(banners) {
tmHideBanner("adCompanionBanner")
}; </script -->
2. Add the following script import:
<script type="text/javascript"
src="http://cdna.tremormedia.com/acudeo/banners.js"></script>
3. Add this div that will act as the ad.
<div id="adCompanionBanner300x250"></div>
AdapTV
To configure companion ads
1. Add this code to the Additional Parameters and Plugins se
key: adaptv.companionId
value: companiondiv
2. Add a div with a matching id in the HTML that holds the following player:
<div id="companiondiv" style="width: 300px; height: 250px;">
</div>
Custom SWF
The Kaltura partner should contact their ad server in order to understand what Javascript code needs
to be implemented on their page in order to enable companion ads.
Targeting with an Ad Server
While ads targeting is performed within the ad server, Kaltura’s VAST advertising module is designed
to pass all the relevant targeting information to the ad server.
Targeting information can be set in several levels:
•
Targeting per player and ad slot – you can add additional key value pairs within the adtag
URL. The ad server will use these for targeting.
•
Targeting per content item - The Kaltura VAST module supports dynamic pulling of metadata
from the content item, and passes it to the ad server.
For example for targeting a specific content category.
To target information
1. Drag content items into the category within the KMC.
Kaltura Management Console (KMC) User Manual
147
Configuring Companion Ads
2. Define the additional parameter in your ad server.
For example, in OpenX set the “category” parameter through “Site - Variable”
3. Add category template category={mediaProxy.entry.categories} into the AdTag URL. At
runtime this template will be populated with the actual values for each video played.
The following targeting templates are available for targeting
category={mediaProxy.entry.categories}
tags={mediaProxy.entry.tags}
name={mediaProxy.entry.name}
id={mediaProxy.entry.id}
Kaltura Management Console (KMC) User Manual
148
Configuring Companion Ads
Targeting per Viewer
In some cases targeting information is not defined per content item, but per viewer.
To support these cases the Kaltura VAST module dynamically pulls metadata from the website via
flashvars passed to the player.
For example targeting per a specific age group. This example assumes that the hosting site has a
user database and would like to further target known users.
To target per viewer
1. Pass the variable (for example, viewer age) from your internal DB to the player via Flashvar.
2. Define the additional parameter in your ad server.
For example in OpenX, set the “viewerAge” parameter through “Site - Variable”
3. Add the flashvar template into the AdTag URL, this template will be populated in runtime with
the actual values.
The template is FLASHVAR_NAME={configProxy.flashvars.FLASHVAR_NAME }and in the
viewerAge example it would be:
viewerAge={configProxy.flashvars.viewerAge}
Ad Targeting via ad plugin
Each ad plugin individually defines which metadata the Kaltura Player passes to the plugin. Generally,
it is very basic metadata such as entry ID. Additional metadata enables the Kaltura user to target ads
with that specific metadata.
Ad Targeting with Tremor
Passing dynamic data
By inserting specific key-value pairs in the uivars, a Kaltura partner can define that any Kaltura
metadata gets passed to Tremor via the Tremor plugin. Then, through the Tremor ad server, the
Kaltura Management Console (KMC) User Manual
149
Configuring Companion Ads
partner can decide how to target ads via the metadata.
Examples:
<var key="customAd.paramKey1" value="duration" />
<var key="customAd.paramValue1" value="{mediaProxy.entry.duration}" />
<var key="customAd.paramKey2" value="entryId" />
<var key="customAd.paramValue2" value="{mediaProxy.entry.id}" />
<var key="customAd.paramKey3" value="categories" />
<var key="customAd.paramValue3" value="{mediaProxy.entry.categories}" />
<var key="customAd.paramKey4" value="ContentRating" />
<var key="customAd.paramValue4" value="{mediaProxy.entryMetadata.ContentRating}"
/>
<var key="requiredMetadataFields" value="true" />
Note that ContentRating, which is a custom data field, has a slightly different value from the rest of the
metadata.
To enable the custom data field, you must insert a custom ad path into the uiconf.
Advertising for Mobile Devices
The advertising settings applied to your player will also apply for mobile delivery. Visit the advertising
section for more information on advertising. As a general rule, VAST ads fully support ads in mobile.
However, the ads will only play in a mobile device if the ad has the proper mobile flavors.
The following table summarizes current advertising support for mobile:
Device
Supported Ad type
Notes & Limitations
iPhone
VAST Pre-roll
Ads are played back in the native player
Bumper video
Player controls are not disabled during playback
(user can skip the ads)
VAST Post-roll
Ads are not clickable
Ads must be encoded for the iPhone (H264)
iPad
VAST Pre-roll
Ads must be encoded for the iPad (H264)
Bumper video
VAST Overlay
VAST Post-roll
Android
(ver 2.2 and up)
All
Android from version 2.2 supports Flash
playback with all ads integration as in Flash
player.
How to Locate the Ad Tag URL
DFP
In DFP there is a “Tag Generator” utility in the dashboard to generate the ad tag url.
The ad tag url (http://ad.doubleclick.net/pfadx/mysite.com/. ) is at the bottom of the widget.
Kaltura Management Console (KMC) User Manual
150
Configuring Companion Ads
OpenX
In OpenX the adtag URL is linked to an OpenX Zone, in the following format:
http://[OPENX_INSTALL]/fc.php?script=bannerTypeHtml:vastInlineBannerTypeHtml:va
stInlineHtml&source=&format=vast&charset=UTF_8&nz=1&zones=z1=[ZONE_ID]
for openX hosted, the URL is d1.openX.org. ,
from within your OpenX account you can retrieve the zone Id.
for example for zone id 150750 in openX hosted the ad tag url would be:
http://d1.openx.org/fc.php?script=bannerTypeHtml:vastInlineBannerTypeHtml:vastI
nlineHtml&source=&format=vast&charset=UTF_8&nz=1&zones=z1=150750
Kaltura Management Console (KMC) User Manual
151
Configuring Companion Ads
AdapTV (via VAST)
Copy the “Specific Ad Tag” from the Ad screen
Connecting with Ad Servers and Networks via adap.tv
To add adap.tv’s service to your Kaltura players
1. Sign up with adapt.tv (Contact us to learn more) – you will then receive an adapt.tv Partner
Key.
2. Go to the Studio tab and edit an existing player or create a new one
3. Go to the Advertising section
4. Enable ads for this player
5. Select adapTV from the “Ad Source” drop down
Enter your adapt.tv Partner Key in “Key Value Pairs” section, in the following format
“key=[YOUR ADAPTV KEY]”
Kaltura Management Console (KMC) User Manual
152
Configuring Companion Ads
6. Target, manage and customize your ads via the adap.tv console.
7. Via adapt.tv you can also connect to additional ad servers & ad networks such as AdTech,
Atlas, DART, OpenX, Advertising.com, ScanScout , SpotExchange, Google AFV, AdBrite,
AdDynamic, AdEngage, AdFish, AdoTube and over 20 other networks and servers.
For example connecting to DART via adapt.tv would simply require pasting the Ad Tag URL
that the AdTech Server supplies.
Connecting with Tremor Media
To add Tremor Media’s service to Kaltura players
Kaltura Management Console (KMC) User Manual
153
Configuring Companion Ads
1. Sign up with Tremor Media (Contact us to learn more) – you will receive a Tremor Media
Program ID.
2. Go to the Studio tab and edit an existing player or create a new one.
3. Go to the Advertising section.
4. Enable ads for this player.
5. Select Tremor from the “Ad Source” drop down
6. Enter your ACUDEO Ad Policy ID as your Program ID in the “Key Value Pairs” section.
Program ID’s are available in the program list and are displayed as Ad Policy IDs in the
ACUDEO Console. Select “Ad Policy ID” in the “Show Ad Policies with” drop down menu.
Use the following format:
progId=your ACUDEO Ad Policy ID.
Additional targeting parameters should be separated with semicolons.
You can specify ad sources for each ad slot within your content through the Tremor Media’s
ACUDEO console.
7. Target, manage and customize your ads via the Tremor Media console (Acudeo).
Kaltura Management Console (KMC) User Manual
154
Configuring Companion Ads
Different Types of Ad Servers
There are additional ad servers that Kaltura supports, which are a bit more complex than just plugins.
For example, Kaltura is now fully integrated with DoubleClick and Freewheel. Their integrations are
more complex since there is a server-side connector that allows you to define the metadata to submit
to the ad server for ad targeting purposes. The Kaltura metadata gets mapped to ad server’s
metadata. Then, just like with a distribution module, see Kaltura Distribution Module, when a Kaltura
partner wants an entry to be included in the ad server, it is marked as such in the KMC. The ad server
connector passes all of the metadata to the ad server, where the Kaltura partner can then decide how
ads should be targeted based on the metadata.
Kaltura Player Additions Related to Ads
If a Kaltura partner wants to create their own type of ad targeting and prevent pre-rolls from playing on
specific entries, they can utilize the flashVar vast.preSequence=0, defined in the embed code
in the additional parameters and plugins.
Advanced functionality is enabled to provide for a better workflow of ad plugins. The Kaltura Player
build its UI only when the plugin is completely ready, enabling for a smooth loading of player and
plugin together once the plugin is ready.
Troubleshooting
Here are a few helpful steps to configure advertising:
For VAST ads:
1. Check that you have a working ad tag URL. Be certain that VAST 2.0. 1.0 are also supported
for the media file content.
•
An example of a working ad tag URL is at: http://ox-d.hbr.org/v/1.0/av?auid=35998
•
In addition to this, a very helpful site that has working VAST ad tag URLs can be found here:
http://www.iab.net/iab_products_and_industry_services/508676/digitalvideo/vast/vast_xml_sa
Kaltura Management Console (KMC) User Manual
155
Configuring Companion Ads
mples .
2. Put the ad tag URL in your browser. You should see an XML that clearly shows that it is a
VAST XML. Various other criteria will appear in the URL. An important tag to look for is the
media file. Take the URL of the media file and make sure it plays properly.
If the URL is not a VAST XML or if the media file does not play properly, create a working
VAST XML with a working media file on your ad server.
3. If the VAST ad tag URL looks valid and the media file plays properly, the next step is to go to
Fiddler.(Debugger) The first important thing to look for here is to make sure that the
crossdomain is working properly. Here is a working Fiddler response:
4.
If the Crossdomain request/response is red or has some abnormal result like 404, you will
need to enable your domain’s crossdomain to allow Kaltura to access it. Here is Kaltura’s
crossdomain.xml, which can be provided as an example of a proper crossdomain.xml :
http://www.kaltura.com/crossdomain.xml .
The next steps are to make sure that the ad is properly being called via Fiddler:
Kaltura Management Console (KMC) User Manual
156
Creating and Tracking Analytics
CHAPTER 16
Creating and Tracking Analytics
This section contains the following topics:
•
Bandwidth Usage Reports
•
Content Reports
•
User and Community Reports
•
Exporting Analytics to a CSV File
Use the Analytics tab to track and display analytical information for bandwidth usage, video content
usage and to produce user and community reports.
Bandwidth Usage Reports
Bandwidth usage reports include information about bandwidth streaming consumption. You can
display the amount of bandwidth used by month or by year.
View Monthly or Yearly Bandwidth Usage
To view a report of bandwidth usage:
1. Click View Monthly or View Yearly.
2. Select a month/year in the drop-down menu.
3. Click bar chart (default) or line chart icon located on the top right of the window. The report
displays the total amount of bandwidth in gigabytes used on each day of the month you
selected, or the total amount of bandwidth in gigabytes used in each month of the year you
selected.
4. Hover over a day's or month’s data to display the exact usage for the day/month.
Content Reports
Content reports display aggregated analytics showing how well your content is performing across your
sites. Use the content reports to gain business insights and learn if your content discovery and
exposure strategies have paid off or when things need to be tweaked to improve outreach or user
engagement.
Top Content
Top Content reports display the following data for your most popular content:
•
Plays – The number of times a user clicked "Play"
•
Minutes Viewed – The sum of minutes that were viewed
•
Average View Time – The average time calculated by dividing the minutes viewed by number
of views
•
Player Impressions – The number of times the video player was loaded
Kaltura Management Console (KMC) User Manual
157
Creating and Tracking Analytics
•
(Not included in the line chart) Player to Impression Ratio – The number of plays divided by
the number of impressions
To view Top Content reports
1. Select a date range in the drop-down menu.
2. Select one or more categories:
•
All (default)
• Click Select Categories.
3. In the Categories window: Select the name of a category. Use the CTRL key to select multiple
categories.
Click Filter.
The filter is applied and the button changes to Selected Categories, including the number of
categories you selected. Hover over the button to see the category names.
4. Click the Selected Categories button to select other categories.
To clear the category filter, click All.
5. (Optional) In the Search Filter field, enter text that appears in content names, tags or
descriptions, and click Apply.
The filter description is displayed above the report.
To clear the filter, delete the text from the Search Filter field and click Apply.
6. In the drop-down menu, select one of the data types for the line chart report.
7. (Optional) Export the line chart report to a CSV file. See Exporting Analytics to a CSV File.
8. In the line chart, hover over the data to display the exact data quantity for the date.
Under the line chart, a summary is followed by reports that display total and individual video results.
For the individual video table, you can:
•
Scroll through the pages at the bottom of the table.
•
Select the number of rows to display per page (10 to 500).
•
Click a video name to display:
o
Top Content reports for the video
o
The date range options for the reports
o
The data type menu for the line chart report
o
Links to the video's Drop-off and Interactions reports (see Content Drop-off and Content
Interactions)
Kaltura Management Console (KMC) User Manual
158
Creating and Tracking Analytics
o
The video's metadata details
o
A player to view the video
Content Drop-off
Content Drop-off reports display the following data for play-through by viewers of your content:
•
Plays – The number of times a user clicked "Play"
•
25 per cent play-through – The number of plays that reached 25% of the video
•
50 per cent play-through – The number of plays that reached 50% of the video
•
75 per cent play-through – The number of plays that reached 75% of the video
•
100 per cent play-through – The number of plays that reached 100% of the video
•
(Not included in the bar chart) Play-through Ratio – The percentage of completed plays. The
number of 100% play-throughs divided by the total number of plays.
To view Content Drop off reports
1. Select a date range in the drop-down menu.
2. Select one or more categories:
•
All (default)
•
Click Select Categories.
• Click the "+/-" icons to expand or collapse categories in the list.
3. In the Categories window:
a. Click the +/- icons to expand or collapse categories in the list.
b. Select the name of a category. Use the CTRL key to select multiple categories.
c. Click Filter.
The filter is applied and the button changes to Selected Categories, including the
number of categories you selected. Hover over the button to see the category names.
d. Click the Selected Categories button to select other categories.
To clear the category filter, click the All button.
4. (Optional) In the Search Filter field, enter text that appears in content names, tags or
descriptions, and click Apply.
The filter description is displayed above the report.
To clear the filter, delete the text from the Search Filter field and click Apply.
5. In the drop-down menu, select one of the data types for the line chart report.
Kaltura Management Console (KMC) User Manual
159
Creating and Tracking Analytics
6. (Optional) Export the line chart report to a CSV file. See Exporting Analytics to a CSV File.
7. In the bar chart, hover over the data to display the exact data quantity for the date.
Under the bar chart, a summary is followed by reports that display total and individual video results.
For the individual video table, you can:
•
Scroll through the pages at the bottom of the table.
•
Select the number of rows to display per page (10 to 500).
•
Click a video name to display:
•
Sort the table by clicking the column headings.
•
Click a video name to display:
o
Content Drop-off reports for the video
o
The date range options for the reports
o
Links to the video's Top Content and Interactions reports (see Top Content and Content
Interactions)
o
The video's metadata details
o
A player to view the video
Content Interactions
Content Interactions reports display the following data for viewer interaction with your content:
•
Plays – The number of times a user clicked "Play"
•
Edits – The number of clicks on the "Edit" button
•
Shares (Viral) – The number of clicks on the "Share" button
•
Downloads – The number of clicks on the "Download" button
•
Reports of Abuse – The number of clicks on the "Report" button
To view Content Interaction reports:
1. Select a date range in the drop-down menu:
2. Select one or more categories:
•
All (default)
•
Click Select Categories.
Kaltura Management Console (KMC) User Manual
160
Creating and Tracking Analytics
3. In the Categories window:
a. Click the +/- icons to expand or collapse categories in the list.
Select the name of a category. Use the CTRL key to select multiple categories.
Click Filter.
The filter is applied and the button changes to Selected Categories, including the
number of categories you selected. Hover over the button to see the category names.
Click the Selected Categories button to select other categories.
To clear the category filter, click the All button.
4. (Optional) In the Search Filter field, enter text that appears in content names, tags or
descriptions, and click Apply.
The filter description is displayed above the report.
To clear the filter, delete the text from the Search Filter field and click Apply.
5. In the drop-down menu, select one of the data types for the line chart report.
6. (Optional) Export the line chart report to a CSV file. See Exporting Analytics to a CSV File.
7. In the line chart, hover over data to display the exact data quantity for the date.
Under the line chart, a summary is followed by reports that display total and individual video results.
For the individual video table, you can:
•
Sort the table by clicking the column headings.
•
Scroll through the pages at the bottom of the table.
•
Select the number of rows to display per page (10 to 500).
•
Click a video name to display:
o
Content Interactions reports for the video
o
The date range options for the reports
o
The data type menu for the line chart report
o
Links to the video's Top Content and Drop-off reports (see Top Content and Content
Drop-off)
o
The video's metadata details
o
A player to view the video
Content Contributions
The Content Contributions reports display the following data for media entry contributions by your
users:
•
Total – The number of media entries contributed, including video, audio, image and mix
•
Video – The number of video entries contributed
•
Audio – The number of audio entries contributed
•
Image – The number of image entries contributed
•
Mix – The number of mixes created
•
(Not included in the individual source table) UGC – The number of media entries contributed
by "User"-type users
•
(Not included in the individual source table) Admin – The number of media entries contributed
by "Admin"-type users that includes all uploads from the KMC.
Kaltura Management Console (KMC) User Manual
161
Creating and Tracking Analytics
To view reports:
1.
2.
3.
4.
Select a date range in the drop-down menu:
In the drop-down menu, select one of the data types for the line chart report.
(Optional) Create a CSV File. See Exporting Analytics to a CSV File.
In the line chart, hover over the data to display the exact data quantity for the date.
Under the line chart, a summary is followed by reports that display total and individual source
results.
For the individual source table, you can:
•
Sort the table by clicking the column headings.
•
Scroll through the pages at the bottom of the table.
•
Select the number of rows to display per page (10 to 500).
•
Click a source name to display:
o
Content Contributions reports for the source
o
The date range options for the reports
o
The data type menu for the line chart report
User and Community Reports
This tab shows demographics and User Generated Content related reports of where content was
contributed, played and shared.
Top Contributors
The Top Contributors reports display the following data for media entries from your most active
contributors:
•
Total – The number of media entries contributed, including video, audio, image and mix
•
Video – The number of video entries contributed
•
Audio – The number of audio entries contributed
•
Image – The number of image entries contributed
•
Mix – The number of mixes created
Kaltura Management Console (KMC) User Manual
162
Creating and Tracking Analytics
To view reports:
1.
2.
3.
4.
Select a date range:
In the drop-down menu, select one of the data types for the line chart report.
(Optional) Export the line chart report to a CSV file. See Exporting Analytics to a CSV File.
In the line chart, hover over the data to display the exact data quantity for the date.
Under the line chart, a summary is followed by reports that display total and individual
contributor results.
For the individual contributor table, you can:
•
Sort the table by clicking the column headings.
•
Scroll through the pages at the bottom of the table.
•
Select the number of rows to display per page (10 to 500).
•
Click a user name to display:
o
Top Contributors reports for the user
o
The date range options for the reports
o
The data type menu for the line chart report
Geographic Distribution
Geographic Distribution reports display the following data for play-through according to the
geographic location of your content viewers:
•
Plays – The number of times a user clicked "Play"
•
25 per cent play-through – The number of plays that reached 25% of the video
•
50 per cent play-through – The number of plays that reached 50% of the video
•
75 per cent play-through – The number of plays that reached 75% of the video
•
100 per cent play-through – The number of plays that reached 100% of the video
•
Play-through Ratio – The percentage of completed plays. The number of 100% play-throughs
divided by the total number of plays.
Kaltura Management Console (KMC) User Manual
163
Creating and Tracking Analytics
To view Geographic Distribution reports:
1. Select a date range.
2. (Optional) Export the line chart report to a CSV file. See Exporting Analytics to a CSV File.
A summary is followed by reports that display total and individual regional results.
For the individual regional table, you can:
•
Sort the table by clicking the column headings.
•
Scroll through the pages at the bottom of the table.
•
Select the number of rows to display per page (10 to 500).
•
Click a region name to display:
o
Geographic Distribution reports for the region's zones (for example, state, province,
district or city)
o
The date range options for the reports
Top Syndications
Top Syndications reports display the following data for the most popular syndicators of your content:
•
Plays – The number of times a user clicked "Play"
•
Minutes Viewed – The sum of minutes that were viewed
•
Average View Time – The average time calculated by dividing the minutes viewed by the
number of views
•
Player Impressions – The number of times the video player was loaded
•
(Not included in the line chart) Player to Impression Ratio – The number of plays divided by
the number of impressions
Kaltura Management Console (KMC) User Manual
164
Creating and Tracking Analytics
To view Top Syndication reports:
1.
2.
3.
4.
Select a date range in the drop-down menu. See Date Ranges for Analytical Reports.
In the drop-down menu, select one of the data types for the line chart report.
(Optional) Create a CSV File. See Exporting Analytics to a CSV File.
In the line chart, hover over the data to display the exact data quantity for the date.
Under the line chart, a summary is followed by reports that display total and individual
syndicator results.
For the individual syndicator table, you can:
o
Sort the table by clicking the column headings.
o
Scroll through the pages at the bottom of the table.
o
Select the number of rows to display per page (10 to 500).
o
Click a syndicator name to display:
o
Top Syndications reports for the website
o
The date range options for the reports
5. Click next to a URL to view the page.
Date Ranges for Analytical Reports
You can specify the date range for each analytical report you generate.
The date ranges are:
•
Yesterday
•
Last 7 days
•
This week
•
Last week
•
Last 30 days (default)
•
This month
•
Last month
•
Last 12 months
•
This year
•
Custom: Click the calendar icons to specify a range.
Kaltura Management Console (KMC) User Manual
165
Creating and Tracking Analytics
Exporting Analytics to a CSV File
To export a report to a CSV file:
1. Click Export to CSV on the top right of the line chart.
A message is displayed: "The file is ready for download".
2. Click OK to proceed.
3. Select a location and file name for the CSV file, and click Save.
Sending Analytics Events to Third Parties
After you create a Kaltura Player, see Creating Players, you can configure third party plug-ins to view
analytics information.
Kaltura Player Supported Plug-ins
The following lists some of the third party plug-ins supported by the Kaltura Player.
•
Google
•
Omniture
•
Nielson
•
Comscore
NOTE: When you create a player through the Studio tab in the KMC, the Kaltura
Analytics configuration is automatically included
All other plug-ins must be added manually. For more information about using third party Analytics
providers see Configuring Third Party Analytics Provider Plug-ins. To learn how to implement a player
plugin that sends Analytics data to third-party servers, see Implementing Player Analytics Plugins.
.
Kaltura Management Console (KMC) User Manual
166
Account Information
CHAPTER 17
Account Information
This section describes the following topics:
•
Account Settings
•
Integration Settings
•
Access Control
•
Transcoding Settings
•
Custom Data
•
My User Settings
•
Account Upgrade
Account Settings
The Account Settings information includes the data you submitted during the registration process and
is accessed through the Settings tab. You can change or update any of the details in this section.
Multiple content categories can be selected by holding down the CTRL key.
To view your account information
•
Select the Settings tab and then select the Account Settings menu.
Kaltura Management Console (KMC) User Manual
167
Account Information
The following table describes the fields for account information.
Field
Description
Partner ID
Your Kaltura Publisher Account id. This id is required in every
call to the Kaltura API.
Name of Publisher/Company-
This field contains the name of your organization.
Name of Account Owner
The user who created the KMC account and is the recipient of
account level email communication. The drop-down menu lists
the names of all users of the KMC account who are
associated with the ‘Publisher Administrator’ role
(full permission to account’s KMC functionalities), so it is
possible to set a different account owner, when needed.
Integration Settings
This tab displays the Integration settings for the KMC. Integration settings contain the information that
provides unique IDs to Kaltura, including your partner ID, which is your site’s identification and ticket
to the Kaltura platform and API. Your Partner ID enables you to connect to Kaltura, display media,
upload media and experience all of Kaltura’s functionality.
Account Info
The account info displays account information. The Partner ID is your Kaltura account identification
number. The Sub Partner ID is generally deprecated and kept for backward compatibility of older
Kaltura based applications.
The Administrator Secret and User Secret are the API private keys used to generate authentication
tokens for sessions with the Kaltura servers when using the API. Since the keys can be used to run
API commands on your content in Kaltura, you should keep these secret. Usually, the user secret is
enough for all activities and therefore this is the key that should be provided to parties wishing to
access your Kaltura account via API. The Admin Secret can be used to login as an administrator, and
therefore can be used to perform any action on your account.
For more information, please refer to the Kaltura API Guide.
To view additional low-level account settings information
Kaltura Management Console (KMC) User Manual
168
Account Information
•
Click Advanced Settings to open the advanced Account Settings display. Changing the
advanced settings will take effect only for new content ingested (from the moment changes
have been saved) and is not retroactive.
Entry Management
The following table describes the fields for the Miscellaneous options.
Field
Description
User Page URL format
When Kaltura Media Entries are played in the Kaltura Player, a
variable named “userLandingPage” will be created for every
played entry. That variable will hold a link to the user page of
the user who created that media entry.
To determine the URL to which the userLandingPage variable
will point to, enter the base URL in this field, followed by the
following token:
{uid} – The User Id who created the media.
For example: http://mysite.com/users/{uid}
Media Page URL format
When Kaltura Media Entries are played in the Kaltura Player, a
variable named “partnerLandingPage” will be created for every
played entry. That variable will hold a link to a media page of
that entry on the publisher site.
To determine the URL to which the partnerLandingPage
variable will point to, enter the base URL in this field, followed
by the following token:
{id} – The Media Entry Id.
For example: http://mysite.com/media/{id}
User Upload Limit
By default, Kaltura allows users to upload files up to 150 MB
per file. Use this option to change the file upload limit. You
cannot upload more than 1GB per upload session. For
example, setting the upload limit to 100MB allows users to
upload up to 10 files at a time.
If you require higher settings, please contact Kaltura’s Support.
Notifications
Kaltura Management Console (KMC) User Manual
169
Account Information
When creating Kaltura applications or integrating various Kaltura features into existing applications or
sites, it is often required that the application be notified of various actions that occurred in Kaltura. For
example: When a user on your site uploads a new video file, you might want your site code to be
notified of when Kaltura has finished processing the video file and made it ready for publishing.
While it is possible to easily query the Kaltura API periodically, Kaltura’s API Notifications utilize a
“push” methodology where a code on your site will be called automatically by Kaltura whenever a
certain actions occur like video upload or media status changes.
Kaltura provide two types of Notifications:
Kaltura Client Notifications – Notifications that are sent from the Kaltura widget (e.g. Kaltura
Contribution Wizard) when a user performs an action like uploading a new video file. The notification
will be called from the Kaltura widget directly to the publisher’s notification handler code hosted on the
publisher’s server.
Kaltura Server Notifications – Notifications that are sent from the Kaltura server to the publisher’s
server using http post requests. The publisher is expected to host a notification handler script on his
server, to which the Kaltura server will call providing information about the actions that occurred.
To setup client and/or server notifications
1. Enter the Notification URL.
2. Select the type of notifications from the displayed list.
For more information about the various notifications and how to implement a notification handler script
on your server, refer to: http://www.kaltura.com/api_v3/testmeDoc/index.php?page=notifications
Access Control
Kaltura Management Console (KMC) User Manual
170
Account Information
See Access Control Profiles for more information.
Transcoding Settings
See Editing and Creating Transcoding Profiles for more information.
Custom Data
See Kaltura Custom Metadata Functionality more information.
My User Settings
All KMC admin users can change their personal details - name, email address (KMC login) and
password from the My User Setting page.
To change personal details
1. Select the Settings tab and then select My User Settings.
2. Click on Edit to modify the information.
For authentication purposes, you will need to provide your current password before being able to
make any changes in the system.
To change your password
1. Select the Settings tab and then select My User Settings.
2. Click on Change KMC Password to modify the information.
Account Upgrade
To learn more and upgrade your account, fill in the online form and our Sales Team will contact you.
To upgrade your account
1. Select the Administration tab and then select Users.
2. Click on “Click Here” or go to http://site.kaltura.com/Request-Users.html to upgrade your
account.
Kaltura Management Console (KMC) User Manual
171