1
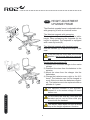
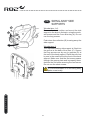
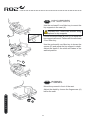
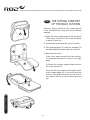
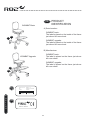
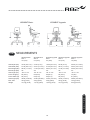
wombat
TM
English user manual
© 2004 R82 A/S. All rights reserved.
The R82 logo and the Wombat chair are registered trademarks of R82 A/S.
03.2005
GB
E
N
G
L
I
S
H
CONTENTS
Safety ................................................................................ 4
Guarantee ......................................................................... 4
Tools .................................................................................. 4
Maintenance ...................................................................... 4
Wombat klar til brug........................................................... 5
Adjusting seat and back .................................................... 6
Height adjustment basic frame .......................................... 7
Height adjustment upgrade frame ..................................... 8
Head support ..................................................................... 9
Swing-away side supports .............................................. 10
Armrest and tray .............................................................. 11
Hip supports .................................................................... 12
Pommel ........................................................................... 12
Swing-away knee supports ............................................. 13
Foot rest .......................................................................... 14
Vests and belts ................................................................ 15
Helpers handles .............................................................. 15
The sitting comfort of the back cushion ........................... 16
The sitting comfort of the seat cushion ............................ 17
Product identification ....................................................... 18
Measurements ................................................................. 19
Accessories ..................................................................... 20
Technical data ................................................................. 20
Producer .......................................................................... 20
Distributor ........................................................................ 20
Care and maintenance .................................................... 21
Stain removal guide ......................................................... 22
Troubleshooting ............................................................... 23
2
Pat. pend.
Pat. pend.
Basic
GB
Upgrade
WOMBAT
Congratulations on choosing the WOMBAT. We are convinced that it will fully live
up to your expectations. Like any other quality product from R82, the WOMBAT
has been developed on the basis of many years of experience, producing and
adapting aids and appliances for disabled persons.
The Wombat is the activity chair from R82, available in 3 sizes and 2 versions:
WOMBAT basic and WOMBAT upgrade
The Wombat basic is available with manuel height adjustment or with a gasspring.
The Wombat upgrade is available with gasspring or an electrical motor. Both
versions is delivered with a multiadjustable seat, back and footrest.
This user manual is meant as guide to assist the user in gaining the full benefit
of the many options offered by the Wombat. Therefore we recommend you to go
through this manual before the Wombat is put into use.
3
E
N
G
L
I
S
H
GB
SAFETY
The Wombat has erned the CE-mark. This certifies that it meets all relevant
European safety requirements.
Remove the CE-mark, when rebuilding the product or when using other
than original R82 spare parts and fittings.
Never leave your child unattended in this product. Ensure permanent
supervision by an adjult. Incorrect use of the Wombat, may cause serious
injury on the user. Take care that all the fixations and adjustments are
placed and fitted correctly and check it on a regular basis.
The Wombat is for indoor use only.
GB
GUARANTEE
Notification of defects will be received at R82 A/S within two years.
The Wombat is guaranteed for 12 months. The guarantee is only valid when
using original R82 spare parts and fittings. All special adjustments must be
made by R82. R82 will not be held responsible for damage or injury caused by
use of non-original parts or repairs made by a non-authorized R82 person.
GB
TOOLS
Use the enclosed Allen keys to perform the adjustments described in this
manual.
When adjustments have been made, then make sure to tighten up.
GB
MAINTENANCE
The cover is removable and can be washed at max 30o. Please find the stain
removal guide in the back of the manual.The Wombat functions without any
maintenance, but it is recommended to clean frequently and to oil the swing
away parts occasionally.
E
N
G
L
I
S
H
Do not use any cleaning materials containing chlorine or methylated
spirit.
The gasspring functions without any maintenance.
Do not expose the gasspring to pressure, high temperatures or perforation.
The batterybox
The battery box may make out an environ-mental danger, therefore it
should be brought into a recycling centre, when it is not to be used any
more.
4
GB
WOMBAT READY TO
USE
Wombat Basic:
When you unpack your Wombat, you will find the
back of the chair packed separately.
C
B
Begin by removing the frame from the box. Loosen
handle (A) on the central bar. Release handle (B)
under the right-hand side of the seat so the seat
can be raised.
A
Pull out the footrest so that it is at a right angle to the
bar. Loosen the tightening handle (C) for the footrest
bar under the seat and adjust the footrest.
D
The back support is fitted on to the seat by turning the
knob clockwise and pulling out the knob (D) behind
the back support bar and attaching the back there.
Wombat Upgrade:
When you unpack your Wombat, you will find the
back of the chair packed separately.
E
G
Begin by removing the frame from the box. Raise
the seat unit by placing your foot on the pedal (E).
Remember first to loosen the safety lock (F) to the
right of the pedal.
F
Pull out the footrest so that it is at a right angle to the
bar. Loosen the tightening handle (C) for the footrest
bar under the seat and adjust the footrest.
Size 1+2: The back support is fitted on to the seat
by turning the knob clockwise and pulling out the
knob (D) behind the back support bar and attaching
the back there.
H
I
Size 3: First remove the security nut (I) to be able to
mount the back on size 3. Pull out the locking lever
(J). Mount the backsupport bar in the fitting and tip
into vertical. Depress the blue ring (K) to push down
the bar in the fitting. Mount the security nut again.
Adjust the height to the desired position. Resecure
the locking lever.
J
K
5
GB
The angle of the Wombat Upgrade seat is adjustable by simply pushing the release handle
(A), located below the seat. Tip away the safety
device (B) before pushing the release handle.
C
A
ADJUSTING SEAT AND
BACK
The angle of the Wombat Basic seat is adjustable by turning the handle (C), located below
the seat.
B
Always keep a hand on the backrest to
avoid the seat from tipping too much
forward.
Furthermore it is possible to angle the back by
loosen the grip (D) on the back of the chair.
D
Seat depth (only size 1+2):
To minimize the seat depth, push the back forward and adjust the angle. To adjust the back,
loosen the handle (E).
Back height (size 1+2):
Adjust the back height by loosen the knob (F).
Turn the knob counterclockwise to loosen. Then
pull out the knob and the back is adjustable in
height.
Let go of the knob and the wanted back height
will be locked. Turn the knob again - this time,
clockwise, and the lock will be further ensured.
E
Back height (size 3):
Pull out locking lever (G) and depress the blue
ring (H) to adjust the back height. Adjust the
height to the desired position and release the
blue ring (H). Resecure locking lever (G).
F
E
N
G
L
I
S
H
H
G
6
GB
HEIGHT ADJUSTMENT
BASIC FRAME
The Wombat basic frame is height adjustable
either manual or with gasspring.
The Wombat basic with manual ajdustment:
To adjust the Wombat basic in height, loosen
the grip (A). Adjust the height and fasten at the
wanted position.
B
A
The Wombat basic with gasspring:
To adjust the frame height with a gasspring, push
down the release handele (B) below the seat.
Tip away the safety device before pushing the
release handle.
E
N
G
L
I
S
H
7
GB
HEIGHT ADJUSTMENT
UPGRADE FRAME
The Wombat upgrade frame is adjustable either
with gasspring or with an electrical motor.
A
The Wombat upgrade with gasspring:
The height is adjustable -from floor to tableheight. When preasuring the footpedal (A) the
height is adjusted. The footpedal is equipped
with a security knob (B).
B
The Wombat upgrade with electrical motor:
Use the handset (C) to adjust the height of the
seat.
If the the chair has to be used in the lowest
position, the foot rest has to be removed
first.
Recharging the batteries (D):
1) Connect the enclosed charger to the mains
voltage
2) Dismount the wires from the batteries to the
actuator
3) Mount the wires from the charger into the
batteriebox
4) Charge the batteries every night or for 8-12
hours. The batteries can not be charged to
much. But do not drain the batteries completely. The batteries are to be replaced within a
periode of 4 years.
D
C
For optimum lifetime of the actuator,
connect it to the mains voltage 12 hours
before use.
E
N
G
L
I
S
H
Do not leave the child by it self with the
handset and do not let ohter child play
around with the handset.
The electric frame does not have a safety
stop at the height adjustment function.
8
GB
HEAD SUPPORT
The head support is mounted in the back of the
chair and is fastened with the finger screw (A).
Use the enclosed 5 mm Allen key to loosen the
screws (B) and to adjust the head support.
A
Angle the head support further by loosen the
screw (C). Adjust the head support sideways by
loosen the screw (D).
Do not adjust the height above the
maximumlevel. See warningmark.
B
D
C
E
N
G
L
I
S
H
9
GB
A
SWING-AWAY SIDE
SUPPORTS
Wombat size 1+2:
Remove the back cushion and mount the side
support in the slots in the back, using the enclosed screws and the 5 mm Allen key (A). Do not
use the long screws.
B
Push down the red button (B) to swing-away the
side support.
Wombat size 3:
The adjustable swing side support is fitted into
the groove at the back of the chair (C). Secure
the long screws one by one to grooves (D) at
the rear of the back support. Place the nuts one
by one in the small hole at the front of the back
support. Make sure that the first screw passes
through the groove plate and is properly threaded into the nut before securing the next screw.
Do not use the short screws.
D
It is recommendable to oil the swing away
parts occasionally.
C
E
N
G
L
I
S
H
10
GB
ARMREST AND TRAY
Mount the armrest fitting in the side of the seat
and adjust sideways. Fasten with the finger
screws below the seat (A).
B
The armrests are heightadjustable by loosen
the knob (B). Turn the knob counter clockwise to
loosen. Then pull out the knob and the armrest
is adjustable in height. Let go of the knob and
the wanted back height will be locked. Turn the
knob again - this time, clockwise, and the lock
will be further ensured.
A
Angle the armrest by loosen the grib (C). Fasten
at the wanted angle.
C
The armrest for size 3 has two vertical bars which
fits into the two holes in the seat (D). Loosen and
turn the knob to angle adjust the armrest.
The tray is mounted by leading the bar into the
pipe below the seat. Fasten at the wanted position with the finger screws (E).
D
The tray can be stabilized by mounting bars
at both sides of the tray.
E
11
E
N
G
L
I
S
H
GB
HIP SUPPORTS
Use the enclosed 5 mm Allen key to mount the
hip supports in the seat (A).
Wombat size 3 offers two different fitting
options for hip supports.
A
Loosen the two screws (B) and (C) to adjust the
hip supports all round. Fasten with the enclosed
5 mm Allen key.
C
Use the enclosed 4 mm Allen key to loosen the
screws (D) and adjust the hip support in depth.
Adjust the depth in the slots and fasten in the
wanted position.
B
D
GB
POMMEL
Mount the pommel in front of the seat.
Adjust the depth by loosen the fingerscrew (A)
below the seat.
E
N
G
L
I
S
H
A
12
GB
SWING-AWAY KNEE
SUPPORTS
The knee supports are mounted in the side of
the seat and fastened with two 4 mm screws
below the seat (A).
Use the 5 mm Allen key to loosen the screw (B)
and angle the knee supports.
A
Angle the cushion on the knee support by using
the 4 mm Allen key and loosen the screw (C).
Use the 4 mm Allen key to loosen the screw (D)
and adjusting the depth. Fasten at the wanted
position.
B
Push down the red button (E) to swing away the
knee support.
C
It is recommended to oil the swing away
parts occasionally.
D
E
E
N
G
L
I
S
H
13
GB
FOOT REST
As standard, the Wombat is delivered with foot
rest. It is possible to dismount the foot rest - an
advantage when using the Wombat at floor
height. Further the foot plate can be adjusted
in height. Use the enclosed 4 mm Allen key to
loosen/fasten (A).
A
To angle the foot rest bar, lossen the grip (B).
Adjust the angle and fasten.
Angle the foot plade by turning the screw in front
of the plate (C).
B
E
N
G
L
I
S
H
C
14
GB
VESTS AND BELTS
The Wombat can be equipped with various vests
and belts.
To ease the mounting, the Wombat is equipped
with two 40 mm and two 25 mm buckles below
the seat and four 25 mm buckles on the back.
GB
HELPERS HANDLES
Mount the handles on the back of the seat and
tip up/down when needed.
E
N
G
L
I
S
H
15
GB
THE SITTING COMFORT
OF THE BACK CUSHION
Optimum sitting comfort is very easily gained
in the Wombat chair, using the velcro sheeted
wedges.
A
1) Open the velcro sealings at the top and sides
of the cover (A) and turn the cover complete
or partly in side out.
2) Loosen the front sheet (B) and roll it down .
3) The lumbarsupport (C) and the wedges (D)
are adjustable and removable as required.
D
D
4) Mounting the cover:
C
If the cover was removed from the cushion,
it is important always to mount it in the right
order.
B
Put down the cushion upside down and turn
the cover inside out.
To mount the cover, start mounting the velcro
at the lowest edge (E) of the cover and the
cushion. Now place the cover on the front of
the cushion and fix it at the sides and at the
top.
E
E
N
G
L
I
S
H
16
GB
THE SITTING COMFORT
OF THE SEAT CUSHION
A
Optimum sitting comfort is very easily gained
in the Wombat chair, using the velcro sheeted
wedges.
1) Open the velcro sealings at the front and sides
of the cover (A) and turn the cover complete
or partly in side out.
2) Loosen the top sheet (B) and roll it up.
B
3) The wedges (C) are adjustable and removable
as required.
4) Mounting the cover:
C
If the cover was removed from the cushion,
it is important always to mount it in the right
order.
C
C
Put down the cushion upside down and turn
the cover inside out.
To mount the cover, start mounting the velcro
at the rearmost edge (D) of the cover and the
cushion. Now place the cover on the front of
the cushion and fix it at the sides and at the
front edge.
D
E
N
G
L
I
S
H
17
GB
WOMBAT Basic
PRODUCT
IDENTIFICATION
A) Serial number
WOMBAT basic:
The label is placed on the inside of the frame
just above left rear wheel.
A
B
WOMBAT upgrade:
The label is placed on the inside of the frame
just above left rear wheel.
B) Manufacturer
WOMBAT basic:
The label is placed on the frame just above
left rear wheel.
WOMBAT Upgrade
WOMBAT upgrade:
The label is placed on the frame just above
left rear wheel.
A
B
A
Dato: 31-01-02
SN:
Varenr:
Belast: kg
0840-01-111878-001
880003
5707292
E
N
G
L
I
S
H
134158
B
Parallelvej 3
DK-8751 Gedved
18
WOMBAT Basic
WOMBAT Upgrade
BA
BA
BH
SW
SD
BH
SD
SW
SA
SH
SH
L
W
GB
SA
W
L
MEASUREMENTS
Seat depth (SD)
Seat width (SW)
Back height (BH)
Back angle (BA)
Seat angle (SA)
Frame length (L)
Frame width (W)
Seat height (SH)
Max. load
Weight
Wombat basic
Size 1
cm (inch)
Wombat basic
Size 2
cm (inch)
Wombat upgrade Wombat upgrade
Size 1
Size 2
cm (inch)
cm (inch)
Wombat upgrade
Size 3
cm (inch)
16-29 (6¼-11¼")
21-30 (8¼-11½")
28-34 (11-13¼")
40°
-20° to +15°
60 (23½")
55 (21½")
46-66 (18-25¾")
45 kg (99 lb)
14,5 kg (32 lb)
23-36 (9-14")
28-37 (11-14½")
31-38 (12-14¾")
40°
-20° to +15°
60 (23½")
55 (21½")
46-66 (18-25¾")
45 kg (99 lb)
14,5 kg (32 lb)
16-29 (6¼-11¼")
21-30 (8¼-11½")
28-34 (11-13¼")
40°
-20° to +15°
60 (23½")
55 (21½")
34-69 (13¼-27")
45 kg (99 lb)
15,5 kg (34 lb)
30-48 (11½-18¾")
35-44 (13¾-17¼")
39-50 (15¼-19½")
43°
-22° to +10°
72 (28")
61 (23¾")
38-68 (14¾-26½")
70 kg (154 lb)
22 kg (48½ lb)
23-36 (9-14")
28-37 (11-14½")
31-38 (12-14¾")
40°
-20° to +15°
60 (23½")
55 (21½")
34-69 (13¼-27")
45 kg (99 lb)
15,5 kg (34 lb)
E
N
G
L
I
S
H
19
GB
ACCESSORIES
Size 1
Size 2
Size 3
Abduction block, size 1
Abduction block, size 2
Abduction block, size 3
Abduction block, size 4
Armrest
Armrest, extended + 6 cm
Armrest, short cushion
Armrest, long cushion
Tray
Hip supports, size 1
Hip supports, size 2
Helpers handles, set
Helpers handles, fixed, set
Swing-away knee supports
Anti-tip device
Assistant operated brake, basic
Assistant operated brake, upgrade
95130-1
95130-2
95130-3
95130-4
95112
95113
95125
95110
95111
95145
95146
95116
95953
95949
95950
95130-1
95130-2
95130-3
95130-4
95112
95113
95125
95110
95111
95145
95146
95116
95953
95949
95950
95130-1
95130-2
95130-3
95130-4
95114
95115
95126
95110
95111
95145
95146
95117
95953
95951
Head support
Swing-away side supports
See special brochure
See special brochure
GB
TECHNICAL DATA
Seat:
Cushions:
Cover:
Frame:
E
N
G
L
I
S
H
GB
ABS: Acrylonitrilbutadienstyren. (Recyclable)
Fireretardent, foam
Fireretardent, 100% trevira CS
Powderpainted steel
PRODUCER
GB
DISTRIBUTOR
R82 A/S
Parallelvej 3
8751 Gedved
Denmark
20
Please find your distributor on www.r82.com
GB
CARE AND MAINTENANCE
UPHOLSTERY
The upholstery is made of fire resistant foam and comfort material. The upholstery can easily be
removed from the cushion and can be machine washed at 30°. Further, regular vacuum cleaning
and brushing will help to preserve the fabric's colour and appearance.
WHEELS
The Wombat wheels should be regularly cleaned using a damp cloth. If the wheels are particularly
dirty, a grease remover can be used.
CENTRAL BRAKES
The central brake cables should be tightened when needed. Check that the brakes work at least
once a month.
FRAME
Fasten all screws underneath the chair on a regular basis. Further, it is important to keep the chair
clean, both for your own comfort and the longevity of the chair. The frame should be regularly
cleaned using a damp cloth.
INSPECTION
It is important to fasten all screws on the chair on a regular basis. All screws which secure the accessories have to be checked, at least once a month. Further, it is important to be aware of any
indications of beginning faults on the frame, PVC parts and the like.
REPAIR
If there is a fault on your chair you should contact your dealer at once. Defective chairs should
not be used. If your chair needs reconditioning or repair, only original R82 parts must be used.
Accessories or available spare parts which are broken can be forwarded to R82 for repair. If fault
in the fundamental parts, the whole chair need to be returned to R82 for repair. R82 will not be
held responsible for damage or injury caused by use of non-original parts or repairs made by a
non-authorized R82 person.
E
N
G
L
I
S
H
21
GB
STAIN REMOVAL GUIDE
BLOOD
Wasoff blood with cold water. If this fails to help, add a neutral kitchen detergent.
INK
Remove as much as possible with absorbent paper. Clean with 20% denatured alcohol and wash
with water to which a neutral kitchen detergent has been added.
CHOCOLATE AND CONFETIONARY
Dab with lukewarm water
GRASS AND VEGETABLES
Dab with lukewarm water with or without a neutral kitchen detergent.
COFFEE, TEA AND MILK
Remove as much as possible with absorbent paper. Dab with water containing a neutral kitchen
detergent.
BALLPOINT PEN AND COSMETICS
Clean with alcohol
NAIL POLISH
Dab with nail polish remover. Use acetone if this fails to help.
OIL AND GREASE
First sprinkle talcum on the spot and leave. Then brush away. Finally, dab carefully with a cloth
mostened with benzen or alcohol.
SHOE POLISH
Dab carefully with a cloth moistened with benzene or alcohol.
JAM, SYRUP, FRUIT AND JUICE
First remove as much as possible with a spoon. Then dab with lukewarm water.
WINE AND SPIRITS
First remove as much as possible with absorbent paper. Then dab with water containing a neutral
kitchen detergent. Finally, rinse with dilutet denatured alcohol.
PAINT, OILBASED
First clean with turpentine. Then dab with water containing a neutral kitchen detergent. Seek expert advice if the spot is old.
PAINT, WATERBASED
Dab with cold water containing a neutral kitchen detergent. Seek expert advice if the spot is old.
22