1
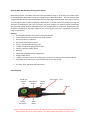
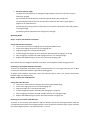
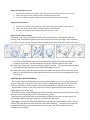
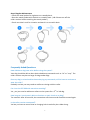
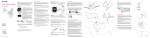
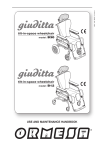
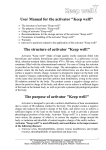
DTC 600 Dog Training Collar System www.mggproducts.co.nz 1 How the MGG DTC 600 dog training system works? MGG ipets products are reliable, effective and comfortable for large or small dogs. The system assists in controlling your dog without a leash for a range of up to 600 metres away. You can instantly send a signal from the Remote Transmitter which activates your dog’s Collar Receiver. Your dog will receive an annoying but safe, harmless stimulation. With correct, consistent use of this product your dog will associate his misbehavior with your corrections and soon enough you will have a well-trained dog. This particular model features adjustable levels and multiple types of stimulation, enabling the user to tweak it according to the dog’s temperament, removing the risk of over stimulation or incorrect usage of stimulation. Features Re-chargeable Remote Transmitter and Collar Receiver Waterproof Remote Transmitter and Collar Receiver 8 intensity levels of Vibration 8 intensity levels of Static Shock Easy to use, adjustable Intensity Dial Trouble free Receiver (Dog) Selector Dial Simple, ergonomic design layout Belt Clip Quick and straightforward pairing process Range of 600 metres Capable of control of up to three dogs (extra receivers are available from MGG Products) Adjustable thick TPU strap to accommodate almost any size of dog 3 modes: Tone, Vibration and Static Shock Key Definitions On/Off and Intensity Dial Select dogs 1, 2 or3 Static Shock Button Vibrate Button Antenna Pairing Receptacle Beep Button Please charge the Remote Transmitter and Collar Receiver for 6 hours separately before first use. 2 Even though it may say it is fully charged. This will condition the battery. (First time only) Remote Transmitter Antenna: Transmits signal from Remote Transmitter to the Collar Receiver Transmitter Indicator Light: When pressing stimulation buttons the Transmitter Indicator Light flashes green and solid red when charging the battery. Intensity Dial: Rotate the dial to adjust the level of stimulation from 0 – 8. In addition, powers on and off the Remote Transmitter. Receiver (Dog) Selector Dial: Rotate the dial to select a receiver. Up to three receivers can pair to the Remote Transmitter. Vibration Button: Delivers vibration stimulation to the selected receiver. Static Shock Button: Delivers static shock stimulation to the selected receiver. Tone Button: Sends a tone signal to the selected receiver which then emits a tone. Transmitter Charging Jack: Charges the battery of the Remote Transmitter when connected to a usb power source. Belt Clip: Allows for the possibility of hands free training. Remote Transmitter Pairing Receptacle: Pairs the Remote Transmitter to the Collar Receiver(s) or powers off the Collar Receiver when properly aligned. Rubber Bung: Protects the internal components of the Remote Transmitter from dust and water. Always remember to replace after charging is complete. Probes (contact Points) The Indicator light is this side Charging Port with Rubber Bung Triangular shaped pairing receptacle mark Collar Receiver Contact Points: Contact points cover the metal screws, and through them static shock stimulation is delivered. Collar Receiver Charging Jack: Charges the battery of the Collar Receiver when connected to a usb power source. Collar Receiver Pairing Receptacle: Pairs the Collar Receiver to the Remote Transmitter or powers off the Collar Receiver. Rubber Bung: Protects the internal components of the Collar Receiver from dust and water. Always remember to replace after charging is complete. 3 Receiver Indicator Light: (A) When the Collar Receiver is charging the light will be a solid red. It switches to green when fully charged. (B) In standby status the Receiver Indicator Light will flash green periodically. (C) Stimulation Buttons pressed on the Remote Transmitter will cause a green light to appear on the Collar Receiver. (D) Initiating the pairing process of the Remote Transmitter and Receiver Collar will produce a solid green light. (E) Powering off the Collar Receiver will give off a red light. Operating Guide Step 1 - Prepare the Remote Transmitter Charge the Remote Transmitter 1. Uncover the Transmitter Charging Jack by lifting the Rubber Cover. 2. Insert the charging connector into the Charging Jack. 3. Plug the charger into a standard wall outlet. 4. A solid red light will appear on the Transmitter indicating that charging is occurring. 5. Once charging is complete the solid red light will turn to a solid green light. 6. Replace the Rubber bung to protect the Transmitter Charging Jack. Note: Before first use charge the Remote Transmitter until completion of the charging process. Powering on and off the Remote Transmitter To power on the Remote Transmitter rotate the Intensity Dial so it is no longer selecting “off.” If done correctly the Transmitter Indicator Light will be flashing green. To power off the Remote Transmitter rotate the Intensity Dial to select “off” and the Transmitter Indicator light will cease flashing. Step 2 - Prepare the Collar Receiver Charge the Collar Receiver 1. Uncover the Collar Receiver Charging Jack by lifting the Rubber bung. 2. Insert the charging connector into the Charging Jack 3. Plug the charger into a standard wall outlet. 4. A solid red light will appear indicating that charging is in progress. 5. Once charging is complete the solid red light will turn to a solid green light. 6. Replace the Rubber bung to protect the Collar Receiver Charging Jack. Powering on and off the Collar Receiver To power on the Remote Collar Receiver align the Remote Transmitter Pairing Receptacle with the corresponding Collar Receiver Pairing Receptacle. Once the Receiver Indicator Light is green separate the two Pairing Receptacles. The Collar Receiver is now on. 4 To power off the Remote Collar Receiver turn off the remote transmitter, realign the Remote Transmitter Pairing Receptacle with the corresponding Collar Receiver Pairing Receptacle. Once the Receiver Indicator Light goes red separate the two Pairing Receptacles. The Collar Receiver is now off. To Pair, hold these two triangular pairing receptacle marks together and follow the instructions below Step 3 – Pairing Collar Receiver to Transmitter Rotate the Intensity Dial so it’s no longer selecting “off.” powered on. The Remote Transmitter will now be 1. Rotate the Receiver Selector Dial on the transmitter to 1, indicating the first receiver for pairing. 2. Ensure the Collar Receiver is off. 3. Align and the Remote Transmitter Pairing Receptacle with the corresponding Collar Receiver Pairing Receptacle. Hold until the Receiver Indicator Light is a steady green, once the steady green light begins to flash press any of the stimulation buttons. Pairing is now complete. 4. If needing to pair a second or third Collar Receiver, repeat these steps but rotate the Receiver Selector Dial on the transmitter to 2 or 3, depending on what Receiver Collar you’re pairing. Step 4 - Test the Training System Functions The testing methods will help determine whether the training system is functioning as intended. Please ensure that the pairing process is complete before attempting to test the functionality. Testing the Static Shock Function 1. Put the test bulb over the Contact Points of the Collar Receiver. 2. Power on the Remote Transmitter and adjust the Intensity Dial from off to 0 or above. 3. Select the correct Collar Receiver with the Receiver Selector Dial on the transmitter. 4. Press the Static Shock Button and the test bulb will flash orange, indicating the static shock function is operating correctly. Test Light. Place over the probes and the light will flash when the collar is shocking 5 Testing the Vibration Function 1. Power on the Remote Transmitter and adjust the Intensity Dial from off to 0 or above. 2. Select the correct Collar Receiver with the Receiver Selector Dial. 3. Press the Vibration Button and the Collar Receiver will respond appropriately. Testing the Tone Function 1. To power on the Remote Transmitter move the Intensity Dial from the “off” position. 2. Select the correct Collar Receiver with the Receiver Selector Dial. 3. Press the Tone Button and the Collar Receiver will emit a tone. Step 5 Fit the collar-receiver Important : The proper fit and placement of the collar-receiver is essential for effective training. The metal contact probes must have direct contact with your dog’s skin as follows: (1) To fit the collar-receiver you will need to attach the collar-strap to the receiver box. (3A) (2) With your dog standing in front of you, place the collar-receiver around its neck so the receiver box and probes are on the underside of your dog’s neck and making direct contact with the skin. You may need to trim the fur to ensure good contact. (3B) (3) Fasten the collar-strap. The fit should be sung but not taut. You should be able to place one finger beneath the collar-strap around your dog’s neck (3C) (4) Allow your dog to wear the collar-receiver for several minutes and then check the strap again. As your dog becomes more familiar with the collar-receiver you should ensure the fit is comfy. CAUTION : RISK OF SKIN DAMAGE . For comfort, safety and effectiveness of this product please see to it that you check the fit of your dog’s collar frequently. If any skin irritation is observed, discontinue the use of the collar for a few days. If the condition persists beyond 48 hours, see your veterinarian. . Do not attach a leash to the collar, which can result in squeezing the metal probes too tightly against your dog’s neck. . The collar-receiver is not designed to be worn constantly. We recommend the collar not be worn for more than 12 hours out of every 24-hours period. . Most dogs feel uncomfortable when wearing the collar for the very first time. Don’t use any functions before the dog has gotten accustomed to the collar. . We suggest you give the dog VIBRATION before starting the STATIC SHOCK. After a time of training your dog will learn that shock will come after vibration. In this way, the vibration alone can effectively curb the misbehaviors of your dog. The STATIC SHOCK might be unnecessary sometimes. 6 Step 6 Regular Maintenance . Check the metal probes for tightness on a weekly basis. . Rinse the metal probes with alcohol on a weekly basis. ( NB: Please turn off the collar-receiver before touching the metal probes. ) . Check your dog’s neck for irritation and wash it on a weekly basis. Frequently Asked Questions: How old does a dog have to be before using the system? Your dog should be able to learn basic obedience commands such as “sit” or “stay”. The collar-receiver may be too large for dogs under 6Kgs. Once my dog is trained and has been obeying my commands, will he have to continue to wear the collar? Probably not but you may need to reinforce training with the collar. Can I use the DTC 600 with more than one dog? Yes , you just need to add more collars to the system for a 2nd or 3rd dog. How long can I continuously deliver vibration or static shock to my dog? Ten seconds. After 10 seconds, the transmitter will time out and should be started again. Is the collar-receiver waterproof? Yes but you have to ensure that its charging hole is sealed by the rubber bung. 7 Can I use the system on aggressive dogs? No. Please do not use this system to correct or eliminate any form of aggression or biting behavior. In the event that your dog is showing signs of aggressive behavior then contact a professional dog trainer in your vicinity. Will I get exactly 600m of range with the DTC 600 re-chargeable training collar? The range you get with this system will vary according to terrain, vegetation, as well as transmission from other radio devices. What do I do if my dog’s neck becomes red and irritated? Discontinue use of the collar until the skin has healed. If the condition persists beyond 48 hours see your veterinarian. Can I replace the collar-receiver with another kind of collar? No . Can I attach a leash to the collar-receiver? No. This can result in pulling the metal probes too tightly against your dog’s neck. Attach a leash to a separate, nonmetallic collar or a harness ensuring the extra collar does not put pressure on the metal probes. How will I know when to charge the system? For both a red light will flash when they need charging. What is the life-span of the lithium batteries of the remote transmitter and the collar-receiver? They can be charged over 400 times How long can I leave collar-receiver on my dog? As the collar is not designed to be worn constantly we recommend the collar not be worn for more than 12 hours out of every 24-hour period. How should I arrange training sessions for my dog? Make the training sessions short and positive, between 10-15 minutes long each time. This will enable your dog to keep its attention focused on you. What kind of dogs is the DTC 600 training collar suitable for? The collar is adjustable from length 15cm to 50cm. If your dog’s neck circumference is larger than 50cm this collar may not be suitable for your dog. This collar is NOT suitable for dogs under 6Kgs. 8 Troubleshooting My dog is not responding . You need to charge the remote transmitter and the collar-receiver for 6H separately before initial use. . Check to see if the remote transmitter and the collar-receiver have been turned on. . Check the intensity levels of vibration and static shock . Make sure the collar-receiver has sufficient power to operate . Restart the collar-receiver by pairing it again if necessary. . Please test the 4 functions (i.e. BEEP, LIGHT, VIBRATION AND STATIC SHOCK) before initial use. See the “test the training system” part of this guide for testing methods. . Check if the collar fits snugly with your dog’s neck. . If necessary, please trim your dog’s neck hair so that the metal probes come in direct contact with your dog’s skin. My collar-receiver worked great for some time but now it does not work after charging. . Firstly check if the receiver has been charged correctly. Check the “prepare the collar-receiver” part of the guide for the correct charging method. . Check that the receiver has been turned on. I want to test the collar-receiver on myself but it does not work. . When testing the receiver on your hands, please touch the 2 electrodes at the same time as touching one single electrode will not work. General Training Tips The following are tips on how to get the best out of your MGG Remote Dog Training Collar: This product is intended to support behavioural training and is not designed to be used without the necessary interactions. Always praise your dog for good behaviour. Verbal commands combined with positive reinforcement will contribute to the success of your training and will achieve the desired results in the shortest time. The recommended age for training is a minimum of 6 months provided that the dog has the attention span and capability to learn basic commands. A good indication will be if he/she can understand and obey “sit” and “stay” commands. That shows that the brain is sufficiently developed to understand the training collar logic. Work with your dog on one behaviour at a time to avoid confusion and frustration. Use as little stimulus as possible and only to reinforce verbal commands when necessary. Do not over correct your dog. 9 Use verbal commands first and supplement with a corrective stimulus only as needed. consistent with your verbal commands using the same words every time. Be Use the beeps as a warning by pushing the Beep button. The dog will become conditioned to the beep preceding the corrective stimulus and will soon learn to recognise the beep as a warning along with your verbal command. This system is not appropriate for correcting aggressive behaviour. professional trainer for advice about that. Please consult a Do not rely on this product solely to train your dog. If your dog shows signs of growling, snarling, biting or aggression while using the collar, stop training immediately and contact a professional trainer. Although most dogs respond to this product, some will not. effectiveness of this or any other trainer on your dog. MGG cannot guarantee the This product is not recommended for aggressive or elderly animals in poor health or animals otherwise unable to withstand the static stimulus. Caution: Any collar worn for extended periods can cause a condition similar to bedsores known as Pressure Necrosis. To reduce the possibility you must do the following. Never leave the collar on your dog for more than 12 hours per day. Examine your dog’s neck daily for any signs of a rash or a sore. Supervise your dog during the first 2 days of training. Regularly check the fit of the collar to prevent excessive pressure. You should be able to insert one finger between the collar strap and your dog’s skin. SAFETY: To maximise the effectiveness of the DTC 600 remote training system and the safety of your dog, please check the fit of the collar frequently and re-adjust the position of the electrodes on their neck if necessary, checking for signs of irritation or discomfort. If signs of skin irritation are noticed, immediately discontinue use and apply antibiotic ointment to help heal and sooth the area. If the condition persists beyond 48 hours seek the advice of a veterinarian. Such side effects are extremely rare and are generally caused by a more serious underlying condition. Wash the dog’s neck area and the correction poles as often as needed to keep the area and poles clean. Make sure the straps are clean for best performance. The straps can be removed for cleaning but must be replaced in the same position. Stop any undesirable behaviour by administering the stimulus DURING THE ACTUAL BEHAVIOUR. Using this device as a punishment after the fact does no good at all and will confuse or frustrate the animal. 10 Warranty Terms & Conditions and Compliance: MGG warrants to the original retail purchaser that your MGG DTC 600 Remote Training System will be free from defects in material and workmanship for a period of one year from the date of the original retail purchase, provided that the damage is not caused by abnormal use or neglect. Warranty does not cover lost parts, cracked screen, physical damage or water damage. Warranty may include repair or exchange. After the expiration of the warranty, replacements and repairs are available for an additional charge. Terms of Use: It is understood that you accept without modification of the terms and conditions, the offering to you of this product. This training collar has been designed for the training of dogs. Your dog’s temperament may not be suitable for this system. This collar is not recommended for dogs that are aggressive or have been neglected. This product is designed for dog training purposes. It is not intended to punish, injure, provoke or harm. Using this product in a way in which is not intended is strictly prohibited . In no event shall MGG be liable for any damages arising out of or connected with the use or misuse of this product. Buyer assumes all risks and liability associated with the use of this product. Modification of Terms and Conditions: MGG reserves the right to change the terms and conditions under which this product is offered. This equipment is in full compliance with the limits for Class B digital device, pursuant to Part 15 of the FCC rules in the United States and Canadian ICES-003 regulations. For Europe, this product meets the standards for R&TTE-Directive 11955/EEC compliance. In some countries, this device may be restricted according to frequency or transmission regulations. The user is responsible for compliance. Unauthorised changes or modifications to the equipment are not approved by MGG and are additionally in violation of FCC regulations. Such modifications render the warranty immediately void. 11 www.mggproducts.co.nz 12