1
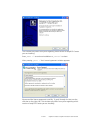
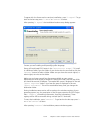
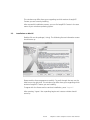
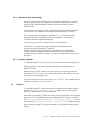
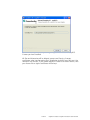
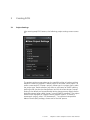
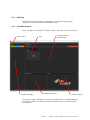
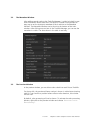
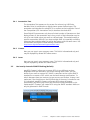
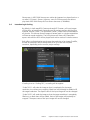
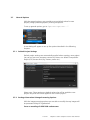
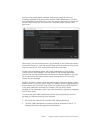
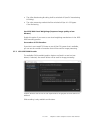
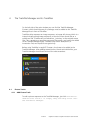
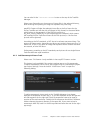
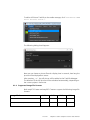
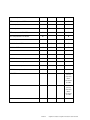
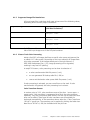
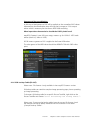
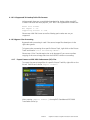
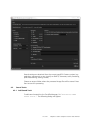
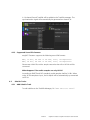
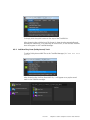
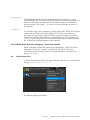
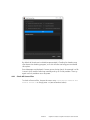
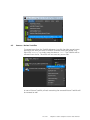
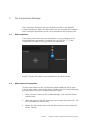
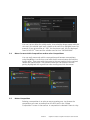
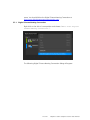
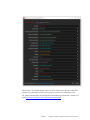
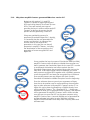
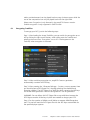
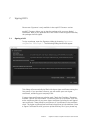
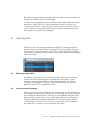
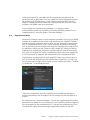
easyDCP Creator
easyDCP Creator+
User manual
Version
3.3
Date
Erlangen, 26/10/2015
Contents
1
1.1
2
2.1
2.2
2.3
2.4
2.5
3
3.1
3.2
3.3
3.4
3.5
3.6
3.7
4
4.1
4.2
4.3
Welcome
Feature Overview
4
4
Installation
Parallel installation of easyDCP Creator and easyDCP Creator+
Installation on Windows
Installation on MacOS
License Activation and Certification
2.4.1
View current license status
2.4.2
Application Data and Settings
2.4.3
Software Upgrade
Uninstall
5
5
5
9
10
10
11
11
11
Creating DCPs
Project Settings
3.1.1
Edit Rate
3.1.2
The Main Window
The Metadata Window
The Preview Window
Packing List (PKL) Parameters
3.4.1
Annotation Text
3.4.2
Creator
3.4.3
Issuer
Use InterOp instead of SMPTE Packing (default)
Letterboxing & Scaling
General Options
3.7.1
Default Project Settings
3.7.2
Package Generation & Image Processing Options
3.7.3
GPU JPEG 2000 Encoder
13
13
14
14
15
15
16
17
17
17
17
18
19
19
19
21
The Trackfile Manager and its Trackfiles
Picture Tracks
4.1.1
Add Picture Track
4.1.2
Add Stereoscopic Picture Track
4.1.3
Add Still Picture Track
4.1.4
Supported Image File Formats
4.1.5
Supported Image File Resolutions
4.1.6
Picture Track Color Processing
4.1.7
Export Frames to JPEG 2000 Codestream (J2C) Files
Sound Tracks
4.2.1
Add Sound Track
4.2.2
Add Sound Track for Dolby Atmos
4.2.3
Supported Sound File Formats
Subtitle Tracks
4.3.1
Add Subtitle Track
4.3.2
Add Auxiliary Data (Dolby Atmos) Track
4.3.3
Supported Subtitle File Formats
22
22
22
23
24
25
27
27
30
31
31
33
34
34
34
35
36
2 of 61
easyDCP Creator / easyDCP Creator+ User Manual
4.4
4.5
Check Source Files
4.4.1
Check All Source Files
Remove / Delete Trackfiles
39
40
41
5
5.1
5.2
5.3
5.4
5.5
5.6
The Composition Manager
Add Composition
Add Content to Composition
Change Offset (EntryPoint) and Duration
Move Content within Compositions and to other Compositions
Delete Composition
Content Kind of a Composition
5.6.1
How to change the Content Kind of a Composition
5.7
Content Title
5.7.1
Digital Cinema Naming Convention
5.8
Preview package
5.9
Generate a DCP
5.10
Why does easyDCP Creator+ generate KDMs since version 2.1?
5.11
Why can I not generate a Fraunhofer Digest file when generating DCP?
5.12
Why can I generate a KDM with easyDCP Creator+? Do I still need the easyDCP KDM
Generator?
42
42
42
43
44
44
45
46
46
47
49
49
51
52
6
6.1
Encrypting DCPs
Encrypting Trackfiles
52
53
7
7.1
Signing DCPs
Signing a DCP
54
54
8
8.1
8.2
8.3
8.4
Opening DCPs
Editing an opened DCP
Saving an opened package
Supplemental DCPs
Opening encrypted DCPs
55
55
55
56
57
9
9.1
9.2
Using Scripting Functionality
Using command line arguments
Examples
57
58
58
10
10.1
10.2
Tips and Tricks handling DCPs
Uploading DCPs and KDMs to FTP-Servers
Opening XML files in textfile editors
59
59
60
11
Contact
61
3 of 61
52
easyDCP Creator / easyDCP Creator+ User Manual
1
Welcome
Thank you for purchasing easyDCP Creator(+) software.
With the easyDCP Creator(+) software you are now able to create DCPs in a
fast and easy way. In the easyDCP Creator standard version you are able to
create unencrypted DCPs. In the easyDCP Creator+ version you are able to
create additionally stereoscopic and encrypted DCPs.
With easyDCP Creator(+) it is possible to create SMPTE compliant DCPs or J2K
Interop DCPs. This software solution needs only a standard PC/Mac to make
either 2k or 4k content ready for the distribution to a digital movie theater.
There is no special or additional hardware necessary.
1.1
Feature Overview
There are two versions of easyDCP Creator(+) available: easyDCP Creator and
easyDCP Creator+. The different features of these two versions are listed in the
table below:
Feature
easyDCP
Creator
easyDCP
Creator+
SMPTE and Interop compliant DCP creation
Yes
Yes
Stereo, 5.1 and 7.1 Surround Audio
Yes
Yes
DPX, TIFF and JPEG 2000 Input
Yes
Yes
Automatic Gamut Transformation from ITU709 to XYZ
Yes
Yes
SMPTE & Interop compliant Subtitles
Yes
Yes
Metadata adjustment (e.g. Offset, Entry Point, Duration, Content
Titles, Content Types, Annotation Texts)
Yes
Yes
Graphical User Interface with Drag and Drop
Yes
Yes
Windows and Mac OS Version
Yes
Yes
3D-Support
No
Yes
Encryption and Signature
No
Yes
4 of 61
easyDCP Creator / easyDCP Creator+ User Manual
Scriptable
No
Yes
Supplemental DCPs (DCPs with referenced MXF tracks)
No
Yes
Loading Key Delivery Messages (KDMs)
No
Yes
QuickTime Input
Yes
Yes
Loading DCPs
Yes
Yes
Loading/Generating IMP (IMF packages)
No
Yes
Dolby Atmos (packaging only)
Yes
Yes
2
Installation
The installation of easyDCP Creator(+) will only take a few minutes. You can
download one single executable setup file (for Windows) or one single package
file (for Mac).
Please check regularly to make sure you have the latest version.
To install easyDCP Creator or easyDCP Creator+, make sure you have the
certain rights (i.e. admin rights).
2.1
Parallel installation of easyDCP Creator and easyDCP Creator+
Both versions of easyDCP Creator (easyDCP Creator and easyDCP Creator+)
may co-exist and can be installed parallel on one operating system. These two
versions are completely independent and “don’t see each other”. Both versions
should be installed in different directories. This can be set up during the
installation process (see 2.2 Installation on Windows or 2.3 Installation on
MacOS).
2.2
Installation on Windows
On windows systems double-click on the one executable setup file. The setup
start window should appear:
5 of 61
easyDCP Creator / easyDCP Creator+ User Manual
This window may differ from yours regarding which version of easyDCP Creator
you are installing.
Press „Next >“ to continue installation or „Cancel“ to abort.
After pressing „Next >“ the License Agreement window appears:
Please read the license agreement carefully. To scroll through the text use the
slide bar on the right side. This window may differ from yours regarding which
version of easyDCP Creator you are installing.
6 of 61
easyDCP Creator / easyDCP Creator+ User Manual
To agree with the license and to continue installation, press “I Agree”. To go
back to the last step press “< Back” or “Cancel” to abort.
After pressing “I Agree” the installation location setup dialog appears:
This window may differ from yours regarding to which version of easyDCP
Creator you are installing and operating system language.
Setup will install easyDCP Creator in the “Destination Folder”. To install
in a different folder, type the folder of your choice into the text field or click the
“Browse” button to select a folder. Make sure you have the certain rights (i.e.
admin rights) to write to that folder.
Make sure you have enough free disc space available on your system.
Dependent on what version of easyDCP Creator you install, this size may differ,
but should be around 50 MBytes. The needed disc space is displayed in the text
“Space required” below. Your free disc space is displayed in the text
“Space available”. This will be recalculated every time you change the
destination folder.
During installation some entries will be made to the windows registry of your
operating system (e.g. for association of the file type extension for DCP Project
Files *.dcpproj, uninstalling information, licensing information). These
registry entries will be removed during uninstall (see 2.5 Uninstall).
To start the installation, press “Install”. To go back to the last step press “<
Back” or “Cancel” to abort.
After pressing “Install” the installation process window appears:
7 of 61
easyDCP Creator / easyDCP Creator+ User Manual
This window may differ from yours regarding to which version of easyDCP
Creator you are installing. To show details (e.g. to view what files and where
the files are copied), press the button „Show details“. This installation
process should take only a few seconds.
After finishing the installation process, the following dialog should appear:
8 of 61
easyDCP Creator / easyDCP Creator+ User Manual
This window may differ from yours regarding to which version of easyDCP
Creator you are currently installing.
After successful installation process, you can find easyDCP Creator in the start
menu of your windows operating system.
2.3
Installation on MacOS
Double-click on the package (*.dmg). The following license information screen
should come up:
Please read the license agreement carefully. To scroll through the text use the
slide bar on the right side. This window may differ from yours regarding which
version of easyDCP Creator you are installing.
To agree with the license and to continue installation, press “Agree”.
After pressing “Agree” the unpacking begins and a status window should
come up:
9 of 61
easyDCP Creator / easyDCP Creator+ User Manual
This window may differ from yours regarding to which version of easyDCP
Creator you are installing.
After finishing the unpacking process, a new drive is mounted to your desktop.
You may copy the Application to the Program folder or the entire mounted
drive to a new directory of your choice. Now you are ready to start the
application.
2.4
License Activation and Certification
Download free demo versions of easyDCP Creator or easyDCP Creator+ at
www.easydcp.com
These free versions are subject to the demo mode restrictions, go to “context
menu->Help->Request License & Certificates” and fill in the licensee’s name,
the URL that shall be stated in the custom signer and server certificates
(easyDCP Creator+ only) and a password that is used to protect access to the
certificates. If the computer is connected to the Internet, click the “submit”
button. The default web-browser will open www.easydcp.com, where further
instructions will guide you through the purchase process.
After the purchase, a link to the commercial installer as well as a zip file with
the License and certificates will be available for download within your user
account at www.easydcp.com. The zip file can be dragged & dropped into the
commercial easyDCP Creator installation to unlock it.
The procedure is also described in a screen cast at www.easydcp.com.
2.4.1 View current license status
To view the license details, right-click the canvas to open the context menu and
select „Help -> License information”.
10 of 61
easyDCP Creator / easyDCP Creator+ User Manual
2.4.2 Application Data and Settings
easyDCP Creator automatically creates an application data folder. It contains
the settings file as well as a folder where the server certificates are stored, a
repository for KDM and easyDCP Digest files and a repository for color
transform files.
On Windows, it is located in <User Application Data>/Fraunhofer IIS/easyDCP
Creator/ and <User Application Data>/Fraunhofer IIS/easyDCP Creator+/
The user application data folder on Windows 7 is in "C:/Documents and
Settings/<username>/Application Data/. On Windows 7 it is located in
C:/Users/<username>/AppData/Roaming/
A shortcut is to just enter %APPDATA% into the address bar.
On Mac OS X, it is located in \Users\<username>\Library\Application
Support\Fraunhofer IIS\easyDCP Creator\ or
\Users\<username>\Library\Application Support\Fraunhofer IIS\easyDCP
Creator+\ order to activate a license under Windows you should have an
installed version of easyDCP Creator(+) as well as a zipped license file on your
computer.
2.4.3 Software Upgrade
To upgrade easyDCP Creator, log into your user account at www.easydcp.com.
Before installing a new version, please uninstall your existing version of
easyDCP Creator.
Make sure your license is valid for the new version by reviewing the license
information (hit ‘F2’). If you need a new license for the new version, you may
purchase it at www.easydcp.com.
Only major releases require a new license, e.g. 3.0 to 3.1. Point releases do not
require a new license, e.g. 3.0.0 to 3.0.1.
2.5
Uninstall
To uninstall all easyDCP Creator components (including the windows registry
entries) run “Remove easyDCP Creator”. Make sure you have certain
rights (e.g. admin rights) to do such operation.
If however your easyDCP Creator entry does not exist anymore in the Windows
start menu, go to the folder where you installed easyDCP Creator. Per default
this is “C:\Programme\Fraunhofer IIS\easyDCP Creator\” and run
the executable “Uninstall easyDCP Creator+.exe” by double-clicking.
After running the easyDCP Creator Uninstaller, the following window should
appear:
11 of 61
easyDCP Creator / easyDCP Creator+ User Manual
This window may differ from yours regarding to which version of easyDCP
Creator you have installed.
All files and directories will be deleted, except user files (e.g. licenses,
certificates, color transformation files). Directories including user files won’t be
removed. This ensures, if you update easyDCP Creator to a newer version, that
your license file or signer certificates will be kept.
12 of 61
easyDCP Creator / easyDCP Creator+ User Manual
3
Creating DCPs
3.1
Project Settings
After starting easyDCP Creator+, the following project settings screen comes
up:
The project settings screen gives you the possibility either to load an existing
easyDCP Creator+ or easyDCP Creator project or to create a new project. To
create a new easyDCP Creator+ project, please type in a project name, select
the project type, decide whether you want to use Interop or SMPTE packing
(packing mode can also be changed later) and hit the create button. Interop
setting is the default and recommended setting because some digital cinema
playback systems (often called “server”) are not SMPTE compliant. The project
name will be displayed on a digital cinema playback system. To create a
stereoscopic project, select “2k Stereoscopic”. To create an Interoperable
Master Format (IMF) package, choose one of the IMF presets.
13 of 61
easyDCP Creator / easyDCP Creator+ User Manual
3.1.1 Edit Rate
Several edit rates are available, depending on the selected project type,
resolution, stereoscopic and Interop/SMPTE mode.
3.1.2 The Main Window
After creating a new easyDCP Creator+ project, the start-up screen comes up:
Main Menu
Trackfile Manager
Composition and
Reel Manager
Reel
Metadata Window
Trackfile Preview
The main window is divided into several sub windows like a Trackfile Manager
and a Reel window. The following sections explain how to use the windows
and features.
14 of 61
easyDCP Creator / easyDCP Creator+ User Manual
3.2
The Metadata Window
After adding several tracks to the Trackfile Manager, it might be helpful to get
some information about these files. The easyDCP Creator+ tool provides an
easy way to set the important metadata of each real due to the Metadata
Window. The Metadata Window can be found at the bottom of the main
window. After clicking onto an item in the Trackfile Manager, you can see the
metadata in a table. The data shown in the table is read only.
3.3
The Preview Window
In the preview window, you are able to take a look into each Picture Trackfile.
On the top left, the previewed frame number is shown in white letters (starting
with 0). If you scroll to a position before offset or after duration, this number
will turn red.
By default, color processing will not be shown. To activate the color processing
preview, right-click on the preview window and choose “Preview Color
Processing”:
15 of 61
easyDCP Creator / easyDCP Creator+ User Manual
Please note: Previews for sounds are not yet supported.
3.4
Packing List (PKL) Parameters
The packing list is a main part of the final DCP. The packing list parameters
contain information about the final DCP (i.e. creator, issuer, annotation text).
These parameters will be packed into the DCP and may be displayed on various
digital cinema servers before, while, and after the DCP ingest. However, some
information will be packed into the each Composition playlist (CPL) of the DCP.
To edit the packing list parameters (which are a main part of the final DCP), go
to the main menu and click “Project->Packing List (PKL)
Parameters…“ or simply hit the shortcut “Ctrl+P”:
16 of 61
easyDCP Creator / easyDCP Creator+ User Manual
3.4.1 Annotation Text
The Annotation Text appears on the screen if a volume (e.g. USB-Drive,
Harddisc Drive) is connected to a digital cinema system before ingest. This
annotation text describes the whole DCP. In contrast to the Annotation Text of
the Composition (CPL Annotation Text) it describes the whole DCP.
Some Digital Cinema servers only show a limited number of characters on their
display screens. If the annotation text is long, much of the information may be
cut off or not visible unless you scroll to a second page. This makes locating a
specific composition difficult if you have multiple titles. It’s especially confusing
when you have multiple trailers as well as the feature with the same name. You
should follow the Digital Cinema Naming Convention at
http://www.digitalcinemanamingconvention.com/.
3.4.2 Creator
Here you can type in your company name. This field is informational only and
may be displayed by several D-Cinema servers.
3.4.3 Issuer
Here you can type in your company name. This field is informational only and
may be displayed by several D-Cinema servers.
3.5
Use InterOp instead of SMPTE Packing (default)
easyDCP Creator(+) allows you to create DCPs in two different versions:
Regardless what you selected in the project settings start screen, you can
decide if you want to create a DCP which is compliant to the current SMPTE
standards or to create a DCP which uses the latest Interop specifications. To
switch between these two versions just go to menu and choose “Interop”and
make sure if the check box on the left hand side of the entry is checked or not.
If it is checked, easyDCP Creator+ will create DCPs using the Interop
specifications. By clicking the check box the mark will be unselected. In this
mode easyDCP Creator+ will create DCPs using the SMPTE standard. IMPs can
only be generated in SMPTE mode.
17 of 61
easyDCP Creator / easyDCP Creator+ User Manual
Please note: A JPEG 2000 interop can neither be ingested nor played back on a
so called “E-Cinema” System. However, some E-Cinema systems are able to
play back JPEG 2000 interop DCPs at lower data rates (< 80MBit/s).
3.6
Letterboxing & Scaling
By default, in both easyDCP Creator and easyDCP Creator+, all input images
will be pillar- or letterboxed. Depending on the project settings and the input
material, vertical (“pillar-”) or horizontal (“letter-”) black bars will be added to
all pictures. This ensures that all images of several reels in a single composition
will have an equal resolution. The final pictures will have a DCI-compliant
aspect ratio and the DCP will be played back well on various D-cinema servers.
Both pillar- and letterboxing may change the resolution of an image Trackfile,
as well as the aspect ratio. It always tries to fill up to the next full pixel
container, depending on the current project settings.
If scaling is set to “Scaling Off”, no scaling will be applied.
“Scale To Fit” will scale the image so that it completely fits the target
resolution, but without any cropping. Black bars will probably be added to fill
the target resolution. The aspect ratio of the input image will not be changed.
“Scale To Fill” will scale the image so that the target resolution is completely
filled out, no black bars will be added. Parts of the images will probably be
cropped. The aspect ratio of the input image will not be changed.
18 of 61
easyDCP Creator / easyDCP Creator+ User Manual
3.7
General Options
With the general options, you are able to set up default values for new
projects, image processing options, and log file options.
To set up general options, got to “Options->Options...”
A new dialog will appear to set up the options described in the following
chapters:
3.7.1 Default Project Settings
Default project settings are automatically applied when creating a new project.
You can set your own company name as the issuer or a default Composition
Playlist (CPL) content kind (e.g. feature, trailer etc.).
Please note: These settings are default values that will be applied to new
projects only and will not be applied to the current project.
3.7.2 Package Generation & Image Processing Options
With the image processing options you are able to modify the way images will
be processed during DCP generation.
Force re-encoding of JPEG 2000 codestreams
19 of 61
easyDCP Creator / easyDCP Creator+ User Manual
With the re-encoding option enabled, each source image file will be reencoded, regardless if the source files are JPEG 2000 codestreams (*.j2c files
and codestreams from MXF files) or not. This ensures that each final image will
have the right format (i.e. the correct DCI compliant profile, bitrate, color
gamut etc.).
Please note: The re-encoding option is only available in the full licensed version
of easyDCP Creator(+), since the easyDCP logo will be burned into each picture
frame at the top left. Thus, each picture has to be re-encoded.
Without the re-encoding option, JPEG 2000 codestreams will be packed
directly into the final package. This may speed up the package generation
process. The user has to make sure that the source files are already in the right
format. No source file checks will be made, the source files will be copied
directly into the package.
easyDCP Creator(+) doesn’t check the input images if the input format is JPEG
2000 in terms of e.g. color space. easyDCP Creator(+) checks image dimensions
and bit depth only. Using this chain a user can create his own JPEG 2000 files
in the post production and easyDCP Creator(+) will just do the faster
packaging. The advantage is that if any color processing is bypassed, packaging
will be much faster.
To ensure that JPEG 2000 codestreams will be directly copied into the final
package, the following settings must be done:
All source files shall be DCI compliant JPEG 2000 codestreams.
The JPEG 2000 codestream re-encoding shall be switched off (see 3.7.2
Package Generation & Image Processing Options).
20 of 61
easyDCP Creator / easyDCP Creator+ User Manual
The pillar-/letterboxing & scaling shall be switched off (see 3.6 Letterboxing
& Scaling).
The color processing method shall be switched off (see 4.1.6.3 Bypass
Color Processing
Use JPEG 2000 Visual Weightings (improves image quality at low
bitrates)
Enable this option if you want to use visual weightings mechanisms in the JPEG
2000 encoding process.
Set number of CPU Encoders
If you don’t want easyDCP Creator to use all the CPU power that is available,
you can set the number of encoders that will be used for image processing.
3.7.3 GPU JPEG 2000 Encoder
The available CUDA-enabled graphics devices are listed in a text box (see
below). If selected, the certain device will be used for image processing.
Graphic devices that do not fit the requirements are greyed out and cannot be
selected.
GPU encoding is only available on Windows.
21 of 61
easyDCP Creator / easyDCP Creator+ User Manual
4
The Trackfile Manager and its Trackfiles
On the left side of the main window you can find the Trackfile Manager.
Content, which should be part of a package, must be added to this Trackfile
Manager first in form of Trackfiles.
Trackfiles either represent an image sequence, an image still picture (which is a
internal virtually copied image sequence), a bunch of mono sound files or a
subtitle xml file. Trackfiles are just references, “pointing” at the original source
files. Thus, renaming or removing any source files means, you have to be added
to the Trackfile Manager again. Trackfiles may have a description (i.e.
Annotation Text) and a specific encryption key.
Before using Trackfiles in easyDCP Creator+, they have to be added to the
Trackfile Manager. After adding several picture, sound and subtitle files, your
Trackfile Manager should look similar to the next screenshot:
4.1
Picture Tracks
4.1.1 Add Picture Track
To add a picture sequence to the Trackfile Manager, just click ”Trackfile>Add Picture Track…” or simply drag and drop files onto
the Trackfile manager.
22 of 61
easyDCP Creator / easyDCP Creator+ User Manual
You can also hit the “+Picture Track” button at the top of the Trackfile
Manager.
Please note: Depending on the amount of image files in the selected directory,
both browsing and opening an image file sequence may take long.
easyDCP Creator will take the selected picture file as the first frame for the
Picture Trackfile and will also pick all images (of this format) in the same folder
which belong to the sequence. If the fifth picture file (e.g.
big_buck_bunny_00004.j2c) of this image sequence is selected, which means
the imported Picture Trackfile will start at this fifth picture (i.e. the first four
pictures will be ignored).
According to the DCI standards, a DCP has to be at least one second long. The
amount of frames varies, depending on the current project’s frame rate (e.g. 24
frames for 24 fps). If you open an image file sequence with a duration less than
one second, an error will occur.
Furthermore, according to the DCI standards, each picture of one single Picture
Trackfile shall have equal resolution.
4.1.2 Add Stereoscopic Picture Track
Please note: This feature is only available in the easyDCP Creator+ version.
This button is only available if the projects settings are set to 2k stereoscopic.
To add a stereoscopic Picture Track, your project must be a stereoscopic project
(see Project Settings). Press the button “Add Picture Track” to open the
following dialog:
To add a stereoscopic picture track to the Trackfile Manager, just choose
separate file sequences for each eye, (i. e. one file sequence for the left eye and
one file sequence for the right eye). Both file sequences have to be equal in
number of files and resolution. Usually this file sequences should be in different
folders whereas the parent directory is the same reel. If you want to load a
stereoscopic MXF file, load it in the left-eye-field and leave the one for the right
eye empty.
23 of 61
easyDCP Creator / easyDCP Creator+ User Manual
4.1.2.1 Numbering of input image file sequences
To represent an image sequence, the image files shall be numbered with or
without leading zeroes (see Examples 1 and 2). In addition, the filenames itself
may contain numbers (see Example 3).
Example 1 (with leading zeroes)
Img_0000001.DPX
Img_0000002.DPX
Img_0000003.DPX
Img_0000004.DPX
…
Example 2 (without leading zeroes)
Pic_998.J2C
Pic_999.J2C
Pic_1000.J2C
Pic_1001.J2C
…
Example 3 (with numbers in filename)
Pic2001_998.TIF
Pic2001_999.TIF
Pic2001_1000.TIF
Pic2001_1001.TIF
…
4.1.3 Add Still Picture Track
Still Picture Trackfiles may be used to show small local advertisings (e.g. “Last
chance to try our ice cream…” or to show a message to the audience
(e.g.“Please put on your 3D glasses now”, “No smoking…”).
24 of 61
easyDCP Creator / easyDCP Creator+ User Manual
To add a still Picture Trackfile to the media manager, click “Trackfile->Add
Still Picture Track…”:
The following dialog should appear:
Now you can choose a picture file and a display time in seconds, how long the
picture will be displayed on screen.
After pressing „Ok“, the still picture will be added to the Trackfile Manager.
The duration of the still picture will be calculated automatically, depending on
the current project’s frame rate.
4.1.4 Supported Image File Formats
Both easyDCP Creator and easyDCP Creator+ support the following image file
formats:
Image File Format
J2C
8 Bit
10 Bit
12 Bit
16 Bit
X
X
X
X
X
J2C (DCI conform)
25 of 61
easyDCP Creator / easyDCP Creator+ User Manual
TIFF uncompressed RGB
X
X
TIFF uncompressed RGBA
X
X
TIFF compressed ZIP RGB
X
X
TIFF compressed ZIP RGBA
X
X
TIFF compressed LZW RGB
X
X
TIFF compressed LZW RGBA
X
X
DPX Windows RGB
X
X
X
X
DPX Windows RGBA
X
X
X
X
DPX Mac RGB
X
X
X
X
DPX Mac RGBA
X
X
X
X
JPG
X
BMP Windows uncompressed
X
BMP Windows compressed
X
BMP Mac uncompressed
X
BMP Mac compressed
X
PNG RGBA
X
X
(will be
internally
downconverted
to 8 Bit)
PNG RGB
X
X
(will be
internally
downconverted
to 8 Bit)
GIF
X
26 of 61
easyDCP Creator / easyDCP Creator+ User Manual
4.1.5 Supported Image File Resolutions
All input image files’ resolutions shall meet at least one of the following values,
depending on the current project’s resolution:
Project Setting
Maximum Input Image Resolution in Pixel
(Full Pixel Container)
DCP 2k
Width : 2048
Height: 1080
DCP 4k
Width : 4096
Height: 2160
IMP
Width: 3840
Height: 2160
For DCPs, one of the above values may be smaller. In other words: at least one
side of the input image must fit the full pixel container.
4.1.6 Picture Track Color Processing
Inside a final DCP, all images shall have a specific color space and gamma (the
so called X’Y’Z’ color space). Depending on the input material, all images have
to be color processed. If the images already are in the right format (i.e.
JPEG 2000 codestream files, *.j2c), image processing can be bypassed,
resulting in very fast DCP packing.
In easyDCP Creator+, color processing can be done via selection of
a color transformation XML file preset (*.xml),
an user generated 3D lookup table file (*.3dl) or
source and destination color spaces XML file presets (*.xml),
If color processing is activated, you see a small icon on the track. If color
transformation is bypassed, the color processing icon is absent.
Color Transform Presets
In versions prior to 3.3.2, color transforms were of the form “source space ->
target space”. Each transform is represented by a file in the color transform
repository. They use a proprietary XML format. The files can be edited and new
ones can be added. These types of color transforms are still available for
backwards compatibility. In the screenshot above, select the “Color Transforms
/ 3D LUTs” group box. The repository can be opened by clicking the folder icon.
New files or 3D LUTs (*.3dl) can be added with the plus icon.
27 of 61
easyDCP Creator / easyDCP Creator+ User Manual
4.1.6.1 ITU 709 to XYZ Color Transformation (default)
Using this chain assures a DCI compliant processing of the input images.
easyDCP Creator+ takes care about the color transformation and JPEG 2000
encoding. EasyDCP Creator+ expects RGB images with a sRGB/709 color
gamut. Use this chain if you don’t want to take care about color spaces and
format conversions.
Note: The color transformation from linear RGB to linear XYZ uses the matrix
defined in SMPTE RP177 Annex B.3, as sRGB/709 has other primaries and white
points than the reference projector.
REC/ITU 709
R’G’B’
color gamut
De-Gamma
(2.2)
RGB
RGB -> XYZ
XYZ
RGB
Gamma
(2.6)
X’Y’Z
’RGB
Input values:
The ranges of values describing the white level and the black level of the ITU
709 standard are not utilized. This means that black is represented by a value
of 0 by each component. On the other hand white is represented by the
maximum value of the file format.
Example 1:
TIFF files with 8 bits => Maximum value = 28 – 1 = 255
Range [0..255]
Example 2:
DPX files with 10 bits => Maximum value = 210 – 1 = 1023
Range [0..1023]
Normalization and Degamma:
Using the given input values easyDCP Creator normalizes the input values and
applies a de-gamma of 2.2
Color Transformation:
The ITU 709 color values will be converted to XYZ color space using the
primaries shown in the following table.
D65 – ITU
709/sRGB
R
G
B
W
x
0,6400
0,3000
0,1500
0,3127
28 of 61
y
0,3300
0,6000
0,0600
0,3290
easyDCP Creator / easyDCP Creator+ User Manual
Gamma and De-normalization:
In this step a fixed gamma of 2.6 will be applied on the normalized XYZ values.
Afterwards a de-normalization step will map the bit-range to 12 bit output
values which is necessary for the correct JPEG 2000 encoding.
What input data characteristics should the R’G’B’ pixels have?
easyDCP Creator(+) uses full input range, means e.g. for 10 Bit 0..1023 code
values (black is 0, white is 1023).
R’G’B’ means a gamma of 2.2 is applied to the linear RGB values.
The color gamut of the RGB values should be sRGB/ITU 709 with D65 white
point.
4.1.6.2 3D Lookup Table (3D LUT)
Please note: This feature is only available in the easyDCP Creator+ version.
3d lookup tables can combine complex image processing steps, hence speeding
up image processing.
To choose a 3d lookup table for a specific Picture Trackfile, right-click on the
Picture Trackfile and choose “Color Processing->3D Lookup Table…”:
Please note: To ensure that lookup tables have the correct file format, check
the example 3d lookup tables, delivered with this software in the folder
„Example Lookup Tables“.
29 of 61
easyDCP Creator / easyDCP Creator+ User Manual
4.1.6.2.1Supported 3D Lookup Table File Formats
Unfortunately there are no established standards for lookup tables. easyDCP
Creator+ will read the most popular „3dl“ files. The supported file formats are:
ASCII File Format
Bit Depth: 1..16
Supporting Points: 2..128
Please note: XML file format as well as floating point values are not yet
supported.
4.1.6.3 Bypass Color Processing
Bypassed color processing is used if the source image files already are in the
right color gamut.
To bypass color processing for a specific Picture Track, right-click on the Picture
Track and choose “Color Processing->None”:
Please note: Color Transformation has to be bypassed if you want use direct
copying of the source image files into the final DCP without re-encoding.
4.1.7 Export Frames to JPEG 2000 Codestream (J2C) Files
To export the source image files of a specific Picture Trackfile, right-click on the
Picture Trackfile and choose “Export Frames”:
After pressing „Export Frames…“, the easyDCP Standalone JPEG 2000
Transcoder comes up:
30 of 61
easyDCP Creator / easyDCP Creator+ User Manual
Several settings are obtained from the current easyDCP Creator+ project (e.g.
resolution, stereoscopic or not, InterOp or SMPTE, framerate, color processing,
pillar-/letterboxing, scaling, bitrate).
Choose an output folder where the processed image files will be stored. Press
Start to start the processing.
4.2
Sound Tracks
4.2.1 Add Sound Track
To add sound material to the Trackfile Manager, hit “Trackfile->Add
Sound Track…”. The following dialog will appear:
31 of 61
easyDCP Creator / easyDCP Creator+ User Manual
To add a sound track, you can also click the quick button on the top of the
Trackfile list. The following dialog will appear:
The audio format section allows you to choose between Stereo (L+R), 5.1, 7.1
Surround content and custom setups. easyDCP Creator supports 16 bit and 24
bit WAV files (see 4.2.3 Supported Sound File Formats). After choosing the
format and picking the desired audio files, hit “Add Sound Track” and a new
sound item will appear in the Trackfile Manager.
32 of 61
easyDCP Creator / easyDCP Creator+ User Manual
Instead of loading mono wav files, you can also import a multichannel input.
easyDCP Creator supports MXF, QuickTime (*.mov) and WAV files as
multichannel audio sources.
4.2.2 Add Sound Track for Dolby Atmos
If a reel contains a Dolby Atmos track, the Main Sound Track has to provide a
sync signal, that is automatically generated on channel 14. Select one of the
Dolby Atmos presets from the “Add Sound Track” dialog and mark unused
channels, plus the actual sync channel 14 as silent:
33 of 61
easyDCP Creator / easyDCP Creator+ User Manual
A 14 channel Sound Trackfile will be added to the Trackfile manager. The
synchronization signal will automatically be generated on channel 14:
4.2.3 Supported Sound File Formats
easyDCP Creator+ supports the following sound file formats:
WAV, 16 Bit, 48 kHz or 96 kHz, mono, uncompressed
WAV, 24 Bit, 48 kHz or 96 kHz, mono, uncompressed
Please note: WAV files with a sample rate other than 48 or 96 kHz will be
converted.
What happens if the audio samples are only 16 Bit?
According to SMPTE and DCI standards, audio samples shall be 24 Bit. When
using 16 bit samples as input, the bit depth will be automatically up-converted
to 24 bit.
4.3
Subtitle Tracks
4.3.1 Add Subtitle Track
To add subtitles to the Trackfile Manager, hit “Add Subtitle Track”:
34 of 61
easyDCP Creator / easyDCP Creator+ User Manual
Or simply click the quick button on the top of the Trackfile list.
After choosing the subtitle input file format is determined automatically and
checked for conformity. If no warnings or errors occur, a new Subtitle Trackfile
item will appear in the Trackfile Manager.
4.3.2 Add Auxiliary Data (Dolby Atmos) Track
To add a Dolby Atmos MXF file to the Trackfile Manager, hit “Add Aux Data
Track”:
After choosing the Auxiliary Data MXF file, it will appear as a purple sound
track in the Trackfile manager.
35 of 61
easyDCP Creator / easyDCP Creator+ User Manual
A Dolby Atmos track must be paired with a 14 channel Main Sound Track,
containing a synchronization signal on channel 14. If a Dolby Atmos track is
present in a reel, the synchronization signal will automatically be generated into
channel 14 of the reel’s Main Sound Track.
4.3.3 Supported Subtitle File Formats
4.3.3.1 Texas Instruments CineCanvas (Interop)
Interop compliant subtitles are based on the “Subtitle Specification for DLP
Cinema™ Projection Technology” published by Texas Instruments. The default
file extension is „.xml“.
An Interop compliant subtitle XML file should look like the following example:
<?xml version="1.0" encoding="UTF-8" ?>
<DCSubtitle Version="1.0">
<SubtitleID>97fd79ed-b2ff-468c-b11f-1a3792fc90dc</SubtitleID>
<MovieTitle>Example Movie Title</MovieTitle>
<ReelNumber>1</ReelNumber>
<Language>English</Language>
<!-- For testing this subtitle example, you need to copy a font file (e.g. "arial.ttf")
right next to this XML file. -->
<LoadFont Id="arial" URI="arial.ttf" />
<Font Id="arial" Color="FFFFFFFF" Effect="shadow" EffectColor="FF000000" Size="42">
<Subtitle SpotNumber="1" TimeIn="00:00:02:000" TimeOut="00:00:07:000" FadeUpTime="2"
FadeDownTime="2">
<Text HAlign="center" VAlign="bottom" VPosition="10.00">Example Subtitle Text One with
LoadFont.</Text>
</Subtitle>
<Subtitle SpotNumber="2" TimeIn="00:00:08:000" TimeOut="00:00:12:000" FadeUpTime="2"
FadeDownTime="2">
<Text HAlign="center" VAlign="bottom" VPosition="10.00">Example Subtitle Text Two with
Loadfont.</Text>
</Subtitle>
</Font>
</DCSubtitle>
<DCSubtitle Version=”1.0”>
The DCSubtitle tag indicates the root of the XML subtitle file. It includes the
attribute version. The version is an optional attribute. If not specified, the
projector will assume the latest version.
<SubtitleID>
The value of the SubtitleID tag is a hexadecimal Universally Unique Identifier
(UUID). To generate a UUID there are several UUID generators available.
easyDCP Creator will generate a new random UUID during packaging.
<MovieTitle>
The MovieTitle tag contains the name the title of the movie in which the
subtitle shall be embedded.
<ReelNumber>
The value of the ReelNumber tag indicates the reel that subtitle was generated
for.
<Language>
36 of 61
easyDCP Creator / easyDCP Creator+ User Manual
The value of the Language tag indicates the subtitle language.
<LoadFont>
This field is optional. If present, easyDCP Creator will try to find the font file
and packs it into the DCP. The font file must not be larger than 640kB.
<Subtitle SpotNumber="1" TimeIn="00:00:01:000" TimeOut="00:00:05:000"
FadeUpTime="20" FadeDownTime="20">
The Subtitle tag indicates the beginning of a specific subtitle. The tag contains
the following attributes and attribute-values:
SpotNumber
The SpotNumber identifies a particular subtitle location. The number is user
definable.
TimeIn
The value of the TimeIn attribute indicates the first appearance of the subtitle.
The formatting is HH:MM:SS:TTT (H=hours, M=minutes, S=seconds, T=ticks).
The ticks can take the values 0-249, where one tick equals 4msec.
TimeOut
The value of the TimeOut attribute indicates the complete disappearance of the
subtitle. The formatting is HH:MM:SS:TTT (H=hours, M=minutes, S=seconds,
T=ticks). The ticks can take the values 0-249, where one tick equals 4msec.
FadeUpTime
The value of the FadeUpTime attribute defines the duration of the subtitle fade
in. The formatting is TTT (T=ticks). The ticks can take the values 0-249, where
one tick equals 4msec.
FadeDownTime
The value of the FadeDownTime attribute defines the duration of the subtitle
fade out. The formatting is TTT (T=ticks). The ticks can take the values 0-249,
where one tick equals 4msec.
<Text Direction=”horizontal” HAlign="center" HPosition=”0” VAlign="bottom"
VPosition="10.00">
The value of the text tag is the actual subtitle text which appears on screen.
The tag may contain the following attributes and attribute-values:
Direction
HAlign
HPosition
The value of this attribute indicates the direction of the rendered subtitle text.
Valid values are horizontal and vertical. Default direction is horizontal.
The value of this attribute indicates the horizontal alignment. Valid values are
left, right and center. Default horizontal alignment is center.
The value of the HPosition attribute indicates the horizontal position of the
subtitle relative to the alignment value. The HPosition value is expressed as a
37 of 61
easyDCP Creator / easyDCP Creator+ User Manual
percentage of the picture width from the edge or center according to the
HAlign attribute. For example, HPosition=”9.5” in conjunction with
HAlign=”left” implies that the text starts at a position 9.5% of the picture
width from the left edge of the image. To center the text, choose
HAlign=”center” and HPosition=”0”. Default horizontal position is 0.
VAlign
The value of this attribute indicates the vertical alignment. Valid values are top,
bottom and center. Default vertical alignment is center.
VPosition
The value of the VPosition attribute indicates the vertical position of the subtitle
relative to the alignment value. The VPosition value is expressed as a
percentage of the picture height from the edge or center according to the
VAlign attribute. For example, VPosition=”10” in conjunction with
VAlign=”bottom” implies that the text starts at a vertical position 10% of the
picture height from the lower edge of the image. The vertical position specified
is the baseline on which the text is drawn. Default vertical position is 0.
4.3.3.2 SMPTE 428-7 D-Cinema Distribution Master – Subtitle
SMPTE compliant subtitles are based on the specification “428-7 D-Cinema
Distribution Master – Subtitle” published by the SMPTE. The default file
extension is „.xml“.
A SMPTE compliant subtitle XML file should look like the following example:
<?xml version="1.0" encoding="UTF-8" ?>
<SubtitleReel xmlns="http://www.smpte-ra.org/schemas/428-7/2010/DCST">
<Id>urn:uuid:94d3a710-b4b5-4b28-a020-eafb2f24c75d</Id>
<ContentTitleText>Example Content Title</ContentTitleText>
<AnnotationText>Example Annotation Text</AnnotationText>
<IssueDate>2012-05-02T12:59:04+02:00</IssueDate>
<ReelNumber>1</ReelNumber>
<Language>en</Language>
<EditRate>24 1</EditRate>
<TimeCodeRate>24</TimeCodeRate>
<StartTime>00:00:00:00</StartTime>
<!-- For testing this subtitle example, you need to rename a font file (e.g.
"arial.ttf") to "5b0283b9-3c28-42a6-86ad-c22acb431665" and copy it right next to this
XML file. -->
<LoadFont ID="Arial">urn:uuid:5b0283b9-3c28-42a6-86ad-c22acb431665</LoadFont>
<SubtitleList>
<Font ID="Arial" Color="FFFFFFFF" Weight="normal" Size="40">
<Subtitle SpotNumber="1" TimeIn="00:00:02:00" TimeOut="00:00:07:00">
<Text Valign="top" Vposition="10.00">Example Subtitle Text One with LoadFont.</Text>
</Subtitle>
<Subtitle SpotNumber="2" TimeIn="00:00:08:00" TimeOut="00:00:12:00">
<Text Valign="top" Vposition="30.00">Example Subtitle Text Two with LoadFont.</Text>
</Subtitle>
</Font>
</SubtitleList>
</SubtitleReel>
<Id>
The value of the tag “Id” is a hexadecimal Universally Unique Identifier (UUID).
To generate a UUID there are several UUID generators available. easyDCP
Creator will not generate a new random UUID during packaging.
38 of 61
easyDCP Creator / easyDCP Creator+ User Manual
<ReelNumber>
<LoadFont>
The ReelNumber tag denotes the ordered placement of this file in a set of
DCDM Subtitle files. The value shall only be used for informative purposes and
shall not influence the reproduction of the subtitle instances. The value is a
positive integer in the range 1 .. n, where n is the total number of reels in a
composition.
The LoadFont tag is used to declare an OpenType [ISO/IEC 14496, Part 18] font
resource for use within the DCDM Subtitle file. The font is identified by a
urn:uuid in the tag’s body. easyDCP Creator expects the entire external font
filename to match the value of the urn:uuid (without any file extensions, e.g.
„.ttf“ or „.otf“) and the font file to be readable right next to the subtitle XML
file. At least one LoadFont element shall be present.
4.3.3.3 SMPTE 429-5 D-Cinema Packaging – Timed Text Trackfile
SMPTE compliant subtitles are based on the specification “429-5 D-Cinema
Packaging – Timed Text Trackfile” published by the SMPTE. This is the
distribution format for unencrypted or encrypted subtitles. The default file
extension is “.mxf”.
4.4
Check Source Files
To check only the source files of a single Trackfile, right-click on a Trackfile and
choose “Check Source Files…“:
The following dialog will appear:
39 of 61
easyDCP Creator / easyDCP Creator+ User Manual
By default all checks are included (recommended). Checking for headers may
slow down the checking progress, so if this will take too long you can disable
this option.
Error Messages are displayed. If errors occurs during check, for example is a file
is zero in size, read the warnings carefully and try to fix the problem. Then try
again until no problems occur anymore.
4.4.1 Check All Source Files
To check all source files, choose the menu entry “Trackfile->Check All
Source Files…“ or simply press F8 (see screenshot below).
40 of 61
easyDCP Creator / easyDCP Creator+ User Manual
4.5
Remove / Delete Trackfiles
To remove items from the Trackfile Manager, just click the right mouse button
pointing at the item you want to remove. A context menu will appear. Just
right-click “Remove” or simply press the shortcut “Del”. The Trackfile will be
removed from the list. This action will not erase any source files.
In case of Picture Trackfile, all reels containing the removed Picture Trackfile will
be removed as well.
41 of 61
easyDCP Creator / easyDCP Creator+ User Manual
5
The Composition Manager
The Composition Window is the most important window in the easyDCP
Creator+ application. Here is the point where you can compose your package.
After starting the application you can see a composition with an empty reel.
5.1
Add Composition
If you want to place more than one composition in your package, you can
create additional compositions. To achieve this, just click the “+” (“Add
Composition”) button on the right side of the composition.
easyDCP Creator will create a new composition in the Reel Window.
5.2
Add Content to Composition
To add content data to a reel, a mechanism called Drag&Drop will be used.
You can select image, sound and Subtitle Trackfiles from the Trackfile Manager
and drop them into a reel. Just follow these three steps:
1. Select a Picture Trackfile in the Trackfile Manager, click and hold the left
mouse button.
2. Move the mouse to the reel where you want to place the picture item. The
item will follow the mouse cursor.
3. Release the left mouse button over the reel where you want to place the
Picture Trackfile.
42 of 61
easyDCP Creator / easyDCP Creator+ User Manual
NOTE: If there is already a Picture Trackfile in the reel, this Trackfile will be
removed and the new item will take over the place in the reel.
NOTE: You have to place a Picture Trackfile first in an empty reel. If you try to
place a sound or Subtitle Trackfile in an empty reel, the items will be discarded.
After placing a media Trackfile in an empty reel, the easyDCP Creator+ creates
a new empty reel on the right hand side. That means that there is always an
empty reel on the right side of a composition. As long as there is no content in
the reel, it is called “New Reel”. You can place additional media Trackfiles in
the new reel. All reels will be combined into a composition in the package later.
You can easily rename your composition just by double clicking onto the CPL
title.
5.3
Change Offset (EntryPoint) and Duration
In some cases you may need to change the offset or duration of a Trackfile
within a reel. This can be done for picture and sound tracks by double-clicking
on them in the reel. Thereby a pop-up window like shown in the screenshot
below opens where you can set offset and duration of a reel’s track.
43 of 61
easyDCP Creator / easyDCP Creator+ User Manual
You can’t set an offset for subtitle tracks, since subtitles always appear with the
time set in the subtitle track itself, relative to the reel’s first displayed frame. For
example, if you set an offset of “100” for the picture track, the first displayed
frame is the 101th frame and the subtitle starts at time "00:00:00:000".
5.4
Move Content within Compositions and to other Compositions
You can easily move reels within a composition and between compositions
using Drag&Drop. Just click on a reel with the left mouse button and hold the
button down. Then move with the mouse to the new position for the reel and
release the mouse button. The positions where you can place the reel are
getting highlighted with a green bar when moving over with the mouse.
5.5
Delete Composition
Deleting a composition is as quite as easy as creating one. Just choose the
composition you want to remove from the DCP and hit the “Delete
Composition” button in the tool bar. A composition is selected if there is a tiny
44 of 61
easyDCP Creator / easyDCP Creator+ User Manual
green frame around the composition. The following screen shot will show how
a selected composition looks like:
5.6
Content Kind of a Composition
The content kind is informational only. The content type is an optional
parameter of a composition. The content kind element defines the kind of
material referred to by the composition playlist. It is meant to be both human
and machine-readable. The content of the element shall match one of the
values listed in the table below. This kind may be displayed to the user in the
server. Some servers sort their DCPs and playlists to the kinds so that a theatre
owner can easily find trailers, advertisements or feature films for example.
Kind
Description
feature
A theatrical feature.
trailer
Short (2 to 3 minutes) content promoting an upcoming theatrical
feature.
test
Content used to test, calibrate or setup D-Cinema exhibition
equipment.
teaser
Very short (typically less than 1 minute) content promoting an
upcoming theatrical feature.
rating
Slate/still picture indicating the recommended age group permitted
to view the content to follow. This rating is generally unique per
country.
advertisement
Content promoting a product or service other than an upcoming
feature.
45 of 61
easyDCP Creator / easyDCP Creator+ User Manual
short
Non advertising/promotional content (3 to 15 minutes) typically
before a theatrical feature.
transitional
Extremely short content (1 to 15 seconds) separating unrelated
compositions.
psa
Public service announcement.
policy
Content defining the code of conduct for patrons.
5.6.1 How to change the Content Kind of a Composition
To edit the content kind of a composition, double click on the "virtual film
role" (called a Composition) like stated in the following screenshot, click on the
“Edit Composition” button.
A dialog called “Edit Composition Parameters” will appear. Please double click
on the most right column in row "Content Kind. Now select the content type
of your choice.
5.7
Content Title
The Content Title appears on the screen if a volume (e.g. USB-Drive, Hard disc
Drive) is connected to a digital cinema system before ingest. This annotation
text describes the whole DCP. In contrast to the Annotation Text of the
Composition (CPL Annotation Text) it describes the whole DCP.
Some Digital Cinema servers only show a limited number of characters on their
display screens. If the title of a composition is long, much of the information
may be cut off or not visible unless you scroll to a second page. This makes
locating a specific composition difficult if you have multiple titles. It’s especially
confusing when you have multiple trailers as well as the feature with the same
46 of 61
easyDCP Creator / easyDCP Creator+ User Manual
name. You should follow the Digital Cinema Naming Convention at
http://www.digitalcinemanamingconvention.com/
5.7.1 Digital Cinema Naming Convention
Right click on the title of a composition and choose “Edit with Digital
Cinema Naming Convention…”:
The following Digital Cinema Naming Convention dialog will appear:
47 of 61
easyDCP Creator / easyDCP Creator+ User Manual
Please note: This dialog always comes up with the last user values, it does not
obtain any information of the current project, except the composition title.
All values are compliant to the Digital Cinema Naming Convention, Version V.9
(see http://www.digitalcinemanamingconvention.com).
48 of 61
easyDCP Creator / easyDCP Creator+ User Manual
5.8
Preview package
Before starting package generation, it is possible to preview the entire project
in easyDCP Player. If you have installed easyDCP Player, just click on the “Play
Preview” button in the upper right corner:
The easyDCP Player can directly play back project files (*.dcpproj) containing
source files (e.g. DPX, WAV and Subtitle XML files), so it is possible to check
e.g. audio and video synchronization before generating the package.
5.9
Generate a DCP
After adding content to compositions, press the “Generate Package…”
button in the upper right corner of the main window.
A dialog will appear where you can select or create a new destination directory
for the DCP, and the final bitrate of the DCP.
49 of 61
easyDCP Creator / easyDCP Creator+ User Manual
After choosing the target directory (destination) for the DCP, just press “Start”
to start the DCP generation process.
If your package contains at least one encrypted Trackfile, you can also choose a
DCP Digest and a KDM server certificate.
50 of 61
easyDCP Creator / easyDCP Creator+ User Manual
5.10
Why does easyDCP Creator+ generate KDMs since version 2.1?
Beginning with version 2.1, easyDCP
Creator+ is capable of opening encrypted
DCPs and using these DCPs as basis for new
DCPs. There are basically two ways of
providing the keys in order to allow easyDCP
Creator+ to decrypt the content for the
preview and for generating a new DCP.
If keys are provided by means of a
proprietary Fraunhofer Digest file (*.dcpdig),
it is assumed that the user generated the
content and that he is in charge of the
sources used for the original DCP
generation. In this case you can alter all
properties in easyDCP Creator+, including
the deactivation of the encryption or the
generation of a new encrypted DCP and
Digest file.
Open DCP
Provide
Digest
Alter DCP
Generate
DCP
Generate
Digest
Open DCP
Provide
(D)KDM
Alter DCP
Generate
DCP
Generate
Digest
If one provides the keys by means of Distribution KDM (or KDM),
easyDCP Creator+ does not allow to disable the encryption nor
does it generate the Fraunhofer Digest for the new DCP. In order
to understand this behavior we have to explain that the
Fraunhofer Digest stores the encryption key as plain text on the
hard drive. If the Digest-option were not disabled, one could
easily open an encrypted DCP together with a (D)KDM, generate
a new encrypted DCP and store the encryption keys in plaintext.
Since content-owners are very diligent with their content,
Fraunhofer IIS decided to disable the option from the beginning.
Since the software does not permit you to generate a Digest,
there has to be another way for communicating the encryption
keys to other software. Using easyDCP Creator+ version 2.1 or
higher this can be done by generating a (D)KDM directly from
within easyDCP Creator+. The “Generate DCP…” dialog was
extended to offer you to generate KDMs. By design, one (D)KDM
will be generated for easyDCP Creator+ itself in order to make
sure that one can open the DCP on the same computer using
easyDCP Creator+ later. A second (D)KDM can be generated for
another software being able to open (D)KDMs, including
easyDCP KDM Generator+ and many other 3rd party hard-/and
software tools.
51 of 61
easyDCP Creator / easyDCP Creator+ User Manual
5.11
Why can I not generate a Fraunhofer Digest file when generating DCP?
Since version 2.1 of easyDCP Creator+ it is possible to open encrypted DCPs
and to use these DCPs as a basis for new DCPs. There are basically two ways of
providing the keys in order to allow easyDCP Creator+ to decrypt the content
for the preview and before generating a new DCP.
If one provides the keys by a Fraunhofer Digest, we assume that the user
generated the content and that he is in charge of the source content used for
the first DCP generation. In such a case you can do everything in easyDCP
Creator+, including the deactivation of the encryption and the generation of a
new Digest when generating a new DCP.
If one provides the keys by a Distribution KDM (or KDM), easyDCP Creator+
does not allow to disable the encryption nor lets it generate the Fraunhofer
Digest for the new DCP. In order to understand this behavior we have to
explain that the Fraunhofer Digest stores the encryption key as plain text on the
hard drive. Without disabling the Digest-option one could easily open an
encrypted DCP together with a (D)KDM, generate a new encrypted DCP and
store the encryption keys in plaintext. Since content-owners are very diligent
with their content, Fraunhofer IIS decided to disable the option since version
2.1.
5.12
Why can I generate a KDM with easyDCP Creator+? Do I still need the easyDCP
KDM Generator?
Please study the answer to the question “Why does easyDCP Creator+
generate KDMs since version 2.1?” in order to learn, why easyDCP Creator+
(version 2.1 or higher) allows for the generation of (D)KDMs. Please notice that
one can only generate one (D)KDM when generating a new DCP. For the
generation of many KDMs, easyDCP KDM Generator is still the software of
your choice allowing you to generate unlimited KDMs with a simple click.
6
Encrypting DCPs
Encrypted DCPs make sure that your content can only be played back on
specific servers. No one will be able to read the unencrypted data.
Every single Trackfile (i.e. picture, sound or subtitle) can either be encrypted or
unencrypted. So you have the ability to only encrypt the pictures, while the
sound is unencrypted or vice versa. Another possibility is that you encrypt all
reels of a single composition except the first reel so that the first reel (e.g. a
52 of 61
easyDCP Creator / easyDCP Creator+ User Manual
trailer or advertisement) can be played back on every d-cinema server while the
rest of the composition can only be played back with the right KDM.
Please note: Encryption is only featured in the easyDCP Creator+ version.
Subtitle encryption is only supported in SMPTE mode.
6.1
Encrypting Trackfiles
To encrypt your DCP, just do the following steps:
Step 1: After loading the image Trackfiles, you can switch the encryption on or
off by clicking the right mouse button, when rolling over the Trackfile and
selecting the menu item “Encryption” on or off. A lock appears on the
Trackfile, when encryption is activated:
Step 2: When switching encryption on, easyDCP Creator+ generates
automatically a random AES128 key.
Step 3: After pressing the “Generate Package…”button, a menu appears. Here
you should create a DCP Digest file (*.dcpdig) selecting the checkbox and
choosing a folder). The DCP Digest is an XML file, which contains the AES keys
for further KDM generation. Now the encrypted DCP can be generated.
WARNING: Do not deliver this DCP Digest file to any exhibitions because the
DCP Digest contains all the keys in plain text needed to decrypt your DCP.
Step 4: For the creation of KDMs we will deliver a separate KDM-Generation
tool. This tool will read the DCP Digest file with the AES keys create KDMs for
the specified player systems.
53 of 61
easyDCP Creator / easyDCP Creator+ User Manual
7
Signing DCPs
Please note: Signature is only available in the easyDCP Creator+ version.
easyDCP Creator+ allows you to sign the package with your own digital
certificates. Note: If you generate DCPs with one or more encrypted Trackfiles,
the package shall be signed.
7.1
Signing a DCP
To sign a package, open the Signature dialog by choosing “Options>Signature Settings…”. The following dialog box should appear:
This dialog will automatically be filled with demo signer certificates during the
first startup. If you purchase a license, you will receive your own signer
certificates, containing your company’s URL.
Custom signer certificates can also be used. Check the Checkbox “Signature
Enabled” and fill out the window “Certificate Chain to be included” with the
entire certificate chain of your own signer certificate (including the self-signed
root certificate). There should be a minimum of 3 certificates in the certificate
chain. The signer certificate (leaf certificate) should not be included here. Enter
a Signer Certificate File with your own private RSA key file. If your private key
54 of 61
easyDCP Creator / easyDCP Creator+ User Manual
file itself is encrypted (which is strongly recommended), enter the password for
this key file, otherwise leave this field empty.
To make sure all certificates and the certificate chain is valid please refer to the
documents “SMPTE 430-2 D-Cinema Operations: Digital Certificate” and
“Compliance Test Plan”, which you can find at http://www.dcimovies.com/. It
is very important to fulfill these specifications, otherwise problems may occur
during ingest or playback of the package.
8
Opening DCPs
With the function for opening packages the easyDCP Creator(+) provides a
powerful feature to apply changes to existing DCPs fast and easily. With this
function you are able to open your own DCPs or third party DCPs and deploy
any changes e.g. adding subtitles, adding sound tracks, adding and rearranging
reels and so forth.
8.1
Editing an opened DCP
An opened unencrypted DCP can be edited just like a DCP that is built from
scratch. Some restrictions apply on encrypted DCPs (see below). It is also
possible to save the opened DCP and the deployed changes as a Project
(*.dcpproj) in the easyDCP Creator(+). From the edited DCP, you can then
generate a new DCP or a supplemental DCP.
8.2
Saving an opened package
When you have opened a package and just make changes on the metadata of
the package, you don’t have to generate a new package, you can also just save
your changes to the existing one. Changes of the metadata include the offset,
duration and annotation text of reels, rearranging, deleting and adding reels,
renaming, deleting and adding compositions. To save the changes, choose
“Save Package” in the file menu. If saving is not possible and re-encoding of
the whole DCP is necessary, an error message will appear.
55 of 61
easyDCP Creator / easyDCP Creator+ User Manual
When saving the DCP, new UUIDs for all compositions and reels and the
packing list will be generated. Thus, the saved DCP will be distinguished from
the original by D-Cinema servers. If you saved an encrypted DCP, the DCPDigest (*.dcpdig) file will be overwritten. Old KDMs for this DCP won’t work
anymore, new KDMs need to be generated.
If you change the Trackfiles of the package, e. g. applying a color
transformation or add new Trackfiles, you have to generate a new DCP or a
supplemental DCP using the button “Generate Package…”.
8.3
Supplemental DCPs
Generating a feature movie is a time expensive procedure. If you’re just adding
subtitles or an additional sound track to an existing movie, easyDCP Creator+
provides a solution saving you a lot of time. You can generate a supplemental
DCP. A supplemental DCP is a DCP, which enhances or modifies an existing
DCP by providing just the changes and using the Trackfiles of the original DCP
as references. Hence you don’t have to build a whole DCP when just adding
material to an existing one. Because a supplemental DCP amends an existing
DCP, both the original DCP and the supplemental DCP have to be ingested on
a D-Cinema Server to playback the compositions of the supplemental DCP.
To generate a supplemental DCP with easyDCP Creator+ you have to open a
DCP and mark the original track and subtitle files as references. For that, you
have to click with the right mouse button on the Trackfile and select “Trackfile
is a Reference” in the displayed menu:
Then new compositions and new Trackfiles can be added and changes at
existing compositions can be applied. All this changes can also be saved as a
Project.
By clicking on the “Generate Package...” button the supplemental DCP will be
generated. The difference to a normal DCP is, all Trackfiles marked as reference
are not packed into the supplemental DCP, they are only referenced by CPL(s).
This saves disk space and time during the generation process of the DCP.
56 of 61
easyDCP Creator / easyDCP Creator+ User Manual
With the easyDCP Creator+ it is even possible to open and edit supplemental
DCPs and generate further supplemental DCPs to them.
8.4
Opening encrypted DCPs
Opening encrypted DCPs is a feature of the easyDCP Creator+ only. When you
open an encrypted DCP where you also have the corresponding Digest file
(*.dcpdig), you can perform any changes you want on the DCP. This way you
can open and modify encrypted DCPs you have built yourself. Without the
Digest you can’t change the DCP. If you have a KDM for the DCP you can view
its content in the preview window. An opened encrypted DCP shows read keys
on the encrypted Trackfiles, indicating that you have no access to this content:
If you have the DCP-Digest file (*.dcpdig) or a KDM for the DCP, you can load
it over the file menu (shown below) to gain access to the encrypted content.
After you have loaded a KDM or Digest, a green key is shown with the
Trackfiles denoting your access to its content. With a Digest file loaded, you
can apply any changes on the DCP and save it or generate a new or
supplemental DCP. Without a Digest you can only generate supplemental
DCPs.
Please note: When generating a supplemental DCP from an encrypted DCP,
new KDMs for the supplemental DCP have to be generated.
9
Using Scripting Functionality
Please note: This feature is only available in the easyDCP Creator+ version.
57 of 61
easyDCP Creator / easyDCP Creator+ User Manual
easyDCP Creator+ can be used with command line arguments. Using easyDCP
Creator+ with command line arguments can be very useful for scripting
purposes or in a scripting environment where many operations has to be
executed automatically. For example this can be a weekly advertisement where
the workflow is always the same. Or maybe you want to create a bunch of
DCPs all with the same picture but with a somewhat different sound to find
out which is the best.
9.1
Using command line arguments
To use easyDCP Creator+ in a scripting environment, open a command
window. Under Microsoft Windows press “Start->Execute” and then enter
“cmd” and press enter. The DOS shell shall be opened.
Change to your easyDCP Creator folder and use easyDCP.exe with the
following options.
Usage:
-i <projectfile>
-o <output directory>
-d <digest filename>
-t <max number of encoding pipelines>
-p <password for signature certificate private key>
-f print system hash (required for requesting a license)
Example:
easyDCP Creator+.com –I C:\myDCPprojs\test.dcpproj -o c:\myDCP\newDCP
-d C:\MyDigests\newDigest.dcpdig
9.2
Examples
easyDCP_Creator -h
Shows help.
easyDCP_Creator "c:/myprojects/Africa.dcpproj"
Starts easyDCP Creator+ and automatically opens the Project File
"c:/myprojects/Africa.dcpproj".
58 of 61
easyDCP Creator / easyDCP Creator+ User Manual
easyDCP_Creator -i “c:\DCPproj\test.dcpproj” -o “c:\DCP”
-d “c:\digests\new.dcpdig”
Creates a DCP into the folder “c:\DCP” using the Project File “test.dcpproj”
and generates the DCP Digest file “new.dcpdig”.
10
Tips and Tricks handling DCPs
10.1
Uploading DCPs and KDMs to FTP-Servers
Before up- or downloading DCPs or KDMs to or from FTP-Servers, the DCPS
and KDMs should be zipped. During the upload or download process files
which are stored in ASCII format – such as the XML files like Packing List (PKL),
Composition Playlist (CPL) or Key Delivery Message (KDM) – are changed and
errors may occur during DCP ingest or playback. Some FTP-Servers changes line
feeds or tabs resulting in bad signature hash values. Mac and Windows often
use different line feed in text files. To prevent this source of errors before
transferring such data all files should be zipped before transaction. You should
zip files for E-Mailing, too.
A single DCP should consists of at least five files:
VOLINDEX or VOLINDEX.xml
The volume index important if you deliver
your DCP over more than one volumes.
ASSETMAP or ASSETMAP.xml
the files to find for the server.
…_pkl.xml
ingested.
The Assetmap containing a list with all of
A packing list (PKL) containing a list with all of the files to be
…_cpl.xml
A composition playlist (CPL) containing information of a
single composition.
…_j2c.mxf
A Trackfile containing JPEG 2000 pictures.
…_pcm.mxf
A Trackfile containing PCM waveform.
…_sub.mxf
A Trackfile containing timed text.
…_kdm.xml
A KDM for a specific D-Cinema playback system.
59 of 61
easyDCP Creator / easyDCP Creator+ User Manual
There may be more files regarding to the complexity of your Package.
Every single DCP shall be stored in its own directory. No more than one DCP
shall be stored in one folder.
10.2
Opening XML files in textfile editors
Opening XML-files of a DCP (e. g. PKL, CPL and KDM) in a text editor is a
dangerous thing. After opening the files for viewing please make sure you do
not save the files. Do not simply edit the XML-files. For example if you want to
change your company name or correct a typo error you have to recreate the
whole DCP. One changed character is enough to fail the signature test and
errors my occur during ingest or playback of the DCP on a D-Cinema Server.
Some editors are running in auto-save mode thus overwriting the original files
(i.e. changing line delimiters due to the specific operating system) resulting in
bad signature hash values. These corrupted signatures cannot be ingested on a
D-Cinema playback system. So don’t touch the files of a DCP. Do not rename
any files of the DCP. Only store one DCP in its own folder. Two or more DCPs
cannot be stored in the same folder, because the assetmap.xml and the
volindex.xml will be overwritten.
60 of 61
easyDCP Creator / easyDCP Creator+ User Manual
11
Contact
We appreciate very much to have your feedback and your annotations about
easyDCP Creator and easyDCP Creator+. In order to enhance the software and
to optimize it for your applications, we are looking forward to your
cooperation.
If you have any problems or questions, please contact us at the following
addresses:
Sales & Technical Support
easyDCP GmbH
Eiblwiesweg 2
82418 Murnau, Germany
[email protected]
Product Management
Fraunhofer Institute for Integrated Circuits IIS
Department Moving Picture Technologies
Heiko Sparenberg
91058 Erlangen, Germany
[email protected]
61 of 61
easyDCP Creator / easyDCP Creator+ User Manual