1
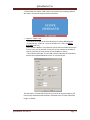
QUBE CINEMA
QubeMaster Pro
User Guide
November 2013
QubeMaster Pro
Information in this document is subject to change without notice and does not
represent a commitment on the part of Real Image Media Technologies Pvt. Ltd. or its
subsidiary Qube Cinema, Inc. The software described in this document is furnished
under a license agreement and may be used or copied only in accordance with the
terms of the agreement. It is against the law to copy the software on any medium
except as specifically allowed in the license agreement.
No portion of this document, including the drawings, may be reproduced or transmitted
in any form or by any means, electronic or mechanical, including photocopying and
recording, for any purpose, without express written permission from Real Image Media
Technologies Pvt. Ltd.
Specifications of the products in this manual are subject to change without prior notice.
Qube is the trademark of Real Image Media Technologies Pvt. Ltd. All other products,
technologies and trademarks mentioned herein are properties of their respective
owners.
© 2005-2013, Real Image Media Technologies Pvt. Ltd.
QubeMaster Pro ver.2.5
Page 2
QubeMaster Pro
Contents
Creating a DCP from Image Sequences ........................................................................................... 7
► Create Track Files ........................................................................................................... 7
► Image/Video Track Files ................................................................................................. 7
► Create Reels.................................................................................................................... 9
► Create Compositions .................................................................................................... 10
► Encode compositions ................................................................................................... 12
Colour-space conversion ......................................................................................... 13
Geometry ................................................................................................................. 14
INTER-OP and SMPTE DCP Formats ........................................................................ 16
► Package a Composition to create a DCP....................................................................... 17
Creating a DCP from Video Files .................................................................................................... 21
► Create track files........................................................................................................... 21
► Create Reels.................................................................................................................. 23
► Create Compositions .................................................................................................... 24
► Encode compositions ................................................................................................... 26
Colour-space conversion ......................................................................................... 27
Geometry ................................................................................................................. 28
INTER-OP and SMPTE DCP Formats ........................................................................ 30
► Package a Composition to create a DCP....................................................................... 31
3D Stereoscopic DCPs .................................................................................................................... 35
► Creating Track files from Stereoscopic Image Sequences ............................................ 35
► Creating Track files from Stereoscopic Video Files ...................................................... 35
► Create Reels.................................................................................................................. 37
► Create Compositions .................................................................................................... 39
► Encode compositions ................................................................................................... 40
Colour-space conversion ......................................................................................... 42
Geometry ................................................................................................................. 43
INTER-OP and SMPTE DCP Formats ........................................................................ 45
► Package a Composition to create a DCP....................................................................... 46
GENERATE KDMs ........................................................................................................................... 50
QubeMaster Pro ver.2.5
Page 3
QubeMaster Pro
Installing Certificate Chains ........................................................................................................... 52
► How to Identify if a Chain Has Been Installed .............................................................. 52
► UNCHAINING CERTIFICATE CHAINS .............................................................................. 53
Unchaining Using Notepad ...................................................................................... 54
USING UNCHAIN.EXE ................................................................................................ 54
► IDENTIFYING ROOT AND INTERMEDIATE CERTIFICATES .............................................. 56
► Installing Root and Intermediate Certificates .............................................................. 58
► Types of Certificates ..................................................................................................... 66
WRAPPING ..................................................................................................................................... 67
Pre-processing filters ..................................................................................................................... 69
► Colour Space Conversion Filters ................................................................................... 69
► 3D Format Converters .................................................................................................. 71
► Geometry Filter ............................................................................................................ 71
Convert 1920x1080 SOURCE to 2048x858 (Scope) ................................................. 71
Convert 1920x1080 SOURCE to 1998x1080 (FLAT) ................................................. 74
Convert 1998x1080 to Scope ................................................................................... 74
Convert 2048x858 (Scope) to 1998x1080 (Flat) ...................................................... 74
► Subtitle Overlay ............................................................................................................ 74
Other Options in the Encoder Window ......................................................................................... 76
► Frame-rate and Sample Rate conversions ................................................................... 76
Converting 25fps source to 24fps DCP ..................................................................... 76
Converting 23.98FPS source to a 24FPS DCP: .......................................................... 78
► Raw Essence ................................................................................................................. 79
Previewing/Trimming .................................................................................................................... 80
► Playback of Jpeg2000 mxf files at HIGH quality ........................................................... 80
► Full-screen playback on an external monitor ............................................................... 80
► Previewing and Trimming 3D files ................................................................................ 80
Importing Digital Cinema Packages ............................................................................................... 82
Adding Subtitles to existing Digital Cinema Packages ................................................................... 83
Editing Digital Cinema Packages .................................................................................................... 84
PARTIAL or SUPPLEMENTAL PACKAGES ........................................................................................ 87
QubeMaster Pro ver.2.5
Page 4
QubeMaster Pro
Storage recommendations for optimal performance ................................................................... 89
Trouble-shooting common problems in QubeMaster Pro ............................................................ 90
► Event Log ...................................................................................................................... 91
QubeMaster Pro ver.2.5
Page 5
QubeMaster Pro
Digital Cinema Packages
Creating an industry standard inter-operable Digital Cinema Package (DCP) in Qube
Master Pro involves a simple, step-by-step process:
- Create Track files for each of the source image, audio and subtitle
components individually.
- Create Reels by combining these track files.
- Create a Composition by combining Reels.
- Encode the source composition into the Jpeg2000 mxf format (encryption
may also be performed at this stage)
- Package the encoded composition into a DCP.
- Generate KDMs for the composition if it is encrypted
The QubeMaster Pro UI is designed with the above workflow in mind.
Recommendations to minimize compatibity issues with various server models:
► Picture compression format, aspect ratio, and frame rate should be identical for
all reels
a. Aspect Ratio
i. 2048x858 or 1998x1080 for 2K
ii. 4096x1716 or 3996x2160 for 4K
b. Frame-rate (Progressive only)
i. INTER-OP DCPs - 24fps for 2D and 48fps for 3D
ii. SMPTE – 25, 25, 30, 60 fps
► Sound bit-depth, sample rate and channels should be identical for all reels
i. Channel configuration (stereo, 6 chanel, Dolby Atmos etc. should
be identical for all audio assets in a composition
ii. Bit-depth should be 24-bit,
iii. Sample-rate should be 48KHz or 96KHz
► All reels should have picture and sound
i. No silent reels
ii. No sound only reels
iii. Even silent cards should have silent sound tracks of the same
track count, sample rate and bit depth as other audio tracks in the
Composition
iv. It is also recommended that if there are subtitles in any reel, then
all reels should have subtitles, (even if some are empty subtitle
files)
► All assets should be either homogenously encrypted or unencrypted.
► Naming Conventions
i.
No spaces in any file names (No spaces in any Track File, Reel,
Composition or Package names)
QubeMaster Pro ver.2.5
Page 6
QubeMaster Pro
Creating a DCP from Image Sequences
Create Track Files
Individual Track files must be created for Image (video), audio and subtitle files
► Tip:
► Source files can also be dragged-and-dropped into QubeMaster
Pro.
► For image sequences, select only the first and last files of the
image sequence and then drag-and-drop them into the Track
Image/Video Track Files
► To create a Track file from an Image Sequence of dpx/Tiff/Tga/BMP/J2C files choose the “New Image Sequence” option.
► In the window that opens, select the first and last files of the image sequence.
► Specify the location to which this new sequence file is going to be saved. This
“sequence” file is only a link to the actual image sequence and is, as such, only a
few KB in size (no image files are copied or created at this stage)
► Specify the frame-rate of the sequence – supported frame-rates are 24, 25, 30,
48, 50, 60, 96, 100, 120. (Please note that while QubeMaster Pro can create
DCPs in all these frame-rates – servers are not required to support all the above.
Playback servers must compulsorily only support 24 and 48 FPS, the others are
QubeMaster Pro ver.2.5
Page 7
QubeMaster Pro
optional. Therefore it is highly recommended that specifications of playback
servers are confirmed before DCPs in varied frame-rates are dispatched.
Audio Track Files
► For multiple mono files
Create a track file using the “multi file audio source” option
Multiple mono audio files can be interleaved into the required multi-channel
mxf using the “Interleaver” window which opens.
Specify the audio file for each channel and also specify the “stream
numbering” from 1 to 6.
Select a destination folder for the resultant mxf file.
Click “Interleave” to create the audio mxf file.
Digital Cinema supports 16 channels of audio. Channel mapping for
additional audio formats - 8 channel audio, channel specifications for Visually
QubeMaster Pro ver.2.5
Page 8
QubeMaster Pro
impaired and hearing impaired audio, D-box audio etc., are described in
Appendix B
► For multi-channel interleaved audio files with the correct channel mapping
Create a track file using the “New Track File” option
► For multi-channel interleaved audio files with incorrect channel mapping
Create a track file using the “New Mult-file audio Source” option
Select the same audio file for all channels
Re-map the channels by specifying the “Stream numbers” so if the Left
Channel is currently on Stream 5, specify 5 next to the Left
Subtitle Track Files
► For DCI compliant Cine–canvas xml or mxf files use the “New track file” option
► To CONVERT a .txt/asc file (in the prescribed format) into a Cine-canvas xml in
QubeMaster Pro, use the “New Subtitle” option.
This method is discussed in detail in Appendix C of the user manual.
Create Reels
Combine relevant Video, Audio and subtitle track files together to create reels.
► Right-click and select “New Reel”
► Select the individual Image, sound and subtitle assets using the drop-down
menu.
QubeMaster Pro ver.2.5
Page 9
QubeMaster Pro
► Tip:
► Alternatively, select all the Track-file assets and then
drag-and-drop them into the REELS pane.
► A new reel will be automatically created with these
assets chosen.
► Name the Reel.
► Use the “InPoint” and “OutPoint” points to trim the reel if required.
► Use the “Sync point” options to individually trim only image or sound (for
example, to remove leaders)
► Sync points should not be added for subtitles – except to check for sync, after
which sync points removed from the Trim window and individual subtitles should
be edited in the subtitling software
► Create single or multiple reels as required.
Create Compositions
► Right-click on Composition and select “New Composition”.
QubeMaster Pro ver.2.5
Page 10
QubeMaster Pro
► Combine multiple reels to create a composition (to encode all the reels together)
or create a single reel composition (to encode each reel individually).
Tip:
Alternatively, select all the Reels associated with a composition
and then drag-and-drop them into the Composition pane.
A new Composition will be automatically created with these
assets
► Select the composition parametres and specify:
Composition Type
Language
Studio
Rating
Aspect Ratio
QubeMaster Pro ver.2.5
Page 11
QubeMaster Pro
► Click on the Reels tab and select all the reels for this composition.
Encode compositions
Encoding converts the source file into a DCI compliant Jpeg2000 mxf file. Before you
begin encoding, it is important to know whether you require an INTER-OP DCP or a
SMPTE DCP.
► Right-click the source composition and select the “Encode” option.
QubeMaster Pro ver.2.5
Page 12
QubeMaster Pro
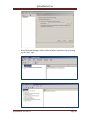
► In the Encoder window, enter a name for the new encoded composition. This
name will be retained in the final DCP, so ensure that the naming is succinct.
► Select a destination folder for the encoded files (this will also be the folder for
the final DCP, so ensure that there is sufficient space on the drive)
► The “Process Media” is by default set to only encode those regions within the
Inpoint and Outpoints specified in the Reel Trim window.
o “Process With Handles” encodes a few additional seconds or frames (as
specified) before the inpoint and after the outpoint (“handles”).
o “Process Entire Media” will result in the all the frames being encoded,
even those outside the “trim” selections. It is to be used in cases where
the entire source media file needs to be encoded irrespective of the in
and out points specified.
► By default the “Compress” option is selected and set to DCI Jpeg2000, to convert
the source file format into the Jpeg2000 mxf format.
► If the image needs colour-space conversion and/or aspect ratio conversion,
select the appropriate filters from the “Pre-Process” drop-down menu.
Colour-space conversion
Digital Cinema Packages need to be in the XYZ colour-space
If the source is RGB then apply the ColourSpace Conversion filter to
convert it to XYZ:
To convert RGB sources to XYZ
Select RGB-XYZ
Select Source Colour-space as RGB Rec709
Source Gamma for RGB is normally 2.2
Destination gamma is 2.6
For a full description of each of the colour-correction pre-processor
filters please see the section on Pre-processing filters.
QubeMaster Pro ver.2.5
Page 13
QubeMaster Pro
Geometry
► Digital Cinema Packages should be in the following Aspect Ratios
2K - 2048x858 (Scope) OR 1998x1080 (Flat)
4K - 4096x1716 (Scope) OR 3996x2160 (Flat)
► Use the options in the Geometry filter to change the aspect ratio
o PAD - to pad black as Pillarbox or Letterbox
o RESIZE - to scale
o CROP - to Crop
► For HD source at 1920x1080
o Convert to FLAT – 1998x1080
o By Padding 39 pixels of Black in Pillarbox
QubeMaster Pro ver.2.5
Page 14
QubeMaster Pro
For a full description of each of the Geometry pre-processor filter
please see the section on Pre-processing filters.
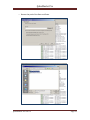
► After applying the necessary filters, click on “Settings” to set the data-rate for
the specific Encode:
For J2K set the data-rate to:
o between 150 and 180 for low quality
o Between 180 and 200Mbits for medium quality
o Between 200 and 250 for good (250Mbits is the maximum bitrate supported for DCI compliant playback devices)
o Higher bit-rates can be chosen for archival purposes.
Check to see if the aspect ratio displayed here is correct – else make
changes to the Geometry filter to achieve the correct aspect.
► By default the “Encrypt” option is selected, to perform the encryption in the
same step as encoding. This can be deselected if Encryption is to be done as a
separate step later.
QubeMaster Pro ver.2.5
Page 15
QubeMaster Pro
INTER-OP and SMPTE DCP Formats
Digital cinema standards have evolved over time and as a consequence the
specifications for a DCI COMPLIANT DCP have changed from the first “Mpeg
MXF INTER-OP” to the current “JPEG2000 MXF INTER-OP” and now to the
specifications of the new SMPTE standard which is being implemented.
QubeMaster Pro can create DCPs in the older Jpeg2000 MXF INTER-OP
standard (referred to, in short as INTER-OP DCPS) and in the new SMPTE
Standard (referred to as SMPTE DCPs).
According to DCI specifications all Jpeg2000 DCPs INTER-OP and SMPTE DCPs
should conform to the following:
► Aspect Ratio:
2K - 2048x858 (Scope) OR 1998x1080 (Flat)
4K - 4096x1716 (Scope) OR 3996x2160 (Flat)
► Colour-space
XYZ colour
► Frame-rate
24 fps or 48 (for 3D), Progressive for Jpeg2000 Inter-op DCPs
24, 25, 48, 50 or 60 or 120fps for SMPTE DCPs.
One big difference between INTER-OP and SMPTE DCPs is the
support for different frame-rates (including High Frame Rate –
HFR DCPs). Frame-rates above 48fps are referred to as HFR or
High Frame Rate.
However, not all servers support all the above frame-rates. Please
check with the server manufacturer’s specification before
dispatching DCPs at frame-rates other than 24 and 48.
► Audio
6 channel audio - mapped in the order L, R, C, Lfe, Ls, Rs
Additional channel configurations are currently not possible in
QubeMaster Pro
48Khz or 96Khz audio sample rate
24bit
► It is recommended that all reels in a composition must be
“technically” identical.
Bit depth and sample rate and stereo/surround must match
for all the audio in a composition.
Aspect ratio must match for all video content
Compression data-rate must be the same
It is recommended that all reels have the SAME contents –
meaning that if one reel has subtitles then all reels should
include subtitles – even if it is Blank. Similarly it is best that all
reels must have audio – even blank audio.
QubeMaster Pro ver.2.5
Page 16
QubeMaster Pro
All of the above parameters must be set correctly during the encoding
process using the various pre-processing filters in QMPro.
► If reels were being encoded separately, combine multiple reels together to
create the FINAL composition.
► Frame-rate conversions from 24 to 25 or 25 to 24 or 23.98 to 24 can be
performed using the “Force Frame-rate” option.
► If image frame-rate are being converted, then similar adjustments need to be
performed on the audio as well – using the Sample-rate and Timebase
conversion options.
► A DCDM (tiff sequence) can be additionally created for archival purposes
► J2C sequences, without the mxf wrapper, can also be generated by selecting the
“Raw essence” option.
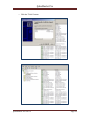
Package a Composition to create a DCP
During the Packaging process a Digital Cinema Package is created which contains all of
the encoded track files (in the mxf format) along with five metadata files
Cpl – composition play list (.xml file). The Composition Playlist (CPL) defines
the sequence in which the reels in a movie are played. It also refers the “in”
frame and the duration of frames to be played within a track file as specified
in the TRIM window.
The CPL also contains information about the number of reels, aspect ratio,
duration, sync info etc. The CPL is signed and has a “hash” which is the same
as that in the pkl so it must not be edited.
Asset map (xml file) – List of assets that are part of the DCP. uuid for each
track file and its path
Pkl – packaging list (.xml) The Packing List defines all elements/files within a
DCP.
Volindex (xml file) – identifies the HDD vol. if assets are spread across
multiple drives.
Image, audio and subtitle mxfs (for SMPTE DCPs)
For INTER-OP DCPs, subtitles (if any) are placed in a separate folder along
with the font file (one folder for each reel) during packaging.
► Right-click on the Encoded Composition and select “Package.
QubeMaster Pro ver.2.5
Page 17
QubeMaster Pro
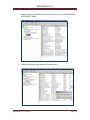
► Multiple Compositions can be packaged into a single DCP by “SHIFT-SELECTING”
the different compositions and then choosing “Package”. DCPs with multiple
compositions will contain only a single PKL but will have multiple CPLs
(depending on the number of compositions chosen)
► Select a folder to which the DCP will be saved.
o The SAME folder that contains the mxf files can be chosen.
If the destination folder is on the same drive as the encoded files, a
“HARDLINK” will be created instead of an actual file copy
QubeMaster Pro ver.2.5
Page 18
QubeMaster Pro
In both these cases, the copying process is much faster.
► Sign the PKL and CPL files only if the composition is Encrypted – else it is not
imperative to select the “Sign CPL/PKL option”
► All the files for the DCP will be created in the specified location
► Click the “Assets” tab and expand the to check if the correct assets are being
packaged.
► The CPL file is named following the DCI naming convention – but can be
manually edited if necessary by double-clicking the CPL name.
QubeMaster Pro ver.2.5
Page 19
QubeMaster Pro
► Click “OK” to package. Packaging will take some time the first time a composition
is packaged, since the “HASHES” for all files have to be calculated and stored.
Subsequent packaging (if necessary) will be much faster.
In any case, no files will be re-copied, only a HARD-LINKS will be created
whenever a package is created onto the SAME DRIVE as the encoded files.
QubeMaster Pro ver.2.5
Page 20
QubeMaster Pro
Creating a DCP from Video Files
Create track files
Individual Track files must be created for Image (video), audio and subtitle files
► Tip:
► Source files can also be dragged-and-dropped into QubeMaster
Pro.
Image/Video Track Files
► To create Track Files from avi/mov/mpeg files sources.
► Use the “New Track File” option
► Browse to the location of the video file
► The frame-rate is automatically detected
► Supported frame-rates are 24, 25, 30, 48, 50, 60, 96, 100, 120. (Please note that
while QubeMaster Pro can create DCPs in all these frame-rates – servers are not
required to support all the above. Playback servers must compulsorily only
support 24 and 48 FPS, the others are optional. Therefore it is highly
recommended that specifications of playback servers are confirmed before DCPs
in varied frame-rates are dispatched.
QubeMaster Pro ver.2.5
Page 21
QubeMaster Pro
Audio Track Files
► If audio is interleaved with the video file, it need not be imported separately.
► For audio as separate multiple mono files
Create a track file using the “multi file audio source” option
Multiple mono audio files can be interleaved into the required multi-channel
mxf using the “Interleaver” window which opens.
Specify the audio file for each channel and also specify the “stream
numbering” from 1 to 6.
Select a destination folder for the resultant mxf file.
Click “Interleave” to create the audio mxf file.
► Digital Cinema supports 16 channels of audio. Channel mapping for additional
audio formats - 8 channel audio, channel specifications for Visually impaired and
hearing impaired audio, D-box audio etc., are described in Appendix B
► For multi-channel interleaved audio files with incorrect channel mapping
QubeMaster Pro ver.2.5
Page 22
QubeMaster Pro
Create a track file using the “New Multi-file audio Source” option
Select the same audio file for all channels
Re-map the channels by specifying the “Stream numbers”. For example, if
the Left Channel is currently on Stream 5, select 5 from the “stream” dropdown menu for the Left channel.
Create Subtitle Track Files
► For DCI compliant Cine–canvas xml or mxf files use the “New track file” option
► To CONVERT a .txt/asc file (in the prescribed format) into a Cine-canvas xml in
QubeMaster Pro, use the “New Subtitle” option.
This method is discussed in detail in Appendix C of the user manual.
Create Reels
Combine relevant Video, Audio and subtitle track files together to create reels.
► Right-click and select “New Reel”
► Select the individual Image, sound and subtitle assets using the drop-down
menu.
QubeMaster Pro ver.2.5
Page 23
QubeMaster Pro
Tip:
Alternatively, select all the Track-file assets and then dragand-drop them into the REELS pane.
A new reel will be automatically created with these assets
chosen.
► Name the Reel.
► Use the “InPoint” and “OutPoint” points to trim the reel.
► Use the “Sync point” options to individually trim only image or sound (for
example, to remove leaders)
Sync points should not be added for subtitles – except to check for sync, after
which sync points removed from the Trim window and individual subtitles should
be edited in the subtitling software
► Create multiple reels as required.
Create Compositions
Combine multiple reels to create a composition (to encode all the reels together) or
create a single reel composition (to encode each reel individually).
► Right-click on Composition and select “New Composition”.
QubeMaster Pro ver.2.5
Page 24
QubeMaster Pro
Tip:
Alternatively, select all the Reels associated with a
composition and then drag-and-drop them into the
Composition pane.
A new Composition will be automatically created with these
assets chosen.
► Select the composition parametres and specify:
Composition Type
Language
Studio
Rating
Aspect Ratio
QubeMaster Pro ver.2.5
Page 25
QubeMaster Pro
► Click on the Reels tab and select all the reels for this composition.
Encode compositions
Encoding converts the source file into a DCI compliant Jpeg2000 mxf file. Before you
begin encoding, it is important to know whether you require an INTER-OP DCP or a
SMPTE DCP. Please read Appendix A to know more about these formats.
► Right-click the source composition and select the “Encode” option.
QubeMaster Pro ver.2.5
Page 26
QubeMaster Pro
► In the Encoder window, enter a name for the new encoded composition. This
name will be retained in the final DCP, so ensure that the naming is succinct.
► Select a destination folder for the encoded files (this will also be the folder for
the final DCP, so ensure that there is sufficient space on the drive)
► The “Process Media” is by default set to only encode those regions within the
Inpoint and Outpoints specified in the Reel Trim window.
o “Process With Handles” encodes a few additional seconds or frames (as
specified) before the inpoint and after the outpoint (“handles”).
o “Process Entire Media” will result in the all the frames being encoded,
even those outside the “trim” selections. It is to be used in cases where
the entire source media file needs to be encoded irrespective of the in
and out points specified.
► By default the “Compress” option is selected and set to DCI Jpeg2000 to convert
the source file format into the Jpeg2000 mxf format.
► If the image needs colour-space conversion and/or aspect ratio conversion,
select the appropriate filters from the “Pre-Process” drop-down menu.
Colour-space conversion
Digital Cinema Packages need to be in the XYZ colour-space
If the source is RGB then apply the ColourSpace Conversion filter to
convert it to XYZ:
To convert RGB sources to XYZ
Select RGB-XYZ
Select Source Colour-space as RGB Rec709
Source Gamma for RGB is normally 2.2
Destination gamma is 2.6
For a full description of each of the colour-correction pre-processor
filters please see the section on Pre-processing filters.
QubeMaster Pro ver.2.5
Page 27
QubeMaster Pro
Geometry
► Digital Cinema Packages should be in the following Aspect Ratios
2K - 2048x858 (Scope) OR 1998x1080 (Flat)
4K - 4096x1716 (Scope) OR 3996x2160 (Flat)
► Use the options in the Geometry filter to change the aspect ratio
o PAD - to pad black as Pillarbox or Letterbox
o RESIZE - to scale
o CROP - to Crop
► For HD source at 1920x1080
o Convert to FLAT – 1998x1080
o By Padding 39 pixels of Black in Pillarbox
QubeMaster Pro ver.2.5
Page 28
QubeMaster Pro
For a full description of each of the Geometry pre-processor filter
please see the section on Pre-processing filters.
► After applying the necessary filters, click on “Settings” to set the data-rate for
the specific Encode:
For J2K set the data-rate to:
o between 150 and 180 for low quality
o Between 180 and 200Mbits for medium quality
o Between 200 and 250 for good (250Mbits is the maximum bitrate supported for DCI compliant playback devices)
o Higher bit-rates can be chosen for archival purposes.
Check to see if the aspect ratio displayed here is correct – else make
changes to the Geometry filter to achieve the correct aspect.
► By default the “Encrypt” option is selected, to perform the encryption in the
same step as encoding. This can be deselected if Encryption is to be done as a
separate step later.
QubeMaster Pro ver.2.5
Page 29
QubeMaster Pro
► If the image needs pre-processing filters to adjust colour-space and aspect ratio,
the appropriate filters can be selected from the “Pre-Process” drop-down menu
and adjustements made accordingly.
For a full description of each of the pre-processor filters please see Appendix D.
INTER-OP and SMPTE DCP Formats
Digital cinema standards have evolved over time and as a consequence the
specifications for a DCI COMPLIANT DCP have changed from the first “Mpeg
MXF INTER-OP” to the current “JPEG2000 MXF INTER-OP” and now to the
specifications of the new SMPTE standard which is being implemented.
QubeMaster Pro can create DCPs in the older Jpeg2000 MXF INTER-OP
standard (referred to, in short as INTER-OP DCPS) and in the new SMPTE
Standard (referred to as SMPTE DCPs).
According to DCI specifications all Jpeg2000 DCPs INTER-OP and SMPTE DCPs
should conform to the following:
► Aspect Ratio:
2K - 2048x858 (Scope) OR 1998x1080 (Flat)
4K - 4096x1716 (Scope) OR 3996x2160 (Flat)
► Colour-space
XYZ colour
► Frame-rate
24 fps or 48 (for 3D), Progressive for Jpeg2000 Inter-op DCPs
24, 25, 48, 50 or 60 or 120fps for SMPTE DCPs.
One big difference between INTER-OP and SMPTE DCPs is the
support for different frame-rates (including High Frame Rate –
HFR DCPs). Frame-rates above 48fps are referred to as HFR or
High Frame Rate.
However, not all servers support all the above frame-rates. Please
check with the server manufacturer’s specification before
dispatching DCPs at frame-rates other than 24 and 48.
► Audio
6 channel audio - mapped in the order L, R, C, Lfe, Ls, Rs
Additional channel configurations are currently not possible in
QubeMaster Pro
48Khz or 96Khz audio sample rate
24bit
► It is recommended that all reels in a composition must be
“technically” identical.
Bit depth and sample rate and stereo/surround must match
for all the audio in a composition.
Aspect ratio must match for all video content
Compression data-rate must be the same
QubeMaster Pro ver.2.5
Page 30
QubeMaster Pro
It is recommended that all reels have the SAME contents –
meaning that if one reel has subtitles then all reels should
include subtitles – even if it is Blank. Similarly it is best that all
reels must have audio – even blank audio.
All of the above parametres must be set correctly during the encoding
process using the various pre-processing filters in QMPro.
► If reels were being encoded separately, combine multiple reels together to
create the FINAL composition.
► Frame-rate conversions from 24 to 25 or 25 to 24 or 23.98 to 24 can be
performed using the “Force Frame-rate” option.
► If image frame-rate are being converted, then similar adjustments need to be
performed on the audio as well – using the Sample-rate and Timebase
conversion options.
► A DCDM (tiff sequence) can be additionally created for archival purposes
► J2C sequences, without the mxf wrapper, can also be generated by selecting the
Raw essence option.
Package a Composition to create a DCP
During the Packaging process a Digital Cinema Package is created which contains all of
the encoded track files (in the mxf format) along with five metadata files
Cpl – composition play list (.xml file). The Composition Playlist (CPL) defines
the sequence in which the reels in a movie are played. It also refers the “in”
frame and the duration of frames to be played within a track file as specified
in the TRIM window.
The CPL also contains information about the number of reels, aspect ratio,
duration, sync info etc. The CPL is signed and has a “hash” which is the same
as that in the pkl so it must not be edited.
Asset map (xml file) – List of assets that are part of the DCP. uuid for each
track file and its path
Pkl – packaging list (.xml) The Packing List defines all elements/files within a
DCP.
Volindex (xml file) – identifies the HDD vol. if assets are spread across
multiple drives.
Image, audio and subtitle mxfs (for SMPTE DCPs)
For INTER-OP DCPs, subtitles (if any) are in a separate folder along with the
font file (one folder for each reel).
► Right-click on the Encoded Composition and select “Package.
QubeMaster Pro ver.2.5
Page 31
QubeMaster Pro
► Multiple Compositions can be packaged into a single DCP by “SHIFT-SELECTING”
the different compositions and then choosing “Package”. DCPs with multiple
compositions will contain only a single PKL but will have multiple CPLs
(depending on the number of compositions chosen)
► Select a folder to which the DCP will be saved.
o The SAME folder that contains the mxf files can be chosen.
QubeMaster Pro ver.2.5
Page 32
QubeMaster Pro
If the destination folder is on the same drive as the encoded files, a
“HARDLINK” will be created instead of an actual file copy
In both these cases, the copying process is much faster.
► Sign the PKL and CPL files only if the composition is Encrypted – else it is not
imperative to select the “Sign CPL/PKL option”
► All the files for the DCP will be created in the specified location
► Click the “Assets” tab and expand the to check if the correct assets are being
packaged.
► The CPL file is named following the DCI naming convention – but can be
manually edited if necessary by double-clicking the CPL name.
QubeMaster Pro ver.2.5
Page 33
QubeMaster Pro
► Click “OK” to package. Packaging will take some time the first time a composition
is packaged, since the “HASHES” for all files have to be calculated and stored.
Subsequent packaging (if necessary) will be much faster.
In any case, no files will be re-copied, only a HARD-LINKS will be created
whenever a package is created onto the SAME DRIVE as the encoded files.
QubeMaster Pro ver.2.5
Page 34
QubeMaster Pro
3D Stereoscopic DCPs
Creating Track files from Stereoscopic Image Sequences
► Left Eye and Right Eye image sequences in separate folders
Use the new “Stereoscopic Image Sequence” option
Point to the first and last files of the Left and Right eye image sequence
► Left Eye and Right Eye image sequences in a single folder
Use the new “Image Sequence” option
Point to the first and last files of the combined image sequence
Specify the frame-rate as 48fps
Creating Track files from Stereoscopic Video Files
► 3D Interleaved video file at 48fps (Left Eye and Right Eye interleaved)
Use the “New Track file” option.
► Two separate video files (Left Eye and Right Eye separate)
First “break-up” each individual mov file into a sequence of “j2c” files using
the “raw essence” option in the encoder window. Be sure to set the bit-rate
as 125Mbits (discussed in the ENCODING section).
After the mov files have been converted to sequences of “j2c” files, use the
new “stereoscopic image sequence” option to select each eye’s image
sequence separately.
Wrap this into an mxf without re-compressing by deselecting the “Compress”
option in the encoder window.
Audio Track Files
► For multiple mono files
Create a track file using the “multi file audio source” option
Multiple mono audio files can be interleaved into the required multi-channel
mxf using the “Interleaver” window which opens.
QubeMaster Pro ver.2.5
Page 35
QubeMaster Pro
Specify the audio file for each channel and also specify the “stream
numbering” from 1 to 6.
Select a destination folder for the resultant mxf file.
Click “Interleave” to create the audio mxf file.
Digital Cinema supports 16 channels of audio. Channel mapping for
additional audio formats - 8 channel audio, channel specifications for Visually
impaired and hearing impaired audio, D-box audio etc., are described in
Appendix B
► For multi-channel interleaved audio files with the correct channel mapping
Create a track file using the “New Track File” option
► For multi-channel interleaved audio files with incorrect channel mapping
Create a track file using the “New Multi-file audio Source” option
Select the same audio file for all channels
Re-map the channels by specifying the “Stream numbers” so if the Left
Channel is currently on Stream 5, specify 5 next to the Left
QubeMaster Pro ver.2.5
Page 36
QubeMaster Pro
Create Subtitle Track Files
► For DCI compliant Cine–canvas xml or mxf files use the “New track file” option
► To CONVERT a .txt/asc file (in the prescribed format) into a Cine-canvas xml in
QubeMaster Pro, use the “New Subtitle” option.
This method is discussed in detail in Appendix C of the user manual.
Create Reels
Combine relevant Video, Audio and subtitle track files together to create reels.
► Right-click and select “New Reel”
► Select the individual Image, sound and subtitle assets using the drop-down
menu.
QubeMaster Pro ver.2.5
Page 37
QubeMaster Pro
Tip:
Alternatively the image, audio and subtitle track files may be
selected together and dragged into the Reels pane.
The Reel window will be opened with these assets
automatically selected
► Name the Reel.
► Use the “InPoint” and “OutPoint” points to trim the reel.
► Use the “Sync point” options to individually trim only image or sound (for
example, to remove leaders)
► IMPORTANT
While trimming a 3D file, care must be taken to ensure that L and R frames are
trimmed together, so for every one frame that needs to be removed, 2 physical
frames (L and R) will be trimmed.
WMPro ensures that trimming is always performed starting with the L frame
only.
► Sync points should not be added for subtitles – except to check for sync, after
which sync points removed from the Trim window and individual subtitles should
be edited in the subtitling software
► Create single or multiple reels as required.
QubeMaster Pro ver.2.5
Page 38
QubeMaster Pro
Create Compositions
Combine multiple reels to create a composition (to encode all the reels together) or
create a single reel composition (to encode each reel individually).
► Right-click on Composition and select “New Composition”.
Tip:
Alternatively, select all the Reels associated with a
composition and then drag-and-drop them into the
Composition pane.
A new Composition will be automatically created with
these assets chosen.
► Select the composition parametres and specify:
Composition Type
Language
Studio
Rating
Aspect Ratio
QubeMaster Pro ver.2.5
Page 39
QubeMaster Pro
► Click on the Reels tab and select all the reels for this composition.
Encode compositions
Encoding converts the source file into a DCI compliant Jpeg2000 mxf file. Before you
begin encoding, it is important to know whether you require an INTER-OP DCP or a
SMPTE DCP. Please read Appendix A to know more about these formats.
► Right-click the source composition and select the “Encode” option.
QubeMaster Pro ver.2.5
Page 40
QubeMaster Pro
► Select the “STEREOSCOPIC” option in the Encoder window. This is VERY
IMPORTANT for Stereoscopic DCPs.
► In the Encoder window, enter a name for the new encoded composition. This
name will be retained in the final DCP, so ensure that the naming is succinct.
QubeMaster Pro ver.2.5
Page 41
QubeMaster Pro
► Select a destination folder for the encoded files (this will also be the folder for
the final DCP, so ensure that there is sufficient space on the drive)
► The “Process Media” is by default set to only encode those regions within the
Inpoint and Outpoints specified in the Reel Trim window.
o “Process With Handles” encodes a few additional seconds or frames (as
specified) before the inpoint and after the outpoint (“handles”).
o “Process Entire Media” will result in the all the frames being encoded,
even those outside the “trim” selections. It is to be used in cases where
the entire source media file needs to be encoded irrespective of the in
and out points specified.
► By default the “Compress” option is selected and set to DCI Jpeg2000 to convert
the source file format into the Jpeg2000 mxf format.
► If the image needs colour-space conversion and/or aspect ratio conversion,
select the appropriate filters from the “Pre-Process” drop-down menu.
Colour-space conversion
Digital Cinema Packages need to be in the XYZ colour-space
If the source is RGB then apply the ColourSpace Conversion filter to
convert it to XYZ:
To convert RGB sources to XYZ
Select RGB-XYZ
Select Source Colour-space as RGB Rec709
Source Gamma for RGB is normally 2.2
Destination gamma is 2.6
For a full description of each of the colour-correction pre-processor
filters please see the section on Pre-processing filters.
QubeMaster Pro ver.2.5
Page 42
QubeMaster Pro
Geometry
► Digital Cinema Packages should be in the following Aspect Ratios
2K - 2048x858 (Scope) OR 1998x1080 (Flat)
4K - 4096x1716 (Scope) OR 3996x2160 (Flat)
► Use the options in the Geometry filter to change the aspect ratio
o PAD - to pad black as Pillarbox or Letterbox
o RESIZE - to scale
o CROP - to Crop
► For HD source at 1920x1080
o Convert to FLAT – 1998x1080
o By Padding 39 pixels of Black in Pillarbox
QubeMaster Pro ver.2.5
Page 43
QubeMaster Pro
For a full description of each of the Geometry pre-processor filter
please see the section on Pre-processing filters.
► After applying the necessary filters, click on “Settings” to set the data-rate for
the specific Encode:
Set the data-rate to:
o Between 150 and 180 Mbits for low quality
o Between 180 and 200 Mbits for medium quality
o Between 200 and 250 Mbits for good quality
250Mbits is the maximum bit-rate supported for playback on
DCI compliant playback devices
o Higher bit-rates can be chosen for archival purposes.
Check to see if the aspect ratio displayed here is correct – else make
changes to the Geometry filter to achieve the correct aspect.
► By default the “Encrypt” option is selected, to perform the encryption in the
same step as encoding. This can be deselected if Encryption is to be done as a
separate step later.
QubeMaster Pro ver.2.5
Page 44
QubeMaster Pro
INTER-OP and SMPTE DCP Formats
Digital cinema standards have evolved over time and as a consequence the
specifications for a DCI COMPLIANT DCP have changed from the first “Mpeg
MXF INTER-OP” to the current “JPEG2000 MXF INTER-OP” and now to the
specifications of the new SMPTE standard which is being implemented.
QubeMaster Pro can create DCPs in the older Jpeg2000 MXF INTER-OP
standard (referred to, in short as INTER-OP DCPS) and in the new SMPTE
Standard (referred to as SMPTE DCPs).
According to DCI specifications all Jpeg2000 DCPs INTER-OP and SMPTE DCPs
should conform to the following:
► Aspect Ratio:
2K - 2048x858 (Scope) OR 1998x1080 (Flat)
4K - 4096x1716 (Scope) OR 3996x2160 (Flat)
► Colour-space
XYZ colour
► Frame-rate for 3D DCPs
48 (24fps per eye) for Jpeg2000 Inter-op DCPs
48 (24fps per eye), 96 (48fps per eye) or 120fps (60fps per eye) for
3D SMPTE DCPs.
One big difference between INTER-OP and SMPTE DCPs is the
support for different frame-rates (including High Frame Rate –
HFR DCPs). Frame-rates above 48fps are referred to as HFR or
High Frame Rate.
However, not all servers support all the above frame-rates. Please
check with the server manufacturer’s specification before
dispatching DCPs at frame-rates other than 48fps 3D.
► Audio
6 channel audio - mapped in the order L, R, C, Lfe, Ls, Rs
Additional channel configurations are currently not possible in
QubeMaster Pro
48Khz or 96Khz audio sample rate
24bit
► It is recommended that all reels in a composition must be
“technically” identical.
Bit depth and sample rate and stereo/surround must match
for all the audio in a composition.
Aspect ratio must match for all video content
Compression data-rate must be the same
It is recommended that all reels have the SAME contents –
meaning that if one reel has subtitles then all reels should
include subtitles – even if it is Blank. Similarly it is best that all
reels must have audio – even blank audio.
QubeMaster Pro ver.2.5
Page 45
QubeMaster Pro
All of the above parametres must be set correctly during the encoding
process using the various pre-processing filters in QMPro.
► If reels were being encoded separately, combine multiple reels together to
create the FINAL composition.
► Frame-rate conversions from 24 to 25 or 25 to 24 or 23.98 to 24 can be
performed using the “Force Frame-rate” option.
► If image frame-rate are being converted, then similar adjustments need to be
performed on the audio as well – using the Sample-rate and Timebase
conversion options.
► A DCDM (tiff sequence) can be additionally created for archival purposes
► J2C sequences, without the mxf wrapper, can also be generated by selecting the
Raw essence option.
Package a Composition to create a DCP
During the Packaging process a Digital Cinema Package is created which contains all of
the encoded track files (in the mxf format) along with five metadata files
Cpl – composition play list (.xml file). The Composition Playlist (CPL) defines
the sequence in which the reels in a movie are played. It also refers the “in”
frame and the duration of frames to be played within a track file as specified
in the TRIM window.
The CPL also contains information about the number of reels, aspect ratio,
duration, sync info etc. The CPL is signed and has a “hash” which is the same
as that in the pkl so it must not be edited.
Asset map(xml) – List of assets that are part of the DCP. uuid for each track
file and its path
Pkl – packaging list (.xml) The Packing List defines all elements/files within a
DCP.
Volindex (xml) – identifies the HDD vol. if assets are spread across multiple
drives.
Image, audio and subtitle mxfs (for SMPTE DCPs)
For INTER-OP DCPs, subtitles (if any) are in a separate folder along with the
font file (one folder for each reel).
► Right-click on the Encoded Composition and select “Package.
QubeMaster Pro ver.2.5
Page 46
QubeMaster Pro
► Multiple Compositions can be packaged into a single DCP by “SHIFT-SELECTING”
the different compositions and then choosing “Package”. DCPs with multiple
compositions will contain only a single PKL but will have multiple CPLs
(depending on the number of compositions chosen)
► Select a folder to which the DCP will be saved.
o The SAME folder that contains the mxf files can be chosen.
If the destination folder is on the same drive as the encoded files, a
“HARDLINK” will be created instead of an actual file copy
QubeMaster Pro ver.2.5
Page 47
QubeMaster Pro
In both these cases, the copying process is much faster.
► Sign the PKL and CPL files only if the composition is Encrypted – else it is not
imperative to select the “Sign CPL/PKL option”
► All the files for the DCP will be created in the specified location
► Click the “Assets” tab and expand the to check if the correct assets are being
packaged.
► The CPL file is named following the DCI naming convention – but can be
manually edited if necessary by double-clicking the CPL name.
QubeMaster Pro ver.2.5
Page 48
QubeMaster Pro
► Click “OK” to package. Packaging will take some time the first time a composition
is packaged, since the “HASHES” for all files have to be calculated and stored.
Subsequent packaging (if necessary) will be much faster.
In any case, no files will be re-copied, only a HARD-LINKS will be created
whenever a package is created onto the SAME DRIVE as the encoded files.
QubeMaster Pro ver.2.5
Page 49
QubeMaster Pro
GENERATE KDMs
If a Composition is Encrypted, the media assets will be locked and require decryption
keys to unlock them. Each encrypted mxf file has a separate key.
To playback an encrypted DCP on any playback device or server, these decryption keys
need to be sent to the device via a KDM (Key Delivery Message) carrying these keys.
IMPORTANT NOTE:
The KDM is specific for a composition.
Two compositions cannot share a KDM even if they contain the SAME mxf
files.
KDMs can be generated only after a Composition has been PACKAGED.
If a Composition has been packaged twice - Each packaged composition must
have a separate KDM which contains the CPL UUID and will unlock the assets
only for that composition.
Before generating a KDM the following are necessary:
The digital certificate for the server. This is also called a “receiver
certificate”, and is unique for each playback device.
The Certificate chain (Root and Intermediate certificates) for the server
model must be available in the windows Certificate Manager.
If an error appears stating “Signer certificate does not terminate in a Root
Certificate”, this indicates that the certificate chain is not installed.
To install a certificate chain please refer the section “Installing Certificate
Chains”
► To generate a KDM, right-click the ENCYPTED/PACKAGED composition
o (Note: if the composition is not encrypted and/or packaged, the
“Generate KDM” option will not be available).
► KDMs can be generated either for one certificate at a time or for multiple
certificates placed within a folder (one level of subfolders)
► Validity period for a KDM can be specified in hours, days. Months and years.
► There is an option to disable or enable Watermarking. This is done by deselecting
the watermarking options. In this case a flag is sent in the KDM requesting the
playback device to disable the watermark on playback.
o Watermarking must be disabled only on the specific request of the
content producer.
► The status of the KDM generation process is updated in the “Status” window.
QubeMaster Pro ver.2.5
Page 50
QubeMaster Pro
QubeMaster Pro ver.2.5
Page 51
QubeMaster Pro
Installing Certificate Chains
KDMs are generated for a server’s “leaf” or “receiver” certificate. The “leaf” or receiver
certificate is part of a CHAIN which contains a ROOT certificate, one or more
INTERMEDIATE certificates and a Leaf certificate.
The root and intermediate certificates are common to all servers from a specific
manufacturer for a specific server version and type, so this process of importing root
and intermediate certificates needs be performed only once for a specific server type.
Some manufacturer’s certificate chains have already been added to the host system’s
certificate store during the installation of QMPro version 2.5, but chains for new server
models will need to be imported to continuously update the certificate store.
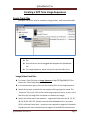
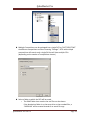
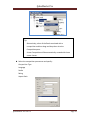
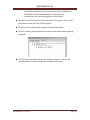
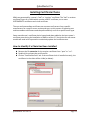
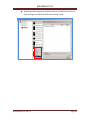
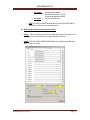
How to Identify if a Chain Has Been Installed
► Rename the file extension for the receiver certificate from “.pem” to “.crt”.
► Double-click and open the certificate file.
► Click on “Certification Path” tab. If the certificate chain is installed correctly, the
certificates in the chain will be visible (as below):
QubeMaster Pro ver.2.5
Page 52
QubeMaster Pro
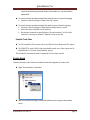
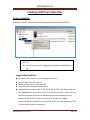
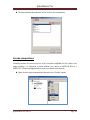
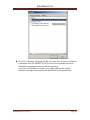
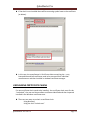
► If the chain is not installed there will be a warning symbol next to the certificate
(as below):
► In this case, the manufacturer’s Certificate chains containing the – root,
intermediate and leaf certificates need to be procured from individual
manufacturers and then installed in windows certificate manager.
UNCHAINING CERTIFICATE CHAINS
If a new certificate chain needs to be installed - the certificate chain must first be
“unchained”, the root and intermediate certificates identified and then imported
installed in the Windows certificate store.
► There are two ways to unchain a certificate chain
Using Notepad
Using the tool “Unchain.exe”
QubeMaster Pro ver.2.5
Page 53
QubeMaster Pro
Unchaining Using Notepad
o Open the certificate chain in Notepad.
o Enable “Word Wrap”
o If it is indeed a chain, it must display three or more “paragraphs”
beginning with the text “BEGIN CERTIFICATE” preceded by 5 hyphens
and “END CERTIFICATE” followed by 5 hyphens.
o Copy paste each of these paragraphs (INCLUDING the hyphens) into a
new note-pad file Name each notepad file (use any name - it does not
matter)
o Rename the “.txt” extension to “.crt”.
o The chain is now ready to be installed
USING UNCHAIN.EXE
“Unchain.exe” is included in the utilities folder of the QubeMaster pro
installer.
o Copy “Unchain.exe” and the certificate chain to a folder. Say
c:\temp\unchain.
o Run “Unchain.exe” from the COMMAND prompt.
Click on the START menu, select “All Programs>Accessories”
folder.
RIGHT-CLICK on the Command Prompt icon and choose “RUN
AS ADMINISTRATOR”)
QubeMaster Pro ver.2.5
Page 54
QubeMaster Pro
o In the command prompt type the path where you have saved
“unchain.exe”. In this example you will type: Cd c:\temp\unchain and
hit “Enter” on the keyboard.
o Now type “unchain.exe” followed by the path where the chain is and
the path where you want to save the certificates to after unchaining.
o In the above example
c:\temp\unchain\cert_chain_Dolby256……pem is the path pointing
to the certificate chain and c:\temp\unchain is the path specified for
saving the resultant certificates.
o “ENTER” on the keyboard. The tool will execute the “unchain”
function and the individual certificates will now be available in the
QubeMaster Pro ver.2.5
Page 55
QubeMaster Pro
path specified… (in this case c:\temp\unchain). They will be
numbered 1, 2, 3 etc.
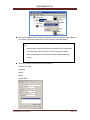
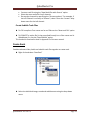
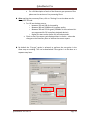
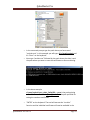
IDENTIFYING ROOT AND INTERMEDIATE CERTIFICATES
► Identify the root and intermediate certificates by following the examples below:
o A root certificate will normally have the same information in the “Issued
to” and “Issued by” fields.
QubeMaster Pro ver.2.5
Page 56
QubeMaster Pro
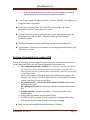
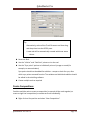
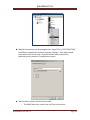
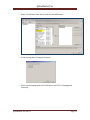
o An Intermediate certificate will have the Root certificate as the “Issued
by” but will have a different “Issued to”
o The “leaf” certificate will have the Intermediate certificate as the “Issued
by”
QubeMaster Pro ver.2.5
Page 57
QubeMaster Pro
Installing Root and Intermediate Certificates
► Be sure your login has administrator rights.
► Launch QMPro
► From the FILE menu, select “Import Certificate Chain”
► Point to the folder containing the Root and Intermediate certificates and Import
them
► If the QubeMaster Pro system is on a domain network and/or if you are logged-in using
network credentials, it is possible that certain security implementations prevent the
certificates from being imported correctly.
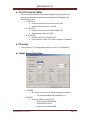
In this case the chains have to be installed manually:
o Click START and in the “search programs” box at the bottom of the pop-up
window, type “mmc” and enter.
o A pop-up user account control window will seek additional permission to run
the program “Management Console”. Select “Yes”
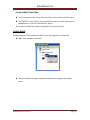
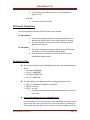
o In the Console window that opens, Select Add/Remove Snap-in… option from
File menu.
QubeMaster Pro ver.2.5
Page 58
QubeMaster Pro
o Select “Certificates” from the List and click the ADD button:
o In the pop-up select “Computer Account”
o Select Local computer and click Finish button and “OK” in the page that
comes up.
QubeMaster Pro ver.2.5
Page 59
QubeMaster Pro
o Now Certificate Manager will be visible as below, expand the list by clicking
on the “plus” sign:
QubeMaster Pro ver.2.5
Page 60
QubeMaster Pro
o Select Trusted Root Certification Authorities->Certificates->All Tasks>Import…
o Click Next button.
QubeMaster Pro ver.2.5
Page 61
QubeMaster Pro
o Browse the path of the Root certificate.
QubeMaster Pro ver.2.5
Page 62
QubeMaster Pro
o Click Next button.
o Click the “Next” button.
QubeMaster Pro ver.2.5
Page 63
QubeMaster Pro
o Click the “Finish” button.
QubeMaster Pro ver.2.5
Page 64
QubeMaster Pro
o Repeat steps to upload the intermediate certificate. In the “INTERMEDIATE
CERTIFICATES” folder
o Close the Certificate store window, click No button.
QubeMaster Pro ver.2.5
Page 65
QubeMaster Pro
Types of Certificates
There are two broad categories of certificates – SHA1 and SHA256.
► SHA1 certificates are the older format certificates and normally only used to
generate KDMs for the older format MPEG-Interop DCPs.
► SHA256 certificates are the new version and are currently used for all Digital
Cinema operations including KDM generation for DCI Jpeg2000 DCPs.
► SMPTE KDMS must use only Sha256 certificates
There are separate chains for Sha1 and Sha256.
QubeMaster Pro ver.2.5
Page 66
QubeMaster Pro
WRAPPING
If files are already in the Jpeg2000 format (either as mxfs or as sequences of “j2c” files)
then they do not need to be re-encoded (compressed), they only need to be wrapped
with a new mxf wrapper.
► Create track file, reel and composition with the jpeg2000 source
► In the Encoder window, deselect the “compress” option.
The file will be just wrapped and encrypted (not re-encoded).
QubeMaster Pro ver.2.5
Page 67
QubeMaster Pro
► Wrapping and Encrypting can ALSO be done at the TRACK level itself, by
right-clicking an encoded track file and choosing “Wrap”.
QubeMaster Pro ver.2.5
Page 68
QubeMaster Pro
Pre-processing filters
Colour Space Conversion Filters
DCI compliant Jpeg2000 DCPs must be created in the XYZ colour space.
Apply the correct colour-space-conversion (CSC filter)
Or
Apply the correct 3D LUT
When viewing completed DCPs and/or encoded mxfs in the preview and trim
windows
Apply the correct “View LUT” to convert the XYZ content into the RGB colour s
pace of the monitor, for viewing.
Colour conversion filters available in QubeMaster Pro:
►
1D LUT (Look Up Table)
o Converts files in the “Log” colour-space to “Linear”
o Typically used for dpx files from DI – where the original source is film
►
Desaturation Matrix
o To be used AFTER 1DLUT, if a 1D LUT is applied
QubeMaster Pro ver.2.5
Page 69
QubeMaster Pro
►
3-D LUT (Look Up Table)
o 3D LUTs are used to ensure that colours viewed during the film postproduction phase are accurately carried forward to the digital print.
o A few Sample LUTs
PrintP3-XYZ
Converts from film print colour to XYZ color
Assumes that the source is DI LOG
PrintP3-709
Converts from film print colour to RGB 709
Assumes that source is DI LOG
XYZ–Rec709
Convert from XYZ to RGB Rec 709
Can be used as a View LUT in the Preview/Trim window
►
CTL script
o To be used if a CTL is being used to perform a 3D LUT manipulation.
►
Colour Space Conversion
RGB-RGB
To convert sources in one RGB colourspace to another
o For example RGB REc709 to RGB DCI P3
RGB-XYZ
To convert RGB sources to XYZ
o Source can be RGB Rec709
o Source can be DCI P3
o Source can be Custom RGB
QubeMaster Pro ver.2.5
Page 70
QubeMaster Pro
Source Gamma for RGB is normally 2.2 and destination
gamma is 2.6
XYZ-RGB
To convert from XYZ to RGB
3D Format Converters
To convert different formats of 3D files from one to another:
► 3D combiner
To a convert a sequence of frame-sequential 3D files into a
sequence of side-by-side or over-under format 3D images.
To create consumer-level low resolution 3D files from the
digital cinema format.
► 3D splitter
To convert a sequence of side-by-side or over-under format
3D image into a frame-sequential 3D sequence
Used to convert consumer-level 3D files into the format
required for digital cinema.
Geometry Filter
► DCI compliant Digital Cinema Packages should be in the following Aspect
Ratios
2K Scope - 2048x858
2K Flat - 1998x1080
4K Scope - 4096x1716
4K Flat - 3996x2160
► Use the options in the Geometry filter to change the aspect ratio
PAD - to pad black as Pillarbox or Letterbox
RESIZE - to scale
CROP - to Crop
Cropping numbers need to be calculated based on the size of
the frame.
► Convert 1920x1080 (HD Source) to 2048x858 (Scope)
For a 1920x1080 source to be made into a Scope (2048x858) DCP, there are two
options. Both will result in black bars on the side (pillar-boxes) or “Padding” of
the encoded image with black pixels to achieve the required 2048 pixels on the
QubeMaster Pro ver.2.5
Page 71
QubeMaster Pro
“X”/horizontal axis. Option 1 will result in loss of picture by cropping, Option 2
will result in the picture being resized (scaled-down)
Option 1 - CROP + Pad
- First CROP the image on the top and bottom to achieve 858 along the
“Y”/Vertical axis. To do this - enter the number 111 in TOP, and 962 in
BOTTOM (NOT 111).
{This is because QMPro’s Crop function asks for the line number after which
it has to crop, not the number of lines to Crop. So, subtract the number of
lines to crop from the total number of lines (1080-111 = 962}!!
- Then PAD 64 in pillarbox. This will add a total of 128 pixels to the width to
achieve the required 2048 pixels on the “X”/Horizontal axis.
This will result in a Scope DCP which has 111 lines of the original image cut off
from the top and bottom and black bars of 64 pixels each on either side of the
image – as below.
QubeMaster Pro ver.2.5
Page 72
QubeMaster Pro
-
-
Option 2 - RESIZE + Pad.
First RESIZE the image proportionately to 1525x858. This will result in an
image which retains the same aspect ratio of the original source, but now
fits within the 858 pixel height of the Scope container
Then PAD 262 in pillarbox. This will add a total of 524 pixels to achieve the
required 2048 pixels on the “X”/Horizontal axis.
The resultant image in the DCP will be smaller than the original and will have
larger black bands on the side than the original source (the image will not fill the
screen)
QubeMaster Pro ver.2.5
Page 73
QubeMaster Pro
► Convert 1920x1080 (HD Source) to 1998x1080 (FLAT)
PAD 39 pixels in pillarbox.
► Convert 1998x1080 (FLAT) to 2048x858 (Scope)
Option 1 - CROP + Pad
o To CROP enter the number 111 in TOP, and 962 in BOTTOM (NOT
111).
{This is because QMPro’s Crop function asks for the line number
after which it has to crop, not the number of lines to Crop. So,
subtract the number of lines to crop from the total number of lines
(1080-111 = 962}!!
o Then PAD 64 in pillarbox
This will result in a Scope DCP which has 111 lines of the original image cut
off from the top and bottom and black bars of 64 pixels each on either side
of the image
Option 2 - RESIZE + Pad.
o First RESIZE the image proportionately to 1588x858. This will result
in an image at the same aspect ratio of the source but which fits
within the Scope container
o Then PAD in pillarbox by 230 to achieve the required 2048 pixels on
the “X”/Horizontal axis.
The resultant image in the DCP will be smaller than the original and will
have larger black bands on the side than the original source (the image will
not fill the screen)
► Convert 2048x858 (Scope) to 1998x1080 (Flat)
Resize to 1998x838 and the PAD in letterbox to 121.
Subtitle Overlay
To overlay (burn-in) subtitles onto the image
o Choose the colour-space as XYZ or RGB depending on whether the
overlay filter has been applied before or after colourspace conversion
filter.
o For 3D DCPs, subtitles can specify a 3D depth for the subtitle by
specifying a "z" depth.
“Z” depth values usually range from -10 to +10
QubeMaster Pro ver.2.5
Page 74
QubeMaster Pro
QubeMaster Pro ver.2.5
"Z" depth of 0 - means the subtitle will be placed at the screen
plane.
A "-"ve number pushes the text behind the screen plane
"+"ve number brings the text in front of the screen plane.
Page 75
QubeMaster Pro
Other Options in the Encoder Window
Frame-rate and Sample Rate conversions
► The “Force Frame Rate” option allows the Frame-rate of the IMAGE to be
changed.
► By default, the frame rate of the mxf is the frame rate of the source content
This can be used to playback 23.97fps at 24 fps.
This can also be used to playback 25fps files at 24fps.
► If force-frame rate is applied, corresponding audio Timebase conversion
(frame-rate conversion) must performed along with sample-rate conversion.
Converting 25fps source to 24fps DCP
Changing the frame rate from 25fps to 24 will cause the content to play 4%
slower and the duration to increase by the same 4%.
► 25fps video file with embedded audio:
o Create reels and compositions as usual file.
o In the Encoder window - select the following options:
QubeMaster Pro ver.2.5
Page 76
QubeMaster Pro
For Audio -
For Video –
Sampling Rate: 48000
Timebase Conversion: 25-24
Force Sampling Rate: 48000
Force Frame Rate: 24
o EDIT the newly created Encoded Reel to move the OUTPOINT of
the REEL to the newly increased duration.
► 25fps Image sequence with separate audio:
o Image - When creating a track file for video specify the frame rate as 24.
This will ensure that the picture essence will play at 24 fps.
o Audio - USE THE AUDIO INTERLEAVER (Multi-file Audio Source selection
from “Track File” pane.
QubeMaster Pro ver.2.5
Page 77
QubeMaster Pro
Set Sampling Rate - 48000
Set Timebase Conversion - 25-24
Force Framerate - 24
Force Sampling Rate – 48000
o EDIT the newly created Encoded Reel to move the OUTPOINT of the
REEL to the newly increased duration. (By default the outpoint is at
the old position of the encoded reel).
Converting 23.98FPS source to a 24FPS DCP:
o
Create reels and compositions as usual file
o
In the Encoder window:
o IMAGE
“FORCE FRAME RATE” to 24 to convert the image from 23.97 to
24
o AUDIO
PULL-UP in TIME-BASE conversion to convert the speed of the
audio
“FORCE SAMPLE-RATE” to 48KHz to ensure the correct audio
sample-rate.
QubeMaster Pro ver.2.5
Page 78
QubeMaster Pro
DCDM
o Selecting the “Create DCDM” option in the encoder window will
create a sequence of TIFF files from the original source with the
chosen filters applied.
o When creating a DCDM ensure that there is sufficient space on the
HDD to accommodate this large amount of data. A single TIFF file can
be as large as 20MB.
Raw Essence
o Creating “Raw Essence” creates a sequence of J2C files WITHOUT the
MXF wrapper
o In both cases a separate audio wav file is created.
o The raw essence can be used for archival purposes
QubeMaster Pro ver.2.5
Page 79
QubeMaster Pro
Previewing/Trimming
Playback of Jpeg2000 mxf files at HIGH quality
o It is possible to playback encoded Jpeg2000 files in realtime
o The smoothness and quality of playback will depend on the performance
of the host computer, especially the graphics display card.
Currently an 8-core CPU,
a compatible graphics display card and
a 2-way striped SATA drive are the minimum requirements for
realtime (24fps) playback of Jpeg2000 mxfs at HIGH Quality.
o Since J2K files are in the XYZ colour-space and the computer monitor is in
RGB colour-space a LUT must be applied in the preview window. Select
the XYZ-RGB colour space.
Full-screen playback on an external monitor
o the DVI output of the graphics display card can be connected to an
external projector or monitor capable of Progressive 2048x1080 display.
o Set the Preferences (Edit menu) for Preview to “Display 2”
Previewing and Trimming 3D files
o 3D files can be previewed on a 3D TV by connecting the DVI output of the
graphics display card to the 3D TV.
o When previewing a 3D Sequence (BEFORE ENCODING) both L and R
frames will be played back.
o When previewing an ENCODED 3D track file or reel, the user can choose
to view only the L frames, only R or sidexside, over-under.
Select the same 3D “format” on the TV as well
► Realtime playback of sequential graphic file sources is entirely dependent on the
performance of the host Mastering system and the HDDs on which the source
files reside. Currently a minimum 6-way stripe of SATA drives is necessary for
realtime playback of sequential graphic files.
QubeMaster Pro ver.2.5
Page 80
QubeMaster Pro
The following shortcuts may be used in the TRIM window to playback and mark trim
points:
Spacebar, L – Play/Pause
1, 2 – Step back 10 frames, Step forward 10 frames
3, 4 – step back 1 frame, step forward 1 frame
E , R – Mark in and Mark out
I, O – Mark in and Mark out
Q, W - Go to in, Go to out
Home, End – Go to beginning and Go to end
D, F – Clear in and Clear out
G – Clear both marks
C – Close Trim window
QubeMaster Pro ver.2.5
Page 81
QubeMaster Pro
Importing Digital Cinema Packages
To import and preview a completed DCP (generated by any other mastering application)
► Right-click on any pane (Composition, Reels or Track-files) to Select the “Import”
option
► Or, drag-and-drop the DCP folder into any pane in QMPro.
► Imported compositions will be highlighted in the Composition pane.
► KDMs for Encrypted DCPs can be imported using the “IMPORT” option
► KDMs can also be dragged-and-dropped into any pane.
QubeMaster Pro ver.2.5
Page 82
QubeMaster Pro
Adding Subtitles to existing Digital Cinema Packages
► Import the DCP into QubeMaster Pro
o The DCP is now available in QMP for further editing and addition of
assets.
► Create a new copy of every reel in this composition, using the COPY-PASTE
method.
o Right-click on the reel> Select copy.
o Click anywhere in the Reel window right-click>paste
► Name the copies to reflect the changes you will be making
o “subtitled”, “edited” etc.
► Double-click these reels to open it in the Trim window and edit each reel to
make the necessary changes.
o For a subtitled version of a DCP, Edit each reel to attach subtitles…
o For a dubbed language version, edit the reel to attach the dubbed audio
etc.
► Follow the procedure for all reels.
► Combine all these NEW (edited) reels into a NEW composition (named
appropriately).
► Package the Edited Composition
o This new composition does not need to be encoded. It can be packaged
directly.
► If it needs to be “Re-Encrypted”
o Right-click on the Composition and selecting the ENCODE option.
o In the ENCODER window, name the new encrypted composition.
o Select the “ENCRYPT” option,
o DESELECT the COMPRESS option and click the Encode button
o By ONLY selecting “Encrypt” and not selecting “Compress” the
mxfs are merely “re-wrapped” not re-encoded.
o PACKAGE this new Encrypted Composition
► Generate KDMs if this is an Encrypted Package.
QubeMaster Pro ver.2.5
Page 83
QubeMaster Pro
Editing Digital Cinema Packages
To implement a cut within a reel using QubeMaster Pro:
(for purposes of illustration, the workflow below assumes that a cut needs to be
implemented in Reel 1 of a feature).
► Import the Original composition into QubeMaster Pro
► Select Reel 1 of the ingested composition
► Copy and Paste it TWICE
o right-click>copy.
o Click anywhere in the window right-click>paste (2 times).
o This will create two duplicates of the first reel.
► Add an A to the name of the first copy
► Add B to the name of the second copy
► Edit Reel 1A
o To edit a reel’s in and out point, you can add the inpoint and outpoint
directly in the area provided.
QubeMaster Pro ver.2.5
Page 84
QubeMaster Pro
o Optionally, use the “In” and “out” buttons available in the Preview
window to select the region.
o Remember to set the Out Point of Reel 1A to the start of the portion to
cut. Close Reel1A.
For example, in the image above - everything BEFORE 00:00:01:07 will not
play and everything AFTER 00:00:27:09 will not play. Only the content
between these two points will play.
► Similarly, Edit Reel 1B
Set the In Point of Reel 1B to the End of the portion to be cut.
► There are now two reels
1A which ENDS before the cut and
1B which STARTS after the cut.
BOTH these reels should be added to a NEW edited COMPOSITION.
► Repeat this procedure for all other edits required in relevant reels.
► Combine all these NEW (edited) reels into a NEW composition (named
appropriately).
► Package the Edited Composition
o This new composition does not need to be encoded. It can be packaged
directly.
QubeMaster Pro ver.2.5
Page 85
QubeMaster Pro
o By not re-encoding the reel, the original mxf files are retained and the
“edited” content is still available in the MXF file, but the in and out points
will be specified in the CPL and therefore the edited portions will not
play. The in and out points in the CPL will ensure that only the desired
content will play in the server.
o If you want to ENSURE that the edited content no longer exists in the
MXF, then you need to Re-ENCODE each EDITED reel with the default
option of “process in-out” selected in the encoder window (this is the
default selection). This will result in new mxfs being created which only
contain the required content.
► PACKAGE the new Composition and check it.
► Generate a KDM
QubeMaster Pro ver.2.5
Page 86
QubeMaster Pro
PARTIAL or SUPPLEMENTAL PACKAGES
DCI specifications support the concept of “Partial” or “Supplemental” packages which
do not contain ALL the assets of the original DCP.
► These “partial” packages contain only SOME of the assets, and are used in
situations where a DCP has already been distributed to a location, but now
needs to be EDITED in some way or some new assets added ( subtitles or dubbed
audio).
► A partial package will have only a partial number of assets:
- In all cases a partial package will have a CPL, PKL, Assetmap and
Volindex,
- Additionally it can have
o newly added subtitles
o Newly added dubbed audio
o New Files missing from the original DCP
** IMPORTANT
► For a Partial Package to work the ORIGINAL DCPS with the EXACT same MXF files
must already be ingested into the server.
o In other words, the MXF assets are already available in each of the
servers and therefore do not need to be sent again.
o When the server ingests the package it will link to the existing video and
audio mxfs that have already been ingested previously.
► If the ORIGINAL DCP is encrypted, it should have a valid KDM whose validity
period matches those for the new “partial package”
► SONY has issued an advisory regarding the failure of partial packages on Sony
Servers. If the Partial DCP is intended for wide distribution, which includes Sony
servers, it is highly advisable to send a FULL DCP instead of a Partial one.
► To create a Partial Package
o Edit the reels in the composition to make necessary changes.
o Package the new composition
In the ASSETS tab of the Packager window, DESELECT the assets
that have ALREADY BEEN SENT (video and audio mxfs that have
already been sent in the earlier package)
The “cpl” asset must ALWAYS be selected
Without a CPL file a server will not display the composition in the
play list.
QubeMaster Pro ver.2.5
Page 87
QubeMaster Pro
o Generate a KDM for the new Partial Package.
o Since this partial DCP is often without the video and audio mxfs, it is small
enough to be EMAILED
o Always ZIP DCP files before emailing them.
QubeMaster Pro ver.2.5
Page 88
QubeMaster Pro
Storage recommendations for optimal performance
► Access source files from and store encoded files to different drives.
► SCSI, SAS or SATA drives are recommended. 6-10 drive SAS or SATA array in RAID
0 configuration for source media
► If accessing files off a network share, ensure a reliable Gigabit network
connection
► For playback
o For real-time playback of J2K files a minimum 2-way stripe (RAID 0) of
SATA drives is necessary
o For real-time playback of TIFF or DPX sequential source files; an 8-way
RAID stripe of SATA/SAS drives is recommended.
QubeMaster Pro ver.2.5
Page 89
QubeMaster Pro
Trouble-shooting common problems in QubeMaster Pro
► Installation issues
a. Check if all the necessary prerequisites have been installed as per the
installation document.
b. Ensure that the same login credentials used to install MicrosoftSQL is
being used when installing QubeMaster Pro
c. It has been found that Hyper-threading causes problems on some x64
installs. Disable Hyperthreading and try again.
d. Ensure compatible graphics display cards
i. Install current/up-to-date graphics card drivers
e. Ensure compatible audio cards
► Quicktime Source file issues
a. Check if QT player is installed and all necessary codecs are installed. This
can be checked by playing the file in Quicktime Player.
b. Quicktime mov files can only be imported into the 32bit version of
QMPro since there is no 64bit version of the Quicktime engine for
windows.
c. Check if other MXF/media file players are installed on the same system
► Encoding issues
a. Check if any file in the sequence is corrupt
b. It has been found that Hyper-threading causes problems on some x64
installs. Disable Hyperthreading and try again Check if any file in the
sequence is different (has alpha channel etc.)
c. Check for sufficient HDD space
d. If Mpeg2 encodes on x64 machines crash after each reel
i. Install Win7Tweak
e. If Mpeg2 outputs crash – check mpeg 2 settings
i. For Mpeg2 DVD aspect ratio cannot exceed 1920x1080
ii. Check frame-rate – DVD cannot be 24 or 48fps.
iii. If settings say “unspecified level” then there could be problems
with output.
► Playback issues
a. Check graphics card and driver
b. Check if Hyperthreading is enabled.
► Final DCP issues (at theatre)
a. If a 3D DCP is not displaying in 3D – check if the “stereoscopic” option
was selected in the encoder window during encoding.
QubeMaster Pro ver.2.5
Page 90
QubeMaster Pro
b. If No audio plays – check the Sample-rate of the audio
c. If subtitles Play out-of sync
i. SYNC POINTS were added to subtitles – this is not supported on
many projector versions.
d. Partial/supplemental DCP errors with Sony servers – this is a known issue
on older Sony servers – must send a full DCP
e. Signed DCPs sometimes have problems – send unsigned DCPs or sign
them with SHA256 certificates (option is available in QMPro’s
preferences)
► Source DCP issues.
a. Check if KDM is valid
b. Cannot ingest from a network drive
c. Copying DCPs to x64 systems running Ext2FSD sometimes causes file level
corruption/failure of integrity check. Uninstall Ext2FSD.
► Subtitle issue
a. Check the XML file for syntax errors
► KDM generation errors
a. Root and Intermediate certificates need to be installed
Event Log
QubeMaster Pro events and errors are logged in the Window’s Event Viewer. The event log can
be accessed thus:
► Click windows “Start” and right-click on your computer name.
► Select “Manage” to open the “Computer Management Console”
QubeMaster Pro ver.2.5
Page 91
QubeMaster Pro
► In the “Computer Management Console” window:
o Expand Applications and Services logs
o Expand Qube
o In the rightmost pane select “Save All Events as” and save as “.evtx”
o Zip and email to [email protected]
QubeMaster Pro ver.2.5
Page 92