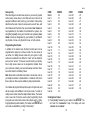
1
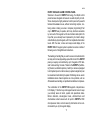
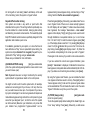
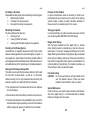
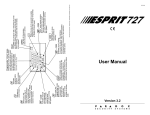
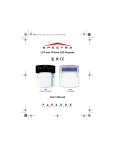
1 5 2 I N F O 9 12 AWAY 6 3 AD Y AR M ED Used to scroll through information presented in display RE 12 AWAY A C READY T CODE (NO PARTITION) plus Red LED illuminates when the system is armed, and flashes when the system is in alarm. ARMED For regular arming the green LED must be "ON" (all zones closed) before system can be armed. Flashing indicates that exit delay is in progress. VERSION 1.8 ENTER 12 plus CODE (WITH PARTITION) Use this key to store keypad entries in memory. presented in display. - Use to scroll through information System "B" arm/disarm key AWAY "AWAY" force arming. (See page 11) Press [INFO], followed by [+] or [-] to see the three information messages. + + I N F O - S X M E O S Y D S Y RE AD Y AR M ED TROUBLE DISPLAY 4 8 plus CODE ENTER STAY 11 No battery/Low battery [7] Communicator fail to report [8] Time lost * Power failure [9] Tamper or zone wiring fail No bell [10] Telephone line monitor Bell output limit [11] Fire trouble Aux. power output 7 10 CLEAR 11 User Manual 11 STAY STAY 11 (PARTITIONED SYSTEMS) System "A" arm/disarm key "FAST STAY ARM" key. Press for 2 sec. and the system "stay" arms automatically. No need to enter an access code. (Enabled by installer) CODE plus Activates "STAY" arming. To stay on the premises and still be protected, "STAY" (partial system) arming permits movement in pre-selected, unarmed zones. STAY 1989 10 AN D A S Y T I R R U C E P R IV E R SA 1999 th X O D A R A P de in Ma NN A [1] [2] [4] [5] [6] BYP MEM TRBL followed by 00-23 (hr.), 00-59 (min.). Press [ENTER], [CLEAR]. Press [TRBL] to view the "trouble code" display. Press [MEM] to bring up alarm zones stored in memory. plus CODE Activates manual zone bypassing. You select which zones to leave open when arming the system. 2ND * To program/change time: Press [ENTER], master code and [MEM], TRBL MEM BYP 10 "FAST ARM" key. Press for 2 sec. and system arms automatically. No need to enter an access code. (Enabled by installer) CLEAR Incorrect entry? Just press It erases any keypad entries and returns control panel to previous status. [CLEAR]. K639EU-00 Paradox Security Systems - Graphic Dept. - PRINTED IN CANADA - 02/99 MODEL 639 KEYPAD ESPRIT UM639 ESPRIT BURGLAR ALARM CONTROL PANEL Welcome to the world of ESPRIT technology. Your Esprit control panel has been designed with ease of use and simplicity in mind. We’ve developed a highly advanced control panel with powerful features that ANYONE can use, without memorizing complex, confusing codes or taking a course in computer programming!! Not only is ESPRIT easy to operate, with many functions accessible by one touch of the keypad, but it’s also functional and stylish. We hope that you’ve already been impressed by its modern design and attractively-styled keypads, with their adjustable illumination levels. With the clear, concise and easy-to-read display of the ESPRIT 639 LCD keypad, system operation becomes a matter of following a set of straightforward instructions. The dwelling or building that you want to secure can be divided into as many as 24 zones (depending upon which model of the ESPRIT panel you require), and controlled by up to 5 keypads or PS1 bedside “remote arming” modules. Thanks to the ESPRIT's "partitioning" feature, two distinct systems (A and B), a dual area (assigned to both systems) and a common area (no system assignment) can be created and controlled by the panel. Partitioning can be used in installations where shared systems are more practical, such as office/warehouse buildings, or apartment/condominium complexes. The combination of the ESPRIT 639 keypad’s comprehensive LCD display, 11 function keys and keypad sounder serve to keep you instantly aware of alarm, system and operational status. Motion detectors, smoke/glass break, vibration/shock and door/window contact sensors will all report to ESPRIT’s RISC microprocessor brain, and vital security information will be communicated to you by the keypad display. 1 UM639 UM639 The ESPRIT can report a wide range of status conditions to the central monitoring station. Automatic test reports can also be sent to the central station to ensure that your system is functioning properly. We recommend that such tests be conducted regularly. Please consult your alarm system installer for instructions. Listen Every time a key is pressed, the keypad beeps (0.5 second tone) to show that the entry has been detected. When you enter information on the keypad, it will guide you with beep tones that communicate acceptance or rejection of your entries. You should be familiar with these two keypad beep tones: Using telephone lines, a computer modem & high-security software, your installing or monitoring company can perform remote diagnostics and modifications to your ESPRIT control panel at your request. In addition, your panel can also be armed remotely should you forget to do so. Depending upon the panel, you may even obtain a system activity printout. This reduces time and expense devoted to security supervision and can be performed in minutes. Look Everything you need to know about your security system is clearly displayed on the ESPRIT 639 keypad. Information is easy to retrieve, and simple to understand. The zones in your security system are immediately identified, and important messages regarding system status appear right in front of you. The large 16-character LCD illuminated display is equipped with adjustable brightness and contrast levels. You can also easily program the “day of the week”, “time of day”, keypad buzzer mute, and keypad chime zones yourself. The keypad diagram on the back cover of this manual provides you with an excellent introduction to the roles of the keypad function keys. The display automatically shows you the system status and there is a programmable delay, set by the installer, between each message. If zone status is normal, the LCD display will read “SYSTEM READY”. If any zone are open, the display will read “ZONE OPEN”. The display automatically shows which zones are open but you can also press [+] or [-] to select a specific zone. 2 Keypad beep tones “CONFIRMATION” beep: When an operation (i.e. arming/disarming) is successfully entered on the keypad, or when the system switches to a new status/mode, the keypad sounder produces an intermittent beep tone (3 short beeps). “END/REJECTION” beep: When the system reverts to its previous status, or when an operation is incorrectly entered on the keypad, the sounder emits a continuous beep tone (1 second). "PARTITIONING" (not available on all models) Based on your instructions, your installer can program your panel to recognize and control two separate systems by activating the panel's "partitioning" feature. When partitioning is activated, each zone can be defined as belonging to System A, System B, both systems (dual area) or given no system assignment (common area). User access codes can also be programmed to arm/disarm one system or both systems simultaneously. Your keypad can display the status of both systems. In partitioning mode, when System A is armed, the display shows “A Armed”. If System B is armed, the display shows “B Armed”. If both systems are armed, the display shows “A&B Armed”. 3 UM639 Code priority When deciding who should have access to your security system control panel, please keep in mind that each user code can be assigned a different code priority by your installer. Code priority determines the level of security access each user will have, and which features and functions they can activate. User Codes can be programmed by the installer to arm/disarm the system, activate [STAY] or [AWAY] arming, and conduct zone bypassing. User Codes can also be designated (by your installer) to arm/disarm only System A zones, only System B zones, or both systems. Programming User Codes In addition to the master code, the Esprit control panel can be programmed to accept up to 48 user codes. You can choose to use either 4 or 6-digit access codes with your system. 6-digit codes are considered more difficult to “crack” and are therefore seen as more “secure.” If, however, ease of recall is your priority, then 4-digit access codes can be programmed instead. Once your codes are entered, your panel will always remember them, even after total AC and battery failure. Note: Never select a code that is too simple or too obvious, such as your telephone number or street address, or codes like 1234, since these codes are often used as defaults by many manufacturers. Your installer will program the Esprit to accept 4 or 6 digit codes, and will also assign code definitions to all access codes. To create or modify access codes, follow the steps indicated below. The master code or user code 01 must be used to enter “programming” mode to program user codes. Each access code is made up of 4 or 6 digits (programmed by alarm installer.) The master code 474747 and user codes are identified by a 2 digit "code number". 4 UM639 CODE Master User 1 User 2 User 3 User 4 User 5 User 6 User 7 User 8 User 9 User 10 User 11 User 12 User 13 User 14 User 15 User 16 User 17 User 18 User 19 User 20 User 21 User 22 User 23 User 24 CODE # 00 01 02 03 04 05 06 07 08 09 10 11 12 13 14 15 16 17 18 19 20 21 22 23 24 CODE User 25 User 26 User 27 User 28 User 29 User 30 User 31 User 32 User 33 User 34 User 35 User 36 User 37 User 38 User 39 User 40 User 41 User 42 User 43 User 44 User 45 User 46 User 47 User 48 CODE # 25 26 27 28 29 30 31 32 33 34 35 36 37 38 39 40 41 42 43 44 45 46 47 48 Creating User Codes: 1) Press [ENTER], followed by your master code 474747. You will hear the “CONFIRMATION” beep. The display will read “ADDRESS: KEY IN ADDRESS“. 5 UM639 UM639 2) Enter the two digit "code number" (01 to 48) for the user code you wish to program. You will hear the “CONFIRMATION” beep. The display will now read “ADDRESS: - KEY IN ADDRESS”. ize yourself with all 5 arming procedures so that you can take full advantage of your security system. 3) Key in a 4 (or 6) digit user code, the “CONFIRMATION” beep will be heard again. The display message returns to “ADDRESS KEY IN ADDRESS“. A four (or six) digit user code has been entered into memory. You may continue programming other user codes, or press [CLEAR] to exit programming mode. Note: The display reads “NONE” when the location is empty. Duress code: The last user code (user 48) can be programmed as a “Duress code”. If you are forced to arm or disarm your system under threat a duress code can be entered in the key sequence to produce a silent alarm at the monitoring station. Check with your installer to see if this option is active on your system. Deleting a user code: Press [ENTER], master code, and code to be erased. If the code is programmed, the display shows: 00********000 ******** Press [2ND] to delete that user code. The display will now read: “NONE”. Press [ENTER] to end user code programming. Press [CLEAR] to exit programming mode. ARMING THE SYSTEM (without partitioning) The Esprit can be armed in 5 different ways designed to cover a wide variety of security situations. We suggest that you familiar- 6 (1) REGULAR system arming (used for normal, day-to-day system operation) The keypad’s green "READY" light must be “on” in order to arm the system. This light will only illuminate if all zones are closed. The LCD display will read “SYSTEM READY”. All doors and windows must be closed, and there can be no movement in areas monitored by motion detectors. When the green “READY” light is not on, the LCD shows and scroll automatically “ZONES OPEN”, followed by the open zone number and description. Press the [+] or [-] keys to see all zones from 1 to 24. If all zones (in both systems) are closed, and the “ZONES OPEN” message still appears in the display, this indicates that there may be a problem communicating with the control panel. Please consult your monitoring company in this case. Once the "READY" light is on, enter your user code. (The installer can program all user codes/code priorities for you.) If you make a mistake entering your code, the keypad sounder “END/REJECTION” beep will let you know. Just press [CLEAR] and re-enter the code. When you have correctly entered your user code, the red "ARMED" light will come on. You will hear the keypad “CONFIRMATION” beep and the display will read “EXIT DELAY”. The "READY" light will flash and the keypad will "beep" (if programmed) during the exit delay period. (For the last 10 seconds of the exit delay, the beep will be faster.) 7 UM639 UM639 Your installer will program exit delay duration based on the time you require to safely exit the protected area once the system is armed. user code is required. The display will read “SYSTEM ARMED” at the end of the exit delay. This feature can be used to allow specified individuals like service personnel (i.e. cleaners, maintenance) to arm the system when leaving the protected area, without giving them access to any other control panel operations. (2) “STAY” arming [STAY] plus ACCESS CODE OR KEY [STAY/11] (Arms the system partially) “Stay” arming allows you to remain in the protected area while “partially” arming the system. Thus, you can stay in and move around your home, or commercial building, while certain designated zones are armed. You may choose to have entry/exit points like doors or windows protected, or the basement, or perhaps all zones on the perimeter of your home or establishment. Based on your instructions, your installer programs the control panel to arm certain zones in “Stay” arming mode. These programmed “Stay” zones will arm in "Stay" mode and can only be changed by your installer. Please remember that fire zones cannot be bypassed. (Using this helpful feature, you can "Stay" arm the system and then leave the premises while others remain in the protected area.) Pressing [STAY] plus ACCESS CODE (or KEY [STAY/11] - SEE BELOW) on the keypad activates the “Stay” arming command. The display will read “STAY ARMED” at the end of the exit delay. “Stay” arming can also be activated by a key switch. Please refer to “key switch/push button arming”. (3) “ONE KEY” arming (One touch system arming - no code required) KEY [10] regular arming When the "READY" light is on, pressing KEY [10] steadily for 2 seconds automatically "full" arms the system, if programmed. No 8 KEY [STAY/11] stay arming Please refer to “Stay” arming section above for a full explanation of this feature. There is no need to wait for the "READY" light before “Stay” arming, however all zones that are defined to be armed in "Stay" mode by your installer, must be "closed" (no movement in the zones when arming the system). Pressing key [STAY/11] steadily for 2 seconds will automatically "Stay" arm the system. The display will read “STAY ARMED” at the end of the exit delay. Double “Stay” arming During the exit delay, press [STAY/11] again to switch any “delay 1” or “delay 2” zones to “instant” zones. 24 hour “Stay” zones, follow “Stay” zones and instant “Stay” zones are not affected. Full system arming cancels “Double Stay” arming. Fast Exit Exit while system is armed in “Stay” mode: A. Fast exit and stay key [11] To exit the premises and remain “Stay” armed, press key [STAY/11] for two seconds. The system will switch to “exit delay” mode (“READY” LED flashes). At the end of the “exit delay” period, the system will return to “Stay” arming mode. B. Fast exit and regular arm key [10] Press key [10] for two seconds. The system will switch to “regu- 9 UM639 UM639 lar” arming with an “exit delay” (“READY” LED flashes). At the end of the “exit delay” period, the system is “regular” armed. bypassed during manual bypass arming, normal arming or “Stay” arming. Note that the fire zone cannot be bypassed.) Keyswitch/Push-button Arming Your system can include a key switch or push button that arms/disarms the system. This arming method is particularly useful when installed in a master bedroom, making system arming and disarming convenient and accessible. The beautifully-styled Esprit PS1 bedside remote has been specifically designed for this application and includes a panic zone. Press the bypass [BYP] key, followed by your ACCESS CODE. You are now in “bypass” mode. If there are no zones currently bypassed, the LCD display will read “(NONE).” If certain zones have already been bypassed, the message “ZONE BYPASS - ZONE NUMBER” appears on the display. The [+] and [-] keys can be used to scroll through information at sequential locations (i.e. to scroll zones from 1-12 and 13-24). To reach the zones to bypass, press [2ND] (i.e. if the display shows zones from 1-12, pressing [2ND] displays zones 13-24 (the indicates that you are in the 13-24 zone display mode), pressing [2ND] again displays zones 1-12.) Enter the key numbers corresponding to the zones you wish to "bypass". Press again on the zone key if you wish to undo a zone selection. If an alarm is generated in your system, or a zone that has not been defined as a “Stay” zone is opened after panel arming, the system can only be disarmed from a keypad (if keyswitch is programmed for "Stay" arming) using an access code. Please ask your installer for more information. (4) MANUAL BYPASS arming [BYP] plus ACCESS CODE (Arms the system while bypassing defective zones and/or zones you wish to leave open) Note: Bypassed zones are no longer monitored by the security system and will not generate an alarm on the control panel. You might not wish to arm the entire system when, for example, workers are renovating part of your house, or for any other reason you need to leave a zone open. If a component of your security system is damaged, it can also be bypassed until repairs are made. Manual bypass arming instructs the control panel to ignore zones that you designate “open”, so that the rest of the system can still be armed. (Based on your instructions, only zones that your installer has programmed “bypass-enabled” can be 10 If you have entered the correct zone bypass information, press [ENTER]. If “ZONE BYPASS” is displayed, it indicates that zones have been bypassed, and system status will be indicated by the LCD display. If you make an error entering zone numbers, press [CLEAR]. By using the “bypass recall” feature, you can reinstate the latest zone bypass instructions saved in memory. Press [BYP] while in “manual bypass arming” mode and the previous bypass status will be reestablished. This eliminates the need to enter the same "bypass" information every time you arm the system. (5) FORCE (Away) arming [AWAY] plus code (Arms the system quickly) To arm the system rapidly without waiting for the “READY” light, use Force “Away” arming. Press [AWAY], followed by a valid access 11 UM639 UM639 code. Once the exit delay expires, any open zones will not be considered “activated” by the panel. Open zones will not be protected, and will not generate an alarm or prevent arming. These “Away” zones will be activated (and, therefore, protected) as soon as they are closed. Armed status is indicated by display of message “SYSTEM ARMED”. Note that the fire zone cannot be force armed. erate a “panic”. Pressing keys [4] and [6] simultaneously for 2 seconds will generate a “panic” alarm or, if programmed, a "medical alarm". Pressing keys [7] and [9] simultaneously for 2 seconds will generate a "panic" or, if programmed, a "fire alarm". Notes: 1 - These features are not recommended for regular use because leaving zones open can reduce the efficiency of system protection. “Force” arming is an ideal feature for use with overhead garage doors! 2 - Upon system disarm, bypassed zones are cleared, unless they have “24 hr.” definition. "No movement" supervision feature. Your panel can be programmed to send a report and/or arm the system if the system is not armed (full or “Stay” arming) and there is no zone activity for a preprogrammed amount of time. This is a particularly useful feature when supervising the elderly, individuals with chronic health problems or a person living alone. Automatically Arm on Time Your installer can program your system to arm at a specific time each day. In this mode, the status of all protected zones and detection devices must be "normal" before arming can occur. Panic zones If you wish to be able to signal a “panic” situation, three "panic" zones can be programmed on your keypad by your installer. Pressing keys [1] and [3] simultaneously for 2 seconds will gen12 Based on your needs, your installer can program these panic zones to generate audible alarms (sirens or bells) or silent alarms, both of which can also generate reports sent directly to your central security station. The 3 different panic zones can also communicate specific messages to your monitoring station, i.e. pressing panic = "call the police", pressing panic = "call the fire department" etc. Ask your installer for the exact definition of your panel's panic alarms. DISARMING THE SYSTEM (without partitioning) Enter the area using the designated entry-exit door(s). The keypad sounder emits a constant tone to remind you to disarm your system. Enter your user code on the keypad before the entry time expires. If you make a mistake while entering this code, press [CLEAR] and re-enter it. The "ARMED" light will go off and the sounder will stop. SYSTEM ARMING/DISARMING (with partitioning) Zones can be divided into two systems. Based on your requirements, the installer designates which zones belong to "System A" or "System B”, both systems (dual area), or are not given a system assignment (common area). A zone belonging to a “dual area” is armed if either “System A” or “System B” is armed, and disarmed only when both systems are disarmed. A zone belonging to a “common area” is a zone that is armed only when both systems are armed, and disarmed if “System A” or “System B” is disarmed. 13 UM639 UM639 Once zones have been assigned to either "System A" or "System B", code definition (as programmed by the installer), this determines which access codes can arm "System A" zones, as well as which codes can arm "System B" zones. Codes can also be given access to both systems. that if the system is in entry delay or if an alarm is in progress, for your protection the panel can only be disarmed from a keypad. Pressing any two PS1 keys simultaneously will generate a panic alarm. Your installer can also adjust the PS1's illumination level and mute the buzzer as required. When the "READY" light is on, entering a code that can access both systems will arm both "System A" and "System B'. The display will read.“A&B ARMED”. Entering this code when the panel is armed will disarm both systems. Alarm Memory [MEM] The message “ALARMS IN MEM” is displayed if any alarm situations take place while your system is armed. A record of all alarm situations that occur is stored in memory. After disarming the system, pressing once on the [MEM] key brings up the zones that were open during the last arming period. The LCD display shows the zone number and description of all zones in alarm memory. To arm/disarm each system separately, do the following: Press [STAY/11] plus a valid access code to arm/disarm "A ARMED". (Valid access code = "System A" code, or code with access to both systems.) The display will read “A ARMED”. Press [AWAY/12] plus a valid access code to arm/disarm "B ARMED". (Valid access code = "System B" code, or code with access to both systems.) The display will read “B ARMED”. “View Event List” Mode (Version 3.00 and onward) Your control panel creates a buffer which contains a record of all system activities, including time and date. This “event list” will be saved even after total power loss. Note: "System A" codes can stop sirens coming from "System B" zones (and vice versa), but will not disarm a system in alarm. In “normal” mode, pressing [MEM], followed by [INFO] switches the system to “view event list” mode. The display will indicate: Event/Event number/Day/Time ex: ALARM 01A (1st line) / 001 Sun 12:52 (2nd line). Pressing key [10] activates "one key" full arming. (When partitioning is “on”, System "A" and "B" are armed when key [10] is pressed.) Pressing key [STAY/11] activates "one key" Stay arming. (When partitioning is “on”, System "A" is armed by pressing key [STAY/11].) Pressing [+] starts from the current to the oldest event and pressing [-] starts from the current to the most recent event. PS1 Bedside remote module Pressing any one of the three keys on this module will arm or disarm the system in "Stay" mode or “System A”. Please note Autoscrolling is started by pressing [+] or [-] for 2 seconds. You have an ajustable delay (1 to 4 seconds) between each events in autoscrolling (same as the scrolling delay, address 036). When you reach the end of the event buffer, a beep is heard. Autoscrolling is turned off by pressing again on [+] or [-]. If an 14 15 UM639 unlisted event occurs or there are no more events in the event list, a fail beep is heard and “not listed” is displayed on the LCD. Important: If “timer loss” message appears in the display, the time and day indicated may not be accurate. If the time was reprogrammed following power loss, all messages displayed before “timer restore” message contain the correct time and day. Programmable output Your Esprit control panel provides total convenience along with top security. Your installer can program the panel to reset smoke detectors and Glasstreks, activate strobe lights, activate light switches in your home or office, reduce or increase building temperature, turn on/off air conditioning, open/close automatic garage doors, and more. Talk to your installer about this helpful feature! Programming Keypad Features Several keypad features can be programmed directly by you, without the help of an installer. To begin programming, enter “user programming mode”. Hold down the [ENTER] key for approximately two seconds. A series of beeps will be heard. The first of several programmable features will appear in the LCD display. To scroll through the list of features, continue pressing [ENTER]. “LCD contrast level programming” The first message which will appear in the display will read: “CONTRAST ADJ. 00 PRESS (+, -)” UM639 “LCD display illumination level programming” The second message to appear in the LCD display is: “BACKLITE ADJ. 00 PRESS (+, -)” Press the [+] key. Each time this key is pressed, the number in the display will increase by 1, and the display illumination and key light levels will increase. If the [-] key is pressed, the number in the display will decrease by 1, and the display illumination and key light levels will also decrease. The lowest numeric reading is 00 and the highest numeric reading is 07. When the right illumination level is reached, press [ENTER] to move to the next programmable feature. “Day of the week programming” The third message to appear in the LCD display is: “DAY : SUN PRESS [1] TO [7]” The display will read “DAY”: (followed by the currently programmed day of the week)”. To program the correct day, find the number corresponding to the day of the week on the list below, and press the single digit shown for that day. [1] [2] [3] [4] = = = = SUNday MONday TUEsday WEDnesday [5] = THUrsday [6] = FRIday [7] = SATurday Press the [+] or [-] keys to increase or decrease the contrast, until it reaches the level you require. When the right contrast level is reached, press [ENTER]. Example: To program “Thursday”, press [5] [ENTER]. After selecting the required day, press [ENTER] to scroll to the “Time of Day” programming feature. 16 17 UM639 “Time of day” programming The fourth message to appear in the LCD display is: “TIME XX:XX ENTER IN 24H“ The display will read “TIME”, followed by the currently programmed time of day. To modify the time programmed, enter the four (4) digits corresponding to the required time, according to the “24 hour” clock. Example: To program 4:05 p.m, enter 16:05 by pressing [1] [6] [0] [5]. After the 4 digits have been entered, you will hear a “confirmation” beep, indicating that the keypad time programmed has been automatically saved in memory. Once the required time has been programmed, press [ENTER] to scroll to the last user-programmable feature. IMPORTANT: PLEASE NOTE THAT “PANEL TIME” MUST ALSO BE PROGRAMMED. “One-key access” programming can be used to set panel time. (Refer to “Key Access Programming”, page 20) “Keypad Mute and Chime Zone Programming” The fifth message to appear in the LCD display is: “CHIME & MUTE“: “KEY “ON“ = ENABLED“ UM639 In programming mode, when the “CHIME & MUTE:” message is displayed, zones shown on the “KEY ON” line have the “chime” feature activated. To turn on the "chime zone" feature, press the corresponding key to activate the chime zone: Key “1” = chime zone 1, Key “2” = chime zone 2, etc. Chime zone is heard only when zones 1-12 are displayed. Example: If [3] is displayed, zone 3 is programmed as a “chime” zones. If you have more than 1 keypad in your system, program the “chimes” for each keypad separately. Keypad zones: To activate chime feature on the 1st keypad zone, press [TRBL]. To activate chime feature on 2nd keypad zone, press [2ND]. Keypad Mute: The keypads in your security system may be located in or near bedrooms, or other locations where keypad sounds generated during entry/exit delays can be a source of annoyance/inconvenience. In these areas, you can “mute” selected keypads, so that no sounds will be generated by a keypad unless keys are actually pressed. To activate “keypad mute” feature, enter “programming” mode at the keypad you wish to mute. (Reminder: depress [ENTER] for 3 seconds). Scroll to the “CHIME & MUTE” message by repeatedly pressing [ENTER]. Each message activates a separate keypad feature. Chime Zone Selection: Your 639 keypad permits zones 1-12 to be programmed as “chime” zones. A chime zone "advises" you when it is opened by creating a rapid intermittent beep tone. Any or all zones of Esprit control panels (zones 1-12) may be programmed as “chime” zones. 18 Press [BYP]. The message will now read “KEY ON = [BYP]”. Use the [BYP] key to turn the “mute” feature “on” or “off” as required. Once selections for these five programmable features have been made, press [ENTER] to save them in keypad memory. Press [CLEAR] to exit “programming” mode. To return to a previous fea- 19 UM639 UM639 ture, continue pressing [ENTER] to scroll through the list. Note: Chime zone is always audible. [STAY] “CANCEL COMMUNICATION ATTEMPTS” Stops calls to Espload. Key Access Programming Several control panel features can be programmed quickly on the keypad, without entering any programming addresses or section numbers. Select “one-key access” programming by pressing [ENTER], followed by the master or user code 1. Then press the single key (listed below) corresponding to the feature you wish to activate. Verify first with your installer that all of the features listed have been programmed and activated on your control panel. Press [CLEAR] to exit key access programming. [9] “AUTO ARMING TIME” PROGRAMMING Display shows “AUTO ARMING TIME” “ENTER IN 24HRS”. Enter two digits (00 to 23) for hours, and two digits (00 to 59) for minutes. [MEM] "PANEL TIME" (and “CLEAR TROUBLE 8”) Display shows “CLOCK MODE” “ENTER IN 24HRS”. Enter two digits (00 to 23) for hours, and two digits (00 to 59) for minutes. [BYP] “TEST REPORT” Press this key to send a test report from your alarm system to the central monitoring station. [TRBL] “CALL ESPLOAD VIA TELEPHONE” If programmed by your installer, this initiates communication to the central monitoring station computer using Espload software. [AWAY] “ANSWER ESPLOAD” This feature initiates “modem” communication between your panel and a computer running Espload software. (The ADP-1 adapter can also be used.) 20 The [INFO] key Press [INFO] key once to enter Info mode. You can then view three programmable messages (installer programmed). The display shows these messages with a 5 second delay between each. You can also press [+] or [-] to view each message. TROUBLE DISPLAY [TRBL] 10 different trouble conditions can be displayed on the keypad. When trouble conditions occur, the display reads “trouble”, press [TRBL]. Also, if programmed by your installer, keypad sounder will beep. If there is a power supply failure, the display will alternate between “SYSTEM TROUBLE/POWER SUPPLY” and the system status message. The display will show which trouble conditions are currently taking place. Pressing on any key will return the keypad to normal zone display. Trouble 1 No battery/low battery If the battery is not connected to the panel, or if it is at low capacity, “TROUBLE 01 BATTERY” appears in the display. The battery connected to the panel should be replaced, because it can no longer provide adequate back-up current in the event of a power failure. The trouble will also be displayed if battery voltage drops to 10.5 volts while the control panel is running on battery power (with no AC). Trouble 2 Power failure If AC power is not being supplied to the control panel and/or the 21 UM639 UM639 power supply is unable to charge the battery and/or the power supply voltage exceeds 14.9 volts, the LCD display will read “TROUBLE 02 POWER SUPPLY”. Power failure can be excluded from [TRBL] key display by your alarm installer. To reprogram the timer, press [ENTER], followed by the master code/user code 1, and [MEM]. Key [MEM] flashes. Then enter 2 digits (00 to 23) for hours, followed by 2 digits (00 to 59) for minutes. Press [ENTER]. Trouble 4 Bell disconnect If a bell or siren is not connected to the bell/siren output, “TROUBLE 04 NO BELL” appears in the display. Trouble 9 Tamper/zone wiring failure Indicates that there is a wiring problem in a protected zone, the LCD display reads “TROUBLE 09 TAMPER”. Trouble 5 Maximum bell current If the processor recognizes that the bell/siren output current exceeds 3A,. the LCD display reads “TROUBLE 05 MAX BELL OUTPUT”. Automatic bell output shutdown results. Once the problem is corrected, power will automatically be restored to the bell/siren circuit. Trouble 10 Telephone line monitor If the panel detects telephone line loss, the LCD display reads “TROUBLE 10 PHONE LINE”. Trouble 6 Maximum auxiliary current If the processor has recognized that the auxiliary output current exceeds 1A (748ES - 3A), the LCD display will read “TROUBLE 06 MAX AUX OUTPUT”. This causes automatic shutdown of the auxiliary output. Once the problem is corrected, power will automatically be restored to the auxiliary output. This output powers such devices as motion detectors and accessory modules. Trouble 7 Communicator report failure If your control panel cannot communicate with the central monitoring station, the LCD display reads “TROUBLE 07 COMMUNICATION”. Trouble 11 Fire/trouble If the fire zone is cut, fire zone key and trouble, the display will read“ TROUBLE 11 FIRE LOOP”. Most "trouble" conditions will be programmed by your installer to be reported directly to your security company. Please contact your alarm company to ensure that repairs are immediately made to your security system. Fire Alarm Operation - Alarm Upon a Fire Alarm, the bell/siren will operate in "pulse mode". Silence/Reset: To silence/reset a fire alarm, enter a valid user code. Trouble 8 Timer loss If the system timer is not functioning, usually after a total battery and AC power failure, the LCD display reads “TROUBLE 08 TIMER LOSS”. The timer should be reprogrammed after total power loss. IMPORTANT: IN CASE OF FIRE, FOLLOW YOUR EVACUATION PLAN IMMEDIATELY! If there is no fire condition, contact your monitoring company without delay to avoid an unnecessary response. 22 23 UM639 UM639 Fire Safety in the Home Reasonable fire safety can be achieved following a 3 point program: 1. Minimizing fire hazards 2. Providing a fire warning system 3. Having and practicing an escape plan Provision for the Disabled In special circumstances where the life-safety of certain occupant(s) depends upon prompt rescue by others, the fire warning system includes a means of prompt, automatic notification to those who are to be depended upon for the rescue. Minimizing Fire Hazards The three traditional fire killers are: 1. Smoking in bed 2. Leaving children home alone 3. Cleaning with flammable liquids such as gasoline Testing your System It is recommend that your system be tested once a week. Contact your monitoring station BEFORE and AFTER testing. Providing a Fire Warning System Household fires are especially dangerous at night. Fires produce smoke and deadly gases that can overcome sleeping occupants. To warn against fire, smoke detectors should be installed outside of each sleeping area in the immediate vicinity of the bedrooms and on each additional story of the family living unit, including basements. Having and Practicing an Escape Plan There often may be very little time between detection of a fire and the time that it becomes deadly - as little as 1 or 2 minutes. Advance warning of a fire may be wasted unless the family has planned in advance for a rapid exit from their residence. 1. Plan and practice for fire conditions with the focus on rapid exit from the residence. 2. Drills should be held so that family members know what to do. 3. Each person should plan for the possibility that an exit out of the bedroom window may be necessary. An exit out of the residence without requiring the opening of a bedroom door is essential. 24 Burglar Alarm Testing With the system disarmed and the “READY” light on, activate motion detectors (walk in protected area). Open and close protected doors. A “zone open” message should appear on the LCD display following each activation. If keypad panic keys are enabled (check with your installer), pushing one of these keys will initiate a local alarm (if programmed) and a signal to be transmitted to the monitoring station (if programmed). Your installer can advise you of the best way to test your particular system. Fire Alarm Testing CAUTION: Do not use open flame or burning materials to test your fire detection devices. Contact your alarm installer for safe methods to test your system. System Maintenance Under normal use, your system requires virtually no maintenance other than regular testing. It is recommended that the standby battery be changed every three years. 25 UM639 UM639 IMPORTANT: Keep this information in a secure location. ACCESS CODES N 4 digit N 6 digit ZONE DESCRIPTION PARTITIONING ACTIVATED Zone Zone Zone Zone Zone Zone Zone Zone Zone Zone Zone Zone Zone Zone Zone Zone Zone Zone Zone Zone Zone Zone Zone Zone NYes NNo 1: 2: 3: 4: 5: 6: 7: 8: 9: 10: 11: 12: 13: 14: 15: 16: 17: 18: 19: 20: 21: 22: 23: 24: 26 SYSTEM Stay/ Away/ A B N N N N N N N N N N N N N N N N N N N N N N N N N N N N N N N N N N N N N N N N N N N N N N N N 24 Bypass Hr Enabled N N N N N N N N N N N N N N N N N N N N N N N N N N N N N N N N N N N N N N N N N N N N N N N N Name Code Arming Priority Regular Stay/A Away/B Byp Master 00 N NN N User 01 NNN N User 02 NNN N User 03 NNN N User 04 NNN N User 05 NNN N User 06 NNN N User 07 NNN N User 08 NNN N User 09 NNN N User 10 NNN N User 11 N NN N User 12 NNN N User 13 NNN N User 14 NNN N User 15 NNN N User 16 NNN N User 17 NNN N User 18 NNN N User 19 NNN N User 20 NNN N User 21 NNN N User 22 NNN N User 23 NNN N User 24 NNN N User 25 NNN N ACCESS CODES 27 N 4 digit N 6 digit Name Code User User User User User User User User User User User User User User User User User User User User User User User 26 27 28 29 30 31 32 33 34 35 36 37 38 39 40 41 42 43 44 45 46 47 48 UM639 Arming Priority Regular Stay/A Away/B Byp NNN N NNN N NNN N NNN N NNN N NNN N NNN N NNN N NNN N NNN N NNN N NNN N NNN N NNN N NNN N NNN N NNN N NNN N NNN N NNN N NNN N NNN N NNN N NOTE: FOR SECURITY REASONS, WRITE ONLY USER NAMES, AND NOT ACTUAL ACCESS CODES! 28 UM639 SPECIAL KEYS AND FUNCTIONS NKey [10] Regular arming is activated. NKey [STAY/11] Stay arming is activated (Arms system A only, when partitioning is enabled) [1] and [3]* Police or [4] and [6]* Auxiliary or [7] and [9]* Fire or N Silent N Audible N Not Used N Silent N Audible N Not Used N Silent N Audible N Not Used * Both keys must be depressed at the same time for 2 seconds Armed LED will flash. The PGM (Programmable Output) functions (if applicable), are: 1)___________________, activated by 2)___________________, activated by SYSTEM TIMES Entering and exiting your premises is permitted through doors that you and your installer have determined. You have one exit time and up to two individual entry times i.e. Zone 1-Front door delay 1 (30 sec), Zone 7-Garage door delay 2 (90 sec) seconds to EXIT your premises. You have Your Entry delay 1 is sec. and you may enter thru zone # . Your Entry delay 2 is sec. and you may enter thru zone # . Your Siren, if activated by an alarm, will sound for minutes. OTHER INFORMATION By: This alarm system was installed on: Service is provided by Tel: Your monitoring station's phone number is: Your account number is: Your alarm transformer location is and is on circuit # 29 . UM639 WARRANTY The Seller warrants its products to be free from defects in materials and workmanship under normal use for a period of one year. Except as specifically stated herein, all express or implied warranties whatsoever, statutory or otherwise, including without limitation, any implied warranty of merchantability and fitness for a particular purpose, are expressly excluded. Because Seller does not install or connect the products and because the products may be used in conjunction with products not manufactured by Seller. Seller cannot guarantee the performance of the security system. Seller obligation and liability under this warranty is expressly limited to repairing or replacing, at Seller's option, any product not meeting the specifications. In no event shall the Seller be liable to the buyer or any other person for any loss or damages whether direct or indirect or consequential or incidental, including without limitation, any damages for lost profits stolen goods, or claims by any other party, caused by defective goods or otherwise arising from the improper, incorrect or otherwise faulty installation or use of the merchandise sold. Paradox Security Systems - Graphic Dept. - PRINTED IN CANADA