1
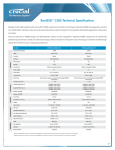
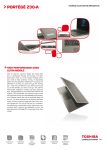
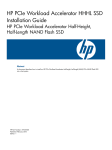
SSD Firmware Update Utility Guide Crucial® m4 2.5” SSD Firmware Revision 070H Boot from CD/USB Update Guide (Update from Rev 0001, 0002, 0009, 0309, 000F, 010G, 040H to Rev 070H) Introduction This document describes the process of updating the firmware on the Crucial m4 SSD using a bootable USB drive or a CD and a bootable ISO image. The ISO image contains the 070H firmware update and DOS boot code. 3. Edit BIOS Settings Per the steps below, you may need to edit your computer’s BIOS settings. Please see your computer’s owner’s manual for details on editing these settings. This process is to be used for updating the firmware from Revisions 0001, 0002, 0009, 0309, 000F, 010G, 040H to Revision 070H. a) Disable/Remove Drive Passwords Enter the BIOS (typically by hitting the “Delete,” “F2,” or “F12” key during the start-‐up screen) and disable any passwords that you may have set on the SSD. Password protections could block firmware updates. PLEASE NOTE: This firmware update is not applicable to any Micron SSD which was purchased separately or as original equipment in a computer system. Any firmware updates for such drives, if necessary, will be made available by the computer manufacturer or at www.micron.com. This firmware update is not applicable to any Micron RealSSD C300 drive. It should not be used with any Micron RealSSD C400 Self Encrypting Drive (SED). This update is for 2.5” m4 drives only and should not be used to update mSATA m4 drives. WARNING: As with all firmware updates, it is strongly recommended that you backup or make copies of all important files before performing this update. This firmware update process is done entirely at your own risk. If performed correctly, there will be no loss of system or user data on the drive. However, if the firmware process is interrupted for any reason, your solid state drive may not function properly. If this update is done on a notebook computer, it is strongly recommended that power be supplied by the AC power adapter. General Instructions Complete the following steps before starting the firmware update process: 1. Backup the Solid State Drive It is highly recommended that full system backup be completed before starting this firmware upgrade procedure. If the upgrade is interrupted (by a power loss or hardware failure of some sort), it is possible that the solid state drive may not function properly. 2. Use AC Power Ensure your mobile PC or desktop PC is plugged in to AC power during the update process. It is not recommended to use only battery power during the upgrade. Do not remove power at any time during the firmware update process as this could produce incomplete results and may render your solid state drive unusable. b) Check the Boot Order If your system does not boot from CD or USB drive, you will need to edit your BIOS settings. While in the BIOS editor, check the drive boot order. As a default, most systems will boot from the CD drive before the system drive. Depending on the BIOS vendor, find an option called “Boot Device Priority,” “Boot Load Order,” or possibly “Advanced BIOS Features.” Ensure that the system boots to the bootable CD or USB drive before the drive that contains the OS. Download the Firmware Update 1. Before beginning the firmware download process close all other programs except for your Internet browser. 2. Find the m4 Rev. 070H Firmware Update Utility associated with your Crucial SSD at http://www.crucial.com/support/firmware.aspx 3. Click the hypertext link for m4 Rev. 070H Firmware, and the browser will prompt you to select Open, Save or Cancel. Select Save to download the ISO Image to your system. 4. Save this file to your desktop or another folder for easy access later and close the download window when download is complete. Create Bootable Media with the ISO Option 1: Burn a Bootable CD Note: Optical drive burning software is built into Windows 7. 1. Using the CD burning software of your choice, burn the firmware ISO image to CD media. 6. Upon completion, the following message will display: Option 2: Create a Bootable USB Drive Note: To use this option, your system must support boot from USB. 1. Start with a newly formatted USB drive (256MB or greater). 2. Open a USB installer program. If you do not have a USB installer program, you may download a free USB installer program such as, for example, the Universal USB Installer (available at www.pendrivelinux.com/universal-‐usb-‐installer-‐easy-‐as-‐1-‐2-‐ 3/). 7. IMPORTANT!!! The revision of the firmware will be listed. If the revision is NOT listed as 070H, then repeat the process from Step 1 of the “Run the Firmware Update” section above. You may restart the process by typing “AUTOEXEC.BAT” at the A:\> prompt. 3. You may need to click through a security dialogue and/or license agreement. 8. If you are not sure which revision firmware you have or if you want to confirm, you can enter: 4. If you are using the Universal USB Installer, then: • At the Step 1 drop down box, scroll to the bottom and select the last option: Try Unlisted Linux ISO . dosmcli -‐-‐verbose -‐d at the A:\> prompt. The last line shown is the Firmware Revision. If 070H is not shown, repeat the process from Step 1 of the “Run the Firmware Update” section above. PLEASE NOTE: This command will list all ATA drives on your system, not just the Crucial SSD. • Go to Step 2 and browse to the firmware ISO that you downloaded earlier. • Go to Step 3 and select the flash drive on which you want to install the ISO. • Click the Create button and click Format E:\Drive (Erases Content). Answer Yes to the warning about overwriting your USB drive. 9. Remove the bootable media and shut down your system by pressing and holding the power button. • A sequence of screens will appear and disappear; when that finishes, the USB drive is loaded. 10. Turn power back ON. You may change any BIOS settings you made at the start of this process back to original settings. Run the Firmware Update 11. Process is complete. 1. Insert the bootable CD or USB with the ISO Image into your system. Troubleshooting Tips 2. Boot the system from the bootable media. This will automatically start the Firmware Update. • Although efforts have been made to test the compatibility of this software with various system and chipset configurations, it is not possible to test every available system. Therefore, certain systems (e.g., older systems) may experience compatibility problems. 3. After the update tool has fully loaded, you will see the following: • In a desktop system, ensure that your drive is plugged into one of first 4 ports on the SATA bus. These are normally labeled 0–3. Some motherboards do not support hot-‐plugging of SATA devices, so it is recommended that power be shut off to the system before changing ports. It is acceptable to update from any previous version 0001, 0002, 0009, 0309, 000F, 010G or 040H, so you may see any of these revisions in the above display. If your m4 drive is not listed in the screen display as above, please see the “Troubleshooting Tips” section below. • From BIOS Setup, change the SATA mode to IDE or Legacy mode or Compatibility mode. Look for a parameter called “SATA Configuration,” or possibly “Integrated Peripherals.” • Save your settings and exit from the BIOS. 4. You may see “Waiting for DRQ” prior to being asked to update the firmware. These messages are normal. Enter “yes” in lower case letters when asked to update the firmware. The following screen will appear: • Proceed with the instructions from Step 1 of the “Run the Firmware Update” section above. 5. On most systems, this process will take between 30 to 60 seconds. Some systems may require a longer time to complete. • If your m4 drive is not recognized in Step 3 of the “Run the Firmware Update” section above, it may be necessary to run this update in IDE mode instead of AHCI mode, on some older systems. To do so, perform the following steps: • Most systems prevent firmware updates when in RAID mode. In this case, changing to AHCI or IDE mode may help to complete the update process. Any RAID configurations should be preserved after the update, when the system is put back into RAID mode, but check with your system’s user manual before proceeding. • Peripheral RAID cards will not pass the necessary commands to perform firmware updates. You may need to move the target drive onto a SATA host bus adapter or SATA connector on the motherboard that facilitates these commands. • This firmware update tool may not properly operate in PCs, notebooks or tablets with UEFI-‐based BIOS. We will make an update tool available separately, which will support firmware updates under UEFI (Unified Extensible Firmware Interface). Firmware Release Notes Firmware for the m4 SSD is being updated from version 040H to 070H. Firmware 070H is recommended for anyone currently running 040H or previous firmware releases. It includes incremental improvements and refinements over these versions which may improve the overall user experience. Like recent firmware versions, version 070H has improvements over versions 000F which are specific for Windows 8 and new UltraBook systems, although systems running Windows 7 and other operating systems may also see improvements. Any m4 firmware version will function normally in Windows 8, even without these performance improvements. The following is a summary of changes between 040H and 070H, which are independent of operating system: • Resolved a power-‐up timing issue that could result in a drive hang, resulting in an inability to communicate with the host computer. The hang condition would typically occur during power-‐up or resume from Sleep or Hibernate. Most often, a new power cycle will clear the condition and allow normal operations to continue. The failure mode has only been observed in factory test. The failure mode is believed to have been contained to the factory. This fix is being implemented for all new builds, for all form factors, as a precautionary measure. The fix may be implemented in the field, as desired, to prevent occurrence of this boot-‐time failure. To date, no known field returns have been shown to be related to this issue. A failure of this type would typically be recoverable by a system reset. Revision History Rev. A………………………………………………………… 2 April 2013 • Initial release ©2013 Micron Technology, Inc. All rights reserved. Information is subject to change without notice. Crucial, and the Crucial logo are trademarks and service marks of Micron Technology, Inc. All other trademarks and service marks are property of their respective owners. Revision 4/2/13 070H